
TKS667W - Machine à glaçons Thor - Notice d'utilisation et mode d'emploi gratuit
Retrouvez gratuitement la notice de l'appareil TKS667W Thor au format PDF.

| Type de produit | Machine à slushie et boissons glacées |
| Marque | Thor |
| Modèle | TKS667W |
| Couleur | Blanc |
| Capacité maximale | 68 oz (2000 ml) |
| Capacité minimale de fonctionnement | 26 oz (770 ml) |
| Modes de fonctionnement | Cold Drink, Slushie, Milkshake, Cocktail, Ice Cream |
| Fonction de refroidissement | Rafraîchit les boissons à 4-5 °C |
| Réfrigérant | Inflammable (type non spécifié) |
| Verrouillage enfant | Oui, via appui prolongé sur le bouton LOCK |
| Arrêt automatique | Après 12 heures de fonctionnement continu |
| Capteur d’inclinaison | Arrête la machine en cas de basculement |
| Nettoyage des pièces amovibles | Lave-vaisselle (sauf cycle séchage chaud) |
| Base moteur | Ne pas immerger, essuyer avec un chiffon humide |
| Mode rinçage | Oui, pour faciliter le nettoyage sans refroidissement |
| Matériau des pièces en contact avec les aliments | Sans BPA |
| Garantie | 1 an limitée (pièces et main-d'œuvre) |
| Service client | (877) 288-8099, www.thorkitchen.com |
| Accessoires inclus | Cuve, vis sans fin, évaporateur, collecteur de condensation, plateau, etc. |
FOIRE AUX QUESTIONS - TKS667W Thor
Questions des utilisateurs sur TKS667W Thor
0 question sur cet appareil. Repondez a celles que vous connaissez ou posez la votre.
Poser une nouvelle question sur cet appareil
Téléchargez la notice de votre Machine à glaçons au format PDF gratuitement ! Retrouvez votre notice TKS667W - Thor et reprennez votre appareil électronique en main. Sur cette page sont publiés tous les documents nécessaires à l'utilisation de votre appareil TKS667W de la marque Thor.
MODE D'EMPLOI TKS667W Thor
THOR KITCHEN®
USE + CARE MANUAL
Slushie Maker in White/Black TKS667B/TKS667W

natural_image
Three THOR brand thermost devices displayed against a digital screen, no visible text or symbols on the devices themselves.IMPORTANT SAFETY INSTRUCTIONS 2
SUGGESTION RECIPE 3
PARTS 4
CONTROL PANEL 5
REQUIRED SUGAR CONTENT 6
TIPS & TRICKS 7
TIPS & TRICKS 8
DISASSEMBLY & CLEANING 9
PRECAUTIONS & FAQs 10
PRECAUTIONS & FAQs 11
PRECAUTIONS & FAQs 12
WARRANTY 13
THOR KITCHEN SLUSHIE MACHINE OWENR'S GUIDE
IMPORTANT SAFETY INSTRUCTIONS
PLEASE READ ALL INSTRUCTIONS BEFORE USEFOR HOUSEHOLD USE ONLY
| Read and review instructions for operation and use. | |
| WARNING Indicates a hazard that may result in personal injury, death, or substantial property damage if ignored. | |
| Combustible Material (Flame symbol on white background within a red diamond) May burst if heated. Keep away from open flames or high heat sources. | |
| Flammable Material (Flame symbol on yellow background within a black triangle) Keep away from ignition sources. Handle with caution. | |
| General Safety Precautions· For indoor and household use only.· When using electrical appliances, always follow basic safety precautions, including those listed below: | |
▲DANGER: FIRE OR EXPLOSION RISK
This appliance uses flammable refrigerant. DO NOT puncture refrigerant tubing. Dispose of the product according to federal and local regulations for flammable refrigerants.
WARNING: SAFETY HAZARDS
To minimize the risk of injury, fire, electrical shock, or property damage, always use the appliance for its intended purpose, avoid modifying or misusing it, and carefully follow all warnings and instructions provided in the manual.
Before First Use:
1 Read all instructions before using the appliance.
2 Check all parts to make sure nothing is missing or damaged.
3 Wash food-contact parts before first use (follow cleaning instructions).
Power & Electrical Safety:
4 Always unplug when not in use, before cleaning, or assembling parts. Pull the plug, not the cord.
5 DO NOT use it if the cord or plug is damaged—contact THOR Kitchen for support.
6 No extension cords—plug directly into an outlet.
7 Keep the cord dry and away from hot surfaces, edges, or water.
Safe Operation:
8 Use on a dry, flat surface with at least 4 inches of space around the back and sides.
9 DO NOT overfill—ensure the level stays below the MAX FILL line.
10 Never leave running unattended.
11 Keep hands, hair, and hair items away from moving parts.
12 DO NOT add hot liquids, ice, or frozen ingredients unless specified.
13 Use only THOR Kitchen-approved parts—others may cause damage or injury.
For Appliances with Cooling Systems:
14 Let sit upright for 2 hours before first use (for refrigerant to settle).
14 DO NOT block vents—keep openings clear for proper cooling.
16 Never puncture refrigerant tubes—dispose of them properly.
Children & Safety:
17 Not for children—keep away and supervise if nearby.
18 Not for people with reduced physical or mental capabilities unless supervised.
Repairs & Service:
19 DO NOT try to repair—contact THOR Kitchen if damaged.
20 DO NOT submerge the motor base in water.
| MODE | RECIPE | REFERENCE TIME |
| COLD DRINK | Beverages (without solid ingredients) | 20-25Mins |
| SLUSHIE | Beverages (without solid ingredients) | 35-65Mins |
| MILKSHAKE | Milk: 30oz (900ml)Cream: 7oz (200ml)Syrup: 5oz (120ml)Vanilla:1oz(30ml) | 30-40Mins |
| SPIKED SLUSHIE | Alcoholic Beverages (without solid ingredients) | 20-35Mins |
| ICE CREAM | For 42oz recipe:Milk: 30oz (900ml)Cream: 7oz (200ml)Syrup: 5oz (150ml)For 26oz recipe:Milk: 15oz (450ml)Cream: 7oz (200ml)Syrup: 4oz (120ml) | 35-65Mins |
NOTE:
The production time is affected by the temperature of the recipe materials and the ambient temperature. the time in the table is for reference only.

A Injection Cover
B Vessel
C Handle
D Outlet
E Condensation Collector
F Cup Tray
G Vessel Lock
H Evaporator
I Auger
J Base
K Control Panel
NOTE: Colors and components may differ depending on the model.
BEFORE FIRST USE
IMPORTANT: Before proceeding, please review all the warnings at the start of this Owner's Guide.
1 Unbox and remove all packaging materials from the unit.
2 Wash all parts in warm, soapy water.
3 Rinse thoroughly and let all parts air-dry.
4 Use a soft cloth to wipe down the control panel, motor base, and evaporator. Let them dry completely before use.
5 Set the unit on the countertop for at least 2 hours before use to allow the refrigerant to settle in the condenser for optimal performance and safety.
NOTE: All attachments are BPA-free. Accessories are dishwasher safe, but do Not use the heated dry cycle for cleaning.
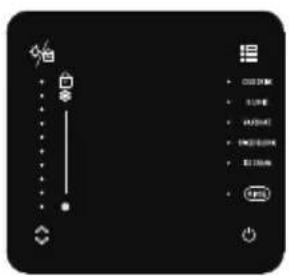
Button 1 - LIGHT & LOCK CONTROL
- Press to turn the light on/off.
- Press and hold for 3 seconds to lock/unlock the machine.
Button 2 - PRESET MODES
- Press to switch between different preset modes.
Button 3 - TEMPERATURE CONTROL
• Temperature control: Each light indicates the temperature and therefore the softness/hardness of the result content.
Button 4 - POWER
- Press to turn the unit on/off.
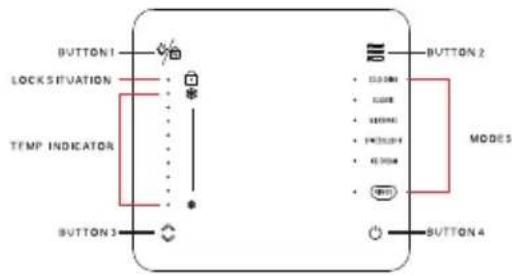
LIGHT INDICATOR
Light Indicator refers to the following three key states:
- LOCK STATUS
When lit: Controls are locked.
• TEMPERATURE LEVEL
More illuminated lights indicate a colder temperature.
- PRESET MODES
Different presets activate specific default lights. Check the light pattern to confirm the selected preset.
• RINSE MODE
Use "RINSE" mode for easily cleaning vessel (in this mode, the cooling system don't work)
PRESETS
• Each preset starts at the best temperature for optimal texture. You can adjust the temperature to get your preferred frozen drink texture.
• In Cold Drink mode, temperature adjustment is not available.
• In Ice Cream mode, the temperature cannot be lowered.
| PRESET | VOLUME RANGE | REFERENCE TIME | DEFAULT | RECIPE EXAMPLES |
| Cold Drink | 26-68oz / (770-2000ml) | 20-25 mins | Soft drink | |
| Slushie | 42-68oz / (1250-2000ml)(Smaller amounts can't mix properly, causing clumping and poor slush texture) | 35-65 mins | Lemonade | |
| Milkshake | 26-42oz / (770-1250ml)(Thicker texture and higher air content limit optimal batch size) | 30-40mins | Blended milkshake | |
| Cocktail | 26-42oz / (770-1250ml) | 20-35mins | Frozen mojito, Gin slushie | |
| Ice Cream | 26-42oz / (770-1250ml)(Thicker texture and higher air content limit optimal batch size) | 35-65mins | Vanilla ice cream |
Tips for the Perfect Slushie:
Sugar Content:
For optimal texture and consistency, ensure that each ingredient contains at least 5% sugar. This helps achieve the ideal freezing point and smooth texture in the final slushie.
Alcohol Usage:
Alcohol should be used in moderation, as excessive amounts can interfere with the freezing process. For best results, maintain an alcohol concentration of 2.8% to 16% and dilute spirits (e.g., tequila) with juice or mix.
Sweetness tip:
Chill Ingredients for Better Flavor: Ingredients tend to taste sweeter and more flavorful when pre-chilled before freezing. For enhanced taste, we recommend chilling your ingredients before adding them to the machine.
SUGAR GUIDELINES
Check the nutrition label to make sure the sugar content meets the recommended minimums below:
| SERVING SIZE | SUGAR CONTENT | |
| 26oz(770ml) | ~65+ g | ~5-7 tablespoons |
| 42oz(1250ml) | ~105+ g | ~7-9 tablespoons |
| 68oz(2000ml) | ~140+ g | ~9-11 tablespoons |
ALCOHOL GUIDELINES
Achieve the perfect balance for your favorite frozen cocktails at home. When using the Cocktail preset, all pre-mixed ingredients (such as wine, beer, etc.) must have alcohol content between 2.8% and 16%.
HARD ALCOHOL/SPIRIT GUIDELINES
For frozen cocktails, refer to the chart below for the maximum amount of hard alcohol (vodka, tequila, etc.) allowed per recipe size.
| Total Recipe Size | Maximum Alcohol Amount |
| 3 1/4 cups - (26oz / 770ml) | 12 cup - (4oz / 120ml) |
| 4 1/2 cups - (36oz / 1000ml) | ^3/_4 cup - (6oz / 180ml) |
| 6 cups - (51oz / 1500ml) | 1 cup - (8oz / 235ml) |
| 8 1/2 cups - (68oz / 2000ml) | 1 38 cup - (11oz / 325ml) |
- Keep the unit upright for at least 2 hours before first use.
• DO NOT add hot ingredients.
• DO NOT add ice or solid ingredients like fruit, ice cream, or frozen fruit. - Pre-freezing ingredients makes them taste sweeter. Don't worry, the sweetness reduces after freezing.
- Ensure every ingredient contains at least 5% sugar.
- For a slushie, using fruit purees or honey as sweeteners is recommended.
- When using the Cocktail preset, ingredients should have 2.8% to 16% alcohol.
- For best results, chill liquids or blended ingredients before adding them to the unit.
- Chill your glasses before serving for the coldest, frosty slushie.
- Adjust the temperature setting to achieve your desired frozen drink texture.
- For the Milkshake preset, serve within 30 minutes to prevent excessive foam.
• Maximum liquid capacity of the Vessel: 68oz.
• The unit can run for up to 12 hours. - All parts, except the motor base, are dishwasher safe.
• Install distance: to left/right side ≥ 50mm, to top ≥ 150mm, to rear ≥ 50mm.
Minimum input = 3 1/4 cups - (26oz / 770ml) Maximum input = 8 1/2 cups - (68oz / 2000ml)
This is NOT a blender.
DO NOT process solid block of ice or ice cubes.
DO NOT make a smoothie or process hard, loose ingredients.
DO NOT attempt to blend or crush non-liquid ingredients.
USING THE THOR KICHEN SLUSHIE MACHINE
NOTE:
• Minimum 26-oz / 770ml input required for using the unit
• Maximum 68-oz / 2000ml liquid capacity.
- DO NOT add ice or solid ingredients such as fruit, ice cream, or frozen items.
• DO NOT add hot ingredients.
| STEP | DIAGRAM |
| 1. Install the condensation collector beneath the evaporator by sliding it into the rail grooves. | 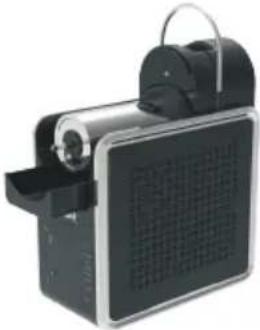 |
| 2. Install the auger by sliding it over the evaporator and rotating it until it locks into place on the pin. | 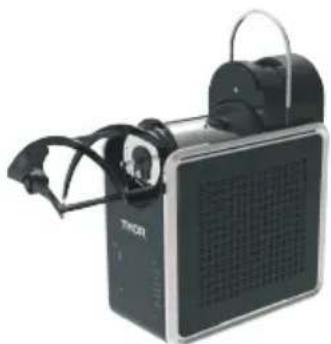 |
| 3. With the vessel lock facing up, slide the vessel over the installed auger and evaporator. | 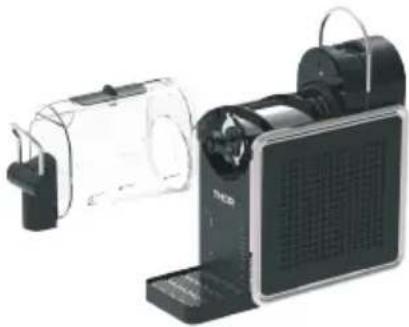 |
| 4. Insert the tray in front of the motor base until it clicks securely into place. |  |
CARE & MAINTENANCE
NOTE:
- When the product is not in use for an extended period, activate the cleaning function and thoroughly clean the detachable parts before storing the machine.
- Liquids from rinsing will flow quickly from the vessel's pour spout. Be sure to use a large cup or bowl to catch the liquid.
NOTE: For optimal results, use the cleaning mode before disassembling and cleaning all parts.
| STEP | DIAGRAM |
| 1. Unlock the vessel lock by pulling it forward and removing the vessel by gently pulling it off the unit. Make sure the vessel is tipped downward to prevent any remaining liquid from spilling out the back. Set the vessel aside. | 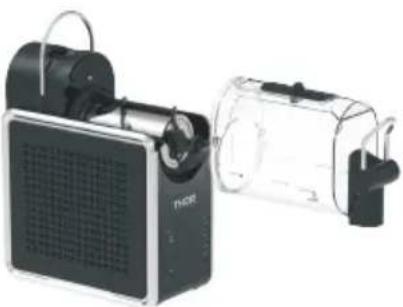 |
| 2. Slide the auger off the evaporator. Set aside. |  |
| 3. Wipe down the evaporator with a sanitized or warm, damp cloth. | |
| 4. Gently slide the condensation catch out of the unit, since there may be residual liquid in the condensation catch. Set aside. | 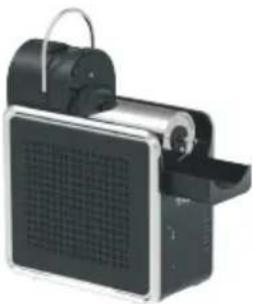 |
| 5. Wipe down unit underneath the evaporator with a sanitized or warm, damp cloth. | |
| 6. If needed, remove the drip tray and/or spout shroud. | |
| 7. Hand-wash all parts with hot, soapy water, or use a dishwasher. If needed, repeat until all parts are fully clean. | |
| 8. Wipe down the motor base with a sanitized or warm, damp cloth. |
STORING
To store the cord, wrap it using the hook-and-loop fastener near the back of the motor base. Do not wrap the cord around the bottom of the base. Store the unit upright with all parts assembled. Hang the drip tray on the left side of the unit for storage. When moving the unit, lift it from the bottom of the motor base. Do not store ingredients inside the vessel.
Q: Can this machine be used to make any kind of beverage?
A: The machine utilizes the property that sugar and alcohol in the liquid can cause the liquid to freeze into small ice crystals at a lower temperature, so it is a product designed for making ice drinks. Thus, there are requirements for the sugar content and alcohol content when making beverages. If these requirements are not met, the production process will have an impact on the machine's stirring, and in severe cases, it may cause the product's stirring motor to get stuck. Therefore, it is recommended to strictly follow the minimum sugar content requirement in the recipe when making ice drinks.
Q: I have already added sugar, why did the product make strange noises and even get stuck after the machine was turned on for a short while?
A: After adding sugar, if it is not fully dissolved, the sugar distribution in the formula liquid will be extremely uneven. The undissolved sugar particles will rub against the machine like sand, and the sugar-free liquid will rapidly cool and freeze into ice instead of small ice crystals. This will cause friction with the auger, leading to collisions and producing abnormal sounds. When the ice blocks become large enough, they will get stuck in the auger. Therefore, the formula liquid must be fully dissolved first and ensure there is sufficient sugar content.
Q: How is the sugar content recommended to be adjusted?
A: We recommend using honey or fructose syrup to prepare the formula solution. This will make the dissolving process much faster than using sugar. Additionally, if you don't have measuring tools or if this is your first time trying to create your own recipe, our suggestion is to start by making a trial batch using a ratio of 1 part syrup to 7 parts recipe liquid (take 1250ml as an example, the sugar content is approximately 160ml and the rest is 1100ml). Furthermore, when using the minimum volume ratio for the recipe, the sugar content can be slightly higher than the aforementioned 1:7 ratio, at a ratio of 1.5 : 6.5.
Q: Why is the slushie I made very runny and watery?
A: This is because the default stop point of our function is set for a specific range of sugar content beverages (such as Pepsi). Within this range, the slushie will have relatively less water content. When you use your own recipes or other recipe beverages, if the sugar content exceeds the default sugar content range, the following two situations will occur: 1. When the sugar content of the recipe liquid exceeds the default range, the formed slushie will be a bit runny (with more liquid content). At this time, it is recommended to add 1-2 more temperature adjustment lights to lower the temperature(press the temperature control button to choose), which will reduce the liquid content. 2. When the sugar content of the recipe liquid is lower than the default range, the formed slushie will be a bit dry (with more ice crystal content). At this time, it will affect the torque of the auger and the speed of the slushie coming out when scooping. It is recommended to remove 1 temperature adjustment light to increase the temperature(press the temperature control button to choose), which will change the smoothness of the slushie. If all the lights have been chosen and the slushie is still runny, it is recommended to reduce the amount of sugar in the recipe liquid when preparing it or dilute the recipe liquid with water before making it.
Q: I want to make a slushie with fruit pulp. Is that possible?
A: There is a very small gap between the auger of the machine and the surface of the evaporator and can not use a formula liquid with fruit pulp. The fruit pulp may get stuck between the auger and the evaporator, causing damage to the machine. You can use a blender to fully crush the fruit pulp and filter out the juice, then add it to the machine. However, be aware that the sugar content of the juice will also vary, it is recommended to add some syrup when using pure fruit juice to ensure the sugar content of the formula liquid.
Q: If I turn on the machine and keep it running normally, but then forget to turn it off, what will happen?
A: Our product has a 12-hour continuous working function. If the user does not perform any key operations after turning on the machine, the product will continue to work for 12 hours after the first formulation is completed, and then it will stop working after 12 hours. During the 12-hour operation, as the water in the formula liquid condenses and sublimates, the sugar content will gradually increase and the slushie will become thinner and thinner. This is normal phenomena.
Q: Why are all the panel lights of the product constantly flashing and unable to be operated?
A: This is because the vessel was not properly installed and locked. When there is no liquid in the vessel, pull the vessel lock to the highest position, gently push the vessel in and then press down the vessel lock. In this way, you can observe a process where the vessel closes with the machine base. At this time, the alarm will be cleared and the product can be operated normally.
Q: Why are all the lights on the right side of the product's panel constantly flashing and unable to be operated?
A: This is because the sugar content in the formula liquid does not match the current temperature setting, resulting in the slushie being too dry, then increasing the resistance during stirring and causing the motor to get stuck. At this point, please unplug the power supply first, wait for 5-10 minutes to allow the slushie to warm up and partially melt. Then plug in the power and turn on the machine again, then set the function to the "Cold Drink" mode. When the motor starts to work, you can enjoy the slushie. If the motor still gets stuck, please repeat above steps until the motor can work normally. Then quickly take out the drink, turn off the machine and clean the vessel. For the next preparation, you can add more syrup or reduce the number of temperature setting lights by 1-2. If this problem does not occur during the operation process, then the product motor has malfunctioned, you need to contact your local after-sales centre to handle it.
Q: Why are the lights on the left side of the product constantly on and unable to be operated?
A: This mainly indicates that the temperature sensor in the vessel has malfunctioned. There are several possible causes for this:
-
The overheated formula liquid was poured into the vessel (it's required that the temperature of the liquid must not exceed 40°C, because higher temperature would damage the vessel, causing irreversible deformation and affecting the sealing performance of the vessel).
-
If it's the problem of the temperature sensor part, please contact the after-sales center.
Q: What will happen if the product is accidentally knocked down?
A: When the product is knocked down or placed on a non-horizontal securing surface, as there is an angle sensor inside, the product will immediately stop working or become unusable. Therefore, before using the machine, please ensure that it place in a horizontal position and should not be accessible to children or small animals.
Q: What is the use of the "Cold Drink" Function?
A: This product has a Cold Drink function, the beverage can be cooled to 4-5°C. The cooling speed is relatively fast, it can generally meet the requirement of reducing the temperature of beverages from room temperature to the desired level within 25 minutes. Moreover, it can continuously replenish beverages for standby use. It should be noted that if only use the "cold drink" function, the sugar content of the beverage does not need to be considered. Any beverage, including water, can be processed using this function. Furthermore, the "cold drink" function can also be used as a pre-preparation function for slushie. Before the party starts, you can cool down the sugary drinks first. After the party begins, switch to the slushie function and it can produce slushie more quickly.
Q: Can the detachable parts of the machine, such as the vessel, be cleaned in a dish-washing machine?
A: Most of these detachable parts are plastic materials, they can be carefully placed in the dish-washing machine for cleaning, but be careful to not to damage the vessel. Please do not dry the product in the dish-washing machine as the drying temperature can cause permanent deformation of the plastic parts and affect the normal installation and sealing of the product.
Q: During the usage process, I didn't stop the machine for continuous production and kept adding new beverages, why does the slushie sometimes not have the same effect as the first time it was made?
A: When adding liquids continuously, the temperature of the mixed liquids may vary in various situations, the mixed liquids do not rise to the temperature range required by the machine. In this case, press the menu button to re-enter this function and the complete process will be activated. This situation may occur more frequently for alcoholic beverages.
Q: Why I can't operate machine and will hear two buzzers after pressing the button?
A: This might be due to the user accidentally triggering the child lock function. At this point, please check if the light next to the child lock icon is on. If yes, just press and hold this button for 3 seconds. When you hear a beep sound and the light corresponding to the lock icon goes out, the child lock function has been removed and the product can be operated normally again.
Q: After I unplug the power cord from the socket and press the switch, why does the product still show up?
A: Because there is a small amount of electricity in the control board capacitor, this stored electricity will not run out immediately after the power cord is unplugged and it will drive display board, but the display will go out soon due to the electricity running out.
Q: Why do I occasionally hear a sizzling sound like liquid spraying? Is there something leaking?
A: We use the compressor principle for refrigeration, when the refrigerant flow from capillary to evaporation tube, will gasify rapidly due to throttling effect, then you may hear the liquid eruption flow sound at this time, this is normal and please don't worry.
Q: Why does the product shake sometimes?
A: Because this product has a refrigeration compressor, when the conditions meet the requirements of cooling down or when refrigeration start again, the compressor will stop and there will be inertial effect, then will make the product shake slightly, this is normal.
One (1) Year Limited Warranty
This warranty is valid only for the original purchaser and original product, and is non-transferable. THOR Kitchen guarantees that, under normal household use and with proper maintenance as described in the Owner's Guide, the product will be free from defects in materials and workmanship for one (1) year from the purchase date. The One (1) Year Limited Warrant applies to purchases made from authorized retailers of THOR Kitchen This warranty is subject to the following conditions and exclusions:
What is covered by this warranty?
1 Defective Products: THOR Kitchen will repair or replace, at its discretion, any defective unit or non-wear able parts within one (1) year from the original purchase date.
2. Replacement Products: If a replacement is issued, the warranty will be extended for six (6) months from the replacement date or for the remaining term of the original warranty, whichever is longer.
THOR Kitchen may replace the product with one of equal or greater value.
What's Not Covered
- Normal Wear and Tear: Wearable parts like blending vessels, lids, cups, blades, motor bases, removable pots, racks, pans, etc., are not covered. These require regular maintenance or replace ment. Replacement parts can be purchased on the THOR Kitchen website.
- Commercial Use: Products used for commercial purposes or tampered with.
- Damage from Misuse or Negligence: Damage due to misuse, abuse, neglect, failure to maintain (e.g., not cleaning the motor base), or mishandling during shipping.
- Consequential and Incidental Damages: THOR Kitchen is not responsible for any damages caused by product failure.
- Unauthorized Repairs: Damages from repairs or alterations not done by THOR Kitchen-authorized personnel, including damages during shipping or from unauthorized repair services.
- Geographical Limitation: This warranty is valid only for products purchased and used within America.
How to Get Service
- Visit www.thorkitchen.com for self-help and troubleshooting.
- Call our Customer Service team at: (877) 288-8099
For quicker assistance, please ensure your product is registered at www.thorkitchen.com
Warranty Claim Process
To start a warranty claim, please contact us at (877)288-8099 and have your proof of purchase ready. We recommend registering your product online at www.thorkitchen.com and keeping the product on hand when you call, so we can assist you more quickly. A Customer Service Specialist will guide you through the return process and provide packing instructions.
State Law
This warranty provides specific legal rights. You may have additional rights under your state's laws. Some states do not allow limitations on incidental or consequential damages. Where prohibited, these limitations do not apply to you.
This manual is for reference only. For the most up-to-date instructions and safety guidelines, please refer to the latest version of the user manual available on our official website. The company reserves the right to update or revise this manual at any time without prior notice.
We Stand Behind the Quality of Our Appliances.

Reliability and customer satisfaction are our top priorities. We offer a solid two-year warranty on both parts and labor. Enjoy professional-grade performance with the confidence that we've got you covered.
Warranty Registration Made Easy.
01 Scan the QR Code or visit thorkitchen. com/register-your-product.
02 Input your purchase and product information and select register.
03 That's it. You're all set. Enjoy!
Questions: service@thorinternational.com

WARRANTY

PARTS
- THOR KITCHEN®
- USE + CARE MANUAL
- THOR KITCHEN SLUSHIE MACHINE OWENR'S GUIDE
- IMPORTANT SAFETY INSTRUCTIONS
- ▲DANGER: FIRE OR EXPLOSION RISK
- WARNING: SAFETY HAZARDS
- Before First Use:
- Power & Electrical Safety:
- Safe Operation:
- For Appliances with Cooling Systems:
- Children & Safety:
- Repairs & Service:
- NOTE:
- BEFORE FIRST USE
- Button 1 - LIGHT & LOCK CONTROL
- Button 2 - PRESET MODES
- Button 3 - TEMPERATURE CONTROL
- Button 4 - POWER
- LIGHT INDICATOR
- - LOCK STATUS
- • TEMPERATURE LEVEL
- - PRESET MODES
- • RINSE MODE
- PRESETS
- Sugar Content:
- Alcohol Usage:
- Sweetness tip:
- SUGAR GUIDELINES
- ALCOHOL GUIDELINES
- HARD ALCOHOL/SPIRIT GUIDELINES
- USING THE THOR KICHEN SLUSHIE MACHINE
- CARE & MAINTENANCE
- STORING
- Q: Can this machine be used to make any kind of beverage?
- Q: I have already added sugar, why did the product make strange noises and even get stuck after the machine was turned on for a short while?
- Q: How is the sugar content recommended to be adjusted?
- Q: Why is the slushie I made very runny and watery?
- Q: I want to make a slushie with fruit pulp. Is that possible?
- Q: If I turn on the machine and keep it running normally, but then forget to turn it off, what will happen?
- One (1) Year Limited Warranty
- What is covered by this warranty?
- What's Not Covered
- How to Get Service
- Warranty Claim Process
- State Law
- We Stand Behind the Quality of Our Appliances.
- Warranty Registration Made Easy.
Marque : Thor
Modèle : TKS667W
Catégorie : Machine à glaçons