
CS589ABS0HB - Four encastrable SIEMENS - Notice d'utilisation et mode d'emploi gratuit
Retrouvez gratuitement la notice de l'appareil CS589ABS0HB SIEMENS au format PDF.

| Caractéristiques techniques | Modèle : SIEMENS CS589ABS0HB |
|---|---|
| Type d'appareil | Non catégorisé |
| Utilisation | Appareil conçu pour une utilisation domestique, adapté à la cuisson et à la préparation des aliments. |
| Maintenance | Nettoyage régulier recommandé, vérifier les filtres et les éléments chauffants selon les instructions du fabricant. |
| Sécurité | Équipé de dispositifs de sécurité standards, suivre les instructions d'utilisation pour éviter les accidents. |
| Informations générales | Vérifier la compatibilité avec les installations électriques existantes avant l'achat. |
FOIRE AUX QUESTIONS - CS589ABS0HB SIEMENS
Questions des utilisateurs sur CS589ABS0HB SIEMENS
0 question sur cet appareil. Repondez a celles que vous connaissez ou posez la votre.
Poser une nouvelle question sur cet appareil
Téléchargez la notice de votre Four encastrable au format PDF gratuitement ! Retrouvez votre notice CS589ABS0HB - SIEMENS et reprennez votre appareil électronique en main. Sur cette page sont publiés tous les documents nécessaires à l'utilisation de votre appareil CS589ABS0HB de la marque SIEMENS.
MODE D'EMPLOI CS589ABS0HB SIEMENS

1
2
3
4
5
natural_image
Technical illustration of a window frame with screw fasteners and a central opening (no text or symbols)en
Important information – fig. 1
This appliance is designed to be fully integrated into kitchen units. It is not intended to be used as a tabletop appliance or within a cupboard.
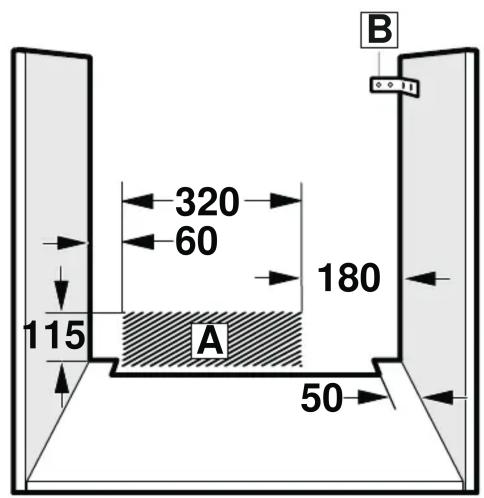
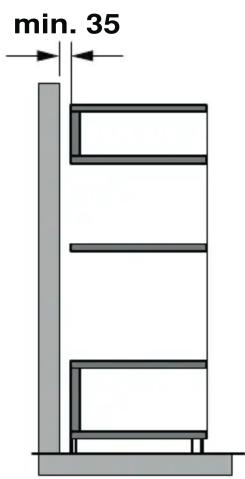
The fitted cabinet must not have a back panel behind the appliance.=There=should=be=a=gap=of=at=least=35=mm=between wall=and=the=cabinet=base=as=well=as=the=rear=panel=of=the=ca situated above.
The=fitted=cabinet=must=have=a=ventilation=opening=measuring=cm²=on=the=front.=On=surround=units=without=a=ventilation=cut-of there=must=be=a=ventilation=opening=measuring=200=cm²=toward the=rear=of=the=side=panels.To=do=this,=trim=the=base=panel=or ventilation grille.
■ Ventilation slots and intake openings must not be covered.
- Check the appliance for damage after unpacking it. Do not connect the appliance if it has been damaged in transit.
Before=starting=up=the=appliance,=remove=any=packaging=mater and adhesive film from the cooking compartment and the door.
■ Fitted units must be heat-resistant up to 90 °C, and adjacent unit fronts up to 70 °C.
- Do not install the appliance behind a decorative panel, as this puts the appliance at risk of overheating.
■ Any cut-outs that need to be made in the units should be made before=the=appliance=is=installed.=Remove=any=shavings,=as=the=appliance=is=installed.=Remove=any=shavings,=as=the=appliance=is=installed.=Remove=any=shavings,=as=the=appliance=is=installed.=Remove=any=shavings,=as=the=appliance=is=installed.=Remove=any=shavings,=as=the=appliance=is=installed.=Remove=any=shavings,=as=the=appliance=is=installed.=Remove=-the=-appliance=-is=-installed=-Remove=-any=-shavings=-is=-these
■ Wear=protective=gloves=so=that=you=do=not=cut=yourself.=Parts=are accessible during installation may have sharp edges.
The=mains=socket=for=the=appliance=must=either=be=located=in-hatched area=A or outside of the area where the appliance is installed.
- Secure=any=unsecured=units=to=the=wall=using=a=standard=bracB.
■ The dimensions in the figures are in mm.
⚠️ Wearers of electronic implants!
The appliance may contain permanent magnets which may affect electronic implants, e.g. heart pacemakers or insulin pumps.
Therefore, during installation, wearers of electronic implants must maintain a minimum distance of 10 cm from the appliance.
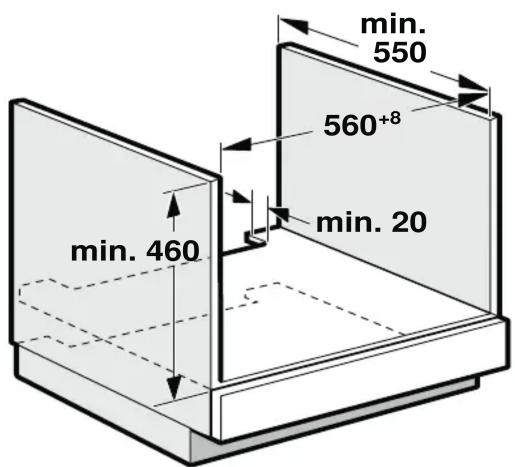
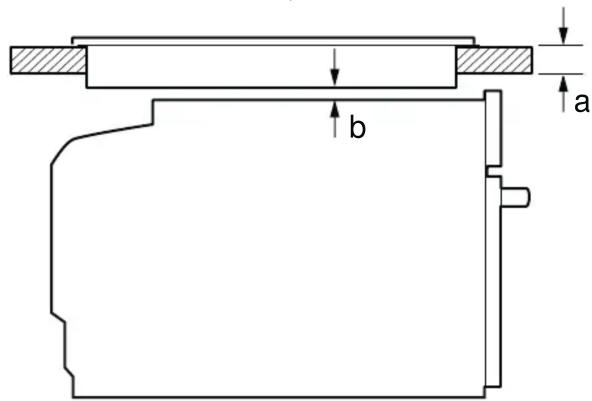
Appliance under worktop – fig. 2
To ventilate the appliance, the intermediate floor must have a ventilation cut-out.
Secure the worktop to the fitted units.
If the appliance is installed under a hob, the following minimum dimensions must be adhered to (including substructure, if applicable):
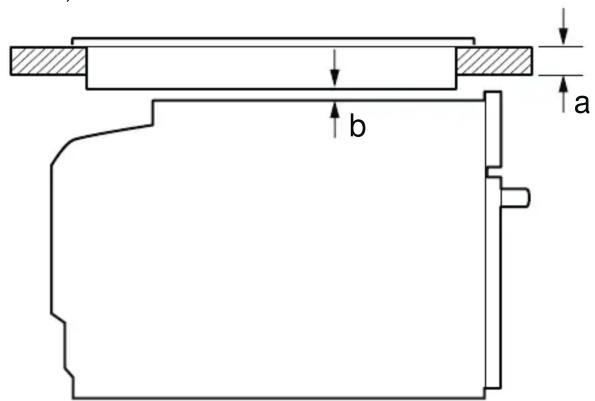
| Hob type a | Surface-mounted | a Flush-mounted | b |
| Induction hob=48 mm=49 mm=5 mm | |||
| Full-surface induction hob | 58 mm=59 mm=5 mm | ||
| Gas hob=38 mm=49 mm=5 mm | |||
| Electric hob=38 mm=41 mm=2 mm | |||
The minimum worktop thickness=a is based on the required minimum clearance=b.
Proceed in accordance with the installation instructions for the hob.
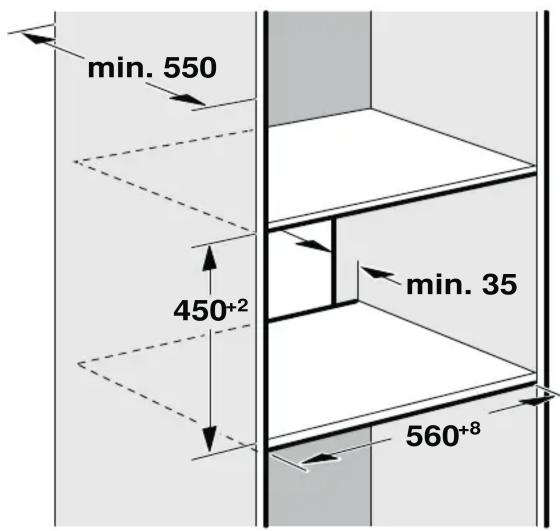
Appliance in a tall unit – fig. 3
To ventilate the appliance, the intermediate floors must have a ventilation cut-out.
If the tall unit has another back panel in addition to the element back panels, this must be removed.
Do not fit the appliance too high up; it must be possible for accessories to be removed easily.
Combination with warming drawer
adiner fit the warming drawer. Follow the installation instructions for the warming drawer. Slide the appliance, on the warming drawer, into the built-in cabinet.
Important: When=sliding=in=the=appliance,=take=care=not=to=damage the warming drawer's panel.
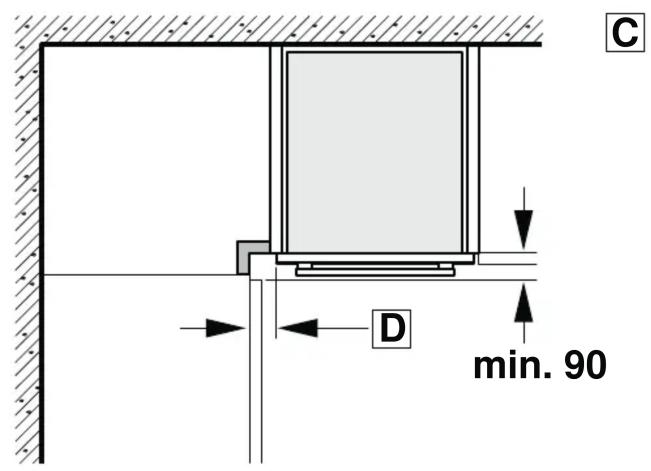
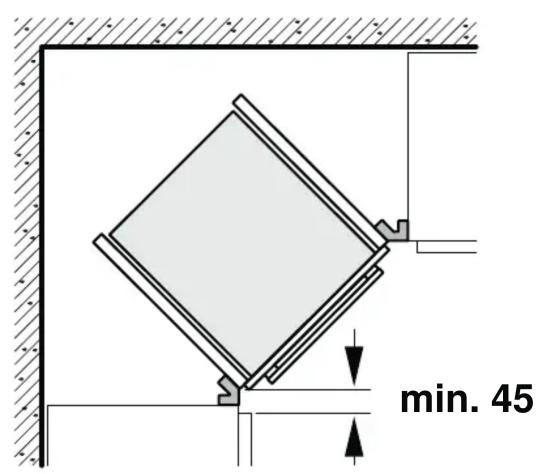
Corner installation – Fig. 4
To ensure that the appliance door can be opened in a corner installation, take account of dimension C. Dimension D is dependent on the thickness of the unit front under the handle.
Connecting the appliance
The=appliance=corresponds=to=protection=class=1=and=must=only=be operated with a protective earth connection.
The=fuse=protection=must=correspond=to=the=power=rating=specified on the appliance's rating plate and to local regulations.
The appliance must be disconnected from the power supply whenever installation work is being carried out.
The power cable must only be replaced with a cable from the original manufacturer, which can be obtained from the after-sales service.
If the power cable is damaged, it must be replaced by the manufacturer, the after-sales service or a person with equivalent qualifications in order to eliminate any risks.
When the appliance is installed, protection must be provided against accidental contact in the future.
Power cable with a plug with earthing contact
The appliance must only be connected to an earthing contact socket which has been correctly installed.
If the plug can no longer be reached after the installation, a partition must be provided in the phases in the permanent electrical installation in accordance with the installation regulations.
India only
Please=note=the=different=colour=code=for=the=wiring:=Green/yellow=PE conductor ⊕, black = neutral conductor, red = live conductor (phase conductor).
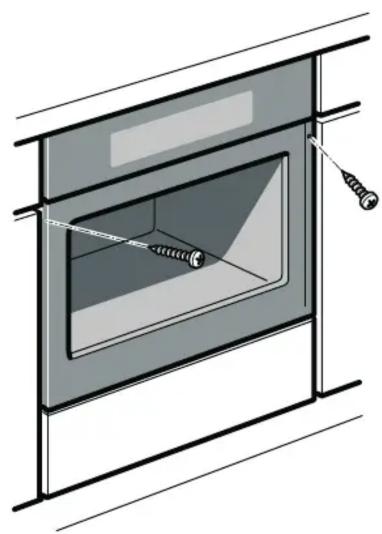
Securing the appliance – fig. 5
-
Using a spirit level, adjust the appliance so that it is perfectly level.
-
Slide the appliance all the way in.
-
Make sure that the appliance is level and centre it.
-
Screw the appliance into place.
The gap between the worktop and appliance must not be sealed by additional strips.
Thermal insulation strips must not be fitted to the side panels of the surround unit.
Removal
- Disconnect the appliance from the power supply.
- Undo the securing screws.
- Lift the appliance slightly and then pull it out completely.
zh-hk
重要資訊-圖1
本電器是嵌入式設計裝置,不應放置在檯面上或一般櫥櫃中使用。
■ 電器所在的櫥櫃應沒有後壁。牆壁與櫥櫃底座以及與上方櫥櫃後面板之間必須保持至少35mm的距離。
■ 安裝電器的櫥櫃前部必須有一個50 cm2的通風孔。如果外圍單元上沒有通風孔,則須在側壁後部留一個200 cm2大小的通風開孔。為此,切割底板或安裝通風格柵。
■ 不得遮蓋通風槽和進風口。
在開箱後請檢查電器是否有損壞。若電器在運送過程中已經受損,請勿連接電源。
在開箱後請檢查電器是否有損壞。若電器在運送過程中已經受損,請勿連接電源。
■ 安裝本電器的櫥櫃必須耐熱高達90 °C的溫度,相鄰櫥櫃的面板必須耐熱高達70 °C的溫度。
切勿將電器安裝在飾門或板式傢俱的後方,此安裝方式可能會導致過熱。
■ 機櫃如需任何修整,都必須在安裝前完成。清除碎屑等施工殘料,否則可能會影響電器零件正常運作。
在安裝過程中所接觸的零件可能具有尖銳的邊緣,請戴上防護手套避免割傷。
■ 電器使用的主插座必須位於斜線區A之內,或電器的安裝範圍之外。
■ 使用標準托架B,將不穩定的的物件固定在牆上。
■ 圖解的尺寸單位為毫米。
⚠ 電子植入物配戴者!
電器內可能有永久磁鐵,或會影響電子植入物、例如心律調整器或胰島素泵。安裝時,電子植入物配戴者必須與電器保持至少10厘米的距離。
裝置安裝在工作檯面下·圖2
為確保裝置通風順暢,隔板必須保留通風孔。
將工作檯面固定在嵌入式家具上。
若要將本裝置安裝在爐具底下空間內,就必須至少保持下列尺寸的空隙(視情況可能包含底部結構):
爐具種類 a普通安裝 a齊平安裝 b
電磁爐=48 mm=49 mm=5 mm
全表面電磁爐=58 mm=59 mm=5 mm
氣體爐=38 mm=49 mm=5 mm
電爐=38 mm=41 mm=2 mm
根據最小必要間距b,計算出工作檯面的最小厚度為a。
請遵循爐具安裝說明書。
將設備安裝在高處-圖3
如要令設備得到通風,中間的層板必須設有通風孔。
如果於高處的裝置除了原本有的背板外還有另一塊背板,請務必將這另一塊背板移除。
將設備安裝在高處時,將確保配件能夠容易移除。
與暖碟抽屉組合使用
先安裝暖碟抽屉。請遵循暖碟抽屉安裝說明書。將設備推入廚櫃,將設備安裝於暖碟抽屉頂部。
重要說明: 當推入電器時,請避免損壞暖碟抽屉面板。
角落位置安裝-圖.4
以確保能夠在角落安裝位置打開設備機門,請預留 C 空間。D 的尺寸需視乎裝置正面手把以下位置的厚度而定。
連接 裝置
本裝置達安全防護等級1,僅允許在架設接地線的狀況下運轉。
保險絲必須符合型號銘牌上的功率數據,並遵守當地規定。無論是何種安裝,裝置均必須保持斷電。
更換連接電線時,只可使用從本公司客戶部門購買的原廠電線。
連接電線如有受損,必須送回原廠或本公司客服部門,或者交由具備相關證照的合格人員進行更換,以免發生危險。
必須透過安裝來確保不會意外接觸裝置。
具有插頭和接地的電源線
本電器僅限插入妥善安裝的接地型插座。
如果插頭在安裝之後無法接上電源,就必須依照安裝規定,在進行永久性電路安裝時,在電源相位中提供分隔。
無插頭、具接地的電源線
務必由持牌的專業人士將電器接電。
進行永久性電路安裝時,必須依據安裝規定在電源相位中提供分隔。確認插座內的電源相位及中性導線。不當連接會損壞電器。務必依照接線圖連接集線器。查看額定銘牌上的電壓資料。依照顏色編碼連接主電源線:綠色 / 黃色 = PE導線 ⊕,藍色 = 中性導線,褐色 = 活線(外部導線)。
固定設備-圖5
- 使用水平儀設置電器水平度,使其完全水平。
- 將設備完全推入。
- 安装完整焗爐並置中。
- 固定設備螺絲。
工作檯面與設備之間的間隙不得被多餘的條板堵塞。
隔熱條板不得放置於附近裝置的側面板上。
拆除
- 中斷設備的電源供應。
- 鬷開固定螺絲。
- 輕輕抬高設備,然後再完全拉出。