KS-V8 - Support écran plat ROLAND - Notice d'utilisation et mode d'emploi gratuit
Retrouvez gratuitement la notice de l'appareil KS-V8 ROLAND au format PDF.


| Marque | Roland |
| Modèle | KS-V8 |
| Type de produit | Support pour clavier électronique |
| Hauteur réglable | 65 à 95 cm |
| Largeur réglable | 40 à 70 cm |
| Profondeur | 50 à 70 cm |
| Poids | 6 kg |
| Charge maximale | 30 kg |
| Matériau | Acier |
| Finition | Noir |
| Alimentation | Aucune (manuel) |
| Fonctions | Support de clavier, réglage en hauteur, gestion des câbles |
| Accessoires inclus | 1 support principal, 2 ressorts avec boulons, 2 passe-câbles, 4 vis, 1 ruban adhésif |
| Outils requis | Clé de 5 mm (fournie), tournevis cruciforme (non fourni) |
| Assemblage | Nécessite deux personnes |
| Surface d'installation | Plane et horizontale |
| Sécurité | Ne pas déplacer avec le clavier dessus ; bien serrer les boulons ; éviter de pincer les doigts |
| Entretien | Nettoyer avec un chiffon doux et sec |
| Pièces détachées | Ressorts, passe-câbles, vis disponibles auprès du fabricant |
| Garantie | 2 ans |
FOIRE AUX QUESTIONS - KS-V8 ROLAND
Questions des utilisateurs sur KS-V8 ROLAND
0 question sur cet appareil. Repondez a celles que vous connaissez ou posez la votre.
Poser une nouvelle question sur cet appareil
Téléchargez la notice de votre Support écran plat au format PDF gratuitement ! Retrouvez votre notice KS-V8 - ROLAND et reprennez votre appareil électronique en main. Sur cette page sont publiés tous les documents nécessaires à l'utilisation de votre appareil KS-V8 de la marque ROLAND.
MODE D'EMPLOI KS-V8 ROLAND
Roland
键盘支架
KS-V8
用户手册
注意
- 使用本设备前,请仔细阅读相关章节:“使用安全须知”和“重要注意事项”(另页)。这些章节提供了关于正确操作设备的重要信息。请妥善保存本手册,以便随时取阅。
- 必须有其他人在场帮助您装配和安装。
- 必须在平坦的水平面上进行装配和调整。
- 安装支架时注意不要夹到手指。
- 上面有键盘时,不要移动支架。否则,可能导致键盘翻转或跌落。
- 如果安装程序中没有涉及的螺母不牢固,请用从市场上买到的扳手(5mm)拧紧。
检查各零件
开始安装前,检查确认所有零件齐全。
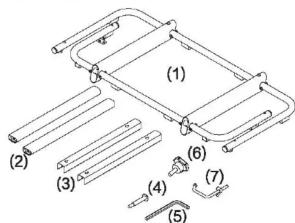
| (1) | 支架 | 1 |
| (2) | 支撑杆(带螺栓) | 2 |
| (3) | 电缆护套 | 2 |
| (4) | 螺柱螺钉 | 4 |
| (5) | 通用扳手 | 1 |
| (6) | 旋钮螺栓 | 4 |
| (7) | 耳机挂钩 | 1 |
* 有关使用旋钮螺栓和耳机挂钩的详细信息,参见钢琴脑附的用户手册。
* 需要提供十字(+)螺丝刀。
* 为改进产品,支架技术参数和/或外观如有变化,恕不另行通知。
组装
1
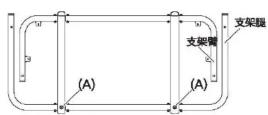
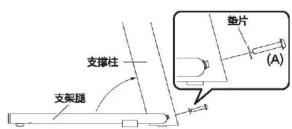
使用内配通用扳手拆下标有(A)的螺栓和垫片。
3
支架背面朝上。
2
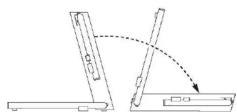
如图所示,抬起支撑柱,同时将其握住,用之前拆下的螺栓(A)和垫片将支撑柱固定在支架圈上。
4
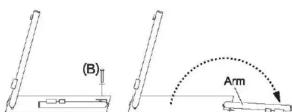
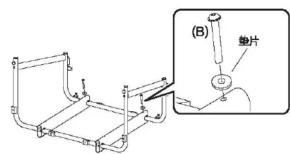
用内配的通用扳手拆下标有(B)的两个螺栓以及垫片,然后将支撑臂摆到图示位置。
Copyright © 2008 ROLAND CORPORATION
版权所有。未经ROLAND CORPORATION书面同意,禁止以任何方式复制本出版物的任一部分。
5
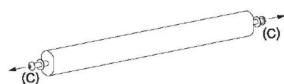
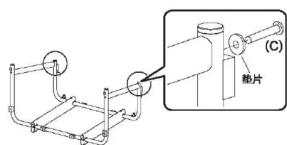
用内配通用扳手拆下螺栓(C)和安装到支撑杆上的垫片。
6
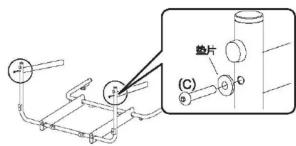
用步骤5中拆下的螺栓(C)和垫片将支撑杆松松地固定在腿上。
7
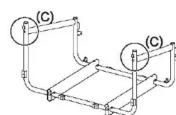
抬高支架臂,用步骤5中拆下的螺栓(C)和垫片,将支撑杆紧固在支架臂上。
8
将步骤6中没有固定紧的螺栓(C)拧牢固。
9
用步骤4中拆下的两个螺栓(B)和垫片将支撑臂固定。
10
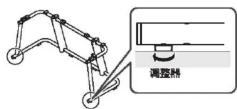
直立放置支架。
11
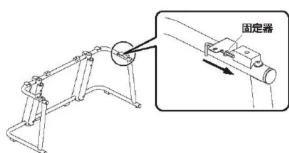
转动位于图示位置的调整器,使支架与地板水平相对。进行调整,使支架不倾斜,不摆动。
安装电缆护套
通过巧妙的组织连接到键盘的电线,安装电缆护套可以改善设备的外观。
1
用十字螺丝刀把两个螺柱螺钉安装到各支撑柱上。
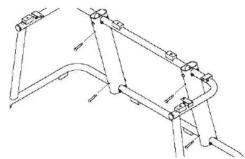
natural_image
Technical line drawing of a mechanical bracket assembly (no text or symbols)2
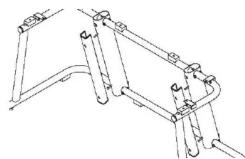
将每个电缆护套上的两个孔勾在您安装到各支撑柱上的两个螺柱螺钉上。
如果安装电缆护套时有困难,暂时松开螺丝,电缆护套安装完成后再拧紧。
natural_image
Technical line drawing of a mechanical bracket or frame structure (no text or symbols)存放通用扳手
内配通用扳手可插入下图所示的孔中。放在这里,可随用随取。