
LM60Mi - Télécommande Uni-T - Notice d'utilisation et mode d'emploi gratuit
Retrouvez gratuitement la notice de l'appareil LM60Mi Uni-T au format PDF.
| Caractéristiques techniques | Modèle : Uni-T LM60Mi, Type : Télécommande, Fréquence : 433 MHz |
|---|---|
| Utilisation | Conçue pour contrôler divers appareils électroniques à distance, facile à programmer. |
| Maintenance et réparation | Vérifiez régulièrement les piles, remplacez-les si nécessaire, nettoyez avec un chiffon doux. |
| Sécurité | Évitez l'exposition à l'humidité, ne pas démonter l'appareil, tenir hors de portée des enfants. |
| Informations générales | Compatibilité avec plusieurs appareils, garantie limitée, consulter le manuel pour les spécifications complètes. |
FOIRE AUX QUESTIONS - LM60Mi Uni-T
Questions des utilisateurs sur LM60Mi Uni-T
0 question sur cet appareil. Repondez a celles que vous connaissez ou posez la votre.
Poser une nouvelle question sur cet appareil
Téléchargez la notice de votre Télécommande au format PDF gratuitement ! Retrouvez votre notice LM60Mi - Uni-T et reprennez votre appareil électronique en main. Sur cette page sont publiés tous les documents nécessaires à l'utilisation de votre appareil LM60Mi de la marque Uni-T.
MODE D'EMPLOI LM60Mi Uni-T
UNI-T
Mini Laser Distance Meter
User Manual

LM40Mi LM50Mi LM60Mi
Perimeter Measurement
Press twice, shows at the screen. One of the side of the parallelogram blinks at the display, please follow the below instructions for perimeter measurement:
Press once for length
Press again for width
The device automatically calculates the perimeter and shows the result in the major display area. The measuring results of the length and width of the parallelogram will be showed in the auxiliary display area.
Volume Measurement
Press three times to enter volume measurement mode. A will show at the top of the screen, and its longsides will blink. Please follow the below instructions for volume measurement:
Press ○ once for length Press ○ again for height Press ○ finally for width
The device automatically calculates the volume and shows the result in the major display area. The measuring results of the height and width of the cube will be showed in the auxiliary display area.
-7-
⚠️ ⬆ CE ☑
Safety Regulations Please read the safety regulations and operation guide, carefully before operating
Please read all of the operational guide and safety regulations in this manual before operation. Improper operations without complying with this manual may cause damage to the device, influence on measurement result or cause personal injury to the user or a third party.
The instrument is not allowed to disassemble or repair in any ways. It is forbidden to do any illegal modification or performance change for laser emitter. Please keep it out of reach of children and avoid being used by any irrelevant person.
It is strictly prohibited to shoot eyes or other parts of body with the laser. It is not allowed to take the laser to shoot the surface of any highly reflective objects.
Due to electromagnetic radiation interference to other equipment and devices, please don't use the meter in the plane or around medical equipment, don't use it in inflammable explosive environment.
Discarded meter device should not be processed just like household garbage, please handle it in line with related law and regulations.
⚠️ Any quality issues or any questions on the meter, please contact local distributors or manufacturer in time, we are ready to offer solutions for you.
-1-
Metope Area Measurement
Press four times till shows at the display. Please follow the below instructions for metope area measurement:
Press once for the height of the wall; Press again for the width 1 of wall 1; The instrument will automatically calculate the area of the wall: Area=Height × Width 1
Press to start the measurement;
Press again for the width2 of wall 2;
The instrument will automatically calculate the total area of the wall:
Total area = Height x (Width 1+ Width 2) By analogy, press ○ to measure the width(n) of the wall (n);
Total area = Height x(Width 1+ Width 2+... + Width n)

-8-
Product Overview
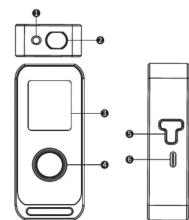
text_image
Diagram of a mobile phone with labeled ports and internal components, including a key inserted into a door.① Laser Emitting Lens ④ Power/Measure Button
② Laser Receiving Lens ⑤ Mode Switch
③ LCD ⑥ Type-C Charging Port
·2·
Pythagoras

There are two Pythagoras modes which is convenient for indirect measurement in a specific complex environment.
① Calculate the second leg by measuring the hypotenuse and another leg. Short press five times to enter Pythagoras mode: Press measure the length of hypotenuse (a
Press O, measure the length of hypotenoid (c) Press O, measure the length of one leg (b) Device automatically calculates the length of another leg (x)
② Calculate the hypotenuse by measuring the length of two legs.
Short press ☑ six times, one leg of □ is blinking. Press ○ , measure the length of one leg (a) Press ○ , measure the length of another leg (b) Device automatically calculates the length of hypotenuse (x)
Legs must be shorter than hypotenuse, or there will be "err" showed at screen. In order to guarantee the accuracy, please make sure all measurements are started from the same point and in the order of hypotenuse and legs.
9 -
Display
6.2.1.3
• Powe

Start the Instrument / Menu Setting
- Turn on/off the Instrument
Under off state, press O, device and laser get started simultaneously and the device enters the measurement mode.
Under on state, long press O for 3s to turn off the device, or it will automatically shut off without any operation within 150 seconds.
(1) 2017年1月1日至2018年1月1日,公司与关联方累计发生关联交易的总金额为人民币45,000万元。
-3
Tips
During use, the following prompts may be displayed in the major display area:
| Prompt | Cause | Solution |
| Err | Out of the measurement range | Use the device within the measurement range |
| Err1 | Signal is too weak | Choose the surface with stronger reflection. Use the reflecting plate. |
| Err2 | Signal is too strong | Choose the surface with weaker reflection. |
| Err3 | Low battery voltage | Charge the battery |
| Err4 | Beyond working temperature | Use the device in the specified temperature. |
| Err5 | Pythagoras measuring breaks the rules | Re-measure and ensure that hypotenuse is longer than legs. |

Different laser labels show different models and range information. LASER RADIATION DO NOT STARE INTO BEAM CLASS 2 CONSUMER LASER PRODUCT compliance with IECIEN 60825-1, EN 50689.
- 10
- Unit Setting
When the laser is turned off, long press 📋 to switch the measurement unit. The default unit is: 0.000m. There are 3 units for selection.
Measurement units:
| Length | Area | Volume | |
| 1 | 0.000m | 0.000 m^2 | 0.000 m^3 |
| 2 | 0.0 in | 0.00 ft ^2 | 0.00 ft ^3 |
| 3 | 0.00 ft | 0.00 ft ^2 | 0.00 ft ^3 |
- Changing Reference Point
When the laser is turned on, long pres ⬇ to change the reference point. The default reference point is the terminal baseline.
• Putt
● Battery Built-in 3.7V 370mAh lithium battery, the battery icon will flash when the battery is low.
Self-calibration &Sound on/off
● Self-calibration Function
The self-calibration function is mainly used to correct data. If the deviation occurs when the user measures the distance, this function can be used for distance correction.
-4-
Technology Specifications
| ITEM | LM40(M) | LM50(M) | LM60(M) |
| Measurement Range | 0.05-40m | 0.05-50m | 0.05-60m |
| Precision | ±12.0mm×5×10−3D* | ||
| Continuous Measurement | √ | ||
| Metlope Area Measurement | √ | ||
| Area/Volume Measurement | √ | ||
| Porimeter Measurement | √ | ||
| Pythagorean Measurement | √ | ||
| Min/Max Value | √ | ||
| Laser Level | Class 2 | ||
| Laser Type | 630-370mm×1mW | ||
| Automatically Cut off Laser | 20s (single measurement) | ||
| Auto Power-off | 150s | ||
| Battery | 3.7V 370mAh Lithium battery | ||
| Full charge measurement times | 8000 times for single measurement | ||
| Storage Temperature | -20°C~60°C | ||
| Working Temperature | 0°C~40°C | ||
| Storage Humidity | 20%-45%RH | ||
| Weight | 75g | ||
| Dimension | 86.5x36.5x19.5mm | ||
11 -
The correction range is -0.009\~0.009m. For example, if the data is 2mm too large, reduce the value by 0.002m; If the data is 2mm smaller, increase the value by 0.002m. Operation:
-
Enter self-calibration: In the shutdown state, press and hold the 🔒 key, and at the same time quickly press the 🔒 key to start the instrument up, and the screen displays "CAL";
-
Modify calibration value: Press ⚡ key to increase the calibration value by 1. When the calibration value is equal to 0.009m, increase the calibration value by 1 again and jump to -0.009m.
-
Save calibration value: Press O to save the current calibration value and enter the sound setting.
- Sound on/off
The instrument is equipped with sound prompt function by default. Users can turn on/off the sound prompt according to their needs.
- Enter sound setting: Refer to "Self-calibration" to enter the self-calibration. Skip the step of modifying the calibration value, save the calibration value directly to enter the sound setting and the process displays forward.
and the screen displays "sound"; 2. Turn on/off sound: Press 📋 to turn the sound on or off. "on" means to turn on the sound, off means to turn off the sound;
to turn off the sound; 3. Save settings: Press ○ to save settings and return to the state to be measured.
-5-
* "d" indicates the actual distance.
** In harsh environment, such as: sunlight is too strong, the ambient temperature fluctuates excessively, the reflection effect of the object's surface is weak, the battery is low, the measurement results will have a large error, so a reflecting
plate is needed.
Instrument Maintenance
- The meter should not be stored in high temperature and humid environment for a long time. If it is not used very often, please place the meter in the box and store it in cool and dry place.
- Please keep the device surface clean. Use a soft wet cloth to wipe the dust on the surface. Do not use corrosive liquid to clean the device. Use the same method as wiping optical devices to wipe the meter and focusing mirror.
Packing List
Please check if all accessories are complete according to the following list.
| No. | Item | Unit | QTY | Note |
| 1 | Meter | pc | 1 | |
| 2 | User Manual | pc | 1 | |
| 3 | Gift Box | pc | 1 | |
| 4 | Charging Cable | pc | 1 | |
| 5 | Hand rope | pc | 1 |
12 -
Single Measurement
Single master of this
Under the test mode, press ○, and the instrument emits laser to lock the measuring point. Press ○ again for single distance measurement, and the measurement result will be displayed in the major display area.
Continuous Me
Under the test mode, long press and max/min will flash on the screen, then release the key to enter the continuous measurement mode, power off in 3 minutes without releasing the button and the maximum and minimum measured values measured in the continuous measurement process will display in the auxiliary display area. The current measurement value will display in the main display area. Short press or to exit the continuous measurement mode.
Area Measurement
Press ☑, □ shows at the screen. One of the side of rectangle blinks at the display, please follow the below instructions for area measurement: Press ○ once for length Press ○ again for width The device automatically calculates the area and shows the result in the major display area. The measuring results of the length and width of the rectangle will be showed in the auxiliary display area.
-6

UNI-T
UNI-TREND TECHNOLOGY (CHINA) CO., LTD. No.6, Gong Ye Bei 1st Road, Songshan Lake National High-Tech Industrial Development Zone, Dongguan City, Guangdong Province, China Tel: (86-769) 8572 3888 http://www.uni-trend.com
P/N:110401113141X