
The Acoustic - Équipement audio ART - Notice d'utilisation et mode d'emploi gratuit
Retrouvez gratuitement la notice de l'appareil The Acoustic ART au format PDF.
| Type de produit | Préampli/processeur pour guitare acoustique |
| Dimensions (L x P x H) | 21,0 x 20,9 x 5,1 cm (8,25 x 8,25 x 2,0 pouces) |
| Poids | 1,36 kg (3 lbs) |
| Alimentation | Adaptateur secteur externe 9 VAC / 400 mA |
| Nombre de presets numériques | 32 (16 en banque A, 16 en banque B) |
| Impédance d'entrée | 1 MΩ |
| Impédance de sortie | 150 Ω (jack 6,35 mm), 300 Ω (XLR), 47 Ω (casque) |
| Niveau d'entrée max | +4 dBu |
| Niveau de sortie max | +11 dBu |
| Bruit résiduel | -81 dB à +5 dBu |
| Gamme dynamique | 86 dB |
| Connecteurs | Entrée jack 6,35 mm asymétrique, sorties stéréo jack 6,35 mm asymétriques, sortie XLR symétrique, sortie casque |
| Gain | Plus de 40 dB |
| Fonctions principales | Préampli avec égaliseur paramétrique (Q, fréquence, boost/cut ±15 dB), contrôle Accent, sélection Warm/Bright, pads Activator (Boost 6 dB, effet on/off), effets numériques intégrés (réverbération, delay, chorus, flanger, pitch shift, etc.), sortie casque |
| Entretien et nettoyage | Débrancher l'adaptateur avant nettoyage ; utiliser un chiffon doux et sec. Ne pas utiliser de solvants ou produits abrasifs. |
| Sécurité | Ne pas utiliser sous la pluie ou en milieu humide ; remplacer l'adaptateur si le câble est endommagé ; débrancher lorsqu'inutilisé. |
| Pièces détachées et réparabilité | Contacter le service client ART pour obtenir un numéro d'autorisation de retour (RA) avant tout envoi en réparation. Garantie 3 ans. |
| Informations générales | Fabriqué aux États-Unis par Applied Research and Technology (ART). Boîtier en acier. |
FOIRE AUX QUESTIONS - The Acoustic ART
Questions des utilisateurs sur The Acoustic ART
0 question sur cet appareil. Repondez a celles que vous connaissez ou posez la votre.
Poser une nouvelle question sur cet appareil
Téléchargez la notice de votre Équipement audio au format PDF gratuitement ! Retrouvez votre notice The Acoustic - ART et reprennez votre appareil électronique en main. Sur cette page sont publiés tous les documents nécessaires à l'utilisation de votre appareil The Acoustic de la marque ART.
MODE D'EMPLOI The Acoustic ART
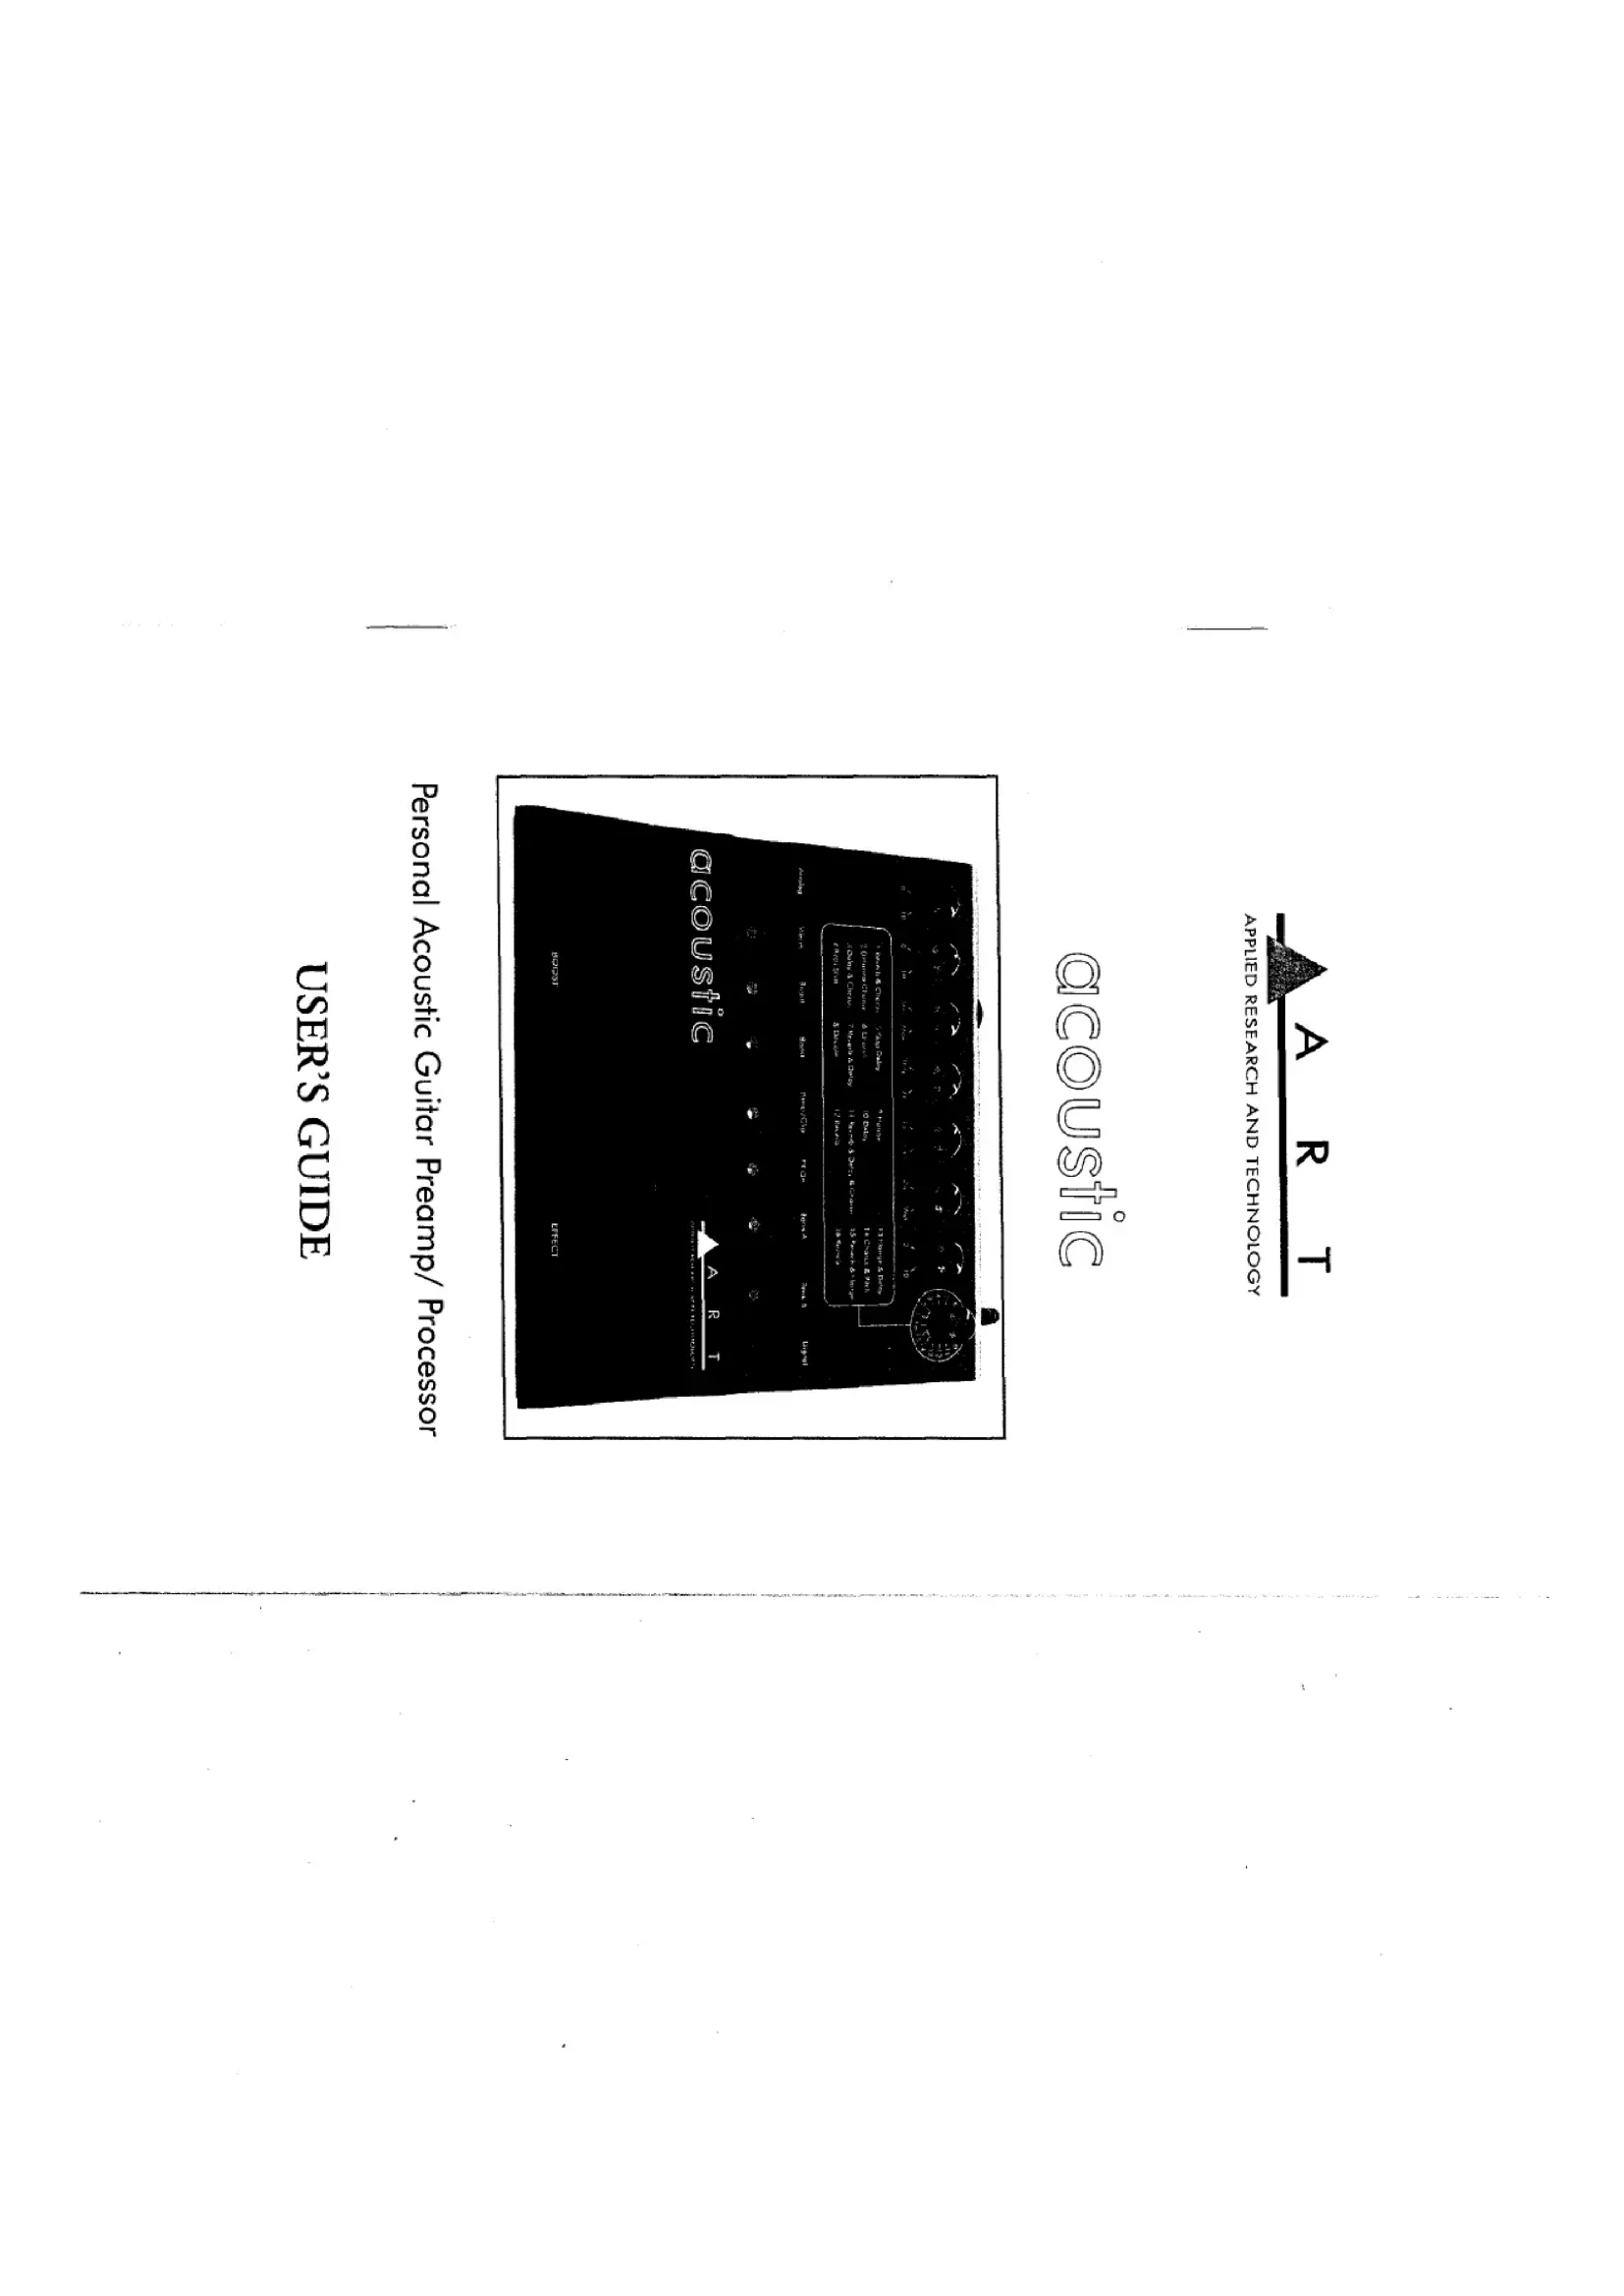
USERS GUIDE
Personal Acoustic Guitar Preamp/ Processor
text_image
ACQUSTIC CAR1 A B C D E F G H I J K L M N O P Q R S T U V W X Y Z A B C D E F G H I J K L M N O P Q R S T U V W X Y Zacoustic
AppLED RESEARCH AND TECHNOLOGY
A R T
| Introduction |
| Features |
| Quick Start Instructions |
| Quick Setup With An Amp |
| Quick Setup Into A Mixer |
| Installation |
| Powering The Acoustic |
| Knobs And Presses |
| Preamp Controls |
| Inpur |
| Accent |
| Parametric EO |
| Q Control |
| Frequency |
| Boost/Curt |
| Notching Hints |
| Oupurt |
| Digital Effects Controls |
| Preset Encoder |
| Blend Control |
| Changing Preset Banks |
| Precamp Character Types |
| Warm |
| Activator Pads |
| Lead Foot Warning |
| Lead Floor Warning |
| Playing Directly Into An Amp |
| Using The Acoustic Directly Into A Mixer |
| Using The Acoustic With A Power Amp & Cabinets |
| Warranty & Service Information |
| Customer Service |
| Acoustic Specifications |
3 4 5 6 7 8 9 10 11 12 13 14 15 16 17 18
* Adds about \$300 to the sound of your acoustic guitar * Clearly improves your relationship with sounds-people; * Designed and manufactured in the United States of America
* Accent control to bring out intricacies in playing * AC powered - no tongue-tingling-testing of batteries required; * All steel construction - The way it ought to be! * Looks as cool as it sounds
* Rcverb, Delay, Doubling, Flanger, Chorus, combination effects * Pitch shifting * Dual pitch shifting * Stereo outputs * Headphone output *
* Fully parametric EQ band for nothing or enhancing * Bright and warm global settings * 16 bit digital effects * 32 presets
* The only acoustic DI box you'll ever need! * Acoustic instrument preamp * Over 40dB of gain
Features
Thank you for purchasing the acoustic - and congratulations: You now own the coolest, hipped, and most versatile acoustic preamp- processors ever developed. Additionally, the Acoustic is one of the able. The Acoustic offers all of the features you need to bring out the best sound your acoustic guitar has to offer. Grab your guitar and get ready to hear the full potential of your acoustic guitar;
Introduction
* Note: The XLR and 1/4" outputs (and Headphones for that matter) can all be used at the same time! Use them all. * Note: The XLR and 1/4" outputs (and Headphones for that matter) * Note: The XLR and 1/4" outputs to two line inputs of your mixer. * Note: The XLR and Right Outputs to two line inputs of your mixer. * Note: The XLR and Right Outputs to two line inputs of your mixer. * Note: The XLR and Right Outputs to two line inputs of your mixer. * Note: The XLR and Right Outputs to two line inputs of your mixer. * Note: The XLR and Right Outputs to two line inputs of your mixer. * Note: The XLR and Right Outputs to two line intoput of your mixer. If you want to run in stereo, connect the Acoustics Left and Right Outputs to two line inputs of your mixer. * Note: The XLR and Right Outputs to two line inputs of your mixer. * Note: The XLR and Right Outputs to two line inputs of your mixer. * Note: The XLR and Right Outputs to two line inputs of your mixer. * Note: The XLR and Right Outputs to two line inputs of your mixer. * Note: The XLR and Right Outputs (and Headphones for that matter) can all be used at the same time! Use them all.
Straight into an amp: If your patching the Acoustic into a guitar (or other instrument) amplifier, use one cord between the instrument and the Acoustics Inrupt. Run a second cord from the Left Output to the amp's Inrupt. If the amp has stereo input capabilities (or if your using two amps), connect another cord between the Acoustics Right Output and the amp's second-channel Inrupt (or the second amps Inrupt).
Insert the supplied AC adapters plug into the input labeled 9VAC Input on the Acoustics back panel.
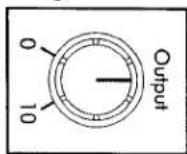
Turn the Output knock to its full counterlockwise position. Turn this know up only after all other setup steps are completed.
Quick Setup
You've unpacked your acoustic and you're in a hurry to get it up and running. You probably would rather play with it than read the manual (at least, right now). Fair enough. But check out the basics outlined here just to get your acoustic on line. It should take only a couple of minutes for you to read through, and then you'll be ready to fire up your acoustic. Refer to this section if you have any difficult-ty. And later, when you want to get into more of the details of your acoustic, check out the rest of the manual.
QUICK START INSTRUCTIONS
The Acoustic, while primarily designed to be used straight into a gui- tar amp, may be used in a variety of setsups including: straight into a power amplifier, P:A, or mixing console. Self-contrained in an all-steel enclosure, the Acoustic is designed for continuouss, professional use and can withstand the rigsors of the road and stage.
INSTALLATION Give your guitar a reel workout. Try all the presets, and don't hold back. Then, when you're ready, check out the rest of this manual for all the details on how to get the most out of your acoustic.
Select Warm or Bright EQ types with the switch to the left of the llu- minated liny. Select the second bank of presets with the switch to the right of the inlay. Apply a boost to your output signal (for solving - or just to be a rebel) with the left rubber activator pad and turn on and of the digital effects with the right rubber activator pad. For a com- place list of the present settings see pages 13 & 14.
Now turn up the Acoustics Output level and raise the gain level on your amp or mixer. You should be hearing the Acoustic! If not, check to turn it on, didn't you?).
Turn up the Input control on the Acoustic. Make sure that your guide acoustics. Aurts volume control is turned up and a signal is being sent to the
Plug the Acoustics' AC adapter into the wall socket (the Acoustic is now powered up). Now turn on your mixer and your monitor amplify.
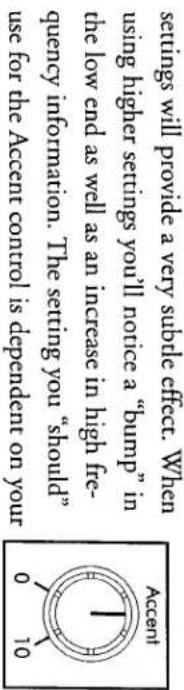
The Accent control is a unangle EQ circuit designed to complement the overall sound of your instrument while bringing out the interface. Cies in your playing. The range is from 0 (none) to 10 (max). Lower
Accent
The Input control adjusts the amount of gain into the preamp circuit. The range is from 0 (none) to 10 (Max). Adjust the Input control for a healthy level. If you experience a low output signal, this control may be set too low. Alternatively, if the Power/Clip LED lights red with the Output control set very low, this level is set too high. You'll get the hanging of setting this properly very quickly.
input
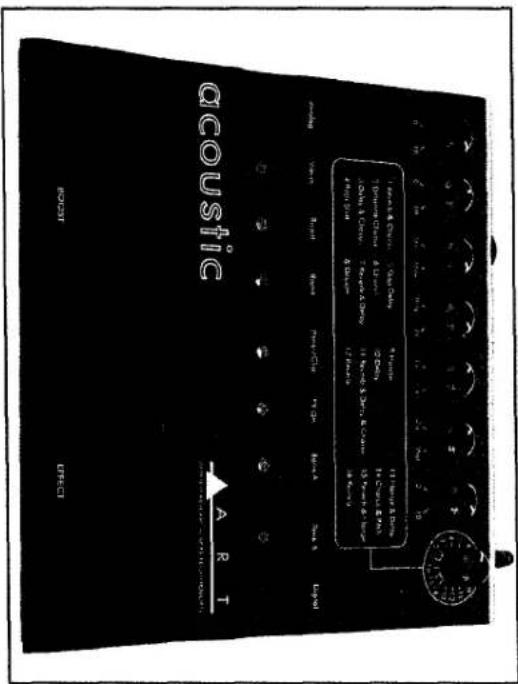
text_image
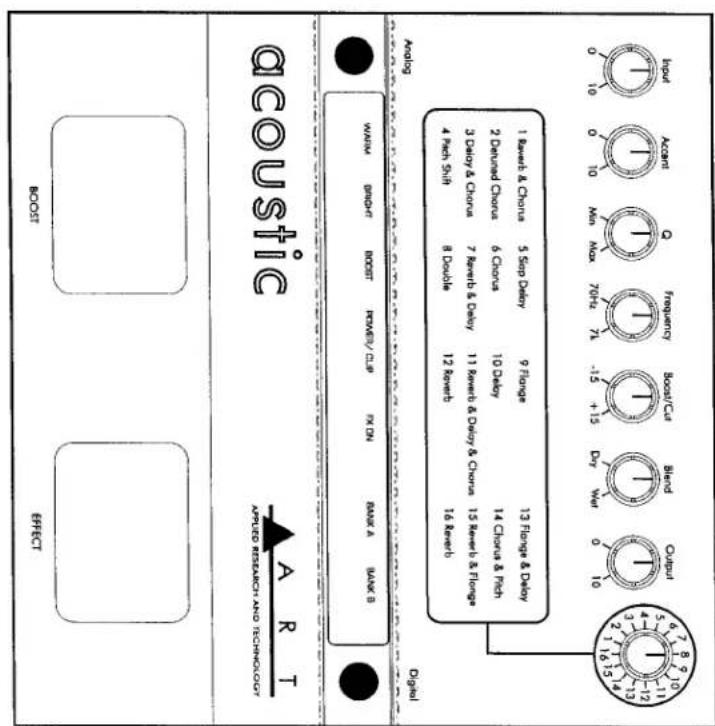
0 10 1 15 13 2 16 14 3 12 11 4 9 8 5 7 6 Output Blend 0 10 Dry Wali -15 +15 70Hz Max Frequency 0 10 Max 0 10 InputThe upper half of the acoustics front panel includes: the controls for the preamp circuitry, blend control, and the preset encoder knob. The effect combinations for the digital presets are screened below these controls for easy identification.
KNOWS AND PRESENTS
Never operate the Acoustic or AC adapter in the rain or in wet location. If the AC adapter cord is ever cut or damaged, discontinue using its and replace the adapter with a new one. To prolong its life, unplung the adapter when the Acoustic is not in use. Refer to the label on the adapter for proper operating voltages.
The Acoustic is powered by an external AC adapter. Always make sure that its output jack is securely plugged into the rear of the acoustic and that the adapter is held firmly in an electrical outlet.
Powering The Acoustic
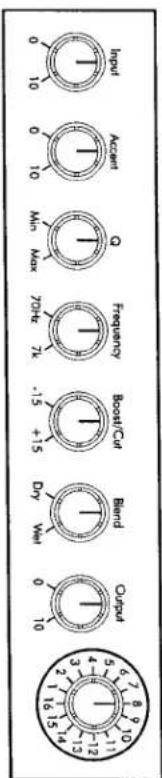
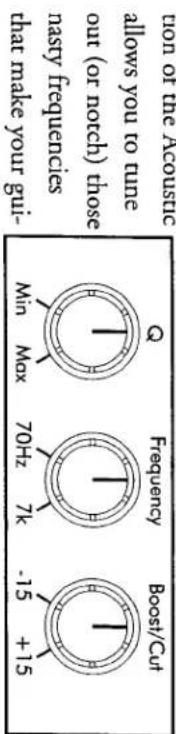
The Q control is used to "tune in" the frequencies you want boosted or cut. Picture a bell. The frequency selected by the Frequency control knob is positioned at the middle of the bell. At the "min" end
Q Control
“big” sound we all dreamt of. As mentioned earlier... the acoustic can make that \199 special sound at least \299 better! “big” sound we all dreamt of. As mentioned earlier... the acoustic can make that \199 special sound at least \299 better!
text_image
Boost/Cut Frequency Min Max 70Hz 7K -15 +15 that make your gui- always you to tune out (or notch) those nasy frequencies that make your gui- on of the acousticThe acoustic is equipped with a fully adjustable EQ band. The Q, Frequency and Boost/Cut controls are powerful tools in shaping your sounds. Since most acoustic guitars already sound like acoustic guitar, there really since any need for heavy EQ'ing. For those who have nice acoustic guitar (basses, violins, cellos, electric tribas, etc.) the EQ sec-
Parametic EQ Band
stage, or playing, volume. At lower volumes, a higher setting will work well. At higher volumes, a low to mid setting will work well. Experiment with different settings and choose the one that works best for you.
text_image
Accent 0 10 settings will provide a very subtle effect. When senses will provide a very subtle effect. When the low end as well as an increase in high free- quency information. The setting you "should" use for the Accent control is dependent on yourNotching (or feedback rhanging) hints “ringing out” that sounds-people do with monitors. This involves find- ing and cutting the frequency. Once you find the feedback, you’ll work with both the frequency and Q controls to “tune” it out. While string in your normal playing position (in front of your amp or monitor speaker) turn up the output level and Boost/Cut control of the boost/Cut control slightly until the feedback subsides. Turn down the Q control slightly. Adjust the Frequency control to “tune in” the the Q control slightly. Boost/Cut control slightly until the feedback subsides. Turn down the boost/Cut control slightly. Adjust the Frequency control to “max” and sweep the frequency conrol until that ragins feedback rears its ugly head. Turn down the
The Boost/Cut control adjusts the amount of boost or cut is applied to the selected EQ settings. Its range is + or - 15dB. Boost/Cut Control
The Frequency control adjusts the frequency range you want to boost or cut. Its range is from 70Hz to 7kHz.
Frequency Control
of the control, the bell is very narrow. At the "max" end of the control the bell is very wide. The Q control selects how the frequencies adja- cent to the selected frequency are selected. Or, in human terms, The "min" setting has a "minimum" effect on adjacent frequencies and the "max" setting has a "maximum" effect on those frequencies. For notchining a problem frequency (feedback) without changing the overall sound, use a setting towards the "min" end of the control. If you are using the EQ to change the overall sound of the instrument (getting rid of that pesky "boxy" sound) use settings closer to the "max" setting Explaining this control is much harder than it is to bear how the control works. After some playing around you'll get the hang of it.
The Press encoder is continuously variable, 16 Position knob that is used to select presses. The related effects combinations are screen printed below the row of controls for easy reference. Select the effects combination you wish to use and set the
The Acoustics high quality digital effects were developed to be impressively musical, plus they are perfect compliments to the natural sounds of acoustic instruments. Note that you can use acoustic with or without digital effects. Preset Encoder
Now that you're sounding like an "Unplugged" Curr, don't forget the acoustic offers a whole other section full of digital wizz-bang goodies that that we haven't even covered yet. Feel free to put down the manual and really get into the fact that you do sound great. When your calluses have calluses, cramps have cramps, etc. - pick the manual back up and read on.
The Output control is used to set the output level of the Acoustic. The Output control is located before the digital effects section (it drives the digital circuitry). Set the Input control so that the Power/Clip LED blockers red occasionally. If you see the Power/Clip (red) LED on constantly, turn down the Input control (-you're overdriving the digital section). Turn up the Output control for a good level to your amplification device.
Output
Feedback again. Repeat this process until the Q control is towards the "min" range of the control. When satisfied with your results, return the output level of the Acoustic to your normal playing level.
Similar to the Warm setting, the Bright setting does what its name Improves: makes your guitar „bright” sounding. Use this setting if you
广力云
terbly guitar.
sitting does what its name impulses: makes your guitar "warm", or full sounding. Use this setting if you have a full sounding guitar and want to keep it that way. The warm setting will retain this characteristic. On the other hand, use the warm setting to "warm-up" a brittle (or
The warm
Warm

text_image
Warm Bright Boost Power/VThe Acoustic provides you with two prepamp character types. These variations are available to either accent or alter the overall tonality of your instrument. Once type is always active. The switch to the left of the Warm and Bright indicator LEDs targets between the two options.
PREAMP CHARACTER TYPES
32 Presents are available in the Acoustic. Variations of the 16 listed efficients combinations are available in Bank 2. To change Presset Banks simply press the switch located to the right of the illuminated link. The selected bank is illuminated - Bank A or Bank B.
Changting Banks
The Blend control adjusts how much of the digital effects are added to your guitar sound. The Blend control ranges from Dry (all guitar) to Wer (dripping wet).
Blend Control
14 for a complete listing of presets and their values. blnd control for the proper amount of effected signals. See pages 13 &
(1) 2017年 ,公司及子公司 ,2018年 ,公司及子公司
ACTIVATOR PADS
Two rubber Activator pads are provided. The one labeled "Boost" provides a 6dB boost to the preamble output when depressed. This is useful when Soloring or when a lower output level is needed. The activator pad labeled "Effect" turns on and off the digital effect sec. Ion. Status lights in the illuminated alloy keep you informed as to the presence of either the boost or digital effects "on" setings.
Iron. Status lights in the illuminated inquiry keep you informed as to the presence of either the boost or digital effects "on" settings.
provides a 6db boost to the preamp output when depressed. This is useful when solving or when a lower output level is needed. The activator pad labeled "Effect" turns on and off the digital effect sec-
Two rubber Activator pads are provided. The one labeled "Boost"
ACTIVATOR PADS
have a "boomy" sounding guitar and want to add "bite", use the Bright setting.
LEAD FOOT WARNING!
Even though the acoustic is built like a tank and the rubber activator pads were designed to be pressed with your feet... The spring chalear ter and effect's bank select switches were designed to be pressed with a finger. Because of its location, you'll be tempred to do some fancy footwork and toggle these switches with your feet. We strongly recorn- mend being lighter-footed; A tap is all it takes! Practice this maneuver with caution (which can be difficult with high- heeled, flame-throwing, pointy-toed stage wear).
DIGITAL EFFECTS PRESENT LIST
The following list describes all of the 32 presets in the Acoustics digit- tal effects section. They are arranged in banks (A and B). Here's a quick explanation of some of the abbreviations:
Bunqnop
mes playing in unison. Short for "milliseconds", or thousands of a
second.
| Preset | Description | Room reverb & chlorus | 2 | Detuned Chlorus | 3 | 4 | 5 | 6 | 7 | 8 | 9 | 10 | 11 | 12 | 13 | 14 | 15 | 16 | Reverb | 1.25 room reverb | Reverb | 1.25 room reverb |
| Reverb & Flange | ||||||||||||||||||||||
text_image
AQUOUSTIC Ampere Reservoir AND TECHNOLOGY OFFICE WAN# SHORTH BOOST REMER/ DLP KX DN MAX A BLAK S Audio 4 rad/h Shift 8 Double 12 channels 3 decay # Chrons 7 dBvd b Delay 11 dBvd b Delay & Chrons 15 dBvd b Flanges 4 rad/h Shift 8 Double 12 channels 2 Decuwd Chrons 6 Chrons 10 dBvd 14 Closus 8 Rad 3 decay # Chrons 7 dBvd b Delay & Chrons 15 dBvd b Flanges Output 1 Select A Chrons 5 Step Delay 9 Range 13 Frontage & Delay 2 Decuwd Chrons 6 Chrons 10 dBvd 14 Closus 8 RadShort for “recognition” This means sending part of created. Short for “recognition” This means sending part of the output signal back through an effect. Reorganizing a delayed signal produces echoes. In hanging and chourising, regeneration of certain frequencies (highs, for instance) can create a thicker, more dramatic effect. Short for “second” (equal to 1,000 milliseconds).
Bank 1
regen pitch
sc


| Preset | Description | 1 | 2 | 3 | 4 | 5 | 6 | 7 | 8 | 9 | 10 | 11 | 12 | 13 | 14 | 15 | 16 | 17 | 18 | 19 | 20 | 21 | 22 | 23 | 24 | 25 | 26 | 27 | 28 | 29 | 30 | 31 | 32 | 33 | 34 | 35 | 36 | 37 | 38 | 39 | 40 | 41 | 42 | 43 | 44 | 45 | 46 | 47 | 48 | 49 | 50 | 51 | 52 | 53 | 54 | 55 | 56 | 57 | 58 | 59 | 60 | 61 | 62 | 63 | 64 | 65 | 66 | 67 | 68 | 69 | 70 | 71 | 72 | 73 | 74 | 75 | 76 | 77 | 78 | 79 | 80 | 81 | 82 | 83 | 84 | 85 | 86 | 87 | 88 | 89 | 90 | 91 | 92 | 93 | 94 | 95 | 96 | 97 | 98 | 99 | 100 | 101 | 102 | 103 | 104 | 105 | 106 | 107 | 108 | 109 | 110 | 111 | 112 | 113 | 114 | 115 | 116 | 117 | 118 | 119 | 120 | 121 | 122 | 123 | 124 | 125 | 126 | 127 | 128 | 129 | 130 | 131 | 132 | 133 | 134 | 135 | 136 | 137 | 138 | 139 | 140 | 141 | 142 | 143 | 144 | 145 | 146 | 147 | 148 | 149 | 150 | 151 | 152 | 153 | 154 | 155 | 156 | 157 | 158 | 159 | 160 | 161 | 162 | 163 | 164 | 165 | 166 | 167 | 168 | 169 | 170 | 171 | 172 | 173 | 174 | 175 | 176 | 177 | 178 | 179 | 180 | 181 | 182 | 183 | 184 | 185 | 186 | 187 | 188 | 189 | 190 | 191 | 192 | 193 | 194 | 195 | 196 | 197 | 198 | 199 | 200 | 201 | 202 | 203 | 204 | 205 | 206 | 207 | 208 | 209 | 210 | 211 | 212 | 213 | 214 | 215 | 216 | 217 | 218 | 219 | 220 | 221 | 222 | 223 | 224 | 225 | 226 | 227 | 228 | 229 | 230 | 231 | 232 | 233 | 234 | 235 | 236 | 237 | 238 | 239 | 240 | 241 | 242 | 243 | 244 | 245 | 246 | 247 | 248 | 249 | 250 | 251 | 252 | 253 | 254 | 255 | 256 | 257 | 258 | 259 | 260 | 261 | 262 | 263 | 264 | 265 | 266 | 267 | 268 | 269 | 270 | 271 | 272 | 273 | 274 | 275 | 276 | 277 | 278 | 279 | 280 | 281 | 282 | 283 | 284 | 285 | 286 | 287 | 288 | 289 | 290 | 291 | 292 | 293 | 294 | 295 | 296 | 297 | 298 | 299 | 300 | 301 | 302 | 303 | 304 | 305 | 306 | 307 | 308 | 309 | 310 | 311 | 312 | 313 | 314 | 315 | 316 | 317 | 318 | 319 | 320 | 321 | 322 | 323 | 324 | 325 | 326 | 327 | 328 | 329 | 330 | 331 | 332 | 333 | 334 | 335 | 336 | 337 | 338 | 339 | 340 | 341 | 342 | 343 | 344 | 345 | 346 | 347 | 348 | 349 | 350 | 351 | 352 | 353 | 354 | 355 | 356 | 357 | 358 | 359 | 360 | 361 | 362 | 363 | 364 | 365 | 366 | 367 | 368 | 369 | 370 | 371 | 372 | 373 | 374 | 375 | 376 | 377 | 378 | 379 | 380 | 381 | 382 | 383 | 384 | 385 | 386 | 387 | 388 | 389 | 390 | 391 | 392 | 393 | 394 | 395 | 396 | 397 | 398 | 399 | 400 | 401 | 402 | 403 | 404 | 405 | 406 | 407 | 408 | 409 | 410 | 411 | 412 | 413 | 414 | 415 | 416 | 417 | 418 | 419 | 420 | 421 | 422 | 423 | 424 | 425 | 426 | 427 | 428 | 429 | 430 | 431 | 432 | 433 | 434 | 435 | 436 | 437 | 438 | 439 | 440 | 441 | 442 | 443 | 444 | 445 | 446 | 447 | 448 | 449 | 450 | 451 | 452 | 453 | 454 | 455 | 456 | 457 | 458 | 459 | 460 | 461 | 462 | 463 | 464 | 465 | 466 | 467 | 468 | 469 | 470 | 471 | 472 | 473 | 474 | 475 | 476 | 477 | 478 | 479 | 480 | 481 | 482 | 483 | 484 | 485 | 486 | 487 | 488 | 489 | 490 | 491 | 492 | 493 | 494 | 495 | 496 | 497 | 498 | 499 | 500 | 501 | 502 | 503 | 504 | 505 | 506 | 507 | 508 | 509 | 510 | 511 | 512 | 513 | 514 | 515 | 516 | 517 | 518 | 519 | 520 | 521 | 522 | 523 | 524 | 525 | 526 | 527 | 528 | 529 | 530 | 531 | 532 | 533 | 534 | 535 | 536 | 537 | 538 | 539 | 540 | 541 | 542 | 543 | 544 | 545 | 546 | 547 | 548 | 549 | 550 | 551 | 552 | 553 | 554 | 555 | 556 | 557 | 558 | 559 | 560 | 561 | 562 | 563 | 564 | 565 | 566 | 567 | 568 | 569 | 570 | 571 | 572 | 573 | 574 | 575 | 576 | 577 | 578 | 579 | 580 | 581 | 582 | 583 | 584 | 585 | 586 | 587 | 588 | 589 | 590 | 591 | 592 | 593 | 594 | 595 | 596 | 597 | 598 | 599 | 600 | 601 | 602 | 603 | 604 | 605 | 606 | 607 | 608 | 609 | 610 | 611 | 612 | 613 | 614 | 615 | 616 | 617 | 618 | 619 | 620 | 621 | 622 | 623 | 624 | 625 | 626 | 627 | 628 | 629 | 630 | 631 | 632 | 633 | 634 | 635 | 636 | 637 | 638 | 639 | 640 | 641 | 642 | 643 | 644 | 645 | 646 | 647 | 648 | 649 | 650 | 651 | 652 | 653 | 654 | 655 | 656 | 657 | 658 | 659 | 660 | 661 | 662 | 663 | 664 | 665 | 666 | 667 | 668 | 669 | 670 | 671 | 672 | 673 | 674 | 675 | 676 | 677 | 678 | 679 | 680 | 681 | 682 | 683 | 684 | 685 | 686 | 687 | 688 | 689 | 690 | 691 | 692 | 693 | 694 | 695 | 696 | 697 | 698 | 699 | 700 | 701 | 702 | 703 | 704 | 705 | 706 | 707 | 708 | 709 | 710 | 711 | 712 | 713 | 714 | 715 | 716 | 717 | 718 | 719 | 720 | 721 | 722 | 723 | 724 | 725 | 726 | 727 | 728 | 729 | 730 | 731 | 732 | 733 | 734 | 735 | 736 | 737 | 738 | 739 | 740 | 741 | 742 | 743 | 744 | 745 | 746 | 747 | 748 | 749 | 750 | 751 | 752 | 753 | 754 | 755 | 756 | 757 | 758 | 759 | 760 | 761 | 762 | 763 | 764 | 765 | 766 | 767 | 768 | 769 | 770 | 771 | 772 | 773 | 774 | 775 | 776 | 777 | 778 | 779 | 780 | 781 | 782 | 783 | 784 | 785 | 786 | 787 | 788 | 789 | 790 | 791 | 792 | 793 | 794 | 795 | 796 | 797 | 798 | 799 | 800 | 801 | 802 | 803 | 804 | 805 | 806 | 807 | 808 | 809 | 810 | 811 | 812 | 813 | 814 | 815 | 816 | 817 | 818 | 819 | 820 | 821 | 822 | 823 | 824 | 825 | 826 | 827 | 828 | 829 | 830 | 831 | 832 | 833 | 834 | 835 | 836 | 837 | 838 | 839 | 840 | 841 | 842 | 843 | 844 | 845 | 846 | 847 | 848 | 849 | 850 | 851 | 852 | 853 | 854 | 855 | 856 | 857 | 858 | 859 | 860 | 861 | 862 | 863 | 864 | 865 | 866 | 867 | 868 | 869 | 870 | 871 | 872 | 873 | 874 | 875 | 876 | 877 | 878 | 879 | 880 | 881 | 882 | 883 | 884 | 885 | 886 | 887 | 888 | 889 | 890 | 891 | 892 | 893 | 894 | 895 | 896 | 897 | 898 | 899 | 900 | 901 | 902 | 903 | 904 | 905 | 906 | 907 | 908 | 909 | 910 | 911 | 912 | 913 | 914 | 915 | 916 | 917 | 918 | 919 | 920 | 921 | 922 | 923 | 924 | 925 | 926 | 927 | 928 | 929 | 930 | 931 | 932 | 933 | 934 | 935 | 936 | 937 | 938 | 939 | 940 | 941 | 942 | 943 | 944 | 945 | 946 | 947 | 948 | 949 | 950 | 951 | 952 | 953 | 954 | 955 | 956 | 957 | 958 | 959 | 960 | 961 | 962 | 963 | 964 | 965 | 966 | 967 | 968 | 969 | 970 | 971 | 972 | 973 | 974 | 975 | 976 | 977 | 978 | 979 | 980 | 981 | 982 | 983 | 984 | 985 | 986 | 987 | 988 | 989 | 990 | 991 | 992 | 993 | 994 | 995 | 996 | 997 | 998 | 999 | 1000 |
Bank 2
PLUGING DIRECTLY INTO AN AMP
Plug your guitar into the Inrupt Jack of the Acoustic. Plug the Left output Jack into your amplifiers instrument inrupt (use the Right output as well if your amp has stereo inputs or if you are using two amps). When plugging a guitar into the Acoustic, make sure that there is sufficient signal level coming from the instrument (you've turned up the volume port). Turn up the Acoustics Inrupt and Output controls before turning up the amplifiers volume control.
USING THE ACoustic DIRECTLY INTO A MIXER Connect the XLR DI/ Bal. output of the Acoustic to a line input channel of your mixer. Adjust the Input and Output levels of the acoustic and then the Input level of the mixer. Once you see sigma present at the mixers' input, turn up your mixers' output levels (or monitor amp). The Acoustics Left and Right 1/4" outputs may be used to go directly to a mixer as well.
using AN ACoustic WITH A POWER AMP & CABINETS Plug your instrument into the Acoustic. Connect the Left and Right output jacks into the Left and Right input jacks on the power amp. Connect the speaker outputs of the amp to two cabinets (or a stereo cabinet). Be sure to power on the Acoustic before turning on the power amp.
WARRANTY & SERVICE INFORMATION
Warranty and Service for this unit will be provided by Applied
Research and Technology, Inc. in accordance with the following
warranty statement.
Applied Research and Technology, Inc. (ART) warrants to the original
purchaser that this product and the components thereof will be free
from defects in workmanship and materials for a period of three years
from the date of purchase. Applied Research and Technology, Inc. will,
without charge, repair or replace, at its option, defective product or
component parts upon prepaid delivery to the factory service depart-
ment or authorized service center, accompanied by proof of purchase
date in the form of a valid sales receipt. EXCLUSIONS: This warranty
does not apply in the event of misuse or abuse of the product or as a
result of unauthorized alterations or repairs. This warranty is void if
the serial number is altered, defaced, or removed.
ART reserves the right to make changes in design or make additions to
or improvements upon this product without any obligation to install
the same on products previously manufactured.
ART shall not be liable for any consequential damages, including with-
out limitation damages resulting from loss of use. Some states do not
allow limitations of incidental or consequential damages, so the above
limitation or exclusion may not apply to you. This warranty gives
specific rights and you may also have other rights which vary from
state to state.
For units purchased outside the United States, service will be provided
by an authorized distributor of Applied Research and Technology, Inc.
For units purchased outside the United States, service will be provided by an authorized distributor of Applied Research and Technology, Inc.
The following information is provided in the unlikely event that your unit requires service.
1) Be sure that the unit is the cause of the problem. Check to make
and the cables themselves are in working condition.
2) If you find the unit to be at fault, write down a complete descrip-
tion of the problem, including how and when the problem occurs.
Please write down a description of your complete setup before calling
Customer Service.
3) Call the factory for a Return Authorization (RA) number.
4) Pack the unit in its original carton or a reasonable substitute. The
packing box is not recommended for a shipping carton. Put the pack-
aged unit in another box for shipping. Print the RA number clearly on
the outside of the shipping box. Print your return shipping address on
the outside of the box.
5) Include with your unit: a return shipping address (we cannot ship
to a P.O. Box), a copy of your purchase receipt, a daytime phone num-
bel, and a description of the problem.
6) Ship only your unit and its power supply (keep your manual!) to:
APPLIED RESEARCH AND TECHNOLOGY, INC.
215 TREMONT STREET
ROCHESTER, NEW YORK 14608
ATTN: REPAIR DEPARTMENT
RA#
7) Contact our Customer Service department at (716) 436-2720 for
your Return Authorization number or questions regarding technical
assistance or repairs. Customer Service hours are 8:30 AM to 5:00 PM
Eastern Time, Monday through Friday.
ACOUSTIC SPECIFICATIONS
(716) 436-2720
(716) 436-3942 (fax)
Applied Research and Technology, Inc.
215 Tremont St.
Rochester, NY 14608 USA
Designed and manufactured in the United States of America.
A R T retains a policy of constant product improvement. A R T reserves the right to make changes in design or make additions to or improvements upon this product without obligation to install the same on products previously manufactured. Therefore, specifications are subject to change without notice.
Maximum input level
Maximum output level
Residual output noise
Input dynamic range
Power requirements
Digital presets
Input impedance
Output impedance
Dimensions
Weight
Connections
150ohm (1/4") 300 o
47 ohm (Headphone)
+4dBu
+11dBu
-81dB @ +5dBu 86dB 9VAC @ 400mA
9,0" D x 8.25" W x 2.0" H 3.0 lbs 1/4" unbal. input. Stereo 1/4" unbal. outputs & bal. XLR input (pin 2 hot). 32 1 meg ohm
Dimensions Weight Connections
9.0" D x 8.25" W x 2.0" H 3.0 lbs 1/4" unbal. input. Stereo 1/4"
Digital presets Input impedance Output impedance Maximum input level Maximum output level Residual output noise Input dynamic range Power requirements
32 1 meg ohm 150ohm (1/4") 300 ohm (XLR) 47 ohm (Headphone) +4dBu +11dBu -81dB @ +5dBu 86dB 9VAC @ 400mA