MODE D'EMPLOI SIWATHERM C6 SIEMENS
Instruction Manual and Installation Instructions
SIWATHERM
EXTRAKLASSE
TXL 720K
Table of Contents
Operating Instructions
Your new dryer 4
Notes on disposal 5
Disposing of packaging 5
Disposing of the old dryer 5
Safety information 6
Using your dryer correctly 6
Before using the dryer 6
Drying your laundry 7
End of programme 7
Looking after your dryer 7
Notes on environmental protection/economical drying 8
Environmentally- friendly and economical drying 8
Description of the dryer 9
Operation and special features 9
Summary of instructions 10
Appliance design 11
Control panel 12
Laundry information 13
Fabric symbols 13
Drying tips 13
Preparing to use your dryer 14
Selecting a programme 15
Selection 15
Programme sequence 15
Standard programmes 16
Timed programmes 17
Special programmes 17
Additional functions 18
Low heat button 18
Anti-crease button 18
Programmable functions 19
End of the programme 23
Anticrease function 23
Switching off 23
Woollens basket 24
Cleaning and care 29
Cleaning the dryer 29
Frost protection / preparation for transport . . . 29
Cleaning the fluff filter 30
Empty the water container 31
Cleaning the condenser unit 32
Changing the pollen filter 33
Changing the bulb for the interior light 34
What to do if 35
After-sales service 38
Technical data 39
Installation, connection and transportation 40
Safety information 40
Installing the dryer 40
Electrical connection 41
Scope of delivery 41
Accessories 41
Accessories and special equipment 42
Connecting kit for condensation drain 42
Washer-dryer stack connection set 43
With removable worktop 43
Cover for under-counter or built-in installation 43
Reversing the door catch 44
Converting the installed load 48
Installation Instructions
Your new dryer
With the purchase of your new dryer, you have chosen a modern, high-quality domestic appliance.
A distinctive feature of your dryer is its low energy consumption.
Every dryer which leaves our factory is carefully check- ked to ensure that it functions correctly and is in perfect condition. Our customer service will be happy to help you should you have any questions - especially regarding installation.
Further information and a selection of our products can be found on our website:
http://www.siemensappliances.co.uk
Read this instruction manual and all additional information provided with the dryer and follow the instructions given.
Keep all the documents in a safe place for future reference, or to pass on to the next owner.
Notes on disposal
Disposing of packaging
Danger of suffocation
There is a danger of suffocation from the cardboard box and plastic film.
Do not allow children to play with the packaging.
All the packaging materials are environmentally friendly and recyclable. Please dispose of the packaging in an environmentally responsible manner.
Your local dealer or local authority will be able to advise you about the disposal methods which are currently available.
Disposing of the old dryer
Danger
The old dryer is dangerous due to the electrical voltage and the risk of suffocation.
Your old dryer:
- Pull off the mains plug.
- Cut off the mains cable and discard along with the plug.
- Break the door lock. This prevents children from locking themselves in the dryer.
Environmentally-friendly disposal conserves valuable raw materials.
Your local dealer or local authority will be able to advise you about the disposal methods which are currently available.
Using your dryer correctly
- Only for domestic use.
- Only for drying fabrics washed in water.
- Do not leave children unsupervised near the dryer.
Risk of explosion/fire
Solvent danger.
Do not use the dryer if:
- the laundry has been treated with a solvent or has been colour-treated (e.g. stain remover, petroleum ether).
Dust danger
Do not use the dryer if:
- the laundry contains dust, e.g. coal dust or flour
- the laundry contains foam/rubber
- the laundry contains traces of hairspray, nail varnish remover or similar substances.
Before using the dryer
Install the dryer in accordance with the installation instructions (see page 40).
- Do not connect the dryer if it has visible signs of damage. If in doubt, contact your local dealer.
Drying your laundry
- Do not leave children unsupervised near the dryer.
- Keep pets away from the dryer.
- Remove all objects from pockets, especially lighters - risk of explosion.
End of programme
- Switch off the dryer when the programme has ended.
Looking after your dryer
- Do not climb onto the dryer.
- Do not lean or sit on the door - the dryer may tip over.
- Do not use detergent boosters containing solvents or dirt and stain removers near the dryer. These substances may damage the dryer.
- Do not lift the dryer by any of the projecting parts - they may break off - risk of injury.
- Empty the dryer completely before transporting it or placing it in storage (see page 29).
i Do not install the dryer in a room where there is a risk of freezing.
Notes on environmental protection/economical drying
Environmentally-friendly and economical drying
- Spin the laundry thoroughly before drying. Spin the laundry thoroughly in the washing machine before drying. The higher the spin speed, the shorter the drying time and the lower the energy consumption.
You should also spin easy-care laundry.
- Use optimum capacities
- Use the maximum recommended capacities. Do not exceed the capacities
(see the table of programmes from page 16 onwards).
- Ensure good room ventilation Open a window or door while drying laundry.
- Clean the filter. Clean the filter after each drying cycle (see page 30).
- Keep the condenser unit clean (see page 32).
- Do not obstruct the cooling air supply
- Do not block or seal the ventilation grille.
Description of the dryer
Operation and special features
The dryer works on the principle of condensation. The condensation produced during the drying cycle is collected in a container. The container should be emptied after each drying cycle.

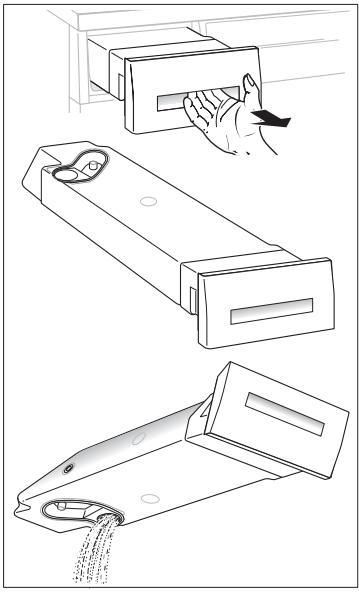
Simple to use
The water container does not have a lock on it. Simply turn the container upside down to empty it. A pipe inserted in the outlet prevents water from overflowing.
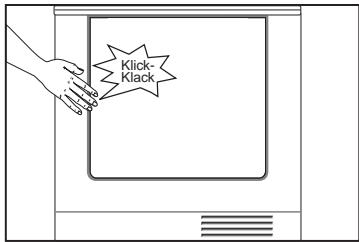
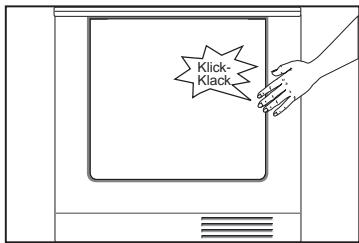
The door is easily opened and closed by pressing on the press-release mechanism.
The door may also be opened during the drying cycle.
Reversible door catch
The door catch can be moved from the right-hand side to the left-hand side of the dryer (see page 44).
Summary of instructions
Before drying
- Open the door.
- Place the laundry in the drum.
- Close the door.
- Select a programme using the programme selector (see the table of programmes from page 16 onwards).
- Set additional functions if required (see page 18).
- Press the Start/Stop button.
Inserting/removing laundry
- Open the door. The drying cycle is halted.
- Add or remove laundry.
- Close the door.
- Select another programme if necessary using the programme selector (see the table of programmes from page 16 onwards).
- Set additional functions if required (see page 18).
- Press the Start/Stop button.
After drying
- Open the door.
- Remove the laundry.
- Turn the programme selector to Off.
- Clean the filter (see page 30).
- Empty the water container (see page 31).
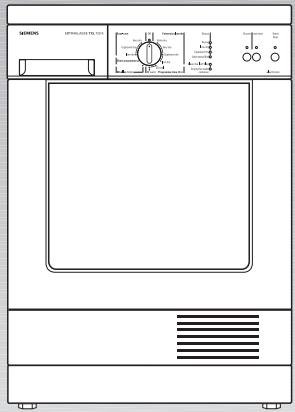
Appliance design
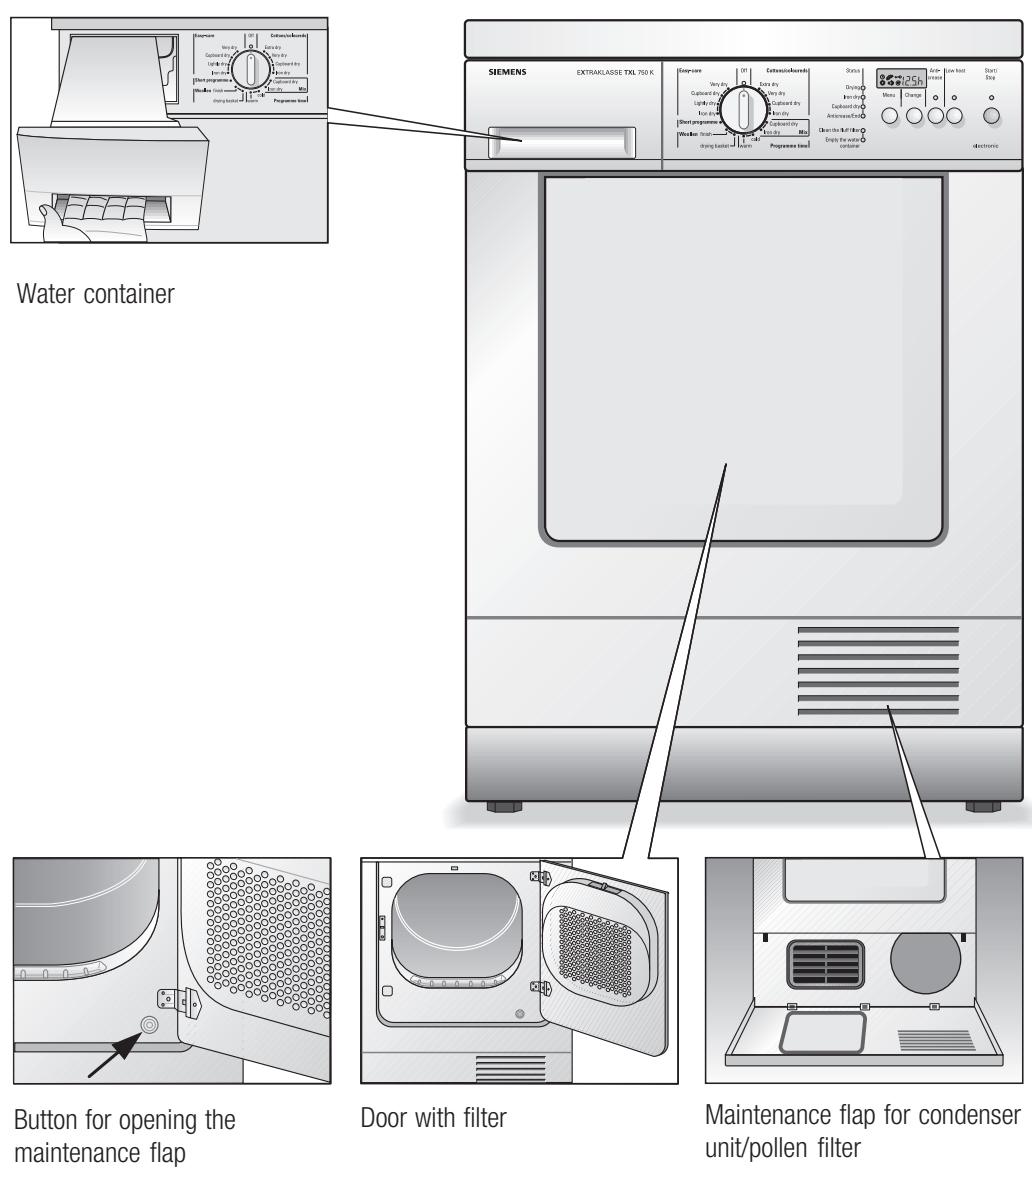
Control panel
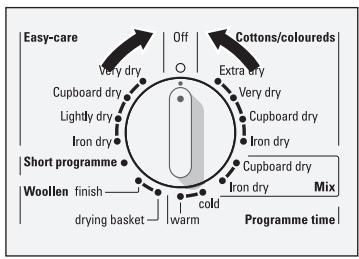
Programme selectorFor switching the dryon and off and selectinthe programme. Can bturned in both direc tion
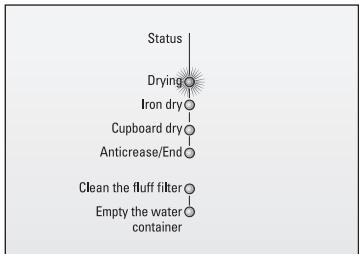
Indicator lamps (LEDs) for the programme status
Indicator panel Displays the selected settings or settings to be changed and the remaining time
Indicator lamps (LEDs) for buttons which have been pressed
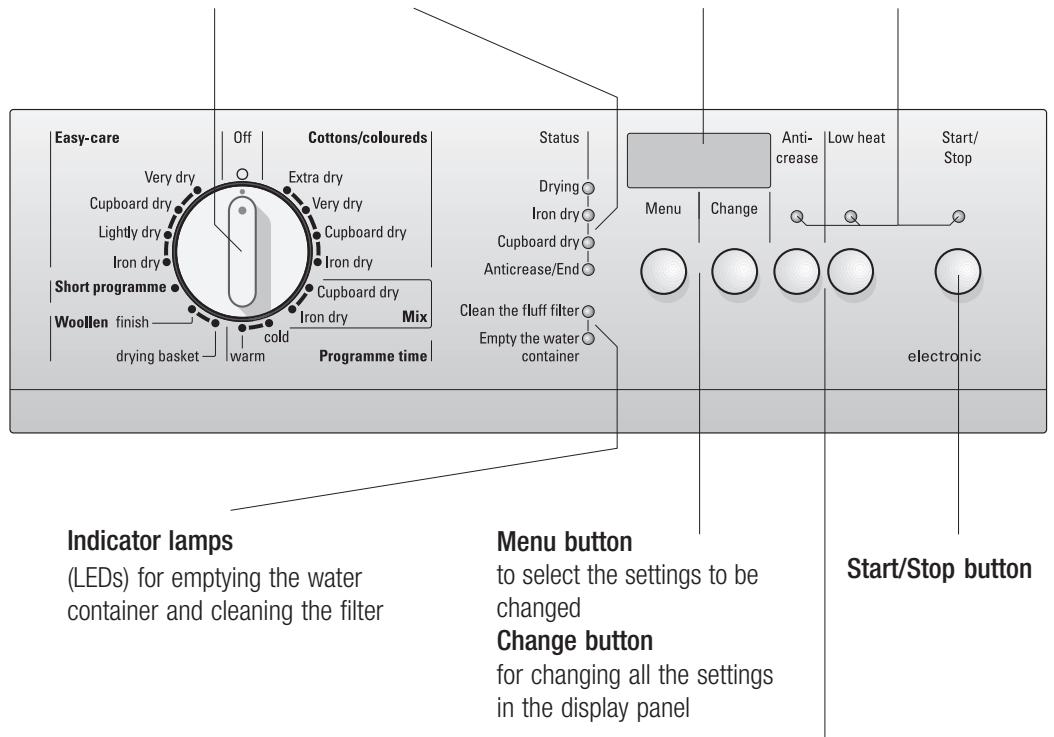
Additional functions buttons
(if required in addition
to the programme)
Low heat
for gentle drying
Anti-crease
for crease-free laundry
Fabric symbols
Check the following fabric symbols:
~一~ drying at normal temperature.
= drying at a lower temperature: Press the Low heat button too or select (super delicate drying).
空 = do not tumble - dry.
Do not tumble-dry the following fabrics:
- Airtight fabrics (e.g. rubber-coated fabrics).
- Delicate materials (silk, curtains made from synthetic material) - they may crease.
- Dripping-wet laundry - high energy consumption.
- Wool or fabrics containing wool, unless you use the woollens basket (see page 24).
- Observe the manufacturer's instructions.
Drying tips
Important for all drying cycles:
- To obtain a uniform drying result, sort the laundry by fabric type and drying programme.
- Fasten zips, hooks and eyes. Tie loose belts, apron strings etc, together.
- Do not over-dry easy-care laundry: This may result in creasing. Allow laundry to finish drying in the air.
- Do not iron laundry immediately after drying. Leave laundry folded up for a short while. This helps the residual moisture to distribute evenly.
- Knitted fabrics (e.g. T-shirts, jackets) often shrink slightly the first time they are tumble-dried. Do not use the "Very dry"/"Extra dry" programmes.
Preparing to use your dryer
Please read through this instruction manual carefully before using the dryer for the first time.
- Open the door.
- Place the laundry into the empty drum.
Ensure that the drum contains only laundry.
- Close the door.
- Select a programme using the programme selector.
- Set additional functions if required (see page 18).
- Press the Start/Stop button.
Remaining time
Once the programme has started, the expected remaining time is displayed. This should be regarded as an estimate.
The accuracy of the display increases if you enter the washing machine's spin speed (see page 22).
Selecting a timed programme:
- Set the programme selector to "cold", "warm" or "drying basket".
- Set the time by pressing the Change button until the time you require appears in the display.
The display returns to "00" after "2:30".
- Press the Start/Stop button.
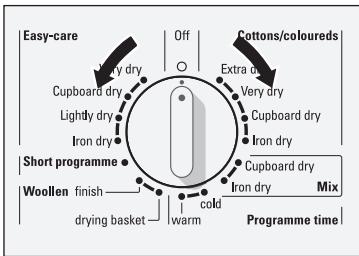
Selecting a programme
Selection
Your dryer has various programmes and additional functions for the best drying results.
i Select the drying programme you require from the table of programmes (from page 16 onwards).
Programme sequence
During the Standard, Mix and Short programmes, the dryer uses an electronic sensor system which constantly monitors how wet the laundry is. The drying cycle automatically stops as soon as the level of dryness set has been reached. The indicator lamps (LEDs) display the programme status.
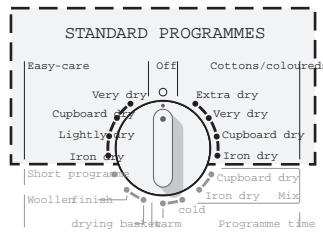
Standard programmes
| Suitable for cottons,linens and coloureds.
Press the Low heat button or select Super delicate drying for heat-sensitive fabrics. | Standard programmes for cottons/coloureds |
| For laundry:Bed linen,table linen and towels | which needs to be pressed | Iron dry |
| Bed linen,table linen,towels,T-shirts,polo shirts,work clothes | which needs to be ironed | Iron dryup to 5 kg * |
| T-shirts,polo shirts,dresses,trousers,work clothes,underwear | which does not need to be ironed,or only needs to be lightly ironed | Iron dry |
| Terry towelling,tea towels and towels,bed linen,underwear and cotton socks | which does not need to be ironed | Cupboard-dryup to 5 kg * |
| Terry towelling,tea towels and towels,bed linen,underwear and cotton socks | which does not need to be ironed-thick,quilted fabrics | Very dry |
| Towelling dressing gowns and bed linen,no underwear or socks | which is particularly thick or quilted | Extra dry |
| Easy-care (drip-dry) laundry made of synthetic and mixed fabrics and cotton e.g. viscose, cuprorayon, modal and polyester up to 3 kg.
Press the Low heat button or select Super delicate drying for very heat-sensitive fabrics (e.g. polyacrylic, polyamide, elastane and acetate silk). | Standard programmes for easy-care fabrics |
| For laundry: | |
| Trousers, dresses, skirts and shirts | which needs to be ironed | Iron dry |
| Trousers, dresses, skirts, shirts, blouses, underwear, leggings and sportswear with high synthetic content. | which does not need to be ironed, or only needs to be lightly ironed | Lightly dry |
| Shirts, blouses and sportswear | which does not need to be ironed | Cupboard-dry up to 2.5 kg* |
| Bed linen and table linen, tracksuits, anoraks and blankets | which does not need to be ironed - thick, quilted fabrics | Very dry |
- In accordance with the IEC 61121:1997 / EN 61121:1999 test programmes.
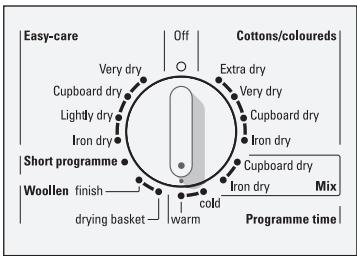
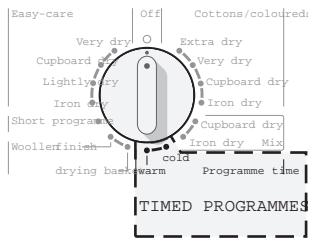
Timed programmes
Timed programmes for delicate fabrics made of acrylic or for subsequent drying or airing.
| Fabrics which have already been pre-dried and are slightly damp, individual laundry items such as bath towels, bath robes, dishcloths and quilted fabrics made of acrylic.
Press the Low heat button or select Super delicate drying for heat-sensitive fabrics. | warm
可以根据 in 10 minute increments up to 2 hours 30 minutes by pressing Change and the display in the display panel). |
| For freshening or airing items of clothing which are not worn very often.
For all types of fabrics. | cold
可以根据 in 10 minute increments up to 2 hours 30 minutes by pressing Change and the display in the display panel). |
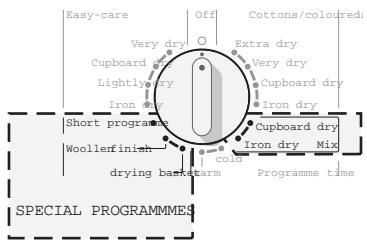
Special programmes
| Laundry loads up to 3 kg |
| For mixed laundry made up of cotton and easy-care fabrics (Mix). | Cupboard-dry Mix or Iron dry Mix |
| Suitable for woollens
Laundry is softened but is not dried ready-to-wear.
Remove the laundry as soon as the programme has finished and hang up. | Woollen finish |
| Laundry which needs to be dried quickly, e.g.: sportswear made of synthetics, cotton or mixed fabrics. | Short programme |
| For individual items which are dried in the woollens basket. The
kg details can be found in the “Woollens basket” section (from page 24 onwards). | Woollens/trainers
(can be set in 10 minute increments up to 2:30 by pressing Change and the display in the display panel). |
Additional functions
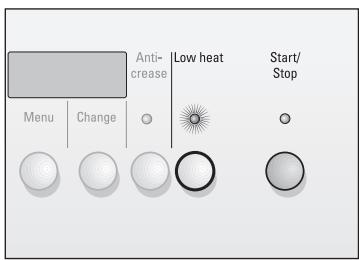
Low heat button
Press this button when drying heat-sensitive fabrics (e.g. acrylic). Observe the fabric l care instructions.
The temperature is reduced and the drying time increased.
Once the programme has started, the dryer "remembers" the function you have selected until the next time the dryer is started.

Anti-crease button
The anti-crease function reduces creases in the laundry. The drying time is increased.
The anti-crease function at the end of the programme continues for two hours.
Once the programme has started, the dryer "remembers" the function you have selected until the next time the dryer is started.
Programmable functions
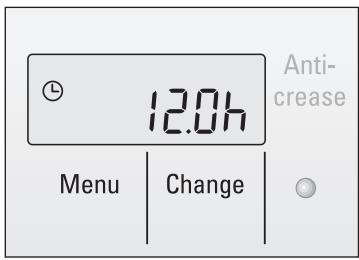
Additional functions can be set by pressing the Menu and Change buttons. All the additional functions which have been set are indicated in the display by the appropriate symbols.
A sticker which explains the symbols is supplied with the dryer. We recommend that you stick this above the display on the dryer's top trim.
| Display | Function | Possible values |
| ① | Time delay | 0 to 19 hours |
| ② | Super delicate drying | On = On
Off = Off |
| -∞ | Child safety lock |
| Level of dryness | 0 to 3 |
| Buzzer |
| ③ | Spin speed
used during wash | From 800
to 1600 |
The , , and settings are stored even when the dryer is switched on or off until a new function is set.
Setting or changing settings
- Select the programme you require using the programme selector.
- Press the Menu button.
flashes in the display. If you press the button again, 念 , -o etc. flashes.
The menu display clears if you do not press a button within 4 seconds.
3. Press Change repeatedly until the value you require is displayed.
4. Press the Menu button to save the setting, or press the Start button to save the setting and start immediately.
The setting is saved automatically if you do not press a button for 4 seconds.
Now you can make additional settings.
Time delay
The programme can be set to start up to 19 hours later (the first 2 hours is set in 30 minute increments, thereafter the time is set in 1 hour increments). (For notes on settings, see page 19).
-
Press the Start/Stop button.
-
The time you have selected counts down. ⑤ flashes in the display. The time counts down in increments of 30 minutes.
The door may be opened at any time. This does not affect the preset time delay.
The time delay may be changed at any time.
- Press the Start/Stop button. The symbol lights up and the Start/Stop indicator lamp flashes.
- Press the Menu button once.
- Press the Change button.
- Press the Start/Stop button again.
- The programme set starts automatically when the time selected has elapsed.
- Turn the programme selector to "Off".
- Select the programme you require using the programme selector.
- Press the Start/Stop button.
Super delicate drying
This is a special programme for very heat-sensitive, easy-care (drip-dry) laundry made from synthetics and mix fabrics and clothing with foam printing, e.g. acrylic, polyamide, elastane and acetate silk. (For notes on settings, see page 19).
If this function is selected, the indicator lamp for the Low heat button also lights up.
The Low heat button remains set when the programme has finished.
Child safety lock
You can lock the dryer settings to prevent the functions you have set from being inadvertently changed. (For notes on settings, see page 19).
When the child safety lock is selected:
- It is not possible to make any changes while a programme is running. The buttons and programme selector cannot be operated.
- The dryer can only be switched off using the programme selector. If the dryer is switched on again, the programme continues with the same settings.
- The door may be opened at any time.
The programme will be halted and may only be restarted once the child safety lock has been released.
To release the child safety lock:
Press and hold the Start/Stop button for 4 seconds.
Machine lock (to prevent unauthorised use)
The dryer cannot be restarted once the programme has finished. is shown in the display.
To release the lock:
Press and hold the Start/Stop button for 4 seconds. The child safety lock remains in place and will be effective the next time a programme is started.
The child safety lock can be released permanently using the Menu button.
(For notes on settings, see page 19).
Fine adjustment of the level of dryness
The dryer has been designed to be as energy-efficient as possible.
The level of dryness of the "Cupboard dry", "Very dry" and "Extra dry" programmes can be individually increased. We would particularly recommend this if you live in a hard-water area or a cold climate. For notes on settings, see page 19.
There are four level of dryness settings (0, 1, 2 and 3). "0" is the default setting.
Buzzer at the end of the programme
There are four buzzer volume settings (0, 1, 2 and 3). At "0" the buzzer is switched off. 1 = quiet, 2 = medium and 3 = loud. (For notes on settings, see page 19).
Spin speed used during wash
The accuracy of the remaining time display is increased if the washing machine's spin speed is entered. The following spin speed settings can be selected: 800, 1000, 1200, 1400 and 1600 ©.
If your washing machine has a different spin speed, set the next lowest spin speed. Example: If the spin speed is 1100 rpm, you should set 1000 ⑥.
End of the programme
Anticlease function
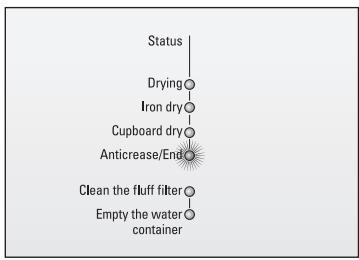
When the "Anticlease/End" indicator lamp lights up:
- Open the door.
- Remove the laundry.
The dryer is equipped with an automatic anti-crease function (Anticreate/End). It is effective if the laundry is not removed from the drum immediately.
The drum rotates at specific time intervals for 1 hour (2 hours if the Anti-crease button is pressed). The laundry should now be removed.
The laundry remains loose, soft and crease-free until it is removed.
Switching off
- Turn the programme selector to Off.
- Clean the filter (see page 30).
- Empty the water container (see page 31).
Do not drink this water.
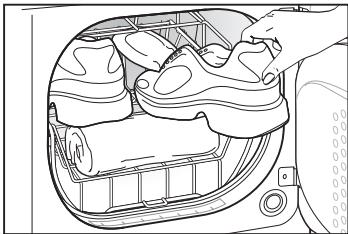
Woollens basket
The woollens basket allows you to dry washable woollens and trainers.
The woollens basket does not turn with the drum. This means that woollens or trainers can be dried.
Wet woolens should not be moved if possible, otherwise they tend to felt. The weight of trainers could damage the drum.
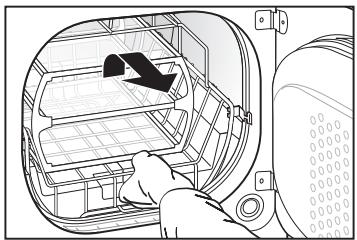
Removing the basket
- Pull the basket upwards out of the styrofoam pak-. kaging and remove it from the drum.
- Remove the individual pieces of styrofoam packaging from the drum.
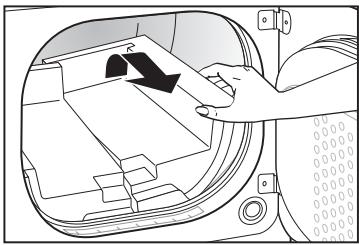
- Remove the rubber band from the basket and the basket insert.
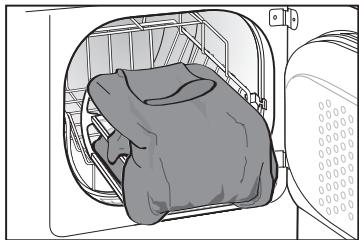
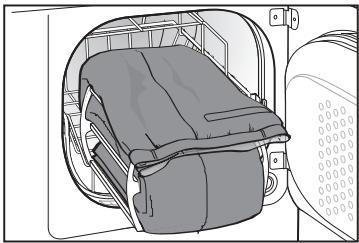
Insert the basket
- Place the basket, minus the insert, horizontally in the drum.
The drum must be empty.
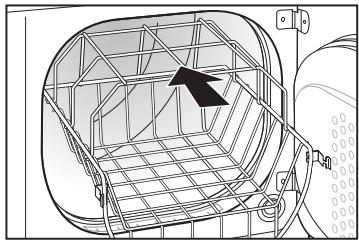
- Guide the basket vertically downwards until the support hooks are in place at the front of the opening.
i Remove the basket from the dryer once the drying cycle is complete.
Notes
The laundry must be spun.
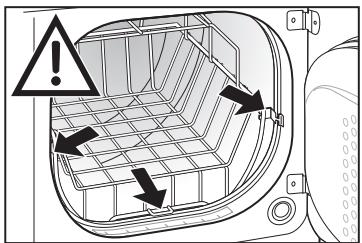
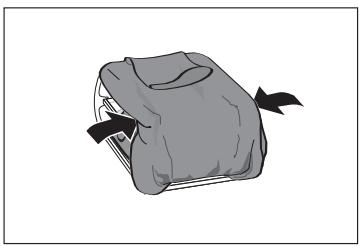
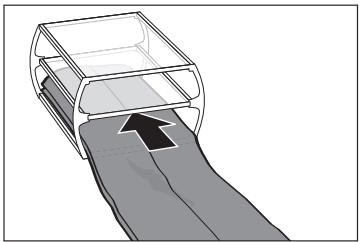
- Place the items loosely in/about the basket insert, do not squash them in or fold them (see following pages for examples).
- Place the basket insert inside the woollens basket.
The laundry must not be touching the drum, it could become caught and be damaged.
The times are selected so that the laundry is dried cupboard-dry.
In some cases, there may be residual moisture on the laundry (with thick or quilted items).
i Only use the "drying basket" programme.
- Once the drying cycle is complete, hang out the laundry and air it for approximately 15 minutes.
| Woollens (machine-washable Ⓒ),
Synthetic or leather trainers
Only dry one piece of clothing or
one pair of shoes at a time. | “drying basket” programme
Woollens or trainers which have been washed and spun
at 800 rpm.
Can be set in 10 minute increments up to 2:30 by pressing
the Change button and the display in the display panel. |
| Thin woolen jumpers
(approximately 350 g) | 80 mins. |
| Thick woolen jumpers
(approximately 850 g) | 90 - 120 mins |
| Skirt | 60 - 90 mins |
| Trousers | 60 - 90 mins |
| Small items, e.g. gloves | 30 mins |
| Trainers | 90 mins. plus airing time,
or a max. of 120 mins |
Information given represents average values only. Brief subsequent drying may be necessary.
Example: Woollen pullover/cardigan/top
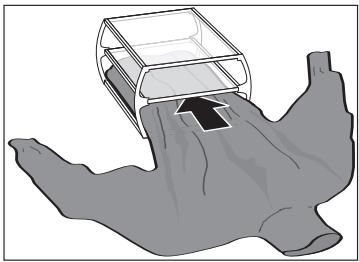
- Insert the bottom of the pullover into the basket insert.
- Lay the top part on top of the basket insert.
- Loosely place the sleeves in the top section of the basket.
- Place the basket insert and the pullover in the basket.
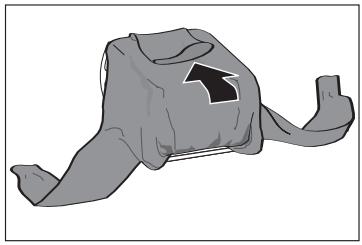
Example: Suit trousers/dress/skirt
- Insert the bottoms of the trouser legs into the basket insert.
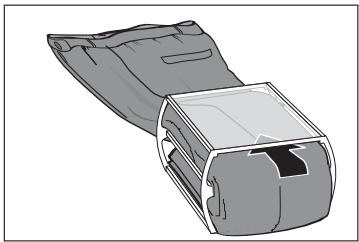
- Guide the top part of the trousers through the top of the basket insert.
- Lay the top part of the trousers on top of the basket insert.
- Place the basket insert inside the basket.
i Place woollen dresses or skirts across the width of the basket insert and arrange them in an S shape.
Example:
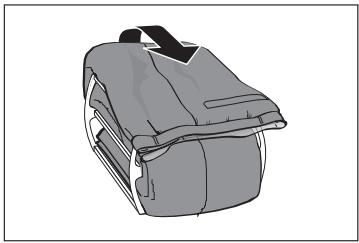
Trainers
The basket insert is not used when drying shoes.
Pull the tongues out as far as possible on trainers. Loosen shoelaces, or remove them if possible. Remove insoles and/or heel cups.
To protect the dryer and subsequent loads of laundry, only dry shoes which have been cleaned.
- Place the shoes directly in the basket,
or
- Place a rolled up hand towel in the basket to make a sloping support surface.
- Place trainers in the basket with the heel on the hand towel.
This ensures even drying.
Cleaning and care
Cleaning the dryer
Risk of explosion
There is a risk of explosion from the solvents. Never use solvents for cleaning.
The dryer may be damaged if it is not cleaned properly.
Do not spray the dryer with a water jet.
Do not use scouring powder or general-purpose cleaners.
- Clean the housing and control panel with a mild cleaner.
Frost protection / preparation for transport
Do not use the dryer when there is a risk of frost.
The dryer should not be used if it is in a room where the temperature may drop below freezing or if it is to be transported:
- Empty the water container (see page 31).
- Select the 10 minute timed programme using the programme selector.
- Press the Start/Stop button. The condensed water in the dryer is pumped into the container.
- Wait five minutes, then empty the container again.
- Turn the programme selector to Off.
Cleaning the fluff filter
Bobbling (fluff) occurs as clothes etc. are used. These bobbles come off during the drying cycle and collect in the fluff filter.
The filter must be cleaned after each drying cycle. A clogged filter results in longer drying times and higher energy consumption.
- Open the door.
2.Pull out the filter.
- Remove the fluff (by drawing your hand across the filter).
- Replace the filter (it can only be inserted one way round).
- Close the door.
Cleaning during a cycle
If the "Clean the fluff filter" indicator lamp comes on and a buzzer sounds while the dryer is on, clean the filter immediately.
- Allow the appliance to cool slightly and then clean the filter as described above.
- Press the Start/Stop button.
i Very dirty or blocked filters should be rinsed under warm running water.
The filter must be dried thoroughly before being replaced.

Cleaning nozzle
For removing dry fluff from the door only.
Over time, fluff from the drying process collects in the door. This fluff can be easily removed using the nozzle provided.
Attach the nozzle to your vacuum cleaner and vacuum the fluff from the door.
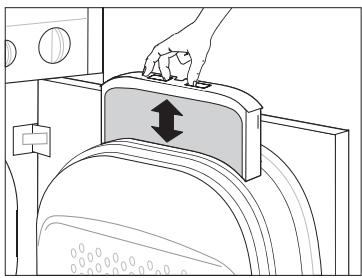
Empty the water container
Do not drink this water.
Condensation accumulates during drying. This condensation is collected in a container. The container should be emptied after each drying cycle.
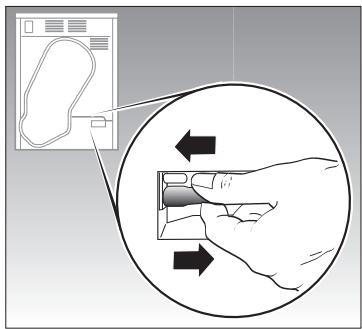
- Remove the container, holding it level.
- Pour out the condensed water.
- Push the container back in until it engages.
Emptying
The container may also be emptied during the drying cycle. It is not necessary to switch off the dryer.
If the "Empty the water container" indicator lamp lights up and a buzzer sounds while the dryer is running, the container must be emptied within 90 minutes. The buzzer stops automatically after approximately two minutes.
Once the 90 minutes have elapsed, the status indicator displays "Anticreate/End".
- Empty the container and then push it back in.
- Press the Start/Stop button. The programme starts again from the beginning.
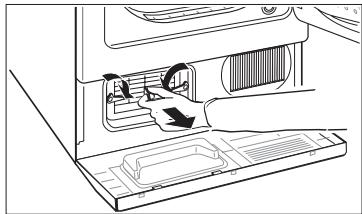
Cleaning the condenser unit
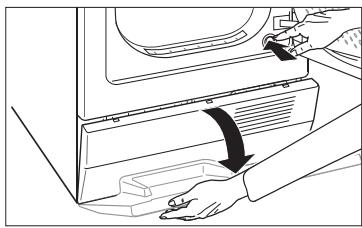
The condenser unit should be cleaned three or four times a year, or more often if the dryer is used very frequently.
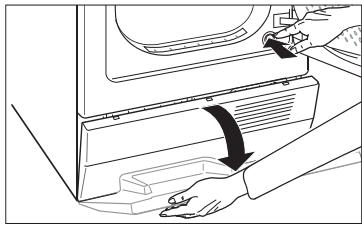
- Residual water may leak out, so place an absorbent towel beneath the maintenance flap.
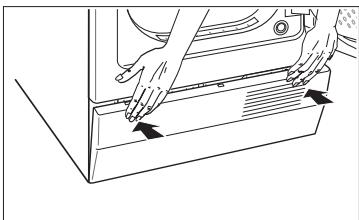
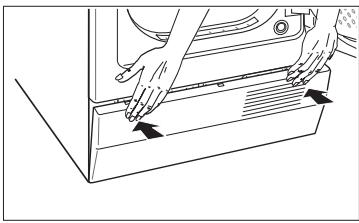
- Open the door.
- Press the Maintenance flap button.
-
Fully fold down the maintenance flap.
-
Turn both locking levers towards each another (in the direction of the arrows).
6.Pull out the condenser unit.
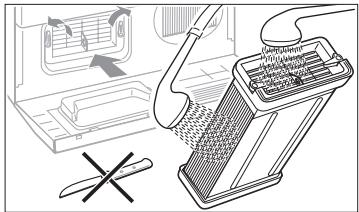
Take care not to damage the condenser unit.
Only use water to clean the condenser unit. Do not use hard or sharp objects.
- Clean the condenser unit thoroughly and let all the water drain off.
- Push the condenser unit back in, the handle must be at the bottom.
-
Turn back both locking levers.
-
Clean fluff and other dirt from the maintenance flap seal.
- Press the maintenance flap evenly on the right and left until it engages in place.
The door will only close if the maintenance flap is properly closed.
Changing the pollen filter
Available from the after-sales service (pack of 2). Order no.: 481723
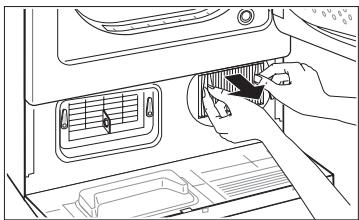
The pollen filter should be changed twice a year, or more often if the dryer is used very frequently.
The dryer may also be used without a pollen filter.
- Residual water may leak out so place an absorbent towel beneath the maintenance flap.
- Open the door.
- Press the Maintenance flap button.
- Fully fold down the maintenance flap.
- Used pollen filters should be pulled forwards and out carefully (there may be some resistance) and disposed of with the household rubbish.
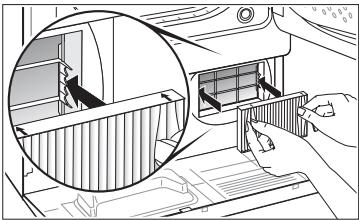
- Insert the new pollen filter levelly with the arrows uppermost. Push the two side pockets on the filter over the tabs in the frame.
- Press the maintenance flap evenly on the right and left until it engages in place.
The door will only close if the maintenance flap is properly closed.
Changing the bulb for the interior light

These are both available from specialist suppliers.
- Torx screwdriver, size T20.
- 15 watt bulb for E14 oven.
Danger of death
Danger of death from electrical voltage. Unplug the dryer before working on it.
-
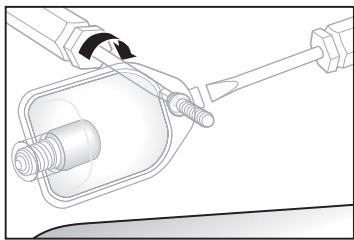
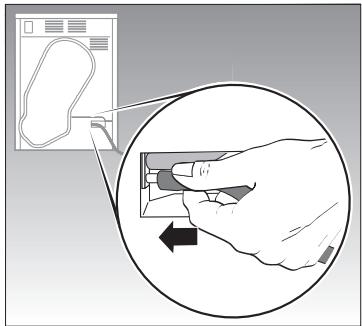
Open the door, let the dryer cool down (if necessary). Arrow indicates the position of the bulb.
-
Undo the light cover bolt in the direction of the arrow. Fold out the light cover through 90^ . If the cover is stuck, insert a flat tool (e.g. a screwdriver) into the opening slot and carefully lever it out.
The light cover is attached and will not fall off.
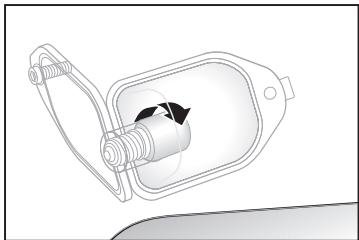
3. Unscrew the bulb in the direction of the arrow.
4. Screw in the new bulb in the opposite direction to the arrow.
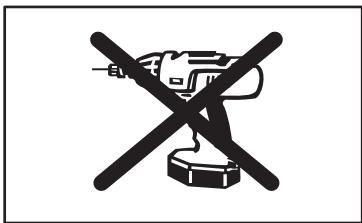
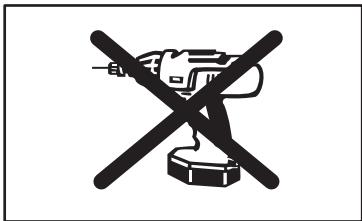
5. Screw the light cover back on carefully (using moderate force).
Do not use a power screwdriver.
Do not use appliances with open, faulty or missing light covers.
What to do if …
Danger, electrical current.
Repairs must only be carried out by the after-sales service or an authorised expert.
If you cannot rectify a fault yourself, or a repair is necessary:
Turn the programme selector to Off.
Remove the plug from the socket.
□ Contact the after-sales service (see page 38).
| What to do if ... | Cause | Solution |
| The “Start/Stop” indicator lamp does not come on. | The dryer is not plugged in. | Plug in the dryer. |
| The Start/Stop button has not been pressed. | Press the button. |
| A fuse has blown in your home. | Reset/change the fuse. |
| The dryer does not start. | The Start/Stop button has not been pressed. | Press the button. |
| The door and/or maintenance flap are not closed properly. | Close the maintenance flap and the door. |
| No programme has been set. | Select the programme you require using the programme selector. |
| The ambient temperature is below 5 °C. | Increase the room temperature. |
| The “Clean the fluff filter” indicator lamp is flashing. | The filter is blocked. | Clean the filter (see page 30). |
| The condenser unit is clogged. | Clean the condenser unit (see page 32). |
| Check the installation conditions (see page 40). |
| The “Clean the fluff filter” indicator lamp is on even though the filter is free of fluff. | The filter is blocked. | Rinse the filter with warm water, dry it thoroughly (see page 30). |
| The condenser unit is clogged. | Clean the condenser unit (see page 32). |
| The “Empty the water container” and “Start/Stop” indicator lamps are flashing. | The water container is full. | Empty the container (page 31). |
| The water drainage hose is kinked. | Unkink the hose. |
| There is water in the water container overflow cap. | The area between the overflow and the overflow cap is blocked. | Wash out the container and the overflow thoroughly with water. |
| One or more programme status indicator lamps are flashing. | There has been a fault in the programme sequence or operation. | Clean the fluff filter and the condenser unit (see pages 30 and 32). |
| Check the installation conditions (page 40). |
| Switch off the dryer, let it cool and then switch it on again. Restart the programme. |
| The maximum drying time for the programme has been exceeded. | Clean the fluff filter and the condenser unit (see pages 30 and 32). |
| Check the installation conditions (see page 40). |
| Spin the laundry in the washing machine at the maximum spin speed. |
| The humidity in the room has increased significantly. | The room is not sufficiently ventilated. | Ensure sufficient ventilation. |
| The ventilation grille is obstructed. | Keep the ventilation grille clear. |
| The condenser unit is missing. | Insert the condenser unit. |
| Water is leaking out. | The door and/or maintenance flap seals are dirty or damaged. | Clean the seal or have it replaced by the after-sales service. |
| The door opens by itself. | The catch is not engaged. | Push the door until you hear a click as the locking catch engages. |
| The drum lighting is not working. | The bulb is faulty. | Change the bulb (see page 34). |
| The contents did not dry or the drying time was too long. | The condenser unit is clogged. | Clean the condenser unit (page 32). |
| The filter is blocked. | Clean the filter (see page 30). |
| The water container is full. | Empty the container (page 31). |
| Water is not draining. | Check the water drainage (if applicable). |
| The pollen filter is badly blocked. | Change the filter or don’t use one at all. |
| Ambient temperature above 30 °C. | Ensure sufficient ventilation. |
| The ventilation grille is obstructed. | Keep the ventilation grille clear. |
| The wrong programme was selected. | Use the table of programmes to help you select the correct programme (see page 16 onwards). |
| The appliance was installed in too small a space. | Ensure that cold air can circulate. |
| A power failure of more than two hours. | Restart the programme. |
After-sales service
Before calling the after-sales service, check to see if you can rectify the fault yourself (see page 35 onwards).
If you contact the after-sales service, even within the warranty period, you will be liable for labour costs.
Please inform the after-sales service of the product number (E-Nr.) and the manufacture number (FD) of the appliance.
This information can be found in the area outlined in bold on the rating plate on the rear of the appliance.
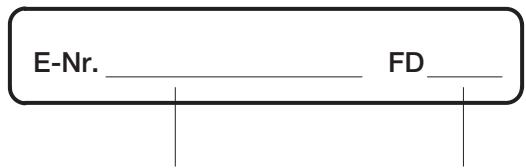
Product number
Manufacture number
Note the numbers for your appliance here.
Please help us to avoid unnecessary journeys by quoting the product and manufacture numbers. This will also save you the related additional costs.
Further information can be found on our website: http://www.siemens.de/hausgeraete
or
at our after-sales service centres.
You can still use our after-sales services even after your warranty has expired, if no other repair workshops are available to you.
Technical data
| Size | Measurement |
| Height | 86 cm (adjustable) |
| Width | 60 cm |
| Depth | 57 cm |
| Weight | approximately 45 kg |
| Nominal capacity | 5 kg |
| Water container volume | 3.2 l |
| A.C. voltage, connected load, fuse | See identification plate |
| Consumption rates | Spin speed in rpm | Drying time
in minutes
(including 8 min. cool
cycle) | Energy consumption in
kWh |
| 10 A | 16 A | 10 A | 16 A |
| Cottons/coloureds 5 kg | | | | | |
| Cupboard-dry | 1,400 | 85 | 65 | 2.60 | 2.60 |
| 800* | 97 | 90 | 3.50 | 3.50 |
| Iron dry | 1,400 | 65 | 50 | 2.17 | 2.10 |
| 800* | 94 | 71 | 3.06 | 2.95 |
| Easy-care 2.5 kg | | | | | |
| Cupboard-dry | 1000 | 50 | 40 | 1.30 | 1.30 |
- Tested in accordance with EN 61121:199 and IEC 61121:1997
Information given represents average values under standard conditions only. Deviations of up to 10% are possible.
Installation, connection and transportation
Safety information
Risk of injury.
The dryer is very heavy.
Do not attempt to lift it on your own.
Do not lift the dryer by any of the protruding parts (e.g. the door) - they may break off.
Risk of tripping.
Risk of tripping due to cables or hoses hanging down. Secure loose cables or hoses.
Check the dryer for damage caused during transportation. Do not connect the dryer if it has visible signs of damage. If in doubt, contact your local dealer.
Always empty the dryer completely before transporting it (see page 29).
Installing the dryer

- Install the dryer on a clean, level and solid surface.
- Adjust the four adjustable feet so that the dryer is standing level. Use a spirit level. Never remove the adjustable feet.
- Keep the ventilation grille on the front of the dryer clear.
- The dryer's surroundings must be kept free of fluff.
i Do not install the dryer in a room where there is a risk of freezing. Water can cause damage if it freezes.
The door catch can be reversed if necessary. The door is hinged on the right at the factory (see page 44).
Electrical connection
Caution:
The dryer must be connected correctly to an A.C. contactor socket.
The mains voltage must comply with the voltage information given on the identification plate (on the rear of the unit).
The connected load and the necessary fusing are shown on the identification plate.
The dryer can be modified to suit the existing fusing (see page 48).
Ensure that:
- the plug and the socket are compatible.
- the wire cross-section is sufficient.
- the earth system is installed in accordance with regulations.
If the mains cable needs altering, this should only be done by the after-sales service.
Do not use multiple plugs/ connectors and/or extension cables.
Only use current-operated circuit breakers which are marked as follows: .
Do not touch the plug with wet hands.
Always pull the plug grip to remove the plug from the socket.
Scope of delivery
The dryer is delivered as a complete unit. The instruction manual and any special equipment ordered can be found in the drum.
Accessories
If you require, the dryer can be adapted or added to on using separately available kits (see page 42 onwards).
Accessories and special equipment
Accessories can be fitted to modify the dryer for your needs. Please order accessories from a specialist supplier or from the after-sales service.
Connecting kit for condensation drain
Order no.: WZ 20160
This kit is used to drain away the condensed water via a hose. There must be a drainage facility available if this option is to be used (e.g. a sink, siphon connection or floor drainage). The water container does not then need to be emptied.
This is particularly recommended if the dryer is installed on top of a washing machine (washer-dryer stack).
Connecting the condensation run-off hose
- Move the hose from the lower to the upper connection (do not damage the hose, do not use tools).
- Connect the condensation drain hose (from the kit) to the lower connection.
- Route the condensation drain hose to the outlet, ensuring that there are no kinks.
Washer-dryer stack connection set
Order no.: WZ 20170
With removable worktop
Order no.: WZ 20230
Cover for under-counter or built-in installation

The dryer can be stacked on top of a Siemens washing machine of the same dimensions to save space.
Risk of injury.
For reasons of safety, the appliances must be stacked by an expert.
Always use a connection set to secure the dryer to the washing machine.
The dryer can be installed under or built-into a kitchen unit.
For reasons of safety, a metal cover must be fitted. This must be fitted by an expert in place of the dryer cover.
Order the kit from a specialist supplier.
Order no.: WZ 20190
i Only connect the power supply once the dryer has been installed.
Only install the dryer under a continuous worktop. It must be securely joined to the neighbouring cupboards.
Caution:
Do not block the ventilation grille on the front of the dryer or cover it with skirting.
Reversing the door catch
The door catch can be reversed if necessary. The door is hinged on the right at the factory.
You will need:
- Torx screwdriver, sizes T10 and T20.
Medium-sized slotted screwdriver.
These are available from specialist suppliers.
Carefully tighten all screws by hand. They could otherwise be overtightened.
Do not use a power screwdriver.
To remove the door:
! Place the door on something soft (e.g. a blanket) so that it is not damaged.
- Undo the screw for the bottom door hinge.
- Hold the door firmly and unscrew the top door hinge.
3.Pull the door and the hinge outwards to the front.
- Lay the door on the blanket.
Converting the dryer:
-
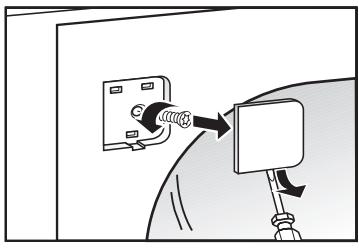
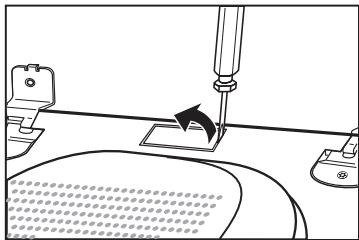
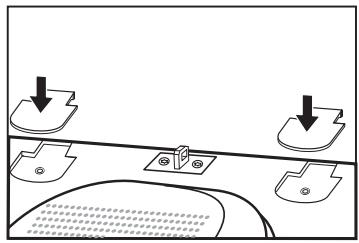
Remove both door fastening point covers: Lever them off carefully with a slotted screwdriver.
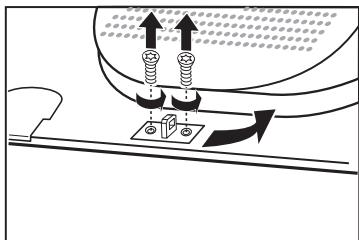
-
Undo both of the screws which are underneath and screw them in on the opposite side.
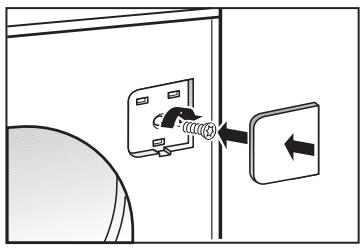
- Replace both covers.
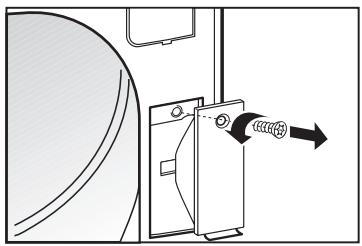
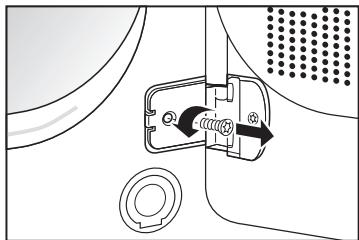
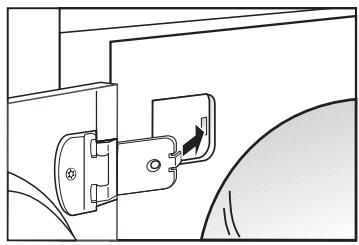
- Undo the screw in the door lock cover. Remove the cover.
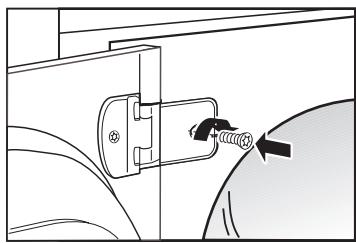
- Unscrew the door lock.
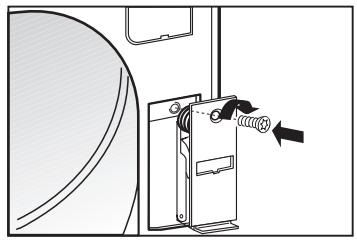
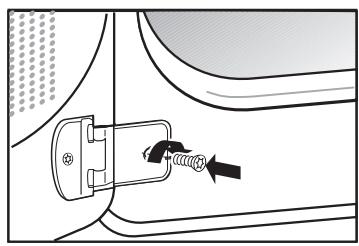
- Screw on the door lock in the opposite position. Replace the cover and screw it back on.
Converting and replacing the door.
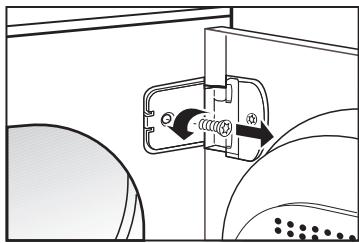
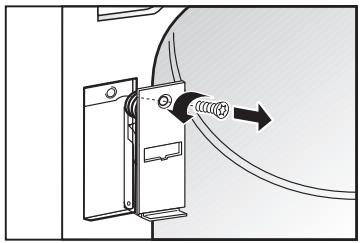
- Carefully lever off the locking catch cover.
- Unscrew the locking catch.

- Screw on the locking catch in the opposite position.

- Replace the locking catch cover.
- Carefully lever off the hinge fastening point cover.
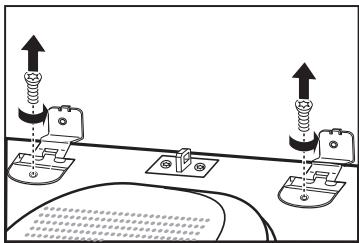
- Unscrew the top and bottom door hinges.

- Screw on the door hinges in the opposite position.
- Replace both covers.
- Place the hinge bracket on the front, hold the door firmly.
- Screw the door first onto the top hinge, and then onto the bottom one.
- Open and close the door carefully several times before using the appliance.
Converting the installed load
The dryer has been designed for 10 or 16 amperes.
If the dryer fuse (factory setting) does not correspond to the socket fuse (household fuse), complete the following steps:
- Connect the dryer to the mains electricity (see page 41).
- Turn the programme selector to Off.
- Simultaneously press and hold the Start/Stop and Low heat buttons.
- Turn the programme selector clockwise to "Extra dry".
- Release both buttons.
- Turn the programme selector 5 positions further clockwise.
- Press the Start/Stop button.
- Press the Low heat button (only if conversion is necessary).
The value set (10 or 16) will be shown in the Display.
i If no value is shown: switch off the dryer and start again.
- Press the Start/Stop button. The value is stored and the display goes out.
- Turn the programme selector to Off.