
EB-L570U - Vidéoprojecteur EPSON - Notice d'utilisation et mode d'emploi gratuit
Retrouvez gratuitement la notice de l'appareil EB-L570U EPSON au format PDF.

| Type de produit | Vidéoprojecteur |
| Marque | Epson |
| Modèle | EB-L570U |
| Résolution native | WUXGA (1920 x 1200) |
| Luminosité | 6200 lumens |
| Contraste | 2 500 000:1 |
| Source lumineuse | Laser |
| Durée de vie de la source lumineuse | 20 000 heures |
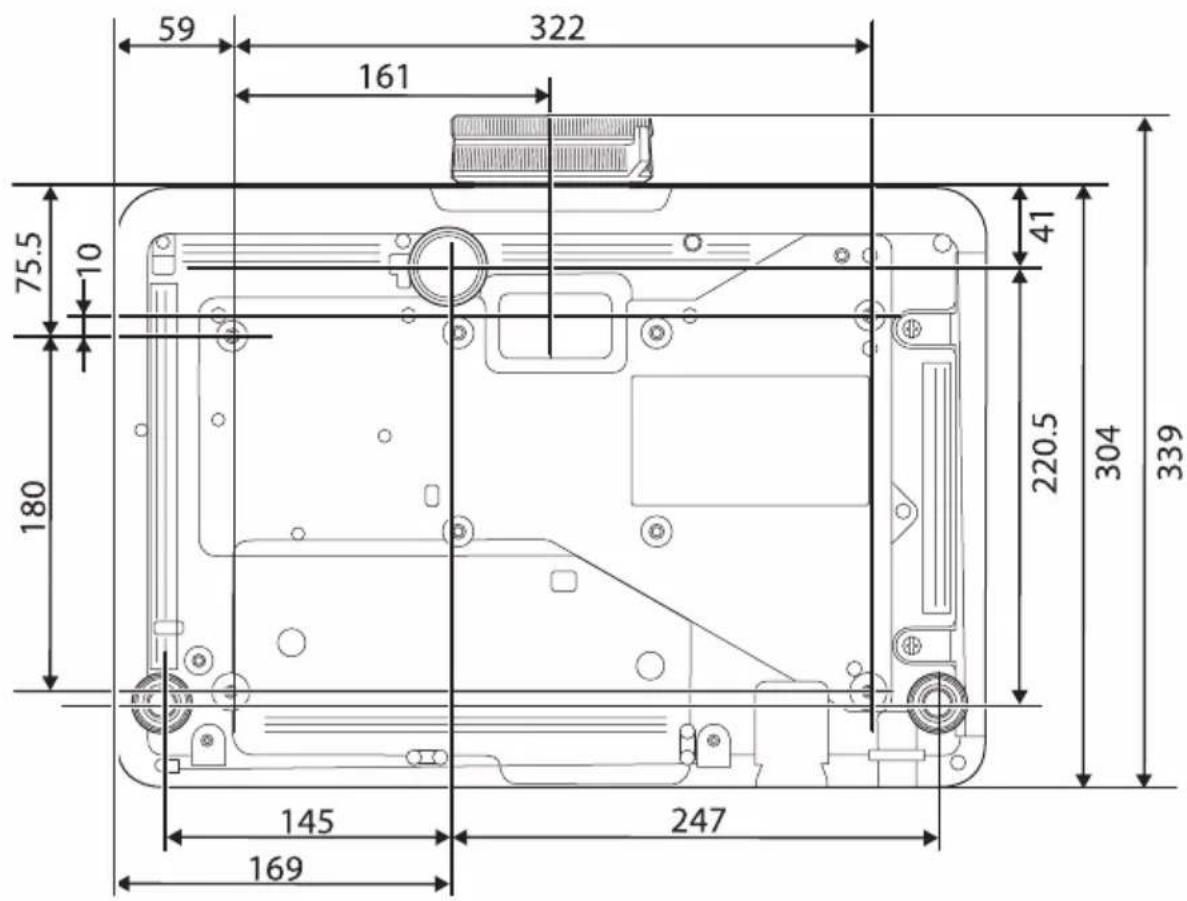
| Dimensions (L x P x H) | 440 x 220 x 136 mm |
| Poids | Environ 8,2 kg |
| Alimentation | 100-240 V CA, 50/60 Hz |
| Consommation électrique | 320 W (mode normal) |
| Consommation en veille | 0,3 W |
| Décalage de l'objectif (lens shift) | Vertical : ±50% ; Horizontal : ±20% |
| Correction trapézoïdale | Verticale et horizontale |
| Connectivité | HDMI (x2), HDBaseT, LAN, USB-A, RS-232C, sortie audio |
| Fonctionnalités principales | Projection multi-écran en daisy-chain, installation sans fil via module WLAN en option, assistant de configuration initiale |
| Entretien et nettoyage | Nettoyer le filtre à air régulièrement ; utiliser un chiffon doux et sec pour l'objectif |
| Sécurité | Verrou Kensington, mot de passe, panneau de commande verrouillable |
| Pièces détachées et réparabilité | Indice de réparabilité : 7,2/10 ; pièces disponibles : module laser, ventilateur, bloc d'alimentation, carte mère |
| Informations générales | Garantie 2 ans ; support technique Epson ; dernière version des manuels disponible sur epson.sn |
FOIRE AUX QUESTIONS - EB-L570U EPSON
Questions des utilisateurs sur EB-L570U EPSON
0 question sur cet appareil. Repondez a celles que vous connaissez ou posez la votre.
Poser une nouvelle question sur cet appareil
Téléchargez la notice de votre Vidéoprojecteur au format PDF gratuitement ! Retrouvez votre notice EB-L570U - EPSON et reprennez votre appareil électronique en main. Sur cette page sont publiés tous les documents nécessaires à l'utilisation de votre appareil EB-L570U de la marque EPSON.
MODE D'EMPLOI EB-L570U EPSON
Multimedia Projector
EB-L775U
EB-L770U
EB-L570U
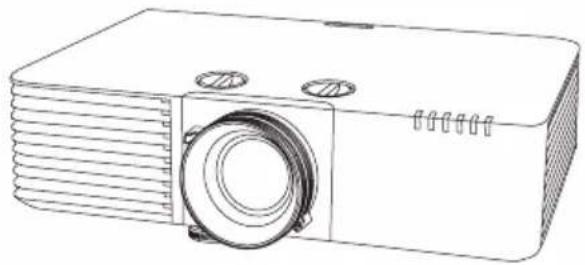
natural_image
Line drawing of a projector with ventilation slots and a circular lens (no text or symbols)| EN | Quick Reference |
| DE | Kurzübersicht |
| FR | Référence rapide |
| IT | Riferimento rapido |
| ES | Referencia rápida |
| PT | Referência Rápida |
| NL | Beknopte handleiding |
| DA | Lynvejledning |
| FI | Pikaopas |
| NO | Hurtigreferanse |
| SV | Snabbreferens |
| CS | Rychlá reference |
| HU | Gyors útmutató |
| PL | Skrócona instrukcja obsługi |
| RO | Ghid informativ |
| EL | Грніорн авафора |
| TR | Нізлі Referans |
| SL | Hitre informacije |
| CA | Referència rápida |
| RU | Краткое руководство |
| UK | Короткий довідник |
| KK | Кысякаша анықтама |
| AR | مرجع سریع |
| ZHS | 快速参考 |
| ZHT | 快速参考 |
| KO | 빠른 참조 |
| ID | Rujukan Cepat |


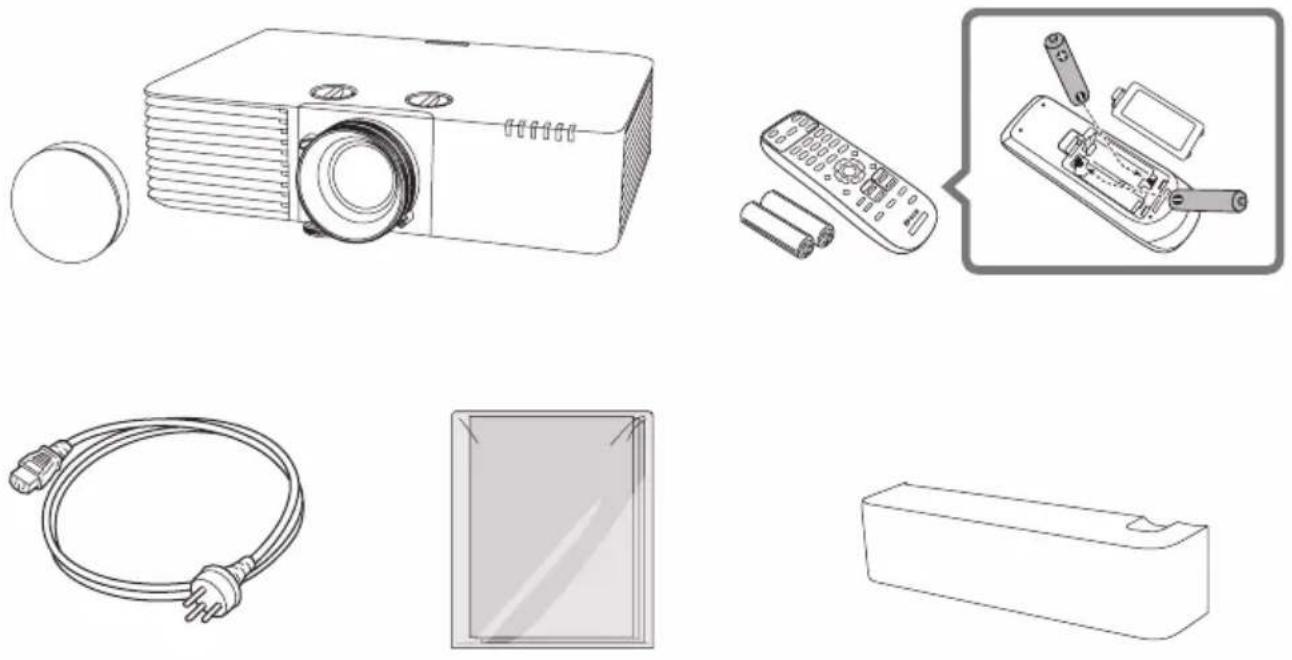
Unpacking
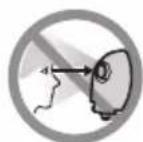
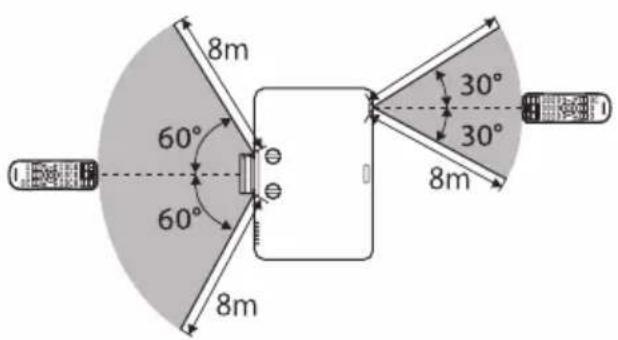
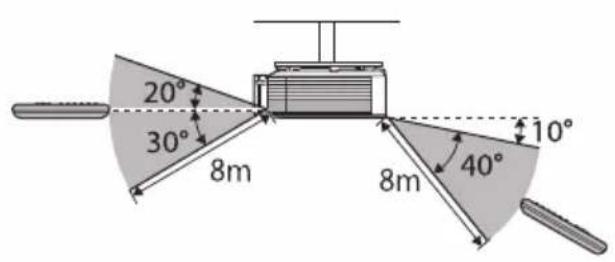
■ Remote Control Operating Range
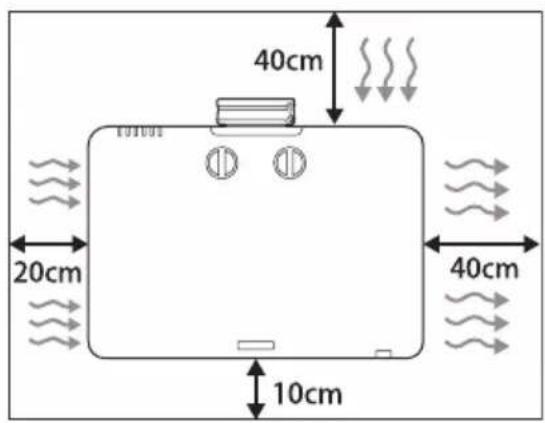
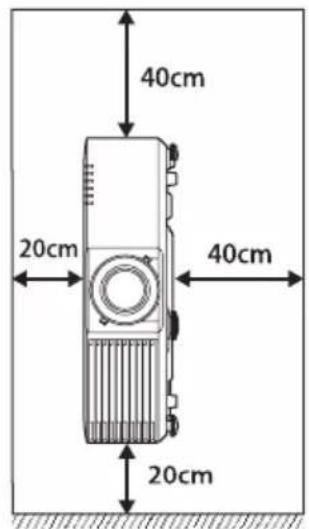
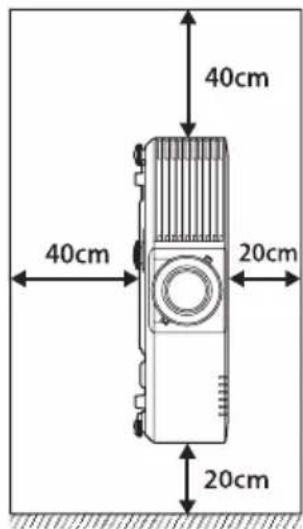
Installing


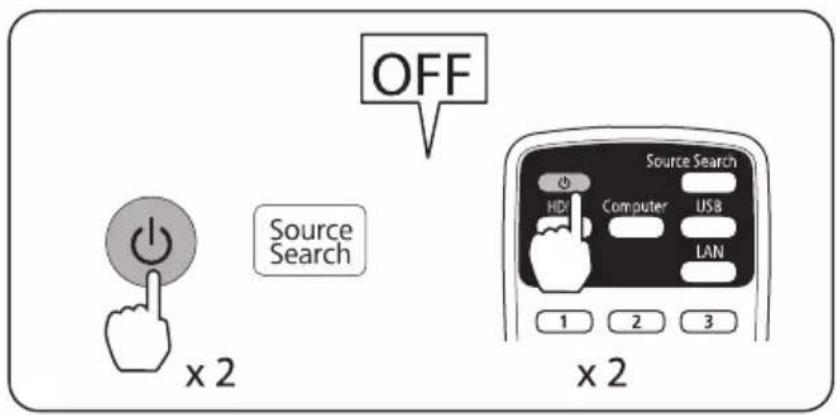
■ Turning On/Off the Projector
Turning On
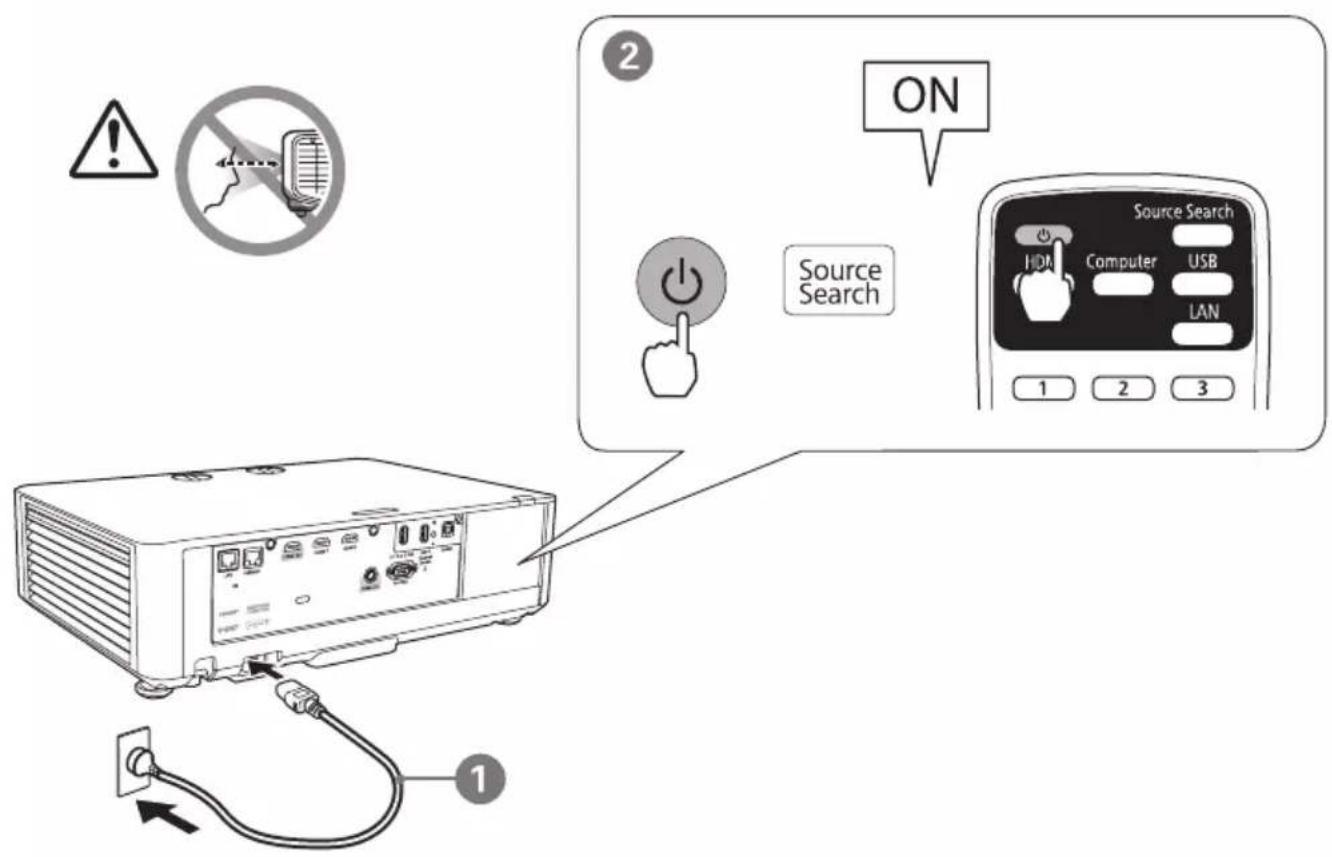
Turning Off
■ Adjusting the Projection Size

flowchart
graph TD
    A["Input Image 1"] <--> B["Input Image 2"]
    C["Control Box"] --> D["Rotating Component"]
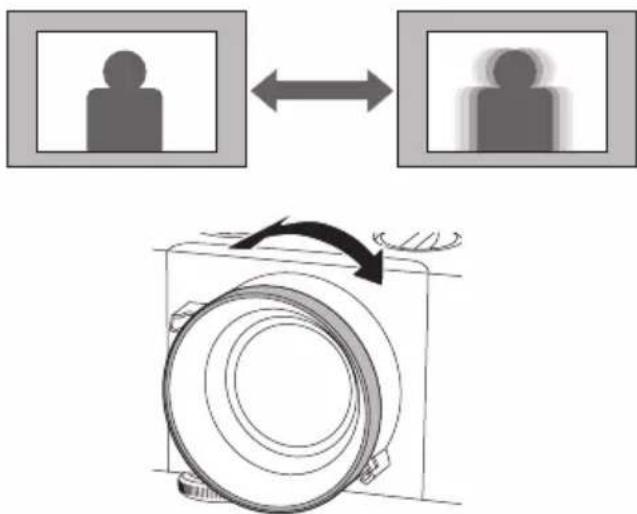
■ Adjusting the Focus
flowchart
graph TD
    A["User Icon"] <--> B["Object Icon"]
    C["Camera Body Rotation Arrow"] --> D["Camera Body Rotation Arrow"]
■ Initial Setting
| EN | The first time you turn on the projector, the setup wizard is displayed. Follow the on-screen instructions to make the initial settings, such as the projection direction and language, using the arrow and ←[Enter] buttons on the control panel or remote control. |
| DE | Wenn Sie den Projektor das erste Mal einschalten, erscheint der Einrichtungsassistent. Konfigurieren Sie anhand der Bildschirmanweisungen die Anfangseinstellungen, wie Projektionsrichtung und Sprache, mit den Pfeiltasten und der ←[Enter]-Taste an Bedienfeld oder Fernbedienung. |
| FR | La première fois que vous allumez le projecteur, l’assistant de configuration s’affiche. Suivez les instructions à l’écran pour effectuer les réglages initiaux, comme le sens de projection et la langue, à l’aide des touches fléchées et ←[Enter] du panneau de commande ou de la télécommande. |
| IT | La prima volta che si accende il proiettore, viene visualizzata la procedura guidata di configurazione. Seguire le istruzioni sullo schermo per effettuare le impostazioni iniziali, come la scelta della direzione di proiezione e della lingua, utilizzando i pulsanti freccia e ←[Enter] sul pannello di controllo o sul telecomando. |
| ES | La primera vez que encienda el proyector, se mostrará el asistente de configuración. Siga las instrucciones que aparezcan en la pantalla para realizar la configuración inicial, como la dirección de proyección y el idioma, usando los botones de flecha y ←[Enter] del panel de control o del mando a distancia. |
| PT | O assistente de configuração será exibido quando o projetor for ligado pela primeira vez. Siga as instruções apresentadas para configurar as definições iniciais, tais como a direção de projeção e o idioma, utilizando os botões direcionais e ←[Enter] no painel de controlo ou no controlo remoto. |
| NL | Als u de projector voor het eerst inschakelt, verschijnt de installatiewizard. Volg de instructies op het scherm om de begininstellingen, zoals de projectierichting en taal, op te geven met de pijl en de knoppen ←[Enter] op het bedieningspaneel of de afstandsbediening. |
| DA | Første gang du tænder projektoren, vises opsætningsvejledningen. Følg instruktionerne på skærmen for, at konfigurere de første indstillinger, såsom projektionsretning og sprog. Dette gøres med piletasterne og ←[Enter]-tasten på betjeningspanelet eller fjernbetjeningen. |
| FI | Kun kytket projektorin päälle ensimmäistä kertaa, ohjattu asetus tulee näkyviin. Tee alkuasetukset näytön ohjeiden mukaisesti, kuten projisoinnin suunta ja kieli, käyttäen ohjauspaneelin tai kaukosäätimen nuoli- ja ←[Enter]-painikkeita. |
| NO | Første gang du slår på projektoren, vises oppsettsveiviseren. Følg instruksjonene på skjermen for å stille inn de første innstillingene, som projiseringsretning og språk, med pilen og ←[Enter]-knappene på kontrollpanelet eller fjernkontrollen. |
| SV | Den första gången du startar projektorn visas konfigurationsguiden. Följ instruktionerna på skärmen för att göra de initiala inställningarna, sådana som projiceringsriktning och språk, genom att använda pilknapparna och ←[Enter]-knappen på kontrollpanelen eller fjärrkontrollen. |
| CS | Při prvním zapnutí projektoru se zobrazí průvodce nastavením. Postupujte podle zobrazených pokynů a proved'te úvodní nastavení, jako je směr promítání nebo jazyk, pomocí tlačítek se šipkami a tlačítka ←[Enter] na ovládacím panelu nebo dálkovém ovladači. |
| HU | Amikor először kapcsolja be a kivetítót, a beállítási varázsló jelenik meg. Kövesse a képernyőn megjelenő utasításokat a kezdeti beállítások, például a vetítési irány és a nyelv megadásához, a nyílgombok és az ←[Enter] gombok használatával a kezelőpanelen vagy a távvezérlőn. |
| PL | Po pierwszym włączeniu projektora, wyświetlany jest kreator ustawień. Wykonaj instrukcje ekranowe w celu wykonania ustawień początkowych, takich jak kierunek projekcji i język, używając strzałek i przycisku ←[Enter] na panelu sterowania lub na pilocie. |
| RO | La prima pornire a projectorului, se afișează expertul de configurare. Urmați instrucțiunile de pe ecran pentru a realiza setările inițiale, cum ar fi direcția și limba proiecției, cu ajutorul butoanelor cu săgeți și a butonului ←[Enter] de pe panoul de comandă sau de pe telecomandă. |
| EL | Tnv πρώτη φορά που θέτετε τον προβολέα σε λειτουργία εμφανίζεται ο οδηγός εγκατάστασης. Ακολουθήστε τις οδηγίες στην οθόνη για να κάνετε τις αρχικές ρυθμίσεις, όπως η κατεύθυνοη προβολής και η γλώσσα, χρησιμοποιώντας τα βέλη και το κουμπί ←[Enter] στον πίνακα ελέγχου ή το τηλεχειριστήριο. |
| TR | Projektörü ilk açtiğinizda kurulum sihirbazı görüntülenir. Yansıtma yönü ve dili gibi ilk ayarları yapmak için kontrol paneli veya uzaktan kumanda üzerindeki ok ve ←[Enter] düğmelerini kullanarak ekrandaki talimatları izleyin. |
| SL | Ob prvem vklopu projektorja se prikaže čarovnik za namestitev. Sledite navodilom na zaslonu, da opravite začetne nastavitve, kot sta usmerjenost projekcije in jezik, pri tem pa uporabite puščične gumbe in gumb ←[Enter] na nadzorni plošči ali daljinskem upravljalniku. |
| CA | La primera vegada que s'encen el projector, apareix l'assistent de configuració. Seguiu les instruccions en pantalla per definir els paràmetres inicials, com ara la direcció de projecció i l'idioma, amb les fletxes i el botó ←[Enter] del panell de control o del comandament a distância. |
| RU | При первом включении проектора отображается мастер настройки. Следуйте экранным инструкциям для выполнения начальных настроек, таких как направление проецирования и язык. Используйте кнопки со стрелками и ←[Enter] на панели управления или пульте ДУ. |
| UK | При першому увімкненні проєктра відображається майстер налаштування. Дотримуйтесь інструкцій на екрані, щоб виконати первинні налаштування, такі як напям та мова, за допомогою кнопок зі стрілками та кнопки ←[Enter] на панелі керування або на пульті дистанційного керування |
| KK | Проекторды алғаш рет іске қосқанда, орнату шебері қөрсетіледі. Басқару тактасындағы немесе қашықтан басқару құралындағы қөрсеткі және ←[Енгізу] түймелерін пайдалану арқылы проекциялау бағыты және тілі сияқты бастанқы параметрлерді орнату үшін, экрандағы нұсқауларды орындаңыз. |
| AR | يظهر معالج الإعداد عند تشفيل جهاز العرض للمرة الأولى. اtbег التعليمات المعروضة على ←[Enter] لضبط الإعدادات الأولية: كاتجاه العرض واللغة، باستخدام أزرار الأstemم والزر في loحة التحكم أو وحدة التحكم عن بُعْد. |
| ZHS | 首次启动投影机时,会显示安装向导。请按照屏幕上的说明使用控制面板或遥控器上的 ←[Enter] 按钮进行初始设置,比如投影方向和语言。 |
| ZHT | 第一次開啟投影機時,設定精靈會顯示。依照螢幕上的指示,使用操作面板或遥控器上的 ←[Enter] 按钮進行初始設定,如投影方向和語言。 |
| KO | 프로젝터를 처음 컬 경우 시작 마법사가 표시됩니다 . 화면상 지침을 따라 조절 판넬 또는 리모콘의 화살표 및 ←[Enter] 버튼을 사용하여 투사 방향 및 언어 등 초기 설정을 지정하십시오 . |
| ID | Saat pertama kali Anda menghidupkan proyektor, wizard konfigurasi akan ditampilkan. Ikuti petunjuk di layar untuk melakukan pengaturan awal, misalnya arah proyeksi dan bahasa, dengan menggunakan tombol anak panah dan ←[Enter] pada panel kontrol atau remote control. |
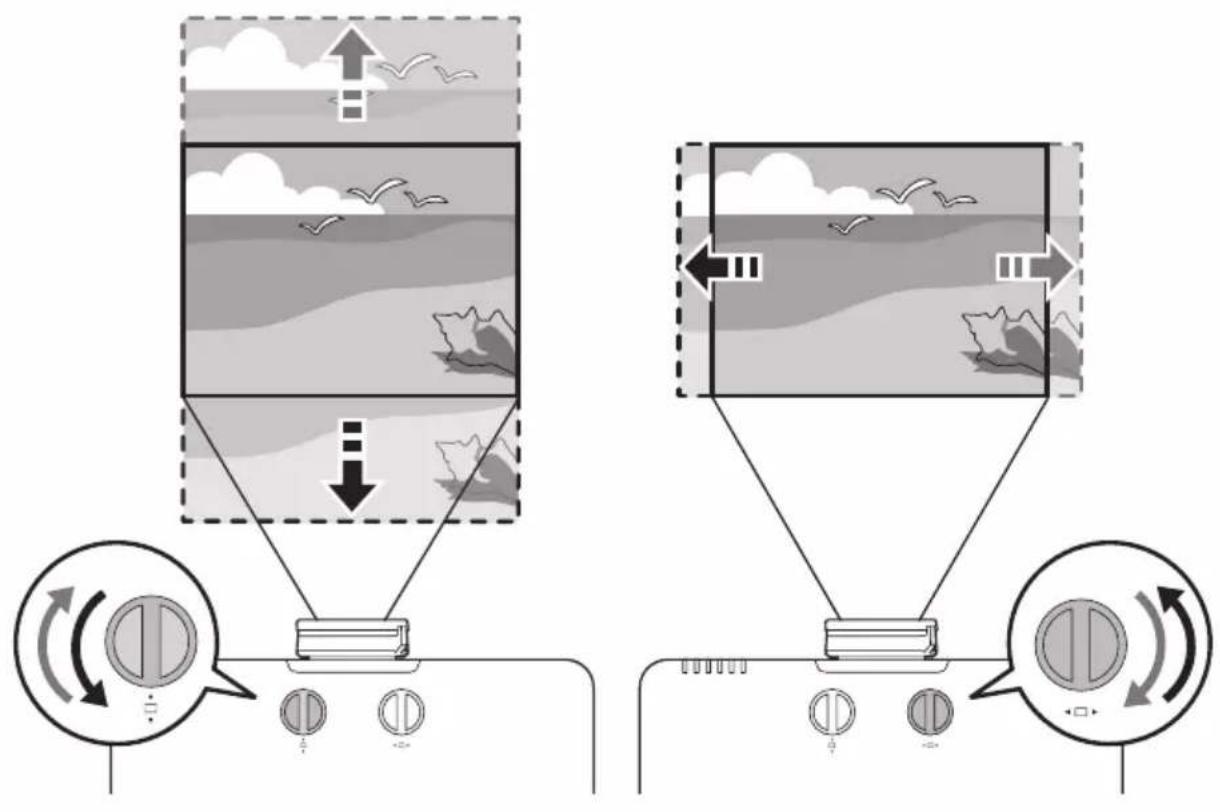
■Adjusting the Position of the Image (Lens Shift)
flowchart
graph TD
    A["Top Panel: Wave propagation"] --> B["Left Panel: Wave packet"]
    B --> C["Right Panel: Wave packet"]
    C --> D["Bottom Panel: Circular components with rotation arrows"]
    style A fill:#f9f,stroke:#333
    style C fill:#bbf,stroke:#333
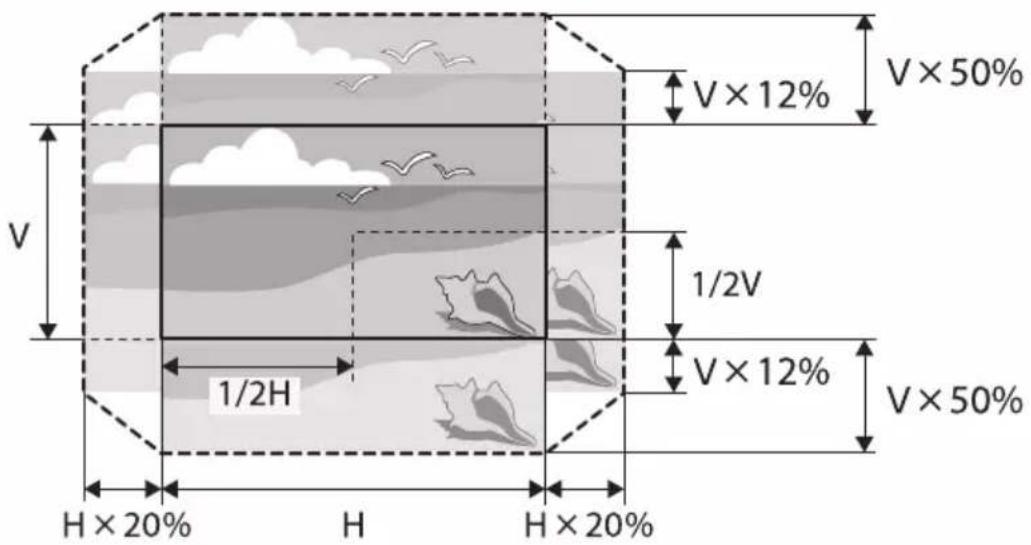
Lens Shift Adjustment Range
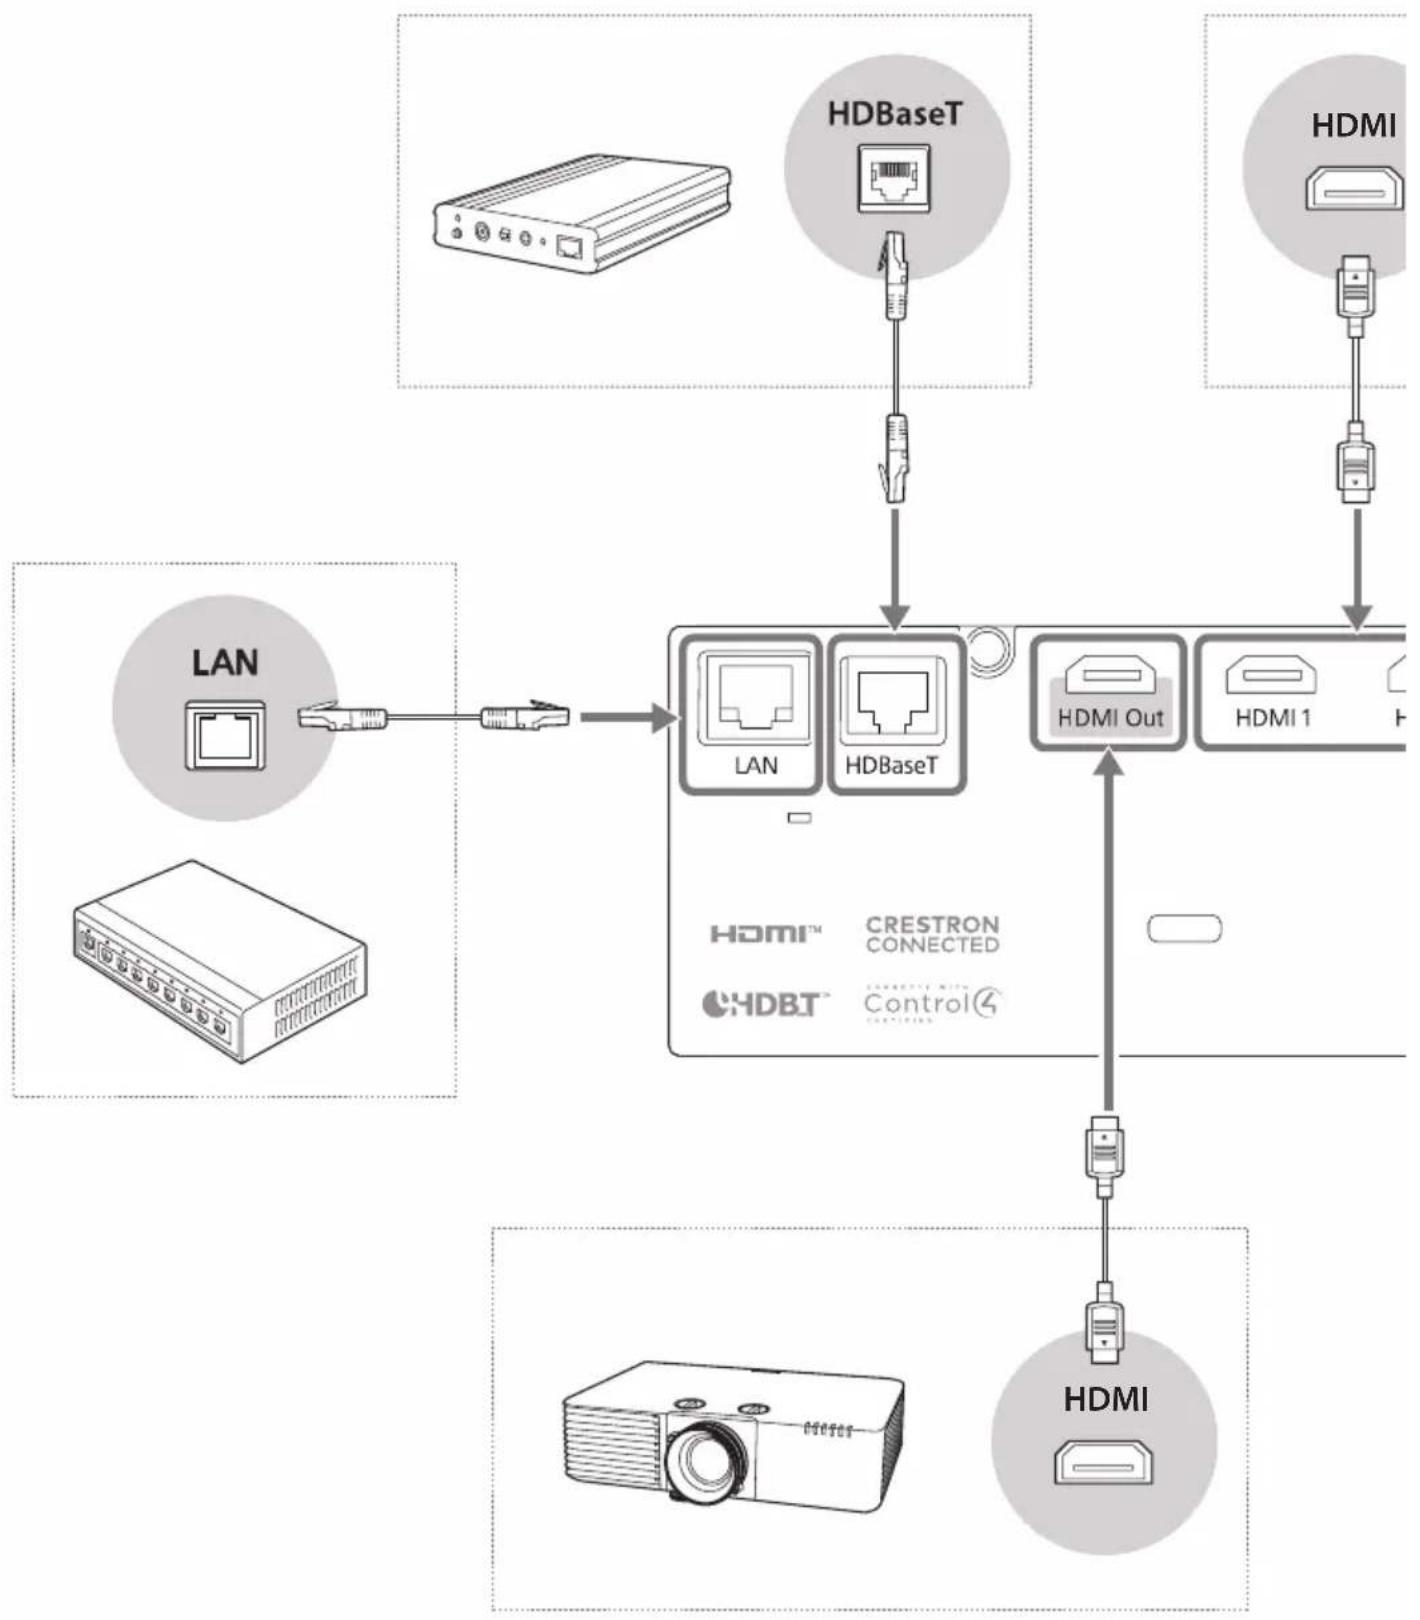
■ Connecting a Device
flowchart
graph TD
    A["LAN"] --> B["LAN"]
    B --> C["HDBASET"]
    C --> D["HDMI Out"]
    D --> E["HDMI"]
    F["HDBASET"] --> G["HL"]
    H["HDMI"] --> I["HL"]
    J["HDMI"] --> K["HL"]
    L["HL"] --> M["HDMI"]
    N["HL"] --> O["HDMI"]
    P["HL"] --> Q["HDMI"]
    R["HL"] --> S["HDMI"]
    T["HL"] --> U["HDMI"]
    V["HL"] --> W["HDMI"]
    X["HL"] --> Y["HDMI"]
    Z["HL"] --> AA["HDMI"]
    AB["HL"] --> AC["HDMI"]
    AD["HL"] --> AE["HDMI"]
    AF["HL"] --> AG["HDMI"]
    AH["HL"] --> AI["HDMI"]
    AJ["HL"] --> AK["HDMI"]
    AL["HL"] --> AM["HDMI"]
    AN["HL"] --> AO["HDMI"]
    AP["HL"] --> AQ["HDMI"]
    AR["HL"] --> AS["HDMI"]
natural_image
Line drawings of four electronic devices: laptop, caseable, video camera, and remote control box (no text or symbols)
flowchart
graph TD
    A[" HDMI 2 "] --> B[" Audio Out "]
    B --> C[" RS-232C "]
    C --> D[" DC Out (2.0A) "]
    D --> E[" USB-A External Camera "]
    E --> F[" Service "]
    F --> G[" USB-A "]
    G --> H[" Device 1 "]
    G --> I[" Device 2 "]
    G --> J[" Device 3 "]
    style A fill:#f9f,stroke:#333
    style B fill:#ccf,stroke:#333
    style C fill:#cfc,stroke:#333
    style D fill:#fcc,stroke:#333
    style E fill:#cff,stroke:#333
    style F fill:#ffc,stroke:#333
    style G fill:#cfc,stroke:#333
    style H fill:#fcc,stroke:#333
    style I fill:#cfc,stroke:#333
    style J fill:#cfc,stroke:#333
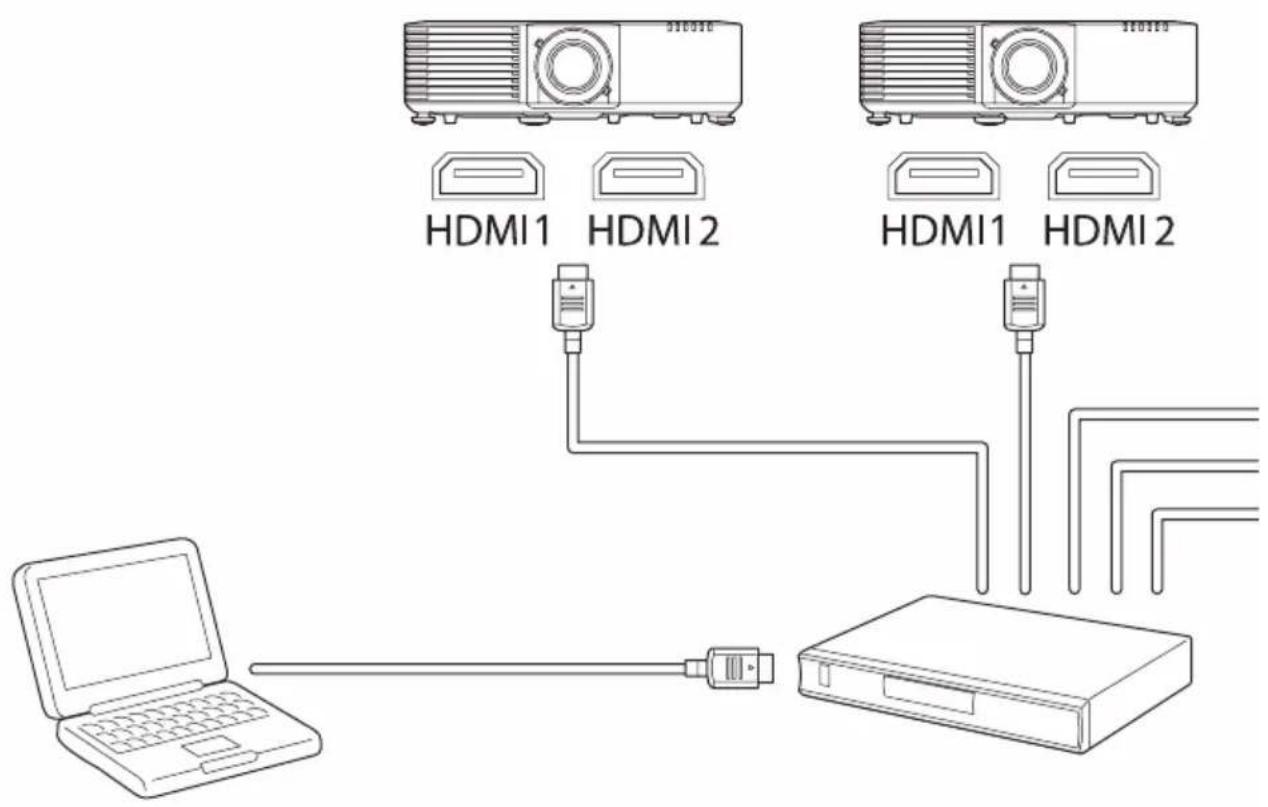
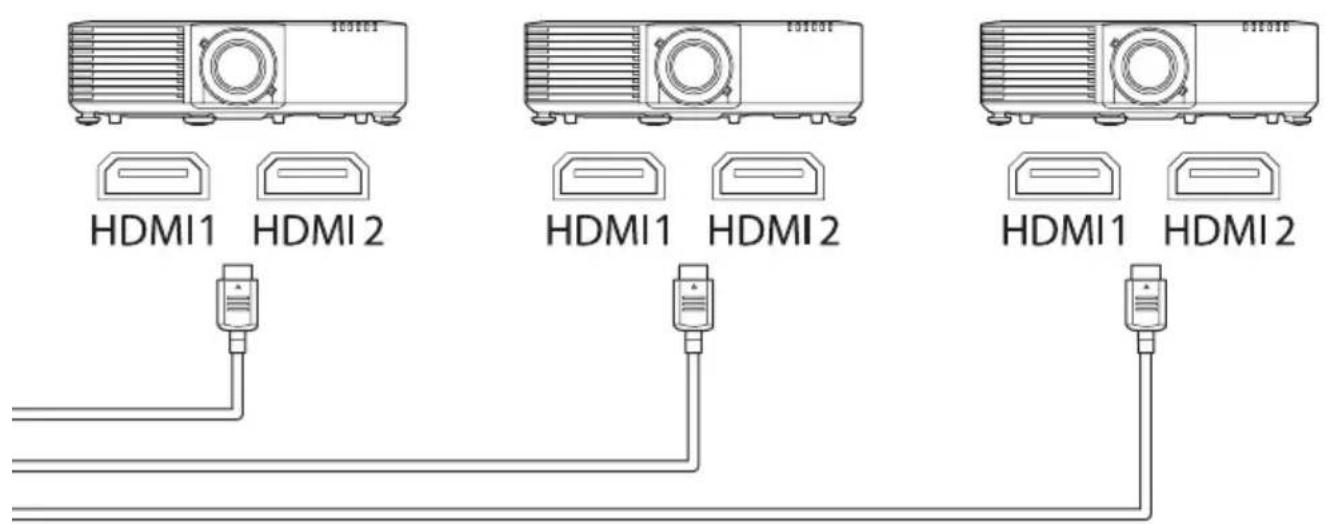
■ Connecting for Multi-Projection
Daisy-Chain Connection
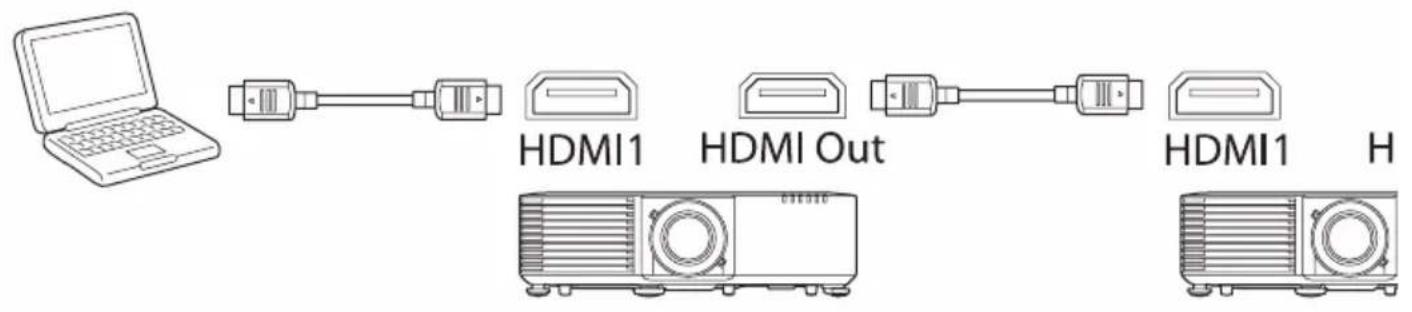
Connection Using Distributer

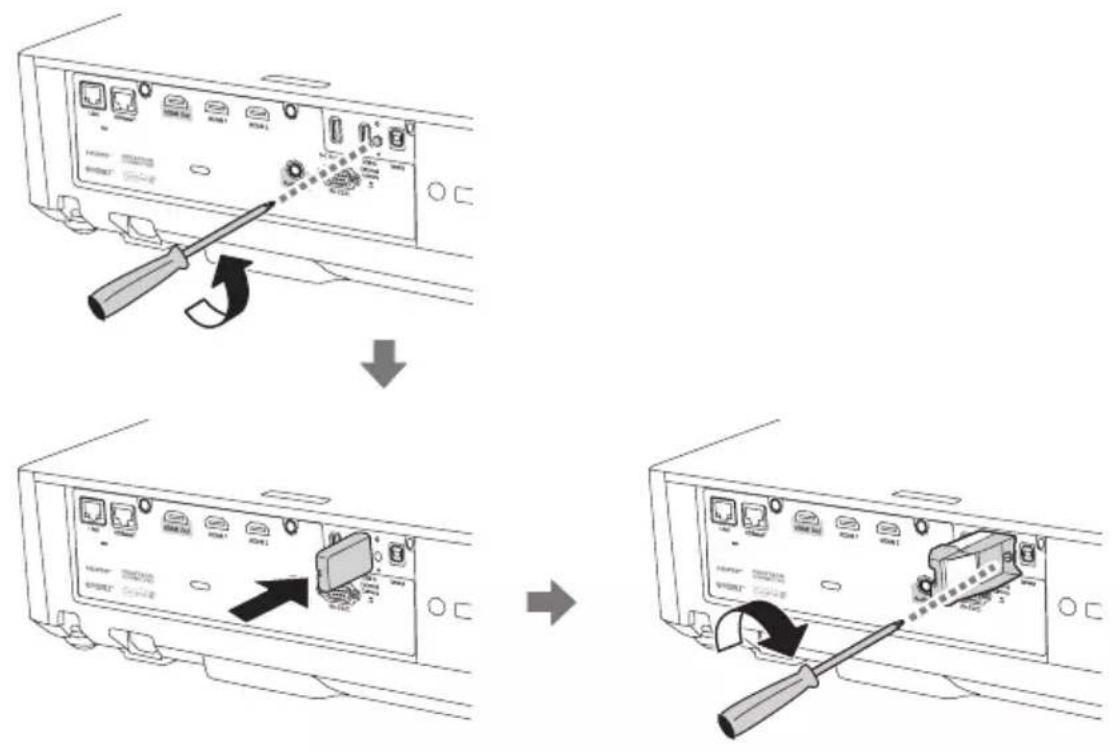
■Installing the Wireless LAN Module
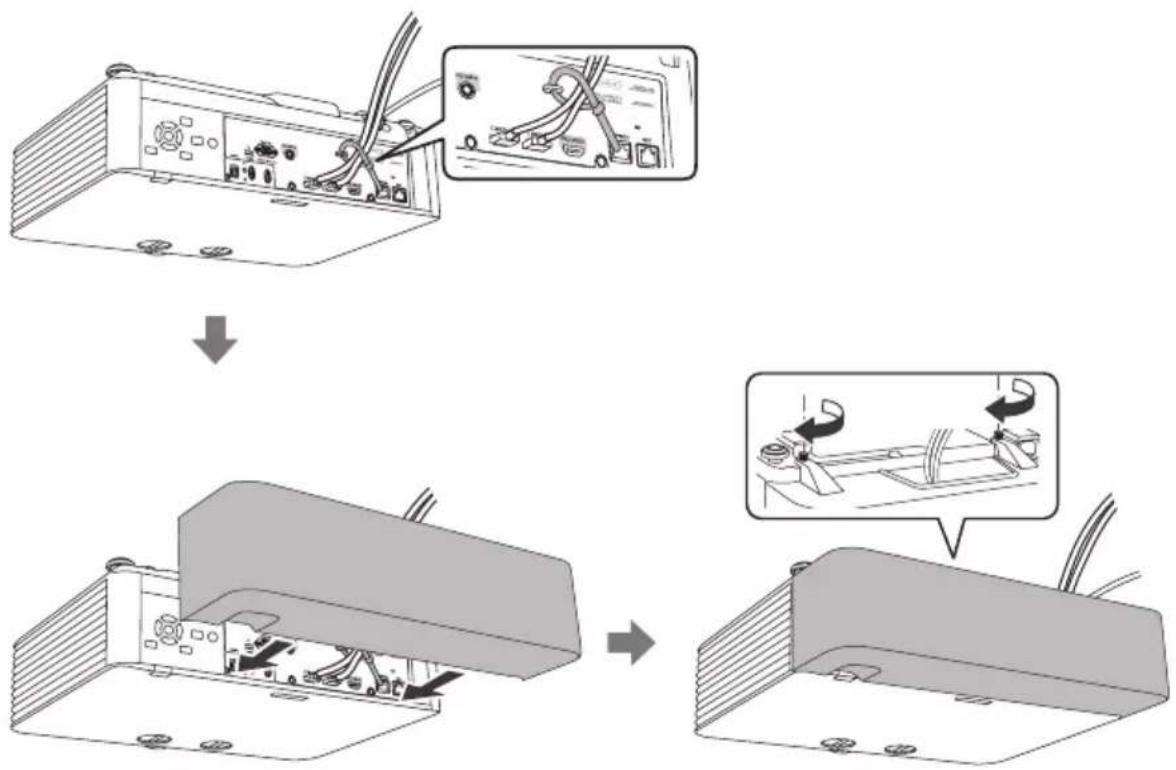
■ Attaching the Cable Cover
■ Projection Distance
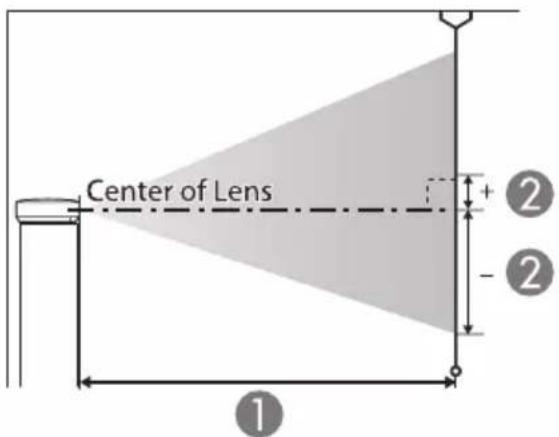
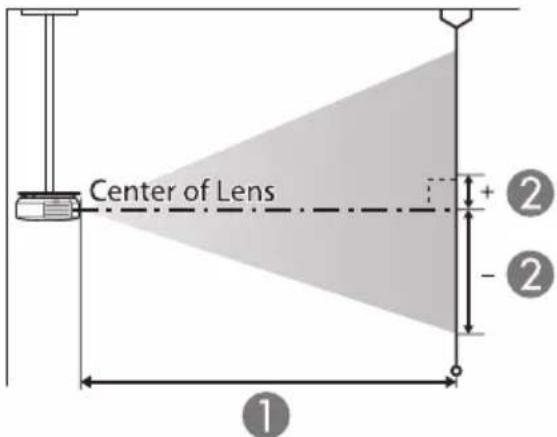
Unit:cm
| 16:10 screen size | 1 | 2 | |
| Inches (Diagonally) | Width × Height | Minimum (Wide) to Maximum (Tele) | Vertical Lens Shift Bottom to Top |
| 50" 108 × 67 1 | 44 - 235 -67 - 0 | ||
| 60" 129 × 81 1 | 74 - 283 -81 - 0 | ||
| 70" 151 × 94 2 | 04 - 331 -94 - 0 | ||
| 80" 172 × 108 | 233 - 378 -108 - 0 | ||
| 100" 215 × 135 | 292 - 474 -135 - 0 | ||
| 120" 258 × 162 | 351 - 569 -162 - 0 | ||
| 150" 323 × 202 | 440 - 713 -202 - 0 | ||
| 200" 431 × 269 | 588 - 951 -269 - 0 | ||
| 300" 646 × 404 | 884 - 1429 -404 - 0 | ||
| 500" 1077 × 673 | 1476 - 2384 -673 - 0 | ||
Unit:cm
| 4:3 screen size | 1 | 2 | |
| Inches (Diagonally) | Width × Height | Minimum (Wide) to Maximum (Tele) | Vertical Lens Shift Bottom to Top |
| 45" 91 × 69 14 | 7 - 240 -69 - 0 | ||
| 50" 102 × 76 1 | 64 - 267 -76 - 0 | ||
| 60" 122 × 91 1 | 97 - 321 -91 - 0 | ||
| 80" 163 × 122 | 264 - 429 -122 - 0 | ||
| 100" 203 × 152 | 331 - 537 -152 - 0 | ||
| 120" 244 × 183 | 398 - 645 -183 - 0 | ||
| 150" 305 × 229 | 499 - 807 -229 - 0 | ||
| 200" 406 × 305 | 666 - 1077 -305 - 0 | ||
| 300" 610 × 457 | 1001 - 1618 -457 - 0 | ||
| 440" 813 × 610 | 1336 - 2158 -610 - 0 | ||
| 441" 896 × 672 | 1473 - 2380 -672 - 0 | ||
Unit:cm
| 16:9 screen size | 1 | 2 | |
| Inches (Diagonally) | Width × Height | Minimum (Wide) to Maximum (Tele) | Vertical Lens Shift Bottom to Top |
| 49" 108 × 61 1 | 45 - 237 -64 - 3 | ||
| 50" 111 × 62 1 | 48 - 242 -66 - 3 | ||
| 60" 133 × 75 1 | 79 - 291 -79 - 4 | ||
| 80" 177 × 100 | 240 - 389 -105 - 6 | ||
| 100" 221 × 125 | 301 - 487 -131 - 7 | ||
| 120" 266 × 149 | 361 - 585 -158 - 8 | ||
| 150" 332 × 187 | 453 - 733 -197 - 10 | ||
| 200" 443 × 249 | 605 - 978 -263 - 14 | ||
| 300" 664 × 374 | 909 - 1469 -394 - 21 | ||
| 400" 886 × 498 | 1213 - 1959 -526 - 28 | ||
| 486" 1076 × 605 | 1474 - 2381 -639 - 34 | ||
Unit:cm
| 16:6 screen size | 1 | 2 | |
| Inches (Diagonally) | Width × Height | Minimum (Wide) to Maximum (Tele) | Vertical Lens Shift Bottom to Top |
| 46" 109 × 41 1 | 47 - 239 -55 - 14 | ||
| 50" 119 × 45 1 | 60 - 260 -59 - 15 | ||
| 60" 143 × 54 1 | 92 - 313 -71 - 18 | ||
| 80" 190 × 71 2 | 58 - 418 -95 - 24 | ||
| 100" 238 × 89 3 | 23 - 524 -119 - 30 | ||
| 120" 285 × 107 | 388 - 629 -143 - 36 | ||
| 150" 357 × 134 | 486 - 787 -178 - 45 | ||
| 200" 476 × 178 | 650 - 1051 -238 - 59 | ||
| 300" 713 × 268 | 976 - 1578 -357 - 89 | ||
| 400" 951 × 357 | 1303 - 2105 -476 - 119 | ||
| 452" 1075 × 403 | 1473 - 2379 -537 - 134 | ||
Unit:cm
| 21:9 screen size | 1 | 2 | |
| Inches (Diagonally) | Width × Height | Minimum (Wide) to Maximum (Tele) | Vertical Lens Shift Bottom to Top |
| 47" 110 × 47 1 | 47 - 240 -58 - 11 | ||
| 50" 117 × 50 1 | 57 - 255 -61 - 11 | ||
| 60" 140 × 60 1 | 89 - 307 -74 - 14 | ||
| 80" 187 × 80 2 | 53 - 410 -98 - 18 | ||
| 100" 233 × 100 | 317 - 514 -123 - 23 | ||
| 120" 280 × 120 | 381 - 617 -148 - 28 | ||
| 150" 350 × 150 | 447 - 773 -184 - 34 | ||
| 200" 467 × 200 | 638 - 1031 -246 - 46 | ||
| 300" 700 × 300 | 958 - 1549 -396 - 69 | ||
| 400" 934 × 400 | 1279 - 2066 -492 - 92 | ||
| 461" 1076 × 46 | 1475 - 2382 -567 - 106 | ||
External Dimensions
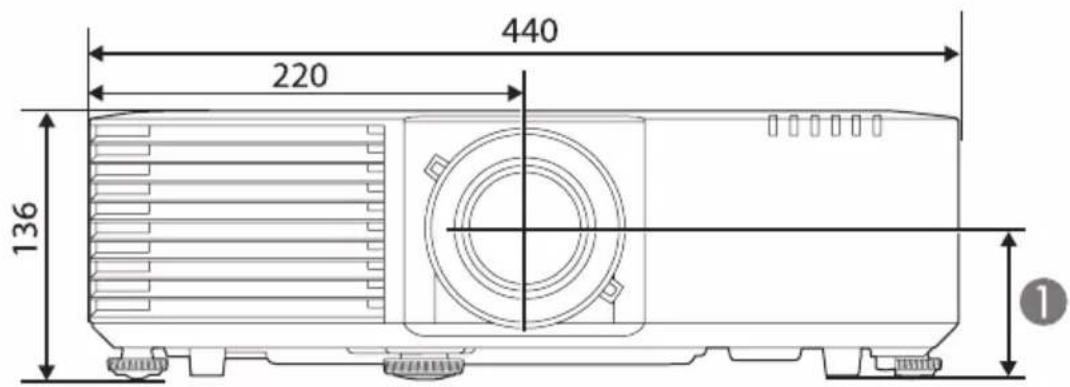
1 Distance from center of lens to suspension bracket fixing point : 74 mm
For more information
epson.sn


http://epson.sn
natural_image
Simple line drawing of a laptop computer with a blank screen and a pointer (no text or symbols)| EN | You can get the latest version of the manuals and specifications on the Epson Web site. |
| DE | Sie finden die aktuelle Version von Anleitungen und Spezifikationen auf der Epson-Website. |
| FR | Vous pouvez obtenir la dernière version des manuels et des spécifications depuis le site Web Epson. |
| IT | È possibile ottenere la versione più recente di manuali e specifiche sul sito web Epson. |
| ES | Puede obtener la última versión de los manuales y las especificaciones en el sitio web de Epson. |
| PT | Pode aceder à versão mais recente dos manuais e das características técnicas no website da Epson. |
| NL | U kunt de nieuwste versie van de handleidingen en specificaties verkrijgen op de website van Epson. |
| DA | Du kan hente de nyeste udgaver af manualerne og specifikationerne på Epsons websted. |
| FI | Voit hakea käyttöoppaiden ja teknisten tietojen uusimmat versiot Epson-verkkosivustolla. |
| NO | Du finner de nyeste versjonene av håndbøkene og spesifikasjonene på Epsons nettsted. |
| SV | Du kan hämta den senaste versionen av handböcker och specifikationer på Epsons webbplats. |
| CS | Nejnovější verzi příruček a specifikací můžete získat na webu společnosti Epson. |
| HU | Az Epson weboldaláról beszerezheti az útmutatók és specifikációk legújabb verzióit. |
| PL | Najnowszą wersję podręczników i specyfikacji można uzyskać na stronie internetowej Epson. |
| RO | Puteți obține cele mai recente versiuni ale manualelor și specificațiilor de pe site-ul web Epson. |
| EL | Μπορείτε να βρείτε την τελευταία έκδοση των εγχειριδίων και των προδιαγραφών στην τοποθεσία Web της Epson. |
| TR | Kılavuzların ve teknik özelliklerin son sürümünü Epson Web sitesinde bulabilirsiniz. |
| SL | Najnovejše različice priročnikov in specifikacij najdete na spletnem mestu Epson. |
| CA | Podeu obtenir la versió més recent dels manuals i les especificacions a la pàgina web d’Epson. |
| RU | Последние версии руководств и технических характеристик доступны на веб- сайте Epson. |
| UK | Останні версії посібників і технічних характеристик можна отримати на веб- сайті компанії Epson. |
| KK | Нүскқаулықтың ең соңғы нұскасын және сипаттамаларды Epson веб- сайтынан алуға болады. |
| AR | يمكنك الحصول على أ '+دث إصدار من أ'dлаة الاستخدام والмоاصفات من موع Epson على الوب. |
| ZHS | 您可以访问 Epson 网站获取最新版手册和规格。 |
| ZHT | 您可在 Epson Web 網站上,取得最新版的手冊及規格。 |
| KO | EPSON 웹사이트에서 설명서와 사양 최신 버전을 볼 수 있습니다 . |
| ID | Anda bisa mendapatkan versi terbaru buku petunjuk dan spesifikasi di situs Web Epson. |