IB550StU3S - Boîtier informatique Icy Box - Notice d'utilisation et mode d'emploi gratuit
Retrouvez gratuitement la notice de l'appareil IB550StU3S Icy Box au format PDF.
| Caractéristiques techniques | Boîtier externe pour disque dur 2,5 pouces, USB 3.0, interface SATA |
|---|---|
| Capacité de stockage | Compatible avec les disques durs jusqu'à 2 To |
| Dimensions | Environ 130 x 80 x 15 mm |
| Poids | Environ 150 g |
| Utilisation | Idéal pour le stockage et le transfert de données, compatible avec Windows, macOS et Linux |
| Installation | Installation sans outil, branchement simple du disque dur |
| Alimentation | Alimentation par USB, pas besoin d'alimentation externe |
| Maintenance et réparation | Nettoyage avec un chiffon doux, éviter l'exposition à l'humidité |
| Sécurité | Ne pas exposer à des températures extrêmes, éviter les chocs physiques |
| Informations générales | Garantie de 2 ans, support technique disponible |
FOIRE AUX QUESTIONS - IB550StU3S Icy Box
Questions des utilisateurs sur IB550StU3S Icy Box
0 question sur cet appareil. Repondez a celles que vous connaissez ou posez la votre.
Poser une nouvelle question sur cet appareil
Téléchargez la notice de votre Boîtier informatique au format PDF gratuitement ! Retrouvez votre notice IB550StU3S - Icy Box et reprennez votre appareil électronique en main. Sur cette page sont publiés tous les documents nécessaires à l'utilisation de votre appareil IB550StU3S de la marque Icy Box.
MODE D'EMPLOI IB550StU3S Icy Box
text_image
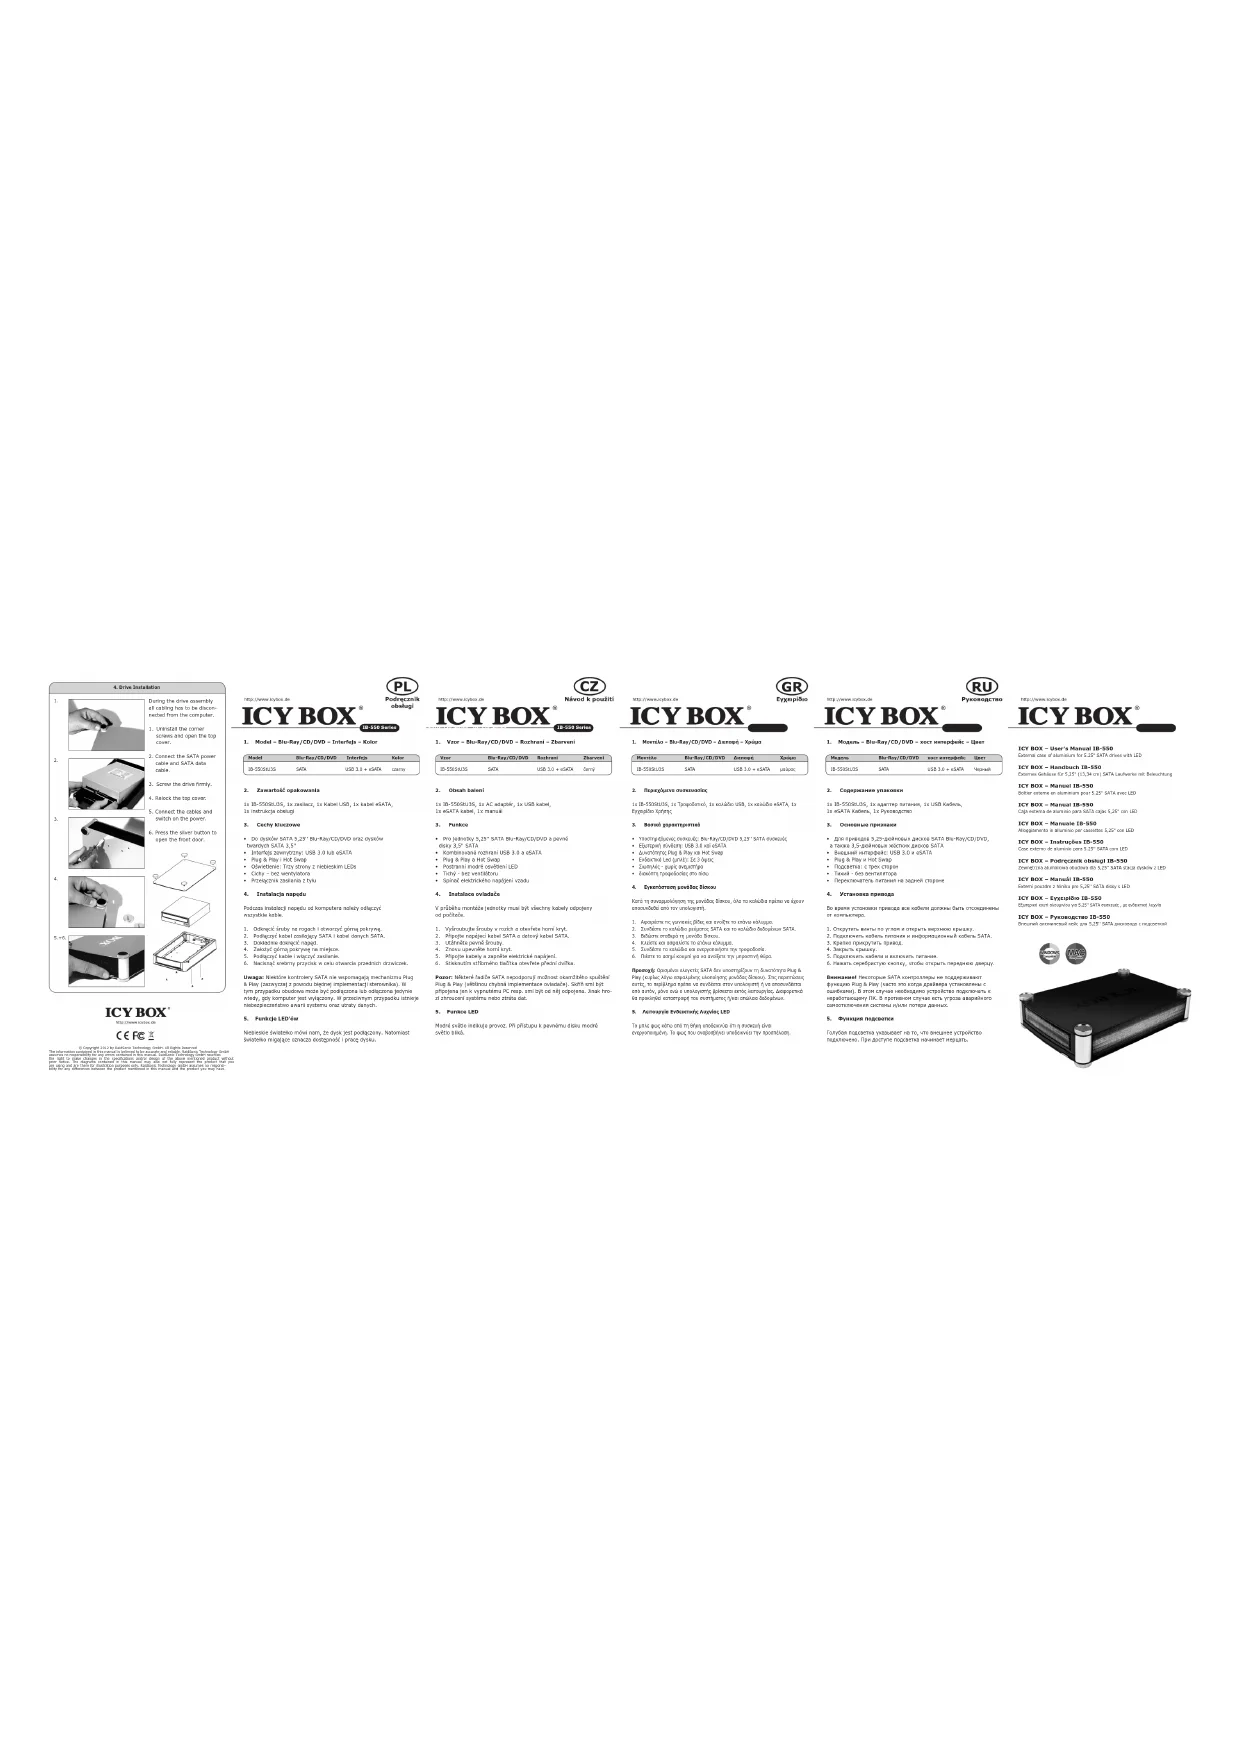
4. Drive Installation 1. During the drive assembly all cabling has to be disconnected from the computer. 2. Connect the SATA power cable and SATA data cable. 3. Screw the drive firmly. 4. Relock the top cover. 5. Connect the cables and switch on the power. 6. Press the silver button to open the front door. 5. +6.ICY BOX®
CEFC
© Copyright 2012 by RaidSonic Technology GmbH. All Rights Reserved the information contained in this manual is believed to be accurate and reliable. RaidSonic Technology GmbH assumes no responsibility for any errors contained in this manual. RaidSonic Technology GmbH receives right, the value changes from the goods mentioned and its demand of a product mentioned product without prior guidance. The diagram contains in this manual may also not have represented any product that you are using and are there for illustration purposes only. RaidSonic Technology GmbH assumes no responsibility for any differences between the product mentioned in this manual and the product you may have.

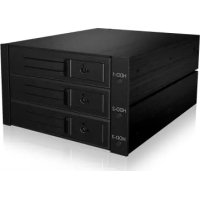
1. Model - Blu-Ray/CD/DVD - Interfejs - Kolor
Model Blu-Ray/CD/DVD Interfejs IP-SS0S1U3S SATA USB 3.0 + eSATA
2. Zawartość opakowania
1x IB-550StU3S, 1x zasilacz, 1x Kabel USB, 1x kabel eSATA, 1x instrukcja obsługi
- Cechy kluczowe
- Do dysków SATA 5,25" Blu-Ray/CD/DVD oraz dysków
• Interfeis zewnytrzny: USB 3.0 lub eSATA
• Plug & Play i Hot Swap
- Oswiedienne: trzy strony - Cicby - bez wentylatora
- Przełącznik zasilania z tyłu
4. Instalacja napędu
Podczas instalacji napędu od komputera należy odiączyć wszystkie kable.
-
Odkręcić śruby na rogach i otworzyć górną pokrywę.
-
Podłączyć kabel zasilający SATA i kabel danych SATA.
-
Podłączyć fizycznej kabel
-
Załność óórna pokrywe na
-
Podłączyć kable i włączyć zasilanie.
- Nacisnąć srebnny przycisk w celu otwarcia przednich drzwiczek.
Uwaga: Niektóre kontrolery SATA nie wspomagają mechanizmu Plug & Play (zazwyczaj z powodu błędnej implementacji sterownika). W tym przypadku obudowa może być podłączona lub odłączona jedynie wtedy, gdy komputer jest wyłączony. W przeciwnym przypadku istnieje niebezpieczeństwo awarii systemu oraz utraty danych.
2.1.1.1.1
Niebieskie światełko mówi nam, że dysk jest podłączony. Natomiast światełko migające oznacza dostępność i pracę dysku.

- Vzor - Blu-Ray/CD/DVD - Rozhrani - Zbarveni
| Vzor | Blu-Ray/CD/DVD | Rozhrani | Zbarveni |
| 1B-5S0StU3S | SATA | USB 3.0 + eSATA | černý |
2. Obsah balení
1x IB-550StU3S, 1x AC adaptér, 1x USB kabel, 1x eSATA kabel, 1x manual
3. Funkce
- Pro jednotky 5,25" SATA Blu-Ray/CD/DVD a pevné disky 3,5" SATA - Kombinované rozhrani USB 3.0 a eSATA - Plug & Play a Hot Swap - Postranní modré osvětlení LED - Tichý - bez ventilátoru - Spinač elektrického napájení vzadu
4. Instalace ovladače
V průběhu montáže jednotky musí být všechny kabely odpojeny od počitače.
-
Vyšroubujte šrouby v rozích a otevřete horní kryt.
-
Připojte napájecí kabel SATA a datový kabel SATA.
-
Zpovu unevněte horní kryt
-
Připojte kabely a zapněte elektrické napájeni.
- Stisknutím stříbrného tlačitka otevřete přední dvířka.
Pozor: Některé řadiče SATA nepodporují možnost okamžitého spuštění Plug & Play (většinou chybná implementace ovladače). Skříň smí být připojena jen k vypnutému PC resp. smí být od něj odpojena. Jinak hroží zhroucení systému nebo ztráta dat.
5. Funkce LED
Modré světlo indíkuje provoz. Při přístupu k pevnému disku modré světlo bílká.

so series
ni
(No text)
[Non-Text]
[Non-Text]
[Non-Text]
[Non-Text]
[Non-Text]
[Non-Text]
[Non-Text]
[Non-Text]
[Non-Text]
[Non-Text]
• •
supersify
[Non-Text]
[Non-Text]
[Non-Text]
[Non-Text]
ca.
mžitého spuštění
Skřiň smí být
sojena. Jimak nro-
[Non-Text]
[Non-Text]
lisku modré
[Non-Text]
[Non-Text]
[Non-Text]
[Non-Text]
[Non-Text]
[Non-Text]
[Non-Text]
[Non-Text]
[Non-Text]
[Non-Text]
[Non-Text]
[Non-Text]
[Non-Text]
[Non-Text]
[Non-Text]
[Non-Text]
[Non-Text]
[Non-Text]
[Non-Text]
[Non-Text]
[Non-Text]
[Non-Text]
[Non-Text]
[Non-Text]
[Non-Text]
[Non-Text]
[Non-Text]
[Non-Text]
[Non-Text]
[Non-Text]
[Non-Text]
[Non-Text]
[Non-Text]
[Non-Text]
[Non-Text]
[Non-Text]
[Non-Text]
[Non-Text]
[Non-Text]
[Non-Text]
[Non-Text]
[Non-Text]
[Non-Text]
[Non-Text]
[Non-Text]
[Non-Text]
[Non-Text]
[Non-Text]
[Non-Text]
[Non-Text]
[Non-Text]
[Non-Text]
[Non-Text]
[Non-Text]
[Non-Text]
[Non-Text]
[Non-Text]
[Non-Text]
[Non-Text]
[Non-Text]
[Non-Text]
[Non-Text]
[Non-Text]
[Non-Text]
[Non-Text]
[Non-Text]
[Non-Text]
[Non-Text]
[Non-Text]
[Non-Text]
[Non-Text]
[Non-Text]
[Non-Text]
[Non-Text]
[Non-Text]
[Non-Text]
[Non-Text]
[Non-Text]
[Non-Text]
[Non-Text]
[Non-Text]
[Non-Text]
[Non-Text]
[Non-Text]
[Non-Text]
[Non-Text]
[Non-Text]
[Non-Text]
[Non-Text]
[Non-Text]
[Non-Text]
[Non-Text]
[Non-Text]
[Non-Text]
[Non-Text]
[Non-Text]
[Non-Text]
[Non-Text]
[Non-Text]
[Non-Text]
[Non-Text]
[Non-Text]
[Non-Text]
[Non-Text]
[Non-Text]
[Non-Text]
[Non-Text]
[Non-Text]
[Non-Text]
[Non-Text]
[Non-Text]
[Non-Text]
[Non-Text]
[Non-Text]
[Non-Text]
[Non-Text]
(
(cz)
ávod k použití
The Ground Truth image displays a single, solid horizontal line. According to Rule 2 (UNDERSCORE & LINE RULES), this is a stylistic or background line, not a placeholder underscore. Therefore, the OCR result must ignore it and output nothing or only meaningful text. The provided OCR content is "____", which consists of four underscores. This is an incorrect interpretation of the line as a placeholder, violating the rule that stylistic lines must be ignored. The OCR has hallucinated placeholder underscores where none exist in the GT. Hence, the OCR result is inconsistent with the Ground Truth.
[Non-Text]
50 Series
ni
[Non-Text]
FA čemý
The Ground Truth image displays a single, solid horizontal line. According to Rule 2 (UNDERSCORE & LINE RULES), this is a stylistic or background line, not a placeholder underscore. Therefore, the OCR result must ignore it and output nothing or only meaningful text. The provided OCR content is "____", which consists of four underscores. This is an incorrect interpretation of the line as a placeholder, violating the rule that stylistic lines must be ignored. The OCR has hallucinated underscores where none should exist based on the GT's visual context. Hence, the OCR result is inconsistent with the Ground Truth.
[Non-Text]
[Non-Text]
[Non-Text]
[Non-Text]
[Non-Text]
[Non-Text]
[Non-Text]
[Non-Text]
[Non-Text]
[Non-Text]
[Non-Text]
odnośeny
1.2.1
[Non-Text]
[Non-Text]
[Non-Text]
[Non-Text]
ta.
mžitého spuštění
skrtn simi być gojena. Jinak hro-
[Non-Text]
[Non-Text]
(1) 2017年1月1日
alsko moure
[Non-Text]
[Non-Text]
[Non-Text]
[Non-Text]
[Non-Text]
[Non-Text]
[Non-Text]
[Non-Text]
[Non-Text]
[Non-Text]
[Non-Text]
[Non-Text]
[Non-Text]
[Non-Text]
[Non-Text]
[Non-Text]
[Non-Text]
[Non-Text]
[Non-Text]
[Non-Text]
[Non-Text]
[Non-Text]
[Non-Text]
[Non-Text]
[Non-Text]
[Non-Text]
[Non-Text]
[Non-Text]
[Non-Text]
[Non-Text]
[Non-Text]
[Non-Text]
[Non-Text]
[Non-Text]
[Non-Text]
[Non-Text]
[Non-Text]
[Non-Text]
[Non-Text]
[Non-Text]
[Non-Text]
[Non-Text]
[Non-Text]
[Non-Text]
[Non-Text]
[Non-Text]
[Non-Text]
[Non-Text]
[Non-Text]
[Non-Text]
[Non-Text]
[Non-Text]
[Non-Text]
[Non-Text]
[Non-Text]
[Non-Text]
[Non-Text]
[Non-Text]
[Non-Text]
[Non-Text]
[Non-Text]
[Non-Text]
[Non-Text]
[Non-Text]
[Non-Text]
[Non-Text]
[Non-Text]
[Non-Text]
[Non-Text]
[Non-Text]
[Non-Text]
 |   |   | [ICY BOX®] | [ICY BOX®] | |||||
| 1. Model - Blu-Ray/CD/DVD - Interface - Colour | 1. Model - Blu-Ray/CD/DVD - Anschluss - Farbe | 1. Modèle - Blu-Ray/CD/DVD - Interface - Couleur | 1. Modèle - Blu-Ray/CD/DVD - Interfaz - Color | 1. Modèle - Blu-Ray/CD/DVD - Extern collegamento - Colore | |||||
| Model | Blu-Ray/CD/DVD Heat-Interface Colour | Model | Blu-Ray/CD/DVD Anachluise Farbe | Model | Blu-Ray/CD/DVD Interface Couleur | Model | Blu-Ray/CD/DVD Interfaz Color | Model | Blu-Ray/CD/DVD Ligueção Cor |
| IB-5505U35 SATA USB 3.0 + eSATA Black | IB-5505U35 SATA USB 3.0 + eSATA Schwarz | IB-5505U35 SATA USB 3.0 + eSATA Noir | IB-5505U35 SATA USB 3.0 + eSATA Negro | IB-5505U35 SATA USB 3.0 + eSATA Negro | IB-5505U35 SATA USB 3.0 + eSATA Negro | IB-5505U35 SATA USB 3.0 + eSATA Negro | IB-5505U35 SATA USB 3.0 + eSATA negro | ||
| 2. Package contents | |||||||||
| 1x IB-5505U35, 1x power adapter and cord, 1x USB cable, 1x eSATA cable, 1x manual | 2. Verpackungsinhalt | ||||||||
| 1x IB-5505U35, 1x Netzteil und Kabel, 1x USB Kabel, 1x eSATA Kabel, 1x Handbuch | 2. Contenu de l'emballage | 2. Contenido del embalaje | 2. Contenuto della confezione | ||||||
| 1x IB-5505U35, 1x adaptador e cable de alimentación, 1x cable USB, 1x cable eSATA, 1x manual | 1x IB-5505U35, 1x adaptador e cable de alimentación e cavo, 1x cavo USB, 1x cavo eSATA, 1x manual | 1x IB-5505U35, 1x adaptador de corrente, 1x cabo USB, 1x cabo eSATA, 1x manual de instruções | |||||||
| 3. Key Features | |||||||||
| For 5.25" SATA Blu-Ray/CD/DVD drives and 3.5" SATA HDDs | |||||||||
| USB 3.0 and eSATA combo interface | |||||||||
| Plug & Play and Hot Swap | |||||||||
| Blue LEDs: On three sides | |||||||||
| Very silent, fanless design | |||||||||
| Power switch on the back | |||||||||
| 4. Drive Installation | |||||||||
| During the drive assembly all cabling has to be disconnected from the computer. | |||||||||
| 1. Uninstall the corner screws and open the top cover. | |||||||||
| 2. Connect the SATA power and SATA data cable. | |||||||||
| 3. Screw the drive firmy. | |||||||||
| 4. Relocik the top cover. | |||||||||
| 5. Connect the cables and switches on the power. | |||||||||
| 6. Press the silver button to open the front door. | |||||||||
| Attention: Some SATA controllers do not support Plug & Play (mostly due to incorrect driver implementation). In this case should only be connected to or disconnected from the computer while the computer is off. Otherwise a system crash or data loss can be caused. | |||||||||
| 5. LED-Function | |||||||||
| The blue light shows the power on. The flashing light shows the CD/DVD access. | |||||||||
| Achtung: Enige SATA Controller unitatant doesn't kein Plug & Play (meist fehlerhafte Trebrierimplementation). Hier darf das Gehäuse nur an einen ausgeschätzten IPC changeschossen bzw. von diesem getrein werden. Sonst droht ein Systemabatur und oder Datenverfuht. | Attention: Certains contriteurs SATA gal no seportent pas Plug & Play (la plupart du temps, il s'agit d'une implantation incorrecte du driver), Dans ce mai, il faut connecter ou disconnecter l'inctorate après l'avoir édicate de la cuixie. Si non une différence de votre système ou une perte de vos données. | Attention: Unos contradores SATA no supporten Plug & Play (implementación del controlar defectose). La caja solo debe ser conectando un'impulsar que apogado? Se amenza con caixa del sistema y/o pérdida de datos. | Attention: Alcuior controller SATA no supporten i Plug & Play (normalemente a causa delle implementazioni erate di diver). In questo caso, la cava unvoluntare al PC o scollegato del PC solo a computer spento. In caso contrario si rischia un crash del sistema o la perdita di dato. | ||||||
| 5. LED-Function | |||||||||
| 5. LED-Funktion | |||||||||
| Die bleue Beluchting zeigt den Betrieb an. Bei Zugriff blinkt die bleue Beluchting. | Fonctionement des Diodes luminesseus La lumière bleue montre en marche. La lumière clignote lors de l'accès au CD/DVD-ROM Le divio azul indique suministro eletrico. Durante el acceso la unidad de disco, este divio azul destile. | Funcañamiento de los diodos luminosos El divio azul indique suministro eletrico. Durante el acceso la unidad de disco, este divio azul destile. | Funcañone LED I led bu slagnano l'etrata della corrente. Il accesso sul HDD viene | ||||||
[Non-Text]
[Non-Text]
indicat
[Non-Text]
。
[Non-Text]
[Non-Text]
[Non-Text]
[Non-Text]
[Non-Text]
[Non-Text]
[Non-Text]
[Non-Text]
[Non-Text]
[Non-Text]
[Non-Text]
[Non-Text]
[Non-Text]
[Non-Text]
[Non-Text]
[Non-Text]
[Non-Text]
[Non-Text]
[Non-Text]
[Non-Text]
[Non-Text]
[Non-Text]
[Non-Text]
[Non-Text]
[Non-Text]
[Non-Text]
[Non-Text]
[Non-Text]
[Non-Text]
[Non-Text]
[Non-Text]
[Non-Text]
[Non-Text]
[Non-Text]
[Non-Text]
[Non-Text]
[Non-Text]
[Non-Text]
[Non-Text]
[Non-Text]
[Non-Text]
[Non-Text]
[Non-Text]
[Non-Text]
[Non-Text]
[Non-Text]
[Non-Text]
[Non-Text]
[Non-Text]
[Non-Text]
[Non-Text]
[Non-Text]
[Non-Text]
[Non-Text]
[Non-Text]
[Non-Text]
[Non-Text]
[Non-Text]
[Non-Text]