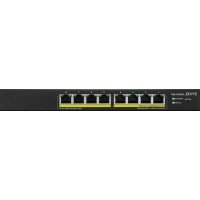
GS19158EP - Commutateur ZYXEL - Notice d'utilisation et mode d'emploi gratuit
Retrouvez gratuitement la notice de l'appareil GS19158EP ZYXEL au format PDF.


| Type de produit | Commutateur Ethernet Gigabit géré |
| Dimensions (L x P x H) | 440 x 200 x 44 mm (1U) |
| Poids | Environ 2,5 kg |
| Alimentation | 100-240 V AC, 50/60 Hz |
| Fonctions principales | Gestion via interface Web, utilitaire ZON, console série, VLAN, QoS, Spanning Tree, Link Aggregation, IGMP Snooping |
| Entretien et nettoyage | Débranchez l'appareil avant nettoyage. Utilisez un chiffon doux et sec. N'utilisez pas de produits abrasifs ou liquides. |
| Sécurité | Raccordez le câble de terre vert/jaune pour protéger contre la foudre et les interférences. Installation par un personnel qualifié. |
| Pièces détachées et réparabilité | Aucune pièce réparable par l'utilisateur. Contactez un professionnel agréé pour toute réparation. |
| Informations générales | Marque : ZyXEL, Modèle : GS19158EP, Garantie : consulter le manuel utilisateur, IP par défaut : 192.168.1.1 |
FOIRE AUX QUESTIONS - GS19158EP ZYXEL
Questions des utilisateurs sur GS19158EP ZYXEL
0 question sur cet appareil. Repondez a celles que vous connaissez ou posez la votre.
Poser une nouvelle question sur cet appareil
Téléchargez la notice de votre Commutateur au format PDF gratuitement ! Retrouvez votre notice GS19158EP - ZYXEL et reprennez votre appareil électronique en main. Sur cette page sont publiés tous les documents nécessaires à l'utilisation de votre appareil GS19158EP de la marque ZYXEL.
MODE D'EMPLOI GS19158EP ZYXEL
ZYXEL
Ethernet Switch Series
Quick Start Guide
ENGLISH | DEUTSCH | ESPAÑOL | FRANÇAIS | ITALIANO | SVENSKA
ČEŠTINA | SLOVENČINA | POLSKI | ROMÁNÁ | MAGYAR | БЪЛГАРСКИ
РУССКИЙ | УКРАЇНСЬКА | 简体中文 | 繁體中文
Step 1 Hardware Installation
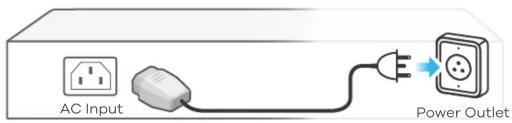
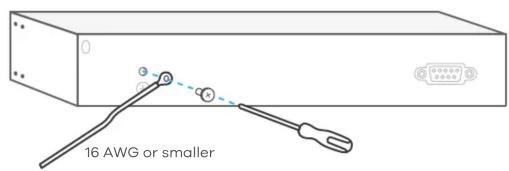
Note: Qualified service personnel must confirm the building's protective earthing terminal is a valid terminal.
Step 2 Configuration Options
Option A: Configure with ZON Utility for DHCP Environment (Smart and Managed Switch only)
1
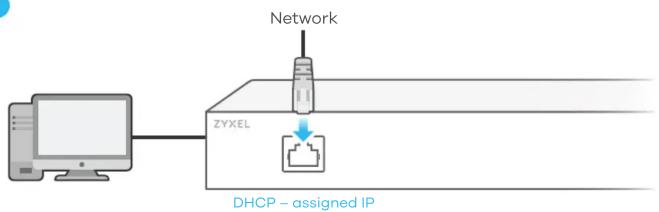
flowchart
graph TD
    A["Computer"] --> B["ZYXEL"]
    B --> C["Network"]
    C --> D["DHCP - assigned IP"]
2

https://www.zyxel.com/form/zon_utility_download.shtml
→
Support Information
USA
+1 800 255 4101
support@zyxel.com
EU
https://support.zyxel.eu
See the User's Guide at www.zyxel.com for more information, including customer support and safety warnings.
EU Importer
Zyxel Communications A/S
Gladsaxevej 378, 2. th. 2860 Søborg, Denmark
https://www.zyxel.com/dk/da/
US Importer
Zyxel Communications, Inc
1130 North Miller Street Anaheim, CA 92806-2001
https://www.zyxel.com/us/en/
Copyright © 2020 Zyxel Communications Corp. All Rights Reserved.


EN To help protect against lightning and interference functions, secure a green/yellow ground cable to the Switch.
DE Zum Schutz vor Blitz- und Interferenzfunktionen befestigen Sie ein grün/gelbes Erdungskabel am Switch.
ES Para ayudar a proteger contra rayos e interferencias, fije un cable de tierra verde/amarillo al conmutador.
FR Pour vous protéger contre la foudre et les interférences, branchez un câble de masse vert/jaune au commutateur.
IT Per proteggere dai fulmini e dalle interferenze, fissare un cavo di terra giallo/verde allo Switch.
SE För att skydda mot blixtnedslag och störningsfunktioner, säkra en grön/gul jordkabel till switchen.
CZ Z důvodu ochrany před bleskem a funkcemi rušení upevněte zelený/žlutý kabel uzemnění k přepínači.
SK Kvôli ochrane pred bleskom a rušením pripojte žltozelený uzemňovací kábel k prepínaču.
PL Aby zabezpieczyć przełącznik przed wyładowaniami elektrycznymi i zakłóceniami należy podłączyć do niego żółto-zielony kabel uziemiający.
RO Pentru a vă proteja împotriva fulgerelor și a altor interferențe, fixați cablu de impamantare la switch.
HU A villámok és az interferencia elleni védelem érdekében rögzítsen egy zöld/sárga védőföldkábelt a swithchez.
BG За да се предпазите от мълнии и смущения, осигурете зелен / жълт заземителен кабел към превключвателя.
RU Для защиты оборудования от помех и разрядов молний прикрепите к коммутатору желтый/зеленый заземляющий кабель.
UA Для захисту обладнання від перешкод і розрядів приєднайте до комутатора жовтий/зелений кабель заземлення.
简中 为了防雷电和防干扰,请将一根绿色/黄色接地线连接至交换机。
繁中為避免雷擊受損以及雜訊干擾,請以綠色/黃色接地線接到Switch設備外殼並鎖緊。
Option A: Configure with ZON Utility for DHCP Environment
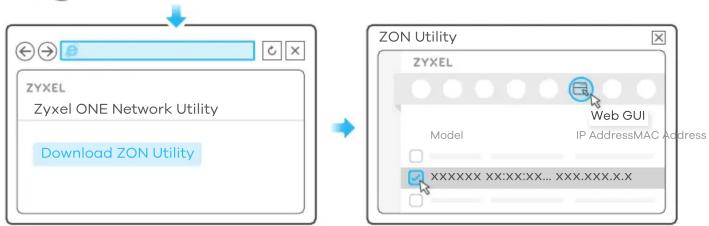
EN ① Connect the Switch and your computer to the same network that has a DHCP server.
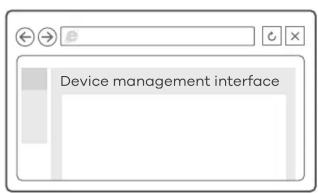
② Use ZON utility to discover the Switch. Select the Switch and click Web GUI icon to access its web configurator.
DE ① Verbinden Sie den Switch und Ihren Computer mit demselben Netzwerk, das über einen DHCP-Server verfügt.
② Verwenden Sie das ZON-Dienstprogramm, um den Switch zu entdecken. Wählen Sie den Schalter und klicken Sie auf das Web GUI Symbol, um auf den Web-Konfigurator zuzugreifen.
ES ① Conecte el conmutador y su ordenador una red que tenga un servidor DHCP.
② Utilice la utilidad ZON para descubrir el conmutador. Seleccione el conmutador y haga clic en el icono Web GUI para acceder al configurador web.
FR ① Connectez le commutateur et votre ordinateur au même réseau doté d'un serveur DHCP.
② Utilisez l'utilitaire ZON pour découvrir le commutateur. Sélectionnez le commutateur et cliquez sur l'icône de l'interface graphique Web pour accéder à son configurateur Web.
IT ① Collegare lo Switch e il computer alla stessa rete che dispone di un server DHCP.
② Usare l'utilità ZON per scoprire lo Switch. Selezionare lo Switche cliccare l'icona Web GUI per accedere al configuratore web.
SE ① Anslut switchen och datorn till samma nätverk, som har en DHCP-server.
② Använd ZON-verktyget för att hitta switchen. Välj switchen och klicka på ikonen Web GUI för att öppna dess webbkonfigurator.
CZ ① Pripojte prepínac a pocítac ke stejné síti, která má server DHCP.
② Ke zjištení prepínace použijte funkci ZON. Vyberte daný prepínac a kliknutím na ikonu Web GUI otevrete webový konfigurátor.
SK ① Prepínac a pocítac pripojte k rovnakej sieti so serverom DHCP.
② Na zistenie prepínaca použite pomôcku ZON. Zvolte prepínac a kliknite na ikonu Web GUI (Webové grafické používatelské rozhranie) na získanie prístupu do nástroja Web Configurator (Webový nástroj na konfiguráciu).
PL ① Podłacz przełącznik i komputer do tej samej sieci, w której znajduje sie serwer DHCP.
② Do wykrywania przełącznika używaj narzedia ZON. Wybierz przełącznik i kliknij ikone Web GUI, aby uzyskac dostęp do konfiguratora internetowego.
RO ① Conectați calculatorul și switch-ul la aceeași rețea care are un server DHCP.
② Utilizați programul ZON pentru a descoperi switch-ul. Selectați switch-ul și faceți clic pe pictograma Web GUI pentru a accesa configuratorul web.
HU ① Csatlakoztassa a switchet és számítógépét ugyanahhoz a DHCP kiszolgálót tartalmazó hálózathoz.
② A ZON alkalmazással keresse meg a switchet. Válassza ki a switchet és kattintson a Web GUI ikonra a weben keresztüli beállításhoz.
BG ① Свържете комутатора и компютъра си към мрежата с DHCP сървър.
② Използвайте помощната програма ZON utility, за да откроете комутатора. Изберете комутатора и щракнете върху иконата на Web GUI, за да получите достъп до неговия уеб конфигуратор.
RU ① Подключите коммутатор и компьютер к одной и той же сети, в которой имеется DHCP-сервер.
② С помощью утилиты ZON выполните обнаружение коммутатора. Выберите коммутатор и нажмите ярлык Web GUI для получения доступа к веб-конфигуратору коммутатора.
UA ① Підключіть комутатор і комп'ютер до однієї мережі, в якій міститься DHCP-сервер.
② За допомогою утиліти ZON виконайте пошук комутатора. Оберіть комутатор і натисніть Web GUI, щоб отримати доступ до веб-конфігуратора комутатора.
简中 ① 将交换机和您的计算机连接到具有DHCP服务的网路。下载并安装Zyxel ZON工具软体。
② ZON可以找出使用动态IP的交换机,选择欲设定的交换机并点选上方Web GUI图示,即可进入设备管理网页。
繁中 ① 將Switch和您的電腦連接到具有DHCP服務的網路。下載並安裝Zyxel ZON工具軟體。
② ZON可以找出使用動態IP的Switch,選擇欲設定的Switch並點選上方Web GUI圖示,即可進入設備管理網頁。
Option B: Configure with Switch Default Static IP
flowchart
graph LR
    A["Switch IP: 192.168.1.1"] --> B["PC IP: 192.168.1.2 ~ 192.168.1.254"]
    style A fill:#f9f,stroke:#333
    style B fill:#ccf,stroke:#333
2
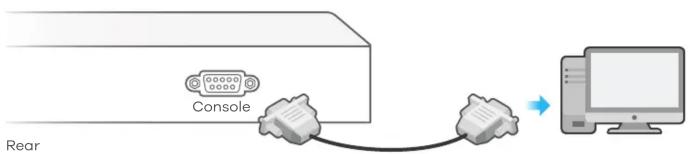
Option C: Configure with Console Cable (Managed Switch Only)
flowchart
graph LR
    A["Console"] -->|Rear| B["Computer"]

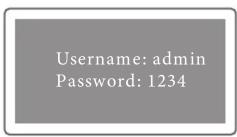
Terminal emulator configuration: VT100 terminal emulator 9600 bps or 115200 bps No parity, 8 data bits, 1 stop bit No flow control
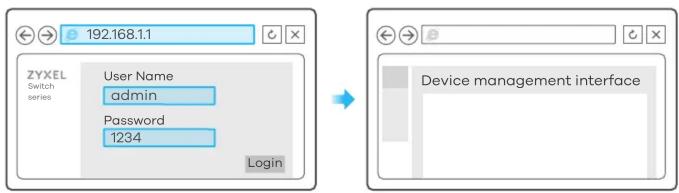
Option B: Configure with Switch Default Static IP
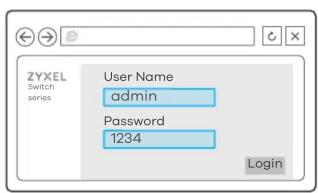
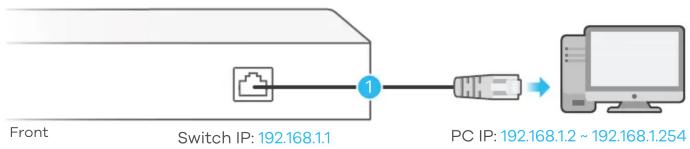
EN ① Connect your computer to the Switch and make sure they are both in the same subnet. ② Launch your web browser to access and configure the Switch.
DE ① Verbinden Sie Ihren Computer mit dem Switch und stellen Sie sicher, dass sich seine IP-Adresse im selben Subnetz befindet.
② Starten Sie Ihren Webbrowser, um auf den Switch zuzugreifen und ihn zu konfigurier
ES
① Conecte el ordenador al conmutador y asegúrese de que su dirección IP esté en la misma subred.
② Abra el configurador web para acceder y configurar el conmutador.
FR ① Connectez votre ordinateur au commutateur et assurez-vous que son adresse IP est dans le même sous-réseau.
② Lancez votre navigateur Web pour accéder au commutateur et le configurer.
IT ① Collegare il computer allo Switch e accertarsi che il suo indirizzo IP si trovi nella stessa sottorete.
② Avviare il browser per accedere e configurare lo Switch.
SE ① Anslut datorn till switchen och kontrollera att dess IP-adress är i samma delnät.
② Starta webbläsaren för åtkomst och konfiguration av switchen.
CZ ① Pripojte pocítac k prepínaci a ujistete se, že jeho IP adresa je ve stejné podsíti.
② Spustte webový prohlížec, ze kterého získáte prístup k prepínaci, a zarízení nakonfigurujte.
SK ① Pocítac pripojte k prepínacu; jeho IP adresa musí byt v rovnakej podsieti.
② Spustte webový prehliadac na získanie prístupu a konfiguráciu prepínaco
PL ① Podłącz komputer do przełacznika i upewnij sie, czy jego adres IP znajduje sie w tej samej-podsieci.
② Uruchom przegladarke internetowa, aby uzyskac dostęp do przełacznika i skonfigurowac przełącznik.
RO ① Conectați calculatorul la switch și asigurați-vă că adresa IP a acestuia se află în aceeași subrețea.
② Lansați browserul web pentru a accesa și configura switch-ul.
HU ① Csatlakoztassa számítógépét a switchhez. Ügyeljen rá, hogy IP-címe ugyanahhoz az alhálózathoz tartozzon.
② Indítsa el böngészojét, hogy elérje és beállítsa a switchet.
BG ① Свържете компютъра към комутатора и се уверете, че и двата са в една и съща подмрежа.
② Стартирайте вашия уеб браузър за да достъп и конфигуриране.
RU ① Подключите компьютер к коммутатору и убедитесь, что их IP-адреса находятся в одной и той же подсети.
② Запустите веб-браузер, чтобы получить доступ к функциям и настройкам коммутатора.
UA ① Підключіть комп'ютер до комутатора і переконайтеся, що їх IP-адреси знаходяться в одній підмережі.
② Запустіть веб-браузер, щоб отримати доступ до функцій і налаштувань комутатора.
简中 ① 将计算机连接到交换机并确保其IP地址处于同一子网。
② 启动Web浏览器以访问并配置交换机。
繁中 ① 將您的電腦連接 Switch,確認 IP 位址屬於同一個子網路區塊。
② 打開瀏覽器網頁,進入 Switch 設定畫面進行設定。
Mounting Options (by each model)
Rack Mounting
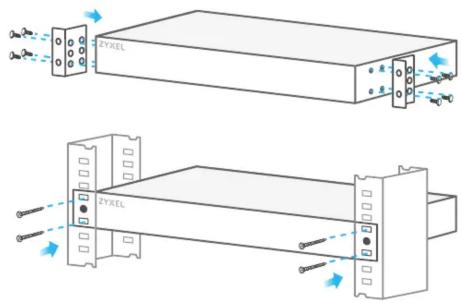
Wall Mounting
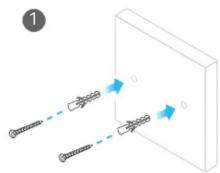
2
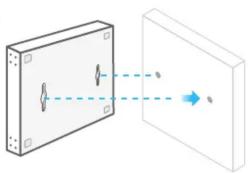
natural_image
Diagram showing a rectangular block with internal components and a dashed arrow pointing to a separate 3D block (no text or symbols)Desktop Installation
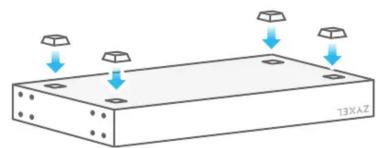
natural_image
Diagram of a rectangular electronic component with four mounting holes and downward arrows indicating direction (no text or symbols)Marque : ZYXEL
Modèle : GS19158EP
Catégorie : Commutateur