
MB578G5S6B - Four encastrable SIEMENS - Notice d'utilisation et mode d'emploi gratuit
Retrouvez gratuitement la notice de l'appareil MB578G5S6B SIEMENS au format PDF.
| Type de produit | Four encastrable |
| Marque | Siemens |
| Modèle | MB578G5S6B |
| Dimensions (L x H x P) | 60 x 60 x 55 cm environ |
| Poids | Environ 35 kg |
| Alimentation | 230 V / 50 Hz, raccordement monophasé |
| Puissance maximale | 3300 W environ |
| Classe de protection | Classe I avec mise à la terre |
| Mode de pose | Encastrable dans un meuble haut ou colonne |
| Fonctions principales | Chaleur tournante, gril, sole, chaleur pulsée, décongélation, lumière intérieure |
| Type de nettoyage | Nettoyage manuel, émaillage facile à nettoyer |
| Porte | Porte à ouverture par poignée, vitre amovible |
| Capacité | Environ 71 litres |
| Sécurité | Arrêt automatique, sécurité enfants, refroidissement forcé |
| Température maximale | 275 °C |
| Accessoires fournis | Grille métallique, lèchefrite, guide de cuisson |
| Réparabilité | Pièces détachées disponibles auprès du SAV Siemens |
| Installation | Nécessite un professionnel agréé pour le raccordement électrique |
FOIRE AUX QUESTIONS - MB578G5S6B SIEMENS
Questions des utilisateurs sur MB578G5S6B SIEMENS
0 question sur cet appareil. Repondez a celles que vous connaissez ou posez la votre.
Poser une nouvelle question sur cet appareil
Téléchargez la notice de votre Four encastrable au format PDF gratuitement ! Retrouvez votre notice MB578G5S6B - SIEMENS et reprennez votre appareil électronique en main. Sur cette page sont publiés tous les documents nécessaires à l'utilisation de votre appareil MB578G5S6B de la marque SIEMENS.
MODE D'EMPLOI MB578G5S6B SIEMENS

4
natural_image
Diagram of a hand removing or adjusting the interior of an oven into a rack (no text or symbols present)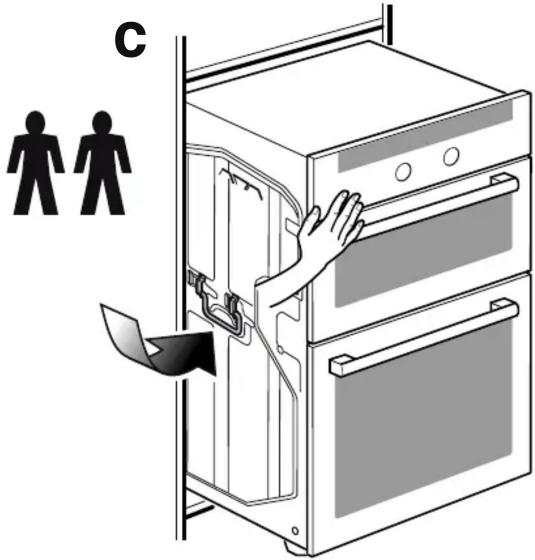
en
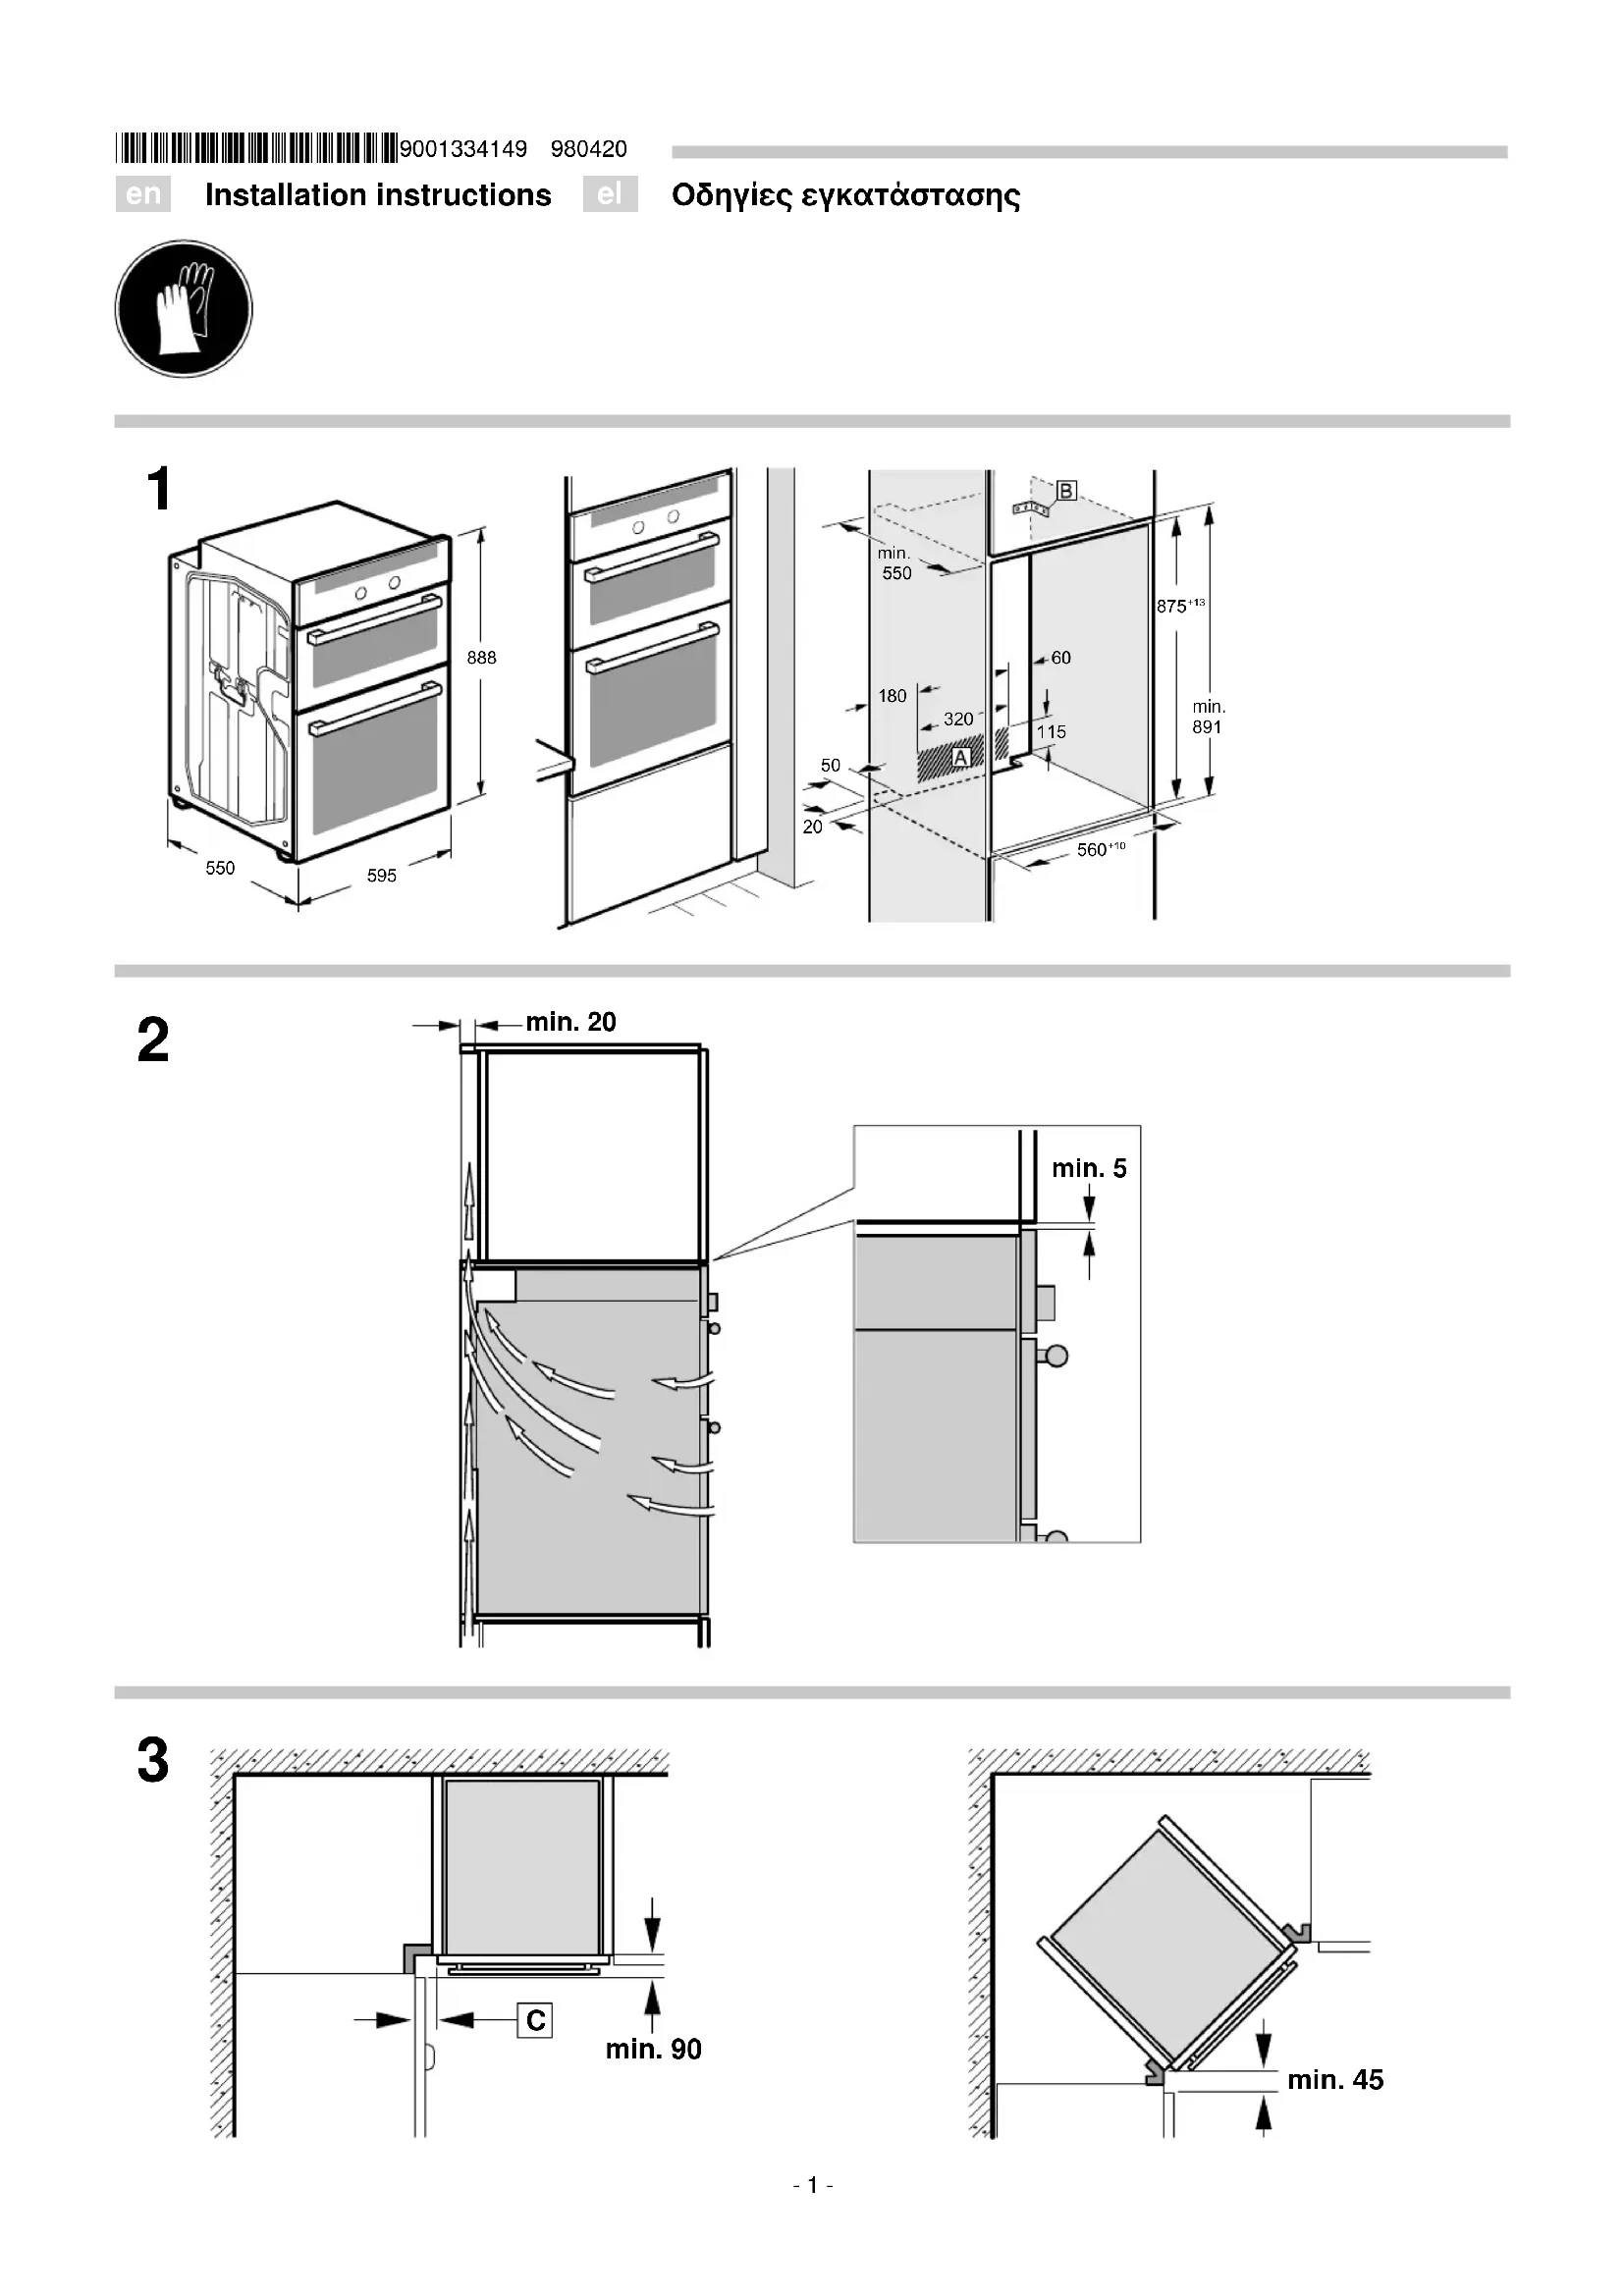
Important information – Fig. 1
The safe operation of this appliance can only be has been installed to a professional standard in ac these installation instructions. The installer shall be li damage resulting from incorrect installation.
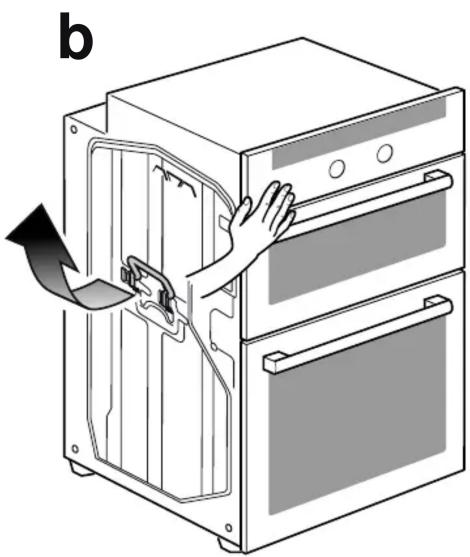
- Do not use the door handle to transport or install the appliance.
The appliance must be transported by two people using the carry handles on either side – figure 4b.
- Check the appliance for damage after unpacking it. Do not connect the appliance if it has been damaged in transit.
■ Proceed in accordance with the installation sheets for installing accessories.
■ Before starting up the appliance, remove any packaging material and adhesive film from the cooking compartment and the door.
■ Fitted units must be heat-resistant up to 90 °C, and adjacent unit fronts up to 65 °C.
- Do not install the appliance behind a decorative door or the door of a kitchen unit, as this may cause the appliance to overheat.
■ Any cut-outs that need to be made in the units should be made before the appliance is installed. Remove any shavings, as they may prevent the electrical components from working properly.
■ Wear protective gloves so that you do not cut yourself. Parts that are accessible during installation may have sharp edges.
■ The mains socket for the appliance must either be located in the hatched area A or outside of the area where the appliance is installed.
- Secure any unsecured units to the wall using a standard bracket B.
■ The dimensions in the figures are in mm.
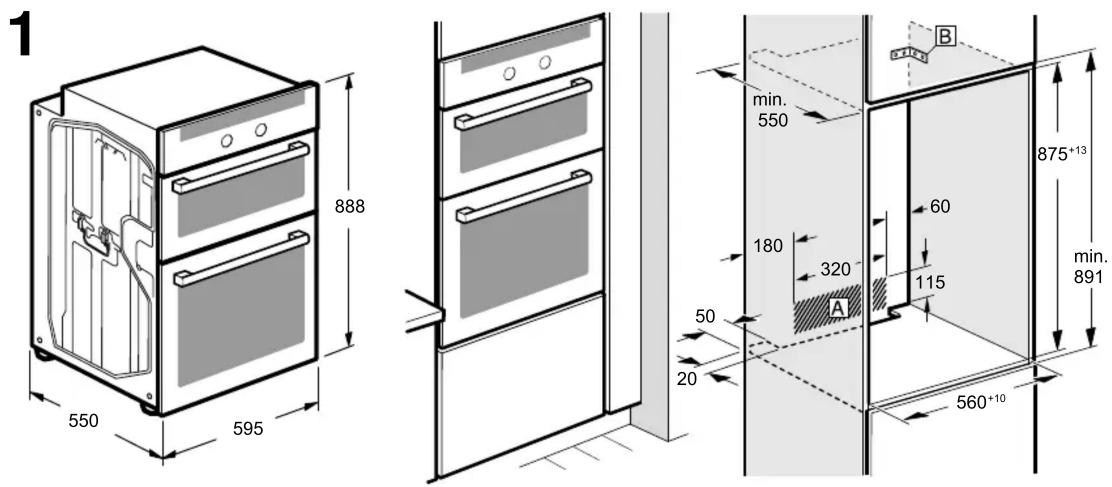
Appliance in a tall unit – fig. 2
To ventilate the appliance, there must be a gap of 20 mm between all intermediate floors and the wall.
If the tall unit has another back panel in addition to the element back panels, this must be removed.
Do not fit the appliance too high up; it must be possible for accessories to be removed easily.
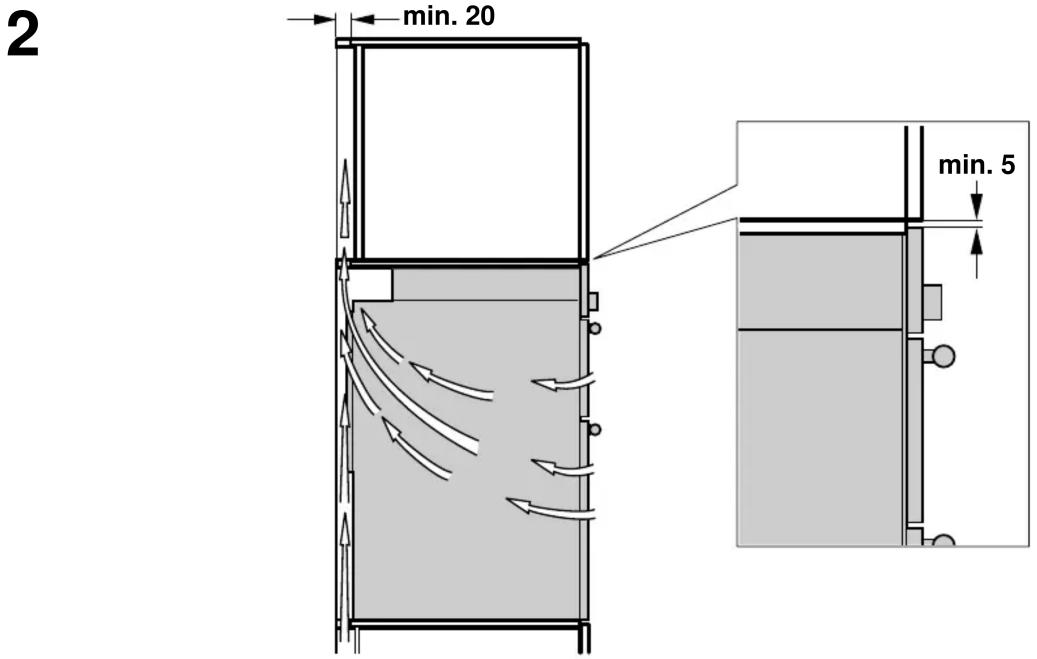
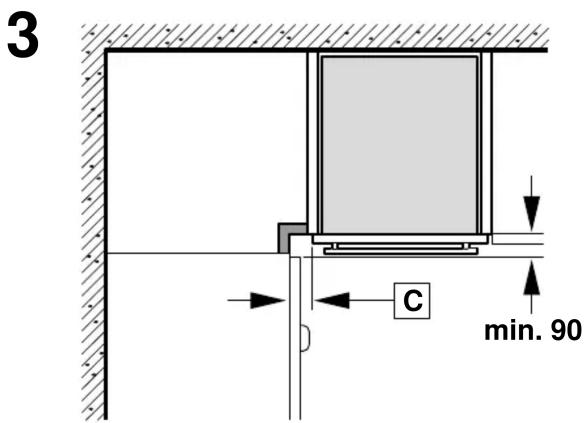
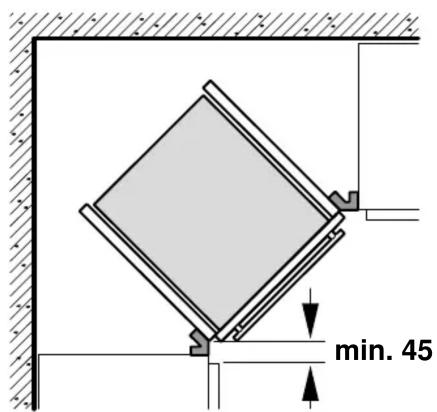
Corner installation – fig. 3
To ensure that the appliance door can be opened in a corner installation, take account of the dimensions. Dimension C is dependent on the thickness of the unit front under the handle.
Connecting the appliance to the electricity supply
The appliance corresponds to protection class I and must only be operated with a protective earth connection.
The fuse protection must correspond to the power rating specified on the appliance's rating plate and to local regulations.
The appliance must be disconnected from the power supply whenever installation work is being carried out.
When the appliance is installed, protection must be provided against accidental contact in the future.
Only a licensed professional may connect the appliance.
In the permanent electrical wiring, an energy-isolating device must be provided in the phases in accordance with the installation requirements. Identify the live and neutral conductors in the mains socket. The appliance may be damaged if it is not connected correctly.
Only connect the appliance as shown in the connection diagram. See the rating plate for the voltage.
Fixing the appliance in place - Fig. 4
-
Do not use the door handle to transport or install the appliance.
The appliance must be transported by two people using the carry handles on either side – figure 4b. -
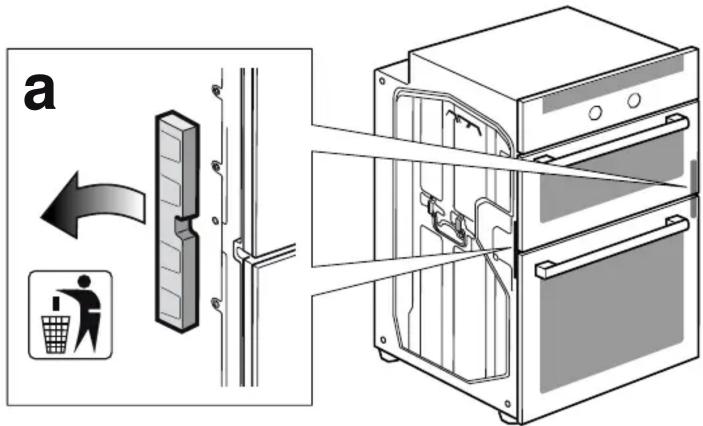
Remove the transport locks on each side and throw them away - figure 4a.
- Carry the appliance by the carry handles on each side. Support the front of the appliance with your hand when doing so – figure 4b.
- Place the appliance in the unit and fold the carry handles back down before pushing it in – figure 4c.
-
Push the appliance in fully. Do not kink or trap the connection cable when doing so, or route it over sharp edges.
-
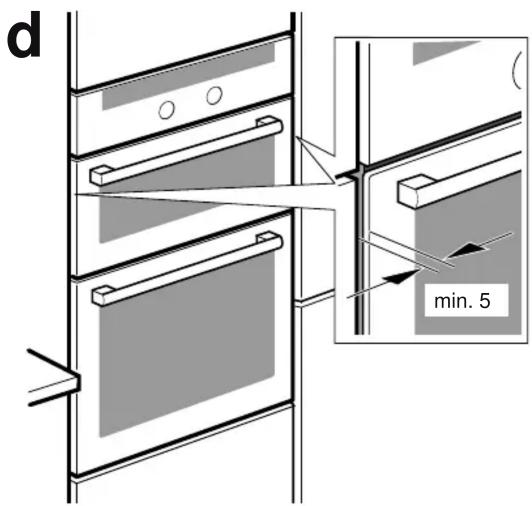
Centre the appliance – figure 4d.
There must be an air gap of 5 mm between the appli front of adjacent units. - Use a spirit level to position the appliance so that it is perfectly guaranteed if it
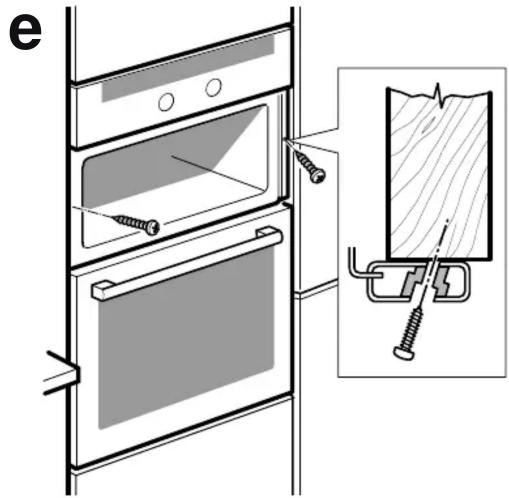
- Screw the appliance into place – figure 4e.
Removal
- Disconnect the appliance from the power supply.
- Undo the securing screws.
- Lift the appliance slightly and pull it out completely.
el
Σημαντικές υποδείξεις - Εικόνα 1
Μόνο η σωστή εγκατάσταση, σύμφωνα μ' αυτές τις οδηγίες συναρμολόγησης, εγγυάται την ασφαλή λειτουργία. Σε που δημιουργηθούν ζημιές από λάθος εγκατάσταση, την ευθύνη φέρει ο εγκαταστάτης.
Μη χρησιμοποιείτε τη λαβή της πόρτας για τη μεταφορά ή την τοποθέτηση.
Μεταφέρετε τη συσκευή με δύο άτομα από τις λαβές μεταφοράς δεξιά και αριστερά - Εικ. 4b.
Μετά την αφαίρεση από τη συσκευασία, ελέγξτε τη συσκευή. Σε περίπτωση ζημιάς κατά τη μεταφορά μην την συνδέσετε.
■ Προσέξτε τα φύλλα συναρμολόγησης για την εγκατάσταση των εξαρτημάτων.
Απομακρύνετε τα υλικά συσκευασίας και τις κολλητικές μεμβράνες πριν τη θέση σε λειτουργία από το χώρο μαγειρέματος και την πόρτα.
■ Τα εντοιχιζόμενα ντουλάπια πρέπει να είναι ανθεκτικά στη θερμοκρασία μέχρι τους 90 °C, οι δε γειτονικές προσόψεις των ντουλαπιών μέχρι 65 °C.
Μην τοποθετήσετε τη συσκευή πίσω από μια διακοσμητική πόρτα ή πόρτα ντουλαπιού. Υπάρχει κίνδυνος υπερθέρμανσης.
■ Πραγματοποιήστε τις εργασίες κοπής των ανοιγμάτων στο ντουλάπι πριν την τοποθέτηση της συσκευής. Αφαιρέστε τα απόβλητα (πριονίδια, γρέζια). Η λειτουργία των ηλεκτρικών εξαρτημάτων μπορεί να επηρεαστεί αρνητικά.
Για την αποφυγή τραυματισμών φοράτε γάντια προστασίας. Εξαρτήματα, τα οποία κατά τη διάρκεια της συναρμολόγησης είναι προσιτά, μπορεί να είναι κοφτερά.
■ Το κουτί σύνδεσης των συσκευών πρέπει να βρίσκεται στην περιοχή της γραμμοσκιασμένης επιφάνειας Α ή έξω από το χώρο τοποθέτησης.
■ Στερεώστε τα μη στερεωμένα ντουλάπια με μια συνηθισμένη γωνία του εμπορίου Β στον τοίχο.
■ Διαστάσεις των εικόνων σε τμ.
μαγειρέματος
Συσκευή σε ψηλό ντουλάπι - Εικ. 2
Για τον αερισμό της συσκευής πρέπει όλοι οι ενδιάμεσοι πάτοι να έχουν μια απόσταση από 20 mm από τον τοίχο τοποθέτησης.
Όταν το ψηλό ντουλάπι έχει πρόσθετα στα πίσω τοιχώματα των ξεχωριστων στοιχείων ένα επιπλέον πίσω τοίχωμα, πρέπει αυτό να αφαιρεθεί.
Τοποθετήστε τη συσκευή μόνο τόσο ψηλά, ώστε να μπορούν να απομακρύνονται τα εξαρτήματα χωρίς πρόβλημα.
Τοποθέτηση σε γωνία - Εικ. 3
Για να μπορεί να ανοίξει η πόρτα της συσκευής, κατά την τοποθέτηση σε γωνία λάβετε υπόψη τις διαστάσεις. Η διάσταση C εξαρτάται από το πάχος της πρόσοψης του ντουλαπιού κάτω από τη λαβή.
Ηλεκτρική σύνδεση της συσκευής
Η συσκευή αντιστοιχεί στην κατηγορία προστασίας Ι και επιτρέπεται να λειτουργεί μόνο με σύνδεση αγωγού προστασίας (γείωση).
Η ασφάλεια πρέπει να πραγματοποιείται σύμφωνα με τα στοιχεία ισχύος στην πινακίδα τύπου και τις τοπικές προδιαγραφές.
Σε όλες τις εργασίες συναρμολόγησης πρέπει η συσκευή να βρίσκεται εκτός τάσης.
Η προστασία επαφής πρέπει να εξασφαλίζεται μέσω της αντίστοιχης τοποθέτησης.
Μόνο ένας αδειούχος εγκαταστάτης επιτρέπεται να συνδέσει τη συσκευή.
Στη μόνιμη ηλεκτρική εγκατάσταση πρέπει να προβλέπεται μια διάταξη διακοπής στις φάσεις σύμφωνα με τους κανονισμούς εγκατάστασης. Εξακριβώστε τους αγωγούς των φάσεων και τον ουδέτερο αγωγό ("μηδέν") στο κουτί σύνδεσης.Σε περίπτωση εσφαλμένης συνδεσης πμορεί η συσκευή να υποστεί ζημιά.
Συνδέστε τη συσκευή μόνο σύμφωνα με το σχέδιο σύνδεσης. Για την τάση βλέπε στην πινακίδα τύπου.
Στερέωση της συσκευής - Εικ. 4
Μη χρησιμοποιείτε τη λαβή της πόρτας για τη μεταφορά ή την τοποθέτηση.
Μεταφέρετε τη συσκευή με δύο άτομα από τις λαβές μεταφοράς δεξιά και αριστερά - Εικ. 4b.
1. Αφαιρέστε την ασφάλεια μεταφοράς δεξιά και αριστερά και αποσύρτε την - Εικ. 4a.
2. Μεταφέρετε τη συσκευή από τις λαβές μεταφοράς δεξιά και αριστερά. Ταυτόχρονα ασφαλίστε την μπροστινή πλευρά της συσκευής με το ένα χέρι - Εικ. 4b.
3. Ακουμπήστε τη συσκευή στο ντουλάπι και πριν την σπρώξετε μέσα διπλώστε τις λαβές μεταφοράς ξανά προς τα κάτω - Εικ. 4c.
-
Σπρώξτε τη συσκευή εντελώς μέσα.Σε αυτή την περίπτωση μην τσακίσετε, μη μαγκώσετε ή μην περάσετε το καλώδιο σύνδεσης πάνω από κοφτερές ακμές.
-
Κεντράρετε τη συσκευή - Εικ. 4d.
Μεταξύ της συσκευής και των γειτονικών προσόψεων των ιτωσμπουλαπιών είναι απαραίτητο να υπάρχει ένα κενό 5 mm.
- Έυθυγραμμίστε τη συσκευή με το αλφάδι ακριβώς οριζόντια.
- Βιδώστε καλά τη συσκευή - Εικ. 4e.
Αφαίρεση
- Θέστε τη συσκευή εκτός τάσης.
- Λύστε τις βίδες στερέωσης.
- Ανασηκώστε ελαφρά τη συσκευή και τραβήξτε την εντελώς έξω.