
FAT24TIU - Chauffage électrique BRANDT - Notice d'utilisation et mode d'emploi gratuit
Retrouvez gratuitement la notice de l'appareil FAT24TIU BRANDT au format PDF.

| Type de four | Four à convection naturelle |
| Usage | Four multifonction |
| Finition | Émail classique |
| Capacité | Non précisé |
| Nombre de fonctions | Non précisé |
| Type de commandes | Non précisé |
| Alimentation | Électrique |
| Dimensions (HxLxP) | Non précisé |
| Poids | Non précisé |
| Système de nettoyage | Non précisé |
| Type de porte | Non précisé |
| Accessoires inclus | Non précisé |
| Consommation énergétique | Non précisé |
| Références modèles | FAT14*, FAT24* |
| Garantie | Non précisé |
FOIRE AUX QUESTIONS - FAT24TIU BRANDT
Questions des utilisateurs sur FAT24TIU BRANDT
0 question sur cet appareil. Repondez a celles que vous connaissez ou posez la votre.
Poser une nouvelle question sur cet appareil
Téléchargez la notice de votre Chauffage électrique au format PDF gratuitement ! Retrouvez votre notice FAT24TIU - BRANDT et reprennez votre appareil électronique en main. Sur cette page sont publiés tous les documents nécessaires à l'utilisation de votre appareil FAT24TIU de la marque BRANDT.
MODE D'EMPLOI FAT24TIU BRANDT
Instructions for use
Brandt
Natural Convection Ovens Usual enamel
Multipurpose Ovens Usual enamel
references:
FAT14*
FAT24*
You have just bought a new oven; thank you for choosing Brandt.
All our ovens have been designed for years of use in your kitchen and to give you full satisfaction. Our priorities are ease of use, aesthetic appearance and reliability.
Nowadays, more than ever, whatever your demands and your tastes, you will find that Brandt provides you with household appliances which will make your life easier and more beautiful every day for years to come.
Your interest in our products is our strongest motivation. For you, Brandt must remain a synonym for quality, economy and performance. That is why we want to stay close to you and encourage dialogue.
Listening to you, informing you, advising you - that's what our consumer service is all about.
Thank you for putting your trust in us.
Our reward will be your satisfaction, which will fully justify our slogan:
"It's good to be able to count on Brandt".
Brandt
CONTENTS
FOR THE USER
How to understand the panel.... P. 3
How to use your oven ...... P. 4 à 6
Oven cooking modes ...... P. 7
Accessories / General cleaning.....P. 8
Cooking chart.... P. 12
FOR THE INSTALLER
How to connect your oven ..... P. 9
How to fit in your oven ...... P. 10
How to change the bulb ..... P. 11
Troubleshooting P. 11

These ovens have been designed for private use in the home and not for commercial use.
Please read these instructions before installing and using your oven.
With a view to the constant improvement of our products, we reserve the right to make any changes in their technical, functional or aesthetic characteristics as a result of technical evolution.
These ovens are designed exclusively for the cooking of drinks and foodstuffs. These products do not contain any asbestos-based component parts.
REF. FAT14*
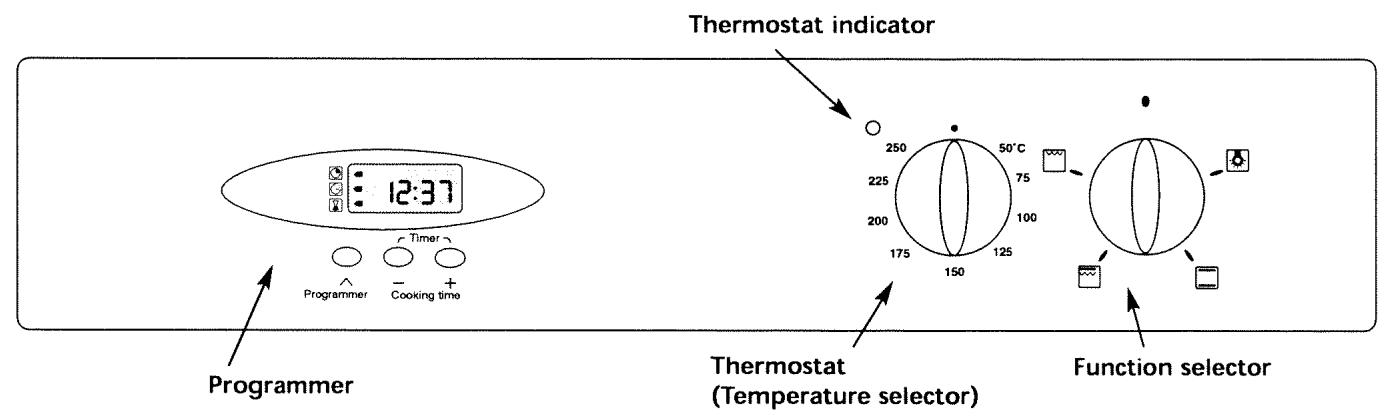
text_image
Thermostat indicator 12:37 Programmer Timer Programmer Cooking time 250 50°C 225 75 200 100 175 125 150 Thermostat (Temperature selector) Function selectorREF. FAT24*
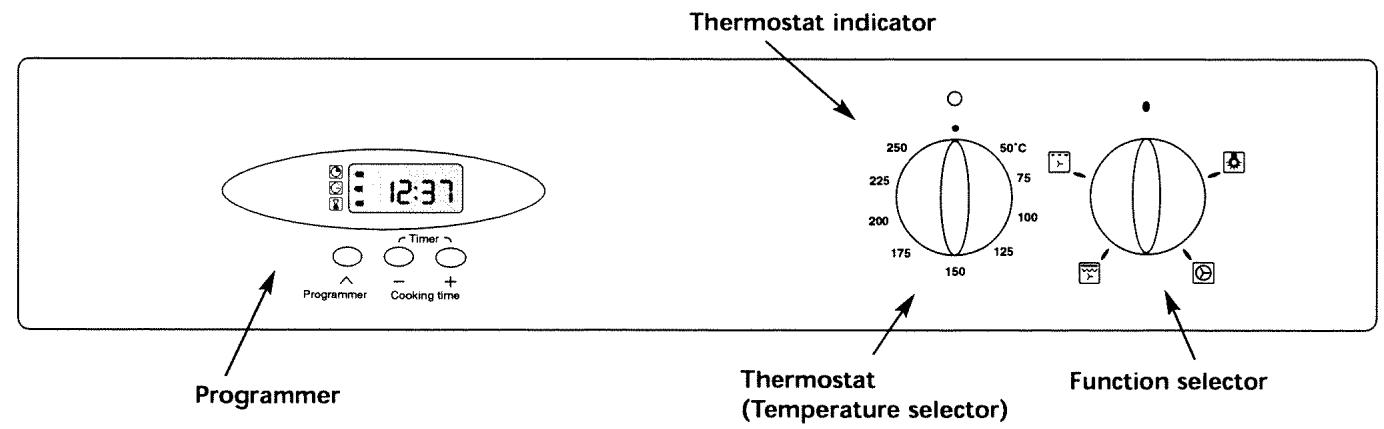
text_image
Thermostat indicator 12:37 Programmer Timer Cooking time 250 50°C 225 75 200 100 175 125 150 Thermostat (Temperature selector) Function selector
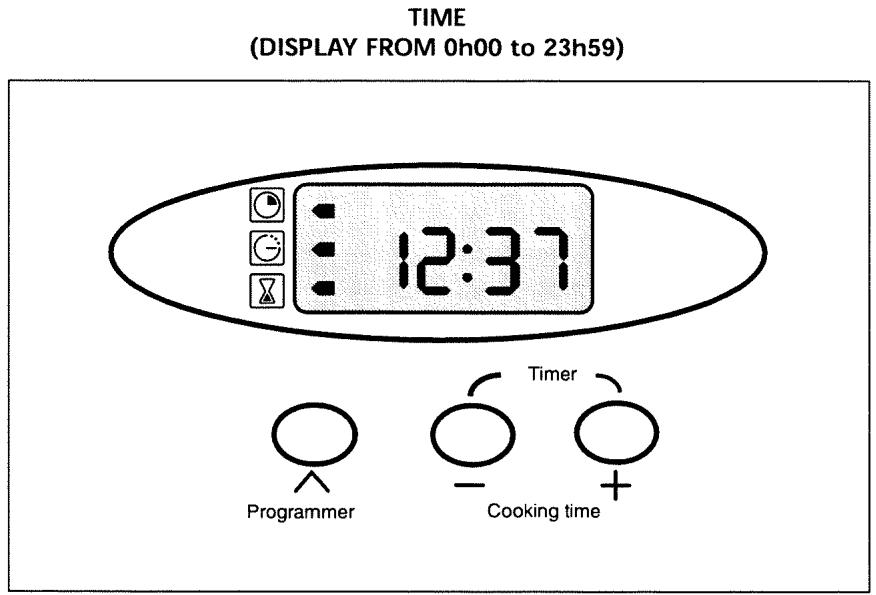
Details of your programmer
text_image
TIME (DISPLAY FROM 0h00 to 23h59) 12:37 Programmer Cooking time Timer● How to set the time
a) WHEN SWITCHING ON
- Set the time with + or - (press and hold key for fast scrolling).
Example : 12h30. - Press PROGRAMMING key to validate.
NB: Failing validation with the PROGRAMMING key, recording is automatic after several seconds.
b) RESETTING THE TIME ON THE CLOCK
- Press on both + and - at the same time for several seconds until display flashes.
- Adjust the time with the + or - keys
- Press PROGRAMMING key to validate.
NB: Failing validation with the PROGRAMMING key, recording is automatic after several seconds.
● How to use the timer (minute minder)
Your oven is equipped with an electronic timer independent of oven operation, which allows counting the time.
- Press the PROGRAMMING key until the Timer symbol and the corresponding display appear.
- Adjust the required time by pressing the + or - keys. Adjustment is made in 30 second intervals and the time displayed is in minutes/seconds (0 to 59min30s).
Keep the key pressed to obtain fast scrolling.
Counting will start several seconds after the end of adjustment and will be permanently visible on the display.
At the end of counting the chosen time, a series of bleeps is emitted (display 0:00). To stop the bleeps completely, press once on any key.
text_image
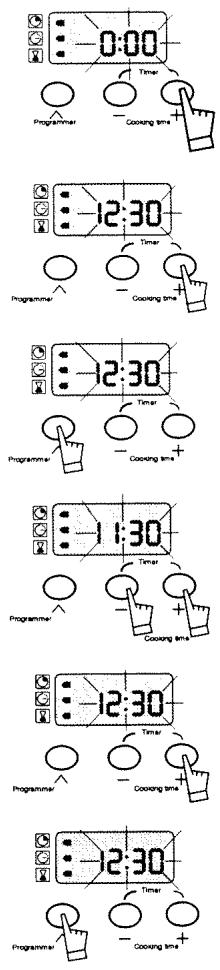
0:00 Programmer Cooking time 12:30 Programmer Cooking time 12:30 Programmer Cooking time 11:30 Programmer Cooking time 12:30 Programmer Cooking time 12:30 Programmer Cooking time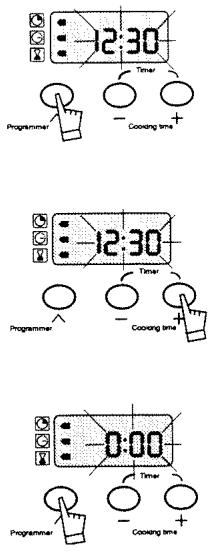
text_image
-12:30 Timer - Cooling time + -12:30 Timer - Cooling time + 0:00 Timer - Cooling time + - - +● For immediate cooking
The programmer should display only the time; this should not flash.
- Choose the cooking mode
Turn the function selection knob to the required position.
Example : "CONVENTIONAL" cooking position
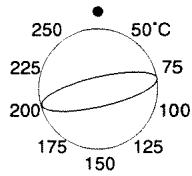
- Choose cooking temperature
Turn thermostat (temperature selector) to the temperature recommended in your recipe.
Example : temperature mark 200°C.
After setting, the oven heats and the thermostat indicator lights up.
NB: THE DOOR MUST ALWAYS BE KEPT CLOSED DURING COOKING
After a cooking cycle the cooling fan continues to operate for a time, in order for the oven to cool down.

text_image
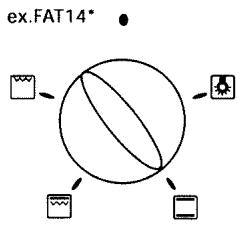
12:30 Programmer - Cooling time Timer ex.FAT14* 250 50°C 225 75 200 100 175 125 150● Programmed cooking (for a specific length of time)
- Choose the cooking mode
Turn the function selector to the position of your choice
Example : "CONVENTIONAL" cooking position
- Choose cooking temperature
Turn the thermostat (temperature selector) to temperature recommended in your recipe.
Example : temperature mark 200°C
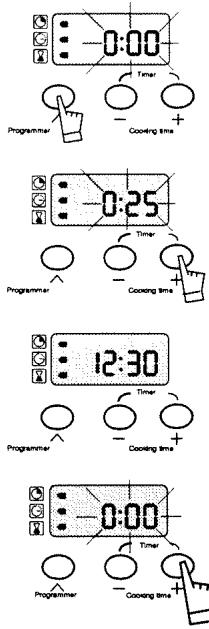
- Choose cooking time
Press once on PROGRAMMING key.
Length of cooking time (at 0H00) and associated symbol flash to indicate that adjustment is possible (it is possible to adjust cooking time up to 23h59).
- Press on + or - keys to adjust the time required.
Example : 25 minutes cooking time
Cooking time starts immediately after release of + or - keys.
After this setting, cooking will stop depending on the cooking time programmed.
NB: It is possible to modify the length of cooking at any time by carrying out the operation described above.
At the end of cooking
- the oven stops,
- the length of cooking symbol goes out,
- cooking is displayed at 0:00,
- a series of bleeps is emitted for several minutes.
Stop the bleeps completely by pressing on any key, and the display changes back to the time of day.
flowchart
graph TD
    A["ex.FAT14*"] --> B(((((((((((((((((((((((((((((((((((((((((((((((((((((((((((((((((((((((((((((((((((((((((((((((((((((((((((((((((((((((((((((((((((((((((((((((((((((((((((((((((((((((((((((((((((((((((((((((((((((((((((((((((((((((((((((((((((((((((((((((((((((((((((((((((((((((((((((((((((((((((((((((((((((((((((((((((((((((((((((((((((((((((((((((((((((((((((((((((((((((((((((((((((((((((((((((((((((((((((((((((((((((((((((((((((((((((((((((((((((((((((((((((((((( Gall)}\n\n\n\n\n\n\n\n\n\n\n\n\n\n\n\n\n\n\n\n\n\n\n\n\n\n\n\n\n\n\n\n\n\n\n\n\n\n\n\n\n\n\n\n\n\n\n\n\n\n\n\n\n\n\n\n\n\n\n\n\n\n\n\n\n\n\n\n\n\n\n\n\n\n\n\n\n\n\n\n\n\n\n\n\n\n\n\n\n\n\n\n\n\n\n\n\n\n\n\n\n<nl>
text_image
0:00 Timer Cooing time 0:25 Timer Cooing time 12:30 Timer Cooing time 0:00 Timer Cooing timeWARNING: At this moment, your oven starts to heat.
Turn back the temperature selector to stop.
The symbol is steady and the time of day is displayed again.
- Programmed cooking (for a specific length of time, with a set end of cooking time)
- Set the temperature and adjust cooking mode.
Example : "CONVENTIONAL" cooking position
temperature mark 200°C
• Press once on PROGRAMMING key.
Cooking time flashes at 0H00.
- Press on + or - keys to set the required time.
Example: 25 minutes cooking time
After pressing +, key once, flashing stops.
- Press the PROGRAMMING key until the end of cooking time flashes with its associated symbol. Its adjustment is then possible.
- Set end of desired cooking time by pressing + or - keys.
Example : end of cooking required at 12h30.
Recording of end of cooking is automatic after several seconds.
Display changes again to the time of day.
After setting, heat start-up is postponed so that cooking finishes at the programmed time (example : 12h30).
When cooking starts, the end of cooking symbol goes out.
At the end of cooking,
- the oven stops,
- the length of cooking symbol goes out,
- cooking is displayed at 0:00
- a series of bleeps is emitted for several minutes.
Stop the bleeps completely by pressing on any key, and the display changes back to the time of day.
WARNING : at this moment, your oven starts to heat
To stop heating, reposition temperature and function selectors on stop.
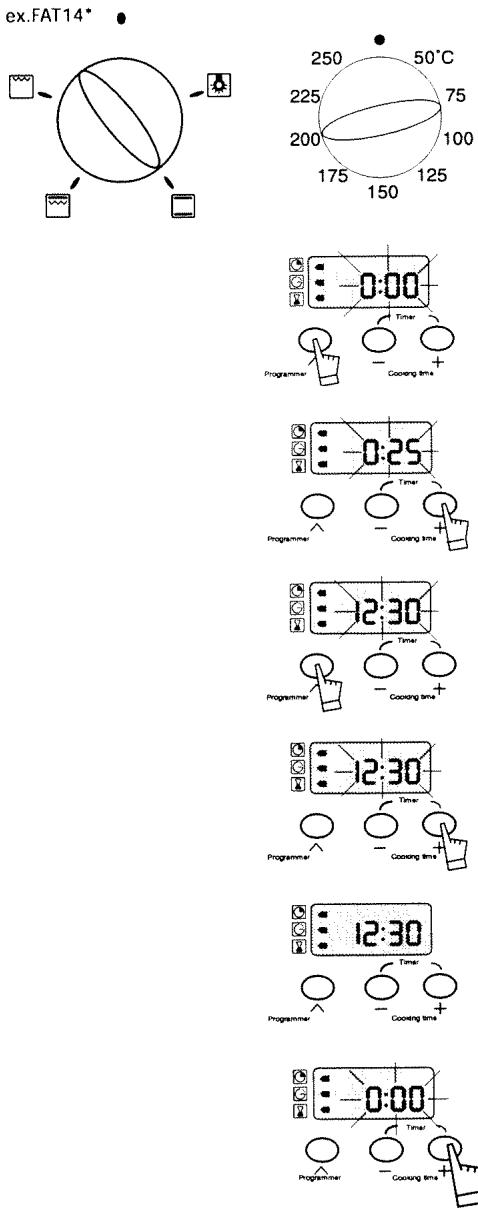
OVEN FAT14\*
CONVENTIONAL
- Cooking by lower and upper heating elements.
- Most dishes are cooked in this mode.
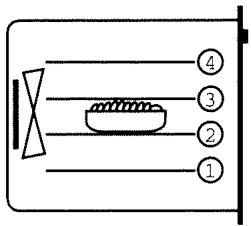
FULL GRILL
- The two heating elements start heating.
- Selection suitable for grilling large pieces of meat or grills in large quantities.
- Pre-heat for five minutes with the trivet in the oven, then place the meat on the trivet at the right level (depending on thickness).
- Place the flat tray on the rack underneath.
If you wish you can place the tray on the first shelf and pour a little water in the tray; this trick reduces fumes and smells, particularly during cooking of grilled meat, sausages, etc... - Ideal for toasts, biscuits, etc ...
HALF GRILL
- Only the inner heating element heats.
- Selection suitable for grilling small pieces of meat and small quantities.
text_image
④ ③ ② ①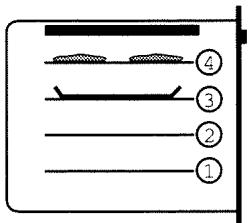
text_image
① ② ③ ④
text_image
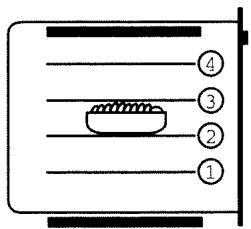
④ ③ ② ①OVEN FAT24\*
FAN CONVECTION
- Operation of the element at the back of the oven allows cooking on 1, 2 or 3 levels (pizza, small cakes, etc.), with fan reinforcement
- It is possible to cook identical or different dishes at the same temperature.
- Warning: If cooking is programmed, cooking time must be the same for the various dishes
FAN TURBO GRILL
- Cooking is by the upper heating elements, boosted by air-circulating propeller to ensure sound heat distribution.
- Selection suitable for grilling large pieces of meat and large quantities.
- Thanks to the propeller, less splashes and less risk of fumes.
- Place the flat tray at first level or on the bottom of the oven if the roast is thick
HALF TURBO GRILL
- Cooking is by only one upper heating element, boosted by air-circulating propeller to ensure sound heat distribution.
- Selection suitable for grilling small pieces of meat or small quantities.
text_image
④ ③ ② ①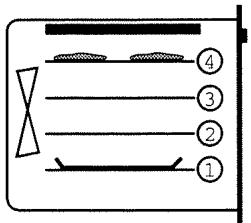
text_image
Diagram showing a layout with numbered sections and structural elements, possibly representing a mechanical or architectural layout.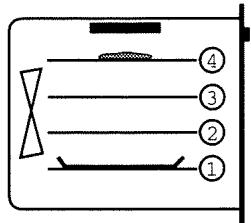
text_image
④ ③ ② ①CURVED RACK (a)
The curved edge grill may be used to support all the dishes containing food to be cooked or browned. This will be used for meat (place directly on the rack) with the drip pan underneath. Turn this grill over to gain more room in the oven.
FLAT RACK (FAT 24\* only)
This serves to support all dishes containing food to be cooked or browned.
ENAMEL TRAY (b)
This serves as a cake tray with sloping sides. It is used for cooking pastries such as cream buns, meringues, small sponge cakes, flaky pastry, etc.
Placed in the notches under the grill, it recovers juices and fat from grilled meats. It can also be used half full of water for cooking in a 'bain-marie.
Avoid placing meat on this tray as this will cause considerable splashing on the sides of the oven.
GRILLING PAN WITH TRIVET AND HANDLE (c)
This tray is used to grill small quantities of meat directly on the trivet which can be used either way around. The handle facilitates removing it from the oven without risk of burns. It is not advisable to place meat directly in this tray which would cause considerable splashing and fumes.

text_image
a b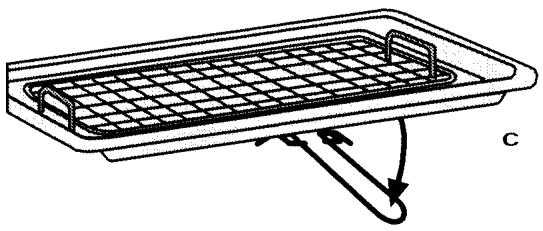
natural_image
Diagram of a rectangular tray with internal grid structure and directional arrows indicating flow or movement (no text or symbols)HOW TO CLEAN YOUR OVEN
Before cleaning, let the oven cool down and check that the knobs are on '0' or Stop.
Generally speaking, abrasive powders and scouring pads, as well as sharp objects are prohibited!
From time to time clean the front of the oven with water and a few drops of washing-up liquid. Rinse with clean water and dry
Clean the inside of the oven, the door and the accessories with hot, soapy water. Rinse and then dry.
HOW TO CONNECT YOUR OVEN
- Before connecting, make sure that the wires of your electrical installation have sufficient capacity to supply your appliance correctly. Your installation must have a 20 amp fuse.
- The electrical connection must be made before fitting in your appliance.
POWER CABLE
- The oven must be connected with an H05 RRF power cable with 3 cores of 1.5 ~mm^2 and they must be connected to a 230 ~V single phase supply, the earth wire (green/yellow) is connected to the earth terminal ± on the appliance. The neutral (blue wire) must be connected to the mains neutral.
- The power cable is connected to the oven by a terminal block at the back. Follow terminal identification and close terminal block with screws after connection.
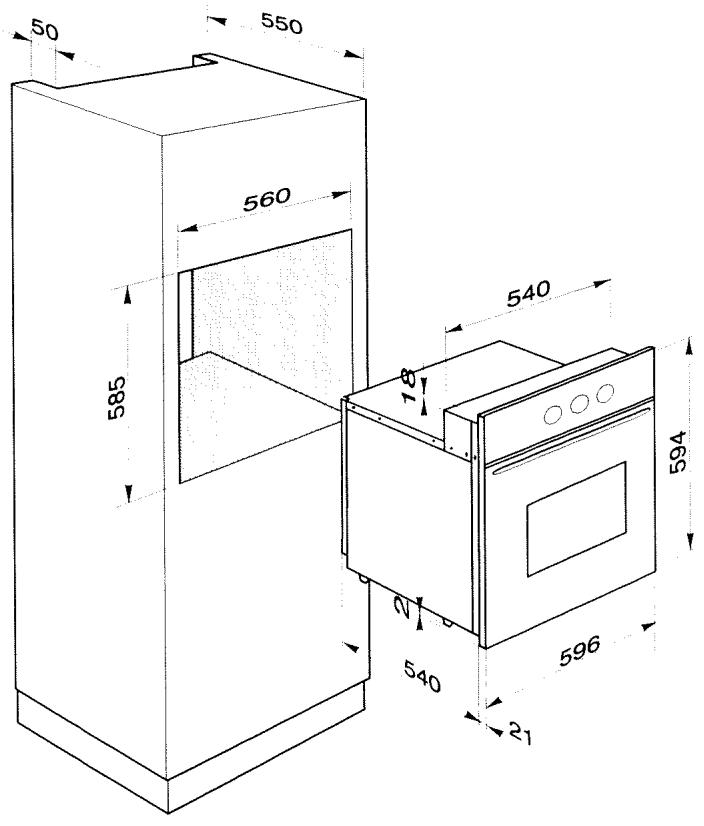
Your oven has maximised air circulation which gives remarkable cooking and cleaning properties on condition that the following indications are followed:
- The oven can be either installed on a working surface or in a cupboard suitably sized, at eye level (see drawing).
- Centre the oven in the cupboard so as to leave a margin of 2mm from the adjacent cupboards.
- Cupboard material must be heat-resistant (or be covered with similar material).
- For greater stability, fix the oven in a cupboard with four screws in the holes provided for this purpose on the sides. Make a ∅ 3mm hole beforehand in the cupboard wall to avoid the wood splitting.
text_image
50 550 560 585 540 78 594 540 596 21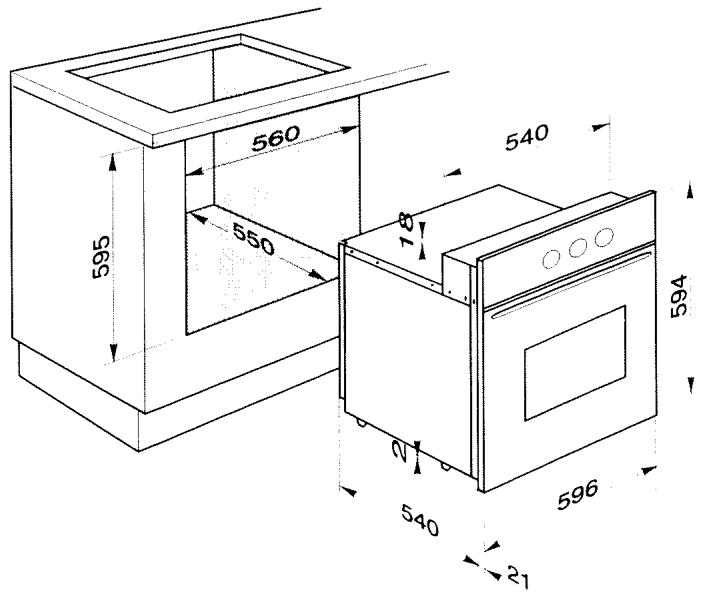
text_image
560 595 550 540 8 7 594 540 21 596NB - It is advisable to have this equipment installed by a specialist fitter.
WARNING ! Disconnect the oven from the electricity supply before changing the bulb.
- Turn the protective glass window a quarter turn to the left.
• Unscrew the bulb in the same direction.
Bulb characteristics: 15 W - 220/240 V
300°C - E 14 cap
- Change the bulb, then replace the glass window and make sure it is in the correct position.
- Reconnect the oven.
TROUBLESHOOTING
You are worried that your oven is not working correctly - this does not automatically mean that there is a problem. In all cases, check the following points:
| YOU NOTICE THAT... | POSSIBLE CAUSES | REMEDIES |
| The oven does not heat. | The oven is not connected.The installation Fuse Has Blown.Temperature chosen Is Too Low.The sensor Is Faulty.The thermostat Is Faulty.The oven has overheated, and is now on safety. | - Connect your oven.- Change installation fuse and check its capacity (16amps).- Increase the temperature.- Call in the After-Sales service.- Call in the After-Sales service.- Call in the After-Sales service. |
| The oven light does not work. | The bulb is out of order.The oven is not connected or the fuse has blown. | - Change the bulb.- Connect the oven or change the fuse. |
In all cases, if you have not been successful, please contact your After-Sales service immediately.
AFTER-SALES SERVICE
Possible interventions on your appliance must be carried out by a qualified professional approved by the maker. When you telephone, please mention the complete reference of your appliance (model, type and series number). These details appear on the maker's plate.
For any upkeep intervention, please request the exclusive use of CERTIFIED ORIGINAL SPARE PARTS.
FAT14*
| Dishes | Pos. | °C | Rack | Prog.mn |
| White meat | ||||
| Roast pork | 190° | 2 | 30/1lb+30 | |
| Pork chops | 225° | 3 | 15-20 | |
| Chicken | 200° | 2 | 20/1lb+20 | |
| Turkey / duck | 190° | 1 | 30/1lb+20 | |
| Sausages (1 lb) | 225° | 3-4 | 10 | |
| Red meat | ||||
| Casserole beef | 150° | 2 | 1h30 | |
| Lamb chops | 225° | 3-4 | 10-20 | |
| Roast beef rare | 200° | 2 | 15/1lb+20 | |
| Lamb | 190° | 2 | 25/1lb+25 | |
| Fish and various meat | ||||
| Kebabs | 225° | 3-4 | 15-20 | |
| Grilled fish | 225° | 3-4 | 15-20 | |
| Salmon steak | 225° | 3 | 10 | |
| Baked fish | 200° | 2 | 45 | |
| Vegetables | ||||
| Jacket potatoes | 200° | 2 | 1h-1h30 | |
| Roast vegetables | 195° | 1 | 1h-1h30 | |
| Roast potatoes | 195° | 1 | 45-60 | |
| Rice | 200° | 1 | 45 | |
| Stuffed pepper | 200° | 2 | 40 | |
| Cakes and pastry | ||||
| Sponge cake | 175° | 2 | 25-30 | |
| Cake- Madeira cake | 175° | 2 | 1h-1h10 | |
| Scones | 225° | 3 | 10-12 | |
| Meringues | 110° | 2 | 2h20-2h40 | |
| Small cakes | 175° | 2 | 20-25 | |
| Choux pastry | 200° | 3 | 35-45 | |
| Angel cakes | 160° | 2 | 40-60 | |
| Short breads - Rich | 175° | 3 | 15-20 | |
| Short crust pastry | 225° | 2 | 10-20 | |
| Fruit crumble | 175° | 2 | 1h-1h20 | |
| Short or puff pastry | 200° | 1 | 30-40 | |
| Fruit pie | 200° | 1 | 35-40 | |
| Tart base | 175° | 1 | 15-25 | |
| Baked custards | 170° | 2 | 20-30 | |
| Rich fruit cake | 150° | 1 | 2h30 | |
| Lemon-meringue pie | pastry 200° | 2 | 15 | |
| meringue150° | 2 | 20-25 | ||
| Various | ||||
| Steak and kidney pie | 200° | 2 | 1h30-1h40 | |
| Rice pudding | 150° | 1 | 1h30 | |
| Yorkshire pudding | 200° | 1 | 15-20 | |
| Bread base pizza | 250° | 1 | 15-25 | |
| Quiche | 225° | 1 | 40 | |
| Soufflés | 175° | 1 | 45 | |
| Bread | 225° | 1 | 30-40 | |
| Lasagnes | 200° | 2 | 40 |
WITH PREHEATING
450g=1lb
FAT24*
| Dishes | Pos. | °C | Rack | Prog. mn |
| White meat | ||||
| Roast pork | 170° | 2 | 30/1lb+30 | |
| Pork chops | 200° | 3-4 | 10-15 | |
| Chicken | 175°-200° | 1 | 55 | |
| Turkey / duck | 190° | 1 | 12/1lb+20 | |
| Sausages (1 lb) | 200° | 3 | 10 | |
| Red meat | ||||
| Casserole beef | 140° | 2 | 1h30 | |
| Lamb chops | 225° | 3-4 | 10-15 | |
| Roast beef rare | 200°-225° | 3 | 15/1lb+20 | |
| Lamb | 175° | 2 | 25/1lb+25 | |
| Fish and various meat | ||||
| Kebabs | 225° | 3-4 | 15-20 | |
| Grilled fish | 200° | 3-4 | 15-20 | |
| Salmon steak | 200° | 3 | 10 | |
| Baked fish | 175°-200° | 2 | 45 | |
| Vegetables | ||||
| Jacket potatoes | 200° | 2 | 1h-1h30 | |
| Roast vegetables | 200° | 1 | 1h-1h30 | |
| Roast potatoes | 200° | 1 | 45-60 | |
| Rice | 200° | 1 | 45 | |
| Stuffed pepper | 175°-200° | 2 | 40 | |
| Cakes and pastry | ||||
| Sponge cake | 160° | 2 | 25-30 | |
| Cake- Madeira cake | 150° | 2 | 1h-1h10 | |
| Scones | 225°* | 2 | 10-12 | |
| Meringues | 100° | 2 | 2h20-2h40 | |
| Small cakes | 160°* | 2 | 20-25 | |
| Choux pastry | 200° | 3 | 35-45 | |
| Angel cakes | 150° | 2 | 40-60 | |
| Short breads - Rich | 150° | 3 | 15-20 | |
| Short crust pastry | 180° | 2 | 10-20 | |
| Fruit crumble | 160° | 2 | 1h-1h20 | |
| Short or puff pastry | 180° | 2 | 30-40 | |
| Fruit pie | 150° | 1 | 35-40 | |
| Tart base | 160°* | 2 | 15-25 | |
| Baked custards | 150° | 2 | 20-30 | |
| Rich fruit cake (8" round) | 130° | 1 | 3h30 | |
| Lemon-meringue pie | pastry 180° | 2 | 15 | |
| meringue130° | 2 | 20-25 | ||
| Various | ||||
| Steak and kidney pie | 180° | 2 | 1h30-1h40 | |
| Rice pudding | 130° | 1 | 1h30 | |
| Yorkshire pudding | 180°* | 2 | 15-20 | |
| Bread base pizza | 200°* | 1 | 15-25 | |
| Quiche lorraine | 180° | 2 | 40 | |
| Soufflés | 175° | 1 | 45 | |
| Bread | 200° | 1 | 30-40 | |
| Lasagnes | 160° | 2 | 40 |
*WITH PREHEATING
450g=1lb
The door must be kept closed for all cooking.
The settings given in this chart are indicative. Experience will enable you to adapt them to your own cooking methods.