
PT678HBA - Haut-parleur Pyle - Notice d'utilisation et mode d'emploi gratuit
Retrouvez gratuitement la notice de l'appareil PT678HBA Pyle au format PDF.
| Type de produit | Système home cinéma amplifié avec haut-parleurs |
| Marque | Pyle |
| Modèle | PT678HBA |
| Puissance de sortie | Avant : 400W crête x2, Centre : 400W crête x1, Surround : 400W crête x2, Caisson de basses : 500W crête x1 |
| Unités de haut-parleurs | Satellite : 2,5 pouces, Caisson de basses : 10 pouces |
| Réponse en fréquence | Satellite : 150 Hz - 20 kHz, Caisson de basses : 40 Hz - 330 Hz |
| Rapport signal/bruit | 85 dB |
| Distorsion harmonique totale | 0,1 % |
| Entrées | MP3, AUX1, AUX2, FM, HDMI1, HDMI2 |
| Sorties | HDMI OUT |
| Bluetooth | Oui, récepteur intégré (ID : bluespeaker, mot de passe : 0000) |
| Tuner FM | Intégré, avec recherche automatique et 12 préréglages |
| Processeur audio numérique (DSP) | Modes Live, Hall, Église |
| Sélection de canaux | 5.1 CH, 3.1 CH, 2.1 CH |
| Matériau du boîtier | Satellite : plastique, Caisson de basses : bois |
| Dimensions (caisson de basses) | 420 x 370 x 280 mm |
| Dimensions (canaux avant/surround) | 150 x 70 x 225 mm |
| Dimensions (canal central) | 150 x 70 x 360 mm |
| Poids net | 35,0 lb (15,9 kg) |
| Poids brut | 41,0 lb (18,6 kg) |
| Alimentation | Secteur, câble d'alimentation amovible |
| Entretien et nettoyage | Chiffon doux légèrement humide avec détergent doux. Ne pas utiliser de solvants. |
| Sécurité | Ne pas exposer à la pluie ou à l'humidité. Ne pas obstruer les évents. Débrancher en cas d'orage ou d'inutilisation prolongée. |
| Pièces détachées et réparabilité | Contacter un centre de service agréé Pyle pour les réparations. Fusible remplaçable. |
| Informations générales | Blindage magnétique pour le canal central. Télécommande fournie. Finition noire. |
FOIRE AUX QUESTIONS - PT678HBA Pyle
Questions des utilisateurs sur PT678HBA Pyle
0 question sur cet appareil. Repondez a celles que vous connaissez ou posez la votre.
Poser une nouvelle question sur cet appareil
Téléchargez la notice de votre Haut-parleur au format PDF gratuitement ! Retrouvez votre notice PT678HBA - Pyle et reprennez votre appareil électronique en main. Sur cette page sont publiés tous les documents nécessaires à l'utilisation de votre appareil PT678HBA de la marque Pyle.
MODE D'EMPLOI PT678HBA Pyle

text_image
P PYLE® HomeHome Theater
natural_image
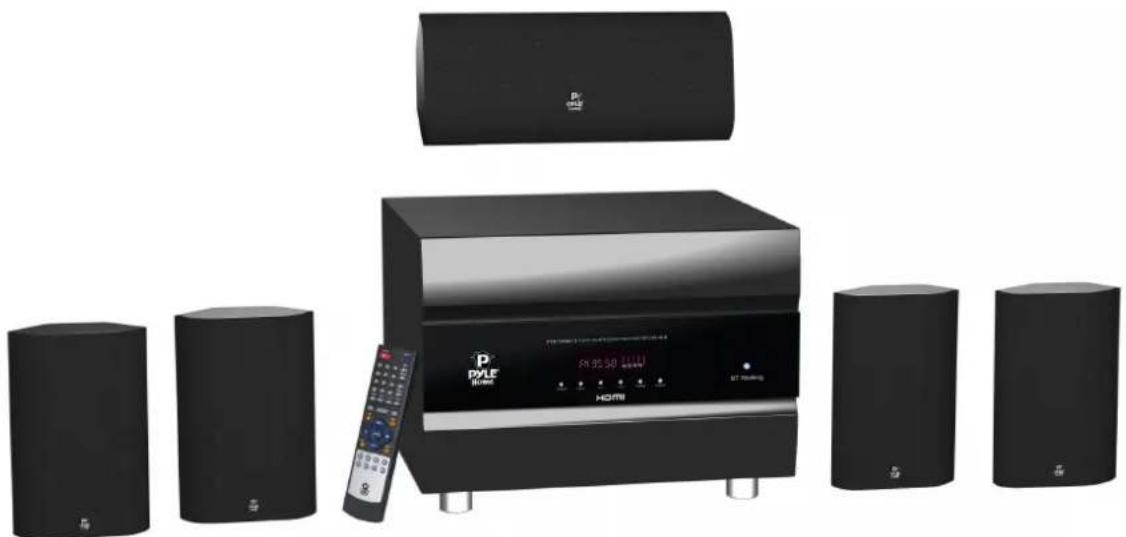
Product photo of a black home audio streaming setup with speakers, a CD, and a TV unit (no visible text or symbols)PT678HBA
HDMI
Owner's Manual
TABLE OF CONTENTS
Important Safety Information
Owner's Record....1
For Customers in the United States....1
Caution....1
Note to Home Theater System Installer....1
Installation
Front Panel Display Window....2
Rear Panel Connectors....3
Battery Installation....4
Using the Remote Control....5
Basic Operations
Turn On/Off the Power....6
Master Volume Control....6
Side Left Channel Volume Control....6
Side Right Channel Volume Control....6
Center Channel Volume Control....6
Subwoofer Volume Control....6
How to Adjust Treble....6
How to Adjust Bass....6
How to Play MP3....6
How to Play HDMI....6
How to Play AUX....6
How to Play Tuner....6
Select Program
Listen to the Preset Program
Memory Program
How to Mute....7
Introduction of DSP Control Key 7
Introduction of Source Output Selector Area....7
Additional Information
Precautions....8
Troubleshooting....10
Specifications....12
Important Safety Information
OWNER'S RECORD
The model and serial number are located on the rear of the unit. Record the serial number in the space provided below. Refer to them whenever you call upon your Pyle regarding this product.
Model No.
Serial No.
FOR CUSTOMERS IN THE UNITED STATES

This symbol is intended to alert the user to the presence of un-insulated “dangerous voltage” within the product’s enclosure, it may be of sufficient magnitude to constitute a risk of electric shock to persons.
CAUTION RISK OF ELECTRIC SHOCK DO NOT OPEN
CAUTION: TO REDUCE THE RISK OF ELECTRIC SHOCK. DO NOT REMOVE COVER (OR BACK). REFER SERVICING TO QUALIFIED SERVICE PERSONNEL.

This symbol is intended to alert the user to the presence of important operating and maintenance (servicing) instructions in the literature accompanying the appliance.
CAUTION
You are cautioned that changes or modifications not expressly approved in this manual could void your authority to operate this equipment.
- To reduce the risk of fire or electric shock, do not expose this apparatus to rain or moisture.
- To prevent fire, do not cover the ventilation of the apparatus with newspapers, table-cloths, curtains and etc. Do not place lighted candles on the apparatus.
- To prevent fire or shock hazard, do not place objects filled with liquid, such as vases, on the apparatus.
- Do not install the appliance in a confined space, such as a bookcase or built-in cabinet.
- Install this system so that the power cord can be unplugged from the wall socket immediately in the event of trouble.
- Batteries or batteries installed apparatus shall not be exposed to excessive heat such as sunlight or fire.
Note to Home Theater System Installer:
This reminder is provided to call Home Theater System installers' attention to Article 820-40 of the NEC that provides guidelines for proper grounding, in particular, specifies that the cable ground shall be connected to the grounding system of the building as close to the point of cable entry as possible.
Installation
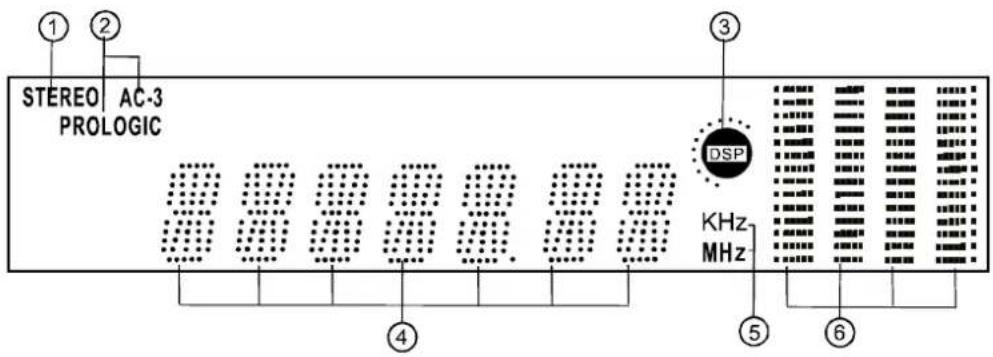
INDICATORS ON FRONT PANEL DISPLAY WINDOW
text_image
STEREO AC-3 PROLOGIC ① ② ③ DSP KHz MHz ④ ⑤ ⑥Name
①STEREO MP3/AUX/TUNER INPUT
②AC-3 PROLOGIC DVD INPUT
③DSP DSP STATE ICON
④ DIGITAL DISPLAY
⑤MHz KHz/MHZ ICON
⑥SPECTRUM DISPLAY
Function
Lights up when input mode is set to MP3, AUX1, AUX2.
Lights up when input mode is set to 5.1 channel or play DVD.
Lights up when play DSP effect.
Lights up to display value of current input mode.
Lights up when Tuner input is selected and indicates the value on the display for KHz/MHz.
Lights up to display the spectrum of different sound channels.
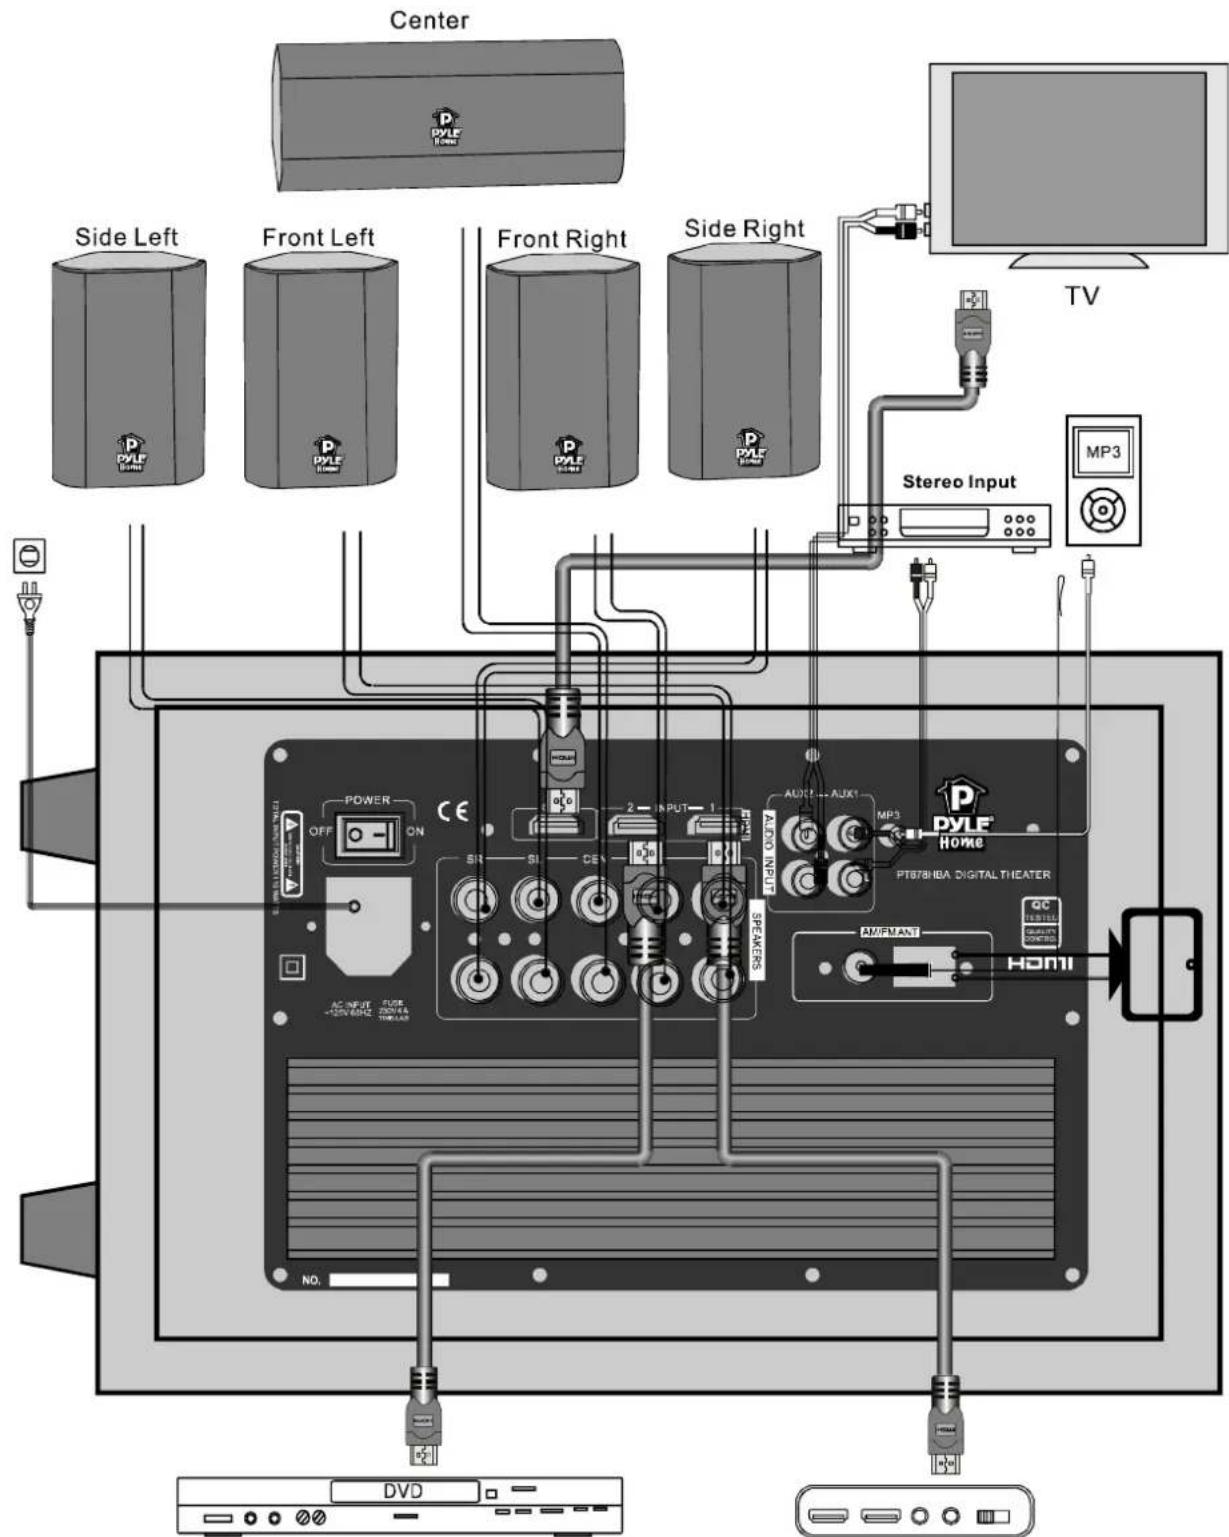
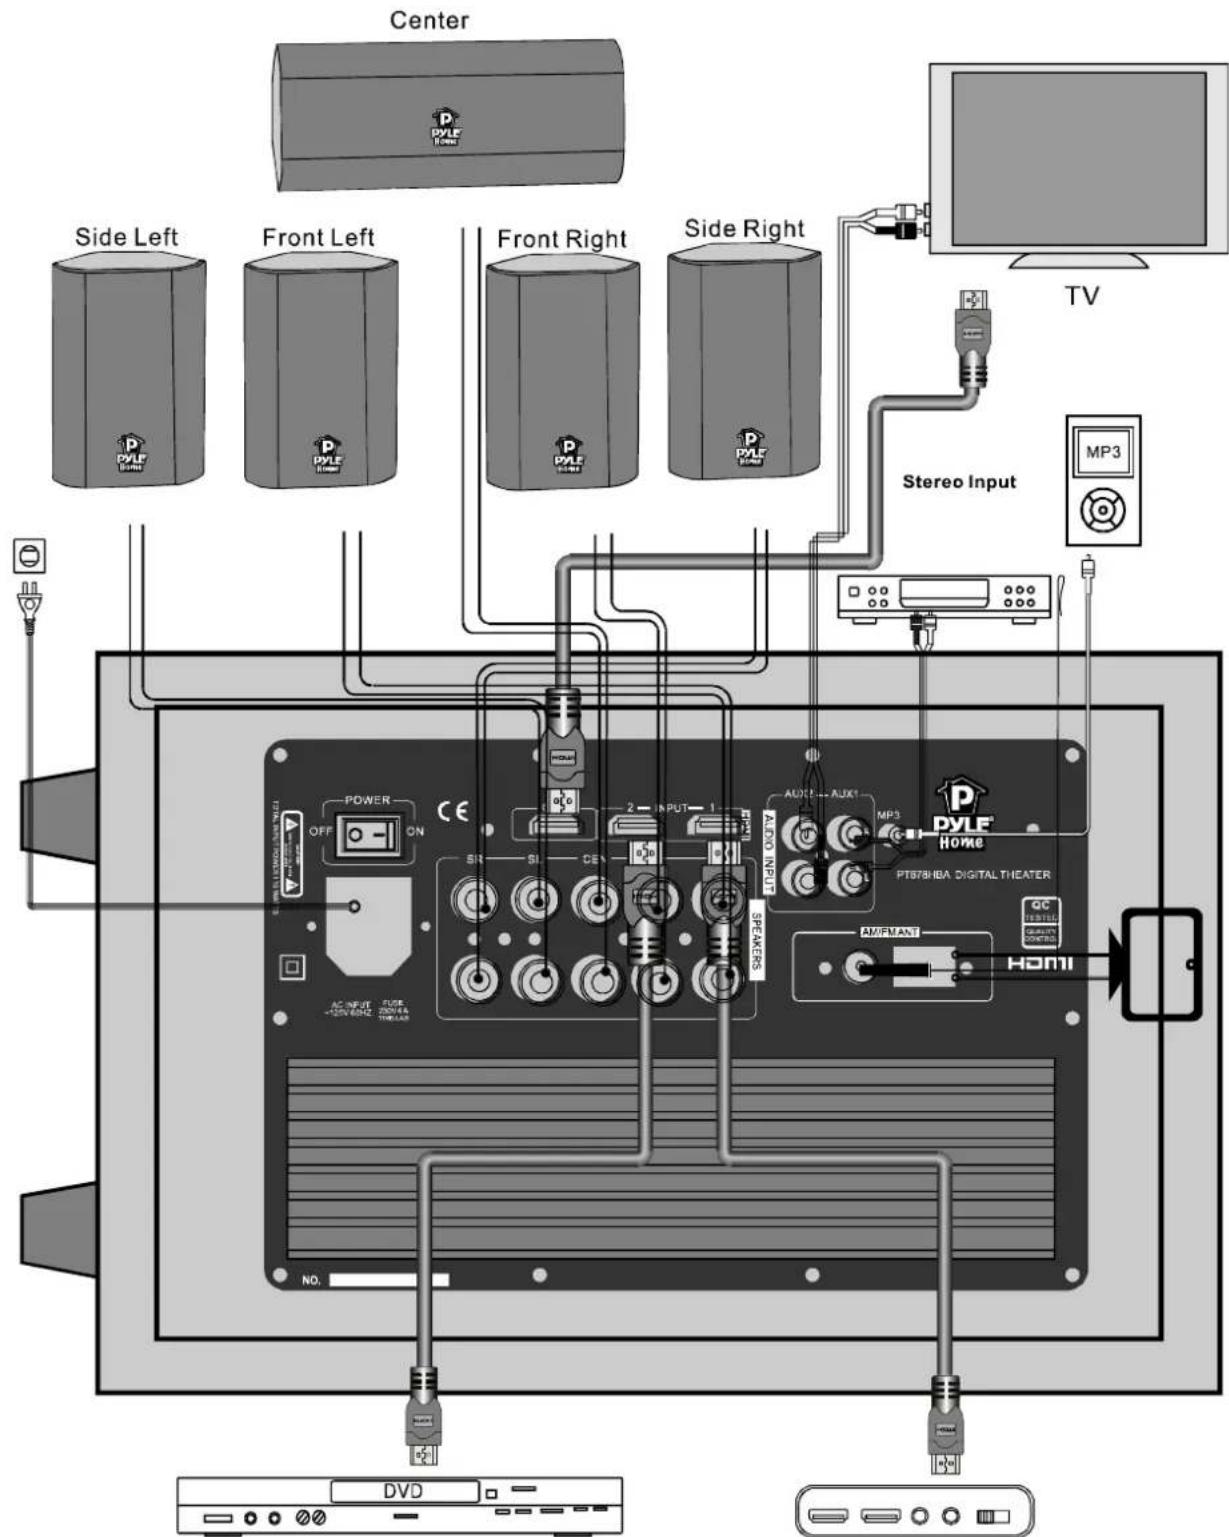
REAR PANEL CONNECTORS
Please install this system according to the following schematic diagram.
text_image
Center Side Left Front Left Front Right Side Right TV MP3 Stereo Input DyLF Home PT878HBA DIGITALTHEATER AM/FMANT HDMI POWER OFF ON S1 CE 2 INPUT 1 AUX1 AUX1 SEAKERS AMPFANT DVDHDMI Source: playstation, direct tv, blue ray, xbox 360, DVD, laptop, media server
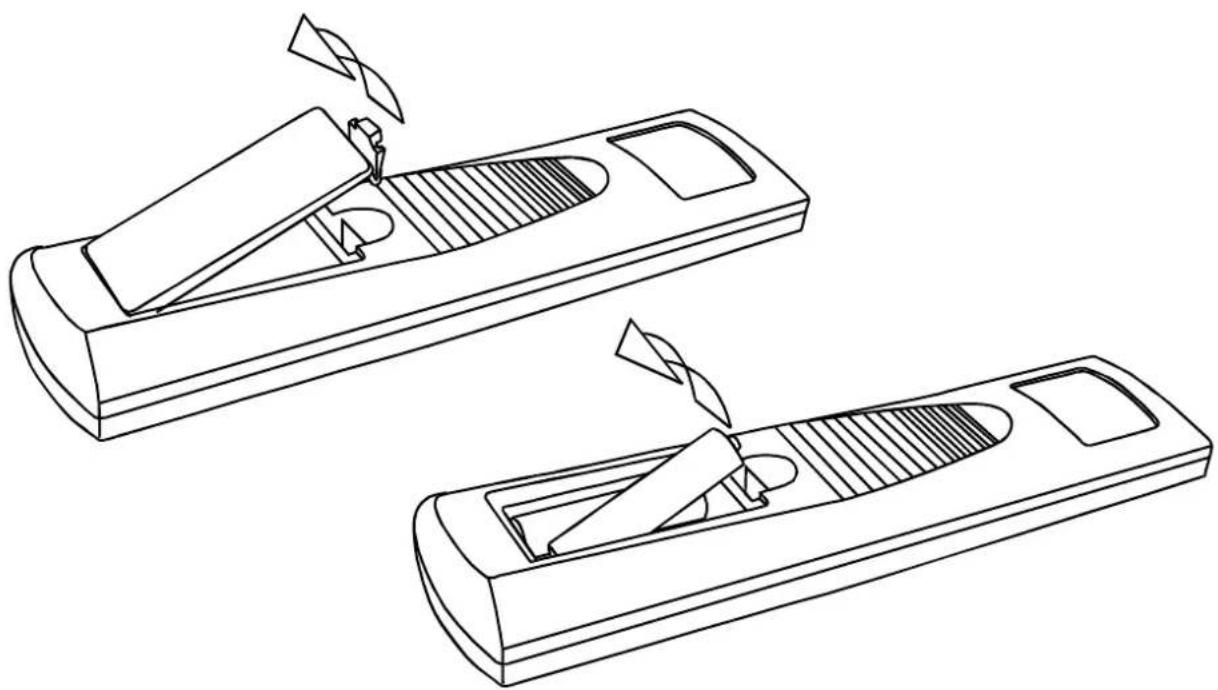
BATTERY INSTALLATION
- On the back of the remote control, push the tab and lift off the battery cover.
- Obtain two (2) fully-charged AAA batteries. Match the “+” and “-” marks on the batteries to the “+” and “-” marks in the battery case, then insert the new batteries.
- Align the cover keys with the case holes and press the cover back into place. The tab should click when the cover is locked.
- Test the unit by pressing POWER or any mode key. If the batteries are inserted correctly, the selected mode key will blink once.

natural_image
Line drawing of two remote control devices with blades and handle, no text or symbols presentNotes
- Do not leave the remote control in an extremely hot or humid place.
- Do not use a new battery with old ones.
- Do not mix manganese batteries with other kinds of batteries.
- Do not expose the remote sensor to direct sunlight or lighting apparatuses. Doing so may cause a malfunction.
- If you do not intend to use the remote control for an extended period of time, remove the batteries to avoid possible damage from battery leakage and corrosion.
- When you replace the batteries, the remote buttons may be reset to their factory settings. If this happens, reset the buttons again.
Tips
Under normal conditions, the batteries should last for about 3 months. When the remote no longer operates the receiver, replace all the batteries with new ones.
USING THE REMOTE CONTROL
| 1. POWERButton-TogglePower OFF and ON | 2. MEMORY Button | |
| 12. TUNER Band Adjustment Button | ||
| 3. TUNER Number Button | ||
| 13. HDMI Control Selector Button | ||
| 4. INPUT MODESelector Area | ||
| 14. CHANNEL SOURCE OUTPUT Selector Area | ||
| 5. TREBLEVolume Increase Button | ||
| 15. BASS Volume Increase Button | ||
| 6. MASTERVolume Control Button | ||
| 16. RIGHT Balance Selector Button | ||
| 7. LEFT Balance Selector Button | ||
| 17. MUTE Control Button | ||
| 8. TREBLEVolume Decrease Button | ||
| 18. BASS Volume Decrease Button | ||
| 9. SIDE LEFTVolume Adjustment Button | 19. SIDE RIGHT Volume Adjustment Button | |
| 10. CENTERVolume Adjustment Button | 20. SUBWOOFER Volume selector Button | |
| 11. DSP Control Selector Button | ||
| 21. Bluetooth Control Area |
Basic Operation
Turn On/Off the Power
POWER
Press “ ” key to control the power on and off.
Master Volume Control
Press the “VOL+” or “VOL-” Key to adjust the main channel volume.
Side Left Channel Volume Control
Side Left Vol.
Press “- + ” key on the remote control, screen display the SL volume, press "-ADJUST+" key to adjust side left channel volume.
Side Right Channel Volume Control
Side Right Vol.
Press “- + ”Key on the remote control, screen display the SR volume, press "-ADJUST+" key to adjust side right channel volume.
Center Channel Volume Control
Center Vol.
Press “- + ”key on the remote control, screen display the CEN volume, press “-ADJUST+” key to adjust center channel volume.
Subwoofer Volume Control
SW Vol.
Press “- + ” key on the remote control, screen display the SW volume, press “-ADJUST+” key to adjust subwoofer channel volume.
How to Adjust Treble
TreB+ TreB-
Press “●” key to adjust the treble output of the main channel.
How to Adjust Bass
Bass+ Bass-
Press “●●” key to adjust the bass output of the main channel.
How to Play MP3
Make sure MP3 connection lines are correct, Press the “MP3” key to play MP3.
How to Play HDMI
HDMI1 HDMI2
Make sure HDMI1/HDMI2 connection lines are correct, Press the “☐ / ☐” key to play HDMI.
How to Play AUX
AUX1 AUX2
Make sure AUX1/AUX2 connection lines are correct, Press the “☐ / ☐” key to play AUX.
How to Play Bluetooth
Paring with a bluetooth sender as the following manual.
- “” play the previous song.
- “” play the next song.
- “▶” play/pause the song.
- “●” paring the bluetooth sender.
How to Play Tuner
1. Select Program
Use “Tuner” key to select FM band. Press the “SCAN” key to adjust the band of tuner.
Press the “SCAN” key for 2 seconds, the FM will search automatically. You can press the “SCAN” key once or the input mode selector to stop the function.
2. Listen to the Preset Program

Press the number keys “10 11 12” to select the radio program that you already saved.
Once selected, screen will display the radio program's frequency in the memory area.
3. Memory Program
When you receive a clear radio program, press the “ MEMORY ” key first, and then the

screen displays the “Memory” icon. Press one of the 12 “⑩ ⑪ ⑫” number key on the remote control to select the memory station. If you want to extract the channel you saved, just press the number key you selected.
How to Mute
Press “MUTE” key to turn sound off/on.
Press again to restore the audio to the original level.
Introduction of DSP Control Key
Press the key “DSP” repeatedly to switch to different operations: Live, Hall or Church. All the above functions can give different sound effects.
Introduction of Source Output Selector Area
- Press “5.1CH” to receive 5.1 channel. (5.1 channel output is the default mode)
- Press "3.1CH" to receive 3.1 channel. (Side left speaker and Side right speaker mute)
- Press “2.1CH” to receive 2.1 channel. (Side left speaker, Side right speaker and Center speaker mute)
How to Pair the bluetooth receiver
The subwoofer have built in a bluetooth receiver. If you need to pair with a bluetooth sender(mobile phone), first open the subwoofer, and press the “pairing” key on the remote control, the VFD will show “pairing” and flicker. Then search the bluetooth receiver(Device ID:bluespeaker) by your own bluetooth sender and connect them by the password:0000. After that, you can enjoy the music by the bluetooth receiver. The system will turn to the normal working statue if no paring in 10 minutes.
Additional information
PRECAUTIONS
On Safety
- Should any solid object or liquid fall into the receiver, unplug the receiver and have it checked by qualified personnel before operating it any further.
On Power Sources
- Before operating the system, check that the operating voltage is identical with your local power supply.
• The operating voltage is indicated on the back of the speakers. - As long as the unit is not removed from the wall outlet, the unit will not be disconnected from the AC power source (main) even if the unit itself has been turned off.
- If you are not going to use the system for a long time, be sure to disconnect the system from the wall outlet. To disconnect the AC power cord, disconnect by grasping the plug itself; never pull the cord.
- One contact prong of the plug is wider than the other for safety purposes, which will fit into the wall outlet only one way. If you are unable to insert the plug fully into the outlet, contact your dealer.
- The AC power cord should only be changed at a qualified service shop.
On Heat Buildup
- Although the system heats up during operation, this is not a malfunction. If you continuously use this system at a large volume, the receiver temperature on top, side and bottom may rise considerably. To avoid burning yourself, do not touch the receiver.
On Placement
- Place the system in a location with adequate ventilation to prevent heat buildup and to prolong the life of the system.
- Do not place the system near heat sources or in a place subject to direct sunlight, excessive dust, or mechanical shock.
- Do not place anything on top of the receiver that might block the ventilation holes and cause malfunctions.
- Do not place the system near equipments such as a TV, VCR, or tape deck. (If the system is being used in combination with a TV, VCR or tape deck, and is placed too close to such equipment, noise may occur and picture quality may suffer. Especially, when using an indoor antenna).
- Use caution when placing the system or speakers on surfaces that have been specially treated (with wax, oil, polish, etc.) as staining or discoloration of the surface may result.
On Operation
- Before connecting other components, be sure to turn off and unplug the system.
- The center speaker is magnetically shielded to allow it to be installed near a TV set. However, color irregularities may still be observed on certain types of TV sets.
- As the front speakers, center speaker and the subwoofer are not magnetically shielded, we recommend that you place them slightly further away from the TV set.
- If color irregularity is observed, turn off the TV set then turn it on again after 15 to 30 minutes.
- If color irregularity is observed again, then place the speaker further away from the TV set.
- If howling occurs, reposition the speakers or turn down the volume on the receiver.
On Cleaning
- Clean the receiver panel, and controls with a soft cloth slightly moistened with mild detergent solution. Do not use any type of abrasive pad, scouring powder, or solvent, such as alcohol or benzene.
- If you have any questions or problems concerning your system, please consult your nearest Pyle dealer.
TROUBLE SHOOTING
Use this chart to help you solve operational problems. If there are any problems that can not be solved, please contact Pyle Service Center.
| Problem | Possible Reasons | Solutions |
| Can't get through power supply | The plug is not inserted properly. | Check power supply and plug. |
| The socket has no power. | Check socket and power supply. | |
| Display can't be turned on | ||
| The fuse is broken. | Replace the fuse. | |
| Have not pressed "POWER" button. | Press the "POWER" button again. | |
| No sound at all | Incorrect selection of input signal. | Read the manual carefully again. |
| The wire and lead are not connected correctly. | Check the wire and lead. | |
| The mute state is turned on. | Turn off the mute state. | |
| Sound source machine is not powered. | Turn on the power of sound source. | |
| Neither of the main channels have sound | The speaker line is not connected properly. | Read the manual. |
| The signal plug is connected incorrectly or lines are short-circuited. | Check the connection of the signal plug. | |
| Center channel has no sound. | The speaker line is not connected properly. | Read the manual. |
| Mode is not set properly. | Mode should be set that the center channel has output. | |
| Side Surround channels have no sound | The speaker line is not connected properly. | Read page 3 of the manual. |
| Mode is not set properly. | Mode should be set that the surround channel has output, for example, 5.1 channel. | |
| The sound of surround channel is low | The sensitivity of speakers is too low. | |
| The volume is set too low. | Reset volume. | |
| The input signal is STEREO. | Change to 5.1 channel. | |
| The sound of center channel is low. | The sensitivity of speakers is too low. | |
| The volume is set too low. | Reset volume. | |
| Sound from speakers is out of order | Speakers are located inappropriately. | Read the manual. |
| The lines are not connected properly or the Disc is defective. | ||
| No sound when you choose HDMI input | Sound source machine is not powered. | Turn on the power of sound source. |
| The HDMI line is not connected properly. | Read the manual. | |
| Sound source machine doesn't set the HDMI out mode | Set the Sound source machine to HDMI out mode | |
| Can't operate or display normally | Affected by exterior strong disturbance. | Turn off first then turn on again. |
| Avoid direct sunlight/heat. | ||
| Radio | ||
| The FM reception is poor. | Need outdoor antenna. | Stretch the FM antenna of the receiver in the rear panel. But please don't connect the receiver to an outdoor FM antenna on raining days. |
| Radio stations cannot be tuned in. | Check that the antennas are connected securely. | Adjust the antennas and connect an external antenna, if necessary. |
| The signal strength of the stations is too weak (when tuning in with automatic tuning). | Adjust manually | |
| No stations have been preset or the preset stations have been cleared (tuning by scanning preset stations). | Make sure you set the tuning interval correctly. | |
| The remote control does not function. | Obstacles exist between the remote and the receiver. | Remove any obstacles in the path between the remote and the receiver. |
| The remote batteries are weak. | Replace all batteries in the remote control with new ones. | |
| Incorrect input selection on the remote control. | Make sure you select the correct input on the remote control. | |
| Error messages | If appears a message, there may be a malfunction. | You can check the condition of the system by the message. |
| Should any problems persist. | Consult your nearest Pyle dealer. | |
| Protect | Irregular current is output to the speakers. The receiver will automatically turn off after a few seconds. | Check the speaker connection then turn on the power again. |
| If you are unable to remedy the problem using the troubleshooting guide | Clearing the receiver's memory may remedy the problem. Note that all memorized settings will be reset to their initial settings on the receiver. | |
| If the problem persist | Take the complete appliance to the nearest Pyle dealer for advice. | |
Powered Home Theater PT678HBA
| Functions | Specifications |
| MP3 | MP3 input |
| AUX1,AUX2 | AUX input |
| FM | FM built-in |
| HDM11,HDM12 | High definition multimedia interface input |
| HDM1 OUT | High definition multimedia interface output |
| Magnetically Shielded | Yes |
| Display | VFD display |
| Remote Control | Full function remote control |
| Adjustment | Every channel adjusts separately |
| Output Power | Front 400W-PEAK x2 |
| Center 400W-PEAK x1 | |
| Surround 400W-PEAK x2 | |
| Subwoofer 500W-PEAK x1 | |
| Drive Unit | Satellite: 2.5 inch |
| Subwoofer: 10 inch | |
| Frequency Response | Satellite: 150Hz-20kHz |
| Subwoofer: 40Hz-330Hz | |
| S/N | 85dB |
| THD | 0.1% |
| Box Material | Satellite: plastic |
| Subwoofer: wooden | |
| Size | Subwoofer: 420 x 370 x 280mm |
| L, R channel: 150 x 70 x 225mm | |
| Surround channel: 150 x 70 x 225mm | |
| Center channel: 150 x 70 x 360mm | |
| Weight | N.W.: 35.0lbs |
| G.W.: 41.0lbs | |
| Finishes | Black |
Pyle AV receivers patent pending technologies are for the world's finest music and home theater systems. All models patent pending. All product titles, publisher's names, artwork, logos and associated images are the trademarks and/or copyright material of their respective owners. All rights reserved. Suggested prices don't represent a bonafide selling price in the metro trading area. Model number, specifications and prices are subject to change without notice.

text_image
P PYLE® HomeHome Theater

natural_image
Product photo of a black home audio streaming setup with speakers, a CD, and a TV unit (no visible text or symbols)PT678HBA
HDMI
Owner's Manual
TABLE OF CONTENTS
Important Safety Information
Owner's Record....1
For Customers in the United States....1
Caution....1
Note to Home Theater System Installer....1
Installation
Front Panel Display Window....2
Rear Panel Connectors....3
Battery Installation....4
Using the Remote Control....5
Basic Operations
Turn On/Off the Power....6
Master Volume Control....6
Side Left Channel Volume Control....6
Side Right Channel Volume Control....6
Center Channel Volume Control....6
Subwoofer Volume Control....6
How to Adjust Treble....6
How to Adjust Bass....6
How to Play MP3....6
How to Play HDMI....6
How to Play AUX....6
How to Play Tuner....6
Select Program
Listen to the Preset Program
Memory Program
How to Mute....7
Introduction of DSP Control Key 7
Introduction of Source Output Selector Area....7
Additional Information
Precautions....8
Troubleshooting....10
Specifications....12
Important Safety Information
OWNER'S RECORD
The model and serial number are located on the rear of the unit. Record the serial number in the space provided below. Refer to them whenever you call upon your Pyle regarding this product.
Model No.
Serial No.
FOR CUSTOMERS IN THE UNITED STATES

This symbol is intended to alert the user to the presence of un-insulated “dangerous voltage” within the product’s enclosure, it may be of sufficient magnitude to constitute a risk of electric shock to persons.
CAUTION RISK OF ELECTRIC SHOCK DO NOT OPEN
CAUTION: TO REDUCE THE RISK OF ELECTRIC SHOCK. DO NOT REMOVE COVER (OR BACK). REFER SERVICING TO QUALIFIED SERVICE PERSONNEL.

This symbol is intended to alert the user to the presence of important operating and maintenance (servicing) instructions in the literature accompanying the appliance.
CAUTION
You are cautioned that changes or modifications not expressly approved in this manual could void your authority to operate this equipment.
- To reduce the risk of fire or electric shock, do not expose this apparatus to rain or moisture.
- To prevent fire, do not cover the ventilation of the apparatus with newspapers, table-cloths, curtains and etc. Do not place lighted candles on the apparatus.
- To prevent fire or shock hazard, do not place objects filled with liquid, such as vases, on the apparatus.
- Do not install the appliance in a confined space, such as a bookcase or built-in cabinet.
- Install this system so that the power cord can be unplugged from the wall socket immediately in the event of trouble.
- Batteries or batteries installed apparatus shall not be exposed to excessive heat such as sunlight or fire.
Note to Home Theater System Installer:
This reminder is provided to call Home Theater System installers' attention to Article 820-40 of the NEC that provides guidelines for proper grounding, in particular, specifies that the cable ground shall be connected to the grounding system of the building as close to the point of cable entry as possible.
Installation
INDICATORS ON FRONT PANEL DISPLAY WINDOW

text_image
STEREO AC-3 PROLOGIC ① ② ③ DSP KHz MHz ④ ⑤ ⑥Name
①STEREO MP3/AUX/TUNER INPUT
②AC-3 PROLOGIC DVD INPUT
③DSP DSP STATE ICON
④ DIGITAL DISPLAY
⑤MHz KHz/MHZ ICON
⑥SPECTRUM DISPLAY
Function
Lights up when input mode is set to MP3, AUX1, AUX2.
Lights up when input mode is set to 5.1 channel or play DVD.
Lights up when play DSP effect.
Lights up to display value of current input mode.
Lights up when Tuner input is selected and indicates the value on the display for KHz/MHz.
Lights up to display the spectrum of different sound channels.
REAR PANEL CONNECTORS
Please install this system according to the following schematic diagram.
text_image
Center Side Left Front Left Front Right Side Right TV MP3 Stereo Input Power OFF ON S1 CE 2 INPUT AUDIO INPUT AUX1 AUX1 MP3 P DVLF Home PT578HBA DIGITALTHEATER QCC AM/FMANT HDMI DVDHDMI Source: playstation, direct tv, blue ray, xbox 360, DVD, laptop, media server
BATTERY INSTALLATION
- On the back of the remote control, push the tab and lift off the battery cover.
- Obtain two (2) fully-charged AAA batteries. Match the “+” and “-” marks on the batteries to the “+” and “-” marks in the battery case, then insert the new batteries.
- Align the cover keys with the case holes and press the cover back into place. The tab should click when the cover is locked.
- Test the unit by pressing POWER or any mode key. If the batteries are inserted correctly, the selected mode key will blink once.
natural_image
Line drawing of two remote control devices with blades and handle, no text or symbols presentNotes
- Do not leave the remote control in an extremely hot or humid place.
- Do not use a new battery with old ones.
- Do not mix manganese batteries with other kinds of batteries.
- Do not expose the remote sensor to direct sunlight or lighting apparatuses. Doing so may cause a malfunction.
- If you do not intend to use the remote control for an extended period of time, remove the batteries to avoid possible damage from battery leakage and corrosion.
- When you replace the batteries, the remote buttons may be reset to their factory settings. If this happens, reset the buttons again.
Tips
Under normal conditions, the batteries should last for about 3 months. When the remote no longer operates the receiver, replace all the batteries with new ones.
USING THE REMOTE CONTROL
| 1. POWERButton-TogglePower OFF and ON |  | 2. MEMORY Button |
| 12. TUNER Band Adjustment Button | ||
| 3. TUNER Number Button | ||
| 13. HDMI Control Selector Button | ||
| 4. INPUT MODESelector Area | ||
| 14. CHANNEL SOURCE OUTPUT Selector Area | ||
| 5. TREBLEVolume Increase Button | ||
| 15. BASS Volume Increase Button | ||
| 6. MASTERVolume Control Button | ||
| 16. RIGHT Balance Selector Button | ||
| 7. LEFT Balance Selector Button | ||
| 17. MUTE Control Button | ||
| 8. TREBLEVolume Decrease Button | ||
| 18. BASS Volume Decrease Button | ||
| 9. SIDE LEFTVolume Adjustment Button | ||
| 19. SIDE RIGHT Volume Adjustment Button | ||
| 10. CENTERVolume Adjustment Button | ||
| 20. SUBWOOFER Volume selector Button | ||
| 11. DSP Control Selector Button | ||
| 21. Bluetooth Control Area |
Basic Operation
Turn On/Off the Power
POWER
Press “ ” key to control the power on and off.
Master Volume Control
Press the “VOL+” or “VOL-” Key to adjust the main channel volume.
Side Left Channel Volume Control
Side Left Vol.
Press “- + ” key on the remote control, screen display the SL volume, press "-ADJUST+" key to adjust side left channel volume.
Side Right Channel Volume Control
Side Right Vol.
Press “- + ”Key on the remote control, screen display the SR volume, press "-ADJUST+" key to adjust side right channel volume.
Center Channel Volume Control
Center Vol.
Press “- + ”key on the remote control, screen display the CEN volume, press “-ADJUST+” key to adjust center channel volume.
Subwoofer Volume Control
SW Vol.
Press “- + ” key on the remote control, screen display the SW volume, press “-ADJUST+” key to adjust subwoofer channel volume.
How to Adjust Treble
TreB+ TreB-
Press “●” key to adjust the treble output of the main channel.
How to Adjust Bass
Bass+ Bass-
Press “●●” key to adjust the bass output of the main channel.
How to Play MP3
Make sure MP3 connection lines are correct, Press the “MP3” key to play MP3.
How to Play HDMI
HDMI1 HDMI2
Make sure HDMI1/HDMI2 connection lines are correct, Press the “☐ / ☐” key to play HDMI.
How to Play AUX
AUX1 AUX2
Make sure AUX1/AUX2 connection lines are correct, Press the “☐ / ☐” key to play AUX.
How to Play Bluetooth
Paring with a bluetooth sender as the following manual.
- “” play the previous song.
- “” play the next song.
- “▶” play/pause the song.
- “●” paring the bluetooth sender.
How to Play Tuner
1. Select Program
Use “Tuner” key to select FM band. Press the “SCAN” key to adjust the band of tuner.
Press the “SCAN” key for 2 seconds, the FM will search automatically. You can press the “SCAN” key once or the input mode selector to stop the function.
2. Listen to the Preset Program

Press the number keys “10 11 12” to select the radio program that you already saved.
Once selected, screen will display the radio program's frequency in the memory area.
3. Memory Program
When you receive a clear radio program, press the “ MEMORY ” key first, and then the

screen displays the “Memory” icon. Press one of the 12 “⑩ ⑪ ⑫” number key on the remote control to select the memory station. If you want to extract the channel you saved, just press the number key you selected.
How to Mute
Press “MUTE” key to turn sound off/on.
Press again to restore the audio to the original level.
Introduction of DSP Control Key
Press the key “DSP” repeatedly to switch to different operations: Live, Hall or Church. All the above functions can give different sound effects.
Introduction of Source Output Selector Area
- Press “5.1CH” to receive 5.1 channel. (5.1 channel output is the default mode)
- Press “3.1CH” to receive 3.1 channel. (Side left speaker and Side right speaker mute)
- Press “2.1CH” to receive 2.1 channel. (Side left speaker, Side right speaker and Center speaker mute)
How to Pair the bluetooth receiver
The subwoofer have built in a bluetooth receiver. If you need to pair with a bluetooth sender(mobile phone), first open the subwoofer, and press the “pairing” key on the remote control, the VFD will show “pairing” and flicker. Then search the bluetooth receiver(Device ID:bluespeaker) by your own bluetooth sender and connect them by the password:0000. After that, you can enjoy the music by the bluetooth receiver. The system will turn to the normal working statue if no paring in 10 minutes.
Additional information
PRECAUTIONS
On Safety
- Should any solid object or liquid fall into the receiver, unplug the receiver and have it checked by qualified personnel before operating it any further.
On Power Sources
- Before operating the system, check that the operating voltage is identical with your local power supply.
• The operating voltage is indicated on the back of the speakers. - As long as the unit is not removed from the wall outlet, the unit will not be disconnected from the AC power source (main) even if the unit itself has been turned off.
- If you are not going to use the system for a long time, be sure to disconnect the system from the wall outlet. To disconnect the AC power cord, disconnect by grasping the plug itself; never pull the cord.
- One contact prong of the plug is wider than the other for safety purposes, which will fit into the wall outlet only one way. If you are unable to insert the plug fully into the outlet, contact your dealer.
- The AC power cord should only be changed at a qualified service shop.
On Heat Buildup
- Although the system heats up during operation, this is not a malfunction. If you continuously use this system at a large volume, the receiver temperature on top, side and bottom may rise considerably. To avoid burning yourself, do not touch the receiver.
On Placement
- Place the system in a location with adequate ventilation to prevent heat buildup and to prolong the life of the system.
- Do not place the system near heat sources or in a place subject to direct sunlight, excessive dust, or mechanical shock.
- Do not place anything on top of the receiver that might block the ventilation holes and cause malfunctions.
- Do not place the system near equipments such as a TV, VCR, or tape deck. (If the system is being used in combination with a TV, VCR or tape deck, and is placed too close to such equipment, noise may occur and picture quality may suffer. Especially, when using an indoor antenna).
- Use caution when placing the system or speakers on surfaces that have been specially treated (with wax, oil, polish, etc.) as staining or discoloration of the surface may result.
On Operation
- Before connecting other components, be sure to turn off and unplug the system.
- The center speaker is magnetically shielded to allow it to be installed near a TV set. However, color irregularities may still be observed on certain types of TV sets.
- As the front speakers, center speaker and the subwoofer are not magnetically shielded, we recommend that you place them slightly further away from the TV set.
- If color irregularity is observed, turn off the TV set then turn it on again after 15 to 30 minutes.
- If color irregularity is observed again, then place the speaker further away from the TV set.
- If howling occurs, reposition the speakers or turn down the volume on the receiver.
On Cleaning
- Clean the receiver panel, and controls with a soft cloth slightly moistened with mild detergent solution. Do not use any type of abrasive pad, scouring powder, or solvent, such as alcohol or benzene.
- If you have any questions or problems concerning your system, please consult your nearest Pyle dealer.
TROUBLE SHOOTING
Use this chart to help you solve operational problems. If there are any problems that can not be solved, please contact Pyle Service Center.
| Problem | Possible Reasons | Solutions |
| Can't get through power supply | The plug is not inserted properly. | Check power supply and plug. |
| The socket has no power. | Check socket and power supply. | |
| Display can't be turned on | ||
| The fuse is broken. | Replace the fuse. | |
| Have not pressed "POWER" button. | Press the "POWER" button again. | |
| No sound at all | Incorrect selection of input signal. | Read the manual carefully again. |
| The wire and lead are not connected correctly. | Check the wire and lead. | |
| The mute state is turned on. | Turn off the mute state. | |
| Sound source machine is not powered. | Turn on the power of sound source. | |
| Neither of the main channels have sound | The speaker line is not connected properly. | Read the manual. |
| The signal plug is connected incorrectly or lines are short-circuited. | Check the connection of the signal plug. | |
| Center channel has no sound. | The speaker line is not connected properly. | Read the manual. |
| Mode is not set properly. | Mode should be set that the center channel has output. | |
| Side Surround channels have no sound | The speaker line is not connected properly. | Read page 3 of the manual. |
| Mode is not set properly. | Mode should be set that the surround channel has output, for example, 5.1 channel. | |
| The sound of surround channel is low | The sensitivity of speakers is too low. | |
| The volume is set too low. | Reset volume. | |
| The input signal is STEREO. | Change to 5.1 channel. | |
| The sound of center channel is low. | The sensitivity of speakers is too low. | |
| The volume is set too low. | Reset volume. | |
| Sound from speakers is out of order | Speakers are located inappropriately. | Read the manual. |
| The lines are not connected properly or the Disc is defective. | ||
| No sound when you choose HDMI input | Sound source machine is not powered. | Turn on the power of sound source. |
| The HDMI line is not connected properly. | Read the manual. | |
| Sound source machine doesn't set the HDMI out mode | Set the Sound source machine to HDMI out mode | |
| Can't operate or display normally | Affected by exterior strong disturbance. | Turn off first then turn on again. |
| Avoid direct sunlight/heat. | ||
| Radio | ||
| The FM reception is poor. | Need outdoor antenna. | Stretch the FM antenna of the receiver in the rear panel. But please don't connect the receiver to an outdoor FM antenna on raining days. |
| Radio stations cannot be tuned in. | Check that the antennas are connected securely. | Adjust the antennas and connect an external antenna, if necessary. |
| The signal strength of the stations is too weak (when tuning in with automatic tuning). | Adjust manually | |
| No stations have been preset or the preset stations have been cleared (tuning by scanning preset stations). | Make sure you set the tuning interval correctly. | |
| The remote control does not function. | Obstacles exist between the remote and the receiver. | Remove any obstacles in the path between the remote and the receiver. |
| The remote batteries are weak. | Replace all batteries in the remote control with new ones. | |
| Incorrect input selection on the remote control. | Make sure you select the correct input on the remote control. | |
| Error messages | If appears a message, there may be a malfunction. | You can check the condition of the system by the message. |
| Should any problems persist. | Consult your nearest Pyle dealer. | |
| Protect | Irregular current is output to the speakers. The receiver will automatically turn off after a few seconds. | Check the speaker connection then turn on the power again. |
| If you are unable to remedy the problem using the troubleshooting guide | Clearing the receiver's memory may remedy the problem. Note that all memorized settings will be reset to their initial settings on the receiver. | |
| If the problem persist | Take the complete appliance to the nearest Pyle dealer for advice. | |
Powered Home Theater PT678HBA
| Functions | Specifications |
| MP3 | MP3 input |
| AUX1,AUX2 | AUX input |
| FM | FM built-in |
| HDM11,HDM12 | High definition multimedia interface input |
| HDM1 OUT | High definition multimedia interface output |
| Magnetically Shielded | Yes |
| Display | VFD display |
| Remote Control | Full function remote control |
| Adjustment | Every channel adjusts separately |
| Output Power | Front 400W-PEAK x2 |
| Center 400W-PEAK x1 | |
| Surround 400W-PEAK x2 | |
| Subwoofer 500W-PEAK x1 | |
| Drive Unit | Satellite: 2.5 inch |
| Subwoofer: 10 inch | |
| Frequency Response | Satellite: 150Hz-20kHz |
| Subwoofer: 40Hz-330Hz | |
| S/N | 85dB |
| THD | 0.1% |
| Box Material | Satellite: plastic |
| Subwoofer: wooden | |
| Size | Subwoofer: 420 x 370 x 280mm |
| L, R channel: 150 x 70 x 225mm | |
| Surround channel: 150 x 70 x 225mm | |
| Center channel: 150 x 70 x 360mm | |
| Weight | N.W.: 35.0lbs |
| G.W.: 41.0lbs | |
| Finishes | Black |
Pyle AV receivers patent pending technologies are for the world's finest music and home theater systems. All models patent pending. All product titles, publisher's names, artwork, logos and associated images are the trademarks and/or copyright material of their respective owners. All rights reserved. Suggested prices don't represent a bonafide selling price in the metro trading area. Model number, specifications and prices are subject to change without notice.