
BE525LMS0H - Micro-ondes SIEMENS - Notice d'utilisation et mode d'emploi gratuit
Retrouvez gratuitement la notice de l'appareil BE525LMS0H SIEMENS au format PDF.

| Caractéristiques techniques | Four à micro-ondes encastrable, puissance de 900 W, volume de 25 L, 5 niveaux de puissance. |
|---|---|
| Fonctions de cuisson | Fonction micro-ondes, fonction grill, fonction combinée. |
| Utilisation | Panneau de commande avec affichage LED, commandes tactiles, minuterie intégrée. |
| Dimensions | Dimensions (L x H x P) : 59,4 x 38,2 x 32,3 cm. |
| Poids | Poids net : 16 kg. |
| Maintenance | Nettoyage intérieur facile avec revêtement en acier inoxydable. |
| Sécurité | Système de verrouillage de sécurité, protection contre la surchauffe. |
| Informations générales | Garantie de 2 ans, installation par un professionnel recommandée. |
FOIRE AUX QUESTIONS - BE525LMS0H SIEMENS
Questions des utilisateurs sur BE525LMS0H SIEMENS
0 question sur cet appareil. Repondez a celles que vous connaissez ou posez la votre.
Poser une nouvelle question sur cet appareil
Téléchargez la notice de votre Micro-ondes au format PDF gratuitement ! Retrouvez votre notice BE525LMS0H - SIEMENS et reprennez votre appareil électronique en main. Sur cette page sont publiés tous les documents nécessaires à l'utilisation de votre appareil BE525LMS0H de la marque SIEMENS.
MODE D'EMPLOI BE525LMS0H SIEMENS
Microwave
微波
BE525LMS0H
[en]Instruction manual 3 [zh-hk]說明手冊 24

Register your product on My Siemens and discover exclusive services and offers.
siemens-home.bsh-group.com/welcome
The future moving in.
Table of contents
Intended use. 4
Important safety information 4 General information. 4 Microwave 5
Installation and connection 6
Causes of damage 7
Environmental protection 7 Environmentally-friendly disposal 7
Getting to know your appliance 7
Control panel. 7
Controls. 8
Changing the signal duration. 8
Accessories 9
Special accessories. 9
Before using for the first time. 9
Cleaning the cooking compartment and putting the turntable in place. 9
Initial use. 9
Cleaning the cooking compartment and accessories. 10
Microwave. 10
Cookware 10
Microwave power settings. 11
Setting the microwave. 11
Grilling. 12
Setting the grill. 12
Setting the microwave and grill 12
M Memory 13
Saving memory settings 13
Starting the memory 13
P Programmes. 13
Setting a programme. 13
Defrosting using the automatic programmes. 14
Cooking with the automatic programmes. 14
Combi-cooking programme. 14
Basic settings. 15
Cleaning 15
Cleaning agent 15
Trouble shooting 16
Customer service. 17
E number and FD number. 17
Tested for you in our cooking studio. 18
Suitable ovenware. 18
Unsuitable cookware 18
Defrosting 18
Heating frozen food 19
Heating food 20
Cooking food 21
Microwave tips 22
Test dishes 23
Additional information on products, accessories, replacement parts and services can be found at www.siemens-home.bsh-group.com and in the online shop www.siemens-home.bsh-group.com/eshops

Intended use
Read these instructions carefully. Only then will you be able to operate your appliance safely and correctly. Retain the instruction manual and installation instructions for future use or for subsequent owners.
This appliance is only intended to be fully fitted in a kitchen. Observe the special installation instructions.
Check the appliance for damage after unpacking it. Do not connect the appliance if it has been damaged in transport.
Only a licensed professional may connect appliances without plugs. Damage caused by incorrect connection is not covered under warranty.
This appliance is intended for domestic use only. The appliance must only be used for the preparation of food and drink. The appliance must be supervised during operation. Only use this appliance indoors.
This appliance is intended for use up to a maximum height of 4000 metres above sea level.
This appliance may be used by children over the age of 8 years old and by persons with reduced physical, sensory or mental capabilities or by persons with a lack of experience or knowledge if they are supervised or are instructed by a person responsible for their safety how to use the appliance safely and have understood the associated hazards.
Children must not play with, on, or around the appliance. Children must not clean the appliance or carry out general maintenance unless they are at least 15 years old and are being supervised.
Keep children below the age of 8 years old at a safe distance from the appliance and power cable.
Always place the accessories into the cooking compartment correctly. "Before using for the first time" on page 9

Important safety information
General information

Warning - Risk of fire!
- Combustible items stored in the cooking compartment may catch fire. Never store combustible items in the cooking compartment. Never open the appliance door if there is smoke inside. Switch off the appliance and unplug it from the mains or switch off the circuit breaker in the fuse box.
- The appliance becomes very hot. If the appliance is installed in a fitted unit with a decorative door, heat will accumulate when the decorative door is closed. Only operate the appliance when the decorative door is open.

Warning - Risk of electric shock!
- Incorrect repairs are dangerous. Repairs may only be carried out and damaged power cables replaced by one of our trained after-sales technicians. If the appliance is defective, unplug the appliance from the mains or switch off the circuit breaker in the fuse box. Contact the after-sales service.
The cable insulation on electrical appliances may melt when touching hot parts of the appliance. Never bring electrical appliance cables into contact with hot parts of the appliance. - Do not use any high-pressure cleaners or steam cleaners, which can result in an electric shock.
- Penetrating moisture may cause electric shock. Never subject the appliance to intense heat or humidity. Only use this appliance indoors.
- A defective appliance may cause electric shock. Never switch on a defective appliance. Unplug the appliance from the mains or switch off the circuit breaker in the fuse box. Contact the after-sales service.
The appliance is a high-voltage appliance. Never remove the casing.

Warning - Risk of burns!
The appliance becomes very hot. Never touch the interior surfaces of the cooking compartment or the heating elements. Always allow the appliance to cool down. Keep children at a safe distance.
- Accessories and ovenware become very hot. Always use oven gloves to remove accessories or ovenware from the cooking compartment.
- Alcoholic vapours may catch fire in the hot cooking compartment. Never prepare food containing large quantities of drinks with a high alcohol content. Only use small quantities of drinks with a high alcohol content. Open the appliance door with care.
Warning - Risk of scalding!
- When you open the appliance door, hot steam may escape. Open the appliance door with care. Keep children at a safe distance.
Water in a hot cooking compartment may create hot steam. Never pour water into the cooking compartment when the cooking compartment is hot.
Warning - Risk of injury!
Scratched glass in the appliance door may develop into a crack. Do not use a glass scraper, sharp or abrasive cleaning aids or detergents.
Microwave
Warning - Risk of fire!
- Using the appliance for anything other than its intended purpose is dangerous and may cause damage. The following is not permitted: drying out for or clothing, heating slippers, grain or cereal pillows, sponges, damp cleaning cloths or similar. For example, heated slippers and grain or cereal pillows may catch fire, even several hours after they have been heated. The appliance must only be used for the preparation of food and drinks.
- Food may catch fire. Never heat food in heat-retaining packages.
Do not leave food heating unattended in containers made of plastic, paper or other combustible materials.
Do not select a microwave power or time setting that is higher than necessary. Follow the information provided in this instruction manual.
Never use the microwave to dry food.
Never defrost or heat food with a low water content, e.g. bread, at too high a microwave power or for too long.
- Cooking oil may catch fire. Never use the microwave to heat cooking oil on its own.
Warning - Risk of explosion!
Liquids and other food may explode when in containers that have been tightly sealed. Never heat liquids or other food in containers that have been tightly sealed.
Warning - Risk of burns!
- Foods with peel or skin may burst or explode during, or even after, heating. Never cook eggs in their shells or reheat hard-boiled eggs. Never cook shellfish or crustaceans. Always prick the yolk when baking or poaching eggs. The skin of foods that have a peel or skin, such as apples, tomatoes, potatoes and sausages, may burst. Before heating, prick the peel or skin.
- Heat is not distributed evenly through baby food. Never heat baby food in closed containers. Always remove the lid or teat. Stir or shake well after the food has been heated. Check the temperature of the food before it is given to the child.
- Heated food gives off heat. The ovenware may become hot. Always use oven gloves to remove ovenware or accessories from the cooking compartment.
- Airtight packaging may burst when food is heated. Always observe the instructions on the packaging. Always use oven gloves to remove dishes from the cooking compartment.
- The accessible parts become very hot when in operation. Never touch hot parts. Keep children at a safe distance.
- Using the appliance for anything other than its intended purpose is dangerous. You are not permitted to use it to dry food or clothing or to warm slippers, grain or cereal pillows, sponges, damp cleaning cloths or the like. This is because, for instance, overheated slippers, grain or cereal pillows, sponges and damp cleaning cloths, etc., may cause burns to the skin.
Warning - Risk of scalding!
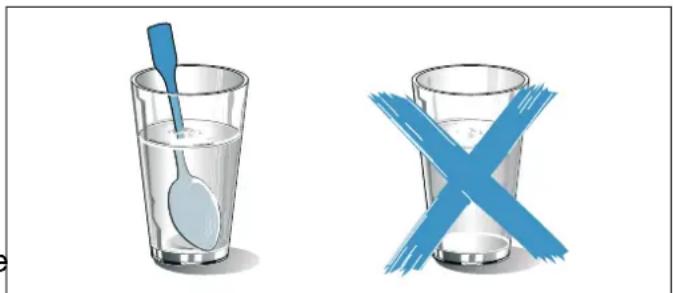
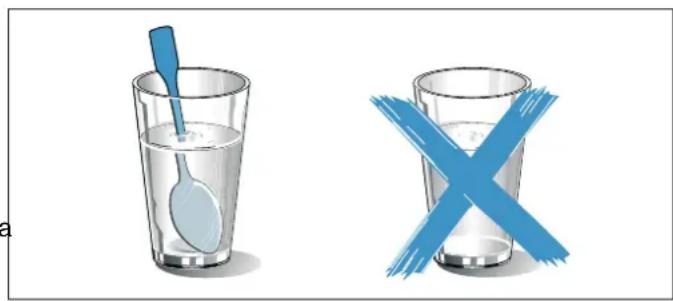
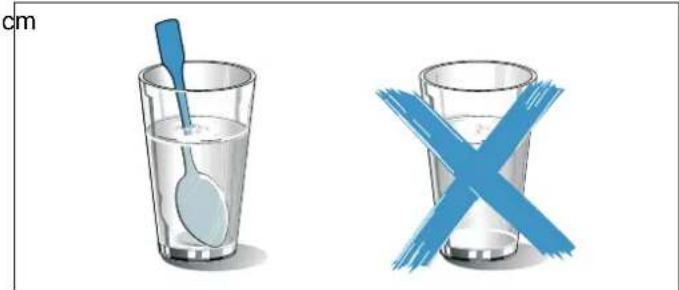
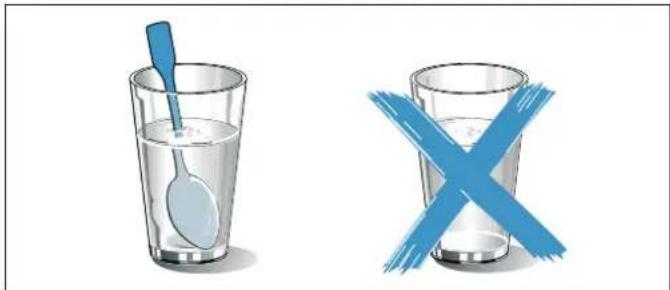
- There is a possibility of delayed boiling when a liquid is heated. This means that the liquid reaches boiling temperature without the usual steam bubbles rising to the surface. Even if the container only vibrates a little, the hot liquid may suddenly boil over and spatter. When heating, always place a spoon in the container. This will prevent delayed boiling.
Warning - Risk of injury!
- Scratched glass in the appliance door may develop into a crack. Do not use a glass scraper, sharp or abrasive cleaning aids or detergents.
- Unsuitable ovenware may crack. Porcelain or ceramic ovenware can have small perforations in the handles or lids. These perforations conceal a cavity below. Any moisture that penetrates this cavity could cause the ovenware to crack. Only use microwave-safe ovenware.
- If using the appliance in microwave mode only, placing cookware and containers made of metal or featuring metal detailing inside the appliance may cause sparks when the appliance is operating. This may damage the appliance. Never use metal containers when using the appliance in microwave mode only.
- Using unsuitable cookware may result in damage. For microwave combination mode, always use cookware made from suitable materials that can also withstand the temperatures used for hot air and grilling modes.
- The glass turntable may splinter. Never allow hard objects to strike the turntable.
- Cracks or chinks in the glass turntable are dangerous. Handle the turntable with care.
Warning - Risk of electric shock!
The appliance is a high-voltage appliance. Never remove the casing.
Warning - Risk of serious damage to health!
- The surface of the appliance may become damaged if it is not cleaned properly. Microwave energy may escape. Clean the appliance on a regular basis, and remove any food residue immediately. Always keep the cooking compartment, door seal, door and door stop clean. "Cleaning" on page 15
- Microwave energy may escape if the cooking compartment door or the door seal is damaged. Never use the appliance if the cooking compartment door or the door seal is damaged. Contact the after-sales service.
- Microwave energy will escape from appliances that do not have any casing. Never remove the casing. For any maintenance or repair work, contact the after-sales service.

Installation and connection
This appliance is designed for domestic use only.
This appliance is designed to be fully integrated into kitchen units.
Please follow the dedicated installation instructions.
The appliance is ready to be plugged in and may only be connected to a grounded socket that has been correctly installed. The mains voltage must correspond to the voltage specified on the rating plate.
Only a qualified electrician may install the socket or replace the power cable.If the plug is no longer accessible once the appliance has been installed, an all-pole isolating switch with a contact gap of at least 3mm must be provided for the wiring.
Do not use multi-socket adaptors, power strips or extension leads. Overloading causes a risk of fire.

Causes of damage
Caution!
Heavily soiled seal: If the seal is very dirty, the appliance door will no longer close properly during operation. The fronts of adjacent units could be damaged. Always keep the seal clean.
- Operating the microwave without food: Operating the appliance without food in the cooking compartment may lead to overloading. Never switch on the appliance unless there is food in the cooking compartment. The only exception to this rule is when performing a short cookware test. "Cookware test" on page 11
- Microwave popcorn: Never set the microwave power too high. Use a power setting no higher than 600 watts. Always place the popcorn bag on a glass plate. The disc may jump if overloaded.
Liquid that has boiled over must not be allowed to run through the turntable drive into the interior of the appliance. Monitor the cooking process. Choose a shorter cooking time initially, and increase the cooking time as required.
- Never use the microwave oven without the turntable.
Creation of sparks: Metal - e.g. a spoon in a glass must be kept at least 2 cm from the oven walls and the inside of the door. Sparks could irreparably damage the glass on the inside of the door.
- Foil containers: Do not use foil containers in the appliance. They damage the appliance by producing sparks.
Cooling with the appliance door open: Only leave the cooking compartment to cool with the door closed. Do not trap anything in the appliance door. Even if the door is only slightly ajar, the fronts of adjacent units may be damaged over time.
- Condensation in the cooking compartment:
- Condensation may appear on the door window, interior walls and floor. This is normal and does not adversely affect microwave operation. To prevent corrosion, wipe off the condensation every time you cook.

Environmental protection
Environmentally-friendly disposal
Dispose of packaging in an environmentally-friendly manner.
This appliance is labelled in accordance with European Directive 2012/19/EU concerning used electrical and electronic appliances (waste electrical and electronic equipment - WEEE). The guideline determines the framework for the return and recycling of used appliances as applicable throughout the EU.

Getting to know your appliance
In this section, we will explain the display and controls. You will also find out about the various functions of your appliance.
Note: Depending on the appliance model, individual details and colours may differ.
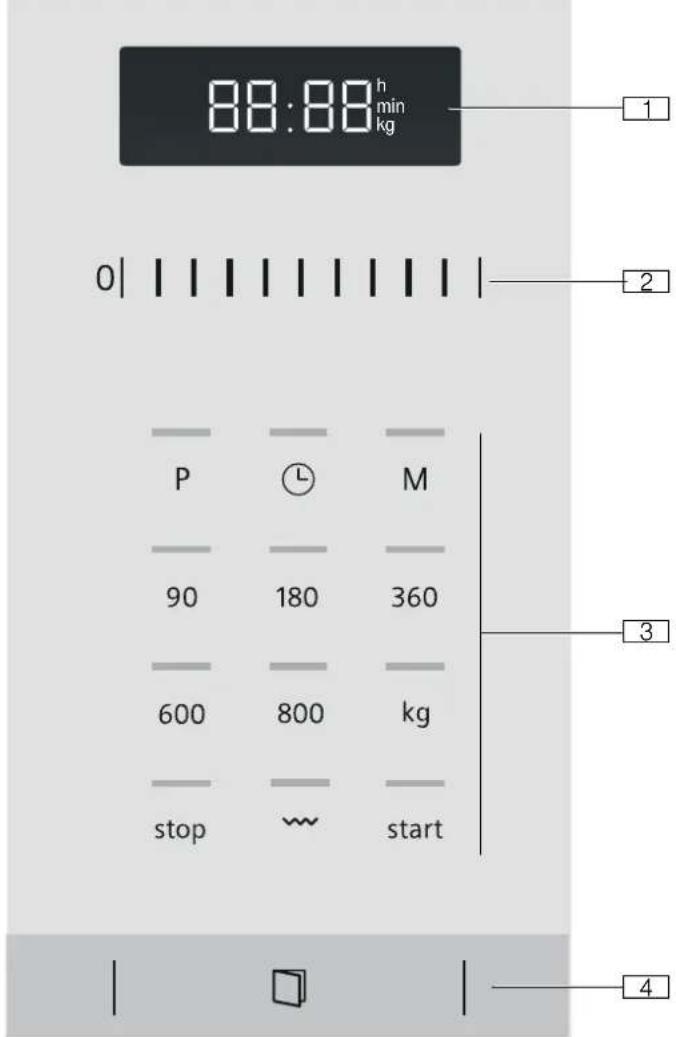
Control panel
You can set your appliance's various functions on the control panel. The current settings are shown on the display.
The overview shows the control panel when the appliance is switched on with a clock time that has been set.
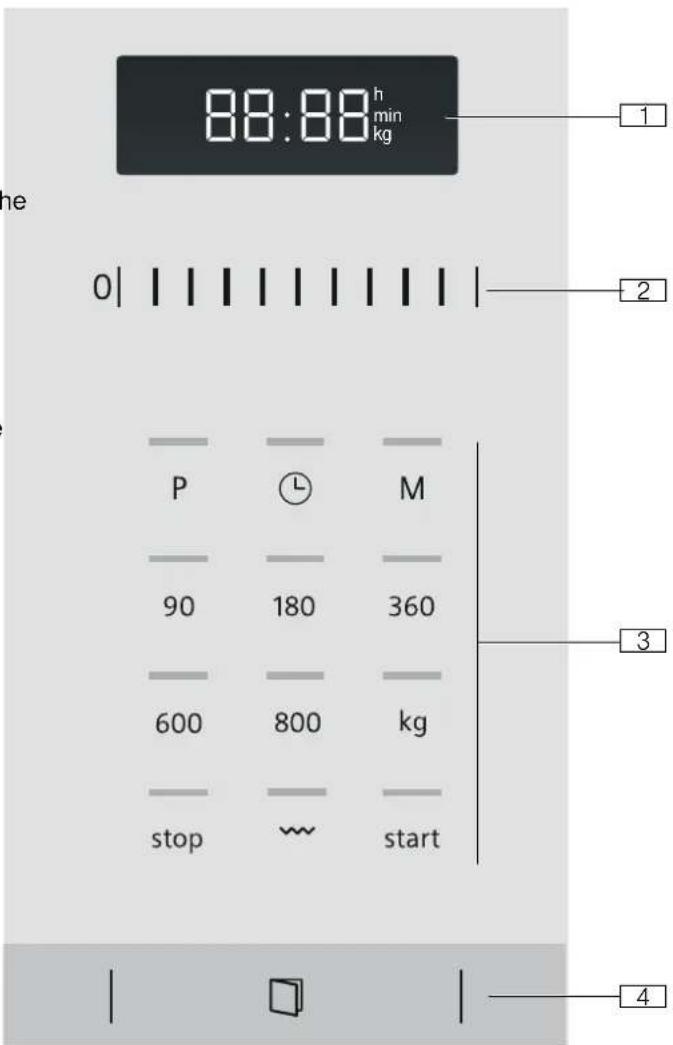
1 Display
For clock and cooking times
2 Control panel
For setting the clock and cooking times or for setting automatic programmes.
3 Touch fields
4Automatic door opening button
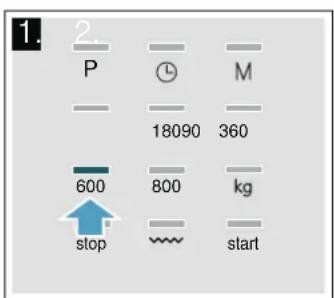
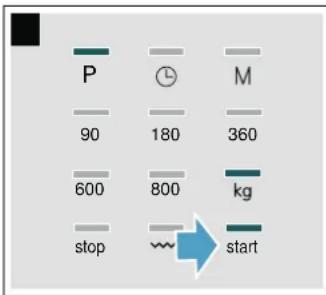
Controls
Here you can find a short explanation of the various fields. You can set your appliance simply and directly.
Touch fields and their functions
Here you can find a short explanation of the various touch fields.
| Touch fields | Function |
| Symbol | |
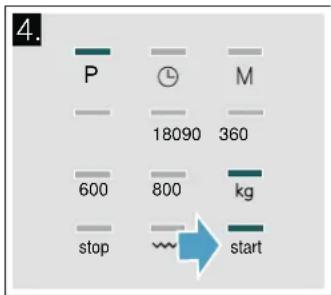
| P | Selects automatic programmes |
| Setting the time | |
| M | Select the memory |
| 90 | Select a microwave power output of 90 watts |
| 180 | Select a microwave power output of 180 watts |
| 360 | Select a microwave power output of 360 watts |
| 600 | Select a microwave power output of 600 watts |
| 800 | Select a microwave power output of 800 watts |
| kg | Select a weight for the programmes |
| stop | Stop or pause the appliance |
| ~ | Selects the grill |
| start | Start the appliance |
| □ | Open appliance door |
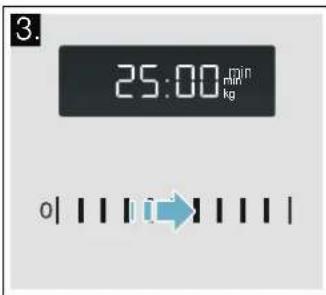
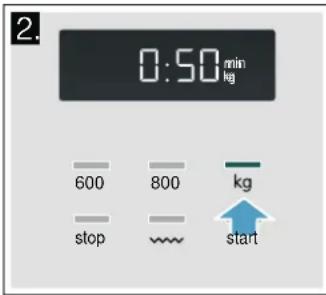
Control panel
The control panel functions like a scroller. Swipe left or right with your finger to change the setting. The faster you swipe, the faster the scroller will move. Tap on the scroller to stop it and select an exact setting.
Automatic door opening
The appliance door springs open if you activate the automatic door opening. You can fully open the appliance door manually.
The automatic door opening does not work in the event of a power cut. You can open the door manually.
Notes
If you open the appliance door during operation, the operation is paused.
- When you close the appliance door, the operation does not continue automatically. You must restart the operation manually.
If the appliance has been switched off for a long time, the appliance door will open after a time delay.
Cooling fan
The appliance is equipped with a cooling fan. The fan may run on even if the oven has been switched off.
Notes
The cooking compartment remains cold during microwave operation. The cooling fan will still switch on. The fan may run on even when microwave operation has ended.
- Condensation may appear on the door window, interior walls and floor. This is normal and does not adversely affect microwave operation. Wipe away the condensation after cooking.
Changing the signal duration
You will hear a signal when the appliance is switched off.
You can change the duration of the acoustic signal.
Touch "Start" for approx. 6 seconds.
The new signal duration is adopted.
The clock reappears.
The following are possible:
Short signal duration - 3 tones
Long signal duration - 30 tones.
Accessories
Below, you will find an overview of the accessories included and information on how to use them correctly.
Caution!
When removing dishes, make sure that the turntable does not move. Make sure that the turntable is properly locked. The turntable can turn left or right.
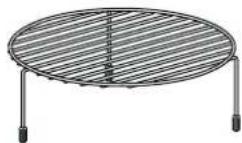
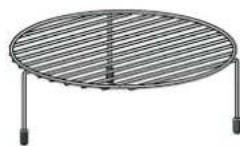
Wire rack
Wire rack for grilling, e.g. steak, sausages or bread, or for setting down cookware, e.g. shallow ovenproof dishes.
Note: Place the wire rack onto the turntable.
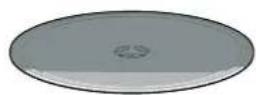
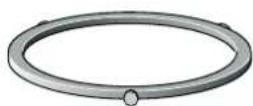
Turntable
Note: Never use the appliance without the turntable.Make sure that it is properly engaged. The turntable can turn clockwise or anti-clockwise.
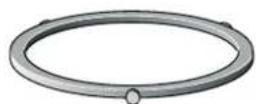
Roller ring
Special accessories
Special accessories can be purchased from our after-sales service, from specialist retailers, or online. You will find a comprehensive range of products in our brochures and online.
Their availability and whether it is possible to order them online varies from country to country. Please see our sales brochures for more details.
Note: Not all special accessories are suitable for every appliance. When purchasing, please always quote the exact identification number (E-no.) of your appliance. "Customer service" on page 17
Steaming utensils For cooking rice, potatoes and vegetables
Before using for the first time
This section tells you what you need to do before using your microwave to prepare food for the first time. Read the section entitled "Safety information" beforehand. "Important safety information" on page 4
Before you can use your new appliance, you will need to put the turntable in place correctly. You must also clean the cooking compartment and accessories.
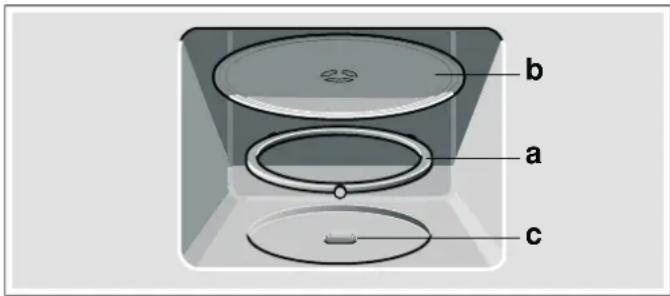
Cleaning the cooking compartment and putting the turntable in place
Before using the appliance to prepare food for the first time, you must clean the cooking compartment and accessories.
How to put the turntable in place
- Place the roller ring a into the recess in the cooking compartment.
- Make sure that the turntable b engages in the drive c in the centre of the cooking compartment floor.
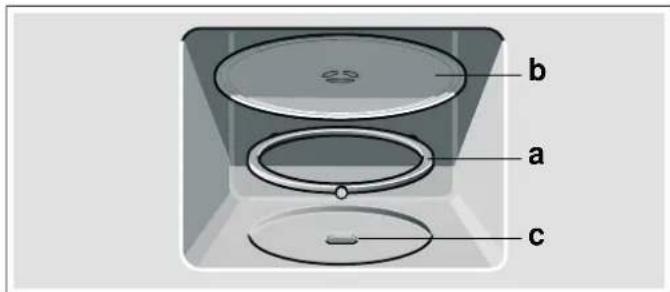
Note: Never use the appliance without the turntable. Make sure that it is properly engaged.The turntable can turn clockwise or anti-clockwise.
Initial use
After connecting the appliance to the mains, or following a power failure, a signal sounds and four zeros appear in the display.
Setting the time
The prompt to set the time may last a number of seconds. A signal sounds, 12:00 appears in the display, the colon flashes and the indicator lamp above the time field lights up.
- Set the time using the control panel.
- Touch
The current time is set.
Hiding the clock
In order to reduce the energy consumption of your appliance in standby, you can hide the clock.
- Touch (D).
- Touch "Stop".
The display is blank.
Resetting the clock
Touch
The set time is shown in the display.
Changing the clock from summer time to winter time
- Touch and set the time using the control panel.
- Touch 日 again.
The time has now been set.
Cleaning the cooking compartment and accessories
To eliminate the new-appliance smell, heat up the cooking compartment with nothing in it except the turntable and with the oven door closed.
Make sure that there is no leftover packaging, such as polystyrene pellets, in the cooking compartment. Before heating the appliance, wipe the smooth surfaces in the cooking compartment with a soft, damp cloth. Keep the kitchen ventilated while the appliance is heating.
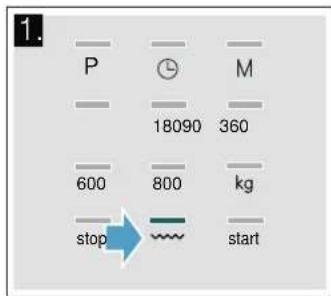
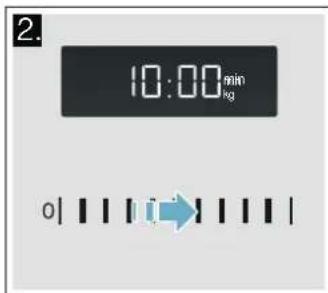
Settings
Grill
10 minutes
Heating up the cooking compartment
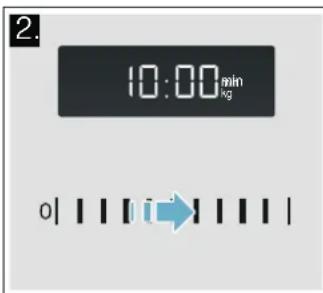
- Touch
10:00 min appears in the display and the indicator lamp above lights up.
- Touch "Start".
An audible signal will sound once the time has elapsed. Press "Stop" or open the appliance door.
Tip: Once the cooking compartment has cooled down, clean the smooth surfaces with soapy water and a dish cloth.
Cleaning the accessories
Clean the accessories thoroughly using soapy water and a dish cloth or soft brush.

Microwave
You can use the microwave to cook, heat up or defrost food quickly. You can use the microwave on its own or in combination with the grill.
To ensure optimum use of the microwave, please observe the notes on cookware and familiarise yourself with the data in the application tables at the end of the instruction manual.
Try out the microwave straight away. You could heat up a cup of water for your tea, for example.
Use a large cup without any decorative gold or silver trim and place a teaspoon in it. Place the cup containing the water on the turntable, slightly off-centre.
- Touch "800 W".
- Set 1:30 min using the control panel.
- Touch "Start".
A signal sounds after 1 minute and 30 seconds. The water is hot.
Warning - Risk of scalding!
There is a possibility of delayed boiling when a liquid is heated. This means that the liquid reaches boiling temperature without the usual steam bubbles rising to surface. Even if the container only vibrates a little, the liquid may suddenly boil over and spatter. When heating, always place a spoon in the container. This will prevent delayed boiling.
Cookware
Not all cookware is microwavable. So that your food is heated and the appliance is not damaged, only use microwavable cookware.
Suitable cookware
Heat-resistant cookware made of glass, glass ceramic, porcelain, ceramic or heat-resistant plastic are suitable. These materials allow microwaves to pass through.
to the You can also use serving dishes. This saves you having
the hot to transfer food from one dish to another. You should on
use cookware with decorative gold or silver trim if the
manufacturer guarantees that they are suitable for use in
microwaves.
Unsuitable cookware
Metal cookware is unsuitable. Metal does not allow microwaves to pass through. Food in covered metal containers will remain cold.
Caution!
Creation of sparks: Metal - e.g. a spoon in a glass - mushe cooking time counts down in the display.
be kept at least 2 cm from the cooking compartment walls.
and the inside of the door. Sparks can irreparably damageThe cooking time has elapsed
the glass on the inside of the door.
Cookware test
Never switch on the microwave unless there is food inside. The short cookware test is the only exception to this rule.
Perform the following test if you are unsure whether your cookware is suitable for use in the microwave.
- Heat the empty cookware at maximum power for 12 to 1 minute.
- Check the temperature of the cookware during this time.
The cookware should remain cold or warm to the touch.
The cookware is unsuitable if it becomes hot or sparks generated.
In this case, stop the test.
Warning - Risk of burns!
The accessible parts become very hot when in operation.
Never touch hot parts. Keep children at a safe distance.
- Touch "Start".
the cooking time counts down in the display.
The cooking time has elapsed.
An audible signal will sound. Open the appliance door or press "Stop". The clock reappears.
Changing the cooking time
This can be done at any time. Change the cooking time using the control panel.
Pausing the appliance
Touch the Stop button once or open the appliance door. This pauses the appliance. The indicator above the Stop button will light up. After closing the door, touch the Start button again.
Cancelling the operation
Open the appliance door and press "Stop" once; or press "Stop" twice.
Note: You can also adjust the cooking time first and then the microwave power setting.
Microwave power settings
Use the touch fields to set the microwave power setting you require.
| 90 W For defrosting delicate foods |
| 180 W For defrosting and continued cooking |
| 360 W For cooking meat and for heating delicate foods |
| 600 W For heating and cooking food |
| 800 W For heating liquids |
Note: The 800 W microwave power setting can be set for
30 minutes, 600 W for 1 hour and the other power
settings for 1 hour and 39 minutes.
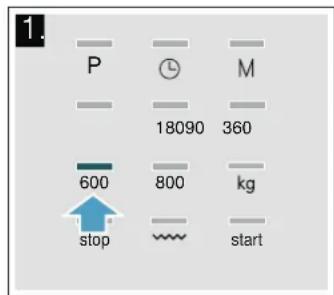
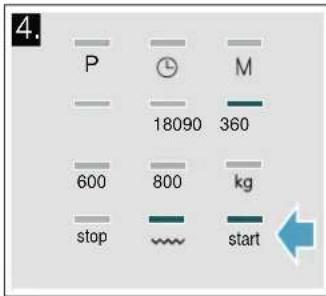
Setting the microwave
Example: Microwave power setting 600 watts, 10 minutes
- Touch the microwave power setting you require.
The indicator lamp above the microwave power setting lights up. - Set the required cooking time using the control panel.


Grilling
The grill is perfect for gratinating and browning the top of dishes.
You can use the grill on its own or in combination with microwave.
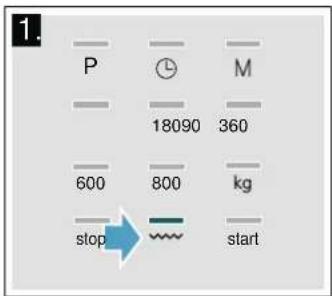
Setting the grill
- Touch
10:00 min appears in the display and the indicator lamp above the button lights up.
- Set the cooking time using the control panel.
- Touch "Start".
The cooking time counts down in the display.
The cooking time has elapsed
An audible signal will sound. Open the appliance door or press "Stop". The clock reappears.
Pausing the appliance
Touch the Stop button once or open the appliance door. This pauses the appliance. The indicator above the Stop button will light up. After closing the door, touch the Start button again.
Correction
You may correct a set cooking time at any time.
Cancelling the operation
Open the appliance door and press "Stop" once; or press "Stop" twice.
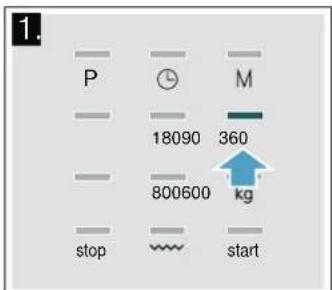
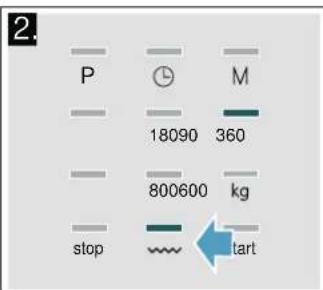
Setting the microwave and grill
Example: 360 W, grill , 5 minutes
- Touch the microwave power setting you require. 1:00 min appears in the display and the indicator lamp, the above the button lights up.
- Touch
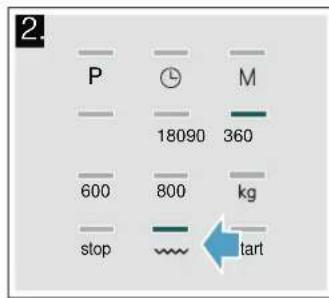
- Set the cooking time using the control panel.
- Touch "Start".
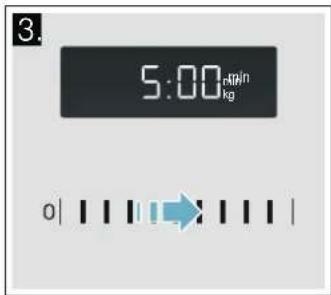
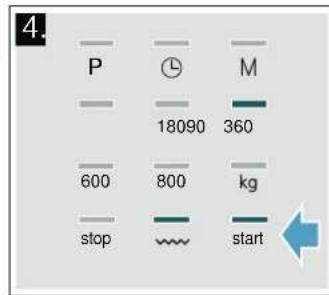
The cooking time counts down in the display.
Memory
The memory function allows you to save the setting for a dish and call it up at any time.
The memory function is useful if you prepare one dish particularly frequently.
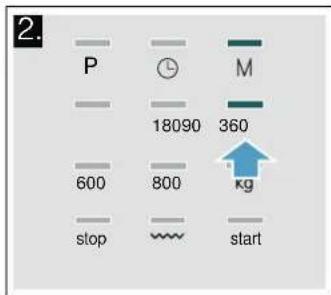
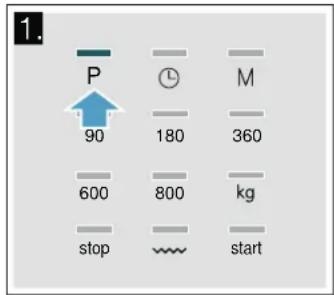
Saving memory settings
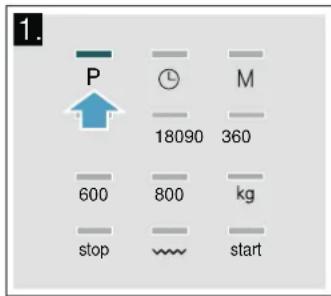
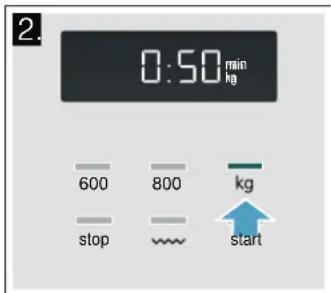
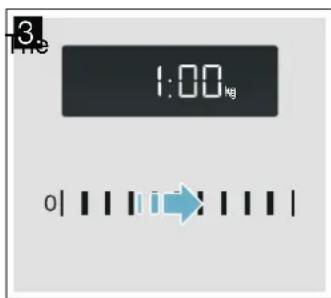
Example: 360 W, 25 minutes
- Touch M.
The indicator lamp above the field lights up. - Touch the microwave power setting you require.
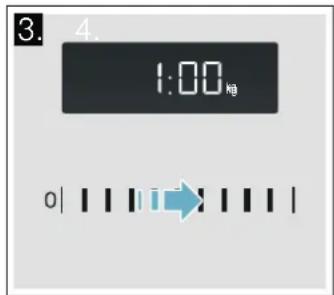
1:00 min appears in the display and the indicator lamp above the field lights up. - Set the cooking time using the control panel.
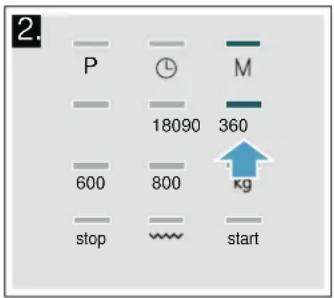
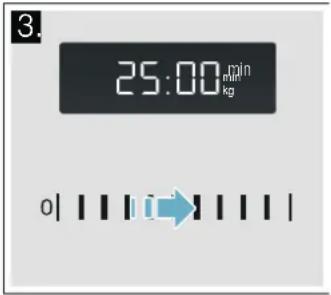
4. Press M to confirm.
The clock reappears. The setting has been saved.
Notes
- You can also save grill only or grill combined with microwave settings.
- You cannot save several microwave power settings one after the other.
- You cannot save automatic programmes.
- You can save the memory settings and start the appliance immediately. To finish, do not touch M, touch "Start" instead.
- To create a new memory setting: Touch "Start". old settings appear. Save the new programme as described in steps 1-4.
Starting the memory
It is very easy to start the saved programme. Place your meal in the appliance. Close the appliance door.
1. Touch M.
The saved settings are displayed.
- Touch "Start".
The cooking time counts down in the display.
The cooking time has elapsed
An audible signal will sound. Open the appliance door or press "Stop". The clock reappears.
Pausing the appliance
Touch the Stop button once or open the appliance door. This pauses the appliance. The indicator above the Stop button will light up. After closing the door, touch the Start button again.
Cancelling the operation
Open the appliance door and press "Stop" once; or press "Stop" twice.
Programmes
You can prepare food really easily using the various programmes. You select a programme and enter the weight of your food. The program then applies the most suitable settings.
Note: You can choose from 8 programmes.
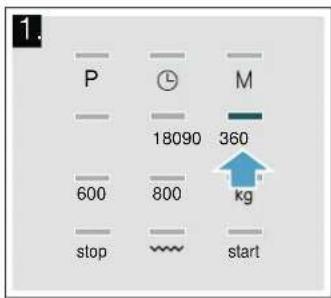
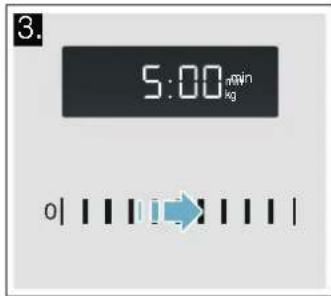
Setting a programme
Once you have selected a programme, make settings as follows:
- Touch P repeatedly until the required programme number appears.
The indicator lamp above the field lights up.
- Touch kg.
A suggested weight appears in the display and the indicator lamp above the field lights up.
-
Use the control panel to specify the weight of the dish.
-
Touch "Start".
You will see the cooking time for the programme counting down.
The cooking time has elapsed
An audible signal will sound. Open the appliance door or press "Stop". The clock reappears.
Correction
Touch "Stop" twice and reset.
Pausing the appliance
Touch the Stop button once or open the appliance door. This pauses the appliance. The indicator above the Stop button will light up. After closing the door, touch the Start button again.
| Programme no. | Cook- ware | Weight range in kg | |
| P 03 | Chicken, chicken pieces | Open | 0.40 - 1.80 |
| P 04 | Bread Open | 0.20 - 1.00 |
Cancelling the operation
Open the appliance door and press "Stop" once; or press "Stop" twice.
Notes
- For some programmes, a signal sounds after a certain time. Open the appliance door and stir the food or turn the meat or poultry. After closing the door, press the "Start" button again.
- You can query the programme number and weight using "P" or "kg". The queried value is shown for 3 seconds in the display.
Defrosting using the automatic programmes
You can use the 4 defrosting programmes to defrost meat, poultry and bread.
Notes
Preparing food
Use food that has been frozen at -18^ and stored in portion-sized quantities that are as thin as possible. Take the food to be defrosted out of all packaging and weigh it. You need to know the weight to set the programme.
- Liquid will be produced when defrosting meat or poultry. Drain off this liquid when turning meat and poultry and under no circumstances use it for other purposes or allow it to come into contact with other foods.
Ovenware
Place the food in a microwaveable shallow dish, e.g. a china or glass plate, but do not cover.
- Resting time
The defrosted food should be left to stand for an additional 10 to 30 minutes until it reaches an even temperature. Large pieces of meat require a longer standing time than smaller pieces. Flat pieces of meat and items made from minced meat should be separated from each other before leaving to stand. After this time, you can continue to prepare the food, even though thick pieces of meat may still be frozen in the middle. The giblets can be removed from poultry at this point.
Signal
For some programmes, a signal sounds after a certain time. Open the appliance door and separate the food out or turn the meat or poultry. Close the door and press the Start button.
| Programme no. | Cook- ware | Weight range in kg |
| Defrosting | ||
| P 01 | Minced meat Open 0.20 - 1.00 | |
| P 02 | Pieces of meat Open 0.20 - 1.00 | |
Cooking with the automatic programmes
With the 3 cooking programmes, you can cook rice, potatoes or vegetables.
Notes
Ovenware
The food must be cooked in microwaveable cookware with a lid. For rice, you should use a large, deep dish.
Preparing food
Weigh out the food. You need to know the weight to set the programme.
Rice:
Do not use boil-in-the-bag rice. Add the required amount of water, as specified on the packaging. This is usually two or three times the quantity of rice. Potatoes:
For boiled potatoes, cut the fresh potatoes into small, even-sized pieces. Add one tablespoon of water for each 100 g boiled potatoes, and a little salt. Fresh vegetables:
Weigh out the fresh, trimmed vegetables. Cut the vegetables into small, even-sized pieces. Add a tbsp water for each 100 g vegetables.
Signal
While the programme is running, a signal sounds after some time. Stir the food.
- Resting time
Once the programme has finished, stir the food again. You should leave it to stand for another 5 to 10 minutes until it reaches an even temperature. The cooking result will depend on the quality and consistency of the food.
| Programme no. | Cookware | Weight range in kg |
| Cooking | ||
| P 05 | Rice | With lid 0.05 - 0.2 |
| P 06 | Potatoes | With lid 0.15 - 1.0 |
| P 07 | Vegetables | With lid 0.15 - 1.0 |
Combi-cooking programme
Notes
Ovenware
Cook the food in ovenware which is not too big, and heat resistant and microwaveable.
Preparing food
Take the food out of its packaging and weigh it. If it is not possible to enter the exact weight, you should round it up or down.
- Resting time
Once the programme has finished, allow the food to rest for another 5 to 10 minutes so it reaches an even temperature.
| Programme no. | Cookware | Weight kg | range |
| P 08 | Combi programme | ||
| Frozen bake, up | Open | 0.4 - 0.9 | |
| to 3 cm deep | |||
Basic settings
Your appliance has basic settings that you can change suit your needs.
| Setting Options | |||
| 1 | Button tone | 0n* | Switched on |
| OFF | Switched off Button tone (will remain active for the start and stop buttons) | ||
| 2 | Demo mode | dEO | The appliance is switched off. You can use the buttons and the display, but the buttons will not activate any function on the appliance (i.e. the microwave has no power). Demo mode is mainly used by dealers. |
| * | Factory setting (factory settings may vary depending on the appliance model) | ||
You can change the button tone on your appliance if you wish.
Changing the button tone
The appliance must be switched off when you do this.
- Press and hold the start and stop buttons at the same time for a couple of seconds.
I will appear in the display.
- Touch the start button.
G_n will start flashing in the display.
-
Switch to F F on the settings area.
-
Touch the start button.
The setting has been applied.
- Touch the stop button.
The button tone has been switched off.
You can change this setting at any time.

Cleaning
With good care and cleaning, your appliance will retain its appearance and remain fully functioning for a long time to come. We will explain here how you should correctly care for and clean your appliance.
Warning - Risk of burns!
The appliance becomes very hot. Never clean the appliance immediately after switching it off. Allow the appliance to cool down.
Warning - Risk of electric shock!
Do not use any high-pressure cleaners or steam cleaners, which can result in an electric shock.
Warning - Risk of injury!
Scratched glass in the appliance door may develop into a crack. Do not use a glass scraper, sharp or abrasive cleaning aids or detergents.
Warning - Risk of serious harm to health!
The surface of the appliance may become damaged if it is not cleaned properly. Microwave energy may escape. Clean the appliance on a regular basis, and remove any food remnants immediately. "Cleaning agent" on page 15
Warning - Risk of electric shock!
Do not immerse the appliance in water or clean under a jet of water.
Note: Unpleasant odours, for example after fish has been prepared, can be removed very easily. Add a few drops of lemon juice to a cup of water. Always place a spoon in the container to prevent delayed boiling. Heat the water for 1 to 2 minutes at maximum microwave output.
Cleaning agent
To ensure that the different surfaces are not damaged by using the wrong cleaning agent, observe the information in the table.
Do not use:
Harsh or abrasive cleaning agents.
Metal or glass scrapers to clean the door panels.
Metal or glass scrapers to clean the door seal.
- Hard scouring pads or sponges.
- Cleaning agents with a high alcohol content.
Wash new sponge cloths thoroughly before use.
| Area Cleaning product | |
| Appliance front Hot soapy water: Clean using a dish cloth and then dry with a soft cloth. Do not use metal or glass scrapers for cleaning. | |
| Appliance front with stainless steel Hot soapy water: Clean using a dish cloth and then dry with a soft cloth. Remove splashes and patches of limescale, grease, starch and albumin (e.g. egg white) immedi- diately. Corrosion can form under these patches or splashes. Special stainless- steel cleaning products are available from the after-sales service or from specialist retailers. Do not use glass cleaners or metal or glass scrapers for cleaning. | |
| Cooking compa- ment made of stain- less steel Hot soapy water or vinegar solution: Clean using a dish cloth and then dry with a soft cloth. Do not use oven spray or any other aggressive oven cleaners or abrasive materi- rials. Scouring pads, rough sponges and pan cleaners are also unsuitable. These items scratch the surface. Allow the interior surfaces to dry completely. |
| Area Cleaning product | |
| Recess in the cooking compartment | Damp cloth: Water must not be allowed to run into the appliance through the turntable drive. Dry the turntable drive with a cloth. |
| Turntable and roller ring | Hot soapy water: When placing the turntable back into its recess, it must engage properly. |
| Wire rack Hot soapy | water: Soak and clean with a dish cloth or brush. Do not scour. Do not use metal or glass scrapers for cleaning. |
| Door panels Glass cleaner: Clean with a dish cloth. Do not use glass scrapers. | |

Trouble shooting
If a fault occurs, there is often a simple explanation. Before calling the after-sales service, please refer to the fault table and attempt to correct the fault yourself.
Tip: If a dish does not turn out exactly as you wanted, refer to the following chapter, where you will find lots of tips and notes relating to the optimum settings. "Tested for you in our cooking studio" on page 18
Warning - Risk of electric shock!
Incorrect repairs are dangerous. Repairs may only be carried out and damaged power cables replaced by one of our trained after-sales technicians. If the appliance is defective, unplug the appliance from the mains or switch off the circuit breaker in the fuse box. Contact the after-sales service.
Fault table
| Fault Possible cause Remedy/information | ||
| The appliance is not working The plug is not plugged into the mains Connect the appliance to the electricity supply | ||
| Power failure Check whether other kitchen appliances are work-ing | ||
| The circuit breaker/fuse is faulty Check in the fuse box to make sure that the circuit breaker/fuse for the appliance is in working order | ||
| Faulty operation Switch off the circuit breaker/fuse for the appli-ance in the fuse box and switch it back on after approximately 10 seconds | ||
| Three zeros are lit on the display. Power failure Reset the time. | ||
| The appliance is not operating. A cooking time is shown on the dis-play. | The control panel has been actuated inadvert-ently. | Touch "Stop". |
| "Start" was not pressed after setting. | Touch "Start" or delete the setting by pressing "Stop". | |
| It is taking longer than usual for food to heat up | The microwave power output has been set too low. | Select a higher microwave power setting. |
| A larger amount of food than usual has been placed in the appliance. | Double the amount – double the time. | |
| The food was colder than usual. Stir or turn the food during heating. | ||
| The turntable is making a scraping or grinding noise. | Dirt or debris in the area around the turntable drive. | Clean the roller ring and the recess in the cooking compartment. |
| The microwave has stopped for no apparent reason. | The microwave has a fault. If this fault recurs, please call the after-sales service. | |
| An M is shown on the display. The appliance is in demo mode Deactivate demo mode. → "Basic settings" on page 15 | ||
| Error message "E - 3" Fault in automatic door opening system. If an error message is displayed, switch the appli-ance off and on again; if the message disappears, it was a one-off problem. If the fault occurs again or the error message is still displayed, please contact the after-sales service and provide the fault code. | ||

Customer service
Our after-sales service is there for you if your appliance needs to be repaired. We will always find an appropriate solution, also in order to avoid after-sales personnel having to make unnecessary visits.
E number and FD number
When calling us, please quote the full product number (E no.) and the production number (FD no.) so that we can provide you with the correct advice. The rating plate bearing these numbers can be found on the right-hand side when you open the cooking compartment door.

To save time, you can make a note of the numbers for your appliance and the telephone number of the after-sales service in the space below in case you need them.
E no. FD no.
After-sales service

Please note that a visit from an after-sales service engineer is not free of charge in the event that the appliance has been misused, even during the warranty period.
Please find the contact data of all countries in the enclosed customer service list.
To book an engineer visit and product advice
GB 03448928999
Calls charged at local or mobile rate.
IE 014502655
0.03 € per minute at peak. Off peak 0.0088 €
per minute.
Rely on the professionalism of the manufacturer. You can therefore be sure that the repair is carried out by trained service technicians who carry original spare parts for your appliances.
This appliance corresponds to the standards EN 55011 and CISPR 11. It is a Group 2, Class B product.
Group 2 means that microwaves are produced for the purpose of heating food. Class B states that the appliance is suitable for private households.

Tested for you in our cooking studio
Unsuitable cookware
Metal cookware is unsuitable. Metal does not allow microwaves to pass through. Food in covered metal containers will remain cold.
In=the=table=below, =you=will=find=a=selection=of=dishes=andCaution!
the ideal settings for them. It tells you which microwave power setting is best suited to your dish. You can use the microwave on its own or in combination with the grill. We have listed some tips with regard to cookware and preparation methods.
Caution!
Sparks: Metal, e.g. a spoon in a glass, must be kept at Feast = 2 = cm = from = the = oven = walls = and = the = inside = of = the = do Sparks could irreparably damage the glass on the inside of the door.
Notes
The times specified in the tables are intended as a guide only. They will depend on the quality and composition of the food.
- Time ranges are often specified in the tables. Set the shortest=time=to=begin=with,=and=then=extend=the=time=it necessary.
Always use an oven cloth or oven gloves when taking hot cookware out of the cooking compartment.
It may be that you have different quantities from those specified in the tables. There is a rule of thumb for operating the microwave: Double the amount = almost double the time, half the amount = half the time.
Always place the cookware on the turntable.
The following tables provide you with numerous options and settings for the microwave.
Suitable ovenware
Suitable dishes are heat-resistant ovenware made of glass, glass ceramic, porcelain, ceramic or heat-resistant plastic. These materials allow microwaves to pass through.
You can also use serving dishes. This saves you having to=transfer=food=from=one=dish=to=another.=You=should=only use ovenware with decorative gold or silver trim if the manufacturer guarantees that they are suitable for use in microwaves.
Defrosting
Place the frozen food in an open container on the turntable.
Delicate parts such as the legs and wings of chicken or fatty outer layers of roasts can be covered with small pieces=of=aluminium=foil.=The=foil=must=not=touch=the=side of=the=cooking=compartment.=You=can=remove=the=foil=hal way through the defrosting time.
Liquid will be produced when defrosting meat or poultry. Drain off this liquid when turning meat and poultry and under=no=circumstances=use=it=for=other=purposes=or=allow it to come into contact with other foods.
Turn or stir the food once or twice during the defrosting time. = Large=pieces of food should be turned several time:
Leave=defrosted=items=to=stand=at=room=temperature=for=a further=10=to=20=minutes=so=that=the=temperature=can=eve out.=The=giblets=can=be=removed=from=poultry=at=this=poi The=meat=can=also=be=processed=further=when=a=small=pa of the core is frozen.
Tips for defrosting
| The time has elapsed but the food is not defrosted, hot or cooked. | Set a longer time. Large quantities=and=food=which=is=piled=high require longer times. |
| Time has elapsed but the food is overheated at the edge and not done in the middle. | Stir it during the cooking time and next time, select a lower microwave power setting and a longer cooking time. |
| After defrosting, the poultry or meat is defrosted on the outside but not defrosted in the middle. | Next time, select a lower microwave power setting. If you are defrosting=a=large=quantity,=turn it several times. |
| Defrosting Weight Microwave pow- | er setting in watts | Cooking time in min-utes | Notes |
| Whole pieces of beef, veal or pork (on the bone or boned) | 800 g=180 | 15 | - |
| 90 | 10-20 | ||
| 1 kg=180 | 20 | ||
| 90 | 15-25 | ||
| 1.5 kg=180 | 30 | ||
| 90 | 20-30 |
| Defrosting | Weight | Microwave pow-er setting in watts | Cooking time in minutes | Notes |
| Meat in pieces or slices of beef, veal or pork | 200 g 180 | 90 | 24-6 | Separate any defrosted parts when turning |
| 500 g 180 | 90 | 55-10 | ||
| 800 g 180 | 90 | 810-15 | ||
| Minced meat, mixed 200 g 90 10 Freeze food flat if possible | ||||
| 500 g 180 | 90 | 510-15 | Turn several times, remove any defrosted meat | |
| 800 g 180 | 90 | 810-20 | ||
| Poultry or poultry portions 600 g 180 | 90 | 810-20 | Separate any defrosted parts | |
| 1.2 kg 180 | 90 | 1510-20 | ||
| Fish fillet, fish steak or slices 400 g 180 | 90 | 510-15 | Separate any defrosted parts | |
| Vegetables, e.g. peas 300 g 180 10-15 - | ||||
| Fruit, e.g. raspberries 300 g 180 7-10 | Stir carefully during defrosting and separate | |||
| 500 g 180 | 90 | 85-10 | any defrosted parts | |
| Butter, defrosting | 125 g 180 | 90 | 12-3 | Remove all packaging |
| 250 g 180 | 90 | 13-4 | ||
| 1 kg | 90 | 65-10 | - | |
| Loaf of bread | 500 g 180 | 90 | 1210-20 | |
| 1 kg | 18090 | 1210-20 | ||
| Cakes, dry, e.g. sponge cake 500 g 90 10-15 Only for cakes without icing, cream or crème | ||||
| 750 g 180 | 90 | 510-15 | pâtissière, separate the pieces of cake. | |
| Cakes, moist, e.g. fruit flan, cheesecake | 500 g 180 | 90 | 515-20 | Only for cakes without icing, cream or gelatine |
| 750 g 180 | 90 | 715-20 | ||
Heating frozen food
Notes
Take ready meals out of the packaging. They will heat up more quickly and evenly in microwaveable cookware. The different components of the meal may not require the same amount of time to heat up.
- Food which lies flat will cook more quickly than food which is piled high. You should therefore distribute the food so that it is as flat as possible in the cookware. Food should not be placed in layers on top of one another.
Always cover the food. If you do not have a suitable cover for your cookware, use a plate or special microwave foil.
- Stir or turn the food 2 or 3 times during cooking.
After heating, allow the food to stand for a further 2 to 5 minutes to allow the temperature to even out.
Always use an oven cloth or oven gloves when removing cookware from the appliance.
| Heating frozen food Weight Microwave power settings in watts Cooking time in minutes Notes | ||||
| Menu, plated meal, ready meal (2-3 components) | 300-400 g 600 8-11 - | |||
| Soup 400 g 600 8-10 - | ||||
| Stew 500 g 600 10--13 - | ||||
| Slices or pieces of meat in sauce, e.g. goulash | 500 g 600 12-17 Separate the pieces of meat when stir-ring | |||
| Bakes, e.g. lasagne, cannelloni 450 g 600 10-15 - | ||||
| Side dishes, e.g. rice, pasta | 250 g 600 2-5 Add a little liquid | |||
| 500 g 600 8-10 | ||||
| Vegetables, e.g. peas, broccoli, carrots | 300 g 600 8-10 Pour water into the dish so that it covers the base | |||
| 600 g 600 14-17 | ||||
| Creamed spinach | 450 g 600 11-16 Cook without additional water | |||
Heating food
Caution!
Metal, e.g. a spoon in a glass, must be kept at least 2 from the oven walls and the inside of the door. Sparks could irreparably damage the glass on the inside of the door.
Notes
Take ready meals out of the packaging. They will heat up more quickly and evenly in microwaveable cookware. The different components of the meal may not require the same amount of time to heat up.
Always cover the food. If you do not have a dedicated lid for your cookware, use a plate or special microwave film.
- Stir or turn the food several times during the heating time. Check the temperature.
After heating, allow the food to stand for a further 2 to 5 minutes to allow the temperature to even out.
Always use an oven cloth or oven gloves when removing cookware from the appliance.
always place a spoon in the container. This will prevent delayed boiling.

Rnning - Risk of scalding!
There is a possibility of delayed boiling when a liquid is heated. This means that the liquid reaches boiling temperature without the usual steam bubbles rising to the surface. Even if the container only vibrates a little, the hot liquid may suddenly boil over and spatter. When heating,
| Heat up dishes | Weight | Microwave out-put in watts | Cooking time in minutes | Notes |
| Beverages | 200 ml | 800 | 2-3 | Place a spoon in the glass; do not overheat alcoholic drinks; check occasionally while heating |
| 500 ml | 800 | 3-4 | ||
| Baby food, e.g. baby bottles | 50 ml | 360 | Approx. 1/2 | No teats or lids. Always shake well after heating. You must check the temperature! |
| 100 ml | 360 | Approx. 1 | ||
| 200 ml | 360 | 1 1/2 | ||
| Soup, 1 cup | 200 g | 600 | 2-3 | - |
| Soup, 2 cups | 400 g | 600 | 4-5 | - |
| Menu, plated meal, ready meal (2-3 components) | 350-500 g | 600 | 4-8 | - |
| Meat in sauce | 500 g | 600 | 8-11 | Separate the slices of meat |
| Heat up dishes Weight Microwave out- put in watts Cooking time in minutes Notes |
| Stew 400 g 600 6-8 - 800 g 600 8-11 - |
| Vegetables, 1 portion 150 g 600 2-3 Add a little liquid |
| Vegetables, 2 portions 300 g 600 3-5 |
Cooking food
Food which lies flat will cook more quickly than food which is piled high. You should therefore distribute the food so that it is as flat as possible in the cookware. Food should not be placed in layers on top of one another.
Cook the food on its own in the microwave - always use with a lid on the cookware. Place the cookware directly the turntable. If you do not have a suitable lid for your cookware, use a plate or special microwave foil.
This will help the food retain its flavour. This means that you can use salt and seasonings sparingly.
After cooking, allow the food to stand for a further 2 to 5 minutes to allow the temperature to even out.
Always use an oven cloth or oven gloves when removing cookware from the appliance.
Grilling:
Always grill on the wire rack with the cooking compartment door closed and do not preheat.
Always place the wire rack on the turntable.
Combined microwave and grill:
Combi mode is especially suitable for bakes and gratins.
Always place the cookware on the turntable and do not cover the food.
Use a deep dish when roasting. This will help keep the cooking compartment clean.
Use large shallow cookware for bakes and gratins. Food takes longer to cook in narrow, deep containers and browns more on top.
Check that your cookware fits in the cooking compartment. It must not be too big, the turntable must still be able to turn.
Always set the maximum cooking time. Check the food after the shorter time specified.
Leave the meat to rest for another 5-10 minutes before carving it. This allows the meat juices to be distributed evenly so that they do not run out when the meat is carved.
Bakes and gratins should be left to cook in the appliance for a further 5 minutes after the appliance has been switched off.
All the values given in the table are guidelines and can vary depending on the properties of your food.
| Cooking food | Accessories | Microwave | power setting watts | Cooking time minutes | iNotes |
| Chicken, whole, 1.2 kg | Cookware with lid | 600 25-30 | Turn half way through the time | ||
| Chicken portions, e.g. chicken quar-ters, 800 g | Cookware without lid, wire rack | 360 W + ☑ | 30-40 | Place with the skin side up, do not turn | |
| Chicken wings, marinated frozen, 800 g | Cookware without lid, wire rack | 360 W + ☑ | 15-25 | Do not turn | |
| Pork without rind approx. 750 g, e.g. neck | Cookware without lid | 360 W + ☑ | 40-50 | Turn once or twice | |
| Bacon rashers, approx. 8 rashers | Wire rack | 180 W - ☐ | 10-15 | - | |
| Meat loaf, 750 g | Cookware without lid | 600 | 20-25 | Cook without a lid | |
| 360 W + ☐ | 25-35 | Maximum 6 cm deep | |||
| Fish, e.g. fillet steaks, 400 g | Cookware without lid | 600 10-15 | Add water, lemon juice or wine as desired | ||
| Fish fillet, au gratin, approx. 400 g | Cookware without lid | 360 W + ☐ | 10-15 | Defrost frozen fish before cooking | |
| Fish kebabs, 4-5 pieces | Wire rack | 180 W + ☐ | 10-15 | Use wooden skewers | |
| Sweet bakes, e.g. quark and fruit souffle, 1 kg | Cookware without lid | 360 W + ☐ | 30-35 | Maximum 5 cm deep | |
| Savoury bakes made from raw ingredi-ents, e.g. pasta bake, 1 kg | Cookware without lid | 360 W + ☐ | 30-35 | Sprinkle with cheese, maximum 5 cm deep |
| Cooking food | Accessories | Microwave power setting in watts | Cooking time in minutes | Notes |
| Savoury bakes made from cooked ingredients, e.g. potato gratin, 1=kg | Cookware without lid | 360 W + ☑ | 30-40=Maximum 4=cm deep | |
| Soup au gratin, e.g. onion soup, 2-4=cups | Cookware without lid | □ | approx. 15-20=- | |
| Vegetables, fresh, 250=g=Cookware with lid | 600=5-10=Cut the vegetables into pieces of equal size; Add 1=to=2 tbsp water per 100=g of vegetables; Stir during cooking | |||
| Vegetables, fresh, 500=g=Cookware with lid | 600=10-15=- | |||
| Vegetable kebabs, 4-5=pieces=Wire rack=180 W + | □ 15-20=Use wooden skewers | |||
| Potatoes, 250=g=Cookware with lid | 600=8-10=Cut the potatoes into pieces of equal size; Add 1=to=2 tbsp water for every 100=g; Stir during cooking | |||
| Potatoes, 500=g=Cookware with lid | 600=11-14 | |||
| Potatoes, 750=g=Cookware with lid | 600=15-22 | |||
| Rice, 125=g=Cookware with lid | 800 5-7 12-15 Add double the amount of liquid | |||
| Rice, 250=g=Cookware with lid | 800 6-8 15-18 | |||
| Bread (pre-toasting), 2-4=slices=Wire rack | □ 1st side: Approx.=2-4 2nd side: Approx.=2-4 | |||
| Toast with topping, 2-6=slices=Wire rack | □ 7-10=Depending on topping | |||
| Fruit, compote, 500=g=Cookware with lid | 600=9-12=- | |||
| Sweet foods, e.g. blancmange (instant) 500=ml | Cookware with lid | 600=6-8=Stir the blancmange thoroughly 2 to 3=times during cooking using an egg whisk | ||
Microwave tips
| You=cannot=find=any information=about=the=setings=for=the=quantity or reduce the cooking times using the following rule of thumb: of food you have prepared. | Double the amount = almost double the cooking time Half the amount = half the cooking time |
| The food has become too dry. | Next time, set a shorter cooking time or select a lower microwave power setting. Cover the food and add more liquid. |
| When the time has elapsed, the food is not defrosted, hot or cooked. | Set a longer time. Large quantities and food which is piled high require longer times. |
| When the time has elapsed, the food is overheated at the edge but not done in the middle. | Stir it during the cooking time and next time, select a lower microwave power setting and a longer cooking time. |
| After defrosting, the poultry or meat is defrosted on the outside but not defrosted in the middle. | Next=time,=select=a=lower=microwave=power=setling.=lf=you=are=defrosting a large quantity, turn it several times. |
Condensation
Condensation may appear on the door window, interior walls and floor. This is normal. This does not affect how the microwave operates. Wipe away the condensation after cooking.

Test dishes
In accordance with EN 60705:2012, IEC 60705:2010 and EN 60350-1:2013 or IEC 60350-1:2011
These tables have been produced for test institutes to facilitate the inspection of the appliance.
Microwave cooking
| Dish Microwave power output in watts, cooking time in minutes Note |
| Custard, 750 g 360 W, 12-17 mins + 90 W, 20-25 mins Place a 20 x 25 cm Pyrex dish onto the turntable. |
| Sponge 600 W, 8-10 mins Place a 22 cm Pyrex dish onto the turntable. |
| Meat loaf 600 W, 20-25 mins Place a Pyrex dish onto the turntable. |
Microwave defrosting
| Dish Microwave power output in watts, cooking time Note in minutes |
| Meat 180 W, 5-7 mins + 90 W, 10-15 mins Place a 22 cm Pyrex dish onto the turntable. |
Combined microwave cooking
| Dish | Microwave power setting in watts, cooking time in minutes | Note |
| Potato gratin | grill + 360 W, 35-40 mins | Place a pyrex dish with a diameter of 22 cm on the turntable. |
目錄

用途 25

重要安全資訊 25
一般資訊
25
微波
26

安裝和連線 27

损壞原因. 27

環境保護 27
符合環保
規定的廢棄處理. 27

了解您的電器. 27
控制面板
27
控制器
27
變更訊號聲長度
聲長度 28

配件 28
特殊配件
28

第一次使用前 29
清潔爐腔並將轉盤放至定位
初次使用
29
清潔爐腔和配件
和配件 29

微波 30
鍋具
30
微波功率
设定. 30
設定微波爐
爐 30

烧烤 31
燒烤設定
31
微波和烧烤設定
烤設定 31

2 跟记憶功能 ..... 315
儲存記憶設定
设定. 31
啟動記憶功能
功能. 31

程序 32
設定程序
32
使用自動程序解凍
程序解冻 32
使用自動程序烹調
程序烹調 33
混合烹调程序
程序. 33

基本設定. 33

清潔 34
清潔劑
34

疑難排解. 34

客户服务中心 35
產品編號及生產編號
建議的烹調時間 36
適用的器皿
的器皿 36
不合適的烹調器皿
不適的烹調器皿 36
解冻
36
加熱急凍食物
最急冻食物. 371
加熱食物
食品 371
烹調食物
列食物 381
微波提示
定提示 391

測試菜式. 40
更多關於產品、配件、更換零件和服務的資訊,請瀏覽:www.siemens-home.bsh-group.com以及網上商店www.siemens-home.bsh-group.com/eshops

用途
詳細閱讀說明 才可以安全並正確地使用本產品請妥善保管說明手冊及安裝說明,以便您在日後或供下一位使用者查閱。
微波烤爐必須完整地安裝於廚房中。請遵照特定的安裝說明。
打開包裝後,請檢查產品有否損壞。如產品在運送過程中受損,請切勿安裝。
只有持牌的專業人員才可以不經插頭來連接電器。保養不包括因不當連接而造成的損壞。
本產品僅限於家居中使用。只限預備食物及飲料之用。操作時務必有人在場看管。僅供室內使用。
本爐具僅適用於最高海拔4000米以下地區。
8歲以上的兒童,身體、感官或精神有障礙者,以及欠缺使用此產品經驗和知識者,可由監護人在旁監督或指導如何安全使用並明瞭其危險性後,使用本產品。
請勿讓孩童將本產品當成玩具或在其周圍嬉戲。
15 岁以上的孩童除非在監督下,否則不得進行清潔及保養的工作。
請確保8歲以下的孩童遠離本產品及電源線。
確定爐腔內的配件放置正確。→“第一次使用前第29頁

重要安全資訊
一般資訊
警告一 火災風險!
- 存放在爐腔中的易燃物品,可能會引致火災。切勿在爐腔中存放易燃物品。如果爐內冒煙,切勿開啟設備機門。請關閉電器並拔下插頭,或關閉保險絲盒內的斷路器。
·本電器會在使用時變得非常灼熱。如果電器安裝在帶有裝飾門的安裝櫻櫃中,當裝飾門關閉時熱能將會累積。僅可在裝飾門開啟時操作本電器。
警告一觸電風險!
·不當維修會造成危險。只能由受過訓練的售後服務技術人員維修或更換受損的電線。如果設備出現問題,請拔掉設備的主電源,或關閉保險絲盒內的斷路器。請聯絡售後服務中心。請聯絡售後服務中心。
·產品的電線絕緣部分會因接觸產品高溫部分而溶化。切勿讓電線接觸爐具高溫的部分。
·請勿使用任何高壓清潔器或蒸氣清洗機,以免觸電。
- 渗入的濕氣可能導致觸電。切勿將電器置於極度高溫或潮濕的環境中。僅供室內使用。
- 損壞的產品可能導致觸電。請勿啟動損壞的產品。請拔掉產品的插頭或關掉保險絲盒內的斷路器。請聯絡售後服務中心。
- 微波爐是高電壓電器。切勿移除外殼。
警告-灼傷風險!
設備會在使用時變得非常灼熱。切勿觸碰爐腔內壁或加熱元件。請務必讓電器冷卻。請勿讓兒童走近此設備。
- 配件和烤爐器皿的溫度極高。務必戴上隔熱手套後,才可從爐腔取出配件或烤爐器皿。
在高溫的烹調空間內,氣化酒精可能會起火。切勿烹調含有大量高酒精濃度飲料的食物。請僅使用含有少量高酒精濃度的飲料。請小心打開機門。
警告-灼傷風險!
·開啟電器爐門時,熱氣可能會一下子竄出。請小心打開機門。請勿讓兒童走近此設備。
- 在高溫爐腔內的水分可能會轉化成高溫水蒸氣。切勿將水倒入高溫的爐腔中。
警告- 受傷風險!
爐門玻璃上的刮痕可能會變成裂痕。切勿使用玻璃刮刀、強效或腐蝕性的清潔用品或清潔劑。
微波
警告- 火災風險!
在預定用途範圍之外使用本微波烤爐十分危險,而可能令設備損壞。禁止以下用途:烘乾食物或衣服,烘暖拖鞋、填充枕頭、海綿,濕潤衣物或類似物品。例如,即使已結束加熱數小時,暖腳拖鞋或填充枕頭仍有可能會起火。本電器只可用於預備食物及飲料。
食物可能會起火。切勿將食物連同保溫包裝一起加熱。
加熱存放於塑膠、紙類或其他易燃材質容器的食物時,請勿離開。
切勿選擇過高的微波功率或過長的時間設定。請遵從本使用說明書內提供的資訊。
切勿利用微波功能抽去食物水分。
切勿以高微波功率或長時間解凍或加熱含水量低的食物(如麵包)。
食用油可能會起火。切勿使用微波爐單獨加熱食用油。
警告- 爆炸風險!
密封容器內的液體或其他食物可能會爆炸。切勿加熱密封容器內的液體或其他食物。
警告一 灼傷風險!
-
加熱期間或甚至在加熱後,需削皮或帶皮的食物可能會爆裂或爆開。切勿烹煮帶殼蛋類或重新加熱水煮蛋類。切勿烹煮貝類或甲殼類食物。請務必在烘烤或烹煮水波蛋時戳破蛋黃。需削皮或是帶皮的食物(例如蘋果、馬鈴薯和香腸)的皮可能會爆裂。請在加熱前先刺破果皮。
-
婴兒食品中的熱度分佈並不均勻。切勿使用密封容器加熱嬰兒食品。必須除下蓋子或奶嘴。攪拌或搖晃已加熱的食品。檢查食物溫度後,才將食物交給孩童。
-
食物加熱後會散發熱氣。器皿可能變熱。戴上隔熱手套後,方可從爐腔取出配件或器皿。
真空包裝袋可能會在加熱過程中爆裂。請務必遵守包裝上的指示。戴上隔熱手套後,方可從爐腔取出菜餚。
運轉時可接觸部分會變得非常灼熱。請勿碰觸高溫部件。請勿讓兒童走近此設備。
在預定用途範圍之外使用本電器會構成危險。電器不得用於烘乾食物和衣物,或加熱拖鞋、填充枕頭、海綿、濕布或類似物品。因為過熱的拖鞋、填充枕頭、海綿、濕布等物品可能會燙傷皮膚。
警告一 灼傷風險!
液體加熱時,可能會發生延遲沸騰的狀況。意思是,雖然液體已達到沸騰的溫度,但表面仍未有一般常見的的蒸汽氣泡。此時,即使容器稍微震動,都可能令滾燙的液體突然沸騰和飛濾。加熱時,請在容器中放入一隻湯匙。這可防止出現延遲沸騰的情況。
警告-受傷風險!
- 爐門玻璃上的刮痕可能會變成裂痕。切勿使用玻璃刮刀、強效或腐蝕性的清潔用品或清潔劑。
不適合的器皿可能會出現龜裂。陶瓷器皿在手柄或蓋子上可能有些小孔洞。這些孔洞隱藏了洞下的空隙。濕氣如果穿透這些空隙,可能會令器皿龜裂。只可使用適合放入微波爐的器皿。
若只使用電器的微波模式,在電器內放置由金屬製成或含有金屬裝飾的廚具和容器,可能會在電器運作時產生火花。這會損壞電器。電器只以微波模式運作時,切勿使用金屬容器。只能使用微波專用廚具,或以微波配合加熱功能代替。
使用不適合的廚具會引致損壞。使用微波組合模式時,務必使用以合適材質製成、可用於熱風及燒烤模式的廚具。 - 玻璃轉盤可能會碎裂。請避免堅硬物體撞擊轉盤。
若玻璃轉盤出現裂痕或細縫會造成危險。請小心處理轉盤。
警告一觸電風險!
微波爐是高電壓電器。切勿移除外殼
警告一 最重危害健康的風險!
不當地清潔或會損害電器表面。微波能量可能會會外洩。定期清潔電器,並立即清除食物殘渣。請隨時保持爐腔、爐門密封條、爐門及門擋的清潔。→ "清潔"第34頁
- 若爐腔門或爐門密封條受損,微波能量可能就會外洩。如果爐腔門或爐門密封條受損,切勿使用電器。請聯絡售後服務中心。
- 微波烤爐若無外殼保護,微波能量將會外洩。切勿移除外殼。若需維護或維修,請聯絡售後服務中心。
安裝和連線
本產品的設計僅限於家庭使用。
本產品的設計可完全整合至樸櫃中。
請遵守專用的安裝說明。
設備已準備好插入,只能連接到已正確安裝的接地插座。
電源電壓必須與銘牌上指定的電壓相對應。
只有合資格電器技術人員才可以安裝插座或更換電線。若安裝電器後插頭位於無法觸及的地方,配線時必須使用接觸間隔至少3毫米的全針腳隔離開關。
請勿使用萬能插蘇、拖板或延長線。電源超載可能會造成火災。
損壞原因
注意!
非常軌髒的密封條:若密封條過分軌髒,運作期間就不能關緊爐門。相鄰機組的正面可能會受損。請務必保持密封條清潔。
切勿開動空置的微波爐:若未在爐腔中放入食物而開動微波爐,將令電器過度負荷。爐腔沒有食物時不得開啟電器,但進行短時間的烹調器皿測試除外。→“廚具測試"第30頁
- 微波烹調爆谷:切勿設定過高的微波功率。使用不高於600瓦的功率設定。請將爆谷袋放在玻璃盤上。如果過載,盤子可能會跳動。
切勿讓灑灑出來的液體透過轉盤驅動器進入電器內部。監控烹調過程。一開始先選擇較短的烹調時間,再按需要增加烹調時間。
切勿使用未安裝轉盤的微波爐。
- 產生火花:金屬(如玻璃杯中的湯匙)必須與爐壁和爐門內側保持至少 2cm 的距離。火花可能會對爐門內側的玻璃造成無法修復的損害。
- 金屬箔紙容器:切勿在電器中使用金屬箔紙容器。產生的火花會損壞電器。
- 開啟爐門散熱。:請在爐門關閉的情況下讓爐腔散熱切勿將物品夾在機門上。即使爐門只打開些微縫隙,與前方相鄰的組件在一段時間後仍可能會損壞。
- 爐腔內的凝結:爐門玻璃、內壁和底面可能出现凝結的水氣。這是正常現象,不會對微波運作產生不良的影響。每次烹調後擦拭凝結水氣,可以避免腐蝕。
環境保護
符合環保規定的廢棄處理
以環保方式處理包裝。
此電器根據歐盟關於使用過的電氣及電子產品的指令2012/19/EU(棄置的電氣及電子產品-WEEE)貼有相關標籤。該指引訂明了在歐盟範圍內舊電氣退還及回收的方法。
了解您的電器
我們會在此章節介紹顯示屏和控制裝置。您將了解到電器的各種功能。
提示:詳細內容與顏色會因電器型號而有所不同
控制面板
您可在控制面板設定本電器的各種功能。目前的設定會顯示於顯示屏上。
以下為透過功能表顯示螢幕設定時鐘時出現的控制面板。
1顯示屏
用於顯示時鐘和烹調時間
2 控制面板
用於設定時鐘和烹調時間,或設定自動程序。
3 触控位置
4 自動開啟爐門按鈕
控制器
這裡為您提供觸控欄的簡短說明。您可以輕鬆地直接設定您的電器。
觸控位置及其功能
這裡為您提供觸控欄的簡短說明。
| 觸控位置 功能 | |
| 符號 | |
| P | 選擇自動程序 |
| 設定時間 | |
| M | 選擇記憶功能 |
| 90 | 選擇90瓦微波輸出功率 |
| 180 | 選擇180瓦微波輸出功率 |
| 360 | 選擇360瓦微波輸出功率 |
| 600 | 選擇600瓦微波輸出功率 |
| 800 | 選擇800瓦微波輸出功率 |
| kg | 選擇程序的重量 |
| 停止 | 停止或暫停電器運作 |
| ← | 選擇燒烤功能 |
| 開始 | 啟動電器 |
| □ | 打開爐門 |
控制面板
控制面板功能類似捲軸。向左或右滑動手指以變更設定。滑動手指的速度越快,捲動速度越快。觸碰捲軸以停止,然後選擇想要的設定。
自動開啟機門
自動開啟機門功能啟用後,電器機門將會自動彈開。您可以手動將電器機門完全打開。
停電時,機門自動開啟功能不會啟用。您可以手動將機門完全打開。
提示
若在操作期間打開電器機門,操作便會暫停。
機門關閉後,電器不會自動繼續操作。您必須手動重新啟動操作。
·若電器長時間關閉,機門會延遲一段時間才開啟。
散熱風扇
本電器配有散熱風扇。即使已關閉微波爐電源,風扇可能仍會轉動。
提示
- 爐腔在微波運作期間維持冷卻。散熱風扇將持續開啟。即使微波運作已結束,風扇可能仍會轉動。
- 爐門玻璃、內壁和底面可能出现凝結的水氣。這是正常現象,不會對微波運作產生不良的影響。烹調後擦去凝結的水氣即可。
變更訊號聲長度
關掉本電器電源時,會聽到訊號聲。您可以變更訊號聲的持續時間。
觸碰「Start」(啟動)按鈕約6秒。
已採用新的訊號聲長度。
時鐘隨即重新顯示。
以下為可用設定:
短訊號聲持續時間-3聲
長訊號聲持續時間-30聲。
配件
您可以在這裡了解內含配件概要,以及如何正確使用它們。
注意!
取出料理時,請注意不要移動到轉盤。確保轉盤仍保持鎖定。轉盤可以左右旋轉。
烤網架
烤網架適合燒烤牛扒、香腸或麵包;或用於放置烹調器皿,例如焗爐用淺烤盤。
提示:將烤架放置在轉盤上。
轉盤
提示:切勿在沒有轉盤時使用電器。請確認轉盤已安裝妥當。轉盤可按順時針或逆時針方向轉動。
轉環
特殊配件
您可以在售後服務中心、專門店和網上商店購買特殊配件。*我們的小冊子和網頁列出為電器而設的各種產品。貨存及是否可在網上訂購,會因不同國家而有所差異。若需詳細資訊,請查看產品目錄。
提示:特殊配件並非適用於所有電器。購買時,請務必提供準確的產品識別碼(E no.)。→“客戶服務中心”第35頁
蒸煮容器 用於烹煮米飯、馬鈴薯和蔬菜
第一次使用前
此章節提供首次使用微波爐烹調食品前的準備工作。請先細閱「安全資訊」章節。→“重要安全訊息”第25頁使用新電器前,您必須正確地安裝轉盤。您也必須先清潔爐腔和配件。
清潔爐腔並將轉盤放至定位
首次使用電器準備食物前,必須先清潔爐腔和配件。
如何將轉盤安裝至定位
- 將轉環a置於爐腔底部的凹槽。
- 將轉盤b插槽放在位於爐腔底部中央的驅動器c處。
提示:切勿使用沒有安裝轉盤的電器。請確認轉盤已安裝妥當。轉盤可按順時針或逆時針方向轉動。
初次使用
將電器連接到電源後或停電後,訊號聲會響起,而顯示屏會顯示四個0。
設定時間
設定時間的提示會顯示數秒。
訊號聲響起,12:00顯示在顯示屏上,冒號會閃爍而時間欄位上的指示燈亮起。
- 使用控制面板設定時間。
- 触碰 日 。
時間已設定完成。
隱藏時鐘
為降低電器在待機時的能源消耗,您可以隱藏時鐘。
- 触碰 山 。
- 触碰「Stop」(停止)。
顯示屏即變成空白。
重設時鐘
觸碰 _
設定時間會顯示在顯示屏上。
變更時鐘(例如從夏令時間變為冬令時間)
1.觸碰 日 然後使用控制面板設定時間。
2. 再次觸碰 _
時間已經設定完成。
清潔爐腔和配件
為去除新電器的味道,請清空爐腔(轉盤除外)並關上機門進行加熱。
請確保爐腔內沒有殘餘的包裝,如聚苯乙烯粒料。加熱電器前,用一塊已濕水的軟布擦拭爐腔內部平滑的表面。加熱時請保持廚房通風。
設定
烧烤
10分鐘
加熱爐腔
- 触碰
顯示屏上會顯示10:00分鐘,\~上方的指示燈會亮起。
2.觸碰「Start」(啟動)。
時間一到,訊號聲就會響起。
按下「Stop」(停止)或打開爐門。
建議:爐腔冷卻後,請立刻以肥皂水和洗碗布清潔平滑的表面。
清潔配件
請使用肥皂水和洗碗布或軟刷徹底清潔配件。

微波
您可以使用微波來快速地烹調、加熱和解凍食物。您可以單獨使用微波功能,也可以結合燒烤功能。
為確保妥善運用微波,請詳閱烹調器皿上的使用要點,並熟悉列於本說明手冊末應用表格中的資料。
立即試用微波爐。例如,你可以將水加熱用來泡茶。
使用無金邊或銀邊裝飾的大型杯具,並放入一隻湯匙。將裝水的杯子放在轉盤上,稍微偏離中心。
- 触碰「800 W」(800瓦)。
- 使用控制面板設定 0:30 分鐘。
- 触碰「Start」(啟動)。
1分30秒後,訊號聲響起。水已加熱
警告一灼傷風險!
液體加熱時,可能會發生延遲沸騰的狀況。意思是,雖然液體已達到沸騰的溫度,但表面仍未有一般常見的的蒸汽氣泡。此時,即使容器稍微震動,都可能令滾燙的液體突然沸騰和飛潰。加熱時,請在容器中放入一隻湯匙。這可防止出現延遲沸騰的情況。


鍋具
不是所有烹調器皿都適合微波。請僅使用可微波的烹調器皿,以免在加熱食物時造成電器損壞。
適用的烹調器皿
由玻璃、玻璃陶瓷、瓷、陶瓷或耐熱塑料製成的耐熱烹調器皿均適用,這些材料可以讓微波順利穿透。
也可以使用正式餐碟,以節省更換餐碟的時間。除非製造商保證,否則不要將有金、銀裝飾邊沿的烹調器皿放入微波爐中使用。
不適合的烹調器皿
不適用金屬烹調器皿。金屬無法讓微波穿透,無法加熱金屬容器內的食物。
注意!
產生火花:金屬(如玻璃杯中的湯匙)必須與爐腔壁面和爐門內側保持至少2厘米的距離。火花會對爐門內側的玻璃造成無法修復的損害。
廚具測試
爐內如無食物,切勿開動微波爐。快速廚具測試則不在此限。
若不確定廚具是否適用於微波,請執行下列測試
- 以最強的功率加熱空廚具 1/2 分鐘到1分鐘。
- 期間請檢查廚具溫度。
廚具應保持冰涼或溫熱。
如果廚具變得極熱或產生火花,即表示不適用於微波爐。此時,請停止測試。
警告-烫伤风险!
運轉時可接觸部分會變得非常灼熱。請勿碰觸高溫部件。
請勿讓兒童走近此設備。
微波功率设定
使用觸控欄位設定所需的微波功率設定。
90瓦 適合解凍精緻食品
180瓦 適合解凍和持續烹調食物
360瓦 適合烹調肉類和加熱精緻食物
600瓦 適合加熱和烹調食物
800瓦 適合加熱液體
提示:800瓦微波功率設定可以設為30分鐘、600瓦為1小時,其它功率則分別為1小時及39分鐘。
设定微波爐
範例:微波功率設定600瓦,10分鐘
- 触碰所需的微波功率設定。
微波功率設定上方的指示燈亮起。
- 使用控制面板設定所需的烹調時間。
3.觸碰「Start」(啟動)。
顯示屏會顯示剩餘的烹調時間。
烹調時間結束後
訊號音會響起。開啟爐門或按下「Stop」(停止)。時鐘隨即重新顯示。
變更烹調時間
您可隨時變更烹調時間。使用控制面板變更烹調時間。
暫停電器運作
觸碰Stop(停止)按鈕或開啟機門。這樣可以暫停電器運作。Stop(停止)按鈕上的指示燈會亮起。關閉機門後,再次點選Start(啟動)按鈕。
取消操作
打開爐門然後按下「Stop」(停止)按鈕一次,或按下「Stop」(停止)按鈕兩次。
提示:您亦可先調整烹調時間,再調整微波功率設定。
烧烤
烧烤功能非常適合烤焗和將菜餚表面烤至金黃色。
您可以單獨使用燒烤功能,也可以結合微波功能。
烧烤設定
- 触碰
顯示屏上會顯示10:00分鐘,按鈕上方的指示燈亮起。
- 使用控制面板設定烹調時間。

- 触碰「Start」(啟動)。
顯示屏會顯示剩餘的烹調時間。
烹調時間結束後
訊號音會響起。開啟爐門或按下「Stop」(停止)。時鐘隨即重新顯示。
暫停電器運作
觸碰Stop(停止)按鈕或開啟機門。這樣可以暫停電器運作。Stop(停止)按鈕上的指示燈會亮起。關閉機門後,再次點選Start(啟動)按鈕。
修改
烹調時間可以隨時修改。
取消操作
打開爐門然後按下「Stop」(停止)按鈕一次,或按下「Stop」(停止)按鈕兩次。
微波和烧烤設定
範例:360瓦,燒烤 一 _ 一 ,5分鐘
- 触碰所需的微波功率設定。
顯示屏上會顯示1:00分鐘,按鈕上方的指示燈會亮起。 - 触碰
- 使用控制面板設定烹調時間。
4.觸碰「Start」(啟動)。
顯示屏會顯示剩餘的烹調時間。
M 記憶功能
記憶功能讓您儲存菜式的設定以便之後使用。
若有經常烹調的菜式,記憶功能會十分實用。
儲存記憶設定
範例:360瓦,25分鐘
- 触碰M。
欄位上方的指示燈亮起。
- 触碰所需的微波功率设定。
顯示屏上會顯示1:00分鐘,欄位上的指示燈亮起。
- 使用控制面板設定烹調時間。
- 按下 M 以確認。
時鐘隨即重新顯示。已儲存設定。
提示
- 您也可以儲存燒烤或是燒烤結合微波的設定。
不能連續儲存數個微波功率設定。
不能储存自動程序。
您可以儲存記憶功能設定,並立即啟動電器。若要結束,請勿觸碰M而是觸碰「Start」(啟動)。
要建立新記憶功能設定:觸碰「Start」(啟動)。隨即顯示舊設定。如步驟1至4所示儲存新的程序。
啟動記憶功能
要啟動已儲存的程序,非常簡單。放入食物。關上爐門。
- 触碰 M。
隨即顯示已儲存的設定。
2.觸碰「Start」(啟動)。
顯示屏會顯示剩餘的烹調時間。
烹調時間結束後
訊號音會響起。開啟爐門或按下「Stop」(停止)。時鐘隨即重新顯示。
暫停電器運作
觸碰Stop(停止)按鈕或開啟機門。這樣可以暫停電器運作。Stop(停止)按鈕上的指示燈會亮起。關閉機門後,再次點選Start(啟動)按鈕。
P程序
您可以使用各種程序輕鬆預備食物。請選擇程序並輸入食物的重量。程序將套用最合適的設定。
提示:共有8種程序可供選擇。
設定程序
選擇程序後,請進行下列設定:
- 重複觸碰 P,直到所需的程序編號出現。
欄位上方的指示燈亮起。
- 縢碰 kg。
建議的重量出現在顯示屏上,而欄位上的指示燈亮起。
- 使用控制面板指定料理的重量。
- 触碰「Start」(啟動)。
顯示屏上隨即顯示程序餘下的烹調時間。
烹調時間結束後
訊號音會響起。開啟爐門或按下「Stop」(停止)。時鐘隨即重新顯示。
修改
觸碰「Stop」(停止)兩次及重設。
暫停電器運作
觸碰Stop(停止)按鈕或開啟機門。這樣可以暫停電器運作。Stop(停止)按鈕上的指示燈會亮起。關閉機門後,再次點選Start(啟動)按鈕。
取消操作
打開爐門然後按下「Stop」(停止)按鈕一次,或按下「Stop」(停止)按鈕兩次。
取消操作
打開爐門然後按下「Stop」(停止)按鈕一次,或按下「Stop」(停止)按鈕兩次。
提示
- 某些程序會在特定時間後響起訊號聲。打開爐門,攪拌食物,或翻動一下肉類或家禽。關閉爐門後,再次按下「Start」(啟動)按鈕。
您可以利用「P」或「kg」來查詢程序編號和重量。查詢的數值會在顯示屏內顯示3秒鐘。
使用自動程序解凍
您可以使用4種解凍程序,以解凍肉類、家禽肉類和麵包。
提示
準備食物
使用已在 -18^ C 冷凍並分裝儲存的食物(越薄越好)。
拆除需解凍的食物的所有包裝並量重。您需知道食物的重量以設定程序。
- 肉類或家禽肉類在解凍時會產生液體。翻轉肉類或家禽肉類時,順道倒掉這些液體。這些液體絕不可用於其他用途或接觸其他食物。
器皿
將食物放置於可用於微波爐的淺盤(如瓷盤或玻璃盤),但毋需覆蓋。
靜置時間
解凍的食物應額外靜置10至30分鐘,讓溫度變得均勻。與小塊的肉類相比,大塊肉類需較長的靜置時間。靜置前,請分開肉塊和碎肉。
之後,儘管厚肉塊中間可能仍然冰凍,您仍可繼續準備食物。此時,可先去除家禽的內臟。
·訊號聲
某些程序會在特定時間後響起訊號聲。打開爐門,將食物分開,或翻動一下肉類或家禽肉。關門,然後按下 Start(啟動)按鈕。
| 程序編號 | 廚具 | 重量範圍(公斤) |
| 解凍 | ||
| P 01 | 碎肉 | 無蓋 0.20 - 1.00 |
| P 02 | 肉塊 | 無蓋 0.20 - 1.00 |
| P 03 | 雞肉、雞塊 | 無蓋 0.40 - 1.80 |
| P 04 | 麵包 | 無蓋 0.20 - 1.00 |
使用自動程序烹調
3種烹調程序,讓您烹煮米飯、馬鈴薯或蔬菜。
提示
器皿
食物必須用連蓋的微波爐相容煮食用具來烹調。米飯應使用大而深的盤子。
準備食物
量度食物的重量。您需知道食物的重量以設定程序。米:
切勿使用袋内烹煮的米。依照包装指示添加适量的水。
水量通常是米量的两到三倍。
馬鈴薯:
煮馬鈴薯時,請將新鮮的馬鈴薯切成大小相若的小塊。每100克的馬鈴薯加入一湯匙的水,以及少許的鹽。新鮮蔬菜:
將新鮮,已洗淨的菜稱重。將蔬菜切成大小相若的小塊。每100克的蔬菜添加一湯匙的水。
■ 言號聲
程序運行後一段時間,會發出訊號聲。請攪拌食物
靜置時間
程序完成後,請再次攪拌食物。食物應額外靜置5至10分鐘,讓溫度變得均勻。
烹調結果將取決於食物的特性和黏稠度。
| 程序編號 | 廚具 | 重量範圍(公斤) |
| 烹調 | ||
| P 05 | 米飯 | 加蓋 0.05 - 0.2 |
| P 06 | 馬鈴薯 | 加蓋 0.15 - 1.0 |
| P 07 | 蔬菜 | 加蓋 0.15 - 1.0 |
混合烹调程序
提示
器皿
且
可以烹調不會太大的食物,耐熱可用於微波。
準備食物
取出包裝中的食物並量重。如果無法輸入確實的重量,請以四捨五入計算。
靜置時間
當程序結束時,食物應靜置5至10分鐘,讓溫度均勻分佈。
| 程序編號 | 廚具 | 重量範圍 | (公斤) | |
| 混合程序 | ||||
| P 08 | 急凍糕點, | 厚度最 | 無蓋 0.4 - 0.9 | |
| 高3厘米 | ||||
基本設定
您可以視乎需要變更電器的基本設定。
| 設定 選項 | ||
| 1 按鈕音調 | 8n* | 啟動 |
| OFF | 關掉 按鈕音調(啟動和停止按鈕的音調仍會保持開啟) | |
| 2 示範模式 | dEO | 電器會關掉。您可以使用按鈕和顯示屏,但按鈕不會啟動電器上的任何功能(即微波爐沒有火力)。示範模式主要由經銷商使用。 |
* 原廠設定(原廠設定視乎電器型號而定)
如有需要,您可以變更電器的按鈕音調。
變更按鈕音調
進行此操作時電器必須關掉。
1.同時按住啟動和停止按鈕數秒。顯示屏將會出現 _
2.觸碰啟動按鈕。
顯示屏中的 0n 將會開始閃爍。
- 在設定區切換為 OFF 。
4.觸碰啟動按鈕。隨即套用設定。
- 触碰停止按钮。
按鈕音調已關閉。
您隨時可變更此設定。

清潔
妥善的保養與清潔可以讓電器長期保持良好外觀與功能。我們將解說護理和清潔電器的正確方法。
警告一 熨傷風險!
本電器會在使用時變得非常灼熱。切勿在關掉電器電源後立刻清潔電器。請先讓電器降溫。
警告一觸電風險!
請勿使用任何高壓清潔器或蒸氣清洗機,以免觸電。
警告一受傷風險!
爐門玻璃上的刮痕可能會變成裂痕。切勿使用玻璃刮刀、強效或腐蝕性的清潔用品或清潔劑。
警告一 嚴重危害健康的風險!
不當地清潔或會損害電器表面。微波能量可能會外洩。請定期清潔電器,並立即清除食物殘渣。→"清潔劑"第34頁
警告一觸電風險!
切勿將本電器浸入水中或利用噴水清潔。
提示:臭味,例如處理魚類之後留下的氣味可以輕鬆去除。在一杯水中加入幾滴檸檬汁。在容器中放入一隻湯匙,以避免延遲沸騰。以最高微波功率將水加熱1至2分鐘。
清潔劑
請遵照列表中的資訊,以確保不會因錯誤的清潔方法而損害設備的表面。

疑难排解
如果發生故障,原因通常不會太複雜。在聯絡售後服務中心前,請先參閱錯誤列表,並嘗試自行修正錯誤。
建議:若您不是非常滿意菜式的烹調成果,請參閱下列章節,您可以在這裡找到許多關於最佳設定的提示與說明。→“建議的烹調時間”第36頁
故障表
| 故障錯誤 可能原因 處理方式 / 資訊 | ||
| 電器無法運作 插頭未插入電源 | 將電器連接至電源插座 | |
| 停電 | 確認廚房中其他電器是否正在運作 | |
| 斷路器/保險絲故障 | 確認保險絲盒中電器所使用的斷路器/保險絲是否正常運作 | |
| 操作錯誤 關閉電器保險絲盒中的斷路器,並在約10秒後重新開啟 | ||
| 顯示屏上亮起三個0。 | 停電 | 重設時間。 |
| 電器未運作。顯示屏上顯示烹調時間。 | 意外啟動控制面板。 | 觸碰「Stop」(停止)。 |
| 設定後未按下Start(啟動)。 | 觸碰「Start」(啟動)或按下「Stop」(停止)刪除設定。 | |
| 加熱食物所需的时间比平時要長 | 微波輸出功率設定過低。 | 選擇較高的微波功率設定。 |
| 放入了太多食物,超出正常份量。 | 雙倍份量-雙倍烹調時間。 | |
| 食物較平時冷。 | 加熱時攪拌或翻動食物。 | |
請勿使用:
强效或腐蝕性的清潔劑。
- 金屬或玻璃刮刀來清潔爐門面板。
- 金屬或玻璃刮刀來清潔爐門密封條。
硬鋼絲絞或海綿。
含高酒精成份的清潔劑。
使用全新的海綿布前,請先將之徹底清洗。
| 區域 清潔產品 | |
| 電器正面 熱肥皂水:先以微濕的抹布清潔,再以軟布抹 乾。請勿使用金屬或玻璃刮刀清潔。 | |
| 附有不鏽鋼的電器正 面 | 熱肥皂水:先以微濕的抹布清潔,再以軟布抹 乾。立即去除水垢、油脂、殼粉和蛋白。這類 污濁會造成腐蝕。不鏽鋼的專門清潔產品在客 務中心和專門零售店有售。切勿使用玻璃 清潔劑,或用金屬或玻璃刮刀清潔。 |
| 不鏽鋼材質的爐腔 | 熱皂質水或醋液:先以洗碗布清潔,再以軟布 抹乾。請勿使用焗爐噴劑、其他具腐蝕性的焗 爐清潔劑或具研磨性的材質。百潔布、硬質海 綿和平底鍋清潔劑亦不適合。這些物件會刮傷 表面。請徹底抹乾內部表面。 |
| 爐腔中的凹槽 漏布:請勿讓水經轉盤驅動器流入電器。用軟 布抹乾轉盤。 | |
| 轉盤及轉輪 熱肥皂水:將轉盤放回凹槽時必須確實固定。 | |
| 烤網架 熱肥皂水:浸泡並使用洗碗布或刷子清潔。請 勿刮磨。請勿使用金屬或玻璃刮刀清潔。 | |
| 爐門面板 玻璃清潔劑:使用洗碗布清潔。請勿使用玻璃 刮刀。 | |
警告一觸電風險!
不當維修會造成危險。只能由受過訓練的售後服務技術人員維修或更換受損的電線。如果設備出現問題,請拔掉設備的主電源,或關閉保險絲盒內的斷路器。請聯絡售後服務中心。請聯絡售後服務中心。
轉盤發出刮磨的噪音。轉盤驅動器位置附近有灰塵或碎片。清潔爐腔的轉環和凹槽。
微波爐因不明原因停止。 微波爐故障。 若故障再次發生,請聯絡售後服務中心。
顯示屏出現 M_ 電器正處於示範模式停用示範模式。
"基本設定"第33頁
錯誤訊息“E-3”自動門開啟系統的故障。
若出現錯誤訊息,請關閉電器再重新啟動;若該訊息
不再出現,就表示這屬於一次性錯誤。若該錯誤再次出現,或錯誤訊息持續顯示,請聯絡售後服務中心並提供故障代碼

客戶服務中心
若電器需要維修,請聯絡我們的售後服務中心。我們一定會找出適合的解決方案,同時避免售後服務人員進行不必要的拜訪。
產品編號及生產編號
聯絡我們時,請提供完整的產品編號(E no.)和生產編號(FD no.),以便服務人員提供正確的建議。打開爐門後,即可在右側找到印有這些編號的標牌。

您也可以在下方空位記下電器編號和售後服務中心的電話號碼,節省尋找時間

售後服務
請注意,即使在保養期內,若因錯誤使用本電器而需要售後服務技工上門服務,亦需要收費。
您可以在附件的客戶服務中心目錄內,找到所有國家的客戶服務中心聯絡詳細資料。
信賴生產商的專業水準。因此,您可確保設備由曾受訓的維修技術人員使用原廠配件來維修。
此電器符合EN55011和CISPR11標準,並屬於Group2,ClassB產品。
Group 2是指用於加熱食物的微波。Class B表示該電器為家用產品。

建議的烹調時間
以下表單會提供一些餐點選擇及最適合的設定資料。包括最適合菜式的微波功率設定。您可以單獨使用微波功能,也可以結合燒烤功能。以下是一些有關烹調器皿和準備方式的提示。
提示
表中的時間僅供參考。實際烹調時間會因食材的品質及成份而異。
- 表中一般會列出時間範圍,先設定較短的時間,如有需要,可延長時間。
從爐腔取出烹調器皿時,必須使用隔熱布或隔熱手套。
食物的份量可能會與表中指定的份量不同。通用的微波操作原則:份量加倍 = 時間加倍;份量減半 = 時間減半。
烹調器皿必須直接放在轉盤上。
下表提供多種微波選項和設定。
適用的器皿
適合用於微波爐的餐碟耐熱,由玻璃、玻璃陶瓷、瓷、陶瓷或耐熱塑料所製。這些材料可以讓微波順利穿透。
也可以使用正式餐碟,以節省更換餐碟的時間。除非製造商保證,否則不要將有金、銀裝飾邊緣的器皿放入微波爐中使用。
不合適的烹調器皿
不适宜使用金屬烹調器皿。金屬無法讓微波穿透,無法加熱金屬容器內的食物。
注意!
火花:金屬(如玻璃杯中的湯匙)必須與爐壁和爐門內側保持至少2厘米的距離。火花可能會對爐門內側的玻璃造成無法修復的損害。
解冻
將冷凍食品放在轉盤上打開的容器內。
需要小心處理的部位(如雞腿和雞翼或烤肉外層脂肪)可使用小塊的錫紙覆蓋。錫紙不可觸碰臥腔內壁。解凍時間經過一半後,即可移走錫紙。
肉類或家禽在解凍時會流出液體。翻轉肉類或家禽時,順道倒掉這些液體。這些液體絕不可作其他用途或接觸其他食物。
解凍時,翻動或攪拌食物一或兩次。較大塊的食物應翻動幾次。
讓解凍的食物在室溫下靜置10至20分鐘,使溫度均勻。此時,可先去除家禽的內藏。即使中心仍有一小部分未解凍,仍然可以進一步處理肉類。
解冻提示
| 經過所設定的時間後,食物仍未解凍、加熱或煮熟。 | 設定較長的時間。大量和堆高的食物需要更長的時間。 |
| 經過所設定的時間後,食物的邊緣烤焦而中心部分仍未熟透。 | 烹調時攪拌,並於下次選擇較低的微波功率設定和延長烹調時間。 |
| 解凍後,家禽或肉類的外層已解凍,但中心部分仍未解凍。 | 下次請選擇較低的微波功率設定。若解凍的食物量較大,請翻動數次。 |
| 解凍 重量 微波功率設定 | (瓦) | 烹調時間 (分鐘) | 備註 |
| 整塊肉(牛肉、小牛肉或豬肉-帶骨或去骨)=800克=180 | 90 | 15 | - |
| 10-20 | |||
| 1公斤=180 | 90 | 20 | |
| 15-25 | |||
| 1.5公斤=180 | 90 | 30 | |
| 20-30 | |||
| 肉塊或牛肉、小牛肉或豬肉片=200克=180 | 90 | 2 | 翻動時,分開任何已解凍的部分 |
| 4-6 | |||
| 500克=180 | 90 | 5 | |
| 5-10 | |||
| 800克=180 | 90 | 8 | |
| 10-15 | |||
| 碎肉,混合=200克=90=10=急凍食物時應盡量平放 | |||
| 500克=180 | 90 | 5 | 翻動數次,去掉任何已解凍的肉 |
| 10-15 | |||
| 800克=180 | 90 | 8 | |
| 10-20 | |||
| 禽肉或禽肉塊=600克=180 | 90 | 8 | 分開任何已解凍的部分 |
| 10-20 | |||
| 1.2公斤=180 | 90 | 15 | |
| 10-20 | |||
| 魚塊、魚扒或切片 400克 180 | 90 | 5 | 分開任何已解凍的部分 |
| 10-15 | |||
| 蔬菜,如豌豆 300克 180 10-15 - | |||
| 水果,如紅桑子 300克 180 7-10 在解凍過程中,請仔細攪拌並分開任何已解凍的 | |||
| 500克 180 | 8 | 部分 | |
| 90 | 5-10 | ||
| 牛油,解凍 125克 180 | 90 | 1 | 拆除所有包裝 |
| 250克 180 | 2-3 | ||
| 90 | 3-4 | ||
| 麵包 500克 180 | 90 | 6 | - |
| 90 | 5-10 | ||
| 1公斤 180 | 12 | ||
| 90 | 10-20 | ||
| 蛋糕,乾身,如海綿蛋糕 500克 90 10-15 只供沒有糖霜、忌廉或吉士忌廉的蛋糕,分開蛋 | |||
| 750克 180 | 5 | 糕片。 | |
| 90 | 10-15 | ||
| 蛋糕,濕潤,如雞果捲、芝士蛋糕 500克 180 | 90 | 5 | 只供沒有糖霜、忌廉或明膠的蛋糕 |
| 90 | 15-20 | ||
| 750克 180 | 7 | ||
| 90 | 15--20 | ||
加熱急凍食物
提示
從包裝中取出即食餐點。食物在微波爐適用的耐熱烹調器皿中能更迅速及均勻地加熱。餐點成分不同的話,加熱時間也可能不同。
- 平放的食物的烹調速度會比堆高的食物快。因此,請盡量將烹調器皿上的食物平放。不應堆疊食物。
請務必覆蓋食物。如果沒有合適的蓋子,請使用盤子或微波專用錫紙。
烹調時請攪拌或翻動食物2~3次。 - 加熱後,讓食物靜置2至5分鐘,使溫度均勻。
從爐中取出器皿時,請務必使用隔熱布或手套。
| 加熱急凍食物 | 重量 | 微波功率設定(瓦) | 烹調時間(分鐘) | 備註 |
| 鰻菜、盤裝菜、即食餐點 (2-3種) | 300-400克 | 600 | 8-11 | - |
| 湯 | 400克 | 600 | 8-10 | - |
| 燉菜 | 500克 | 600 | 10-13 | - |
| 帶有醬汁的肉片或肉塊,如燉牛肉 | 500克 | 600 | 12-17 | 攪拌時分開肉塊 |
| 烘烤,例如千層麵、意大利肉捲 | 450克 | 600 | 10-15 | - |
| 配菜,如米飯、麵食 | 250克 | 600 | 2-5 | 添加少量水 |
| 500克 | 600 | 8-10 | ||
| 蔬菜,如豌豆、西蘭花、蘿蔔 | 300克 | 600 | 8-10 | 將水倒入盤子,使其覆蓋底部 |
| 600克 | 600 | 14-17 | ||
| 忌廉菠菜 | 450克 | 600 | 11-16 | 烹煮時不需加入額外的水 |
加熱食物
注意!
金屬(如玻璃杯中的湯匙)必須與爐壁和爐門內側保持至少2厘米的距離。火花可能會對爐門內側的玻璃造成無法修復的損害。
提示
從包裝中取出即食餐點。食物在微波爐適用的耐熱烹調器皿中能更迅速及均勻地加熱。餐點成分不同的話,加熱時間也可能不同。
請務必覆蓋食物。如果廚具沒有專用的蓋子,請使用盤子或微波專用膜。
- 加熱期間,請攪拌或翻動食物數次。檢查溫度。
- 加熱後,讓食物靜置2至5分鐘,使溫度均勻。
從爐中取出器皿時,請務必使用隔熱布或手套。
警告一 灼傷風險!
液體加熱時,可能會發生延遲沸騰的狀況。意思是,雖然液體已達到沸騰的溫度,但表面仍未有一般常見的的蒸汽氣泡。此時,即使容器稍微震動,都可能令滾燙的液體突然沸騰和飛溅。加熱時,請在容器中放入一隻湯匙。這可防止出現延遲沸騰的情況。
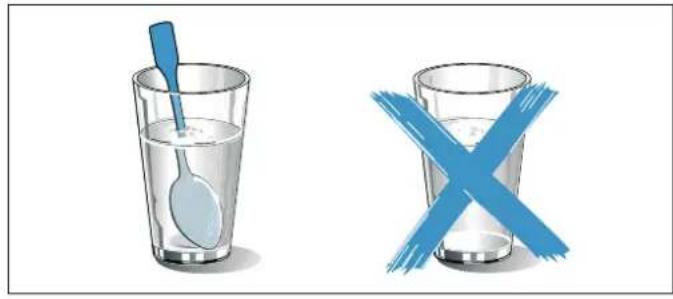
| 加熱菜絹 重量 微波輸出(瓦) 烹調時間 (分鐘) | ||||
| 飲料 200毫升 800 2-3 加熱時請在容器中放入一隻湯匙,請勿過度加熱酒精類飲 | ||||
| 500毫升 800 3-4 | 料,並間中檢查加熱情況 | |||
| 嬰兒食物,如奶瓶 50毫升 360 約1/2 不要蓋上奶嘴或蓋。加熱後必須搖勻。必須檢查溫度! | ||||
| 100毫升 360 約1 | ||||
| 200毫升 360 11/2 | ||||
| 湯,1杯 200克 600 2-3 - | ||||
| 湯,2杯 400克 600 4-5 - | ||||
| 鍍菜、盤裝菜、即食餐點 (2-3種) | 350-500克 | 600 4-8 - | ||
| 有酱汁的肉類 | 500克 | 600 8-11 | 分開肉片 | |
| 燉菜 400克 600 6-8 - | ||||
| 800克 | 600 8-11 | - | ||
| 蔬菜,1份 | 150克 | 600 2-3 添加少量水 | ||
| 蔬菜,2份 | 300克 | 600 3-5 | ||
烹調食物
平放的食物的烹調速度會比堆高的食物快。因此,請盡量將烹調器皿上的食物平放。不應堆疊食物。
在微波時加上蓋子可以充分保留食物的熱能,縮短烹調時間。將烹調器皿直接放在轉盤上。如果沒有合適的蓋子,請使用盤子或微波專用錫紙。
有助保持食物風味。您只需添加少許鹽和調味料。
加熱後,讓食物靜置2至5分鐘,使溫度均勻。
從爐中取出器皿時,請務必使用隔熱布或手套。
烧烤: 日
在烤架上燒烤時,請務必使用烤架而切勿預熱。
務必將烤架放在轉盤上。
結合微波和燒烤:
混合模式特别適合烘焙和烤焗。
務必將烹調器皿放在轉盤上,切勿蓋住食物。
燒烤時使用深碟,有助保持爐腔乾淨。
烘焙和烤焗時應使用大件盞底鍋具。用深窄容器盛載的食物需要較長的烹調時間,而只有最頂部會烤出金黃色。
檢查烹調器皿是否可放入爐腔。器皿不能太大,因為須預留轉盤轉動空間。
務必設定最大烹調時間。指定的時間到前,請檢查食物狀態。
切開肉之前,請先靜置5-10分鐘。這樣可讓肉汁平均分佈,以免在切肉時流出。
電器關上後,應該將烘焙和烤焗食物在爐腔內靜置5分鐘。
所有提示只供參考,需要視乎食物狀態調節。
| 烹調食物 | 配件 | 微波功率(瓦) | 烹調時間(分鐘) | 備註 |
| 雞,全隻,1.2公斤 | 有蓋鍋具 | 600 | 25-30 | 烹調時間已過一半時翻動 |
| 雞塊,如全雞的四分之一,800克 | 無蓋鍋具,烤網架 | 360 瓦 +□ | 30-40 | 帶皮一面朝上擺放,不要翻面 |
| 急凍滷雞翼,800克 | 無蓋鍋具,烤網架 | 360 瓦 +□ | 15-25 | 不要翻面 |
| 去皮豬肉,約750克(如頸肉) | 無蓋廚具 | 360 瓦 +□ | 40-50 | 翻動一、兩次 |
| 煙肉片,約8片 | 烤網架 | 180 瓦 +□ | 10-15 | - |
| 肉卷,750克 | 無蓋廚具 | 600 | 20-25 | 無蓋烹調 |
| 360 瓦 +□ | 25-35 | 厚度最高6厘米 | ||
| 魚,如魚塊、魚柳,400克=無蓋廚具=600=10-15=按需要加水、檸檬汁或酒 | ||||
| 魚柳,烤焗,約400克=無蓋廚具=360瓦+ | □ | 10-15=烹調前先將魚解凍 | ||
| 烤魚串,4-5串=烤網架=180瓦+ | □ | 10-15=使用木叉 | ||
| 烤焗甜點,如乳酪水果梳乎厘,1公斤=無蓋廚具=360瓦+ | □ | 30-35=厚度最高5厘米 | ||
| 鹼點,以生食材製作,如烘焙意大利麵食,1公斤 | 無蓋廚具=360瓦+ | □ | 30-35=灑上芝士,厚度最高5厘米 | |
| 鹼點,以烹調過的食材製作,如焗馬鈴薯批,1公斤 | 無蓋廚具=360瓦+ | □ | 30-40=厚度最高4厘米 | |
| 烤焗湯品,如洋葱湯,2-4杯=無蓋廚具 | □ | 約15-20=- | ||
| 新鮮蔬菜,250克=有蓋鍋具=600=5-10=將蔬菜切成大小相若的片狀; | 每100克的蔬菜加入1至2湯匙的水;烹調時拌勻 | |||
| 新鮮蔬菜,500克=有蓋鍋具=600=10-15=- | ||||
| 蔬菜串,4-5串=烤網架=180瓦+ | □ | 15-20=使用木叉 | ||
| 馬鈴薯,250克=有蓋鍋具=600=8-10=將馬鈴薯切成大小相若的塊狀; | ||||
| 馬鈴薯,500克=有蓋鍋具=600=11-14 | 每100克加入1至2湯匙的水;烹調時拌勻 | |||
| 馬鈴薯,750克=有蓋鍋具=600=15-22 | ||||
| 米,125克=有蓋鍋具=800 | 180 | 5-7 | 加入雙倍的水 | |
| 12-15 | ||||
| 米,250克=有蓋鍋具=800 | 180 | 6-8 | ||
| 15-18 | ||||
| 麵包(已烤過),2-4片 | 烤網架 | □ | 第一面:約2-4 | - |
| 第二面:約2-4 | ||||
| 多士,有沾醬,2-6片 | 烤網架 | □ | 7-10=視乎配料而定 | |
| 糖漬水果,500克 | 有蓋鍋具=600=9-12=- | |||
| 甜食,如牛奶凍(即時),500毫升 | 有蓋鍋具=600=6-8 | 烹調期間,使用打蛋器徹底攪拌牛奶凍2至3次 | ||
微波提示
| 未有與您所預備的食物份量的相關資訊。 | 使用以下法則增加或減少烹調時間: 雙倍份量 = 將近雙倍的烹調時間 一半份量 = 一半的烹調時間 |
| 食物變得太乾。 | 下次請縮短烹調時間,或選擇較低的微波功率設定。覆蓋食物,並加入更多的水。 |
| 經過所設定的時間後,食物仍未解凍、加熱或煮熟。 | 設定較長的時間。大量和堆高的食物需要更長的時間。 |
| 經過所設定的時間後,食物的邊緣烤焦,但中心部分仍未熟透。 | 烹調時攪拌,並於下次選擇較低的微波功率設定和延長烹調時間。 |
| 解凍後,家禽或肉類的外層已解凍,但中心部分仍未解凍。 | 下次請選擇較低的微波功率設定。若解凍的食物量較大,請翻動數次。 |
冷凝
爐門玻璃、內壁和底面可能出現凝結的水氣。這是正常現象。並不會影響微波爐的運作。烹調後擦去凝結的水氣即可。

測試菜式
這些列表供測試機構檢查設備時使用。
微波烹調
菜式 微波輸出功率(瓦),烹調時間(分鐘) 備註
| 奶黄,750克 360瓦,12-17分鐘+90瓦,20-25分鐘 將直徑20×25厘米的耐熱盤放在轉盤上。 |
| 海綿蛋糕 600瓦,8-10分鐘 將直徑22厘米的耐熱盤放在轉盤上。 |
| 肉塊 600瓦,20-25分鐘 將耐熱盤放在轉盤上。 |
微波解冻
菜式 微波輸出功率(瓦),烹調時間(分鐘) 備註
肉類180瓦,5-7分鐘+90瓦,10-15分鐘將直徑22厘米的耐熱盤放在轉盤上。
結合微波烹調
菜式 微波功率設定(以瓦為單位),烹調時間(以分鐘為單位)
備註
焗馬鈴薯

燒烤 +360W ,35-40分鐘將直徑22厘米的耐熱盤放置在轉盤上。
BSH Hausgeräte GmbH
Carl-Wery-Str. 34
81739 München
GERMANY
Manufactured by BSH Hausgeräte GmbH under Trademark License of Siemens AG
由BSH家用电器有限公司根据西门子股份公司的商标许可制造
MANUFACTURED BY BSH HAUSGERAETE GMBH UNDER TRADEMARK LICENSE OF SIEMENS AG
siemens-home.bsh-group.com

9001334924 (990919)