
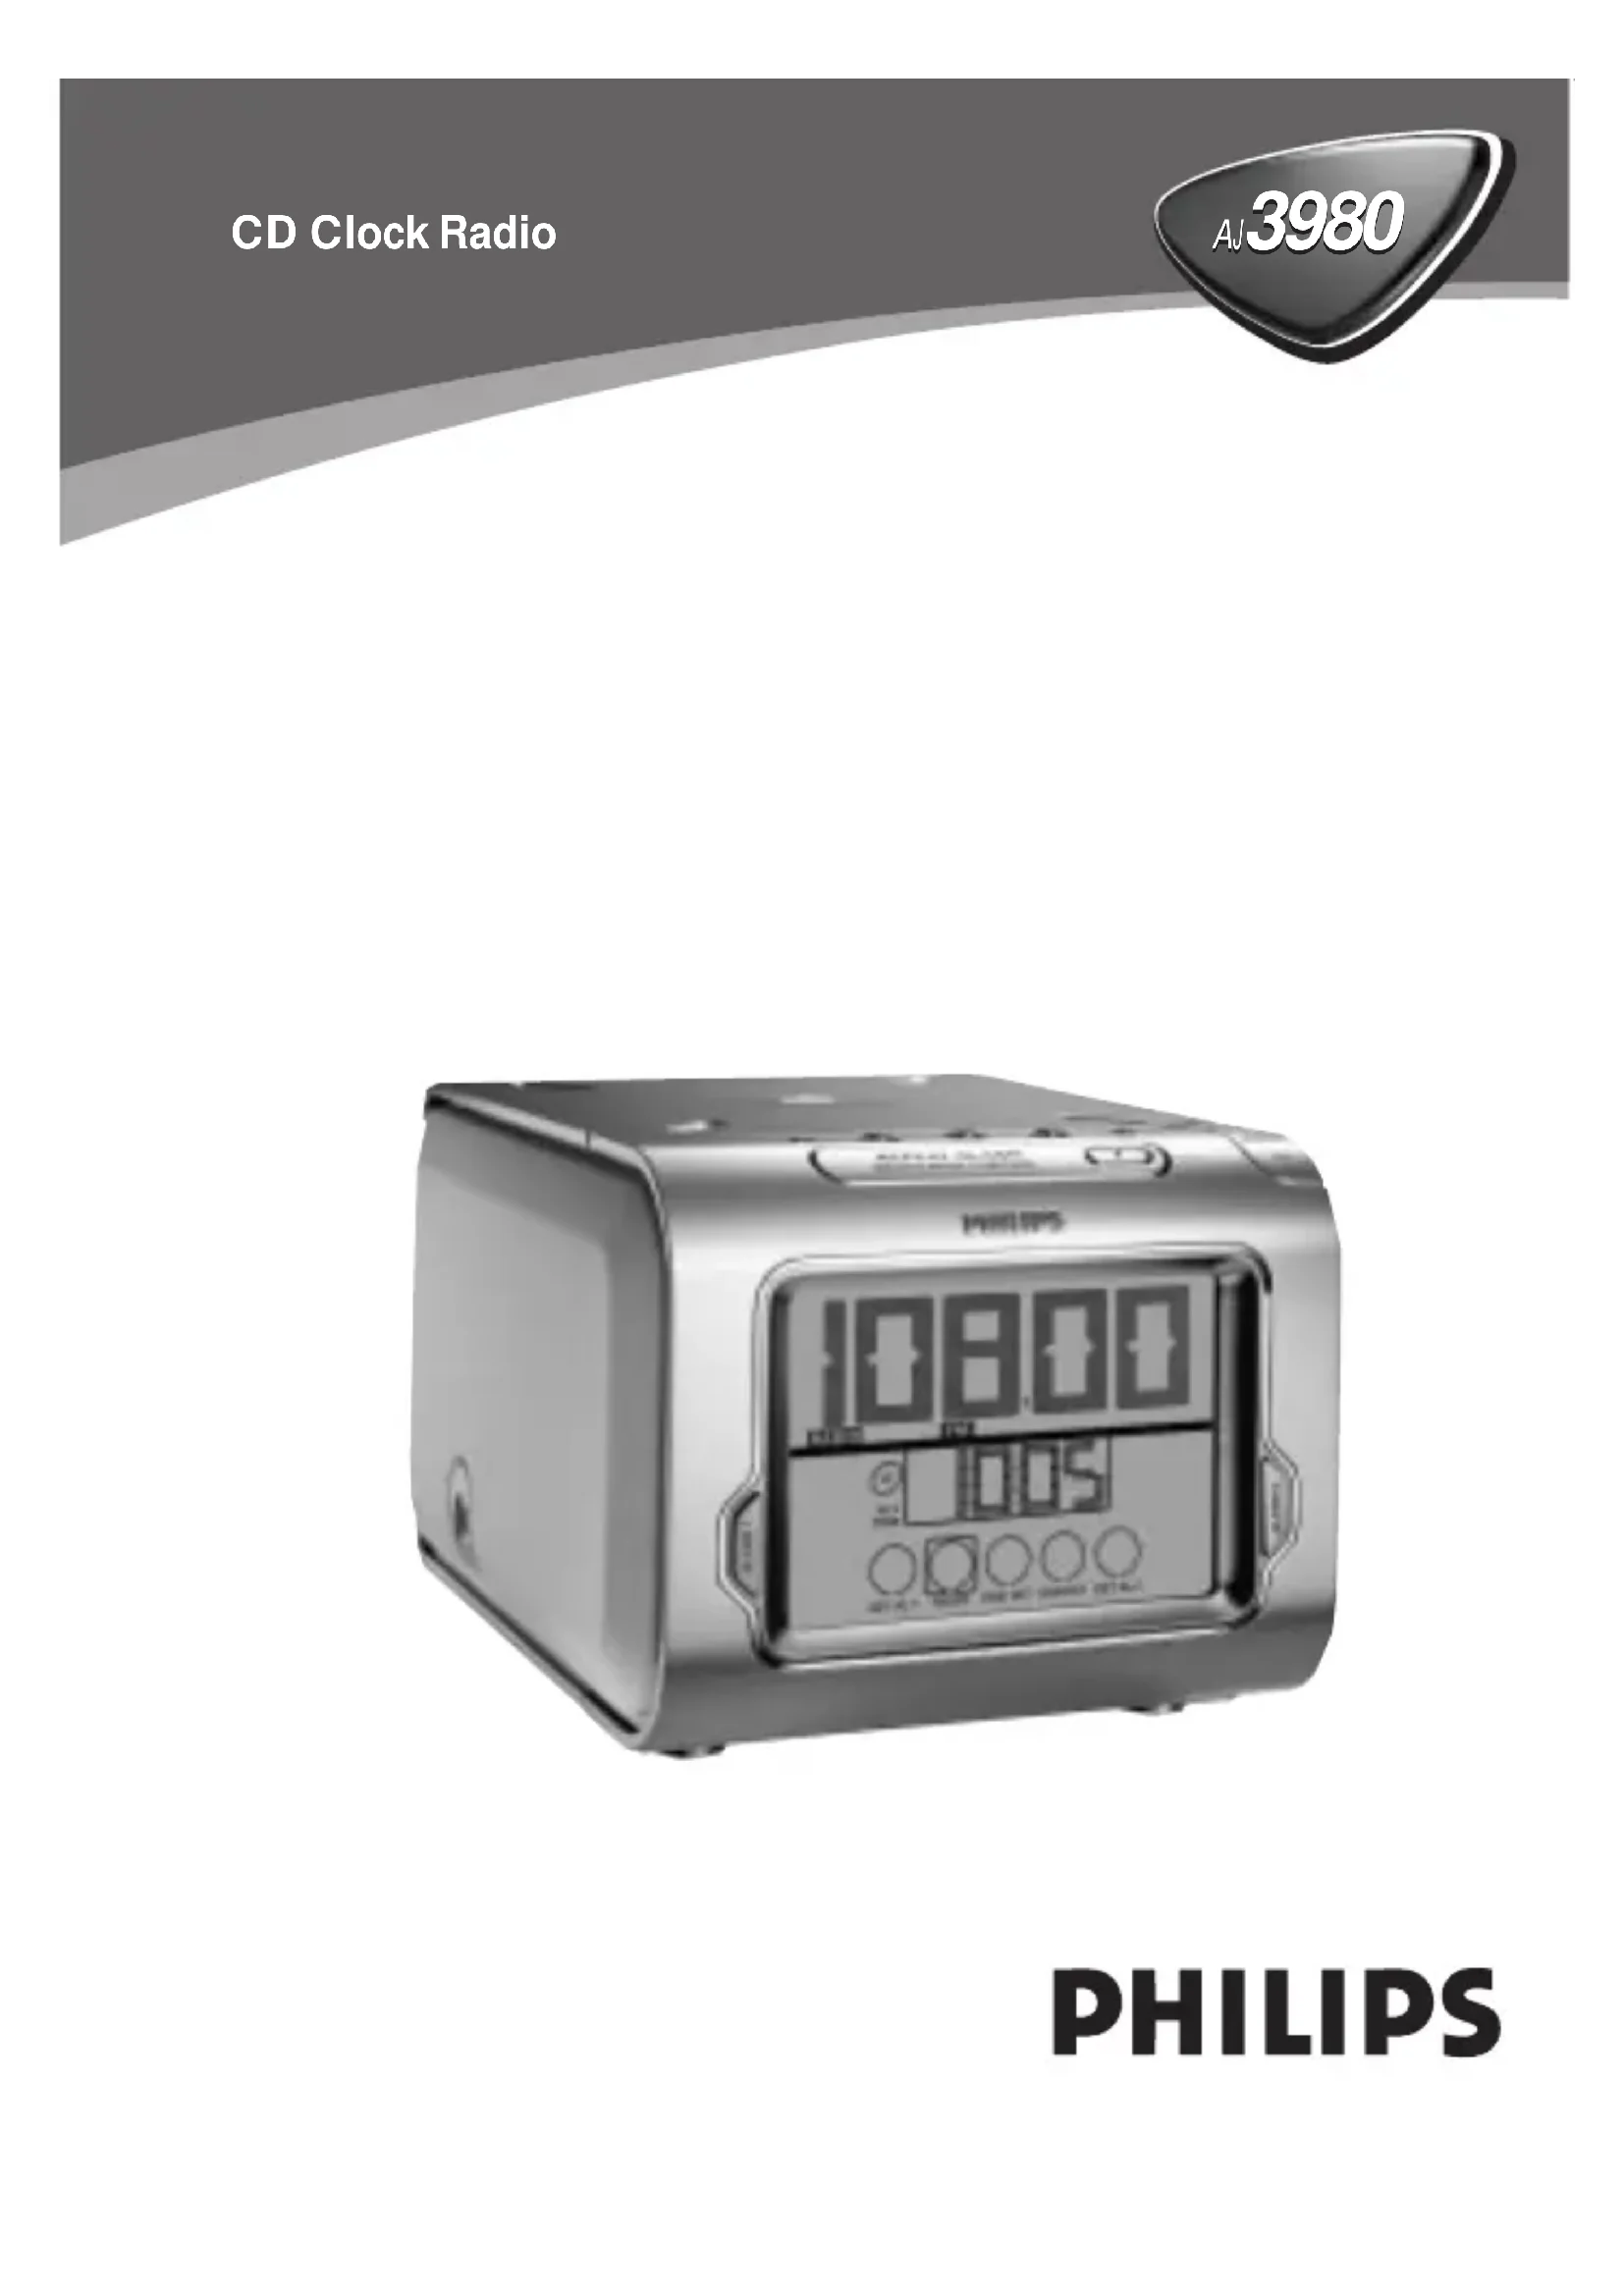
AJ3980 - Radio-réveil PHILIPS - Notice d'utilisation et mode d'emploi gratuit
Retrouvez gratuitement la notice de l'appareil AJ3980 PHILIPS au format PDF.
| Type de produit | Radio-réveil |
| Marque | Philips |
| Modèle | AJ3980 |
| Alimentation | Secteur AC (230V/50Hz ou adapté, voir plaque signalétique) |
| Consommation en veille | 1.5 W |
| Affichage | Écran LCD avec rétroéclairage réglable (3 niveaux : faible, moyen, fort) |
| Radio | FM, MW/AM avec 5 présélections par bande |
| Lecteur CD | Compatible CD, CD-R, CD-RW ; lecture de pistes 1 à 99 |
| Alarmes | 2 alarmes indépendantes avec modes CD, radio ou buzzer |
| Volume d'alarme | Progressif de 12 (doux) à 25 (maximum) |
| Répétition d'alarme | 9 minutes (snooze) |
| Minuterie sommeil | 15, 30 ou 60 minutes |
| Sauvegarde mémoire | Jusqu'à 3 minutes lors d'une coupure secteur |
| Sortie casque | Prise jack 3.5 mm |
| Commande | Commandes tactiles et boutons physiques |
| Syntonisation | Manuelle et automatique |
| Sécurité | Laser classe 1, ne pas ouvrir (risque de choc électrique) |
| Entretien | Nettoyer avec un chiffon doux et sec ; éviter l'humidité |
| Réparabilité | Réparation par un professionnel agréé uniquement ; ouverture annule la garantie |
| Accessoires inclus | Cordon d'alimentation, notice d'utilisation |
FOIRE AUX QUESTIONS - AJ3980 PHILIPS
Si des craquements persistent, syntonisez manuellement ou utilisez la recherche automatique.
Questions des utilisateurs sur AJ3980 PHILIPS
0 question sur cet appareil. Repondez a celles que vous connaissez ou posez la votre.
Poser une nouvelle question sur cet appareil
Téléchargez la notice de votre Radio-réveil au format PDF gratuitement ! Retrouvez votre notice AJ3980 - PHILIPS et reprennez votre appareil électronique en main. Sur cette page sont publiés tous les documents nécessaires à l'utilisation de votre appareil AJ3980 de la marque PHILIPS.
MODE D'EMPLOI AJ3980 PHILIPS
PHILIPS
3
TIME
4

5
CD
6
RADIO
7
SLEEP TIMER

8


9

English
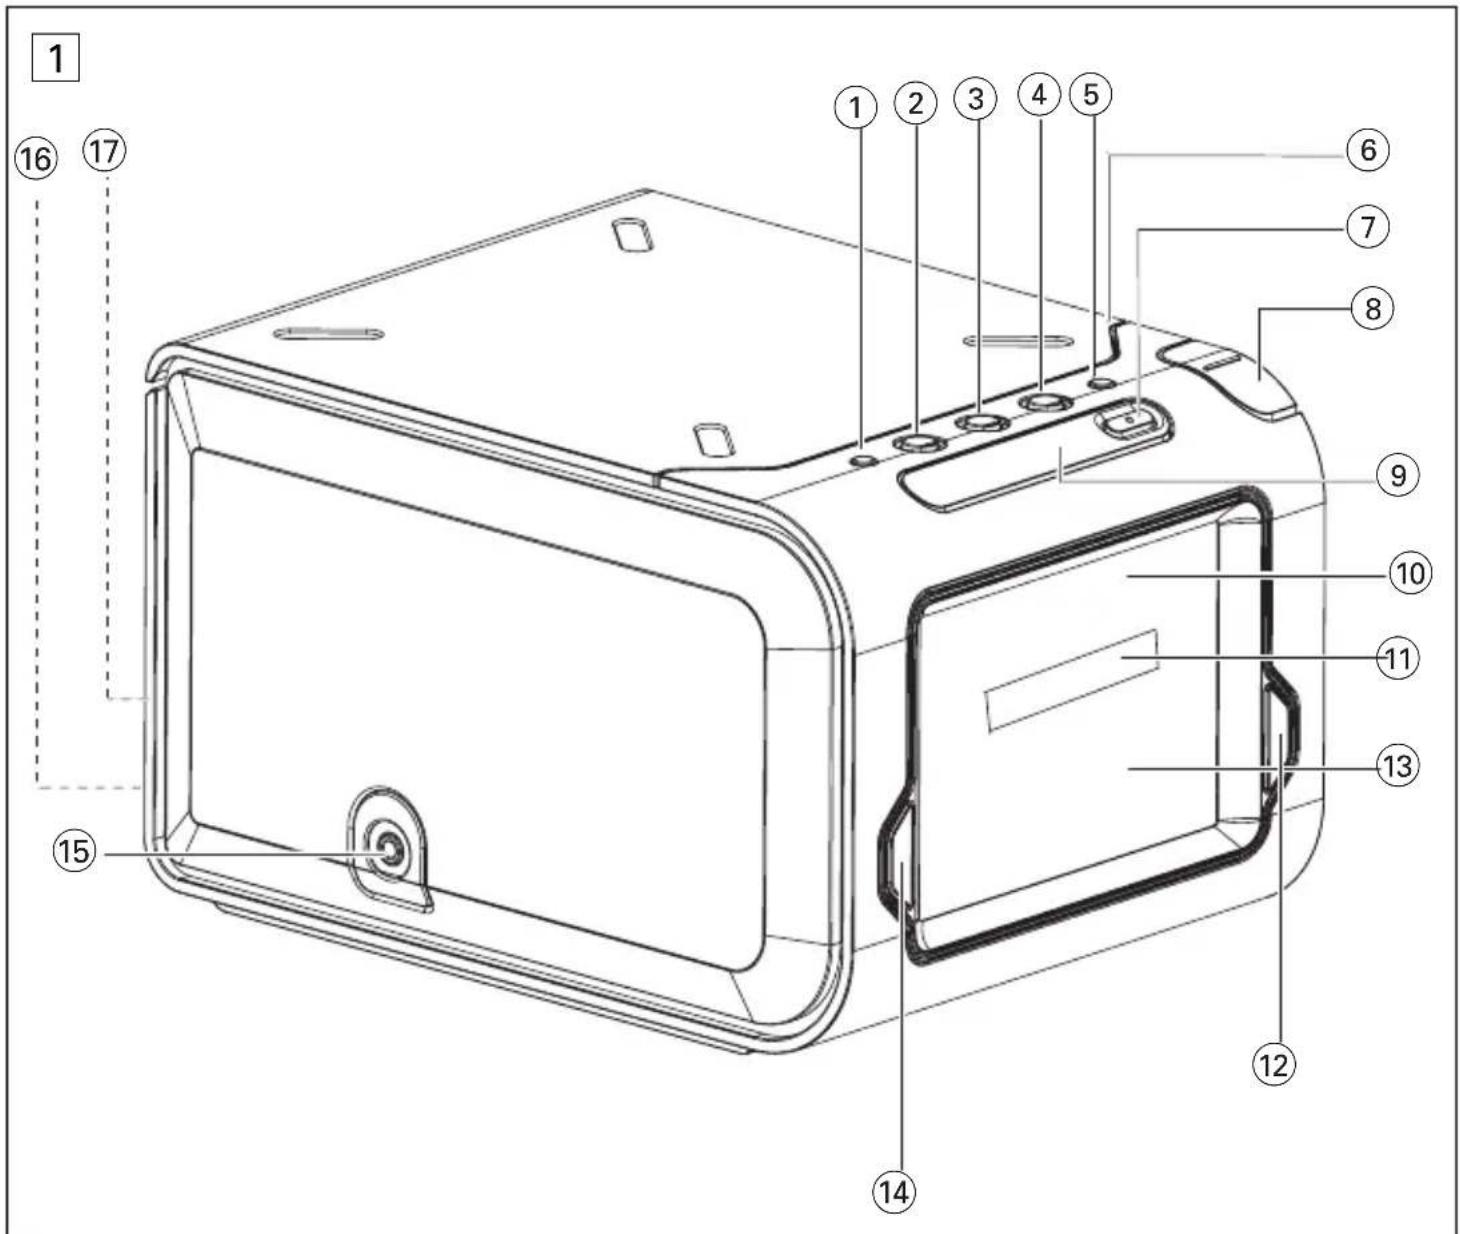
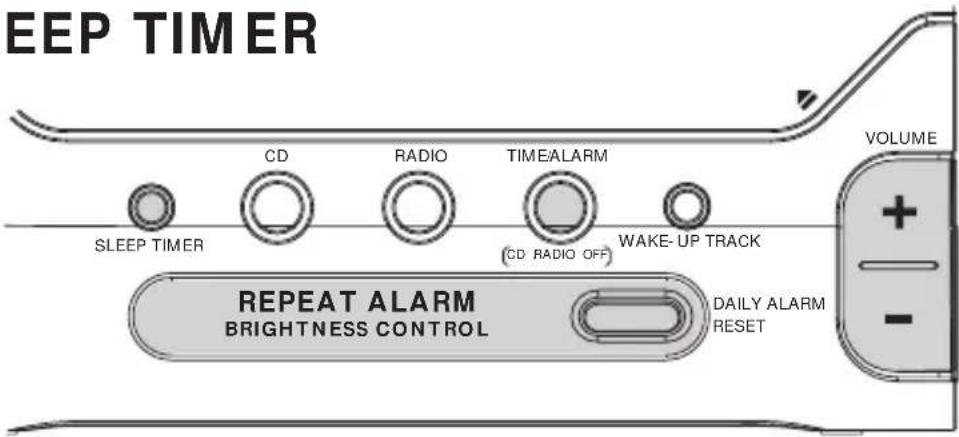
CONTROLS (see figure 1)
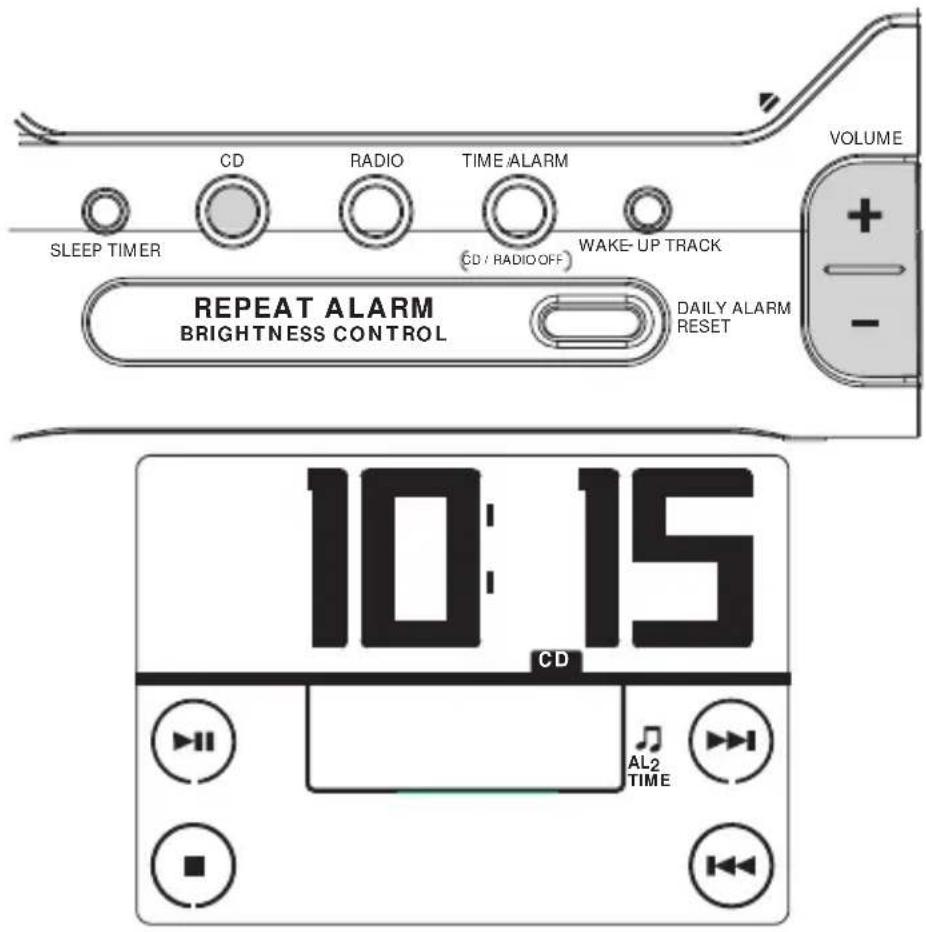
① SLEEP TIMER - adjusts timer options for CD / radio - switches CD / radio on.
② CD - starts CD playback
③ RADIO - switches on radio
④ TIME/ALARM
CD/RADIO OFF
- switches off CD / radio
- selects clock display
DAILY ALARM RESET
WAKE-UP TRACK
- programs your favorite CD track for wake-up track alarm.
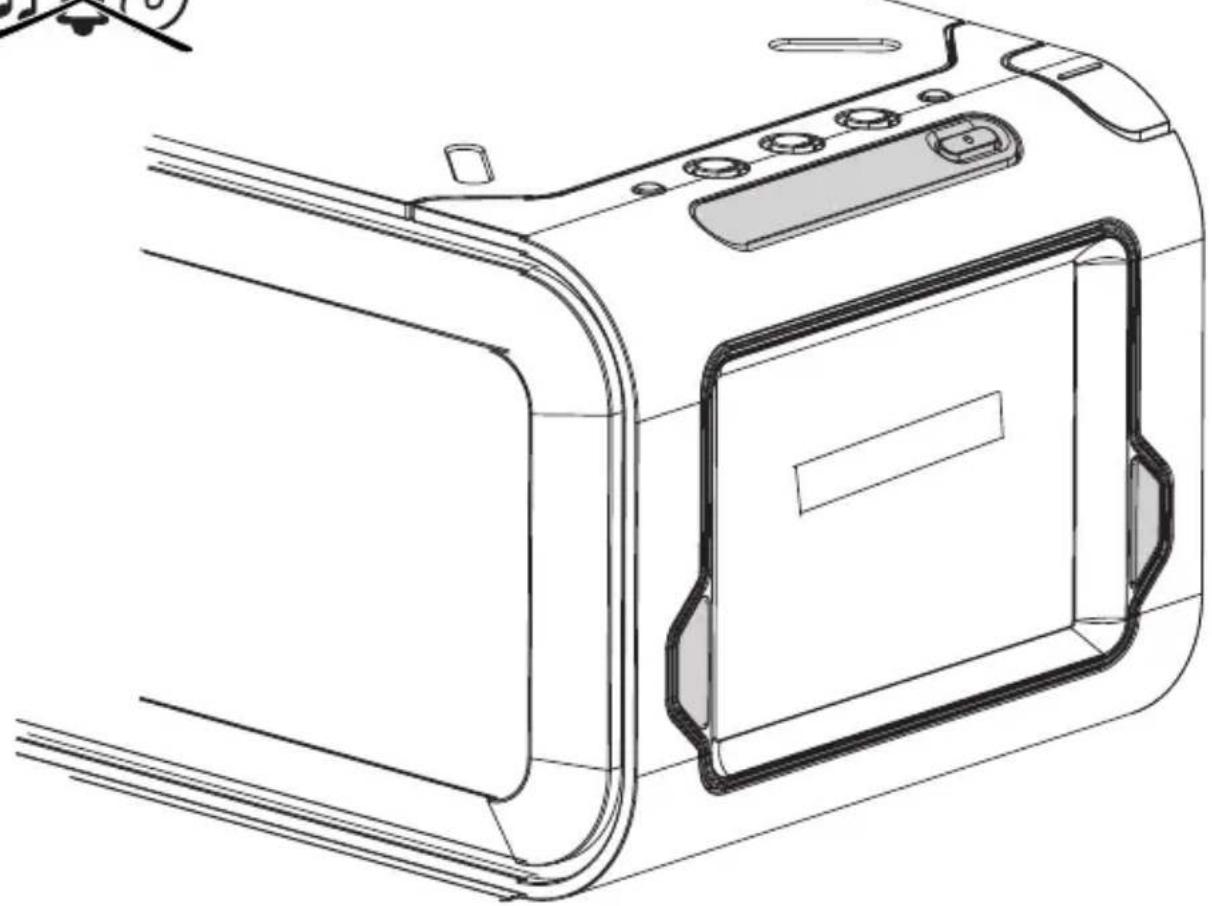
6 PUSH TO OPEN - push this corner to open CD door
- stops the active alarm for 24 hours
(8) + / - VOLUME - adjusts the volume
REPEAT ALARM/ BRIGHTNESS CONTROL
-switches off the alarm for a 9 minute period
-switches off timer function
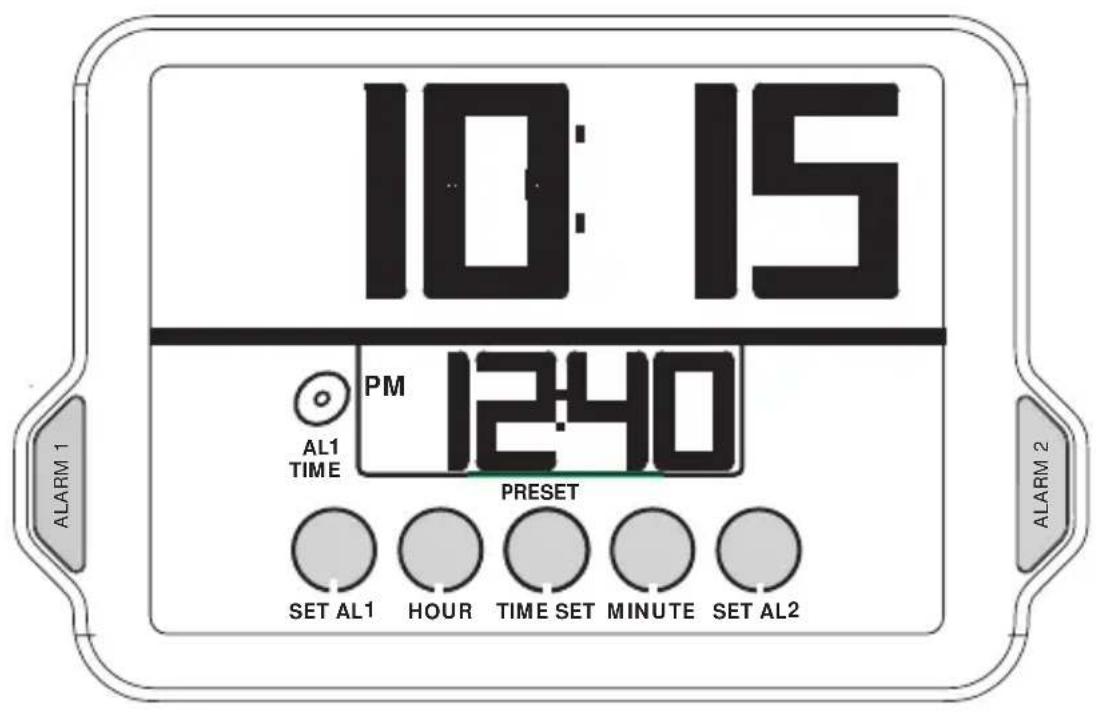
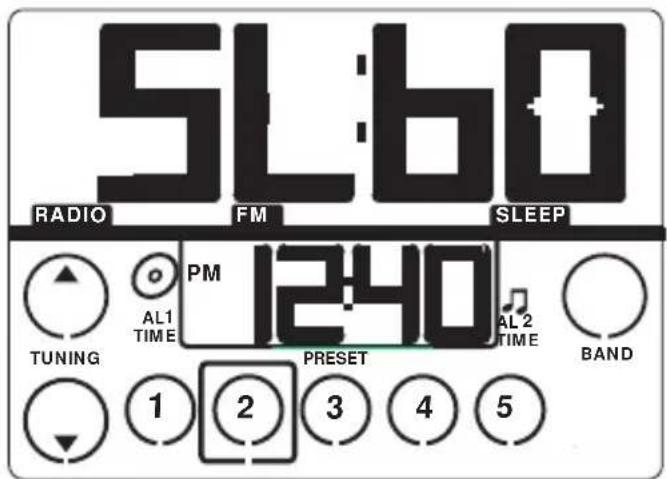
10 Main display
shows clock time and function status
shows radio frequency and CD track number briefly when respective function is in use
Alarm time display
- shows the alarm time and the chosen alarm activated:
-CD (AL1TIME),radio / buzz
(AL 2 TIME)
12ALARM 2
selects radio /spitzer alarm
- switches radio / buzzer alarm on/off
念 Touch Screen Controls
Clock controls shown in standby mode. The radio / CD controls appear when the radio / CD is switched on.
SET AL 1 - sets CD alarm time
HOUR - adjusts hour setting
TIME SET - sets clock time
MINUTE - adjusts minute setting
SET AL 2 - sets radio / buzzer alarm
CONTROLS/ INSTALLATION
CD:
- starts / pauses CD playback
- stops CD playback
/ - skips to the next / previous CD tracks
fast search within a track
Radio:
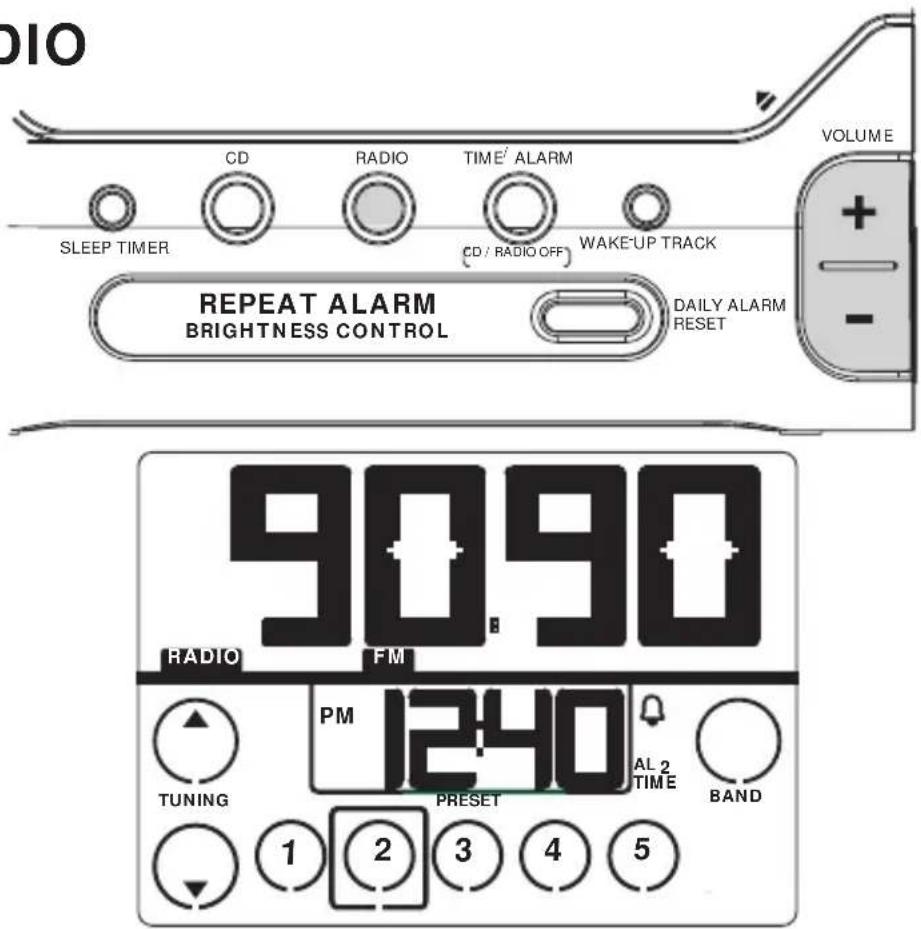
TUNING / (up / down)
-tunes to radio stations automatically' manually
PRESET (1) - (5) - to select / store a radio preset station
BAND - Selects waveband FM/MW/AML
14 ALARM 1
- selects CD alarm
- switches CD alarm on/off
(15)Ω-3.5mm socket for headphones
16. Coll antenna - improves FM reception
Power cord
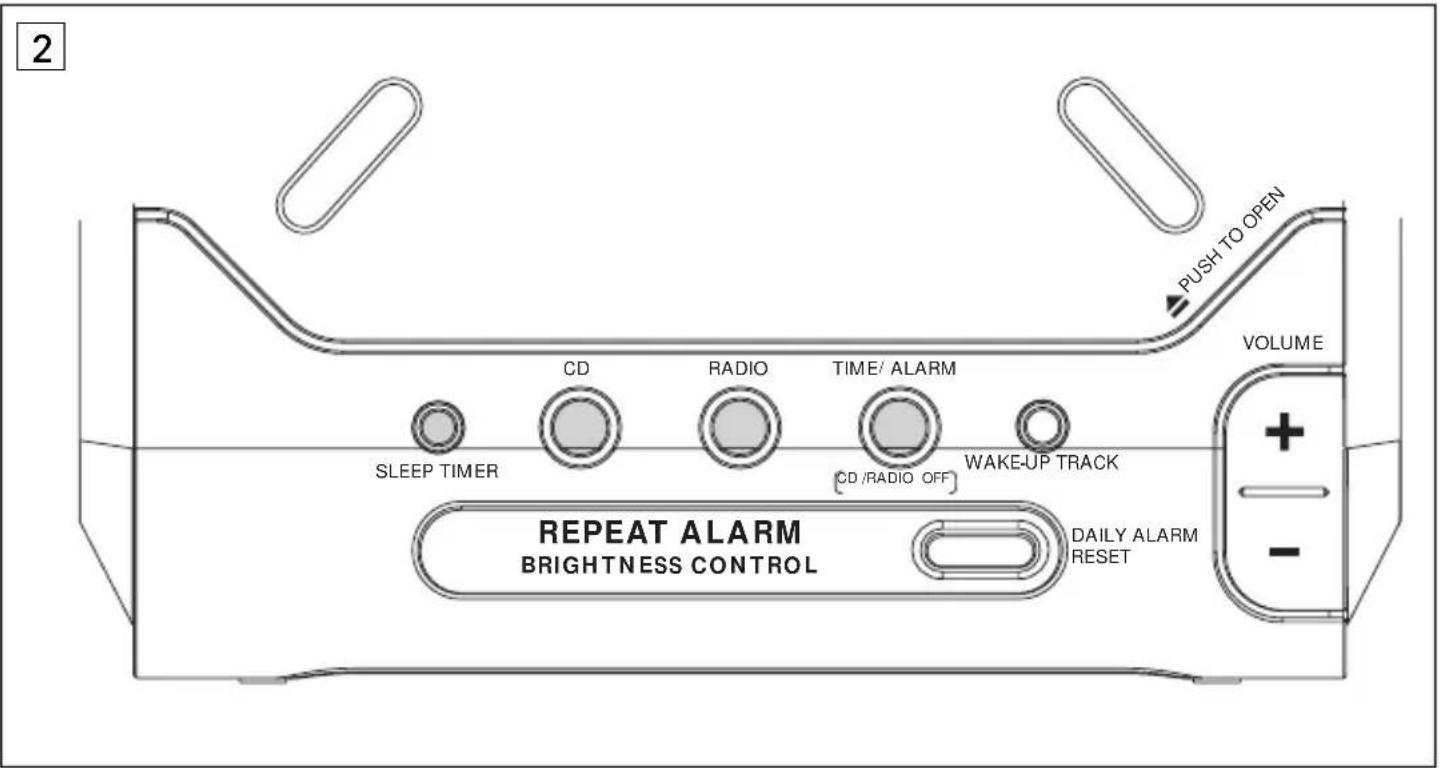
INSTALLATION (see figure 2)
AC Power Supply
- Check if the power voltage, shown on the type plate on the bottom of the set, corresponds to your power supply. If it does not, consult your dealer or service centre.
- Connect the plug to the wall socket.
...PH...ILIPS scrolls across the display continuously
- To exit the demo mode, press any button on the set.
Eg. TIME / ALARM (CD/RADIO OFF)
SLEEP TIMER
RADIO
CD
- To disconnect the set completely from the power supply, withdraw the plug from the wall socket.
Standby power consumption (clock mode)....1.5W
SETTING THE CLOCK AND ALARM TIMES
MEMORY BACKUP
The memory backup conveniently allows your clock, alarm and radio presets to be stored for up to 3 minutes when there is a power interruption e.g. AC power failure. The complete CD clock radio and display will be switched off. As soon as the power supply returns, the display will indicate the correct time.
If power supply returns after 3 minutes, you will need to re-enter the clock and alarm time settings.
CONNECTING HEADPHONES
Connect headphones with a 3.5 mm plug into the socket.
→The built-in speaker will now be muted on the set.
DISPLAY BRIGHTNESS
In the dim / medium setting, the backlight is interactive and gently fades in and out whenever you press a touch screen control.
There are 3 settings: bright medium dim
Press REPEAT ALARM/ BRIGHTNESS CONTROL ONCE OR MORE.
SETTING THE CLOCK TIME (see figure 3)
The time is displayed using the 24 hour clock.
1. In the standby mode, press TIME SET to activate the clock setting mode.
The current clock time in the main display flashes.
2. Press HOUR / MINUTE to adjust the hours and minutes respectively.
- With your finger held down on HOUR / MINUTE, the display will increase the hours / minutes rapidly and continuously.
Press HOUR / MINUTE briefly and repeatedly to adjust the time slowly.
3. Press TIME SET again when you have reached the correct time.
→You will hear a double beep to confirm the time setting.
SETTING THE ALARM (see figure 3)
GENERAL
Two different alarm times, ALARM 1 and ALARM 2 can be set in the CD / radio / buzz modes.
This can be useful when for example you need to be woken up at a different time during the week and at the weekend.
SETTING THE ALARM TIME
- In the standby mode, press ALARM 1 / ALARM 2 to select the alarm mode. Check the respective icon appears in the display: CD / radio / buzzer
Either press briefly:
- ALARM 1 once for CD alarm. This enables CD playback from the first track as your alarm cal
- ALARM 2 once or more for radio / blzter alarm.
-
Press SET AL 1 or SET AL 2 to activate the alarm setting mode.
The current alarm time display flashes. -
Press HOUR/ MINUTE to adjust the hours and minutes respectively.
-
With your finger held down on HOUR/ MINUTE, the display will increase the hours / minutes rapidly and continuously.
Press HOUR/ MINUTE briefly and repeatedly to adjust the time slowly. - Press SET AL 1 or SET AL 2 again when you have reached the correct time.
→You will hear a double beep to confirm the time setting.
Alarm time display
If you have set both alarms, the standby alarm time display will show the alarm time which is ready to go off first, according to the current clock time. E.g. if current clock time = 7:30
AL2 TIME =6:20
AL1TIME = 7:45
the standby alarm display shows the alarm time, 7:45.
GENTLE WAKE VOLUME
A sure way of getting up in the mornings, the gentle wake volume for the alarm begins from a fixed gentle volume 12 and gradually increases to a maximum higher setting of 25 .
The default low volume is : , and the
maximum volume is 0.0:25
During the alarm call, if you press + / - VOLUME, the volume stops automatically getting louder.
ALARM CD CD / RADIO
Helpful Tip :
If you want the alarm to wake you up, FIRST CHECK:
you have disconnected the headphones. radio alarm : make sure you have tuned properly to a station.
SELECTING CD WAKE-UP ALARM MODE
You can program and select a CD track number between 1-99, when the set is in the standby or radio playback mode.
However, if the track number programmed does not exist on your CD, the CD will start playback from the first track during the alarm call.
1. Set the alarm time for AL1 TIME.
2. Insert a CD into the CD compartment.
3. Press ALARM 1 to select CD alarm mode.
4. Press WAKE-UP TRACK to activate favorite track programming.
5. Press or until the desired track number is shown.
6. Press WAKE-UP TRACK to confirm the selected track number.
The display returns to standby clock time.
7. If you want to review your programmed track number, press WAKE-UP TRACK.
IMPORTANT!
The buzzer alarm option will automatically replace the CD-alarm if you have:
- inserted a CD incorrectly:
- inserted a damaged CD;
- forgotten to insert any CD;
not closed the CD door properly.
SWITCHING OFF THE ALARM (see figure 4)
There are three ways of switching off the alarm. Unless you cancel the alarm completely, the DAILY
ALARM RESET option will be automatically selected after 59 minutes, from the time your alarm time first sounds.
Helpful Tip
During an alarm call/ repeat alarm, only the DAILY ALARM RESET, REPEAT ALARM/ BRIGHTNESS CONTROL and ALARM 1 or ALARM 2 and +/- VOLUME controls on the set will operate.
DAILY ALARM RESET
If you want the alarm mode to be stopped immediately but also wish to retain the same alarm setting for the following day:
- Press and hold DAILY ALARM RESET
→You will hear a beep tone to confirm that the alarm reset has been activated.
REPEAT ALARM
This will repeat your alarm call at 9 minute intervals.
During the alarm call, press REPEAT ALARM/
BRIGHTNESS CONTROL. 1. Prospect as often as desired
Repeat as often as desired.
→ Your alarm mode indication, o, q will flash throughout the time the repeat alarm is active.
CANCELLING THE ALARM COMPLETELY
When an alarm is cancelled this is shown by the selected alarm indication and symbol disappearing from the display.
To cancel the set alarm time before it goes off:
Press ALARM 1 or ALARM 2 until the alarm icons / / disappears from the display.
CD PLAYBACK (see figure 5)
-
Insert a CD with the printed side facing up, and close the door.
-
Press the CD button to start playback.
Display shows: 3^ = -1 and the total number of tracks, then your current track number, before returning to clock time
CD touch screen controls appears throughout CD operation.
Other possible CD indications before returning to clock time:
door is shown if the CD door is not closed.
is shown if no CD has been inserted / inserted incorrectly.
F C D is shown if the CD-R(W) is non-finalized
indicates a general error in operation of the set.
- Adjust the sound with +/- VOLUME.
4 To interrupt, press
→ CD flashes.
-
Press again to resume playback.
-
Press to stop playback. Or press TIME/
ALARM CD/RADIO OFF to return to standby mode.
Helpful Tip :
In the CD stop position, the CD touch screen display remains active for 5 minutes.
Press to start playback again if you have stopped briefly e.g. to change a CD.
- If CD playback is paused for more than 15 minutes and no controls are pressed, the set automatically goes to standby mode.
SELECTING A DIFFERENT TRACK DURING PLAYBACK
The track number appears briefly in the display when you press () or () to skip tracks.
Press once or more to skip to the next track(s).
- Press more than once to skip to previous tracks
- Press once and playback will return to the beginning of the current track.
FINDING A PASSAGE WITHIN A TRACK
- During playback, press and hold
or
The CD is played at high speed and low volume: the display will show C and your current track number.
2. Release of when you recognize the passage you want.
→Normal CD playback and standby clock time resumes.
RADIO RECEPTION (see figure 8)
- Press the RADIO button to switch on the radio Radio touch screen controls appears throughout radio operation
The radio frequency and waveband appears in the display for 10 seconds before reverting back to the clock display. - Press the BAND button to select your waveband FM/MW/AMI.
- Tune to your station manually or automatically by using / (up / down).
To improve reception :
FM: extend the coil antenna fully at the back of the set for optimum reception.
MW(AM) : uses a built-in antenna. Direct the antenna by adjusting the position of your set.
4. Adjust the sound using the +/-VOLUME
5. To switch off the radio, press the TIME/ALARM [G-D-RADIO OFF] button.
TUNING TO A STATION (see figure 6)
Manual tuning:
- Press () briefly to find your station. Repeat until you have found the desired station.
Automatic tuning:
Press and hold / until the display frequency starts to change frequency.
- When a station of sufficient strength has been found, tuning will stop. Or you can stop the automatic tuning search by pressing either again. Repeat until you have found the desired station.
PRESET STATIONS (see figure 6)
Storing preset stations
You can program up to five radio stations for each band. If you like, you can also replace a preset station with another frequency. The current station will be indicated by a square round the preset number in the display. E.g.
- Tune to your desired station (see RADIO RECEPTION).
- As soon as you have found your station, press and hold a preset number (1)-(5). Release the number when you hear a double beep confirming that the station has now been set.
Selecting preset stations
- Select and press a preset number, 1-5.
SLEEP TIMER / MAINTENANCE TROUBLESHOOTING
SLEEP TIMER (see figure 7)
About SLEEP TIMER
This feature is a built-in timer device which enables the set to be automatically switched off during CD / radio playback, after a set period of time. There are three timer options: 60 . 30 and 15 minutes.
Setting SLEEP TIMER
- Press the SLEEP TIMER button rapidly once or more to select your timer options: 60, 30 and 15 minutes.
The display will show SL and the timer options briefly.
→ SLEEP appears when the timer is active. - To cancel the timer, you can either press:
TIME/ALARM (CD: RADIO OFF)
REPEAT ALARM/ BRIGHTNESS CONTROL
Maintenance
General (see figure 8)
- If you do not intend to use the set for a long time, withdraw the plug from the wall outlet.
- Do not expose the set, to humidity, rain, sand or excessive heat caused by heating equipment or direct sunlight.
To clean the set, use a soft, dry cloth. Do not use any cleaning agents containing alcohol, ammonia, benzene or abrasives as these may harm the product's surface.
CD player and CD handling (see figure | 9 |)
- The lens of the CD player should never be touched!
- Sudden changes in the surrounding temperature can cause condensation to form and the lens of your CD player to cloud over. Playing a CD is then not possible. Do not attempt to clean the lens but leave the set in a warm environment until the moisture evaporates.
Always shut the CD door to keep the CD compartment dust-free. To clean, dust the compartment with a soft dry cloth.
To clean the CD, wipe in a straight line from the centre towards the edge using a soft, lint-free cloth. Do not use cleaning agents as they may damage the disc. - Never write on a CD or attach any stickers to it.
If a fault occurs, first check the points listed below before taking the set for repair. If you are unable to remedy a problem by following these hints, consult your dealer or service centre.
WARNING:
Do not open the set as there is a risk of electric shock! Under no circumstances should you try to repair the set yourself, as this will invalidate the guarantee.
No sound
Volume not adjusted
Adjust the VOLUME
- Headphones are connected
- Disconnect headphones
No reaction to any operation of the bottoms
Electrostatic discharge
- Disconnect the set from the power supply and reconnect the set after 5 minutes.
CD playback does not work
CD badly scratched or dirty
Replace/clean CD
Laser lens steamed up
- Wait until lens has adjusted to room temperature
Laser lens dirty
Clean lens by playing a CD lens cleaning disc
-CD-R(W) is non-finalized
Use a finalized CD-R(W)
Occasional crackling sound during FM
broadcast
Weak signal
- Extend coil antenna fully
Continuous crackling/ hiss disturbance during MW(AM) broadcast
- Electrical interference from TVs, computers, fluorescent lamps, etc.
- Move set away from other electrical equipment
The alarm does not function
- Alarm mode not selected
See chapter on SETTING THE ALARM
Alarm time not set
See chapter on SETTING THE ALARM.
CAUTION
Use of controls or adjustments or performance of procedures other than herein may result in hazardous radiation exposure or other unsafe operation.
Environmental information
All unnecessary packaging material has been omitted. We have done our utmost to make the packaging easily separable into 2 materials: paper pulp, polyethylene.
Your set consists of materials which can be recycled if disassembled by a specialized company.
Please observe local regulations on the disposal of packing materials and old equipment.
Important notes for users in the U.K.
Mains plug
This apparatus is fitted with an approved 13 Amp plug. To change a fuse in this type of plug proceed as follows:
- Remove fuse cover and fuse.
2 Fix new fuse which should be a BS1362 5 Amp, A.S.T.A. or BSI approved type. - Refit the fuse cover.
If the fitted plug is not suitable for your socket outlets, it should be cut off and an appropriate plug fitted in its place. If the mains plug contains a fuse, this should have a value of 5 Amp. If a plug without a fuse is used, the fuse at the distribution board should not be greater than 5 Amp.
Note: The severed plug must be disposed of to avoid a possible shock hazard should it be inserted into a 13 Amp socket elsewhere.
How to connect a plug
The wires in the mains lead are coloured with the following code: blue = neutral [N], brown = live [L].
As these colours may not correspond with the colour markings identifying the terminals in your plug, proceed as follows:
- Connect the blue wire to the terminal marked N or coloured black.
- Connect the brown wire to the terminal marked L or coloured red.
- Do not connect either wire to the earth terminal in the plug, marked E (or e) or coloured green (or green and yellow).
Before replacing the plug cover, make certain that the cord grip is clamped over the sheath of the lead - not simply over the two wires.
Copyright in the U.K.
Recording and playback of material may require consent. See Copyright Act 1956 and The Performer's Protection Acts 1958 to 1972.
This product complies with the radio interference requirements of the European Union.
The serial and production number are located on the bottom of the set.
Meet Philips at the Internet http://www.philips.com
English
Français
Espanol
Nederlands
Deutsch
Italiano

AJ3980
CLASS 1 LASER PRODUCT

- PHILIPS
- English
- CONTROLS/ INSTALLATION
- INSTALLATION (see figure 2)
- SETTING THE CLOCK AND ALARM TIMES
- CONNECTING HEADPHONES
- DISPLAY BRIGHTNESS
- SETTING THE CLOCK TIME (see figure 3)
- SETTING THE ALARM (see figure 3)
- Alarm time display
- GENTLE WAKE VOLUME
- ALARM CD CD / RADIO
- Helpful Tip :
- SELECTING CD WAKE-UP ALARM MODE
- IMPORTANT!
- SWITCHING OFF THE ALARM (see figure 4)
- Helpful Tip
- DAILY ALARM RESET
- - Press and hold DAILY ALARM RESET
- REPEAT ALARM
- CANCELLING THE ALARM COMPLETELY
- CD PLAYBACK (see figure 5)
- SELECTING A DIFFERENT TRACK DURING PLAYBACK
- FINDING A PASSAGE WITHIN A TRACK
- RADIO RECEPTION (see figure 8)
- To improve reception :
- TUNING TO A STATION (see figure 6)
- Manual tuning:
- Automatic tuning:
- PRESET STATIONS (see figure 6)
- Storing preset stations
- Selecting preset stations
- SLEEP TIMER / MAINTENANCE TROUBLESHOOTING
- SLEEP TIMER (see figure 7)
- About SLEEP TIMER
- Setting SLEEP TIMER
- Maintenance
- CD player and CD handling (see figure | 9 |)
- WARNING:
- No sound
- No reaction to any operation of the bottoms
- CD playback does not work
- Occasional crackling sound during FM
- broadcast
- Continuous crackling/ hiss disturbance during MW(AM) broadcast
- The alarm does not function
- CAUTION
- Environmental information
- Important notes for users in the U.K.
- Mains plug
- How to connect a plug
- Copyright in the U.K.
- Meet Philips at the Internet http://www.philips.com
- CLASS 1 LASER PRODUCT
Marque : PHILIPS
Modèle : AJ3980
Catégorie : Radio-réveil