CM836GNB6 - Micro-ondes SIEMENS - Notice d'utilisation et mode d'emploi gratuit
Retrouvez gratuitement la notice de l'appareil CM836GNB6 SIEMENS au format PDF.

| Type de produit | Micro-ondes encastrable |
| Marque | Siemens |
| Modèle | CM836GNB6 |
| Dimensions (H x L x P) | 382 x 595 x 388 mm |
| Poids net | Environ 20 kg |
| Puissance micro-ondes | 900 W |
| Capacité | 25 L |
| Tension de fonctionnement | 220-240 V ~ 50/60 Hz |
| Fonctions principales | Décongélation, cuisson automatique, gril (optionnel) |
| Nettoyage | Intérieur en acier inoxydable, facile à nettoyer |
| Sécurité | Verrouillage enfant, arrêt automatique après utilisation |
| Installation | Encastrable, nécessite une ventilation adéquate |
| Matériau de la porte | Verre et acier inoxydable |
| Classe énergétique | A (estimation) |
| Accessoires inclus | Plat tournant, grille (selon modèle) |
FOIRE AUX QUESTIONS - CM836GNB6 SIEMENS
Questions des utilisateurs sur CM836GNB6 SIEMENS
0 question sur cet appareil. Repondez a celles que vous connaissez ou posez la votre.
Poser une nouvelle question sur cet appareil
Téléchargez la notice de votre Micro-ondes au format PDF gratuitement ! Retrouvez votre notice CM836GNB6 - SIEMENS et reprennez votre appareil électronique en main. Sur cette page sont publiés tous les documents nécessaires à l'utilisation de votre appareil CM836GNB6 de la marque SIEMENS.
MODE D'EMPLOI CM836GNB6 SIEMENS
en
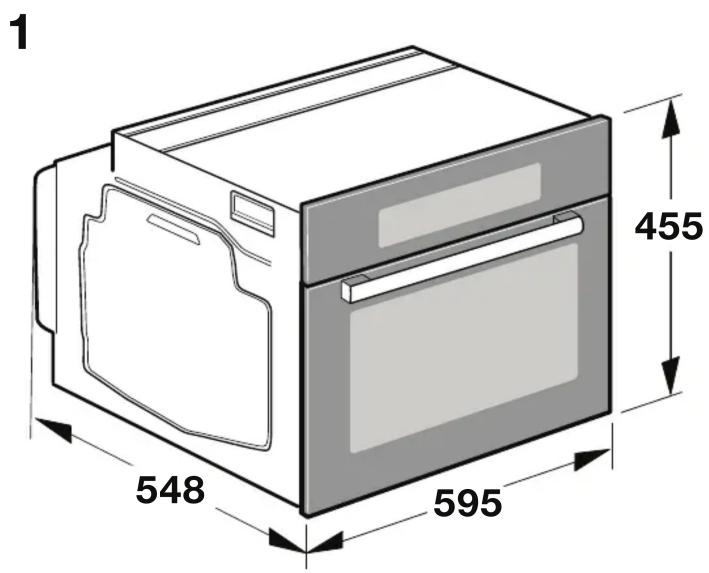
Important information - Fig. 1
- The fitted cabinet must not have a back panel behind the appliance. There should be a gap of at least 35 mm wall and the cabinet base as well as the rear panel that is situated above.
The fitted cabinet must have a ventilation opening of 50~cm^2 on the front. On conversion units without a ventilation must be a ventilation opening of 200 cm² towards side panels. To do this, trim the base panel or fit a ventilation grille.
Ventilation slots and intakes must not be covered. - Check the appliance for damage after unpacking it. Do not connect the appliance if it has been damaged in transit.
Before starting up the appliance, remove any packaging and adhesive film from the cooking compartment and the door.
Fitted units must be heat-resistant up to 90^ , and adjacent unit fronts up to 70^ . - Do not install the appliance behind a decorative panel. There is a risk of overheating.
- Any cut-outs that need to be made in the units should be made before the appliance is installed. Remove any shavings as they may prevent the electrical components from working properly.
- Wear protective gloves so that you do not cut your are accessible during installation may have sharp edges.
For appliances that have a hinged switch panel, make sure that the switch panel does not hit adjacent kitchen units when you open it.
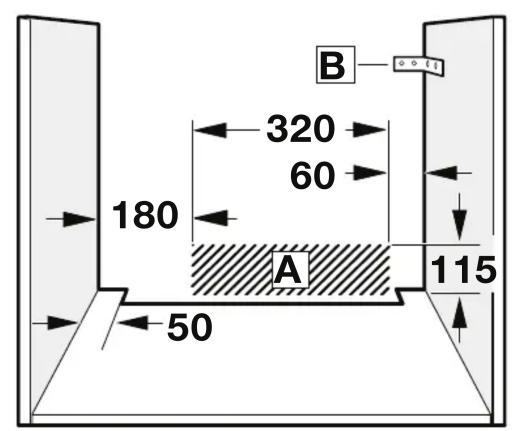
The power socket for the appliance must either be hatched area A or outside of the area where the appliance is installed. - Secure any unsecured units to the wall using a si B.
The dimensions in the figures are in mm.
Wearers of electronic implants!
The appliance may contain permanent magnets which may affect electronic implants, e.g. heart pacemakers or insulin pumps. Therefore, during installation, wearers of electronic implants must maintain a minimum distance of 10cm from the appliance.
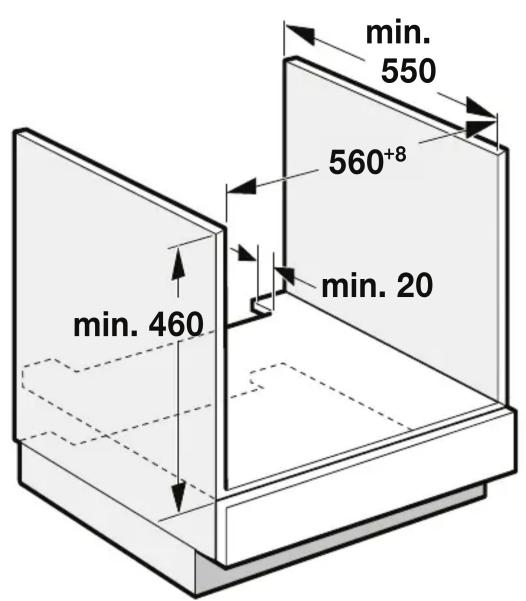
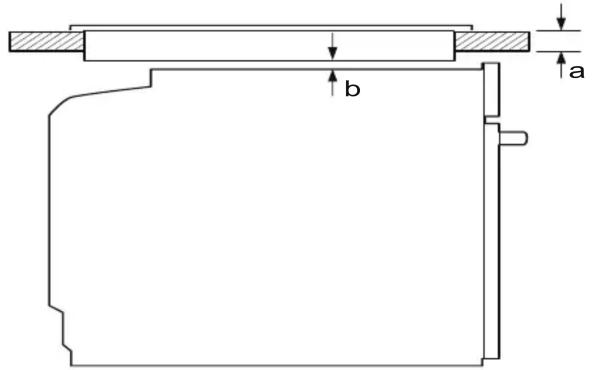
Appliance under worktop - Fig. 2
To ventilate the appliance, the intermediate floor must have a ventilation cut-out.
Secure the worktop to the fitted units.
If the appliance is installed under a hob, the following minimum dimensions must be adhered to (including substructure, if applicable):

Induction hob 42 mm 43 mm 5 mm
Full-surface induction48 mm 53 mm 5 mm hob
Gas hob 37 mm 47 mm 5 mm
Electric hob 28 mm 30 mm 2 mm
The minimum worktop thickness a results from the minimum required dimension b.
Observe the installation instructions for the hob.
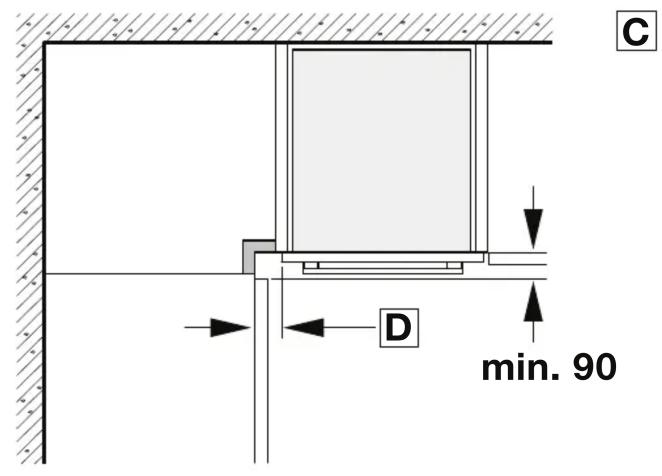
Appliance in a tall unit - Fig. 3
To ventilate the appliance, the intermediate floors must have a ventilation cut-out.
If the tall unit has another back panel in addition to the element back panels, this must be removed.
Only fit the appliance up to a height which allows access easily removed.
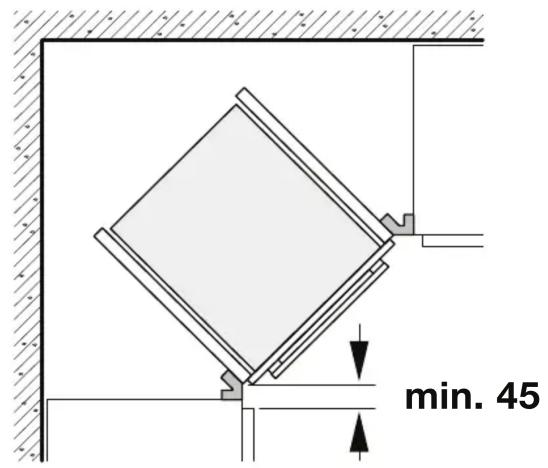
ObrttheInstallation - Fig. 4
To ensure that the appliance door can be opened in a corner installation, take account of dimension C. Dimension D is dependent on the thickness of the unit front under the handle
Connecting the appliance
The appliance corresponds to protection class 1 and must proceed with a protective earth connection.
The fuse protection must correspond to the power rating on the appliance's rating plate and to local regulations.
The appliance must be disconnected from the power supply whenever installation work is being carried out.
The appliance must only be connected with the power cable provided. Connect the power cable to the back of the appliance (listen for the click).
A 3 m power cable can be obtained from the after-sales service.
If The Power table must only be replaced with a cable from the original manufacturer, which can be obtained from the after-sales service.
When the appliance is installed, protection must be provided against accidental contact in the future.
loader cablewith a plug with earthing contact
The appliance must only be connected to a properly installed protective contact socket.
If the plug is no longer accessible following installation, an isolating switch must be present on the installation side with a contact gap of at least 3 mm.
Power cable without a three-pin earthed plug
The appliance must only be connected by a licensed professional.
The installation must have an all-pole isolating switch with a contact gap of at least 3mm . Identify the live and neutral conductors in the mains socket. The appliance may be dated it is not connected correctly.
Only connect the hob as shown in the connection diagram. See the rating plate for the voltage. Connect the wires of the mains power cable according to the colour coding: Green/yellow = PE conductor < , blue = neutral conductor, brown = live (external conductor).
Only in Sweden, Finland and Norway
The appliance can also be connected using the plug provided which has an earthing contact system. This must still be accessible after installation. If this is not the case, an all-pole isolating switch must be used on the installation side with gap of at least 3 mm.
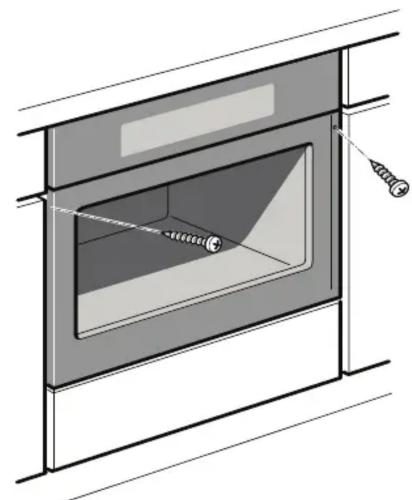
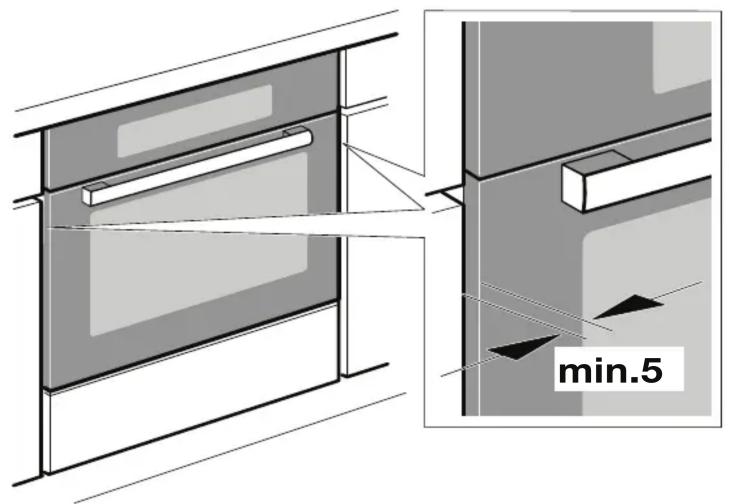
Securing the appliance - Fig. 5
-
Fully insert the appliance and centre it.
-
Screw the appliance into place.
The gap between the worktop and appliance must not be sealed by additional strips.
Thermal insulation strips must not be fitted to the side panels of the surround unit.
Removal
- Disconnect the appliance from the power supply.
- Undo the securing screws
- Lift the appliance slightly and then pull it out completely.
b 1aalall aalll jdall jde a Jaae baw claw d
gall
3J- aUle d g jLjell
a aaaan aaan an aan anan anan anan anan anan anan anan anan anan anan anan anan anan anan anan anan anan anan anan anan anan anan anan anan anan anan anan anan anan anan anan anan anan anan anan anan anan anan anan anan anan anan anan
aalil 1ylll aal yla 1y lgl aalaaall aalld
aIgss sll lss
4J-+
C 1
aall JwJgJgJgJgJgJgJgJgJgJgJgJgJgJgJgJgJgJgJgJgJgJgJgJgJgJgJgJgJgJgJgJgJgJgJgJgJgJgJgJgJgJgJgJg
jL
aL aLg JgJgJgJgJgJgJgJgJgJgJgJgJgJgJgJgJgJgJgJgJgJgJgJgJgJgJgJgJgJgJgJgJgJgJgJgJgJgJgJg
jglgssuagaaaegaae aae aee aee aee aee aee aee
all
Jll Jlae Jie Jilu Jy Jg Jl
y 11 11 11 11 11 11 11
(gss)
- 与 S1 相似 S2 , S3 , S4 , S5 , S6 , S7 , S8 , S9 , S10 , S11 , S12 , S13 , S14 ,
gJyI 1
J 1
jusy
J 1
y 1 y 1 y 1 y 1 y 1 y 1 y 1 y 1 y 1 y 1 y 1 y 1 y 1 y 1 y 1 y 1 y 1 y 1 y 1 y 1 y 1 y 1 y 1 y 1 y 1 y 1 y 1 y 1 y 1 y 1 y 1 y 1 y 1 y 1 y
Jusu
aaiiaieiiee iieae
3 3 3 3 3 3 3 3 3 3 3 3 3 3 3 3 3 3 3 3 3 3 3 3 3 3 3 3 3 3 3 3 3 3 3 3 3 3 3 3 3 3 3 3 3 3 3 3 3 3 3
(g
gjglg jilie gagll
Jg 3 j
5J- jIJI JaiLi
aJg jg aJg 1
a. a. 2
LbIaIbIaIbIaIbIaIbIaIbIaIbIaIbIaIbIaIbIaIbIaIbIaIbIaIbIaIbIaIbIaIbIaIbIaIbIaIbIaIbIaIbIaIbIaIbIaIbIaIbIa
a a a a a a a a a a a a a a a a a a a a
J 1
jLJI JIOJ 2
Jolll 1
ar
1Jk-aaasla
j j 1
35 35 35
a
50 50
aagaaagaaagaaagaaagaaagaaagaaagaaagaaagaaagaaagaaagaaagaaagaaagaaagaaagaaagaaagaaagaaagaaagaaagaaagaaagaaagaaagaaagaaagaaagaaagaaagaaagaaagaaagaaagaaagaaagaaagaaagaaagaaagaaagaaagaaagaaagaaagaaagaaagaaagaaa
gjgjg jgjjg jgjjg jgjjg
A
a 1
Jiaill aie jie aaii iil
J 1
90g 1
070
Aaagaaagaaal aagaaal gaaagaaagaaagaaagaaagaaagaaagaaagaaagaaagaaagaaagaaagaaagaaagaaagaaagaaagaaagaaagaaagaaagaaagaaagaaagaaagaaagaaagaaagaaagaaagaaagaaagaaagaaagaaagaaagaaagaaagaaagaa
i 1
Jaa Jaa Jaa Jaa Jaa Jaa Jaa Jaa Jaa
Lg 11 11 11 11 11 11 11 11 11 11
aIgalldoJgSs
aljol joc no sll , aolao cnilio aolgl ae alaiill o jy w
gaiiiei jglalallalal
A aallll al lolj jllllll
jll jll
B 1
gjgjgjgj
a 1111111111111111111111111111111111111
golulj gacg jiaagjgl aab jy jolal all jus
jI 10 jie JaaJoo Ie
2Jsi-Jaellcbw jIJI
a a a a a a a a a a a a a a a a a a a a
a
aI 1
()
b
a
山
abw
| po 5 | po 43 | po 42 | العربية |
| po 5 | po 53 | po 48 | العربية |
| po 5 | po 47 | po 37 | العربية |
| po 2 | po 30 | po 28 | العربية |
4
5