
TC14S3MZ - Caméra de surveillance PANASONIC - Notice d'utilisation et mode d'emploi gratuit
Retrouvez gratuitement la notice de l'appareil TC14S3MZ PANASONIC au format PDF.

| Caractéristiques | Détails |
|---|---|
| Type de produit | Caméra de surveillance |
| Résolution vidéo | 1080p Full HD |
| Vision nocturne | Oui, avec infrarouge |
| Angle de vue | 90 degrés |
| Connectivité | Wi-Fi, Ethernet |
| Stockage | Carte microSD, stockage cloud |
| Application mobile | Compatible avec iOS et Android |
| Installation | Fixation murale, configuration facile |
| Maintenance | Nettoyage régulier de l'objectif, mise à jour du firmware |
| Sécurité des données | Cryptage des données, protection par mot de passe |
| Garantie | 2 ans |
| Dimensions | 15 x 10 x 8 cm |
| Poids | 300 g |
FOIRE AUX QUESTIONS - TC14S3MZ PANASONIC
Questions des utilisateurs sur TC14S3MZ PANASONIC
0 question sur cet appareil. Repondez a celles que vous connaissez ou posez la votre.
Poser une nouvelle question sur cet appareil
Téléchargez la notice de votre Caméra de surveillance au format PDF gratuitement ! Retrouvez votre notice TC14S3MZ - PANASONIC et reprennez votre appareil électronique en main. Sur cette page sont publiés tous les documents nécessaires à l'utilisation de votre appareil TC14S3MZ de la marque PANASONIC.
MODE D'EMPLOI TC14S3MZ PANASONIC
Panasonic

TC---21S3M/Z
TC---14S3M/Z
(U.K. Standard)
WARNING AND PRECAUTIONS
This T.V. is designed to operate on A.C. 220 --- 240V, 50CABINET AND PICTURE TUBE CARE
- Do not expose this monitor to rain or excessive moisture.
-WARNING: HIGH VOLTAGE!
Do not remove the rear cover, there are no user serviceable parts inside.
- Avoid exposing the monitor to direct sunlight or other sources of heat.
- Remove the mains plug from the wall socket when the monitor is not to be used for a prolonged period of time. Do not pull the power cable to remove the mains plug from the socket, always remove it by the plug.
Remove the mains plug from the wall socket. The cabir and picture tube can be cleaned with a soft cloth moistened with mild detergent and water. Do not use solutions containing benzol or petroleum. Monitors can produce static electricity, care must be taken whenever touching the monitor screen.
- Adequate ventilation is essential to prevent failure of electrical components. We recommend that a gap of at least 5cm is left all around this monitor even when it is placed inside a cabinet or between shelves.
FOR YOUR SAFETY PLEASE READ THE FOLLOWING CAREFULLY
This appliance is supplied with a fitted three pin mains plug for your safety and convenience. A 5 amp fuse is fitted in this plug. If the fuse is replaced then the replacement fuse must be 5 amp rated and should be approved by ASTA or BSI to BS1362.
Check for the ASTA mark
A5A
or the
BSI man

on the body of the fuse.
If the fitted plug has a removable fuse cover you must ensure that it is refitted when the fuse is replaced. If you lose the fuse cover the plug must not be used until a replacement cover is obtained.
Replacement fuse covers can be purchased through your local Panasonic dealer.
The plug fitted to this appliance incorporates a mains filter circuit. If this is removed or replaced with a non-filtered mains plug this monitor will no longer meet the European standards for Electromagnetic Compatibility (EMC). If the fitted plug is unsuitable for the socket outlet in your home an appropriate adapter should be used.
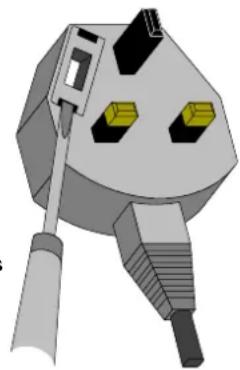
Nonetheless, if the fitted plug is replaced, the fuse should be taken out and the cut-off plug disposed of safely. There is danger of severe electrical shock if the cut off plug is inserted into any 13amp socket.
If a new plug is to be fitted please observe the wiring code as shown below. If in any doubt please consult a qualified electrician.
How to replace the fuse :
- Lift out the removable fuse compartment with a screwdriver and replace the fuse, securely into the mains plug.
Important Note : The layout of the mains plug used may differ from this illustration.
IMPORTANT :--The wires in the mains lead of this appliance are coloured in accordance with the following code : -
BLUE:NEUTRAL
BROWN : LIVE
As the colours of the wires in the mains lead of this appliance may not correspond to the markings identifying the terminals in your plug, proceed as follows :---
- The BLUEwire must be connected to the terminal marked 'N' or coloured black.
- The BROWNwire must be connected to the terminal marked 'L' or coloured red.
IMPORTANT NOTE : Under no circumstances should either of these wires be connected to the Earth terminal of the three pin plug, marked with the letter 'E' or the earth symbol ( ).

Connect input equipment as shown on page 4 Plug the monitor into a mains socket and switch ON.

To switch ON press the power On / Off button on the front of the monitor. If the power to this monitor is in whilst it is switched on, when power is returned the monitor will automatically switch back on. To switch OFF the power On / Off button again.
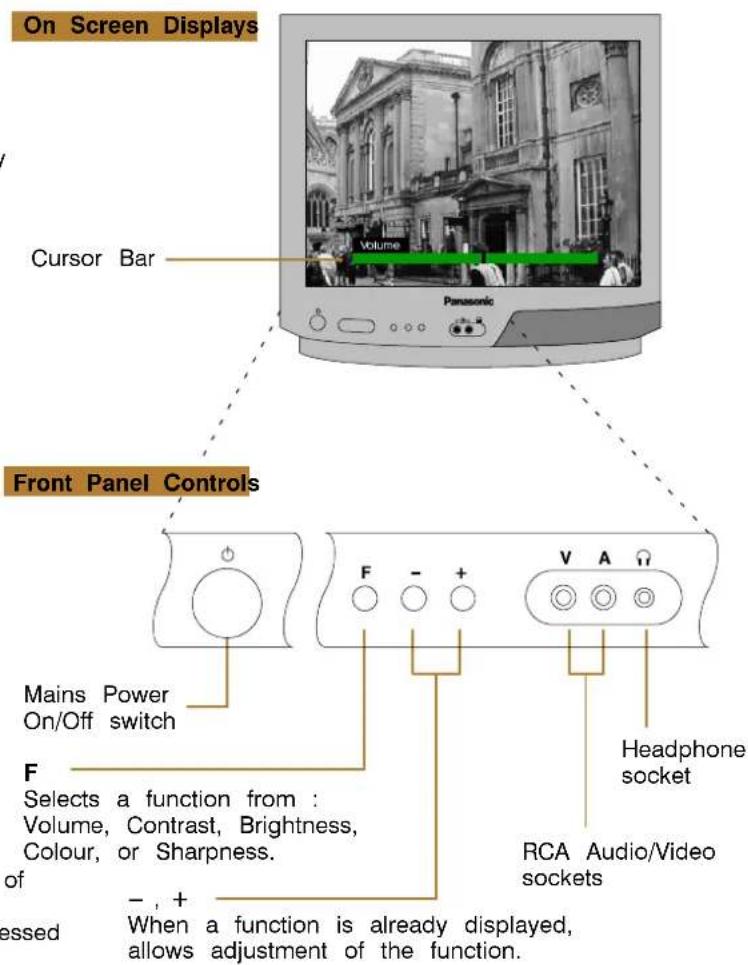
LOCATION OF CONTROLS
Using the On Screen Displays (OSDs)
Sound and picture adjustments are carried out using a series of On Screen Displays, accessed by pressing the F key on the front of the monitor.

Press F repeatedly to select the required function.

The following adjustments may be made in turn: Volume, Contrast, Brightness, Colour and Sharpness. Press + to increase or - to decrease the setting.

FUNCTION SEQUENCE
If the F key is not pressed within a few seconds of each selection the display will disappear.
When the F key on the front of the monitor is pressed again, the display will start off at Volume.
ACCESSIONS
The following accessories are provided:
SCART to BNC/RCA adaptor lead TJS8E006
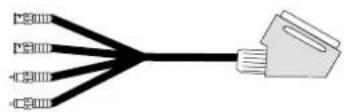
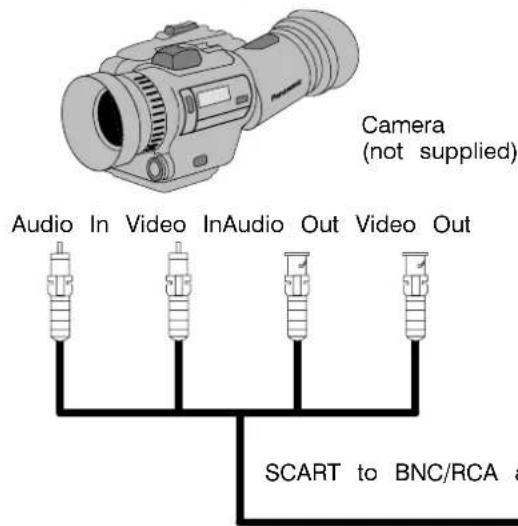
21 pin SCART Terminal
Front RCA and Headphone terminals
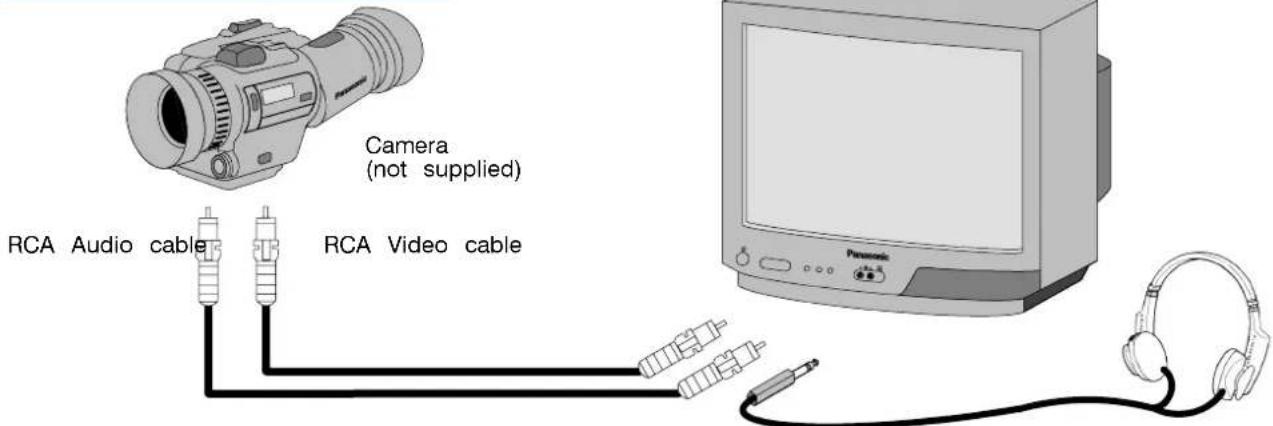
Only the SCART to BNC/RCA adaptor lead is supplied. No other leads are supplied (3.5mm Plug) Do not connect a computer with TTL output (5V) to this monitor. (not supplied)
The monitor's speaker will be automatically disconnected whilst the headphones are connected.
Do not connect front and rear AV inputs simultaneously, as the sound and pictures will be mixed.
This monitor is not classed as professional standard equipment. As such, we recommend a MAXIMUM of 10 pieces when configured in a loop system utilising the video out facility. Brightness adjustment may also be necessary to achieve desired performance.
SPECIFICATION
TROUBLE- SHOOTING
| Model Number | TC-21S3M/Z | TC-14S3M/Z |
| Power Source | 220 --- 240V 50Hz A.C. | |
| Power Consumption | 50W | 33W |
| Picture Tube (visible diagonal) | 51cm | 34cm |
| Audio Output (Music) | 6W, 8Ω impedance, Mono | |
| Dimensions (HxWxD) | 477x518x478 | 364x389x384 |
| Weight | 21kg | 10kg |
| Headphones --- Front | 3.5mm, 8Ωimpedance, Mono | |
| AV - Rear | 21 pin terminal --- Audio/Video in/ Video loop --- 10 pieces maxi | |
| AV - Front | RCA Audio in/RCA Video in | |
| Symptom | Check |
| No picture, no sound | Not plugged into A.C. outle Not switched on. Picture/sound controls set to minimum. |
| No colour | Check colour level. |
| Normal picture, no sound | Check volume level. |
Design and specifications are subject to change without notice. Weights and dimensions shown are approximate.
Panasonic
Sales and Support Information
Customer Care Centre
For UK customers: 08705 357357.
For Republic of Ireland customers: 01 289 8333.
-Visit our website for product information www.panasonic.co.uk.
E-mail: customer.care@panasonic.co.uk.
Direct Sales at Panasonic UK
- Order accessory and consumable items for your product with ease and confidence by phoning our Customer Care Centre Monday--Friday 9:00am---5:30pm (Excluding public holidays).
- Or go on line through our Internet Accessory ordering application at www.panasonic.co.uk.
- Most major credit and debit cards accepted.
- All enquiries, transactions and distribution facilities are provided directly by Panasonic UK Ltd.
It couldn't be simpler! - Also available through our Internet is direct shopping for a wide range of finished products, take a browse on our website for further details.