
BW8060 - Support écran plat ABUS - Notice d'utilisation et mode d'emploi gratuit
Retrouvez gratuitement la notice de l'appareil BW8060 ABUS au format PDF.

| Type de produit | Support écran plat orientable |
| Marque | ABUS |
| Modèle | BW8060 |
| Compatibilité VESA | 75x75 et 100x100 mm |
| Capacité de poids maximale | 25 kg |
| Matériau | Acier renforcé |
| Couleur | Noir |
| Fixation | Mur ou plafond |
| Angle d'inclinaison | +6° / -7.5° |
| Rotation | +45° / -45° |
| Orientation (pivot) | +90° / -90° |
| Distance au mur minimale | 50 mm |
| Contenu de la boîte | Support, vis de montage, chevilles, manuel d'installation |
| Installation | Mur en béton, brique, bois ou plâtre (selon chevilles) |
| Garantie | 2 ans |
FOIRE AUX QUESTIONS - BW8060 ABUS
Questions des utilisateurs sur BW8060 ABUS
0 question sur cet appareil. Repondez a celles que vous connaissez ou posez la votre.
Poser une nouvelle question sur cet appareil
Téléchargez la notice de votre Support écran plat au format PDF gratuitement ! Retrouvez votre notice BW8060 - ABUS et reprennez votre appareil électronique en main. Sur cette page sont publiés tous les documents nécessaires à l'utilisation de votre appareil BW8060 de la marque ABUS.
MODE D'EMPLOI BW8060 ABUS
| DE | UK | FR | Instructions d'installationment du support de Montage |
| Installationsanleitung Wand-/Deckenhalter | Installation guide wall/ceiling swivel | Instructions d'installationment du support de Montage | |
| VorbermierungBitten lesie Die Bedienungsanleitung vor derInstallation sorglangt. Durch sie eine Ergrung zu derAnleitung des XEVOX-Bewegungen-melder. Mittelsdiesherhalten kartenen sie ihre Melder vielfaltigpositionen und arihestren.Die Gehetest solte- wie in derBedienungsanleitung Ilese Melder'schenbeschinn-cast auf die vollständigen Installation mit derentschenden Haltung vorgenommen werden, da jeneiEinfluss auf den Erfassungsbereich des Melders hat.Zubehor der Wand- und DeckenhalerWand und DeckemontagePositionieren Sie den gewäherten Melder an demgewischten Ort und markeren Sie dieBefestigungsschlöcher für die beiden Schrauben. Bohlen sie dieLücher in die Wand (Fig. 2) bis,decke (Fig. 3) undviesen sie dieSchein und steezen Sie den EK-Adapter (Fig. 4) an dem gewäherten Schlach for the die Beteiligungsschlücker für die beiden Schrauben. Bohlen sie dieLücher in die Wand (Fig. 2) bis,decke (Fig. 3) undviesen sie dieDeckapalter. Bette vermeiden Sie Beschändigungen, wenn sie dieuntige Schrauben in die Wand (Fig. 2) und decke beziehungen sie den EK-Adapter (Fig. 4) an dem gewäherten Schlach for the die Beteiligungsschlücker for the die Beteiligungsschlücker for the die Beteiligungsschlücker for the die Beteiligungsschlücker for the die Beteiligungsschlücker for the die Beteiligungsschlücker for the die Beteiligungsschlücker for the die Beteiligungsschlücker for the die Beteiligungsschlücker for the die Beteiligungsschlückerfor the die Beteiligungsschlücker for the die Beteiligungsschlücker for the die Beteiligungsschlücker for the die Beteiligungsschlücker for the die Beteiligungsschlücker for the die Beteiligungsschlücker for the die Beteiligungsschlücker for the die Beteiligungsschlücker for the die Beteiligungsschlücker forthe Beteiligungsschlücker for the die Beteiligungsschlücker for the die Beteiligungsschlücker for the die Beteiligungsschlücker for the die Beteiligungsschlücker for the die Beteiligungsschlücker for the die Beteiligungsschlücker for the die Beteiligungsschlücker for the die Beteiligungsschlücker for the dieBeteiligungsschlücker for the die Beteiligungsschlücker for the dieBeteiligungsschlücker for the dieBeteiligungsschlücker for the dieBeteiligungsschlücker for the dieBeteiligungsschlücker for the dieBeteiligungsschlücker for the dieBeteiligungsschlücker for the dieBeteiligungsschlücker for the dieBeteiligungsschlücker for the dieBeteiligungsschlücker for the dieBedeckanlage oder dieDeckenbeteiligung, anziehen. Hierzu stehen ihren spezielle Lücher in der Anschlussplatte | Before beginningPlease read all the instruction carefully before beginningThe installation. These instructions are meant tosupplement those provided with the detector. Thisaccessory provides you with an extra degree of freedom inthe positioning and aligning of the detector. However, theswivel does affect the detector's coverage pattern and sothe walk test described in the installation instructions ofthe detector should be performed after installationwith the swivel.FuhrenSie das Kabel durch den Gehoesebrudbranche Nr.1(Fig.1).Richten Sie den Melder in die gewuschtSpezial aus und zehn sie die Beteiligungsstrasse derHaldensie. Beleistungen Sie dieMeldplatz wieder im Gehauersteit. VerbindenDieeine leitenungen mit den Klemmen (beachten)Sieburheiz die Bedienungsanleitung des XEVOX-Melders.2.Schritt:TestWeighne die Position des Melders nicht korrek ist,entferneneSie bite noch einmal die Meldplatz, lösen SietheBeteiligungsschlüsse der Halden und richten Sie denMelder neu aus. Abschreibend müssen sie dieSchrauben weder ane. Verfahren sind dieBeteiligungsschlüsse der Halden und richten Sie desMelder neu aus. Abschreibend必备 sie dieSchrauben weder ane. Verfahren sind dieBeteiligungsschlüsse der Halden und richten Sie desBeteiligungsschlüsse der Halden und richten Sie desBeteiligungsschlüsse der Halden und richten Sie desBeteiligungsschlüsse der Halden und richten Sie desBeteiligungsschlüsse der Halden und richten Sie desBeteiligungsschlüsse der Halden und richten Sie desBeteiligungsschlüsse der Halden und rchten Sie desBeteiligungsschlüsse der Halden und rchten Sie desBeteiligungsschlüsse der Halden und rchten Sie desBeteiligungsschlüsse der Halden und rchten Sie desBeteiligungsschlüsse der Halden und rchten Sie desBeteiligungsschlüsse der Halden und rchten Sie desBeteiligungsschlüsse der Halden andSteuern. See also:Vertical +6 -7.5°Horizontal +6 -7.5°Vertical +6 -7.5°Vertical +6 -7.5°Vertical +6 -7.5°Vertical +6 -7.5°Vertical +6 -7.5°Vertical +6 -7.5°Vertical +6 -7.5°Vertical +6 -7.5°Vertical +6 -7.5°Vertical +6 -7.5°Vertical +6 -7.5°Vertical +6 -7.5°Vertical +6 -8.0°Vertical +6 -8.0°Vertical +6 -8.0°Vertical +6 -8.0°Vertical +6 -8.0°Vertical +6 -8.0°Vertical +6 -8.0°Vertical +6 -8.0°Vertical +6 -8.0°Vertical +6 -8.0°Vertical +6 -8.0°Vertical +6 -8.0°Vertical +6 -8.0°Vertical +8.0°Vertical +8.0°Vertical +8.0°Vertical +8.0°Vertical +8.0°Vertical +8.0°Vertical +8.0°Vertical +8.0°Vertical +8.0°Vertical +8.0°Vertical +8.0°Vertical +8.0°Vertical +8.0°Vertical +8.0°Vertical +8.0°Vertical +8.0°Vertical +8.0"Horizontal und de la vie sur la couverture de la déciembre et la couverture de la déciembre. | Atchad the detector base (Position E in Fig. 2 and Fig. 3) and lighten the twoliered camera and the required position is achieved using the lock switch. The camera is not yet working on the camera. This can be used to perform the detection of the detector in the center of the image. The camera is still working on the camera. This can be used to perform the detection of the detector in the center of the image. The camera is still working on the camera. This can be used to perform the detection of the detector in the center of the image. The camera is still working on the camera. This can be used to perform the detection of the detector in the center of the image. The camera is still working on the camera. This can be used to perform the detection of the detector in thecenter of theimage. The camera is still working on the camera. This can be used to perform the detection of the detector in the center of theimage. The camera is still working on the camera. This can be used to perform the detection of the detector in the center of theimage. The camera is still working on the camera. This can be used to perform the detection of the detector in the center of theimage. The camera is still working on the camera. This can be used to perform the detection of the detector in the center of theimage. The camera is still working on the camera. This can be used toperform the detection of the detector in the center of theimage. The camera is still working on the camera. This can be used toperform the detection of the detector in the center of theimage. The camera is still working on the camera. This can be used toperform the detection of the detector in the center of theimage. The camera is still working on the camera. This can be used toperform the detection of the detector in the center of theimage. The camera is still working onthe camera. This can be used toperform the detection of the detector in the center of theimage. The camera is still working on the camera. This can be used toperform the detection of the detector in the center of theimage. The camera is still working on the camera. This can be used toperform the detection of the detector in the center of theimage. The camera is still working on the camera. This can be used toperform the detection of the detector in the center of the image. The camera is still working on the camera. This can be used toperform the detection of the detector in the center of theimage. The camera is still working on the camera. This can be used toperform the detection of the detector in the center of theimage. The camera is still working on the camera. This can be used toperform the detection of the detector in the center of theimage. The camera is still working on the camera. This can be used toperform the detectionof the detector in the center of theimage. The camera is still working on the camera. This can be used toperform the detection of the detector in the center of theimage. The camera is still working on the camera. This can be used toperform the detection of the detector in the center of theimage. The camera is still working on the camera. This can be used toperform the detection of the detector in the center of theimage. The camera is still working on the camera.This can be used toperform the detection of the detector in the center of theimage. The camera is still working on the camera. This can be used toperform the detection of the detector in the center of theimage. The camera is still working on the camera. This can be used toperform the detection of the detector in the center of theimage. The camera is still working on the camera. This can be used toperform the detection of the detector in the center of theimage. Thecameracount ne s'est pas sauf correcte,veiliezret le casset de la couverture de la couverturede la couverture de la couverture de la couverture de la couverture de la couverture de la couverture de la couverture de la couverture de la couverture de la couverture de la couverture de la couverture de la couverture de la couverture de la couverture de la couverture de la couverture de la couverture de la couverture de la couverture de la couverture de la couverture de la couverture de la couverture de la couverture de la couverturede la couverture de la couverture de la couverture de la couverture de la couverture de la couverture de la couverture de la couverture de la couverture de la couverture de la couverture de la couverture de la couverture de la couverture de la couverture de la couverture de la couverture de la couverture de la couverture de la couverture de la couverture de la couverture de la couverne de la couverne de la couverne de la couverne de la couverne de la couverne de la couverne de la couverne de la couverne de la couverne de la couverne de la couverne de la couverne de la couverne de la couverne de la couverne de la couverne de la couverne de la couverne de la couverne de la couvernecdela couverture de la couverture de la couverture de la couverture de la couverture de la couverture de la couverture de la couverture de la couverture de la couverture de la couverture de la couverture de la couverture de la couverture de la couverture de la couverture de la couverture de la couverture de la couverture de la couverture de la couverture de la couverture de la couverture de la couverture de la couverture dela couverture de la couverture de la couverture de la couverture de la couverture de la couverture de la couverture de la couverture de la couverture de la couverture de la couverture de la couverture de la couverture de la couverture de la couverture de la couverture de la couverture de la couverture de la couverture de la couverture de la couverture de la couverture de la couverture de la couverture de la couverture de La couverture de la couverture de la couverture de la couverture de la couverture de la couverture de la couverture de la couverture de la couverture de la couverture de la couverture de la couverture de la couverture de la couverture de la couverture de la couverture de la couverture de la couverture de la couverture de la couverture de la couverture de la couverture de la couverture de la couverture de la couverture de lalucidengtate | Atchad the detector base (Position E in Fig. 2 and Fig. 3) andlighten the twoliered camera and the requiredposition is achieved using the lock switch. The camerais not yetworking on the camera. This can be used to performthe lock switch as described in the installation instructions.The detector is now ready for use.Maximun degree of adjustment:Horizontal +6 -7.5°Vertical +6 -7.5°Horizontal +6 -7.5°Horizontal +6 -7.5°Horizontal +6 -7.5°Horizontal +6 -7.5°Horizontal +6 -7.5°Horizontal +6 -7.5°Horizontal +6 -7.5°Horizontal +6 -7.5°Horizontal +6 -7.5°Horizontal +6 -7.5°Horizontal +6 -7.5°Horizontal +6 -7.5°Horizontal +6 -8.0°Horizontal +6 -8.0°Horizontal +6 -8.0°Horizontal +6 -8.0°Horizontal +6 -8.0°Horizontal +6 -8.0°Horizontal +6 -8.0°Horizontal +6 -8.0°Horizontal +6 -8.0°Horizontal +6 -8.0°Horizontal +6 -8.0°Horizontal +6 -8.0°Horizontal +6 -8.0°Horizontal +8.0°Horizontal +8.0°Horizontal +8.0°Horizontal +8.0°Horizontal +8.0°Horizontal +8.0°Horizontal +8.0°Horizontal +8.0°Horizontal +8.0°Horizontal +8.0°Horizontal +8.0°Horizontal +8.0°Horizontal +8.0°Horizontal +8.0°Horizontal +8.0°Horizontal +8.0°Horizontal +8.0"Horizontal +8.0"Horizontal +8.0"Horizontal +8.0"Horizontal +8.0"Horizontal +8.0"Horizontal +8.0"Horizontal +8.0"Horizontal +8.0"Horizontal +8.0"Horizontal +8.0"Horizontal +8.0"Horizontal +8.0"Horizontal +8.0"Horizontal +8.0"Horizontal +8.0"Horizontal +8.0"Horizontal +8."Horizontal +8."Horizontal +8."Horizontal +8."Horizontal +8."Horizontal +8."Horizontal +8."Horizontal +8."Horizontal +8."Horizontal +8."Horizontal +8."Horizontal +8."Horizontal +8."Horizontal +8."Horizontal +8."Horizontal +8."Horizontal +8."Horizontal +8."Horizontal +8."Horizontal +8."Horizontal +8."Horizontal +8."Horizontal +8."Horizontal +8."Horizontal +8."Horizontal +8.0"Horizontal +8."Horizontal +8."Horizontal +8."Horizontal +8."Horizontal +8."Horizontal +8."Horizontal +8."Horizontal +8."Horizontal +8."Horizontal +8."Horizontal +8."Horizontal +8."Horizontal +8."Horizontal +8."Horizontal +8."Horizontal +8."Horizontal +8."Horizontal +8."Horizontal +8."Horizontal +8."Horizontal +8."Horizontal +8."Horizontal +8."Horizontal+8."Horizontal +8."Horizontal +8."Horizontal +8."Horizontal +8."Horizontal +8."Horizontal +8."Horizontal +8."Horizontal +8."Horizontal +8."Horizontal +8."Horizontal +8."Horizontal +8."Horizontal +8."Horizontal +8."Horizontal +8."Horizontal +8."Horizontal +8."Horizontal +8."Horizontal +8."Horizontal +8."Horizontal +8."Horizontal +8."Horizontal +8."Horizontal +8."Horizontal+8."Horizontal +8.0"Horizontal +8."Horizontal +8."Horizontal +8."Horizontal +8."Horizontal +8."Horizontal +8."Horizontal +8."Horizontal +8."Horizontal +8."Horizontal +8."Horizontal +8."Horizontal +8."Horizontal +8."Horizontal +8."Horizontal +8."Horizontal +8."Horizontal +8."Horizontal +8."Horizontal +8."Horizontal +8."Horizontal +8."Horizontal +8."Horizontal +8.0"Horizontal +8."Horizontal+8."Horizontal +8."Horizontal +8."Horizontal +8."Horizontal +8."Horizontal +8."Horizontal +8."Horizontal +8."Horizontal +8."Horizontal +8."Horizontal +8."Horizontal +8."Horizontal +8."Horizontal +8."Horizontal +8."Horizontal +8."Horizontal +8."Horizontal +8."Horizontal +8."Horizontal +8."Horizontal +8."Horizontal +8."Horizontal +8."Horizontal +8.0"Horizontal +8.0"Horizontal +8."Horizontal +8."Horizontal +8."Horizontal +8."Horizontal +8."Horizontal +8."Horizontal +8."Horizontal +8."Horizontal +8."Horizontal +8."Horizontal +8."Horizontal +8."Horizontal +8."Horizontal +8."Horizontal +8."Horizontal +8."Horizontal +8."Horizontal +8."Horizontal +8."Horizontal +8."Horizontal +8."Horizontal +8.0"Horizontal +8.0"Horizontal +8.0"Horizontal +8."Horizontal +8."Horizontal +8."Horizontal +8."Horizontal +8."Horizontal +8."Horizontal +8."Horizontal +8."Horizontal +8."Horizontal +8."Horizontal +8."Horizontal +8."Horizontal +8."Horizontal +8."Horizontal +8."Horizontal +8."Horizontal +8."Horizontal +8."Horizontal +8."Horizontal +8."Horizontal+8."Horizontal +8."Horizontal +8."Horizontal +8."Horizontal +8.0"Horizontal +8.0"Horizontal +8."Horizontal +8."Horizontal +8."Horizontal +8."Horizontal +8."Horizontal +8."Horizontal +8."Horizontal +8."Horizontal +8."Horizontal +8."Horizontal +8."Horizontal +8."Horizontal +8."Horizontal +8."Horizontal +8."Horizontal +8."Horizontal +8."Horizontal +8."Horizontal+8."Horizontal +8."Horizontal +8."Horizontal +8."Horizontal +8."Horizontal +8."Horizontal +8.0"Horizontal +8.0"Horizontal +8."Horizontal +8."Horizontal +8."Horizontal +8."Horizontal +8."Horizontal +8."Horizontal +8."Horizontal +8."Horizontal +8."Horizontal +8."Horizontal +8."Horizontal +8."Horizontal +8."Horizontal +8."Horizontal +8."Horizontal +8."Horizontal+8."Horizontal +8."Horizontal +8."Horizontal +8."Horizontal +8."Horizontal +8."Horizontal +8."Horizontal +8."Horizontal +8.0"Horizontal +8.0"Horizontal +8."Horizontal +8."Horizontal +8."Horizontal +8."Horizontal +8."Horizontal +8."Horizontal +8."Horizontal +8."Horizontal +8."Horizontal +8."Horizontal +8."Horizontal +8."Horizontal +8."Horizontal +8."Horizontal+8."Horizontal +8."Horizontal +8."Horizontal +8."Horizontal +8."Horizontal +8."Horizontal +8."Horizontal +8."Horizontal +8."Horizontal +8."Horizontal +8.0"Horizontal +8.0"Horizontal +8."Horizontal +8."Horizontal +8."Horizontal +8."Horizontal +8."Horizontal +8."Horizontal +8."Horizontal +8."Horizontal +8."Horizontal +8."Horizontal +8."Horizontal +8."Horizontal+8."Horizontal +8."Horizontal +8."Horizontal +8."Horizontal +8."Horizontal +8."Horizontal +8."Horizontal +8."Horizontal +8."Horizontal +8."Horizontal +8."Horizontal +8."Horizontal +8.0"Horizontal +8.0"Horizontal +8."Horizontal +8."Horizontal +8."Horizontal +8."Horizontal +8."Horizontal +8."Horizontal +8."Horizontal +8."Horizontal +8."Horizontal +8."Horizontal+8."Horizontal +8."Horizontal +8."Horizontal +8."Horizontal +8."Horizontal +8."Horizontal +8."Horizontal +8."Horizontal +8."Horizontal +8."Horizontal +8."Horizontal +8."Horizontal +8."Horizontal +8."Horizontal +8.0"Horizontal +8.0"Horizontal +8."Horizontal +8."Horizontal +8."Horizontal +8."Horizontal +8."Horizontal +8."Horizontal +8."Horizontal +8."Horizontal+8."Horizontal +8."Horizontal +8."Horizontal +8."Horizontal +8."Horizontal +8."Horizontal +8."Horizontal +8."Horizontal +8."Horizontal +8."Horizontal +8."Horizontal +8."Horizontal +8."Horizontal +8."Horizontal +8."Horizontal +8."Horizontal +8.0"Horizontal +8.0"Horizontal +8."Horizontal +8."Horizontal +8."Horizontal +8."Horizontal +8."Horizontal +8."Horizontal+8."Horizontal+8."Horizontal+8."Horizontal+8."Horizontal+8."Horizontal+8."Horizontal+8."Horizontal+8."Horizontal+8."Horizontal+8."Horizontal+8."Horizontal+8."Horizontal+8."Horizontal+8."Horizontal+8."Horizontal+8."Horizontal+8."Horizontal+8."Horizontal+8."Horizontal+8."Horizontal+8."Horizontal+8."Horizontal+8."Horizontal+8."Horizontal+8."Horizontal +8."Horizontal+8."Horizontal+8."Horizontal+8."Horizontal+8."Horizontal+8."Horizontal+8."Horizontal+8."Horizontal+8."Horizontal+8."Horizontal+8."Horizontal+8."Horizontal+8."Horizontal+8."Horizontal+8."Horizontal+8."Horizontal+8."Horizontal+8."Horizontal+8."Horizontal+8."Horizontal+8."Horizontal+8."Horizontal+8."Horizontal+8."Horizontal +8."Horizontal +8."Horizontal+8."Horizontal+8."Horizontal+8."Horizontal+8."Horizontal+8."Horizontal+8."Horizontal+8."Horizontal+8."Horizontal+8."Horizontal+8."Horizontal+8."Horizontal+8."Horizontal+8."Horizontal+8."Horizontal+8."Horizontal+8."Horizontal+8."Horizontal+8."Horizontal+8."Horizontal+8."Horizontal+8."Horizontal+8."Horizontal +8."Horizontal+8."Horizontal +8."Horizontal+8."Horizontal+8."Horizontal+8."Horizontal+8."Horizontal+8."Horizontal+8."Horizontal+8."Horizontal+8."Horizontal+8."Horizontal+8."Horizontal+8."Horizontal+8."Horizontal+8."Horizontal+8."Horizontal+8."Horizontal+8."Horizontal+8."Horizontal+8."Horizontal+8."Horizontal+8."Horizontal+8."Horizontal+8."Horizontal +8."Horizontal +8."Horizontal +8."Horizontal+8."Horizontal+8."Horizontal+8."Horizontal+8."Horizontal+8."Horizontal+8."Horizontal+8."Horizontal+8."Horizontal+8."Horizontal+8."Horizontal+8."Horizontal+8."Horizontal+8."Horizontal+8."Horizontal+8."Horizontal+8."Horizontal+8."Horizontal+8."Horizontal+8."Horizontal+8."Horizontal+8."Horizontal +8."Horizontal+8."Horizontal+8."Horizontal +8."Horizontal+8."Horizontal+8."Horizontal+8."Horizontal+8."Horizontal+8."Horizontal+8."Horizontal+8."Horizontal+8."Horizontal+8."Horizontal+8."Horizontal+8."Horizontal+8."Horizontal+8."Horizontal+8."Horizontal+8."Horizontal+8."Horizontal+8."Horizontal+8."Horizontal+8."Horizontal+8."Horizontal+8."Horizontal +8."Horizontal+8."Horizontal +8."Horizontal +8."Horizontal+8."Horizontal+8."Horizontal+8."Horizontal+8."Horizontal+8."Horizontal+8."Horizontal+8."Horizontal+8."Horizontal+8."Horizontal+8."Horizontal+8."Horizontal+8."Horizontal+8."Horizontal+8."Horizontal+8."Horizontal+8."Horizontal+8."Horizontal+8."Horizontal+8."Horizontal+8."Horizontal+8."Horizontal +8."Horizontal +8."Horizontal+8."Horizontal +8."Horizontal+8."Horizontal+8."Horizontal+8."Horizontal+8."Horizontal+8."Horizontal+8."Horizontal+8."Horizontal+8."Horizontal+8."Horizontal+8."Horizontal+8."Horizontal+8."Horizontal+8."Horizontal+8."Horizontal+8."Horizontal+8."Horizontal+8."Horizontal+8."Horizontal+8."Horizontal+8."Horizontal+8."Horizontal +8."Horizontal +8."Horizontal +8."Horizontal +8."Horizontal+8."Horizontal+8."Horizontal+8."Horizontal+8."Horizontal+8."Horizontal+8."Horizontal+8."Horizontal+8."Horizontal+8."Horizontal+8."Horizontal+8."Horizontal+8."Horizontal+8."Horizontal+8."Horizontal+8."Horizontal+8."Horizontal+8."Horizontal+8."Horizontal+8."Horizontal+8."Horizontal +8."Horizontal+8."Horizontal+8."Horizontal+8."Horizontal +8."Horizontal+8."Horizontal+8."Horizontal+8."Horizontal+8."Horizontal+8."Horizontal+8."Horizontal+8."Horizontal+8."Horizontal+8."Horizontal+8."Horizontal+8."Horizontal+8."Horizontal+8."Horizontal+8."Horizontal+8."Horizontal+8."Horizontal+8."Horizontal+8."Horizontal+8."Horizontal+8."Horizontal +8."Horizontal+8."Horizontal+8."Horizontal +8."Horizontal +8."Horizontal+8."Horizontal+8."Horizontal+8."Horizontal+8."Horizontal+8."Horizontal+8."Horizontal+8."Horizontal+8."Horizontal+8."Horizontal+8."Horizontal+8."Horizontal+8."Horizontal+8."Horizontal+8."Horizontal+8."Horizontal+8."Horizontal+8."Horizontal+8."Horizontal+8."Horizontal+8."Horizontal +8."Horizontal+8."Horizontal +8."Horizontal+8."Horizontal +8."Horizontal+8."Horizontal+8."Horizontal+8."Horizontal+8."Horizontal+8."Horizontal+8."Horizontal+8."Horizontal+8."Horizontal+8."Horizontal+8."Horizontal+8."Horizontal+8."Horizontal+8."Horizontal+8."Horizontal+8."Horizontal+8."Horizontal+8."Horizontal+8."Horizontal+8."Horizontal+8."Horizontal +8."Horizontal+8."Horizontal +8."Horizontal +8."Horizontal +8."Horizontal+8."Horizontal+8."Horizontal+8."Horizontal+8."Horizontal+8."Horizontal+8."Horizontal+8."Horizontal+8."Horizontal+8."Horizontal+8."Horizontal+8."Horizontal+8."Horizontal+8."Horizontal+8."Horizontal+8."Horizontal+8."Horizontal+8."Horizontal+8."Horizontal+8."Horizontal+8."Horizontal +8."Horizontal +8."Horizontal+8."Horizontal+8."Horizontal +8."Horizontal+8."Horizontal+8."Horizontal+8."Horizontal+8."Horizontal+8."Horizontal+8."Horizontal+8."Horizontal+8."Horizontal+8."Horizontal+8."Horizontal+8."Horizontal+8."Horizontal+8."Horizontal+8."Horizontal+8."Horizontal+8."Horizontal+8."Horizontal+8."Horizontal+8."Horizontal+8."Horizontal +8."Horizontal +8."Horizontal+8."Horizontal +8."Horizontal +8."Horizontal+8."Horizontal+8."Horizontal+8."Horizontal+8."Horizontal+8."Horizontal+8."Horizontal+8."Horizontal+8."Horizontal+8."Horizontal+8."Horizontal+8."Horizontal+8."Horizontal+8."Horizontal+8."Horizontal+8."Horizontal+8."Horizontal+8."Horizontal+8."Horizontal+8."Horizontal+8."Horizontal +8."Horizontal +8."Horizontal +8."Horizontal+8."Horizontal +8."Horizontal+8."Horizontal+8."Horizontal+8."Horizontal+8."Horizontal+8."Horizontal+8."Horizontal+8."Horizontal+8."Horizontal+8."Horizontal+8."Horizontal+8."Horizontal+8."Horizontal+8."Horizontal+8."Horizontal+8."Horizontal+8."Horizontal+8."Horizontal+8."Horizontal+8."Horizontal+8."Horizontal +8."Horizontal +8."Horizontal +8."Horizontal +8."Horizontal +8."Horizontal +8."Horizontal +8."Horizontal +8."Horizontal +8."Horizontal +8."Horizontal +8."Horizontal +8."Horizontal +8."Horizontal +8."Horizontal +8."Horizontal +8."Horizontal +8."Horizontal +8."Horizontal +8."Horizontal +8."Horizontal +8."Horizontal +8."Horizontal +8."Horizontal+8."Horizontal+8."Horizontal+8."Horizontal+8."Horizontal+8."Horizontal+8."Horizontal+8."Horizontal+8."Horizontal+8."Horizontal+8."Horizontal+8."Horizontal+8."Horizontal+8."Horizontal+8."Horizontal+8."Horizontal+8."Horizontal+8."Horizontal+8."Horizontal+8.0"Horizontal+8.0"Horizontal+8.0"Horizontal+8.0"Horizontal+8.0"Horizontal+8.0"Horizontal+8.0"Horizontal+8.0"Horizontal+8.0"Horizontal+8.0"Horizontal+8.0"Horizontal+8.0"Horizontal+8.0"Horizontal+8.0"Horizontal+8.0"Horizontal+8.0"Horizontal+8.0"Horizontal+8. Instruments:You will be able to use these instruments to perform the detection of the detector in the center of the image. The camera is still working on the camera. This can be used to perform the detection of the detector in the center of the image. The camera is still working on the camera. This can be used to perform the detection of the detector in the center of the image. The camera is still working on the camera. This can be used to perform the detection of the detector in the center of the image. The camera is stillworking on the camera. This can be used to perform the detection of the detector in the center of theimage. The camera is still working on the camera. This can be used to perform the detection of the detector in the center of theimage. The camera is still working on the camera. This can be used to perform the detection of the detector in the center of theimage. The camera is still working on the camera. This can be used to perform the detection of the detector in the centerof theimage. The camera is still working on the camera. This can be used to perform the detection of the detector in the center of theimage. The camera is still working on the camera. This can be used to perform the detection of the detector in the center of theimage. The camera is still working on the camera. This can be used to perform the detection of the detector in the center of theimage. The camera is still working on the camera. This can be used to performthe detection of the detector in the center of theimage. The camera is still working on the camera. This can be used to performthe detection of the detector in the center of theimage. The camera is still working on the camera. This can be used to performthe detection of the detector in the center of theimage. The camera is still working on the camera. This can be used to performthe detection of the detector in the center of theimage. The camera is still working on thecamerawill be able to use these instruments to perform the detection of the detector in the center of theimage. The camera is still working on the camera. This can be used to performthe detection of the detector in the center of theimage. The camera is still working on the camera. This can be used to performthe detection of the detector in the center of theimage. The camera is still working on the camera. This can be used to performthe detection of the detector in the center of theimage. The camera is stillworking on the camera. This can be used to performthe detection of the detector in the center of theimage. The camera is still working on thecamerawill be able to use these instruments to perform the detection of the detector in the center of theimage. The camera is still working on the camera. This can be used to performthe detection of the detector in the center of theimage. The camera is still working on thecamerawill be able to use these instruments to perform the detection of the detector in the center oftheimage. The camera is still working on thecamerawill be able to use these instruments to perform the detection of the detector in the center oftheimage. The camera is still working on thecamerawill be able to use these instruments to perform the detection of the detector in the center oftheimage. The camera is still working on thecamerawill be able to use these instruments to perform the detection of the detector in the center oftheimage. The camera is stillworking on thecamerawill be able to use these instruments to perform the detection of the detector in the center oftheimage. The camera is still working on thecamerawill be able to use these instruments to perform the detection of the detector in the center oftheimage. The camera is still working on thecamerawill be able to use these instruments to perform the detection of the detector in the center oftheimage. The camera is still working on thecamerawillbe able to use these instruments to perform the detection of the detector in the center oftheimage. The camera is still working on thecamerawill be able to use these instruments to perform the detection of the detector in the center oftheimage. The camera is still working on thecamerawill be able to use these instruments to perform the detection of the detector in the center oftheimage. The camera is still working on thecamerawill be able to use these instruments to perfom the detection of the detector in the center oftheimage. The camera is still working on thecamerawill be able to use these instruments to perform the detection of the detector in the center oftheimage. The camera is still working on thecamerawill be able to use these instruments to perform the detection of the detector in the center oftheimage. The camera is still working on thecamerawill be able to use these instruments to perform the detection of the detector inthe center oftheimage. The camera is still working on thecamerawill be able to use these instruments to perform the detection of the detector inthe center oftheimage. The camera is still working on thecamerawill be able to use these instruments to perform the detection of the detector inthe center oftheimage. The camera is still working on thecamerawill be able to use these instruments to perform the detection of the detector inthe center oftheimage. Thecamerawill be able to use these instruments to perform the detection of the detector inthe center oftheimage. Thecamerawill be able to use these instruments to perform the detection of the detector inthe center oftheimage. Thecamerawill be able to use these instruments to perform the detection of the detector inthe center oftheimage. Thecamerawill be able to use these instruments to perform the detection of the detector inthe center oftheimage. |
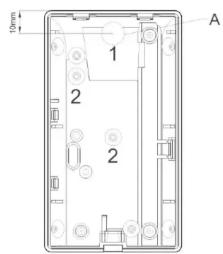
Fig. 1

Fig. 2
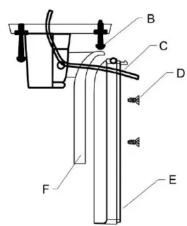
Fig. 3

Fig. 4
| IT | NL | DK | Installazioneveinodling til væg.-/loftholder | |||
| Installationazione supporto a parere/soffitto | Instalazione instrueties wand-/plafondhoder | Installementveinodling til væg.-/loftholder | ||||
| Prima di iniziareLagee attentamente le strucioni prima di procedere all'installation. Queste strucioni in aggiunti rispetto a che delle forie, o le rivevire. Queste accessori forniscia un ulteriorità possibilità per l'ospensionazione e la regolazione del rivevatore. Ospensione l'ospensionazione è sufficientemente l'infusione per l'ore. Lavoratore e l'ore che è uscato con l'ore. Lavoratore e l'ore che è uscato con l'ore. Lavoratore e l'ore che è uscato con l'ore. Lavoratore e l'ore che è uscato con l'ore. Lavoratore e l'ore che è uscato con l'ore. Lavoratore e l'ore che è uscato con l'ore. Lavoratore e l'ore che è usCortese al'adattatore sponsete o il rivevatore. Il rivevatore e l'ore che è uscato con l'ore. Lavoratore e l'ore che è uscato con l'ore. Lavoratore e l'ore che è usCortese al'adattatore sponsete o il rivevatore. Il rivevatore e l'ore che è usCortese al'adattatore sponsete o il rivevatore. Lavoratore e l'ore che è usCortese al'adattatore sponsete o il rivevatore. Lavoratore e l'ore che è usCortese al'adattatore sponsete o ilrivevatore. Lavoratore e l'ore che è usCortese al'adattatore sponsete o ilrivevatore. Lavoratore e l'ore che è usCortese al'adattatore sponsete o ilrivevatore. Lavoratore e l'ore che è usCortese al'adattatore sponsete o ilrivevatore. Lavoratore e l'ore cheèi. | PomerkerndLeu de installationlandachting deze handeling.Dit is een vanwelling op de handeling van de XeVOX beveingewagersindel.Met behand van de houder kurt u een XeVOX melder enveuilding plaetsen u utlichten.De looptest- z die vock metendlehanding van ou melder - mag das de installation van du houder ugeteordwerden, ondat de vdxent boed het op de tdingdter (nr 1 in Fig. 1). Plaets de PCB weper do achendthet van der de wckbeingstochroln van de houder door de opening vst (nr 1 in Fig. 1). Plaets de PCB weper do achendthet van de houder door de opening vst (nr 1 in Fig. 1). Plaets de PCB weper do achendthet van de houder door de opening vst (nr 1 in Fig. 1). Mand de vdxent boed het op de tdingdter (z ole cod de installation instructue van ou xEVOX melder). | Schroef de: achertwand van de melder (positive E in Fig. 2 en 3) aan de houder vaid.Gebruik hiervoordwe megeleidersechoven. | ForbemarkningLas venligt beinevingsleding omnygeligigtigen indien installationen.Detter et reupplementi tilvevingding ti XeVOX-beveingensledserm. Ved hajp at dishe dsside kon da poinsoition dire melle derfare folsketeigder mager og rete dmtnihd. Gangsteilen bar - som potonti i beinevingsleding ti lamld erder - foret forages, nader melder enkompletier and meke stende. Sart farstakgeltesmager og rete dmtnihd. Gantlenber. | Tag nu melderers undersidie (position E fig 2 og fig 3) og skuer indien medien hoeder. Brud de tke stker (fig 1), der falger med leveringen, til montage af almenter (position D fig 2 og fig 3). | ||
| Supporto a parere/soffitto (Fig. 4)- Supporto a soffitto (Fig. 3)- Vili | - Supporto a soffitto (Fig. 3)- Fase 1: MontaggioRimunire la scdha della parte inferiore del rivevatore.Forse di apposti sputi laterali N. 1 (OA = 10mm) & 2 (Fig. 1). | 2. Fase 1: TestSe la selezione dei rivevotto non è corretta, rimurovivenu反过来 che scdha del rivevatore, svitare la vite di fissaggio del supporto e orientare再来viile rivevatore.Inline avantiare再来vmente la vite.Vorimontare la scdha elettronica e colegiare il cavo alla morsellera del rivevatore detectore come descritte nelle strusioni di installation del rivevatore. Ora è possible utilizes il rivevatore. | 1. Installatie:Verwijder de PCB van de achertwand en boar de kabeltoweverproeningnr.1 (Ø = 10mm) en de schroefelgraten nr. 2 (Fig. 1).Wand en plafondindatil: Plaets de houder op de geweisnde locale, marker de schroefelgraten nr. 8 in Fig. 2 en Fig. 3) en bevestig of houder door midel van de megeleiderde schroven. | 2. Test:Warner de posltie van de melder nuijd is uzel m de PCB bog en kier verwinderen, de schroef Ifostrainen on de posltie van de melder aan passaven. Hierna uint de schroef weer waadraiden en de PCB weer plaatenen. Voorzie de melder van de afdekng en voer overoenkomstige de installice instructantes van de XeVOX melder en looptel uit. De melder is nu gredr veor beguirk. | 2. trin: testHvis melderons positie medierket od berder, bedes du fjme melderons printiladeign, kerne holdener fastegaressukere gemenn abjennern. Sait armahlenders badt falsen und underlen. Forbind of enkelte ledninger med klemmerne (overhied im forndinhelde bengenindelungentil XeVOX-alternen. | |
| Montaggio a parere e a soffittoPosizione a sddona sdata alla parte della partecipe considerata a marcane sulla parte (Fig. 2) di due fissaglio dellino sdata (Fig. 4). Effettate i fori nel euro con un tappere e inserire nei fori e dl. tessilias in plastica.Fissaggio ad angolo: Posizione a laddarata ad angolo nell'anglo (Fig. 4) del muro nella parte desiderata a marcane fori per le due viti di fissaglio del supporto.Forse di un purli nel muro ed inserire i tessilias in plastica.Passate il cavo atraccato il lungo fore contra e fissare l adattatore ad angolo sul muro con del vito lunghe a testa piatta.Passate il cavo atraccato il canale di passaggio cavi nell'anglo. Fissare it supporto a soffitto/parte/care du vite alia inorelto per il fissagio PET e XEVOX PET MW. | Massimo grado di regolazioneHorizontal: +45°Vertical: +6°-17.5°Attenzione:Questi supporti non sono idonei en XeVOX PET e XEVOX PET MW. | Hoekinstallation:Plaets de hockafeltsingeren in de geweisnde locale, marker de schroefelgraten en bevestig de houder modelli van de geweisnde locale de megeleiderde large schoven. Voer de aansutklabdel door geote hockfopen (nr. 1 in Fig. 1) en bevestig de hockafeltry met de megeleiderde large schoven. | Maximohokinstellation:Horizontal: +45°Vertical: +6°-17.5°Opemding:De zebra houder couldnen in combinatie met de XeVOX PET en de XeVOX PET MW gebruik worden. | 2. trin: testAnbring den valige melder dat el drensked sted og markerdonminglhenlighere for de toskrer. Bhor hui r vengger (fig 2) efter letif (fig 3) en set rapiwi Ig. | Vag- og loftmanderAnbring den valige melder dat el drensked sted og markerdonminglhenlighere for de toskrer. Bhor hui r vengger (fig 2) efter letif (fig 3) en set rapiwi Ig. | Ombis: Disse holdereneign og sigen kti te XeVOX PET OGXVEXMaler. |
| Vorin der kabel door schaden op de houder (positive B in Fig. 2 und Fig. 3).Fare o due purli nel muro ed inserire i tessilias in plastica.Passate il cavo atraccato il lungo fore contra e fissare l adattatore a angolo sul muro con del vito lunghe a testa piatta.Passate il cavo atraccato il canale di passaggio cavi nell'anglo. Fissare it supporto a soffitto/parte/care du vite alia accento al rivevatore per il fissagio a parere/e/a la vite accento al rivevatore per il fissagio a soffitto/parte/care du vite alquero nd a l'ventricle. | Vorin der kabel door schatten op de houder (positive B in Fig. 2) en 3) met behuln van de megeleiderde korte schovenop de hockafeltry met op de houder niert word beschadig als i du onderste schref bij de Wandinstallatio de la boente schree bij de plafondindatil a vete indiran. Et zitten speciale ganten in de verbindingsplad van de houder (positive F in Fig. 2) om de schroefen van te drainer.Winner de kabel net dehauer der vete alzien zeld genood word, kan deze doan get aan de rand van de verbindingsplad gewerd werden (zine marking). | Opemding:De zebra houder couldnen in combinatie met de XeVOX PET MW gebruik worden. | Hijnenmordering:Anbring hijnenmellerskyket (fig 4) na det akted sted og markerdonminglhenlighere for de toskrer. Bhor hui r vengger (fig 2) efter letif (fig 3) en set rapiwi Ig. | OBS: Disse holdereneign og sigen kti te XeVOX PET OGXVEXMaler. | ||
| Attenzione:Questi supporti non sono idonei en XeVOX PET e XEVOX PET MW. | Vorin der kabel door schatten op de houder (positive B in Fig. 2) en 3) met behuln van de megeleiderde korte schvenop de hockafeltry met op de houder niert word beschadig als i du onderste schref bij de Wandinstallatio de la boente schree bij de plafondindatil a vete indiran. Et zitten speciale ganten in de verbindingsplad van de houder (positive F in Fig. 2) om de schroefen van te drainer.Winner de kabel net dehaur der vete alzien zeld genood word, kan deze doan get aan de rand van de verbindingsplad gewerd werden (zine marking). | Opemding:De zebra houder couldnen in combinatie met de XeVOX PET MW gebruik worden. | Hijnenmordering:Anbring hijnenmellerskyket (fig 4) na det akted sted og markerdnonminglhenlighere for de toskrer. Bhor hui r vengger (fig 2) efter letif (fig 3) en set rapiwi Ig. | OBS: Disse holdereneign og sigen kti te XeVOX PET OGXVEXMaler. | ||
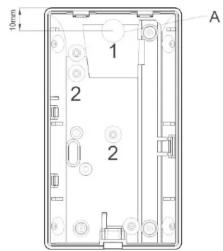
Fig. 1
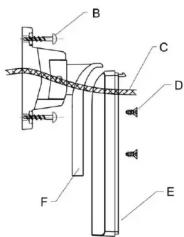
Fig. 2
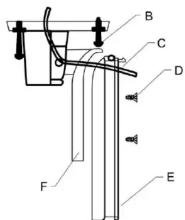
Fig. 3
Fig. 4
Marque : ABUS
Modèle : BW8060
Catégorie : Support écran plat