
IH1500S - Chauffage ELRO - Notice d'utilisation et mode d'emploi gratuit
Retrouvez gratuitement la notice de l'appareil IH1500S ELRO au format PDF.

| Type de produit | Radiateur quartz infrarouge |
| Marque | ELRO |
| Modèle | IH1500S |
| Usage | Extérieur (terrasse, patio) |
| Alimentation | 230 V ~ 50 Hz |
| Puissance de chauffe | 1500 W |
| Indice de protection | IP65 (étanche aux jets d'eau) |
| Classe électrique | I (mise à la terre) |
| Dimensions (H x L) | 2100 x 540 mm |
| Poids | 21,5 kg |
| Longueur du câble | 5 m |
| Installation | Murale horizontale ou sur socle fourni |
| Distances de sécurité | 50 cm au-dessus et sur les côtés, 100 cm devant |
| Type d'élément chauffant | Tube quartz |
| Fonction principale | Chauffage radiant rapide |
| Entretien | Nettoyer avec un chiffon doux et sec après 20 min de refroidissement |
| Sécurité | Ne pas couvrir, ne pas insérer d'objets, ne pas utiliser pour sécher du linge |
| Pièces détachées et réparabilité | Câble et élément chauffant remplaçables uniquement par un électricien qualifié |
| Contenu du package | Radiateur, socle de montage, visserie |
| Utilisation déconseillée | Enfants, à proximité de rideaux |
FOIRE AUX QUESTIONS - IH1500S ELRO
Questions des utilisateurs sur IH1500S ELRO
0 question sur cet appareil. Repondez a celles que vous connaissez ou posez la votre.
Poser une nouvelle question sur cet appareil
Téléchargez la notice de votre Chauffage au format PDF gratuitement ! Retrouvez votre notice IH1500S - ELRO et reprennez votre appareil électronique en main. Sur cette page sont publiés tous les documents nécessaires à l'utilisation de votre appareil IH1500S de la marque ELRO.
MODE D'EMPLOI IH1500S ELRO

natural_image
Close-up of hands using a screwdriver to adjust a mechanical component (no text or symbols visible)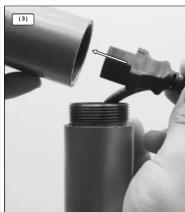
natural_image
Close-up of a hand holding a cylindrical mechanical component with a tool inserted, no visible text or symbols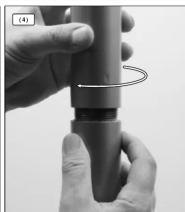
natural_image
Close-up of hands performing a finger manipulation on a cylindrical object (no text or symbols visible)
natural_image
Close-up of hands using a tool to adjust or install a mechanical component (no visible text or symbols)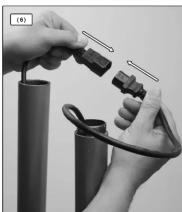
natural_image
Close-up of hands holding small mechanical components with a tool, no visible text or symbols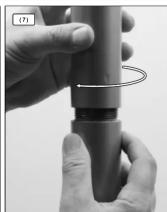
natural_image
Close-up of a mechanical component with a finger inserted, showing a bolted joint and a wire (no visible text or symbols)GB
SAFETY PRECAUTIONS
Please read the following recommendations carefully
before connecting the de
- Do not place/install the device directly underneath a wall
socket.
- Keep out of reach of children or unqualified individuals.
- Leave enough free space around the heater; a minimum of 50 cm at the top and sides, and 100 cm at the front.
of 50cm at the top and sides, and 100 cm at the front.
- Radiator is only suitable for horizontal wall mounting. Do not insert objects into the heater.
- Do not insert objects into the heater. Check whether the voltage stated on the type top
- Check whether the voltage stated on the type tag matches the power current in your home.
- matches the power current in your home. - Only use the heater in the indicated position.
- Only use the heater in the indicated position. - When mounting on a wall, ensure a stable installation
- Do not use the device for drying laundry.
- Do not block intake and outlet air vents to prevent
- We believe that and some, as follows to prevent overheating
- During maintenance and after using the device, pull the
plug out of the socket.
- When replacing the power cord, use a cord similar to the
one installed
- Do not place the heater near curtains.
- This heater is not suitable for children.
[Non-Text]
GENERAL
This quartz radiator is ideal for heating patio. The radiator
quickly generates radiant heat after being switched on.
(1) 2017年1月1日至2018年1月1日,公司与关联方累计发生关联交易的总金额为人民币45,639.00万元。
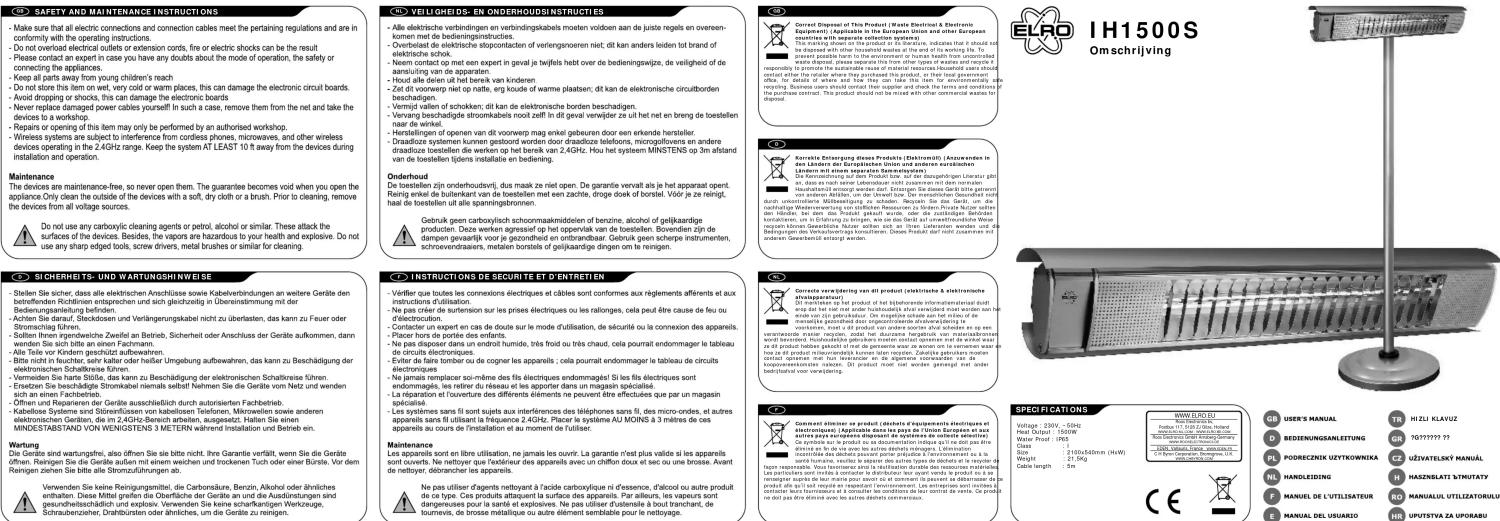
CONTENT (1)
a. Radiator
b. Mounting bas
INSTALLATION AND USE
- Insert the flanged column into the base and fit the
Insert the flanged column into the base and in the column to the base with 3 screws (2).
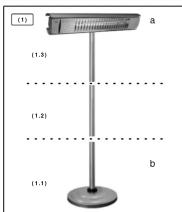
- Insert the cable plug into the the middle column (3)
- Fix the middle and lower column by screwing
clockwise (Do not overtighten) (4).
- Mount the lamp to upper column with M6 screw
and nut (5).
- Insert the cable plug into the cable socket (6) and
connect the upper column to the lower column by
screwing clockwise (Do not overtighten) (7).
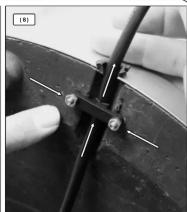
- Pull gently at the cable at the bottom of the base to keep
it taut. Fix the cable to the base with the cable clamp and
2 M4 nuts (8)
CABLE ELEMENT REPLACEMENT
CABLE / ELEMENT REPLACEMENT The cable / heating element can only be replaced by a
The cable / heating element can only be replaced by a qualified electrician.
qualified electric
TIPS
- Let the lamp cool down first for 20 minutes before
cleaning.
- Use a soft cloth, no aggressive or chemical cleaning
agents.
TR
GÜVENLİK TALİ MATLARI
Lütfen cihazı bağlamadan önce aşağıdaki talimatları
dikkatlice okuyunuz:
- Cihazı doğrudan bir duvar prizinin altına verliestirmeyiniz
- Cocukların erisemeveceği bir vere kurunuz
- Irutinin cevresinde üstten ve vanlardan en az 50 cm ve
Yatınlinin şevresimde usten ve yamardan en az 50 um ve önden en az 100 cm bosluk bırakınız
- Isitici valnizca duvara yatay montai için uygundur.
- Istucinun icine yabancı cisimler sokmayınız.
- Teknik özellikler etiketindeki gerilim değerinin evinizdeki
elektrik şebekesinin akım değeri ile eslestiğinden emin
olunuz.
- Isiticiyi yalnızca belirtilen pozisyonda kullanınız.
- Duvara montajda sağlam ve sabit şekilde monte ediniz.
- Cihazı çamaşır kurutmak için kullanmayınız.
- Aşırı isınmayı önlemek için hava giriş ve çıkış yerlerini
kapatmayınız.
- Bakım yapacağınıda ve her kullanımdan sonra cihazın
fisini prizden çekiniz.
- Güç kablosunu değiştireceğinizde orijinali ile aynı özellikleri
bir kablo kullanınız.
- İsiticiyi perdelerin yakınlins yerleştirmeyiniz.
- Tsitici, çocukların kullanabileceği şekilde tatsächamıştır.
05EN51
GENEL Dy kwarta uayu, da maklay uatmak join idagidis. Istav:
Bu Kuartz ıstilci diş mekamanı ıslırmak için İnealdırı. ıstilci
açnolktan sonra çevresim nehmen istilir.
BAKET i CERI ĉi (1)
PAKETTÇERTO a Indizi
b Montai taban
S. H. M. (2)
KURULUM VE KULLANIM
- Flanslı kolony tabana verleştirip 3 vidayı kullanarak.
kolony tabana sabitleviniz (2).
- Kablo fisini orta kolona verlestitiniz (3).
- Orta ve alt kolonu saat yönünde çevirerek sabitleyiniz
(əsiri sıkmayınız) (4).
- Lambayı M6 vida ve somunla üst kolona takınız (5
- Kablo fişini kablo prizine takınız (6) ve üst kolonu saat
yönünde çevirerek alt kolona bağlayınız (aşırı sıkmayınız)
(7).
- Gergin durması için kabloyu tabanın altından halifçe
çekiniz. Kablo kelepçesi ve 2 adet M4 somunu kullanarak
kabloyu tabana sabitleyiniz (8).
(1) 2017年1月1日(星期五)下午1:30
KABLO / PARÇA DEGIŞIMI
Kablo / İslıma parçası yainızca yetkili bir elektrikçi
taraindan degli
i DUOCLADI
TPUÇLARI Tamizlemoden önce lambanın tamamen soğumorun;
- lemlizlemeden once tambahin tambahren sogunfasim bokloviniz (vekleuk 20 dekilo)
- Bekleyimiz (yaklaşık 20 dakika)
- temizlik için yumuşak bir bez kullanımız. Ağınlı İer veya kimyasal temizlik malzemeleri kullanmayınız
imly door to me and make them for the summary time.
D
SICHERHEI TSVORKEHRUNGEN
Bitte vor dem Anschluss des Geräts die
nachstehenden Empfehlungen sorgfältig lesen:
[Non-Text]
- Das Gerät nicht direkt unter einer Wandsteckdose
aufstellen/installieren.
- Von Kindern oder unqualifizierten Personen fernhalten.
- Genügend Abstand um den Heizkörper einhalten.
mindestens 50 cm nach oben und seitlich und 100 cm
nach vorne.
- Der Strahler ist nur für waagrechte Wandmontage
geeignet
- Keine Gegenstände in den Heizstrahler stecken.
- Überprüfen Sie, ob die auf dem Typenschild angegebene
Netzspannung mit der Stromversorgung Ihres Hauses
übereinstimmt.
- Den Heizkörper nur in der angezeigten Position benutzen
- Bei Wandmontage eine stabile Installation gewährleisten
- Das Gerät nicht zum Trocknen von Wäsche benutzen.
- Die Luftteinlags- und Auslassgitter nicht blockieren, um
- Die Bartemass und Auslausgitter nicht blockieren, um Überhitzung zu vermeiden.
- Während der Wartung und
Würrende der Wartung und nach der Schutzung des Geräte Netzstecker ziehen
- Beim Austauschen des Netzkahels ein Kabel benutzen
- Damm Restauschen des NotExclusis ein das dem installierten Kabel ähnlich ist
- Das den installierten Kabel amfinlich hat. Den Heizkörper nicht neben Vorbänger
- Den Heizkörper nicht haben vormangen aufstehle Diese Heinkörper ist für Kindes nicht geinnet
- Dieser Heizkörper ist für Kinder nicht g
ALL GENEIN
ALLGEMEIN Diese Quinn Steckles ist ideal zum Ueigen des Terragen
Dieser Quartz-Strahler ist Ideal zum Heizen der Teil Der Strehler erzeugt nach dem Einschalten schnell
Der Strammer erzeug Strahlungswöme
Strahlungswarm
INHALT (1)
a Heizstrahler
a. Helizschafter b. Montagesock
- Montagood
INSTALLATION UND REDLENUNG
- Den geflanschten Ständer in die Basis stecken und mit 3
Schräuben an der Basis befestigen (2).
- Den Kabelstecker am mittleren Teil des Ständers
einstecken (3)
- Den mittleren und unteren Teil des Ständers durch
Zuschrauben im Uhrzeigersinn befestigen (nicht
überdrehen) (4)
- Die Lampe mit der M6 Schraube und Mutter am oberen
Teil des Ständers befestigen (5).
- Den Kabelstecker an der Kabelsteckdose (6) einstecker
und den oberen Teil des Ständers mit dem unteren Teil
des Ständers durch Zuschrauben im Uhrzeigersinn
verbinden (nicht überdrehen) (7).
- Sanft am Kabel unten an der Basis ziehen, um es strat
zu halten. Das Kabel mit der Kabelklemme und 2 M4
Muttern an der Basis befestigen (8)
[Non-Text]
AUSTAUSCH DES KABELS / ELEMENTS
Das Kabel / Heizelement kann nur von einem qualifizierter
Elektrike
THE WORLD
11pps
- Vor der Reinigung die Lampe zuerst 20 Minuten abkühler insgesen.
Ein welcher Tuch, keine expressiven oder chemischer
- Ein welches Tuch, keine aggre Reinigungsmittel verwenden
Reinigungsmittel verwenden.
PL
ŚRODKI OSTROŻNOŚCI
Należy przeczytać dokładnie poniższe instrukcje
przed podlaczeniem urządzenia:
, 1984, 2005
- Nie umieszczac/ instalować urządzenia bezpośrednio pod
gniazdem sciennym.
- Trzymać poza zasięgiem dzieci i niewykwalifikowanych
osób.
- Pozostawić wystarczającą przestrzeń wokół grzejnika;
minimum 50cm na górze i po obu stronach oraz 100 cm z
przodu.
- Grzejnik można zamontować tylko poziomo na ścianie.
- Nie wkładać żadnych przedmiotów do grzejnika.
- Sprawdzić, czy napięcie na odpowiedniej plakietc
odpowiada natężemu prądu w Państwa domu.
- Korzystać z grzejnika wyłącznie we wskazanej pozycji.
- Podczas montażu na ścianie, zapewnic stabilną instalację. Nie kozwateć a serodzania do ovazania papia.
- Nie korzystać z urządzeńna ob suszenia prama. Nie blokowość wlotowych ani wlotowych otworów
- Nie blokować wiotowych am wyłotowych otworów wentylaczyjnych, aby zanchiec przegrzaniu.
- Podczas konserwacji i po użyciu urządzenia, wyj
Podczas konserwazji pro uzycia ureázazmi wystrze z gniazda
- Podczas wymiany kabla zasilania, skorzystać z kabla
podobnego do zainstalowanego.
- Nie umieszczać grzeinika w pobliżu zaslon
- Grzejnik nie jest odpowiedni dla dzieci.
•
OGÓLNE
Te grzejnik kwarcowy jest odpowiedni do ogrzewania patio.
Grzejnik szybko generuje ciepło po włączeniu.
[Non-Text]
ZAWARTOŚĆ OPAKOWANIA (1)
a.Grzejnik
b. Podstawa montażowa
[Non-Text]
INSTALACJA I UZYTKOWANIE
- Włożyć kolumnę z kołnierzem do podstawy i zamocować
taką kolumnę za pomocą 3 śrub (2).
- Wstawic wtyczkę do środkowej kolumny (3)
- Dokręcic sruby w środkowej i dolnej kolumnie w prawo (§29. dolarteć za groze) (4).
(Nie dokręscac za miochlo) (4).
- Zamiromować lampę na gormej kolumnie za pomocą śrub M6, seran korwotki (5).
Mo biaz nakrętki (5). - Wotvić wtyczka kablowa do gniazdka kablowego (6) i
Wiczyc wycstkę kablową do gniazuka kablowęgo (6) 1 polaczyć górna kolumnę z dolna, paprzez dokrecenia śrub
polaczyć gomią kolammę z domą, paprzez dokładzenie śrub w praśko (Nia dekreść za grose). (7)
- Pociągnąć delikatnie za kabel w dolnej części podło
Pociągniąs domatniło. Za kabor w dolnej ołącji podstawy, aby utrzymać go w napieciu. Zamocować kabel na
podstawie za pomocą zacisku oraz 2 nakretek M4 (8).
PROVISIONS TO PREMISE INCOME STATEMENT (FINANCE 14):
WYMLANA KABLA/ ELEMENTU GRZEW CZEGO
Kabel/ element grzewczy mogą być wymieniane tylko przez
wykwalifikowanego elektryka.
。
WSKAZÓWKI
- Poczekać na schłodzenie lampki na 20 r
czyszczeniem.
- Użyć miękkiej szmatki, a nie żracych lub chemicznych
środków do czyszczenia.
NL
VELLI GHEI LSMAATREGELEN
Lees de volgende aanbevelingen zorgvuldig door
voordat u het apparaat aansluit
(No text)
- Plaats/installeer het apparaat niet direct onder een
stopcontact.
- Houd bulten bereik van kinderen of onbevoegde
personen
- Laat voldoende ruimte vrij rondom de verwarming; een
minimum van 50cm aan de bovenkant en zijkanten, en
100 cm aan de voorkant.
- De radiator is a
wandmontage.
- Steek geen voorwerpen in de verwarming.
- Controleer of de spanning vermeid op het typeplaatje
overeenkomt met de spanning van uw huisinstallatie.
- Gebruik de verwarming in de aangegeven positie.
- Bij de mot installatie
- Gebruik het apparaat niet voor het drogen van wasgoer
- Blokkeer niet de in- en uitlaatopeningen van de ventilat
Blinkter niet de in een uitlaatopeningen van de ventilat om oververhitting te voorkomen
- Bil het onderhoud en na het gebru
trek de stekker uit het stopcontact.
- Bij het vervangen van het snoer, gebruik een kabel
vergelijkbaar met degene geïnstalleerd.
- Plaats de verwarming niet in de buurt va
- Deze kachel is niet geschikt voor kinderen.
(No text)
ALGEMEEN
Deze kwartsradiator is ideaal voor het verwarmen op een
terras. De radiator genereert na het inschakelen snel
stralingswarmte.
(No text)
INHOUD (1)
a. Radiator
b. Montageplaat
(No text)
INSTALLATIE EN GEBRUIK
- Plaats de flenskolom in de voet en bevestig de kolom met
3 schroeven
- Steek de stekker in de middelste kolom (3)
- Bevestig de middelste en onderste kolom do
te draaien (niet te strak) (4).
- Monteer de licht tegen de bovenste kolom met de M6-
schroef en moer (5).
- Steek de stekker in de kabelaansluiting (6) en bevestig de bevanste islem en de onderste islem door rechtstem
de bovenste kolom op de onderste kolom door rechtsom to schanzen (niet to stork) (7).
te schroeven (met te striak) (7).
- Trek voorzichtig aan de kabel aan de onderkant van de voet om het strak te houden. Bevestig de kabel tegen d
voel om het strak te houden. L basis met de kabelkiem en 2 M
Basis first de kabelikem en 2 m4 mouren (6).
KARELL ELEMENT VERVANGEN
De kabel / verwarmingselement mag alleen door een
gekwalificeerde elektricien worden vervangen
5.2017.4.2023
TIPS
- Laat de lamp eerst 20 minuten afkoelen alvorens te
reinigen.
- Gebruik een zachte doek, geen agressieve of chemische
reinigingsm
natural_image
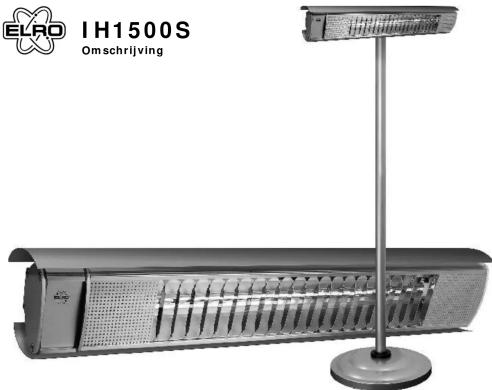
Exterior view of a modern outdoor heater with a stand and label 'IH1500S Omschrijving' (no other text or symbols visible)SPECIFICATIONS
Voltage: 230V, -50Hz
Heat Output: 1500W
Water Proof: IP65
Class: I
Size: 2100x540mm (HxW)
Weight: 21.5Kg
Cable length: 5m
The Ground Truth image displays a single, solid horizontal line. According to Rule 2 (UNDERSCORE & LINE RULES), this is a stylistic or background line, not a placeholder underscore. Therefore, the OCR result must ignore it and output nothing or only meaningful text. The provided OCR content is "____", which consists of four underscores. This is an incorrect interpretation of the line as a placeholder, violating the rule that stylistic lines must be ignored. The OCR has hallucinated underscores where none should exist based on the GT's visual context. Hence, the OCR result is inconsistent with the Ground Truth.
(No text)
(No text)
WWW.ELRO.EU Ross Electronics Inc. Postbus 117, 5105 ZJ Gilze, Holland www.ELRO.NC.COM - www.ELRO.BE.COM Ross Electronics GmbH Armberg-Germany www.ROAELECTRONICS.OE EDEN, Vallautia, France - www.eden.pf CH Byron Corporation, Belgium, U.K. www.chevron.com

Marque : ELRO
Modèle : IH1500S
Catégorie : Chauffage