
CappuLatté AEM646 - Machine à café Aroma - Notice d'utilisation et mode d'emploi gratuit
Retrouvez gratuitement la notice de l'appareil CappuLatté AEM646 Aroma au format PDF.

| Caractéristiques techniques | Machine à café Aroma CappuLatté AEM646 |
|---|---|
| Type de machine | Machine à café automatique |
| Capacité du réservoir d'eau | 1,5 L |
| Pression de la pompe | 15 bars |
| Fonctionnalités | Préparation de cappuccino, latte, espresso |
| Type de café | Café moulu et dosettes |
| Dimensions | 30 x 25 x 35 cm |
| Poids | 4,5 kg |
| Utilisation | Facilité d'utilisation avec un panneau de contrôle intuitif |
| Entretien | Nettoyage automatique, réservoir amovible |
| Maintenance | Décalcification recommandée tous les 3 mois |
| Sécurité | Système de protection contre la surchauffe |
| Garantie | 2 ans |
| Informations générales | Idéale pour les amateurs de café à domicile |
FOIRE AUX QUESTIONS - CappuLatté AEM646 Aroma
Questions des utilisateurs sur CappuLatté AEM646 Aroma
0 question sur cet appareil. Repondez a celles que vous connaissez ou posez la votre.
Poser une nouvelle question sur cet appareil
Téléchargez la notice de votre Machine à café au format PDF gratuitement ! Retrouvez votre notice CappuLatté AEM646 - Aroma et reprennez votre appareil électronique en main. Sur cette page sont publiés tous les documents nécessaires à l'utilisation de votre appareil CappuLatté AEM646 de la marque Aroma.
MODE D'EMPLOI CappuLatté AEM646 Aroma
AROMA®
Cappu-Latte ESPRESSO SYSTEM
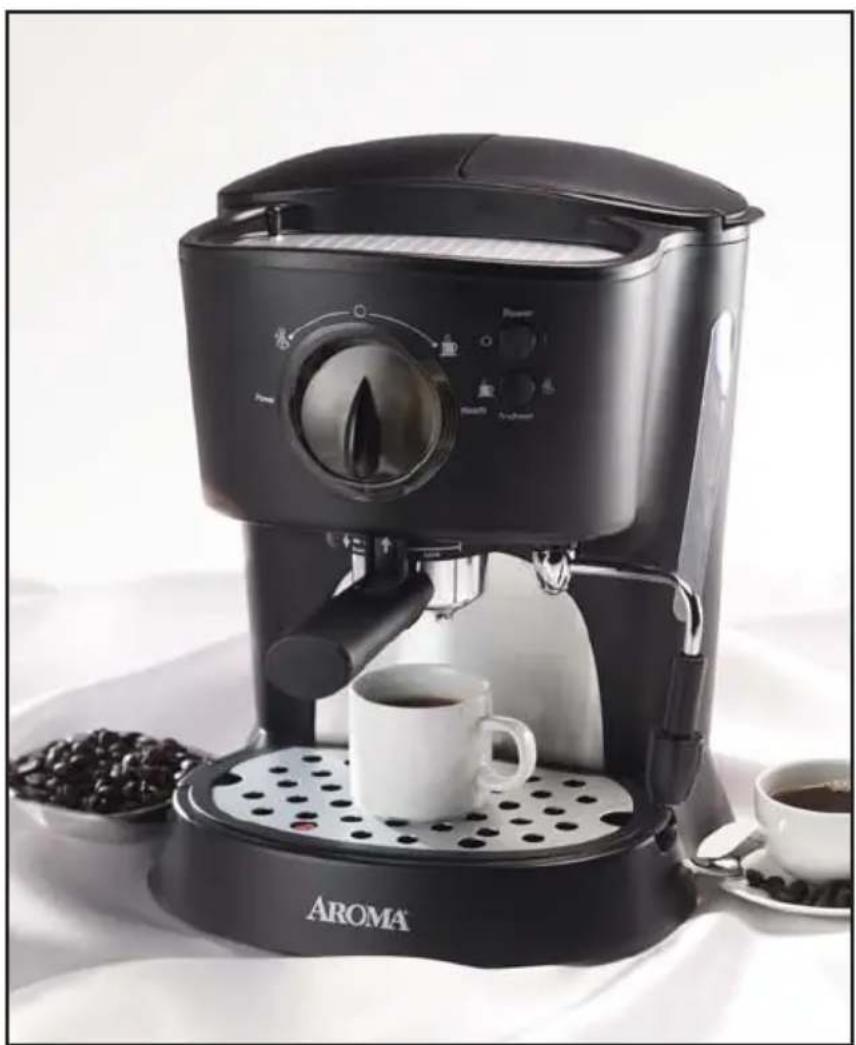
Instruction Manual
Model AEM-646
Congratulations!
Your AROMA Cappu-Latte Espresso System will make a fine addition to your home. Now you can enjoy the great taste of gourmet espresso in the comfort of your own kitchen. This elegant, high-quality unit will provide great tasting espresso coffee in just minutes time after time.
Please read the following instructions carefully before your first use.
Published By:
Aroma Housewares Co.
6469 Flanders Drive
San Diego, CA 92121
U.S.A.
1-800-276-6286
www.aromaco.com
IMPORTANT SAFEGUARDS
Basic safety precautions should always be followed when using electrical appliances, including the following:
- Read all instructions before use.
- Do not touch hot surfaces. Use handles or knobs.
- To protect against electrical shock, do not immerse cord, plug or espresso maker in water or any other liquid.
- Close supervision is necessary when this appliance is used by or near children. This appliance is not intended to be used by children.
- Unplug from outlet when not in use and before cleaning. Allow to completely cool before putting on or taking off any parts and before cleaning.
- Do not operate this appliance with a damaged cord, plug or after the appliance malfunctions or has been damaged in any manner. Return appliance to the nearest authorized service facility for examination, repair or adjustment.
- The use of accessory attachments not recommended by the appliance manufacturer may cause injuries.
- Do not use outdoors.
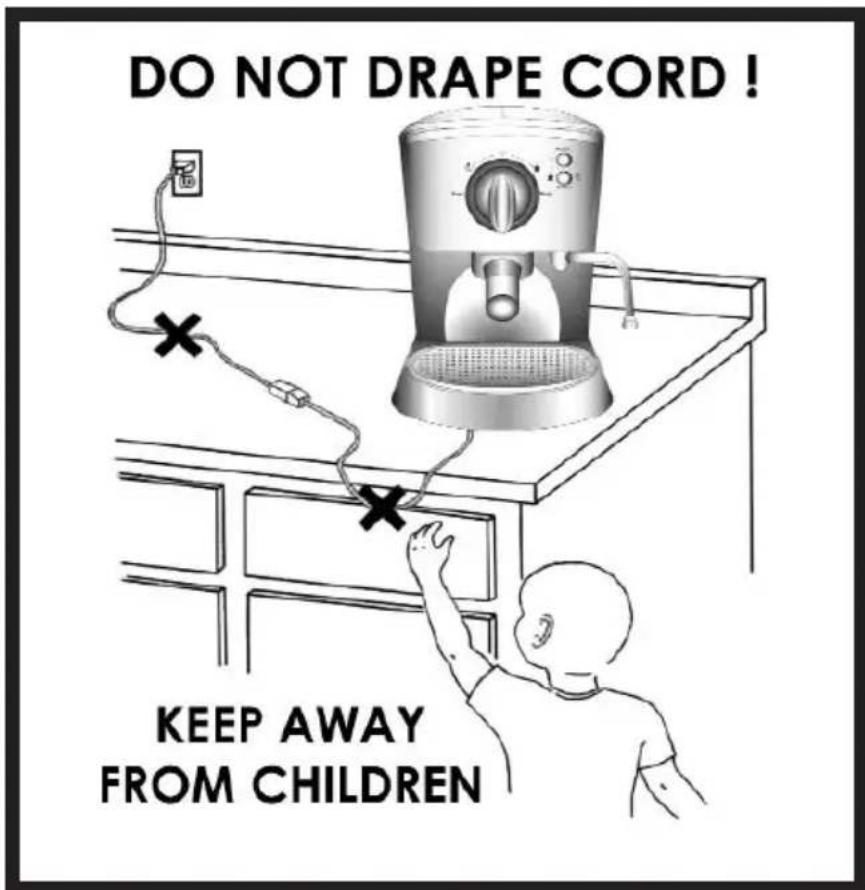
- Do not let cord hang over edge of table or counter, or touch hot surfaces.
- Do not place on or near a hot gas or electrical burner or in a heated oven.
- To disconnect, press the Power button, then remove plug from wall outlet.
- Do not use appliance for anything other than its intended use.
- Scalding may occur if the lid is removed during the brewing process.
SAVE THESE INSTRUCTIONS
Product for Household Use Only.
SHORT CORD INSTRUCTIONS
- A short power-supply cord is provided to reduce risk resulting from becoming entangled in or tripping over a longer cord.
- Longer extension cords are available and may be used if care is exercised.
- If a longer extension cord is used:
a. The marked electrical rating of the extension cord should be at least as great as the electrical rating of the appliance.
b. The longer cord should be arranged so that it will not drape over counter or tabletop where it can be pulled by children or tripped over unintentionally.
c. If the appliance is of the grounded type, the extension cord should be a grounding-type-3-wire cord
POLARIZED PLUG
This appliance has a polarized plug (one blade is wider than the other); follow the instructions below:
To reduce the risk of electric shock, this plug is intended to fit into a polarized outlet only one way. If plug does not fully fit into the outlet, reverse the plug. If it still does not fit, contact a qualified electrician. Do not attempt to modify the plug in any way.
This appliance is for household use only.
PARTS IDENTIFICATION
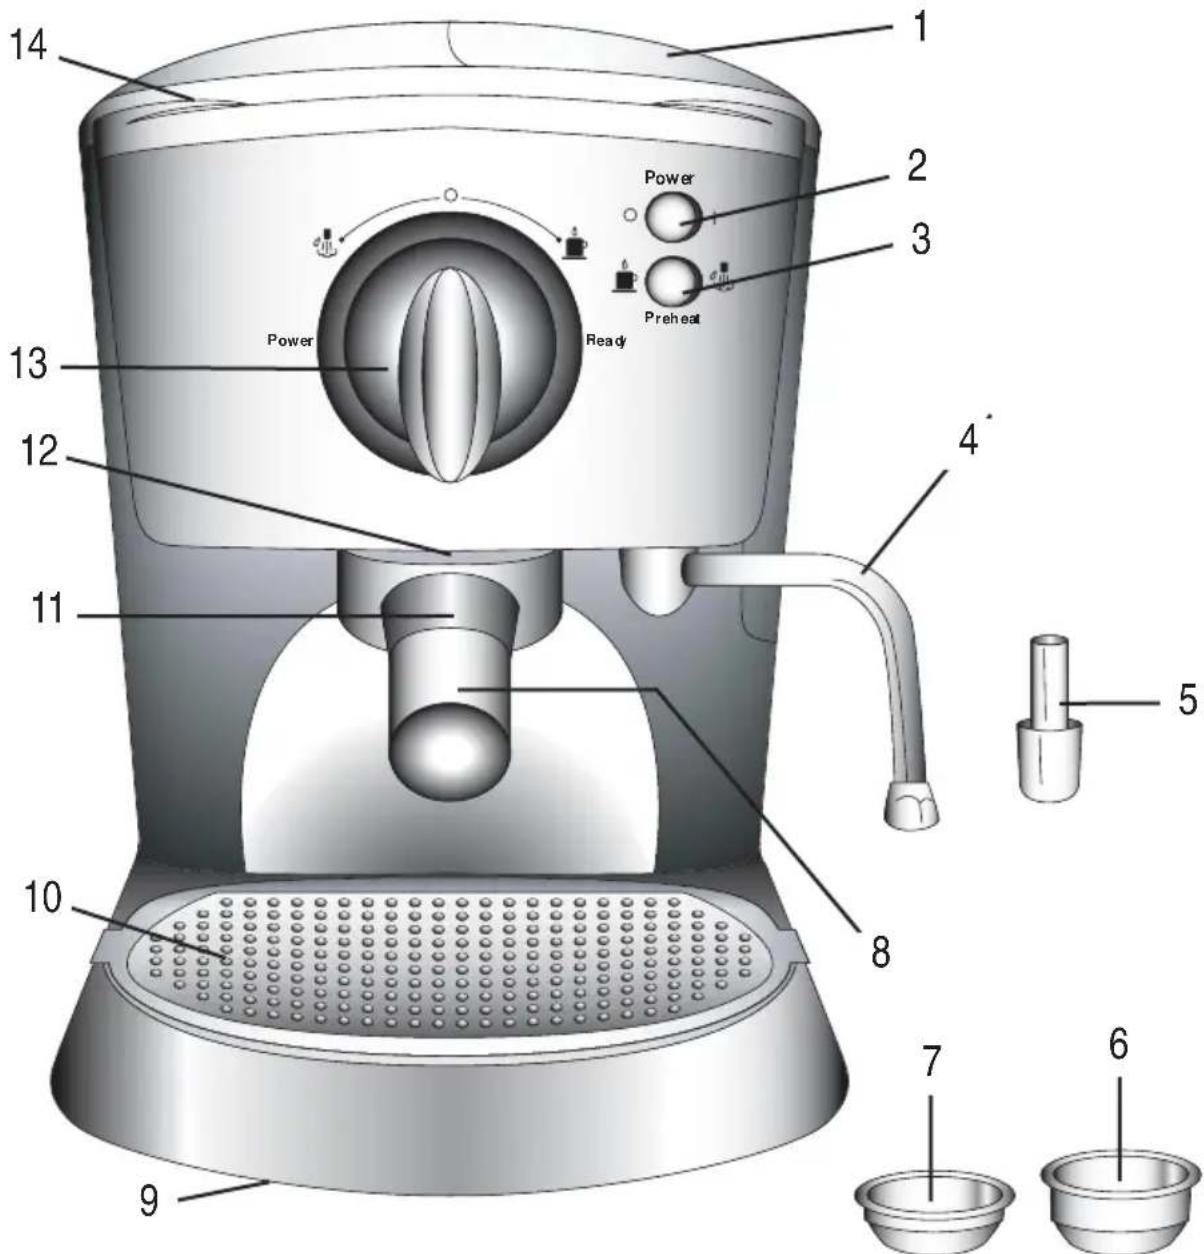
- Removable water reservoir
- Power switch
- Preheat switch
- Steam nozzle
- Froth attachment
- 2-cup filter
- 1-cup filter
- Filter handle
-
Slip resistant rubber feet
-
Drip tray with overflow protection
- Filter lock
- Espresso brewing head
- Operation dial
- Preheating plate
HOW TO USE
Before First Use:
- Read all the instructions and important safeguards.
- Remove all packaging materials; make sure all your items are received in good condition.
- Lift water reservoir lid and remove the measuring spoon from the water reservoir.
- Wash all the accessories with warm soapy water using a sponge or dishcloth.
- Rinse thoroughly to remove soapy residue.
- Wipe body clean with a damp cloth.
Pre-Rinsing the Cappu-Latte Espresso System:
- Remove the water reservoir, wash thoroughly with warm soap and water, and fill it up with cold water. Return the reservoir and plug the unit into an outlet.
- Place a filter in the filter handle and position the filter handle on the espresso brewing head. Lock the filter handle in place, but do not over tighten.
- Place a large container beneath the brewing head.
- Once the ready light illuminates the water has been heated to the correct temperature. Turn the operation dial clockwise to the espresso function and allow all the water to run through the unit.
** It may be necessary to turn the operation dial back to the "O" off position mid-cycle to empty the large container.
Do not use abrasive cleaners or scouring pads.
Do not immerse the espresso maker, cord or plug in water at any time.
Filling The Water Reservoir:
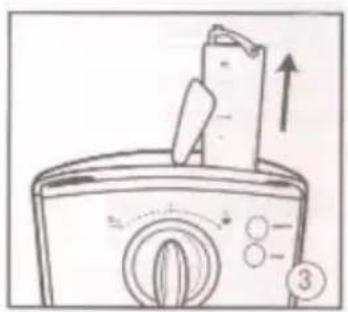
Lift up to open the lid of the water reservoir
While it is in place, fill the water reservoir with cold water
Or
Remove water reservoir
HOW TO USE
Fill with cold water from the sink
Replace water reservoir Begin
Preheating by shifting the Preheat switch to the espresso setting
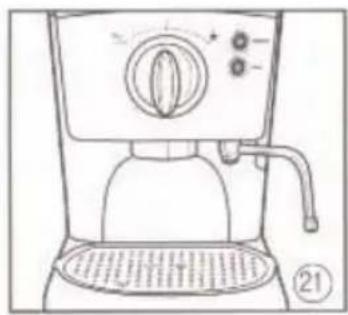
Preparing Your Cappu-Latte Espresso System:
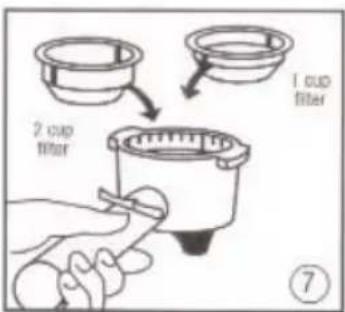
Select either the 1-cup or the 2-cup filter
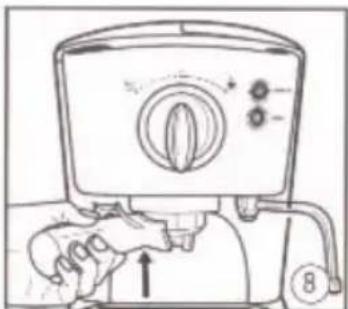
Position the filter handle on the espresso brewing head
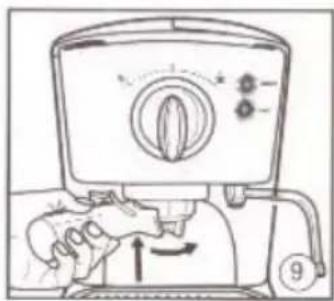
Lock the filter head into place by turning it handle to the right
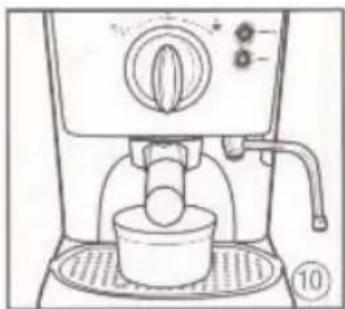
Place your espressocup beneath theespresso brewing head
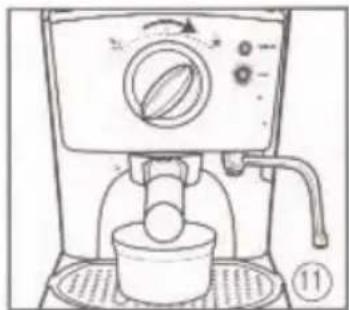
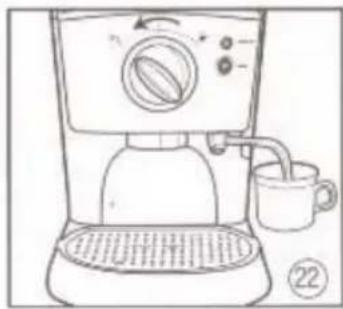
Once the ready light turns on, turn the operation dial clockwise to activate the espresso function
HOW TO USE
Making Gourmet Espresso:
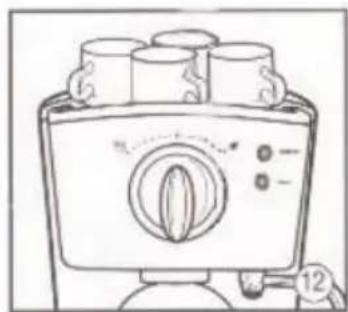
Preheat your espressocups by placing themupside down on thepreheating plate
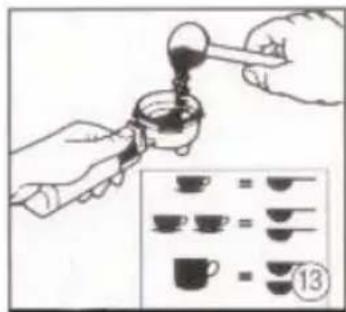
Shift the Preheat switch to the espresso setting. Place your choice of coffee in the coffee filter
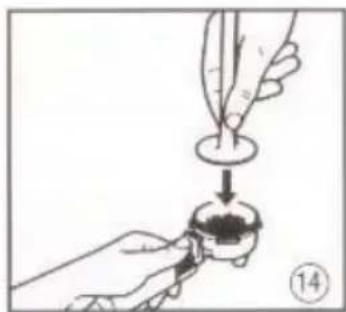
Use the included tamper to pack the coffee into the filter
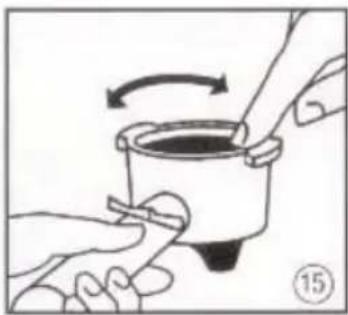
Remove excess coffee grounds by wiping the edge of the filter

Insert the filter handle into the espressomachine and lock it in place by turning the filter handle to the right
Once the ready light turns on, turn the operation dial clockwise to the espresso setting to begin making espresso
Frothing the Milk: (Detailed directions on page 12)
Begin by removing the used coffee grounds
Slide the froth attachment onto the steam nozzle
Turn the operation dial counter-clockwise to froth the milk
HOW TO USE
Hot water dispensing:
Fill the machine with water and shift the Preheat switch to the steam setting. Remove the froth attachment
Turn the operation dial counter-clockwise to dispense hot water
Cleaning and caring for your unit:
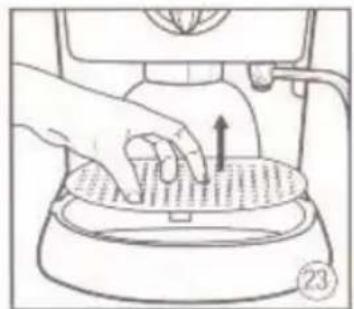
Carefully remove the top cover of the drip tray

Remove drip tray and wash with soap and water
PREPARING GOURMET ESPRESSO
Follow these steps for the perfect espresso. You may want to go back to the How to Use section of the manual to reference the picture guide:
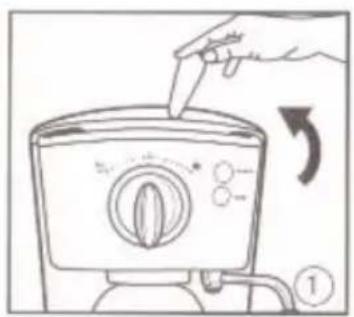
- Make sure the operation dial is turned to the "O" off position and the Power switch is in the off position. Then, insert the plug into the proper outlet.
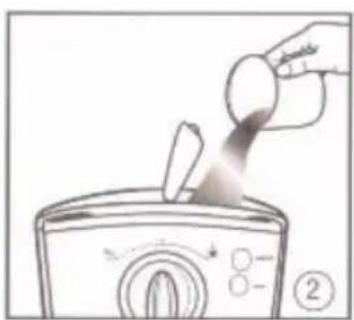
- Fill the water reservoir with cold water as shown in the picture guide.
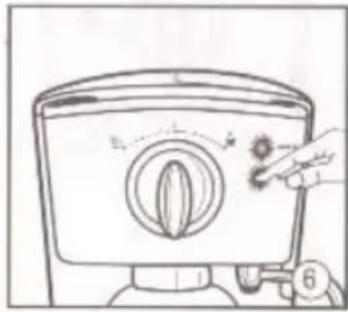
- Shift the Preheat switch to the espresso icon. To begin the preheating process, shift the Power switch to the on position. The red "Power" light will illuminate.
Note:
When the water temperature has reached the ideal temperature for brewing.
espresso, the ready light will illuminate.
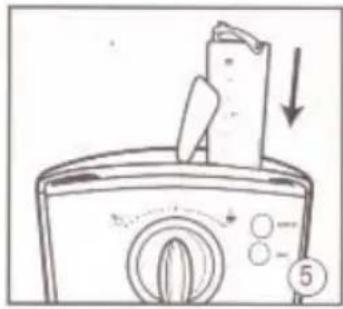
- Preheat your espresso cups by placing them upside down on top of the preheating plate.
- Select your desired filter size and place the filter in the filter handle.
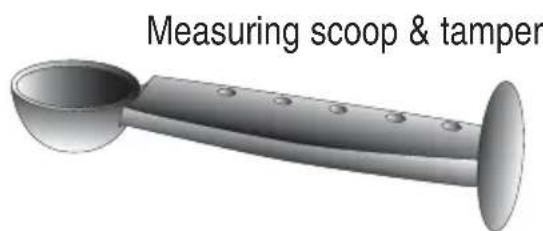
- Using the measuring scoop provided, place one or two scoops of ground coffee into the filter depending on the filter size. Use the tamper on the other side of the measuring scoop to pack the coffee into the filter. Be careful not to apply too much pressure when packing.
Note:
Do not overfill the filter with coffee, and always wipe around the edges of the filter to remove excess coffee grounds. Do not tamp the coffee with excessive force. Lightly flatten the grinds with a small amount of pressure
PREPARING GOURMET ESPRESSO
Continued...
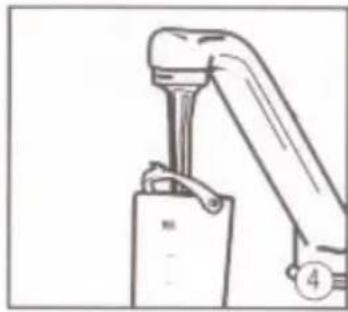
- Insert the filter handle into the espresso machine and lock it in place.
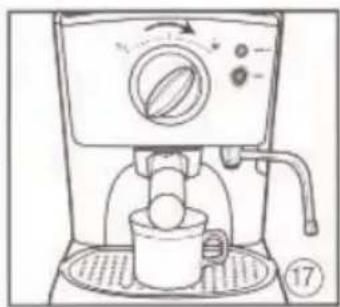
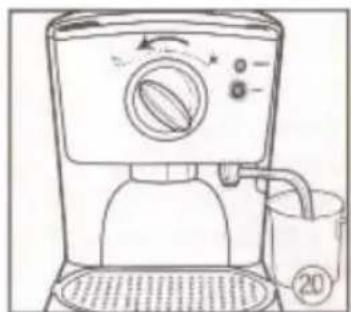
- Once the water is at the correct temperature and the ready light turns on, turn the operation dial clockwise to the espresso setting. The machine will begin to make a pumping noise. This is the espresso brewing process and is completely normal. Once the cups are filled to the desired level, return the operation dial to the "O" off position.
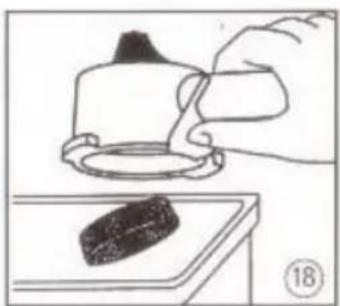
- Allow the unit to cool completely, then remove the filter handle by turning it to the left. To remove the used coffee grounds, push the filter lock foward against the edge of the filter, flip upside down over a trash bin and gently tap out the used coffee.
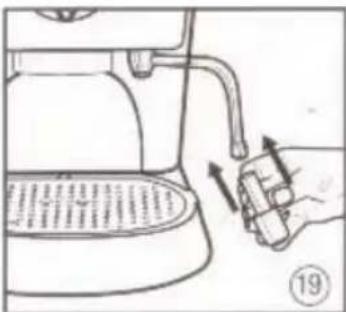
After each use of your Cappu-Latte Espresso System, it is recommended that you flush the machine to remove and wash out any old or used coffee grinds stuck in the espresso machine, and also to help ensure the correct water temperature for the next espresso shot. With the filter handle already removed from the espresso machine, turn the operation dial clockwise to the espresso function and allow the water to run until there is a consistent flow of water.
Do not leave the filter handle locked in position for extended periods of time or when the machine is not in use. This may damage the brewing head rubber seals.
ESPRESSO TIPS
Now you are ready to enjoy the wonderful process of making gourmet espresso at home. Your new Cappu-Latte Espresso System coupled with a little practice and experience will have you making coffeehouse espresso in no time at all. Here are a few suggestions to help you along the way:
- One single shot of espresso should be no more than 1.25oz of coffee.
- Before running your brewing cycle, be sure that your espresso is tamped (packed down) evenly.
- Do not use coffee grinds that are too coarse. A fine to medium grind of coffee is recommended.
- For optimum results, use cold milk and a stainless steel container when steaming. Do not overheat the milk when frothing. The perfect temperature is right when the container becomes too hot to continue to hold.
- If too much water is run through the coffee grounds, the espresso will likely come out thin and have a bitter taste.
- In the event your espresso pours too slowly from the machine, use less pressure when tamping the coffee grinds or try using a coarser blend.
- Fresher coffee beans or grounds will yield better taste. Always buy the freshest coffee available and store in an air-tight container in a cool, dry, dark place.
- Whole coffee beans will stay fresher longer than ground coffee. When grinding your own coffee, never grind more than you will use for immediate brewing. The coffee will lose its flavor quickly once it's ground.
- Proper maintenance of your espresso maker will result in better tasting espresso. Keep it cleaned and thoroughly rinsed. Run water through the brewing head and flush the steam nozzle with fresh water after each use.
Warning:
In rare instances using coffee grounds that are too small may cause the coffee flow to reduce to a slow drip, or the machine to stop working altogether. If this occurs, run water through the brewing head with fresh water, and use a coarser coffee grind.
MILK FROTHING STEPS
The perfect cappuccino begins with milk frothed to the perfect texture. The following are some steps to help you master creating the perfect froth:
- Begin by sliding the froth attachment onto the steam nozzle. The steam nozzle may be used without the froth attachment if preferred.
- Fill a stainless steel container with fresh, cold milk no more than half way.
Hint: Steam an amount of milk that is appropriate for the amount of espresso you are preparing. The volume of milk will increase during the frothing process.
- Activate the steam function before frothing the milk to remove any condensed water. To do this, swing the steam nozzle to the side of the machine, and place an empty glass or cloth under the steam nozzle and turn the operation dial counter-clockwise to activate the steam function. Operate for 3-5 seconds.
- Insert the steam nozzle into your stainless steel container so that the head of the nozzle is just below the surface to the milk. Place your hand on the side of the conatiner during the frothing process to feel for temperature.
- Position your stainless steel container so that the head of the steam nozzle is near one side. This will cause the milk to circulate and give you better results as you froth. The milk in the container will rise as it is heated. Follow the level of the milk by lowering your container so that the steam nozzle head is always just below the surface.
- After the milk has doubled its original volume the steam nozzle can be lowered further below the surface. This action will give the milk the perfect texture.
- Once your stainless steel container becomes too hot to comfortably hold, the milk has reached the ideal temperature and the steaming process can stop. Simply turn the operation dial to the "O" off position and remove your container.
- For best results, pour the frothed milk into your gourmet espresso as soon as possible.
CARE AND CLEANING
WARNING: NEVER WASH YOUR ESPRESSO MACHINE ACCESSORIES IN THE DISHWASHER
Regular and proper maintenance of your Cappu-Latte Espresso System will ensure a long-lasting life, and the best tasting espresso. Coffee oils and deposits build up over time and need to be flushed out and cleaned for optimum espresso taste.
Cleaning the steam nozzle and froth attachment:
Clean these parts immediately after each use to avoid damage. Wipe the stainless steel steam nozzle with a clean, damp cloth and simply place the froth attachment under warm running water until all excess milk has been removed. After this step, turn the operation dial counter-clockwise to the steam setting and clear any leftover milk out of the steam nozzle.
On a monthly basis we recommend a thorough cleaning of the steam nozzle to ensure longevity. For a thorough cleaning, insert the head of the steam nozzle into a container of water. Make sure that the water level is over the head of the steam nozzle. Run steam through the nozzle for 30 seconds and let it soak overnight. After the nozzle has soaked, remove the steam nozzle head and stick a pin up the steam nozzle. (To remove the nozzle head, use the measuring scoop as a tool. There are fittings on the scoop that fit on the steam nozzle head and act as a wrench to make removing the head simple). Remove pin, then turn the unit on and run steam through the nozzle again for 30 seconds.
Warning: Use caution when operating the steam nozzle. Steam is very hot and can scald.
Cleaning the drip tray:
Remove the drip tray and its cover after each use to empty. If the red overflow indicator appears through the cover, empty the drip tray immediately. Using non-abrasive cleaners, wash the drip tray and cover in warm, soapy water, rinse and dry. It is normal for the inside of the drip tray to be stained by coffee oils.
CARE AND CLEANING
Cleaning the espresso brewing head and filters:
Rinse the filter and filter head using warm water after each use. Every 10-15 uses, wash in warm soapy water using a mild detergent. To clean the espresso brewing head, flush water through and wipe the head and the inside rim with a damp cloth. To help ensure the longevity of the filter and filter handle, run the machine with the filter in place using only water, no coffee, at the end of each espresso making session. If the filter holes become clogged with coffee grinds, remove them by using a fine bristled brush.
Caring for the rubber seals:
The rubber seal is located on the bottom of the brewing head. It creates a seal against the filter handle when making espresso. As time passes this seal loses its elasticity and needs to be replaced. We recommend replacing this seal every 8-12 months.
Indications that the seal needs replacing include the following: the filter handle feels loose when rotated to the right or steam escapes from around the espresso brewing head during use.
For information on obtaining replacement rubber seals, please call the Aroma Customer Service Center at 1-800-276-6286.
Cleaning the espresso preheating plate and exterior:
Wipe the preheating plate and espresso maker exterior with a damp cloth and wipe dry. Do not use abrasive cleaners or metal scouring pads as they can scratch the surfaces.
CARE AND CLEANING
Descaling your Cappu-Latte Espresso System:
We recommend that you descale your Cappu-Latte Espresso System every 2-3 months depending on the hardness of your water and frequency of use. You may purchase a variety of espresso maker descaling solutions in the market or you can use distilled white vinegar. Keep in mind that vinegar might produce a lingering taste for the first few batches of espresso after the descaling process.
- Remove the water reservoir and drip tray from the unit and set aside. Remove the filter handle and rinse it thoroughly under running water and set it aside.
- Remove the froth attachment and fill the water reservoir with your descending solution.
- Using two large containers and place one beneath the brewing head, and the other beneath the steam nozzle.
- Plug the unit in, shift the Preheat switch to the espresso setting and turn the power on. Run roughly 1/3 of the liquid through the machine.
- Once the liquid has been run through, shift the Preheat switch to the steam setting and run the solution through the steam nozzle for approximately 2 minutes.
- Afterwards, turn the machine off by shifting the Power switch to the off position. Shift the Preheat button back to the espresso position.
CARE AND CLEANING
Descaling your Cappu-Latte Espresso System continued:
- Leave the machine turned off for 15 minutes to allow the descending solution to take affect.
- After the 15 mintues, turn the unit back on and run half of the remaining descending solution through the machine. After the solution has passed through, activate the steam function and allow the unit to steam for 3-5 minutes.
- Activate the espresso function again and allow the rest of the solution in the reservoir to run through the machine. Remove the containers placed under the brewing head and steam nozzle, empty and replace.
- Thoroughly wash and rinse the water reservoir to remove all traces of the descending solution. Once this is done, run 2 full cycles with the water reservoir completely full. Refill the water reservoir and run the steam nozzle for 5 minutes. Water run through the machine should be clean and clear after this process.
- Return the drip tray and froth attachment to their positions.
- You are now ready to brew gourmet espresso again.
LIMITED WARRANTY
Aroma Housewares Company warrants this product free from defects in material and workmanship for one year from provable date of purchase in the continental United States.
Within this warranty period, Aroma Housewares Company will repair or replace, at its option, defective parts at no charge, provided the product is returned, freight prepaid with proof of purchase and U.S. (8.00 for shipping and handling charges payable to Aroma Housewares Company. Before returning an item, please call the toll free number below for return authorization number. Allow 2-4 weeks for return shipping.
This warranty does not cover improper installation, misuse, abuse or neglect on the part of the owner. Warranty is also invalid in any case that the product is taken apart or serviced by an unauthorized service station.
This warranty gives you specific legal rights which may vary from state to state and does not cover areas outside the United States.
AROMA HOUSEWARES COMPANY
6469 Flanders Drive
San Diego, California 92121
1-800-276-6286
M-F, 8:30 AM - 5:00 PM, Pacific Time
Website: www.aromaco.com