Dart 2 - Aspirateur Sebo - Notice d'utilisation et mode d'emploi gratuit
Retrouvez gratuitement la notice de l'appareil Dart 2 Sebo au format PDF.


| Marque | Sebo |
| Modèle | Dart 2 |
| Type de produit | Aspirateur traîneau avec brosse électrique |
| Puissance du moteur | 1000 W (max 1300 W) |
| Dépression | 225 mbar (2300 mm WS) |
| Débit d'air | 50 l/s |
| Capacité du sac | 3,5 litres (sac 3 couches) |
| Poids | 4,5 à 7,2 kg selon équipement |
| Niveau sonore | 67,5 - 68,5 dB(A) |
| Classe de protection | II (double isolation) |
| Longueur du câble | 9,5 m |
| Alimentation | 220-240 V, 50 Hz |
| Filtration | S-Classe (filtre à sac, filtre moteur, filtre d'évacuation) |
| Brosse électrique | Largeurs 31 cm ou 37 cm, moteur 175/200 W, vitesse 2700 tr/min |
| Réglage de la brosse | 4 positions avec indicateur lumineux (vert/rouge) |
| Indicateur de sac plein | Témoin orange sur le couvercle du filtre |
| Accessoires fournis | Brosse électrique, suceur combiné, suceur fente, clip accessoires |
| Entretien | Changement du sac filtrant, filtre moteur (tous les 20 sacs), filtre d'évacuation |
| Sécurité | Protection contre les surcharges, arrêt automatique de la brosse en position verticale |
| Pièces détachées | Sac filtrant (ref. 7029 ER), filtre moteur (7012 ER), filtre d'évacuation (7015 ER), brosse (5010/2838 ER) |
FOIRE AUX QUESTIONS - Dart 2 Sebo
Questions des utilisateurs sur Dart 2 Sebo
0 question sur cet appareil. Repondez a celles que vous connaissez ou posez la votre.
Poser une nouvelle question sur cet appareil
Téléchargez la notice de votre Aspirateur au format PDF gratuitement ! Retrouvez votre notice Dart 2 - Sebo et reprennez votre appareil électronique en main. Sur cette page sont publiés tous les documents nécessaires à l'utilisation de votre appareil Dart 2 de la marque Sebo.
MODE D'EMPLOI Dart 2 Sebo
GEBRAUCHSANWEISUNG / INSTRUCTION MANUAL

natural_image
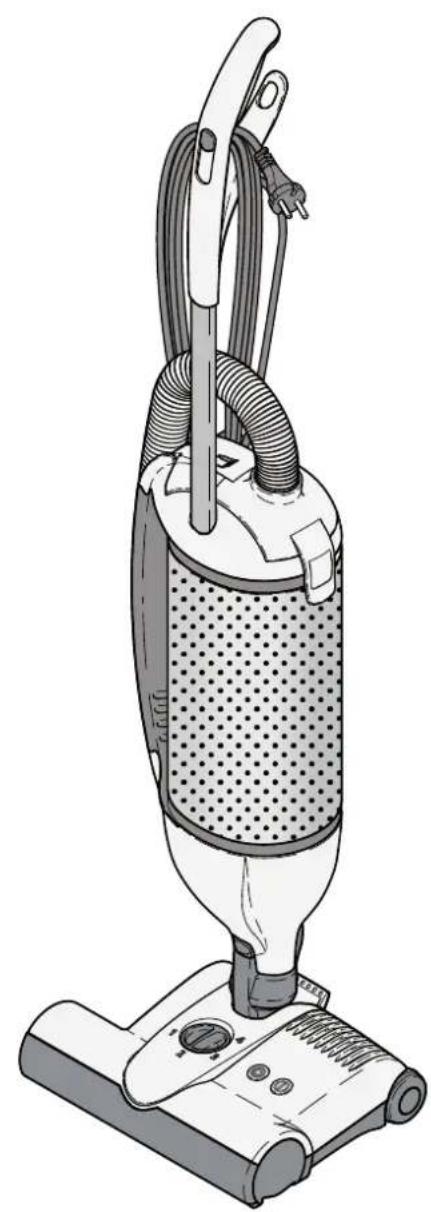
Illustration of a vacuum cleaner with mesh handle and control panel (no text or symbols)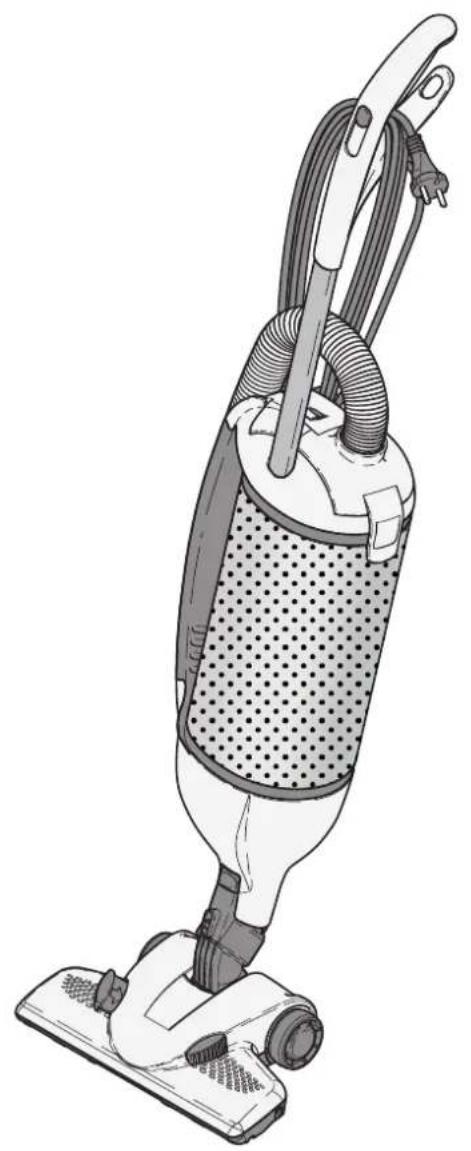
natural_image
Illustration of a vacuum cleaner with attached cable and filter (no text or symbols)
natural_image
Abstract wavy line pattern on dark background (no text or symbols)Inhaltsverzeichnis
- Technische Daten ....3
- Sicherheitshinweise ....4
- Gerätebeschreibung ....6
- Inbetriebnahme....6
- Handhabung ....6
- Elektroteppichbürste ....7
- Entnahme der Rundbürste 8
- Kombibodendüse ....S9
- Filteranzeige ....9
- Wechsel der Filtertüte 9
- Motorschutzfilter 9
- Verstopfungen beseitigen 10
- Hinweis zur Entsorgung ....12
Table of contents
- Technical Details ....3
- Safety Instructions ....4
- Machine Description ....6
- Assembly ......6
- Operating Instructions ....6
- Power Head ....7
- Removing the Brush Roller ....8
- Combination Nozzle ....9
- Filters 9
- Changing the Filter Bag ......9
- Motor Protection Filter 9
- Removing Blockages ....S10
- Note on disposal 12
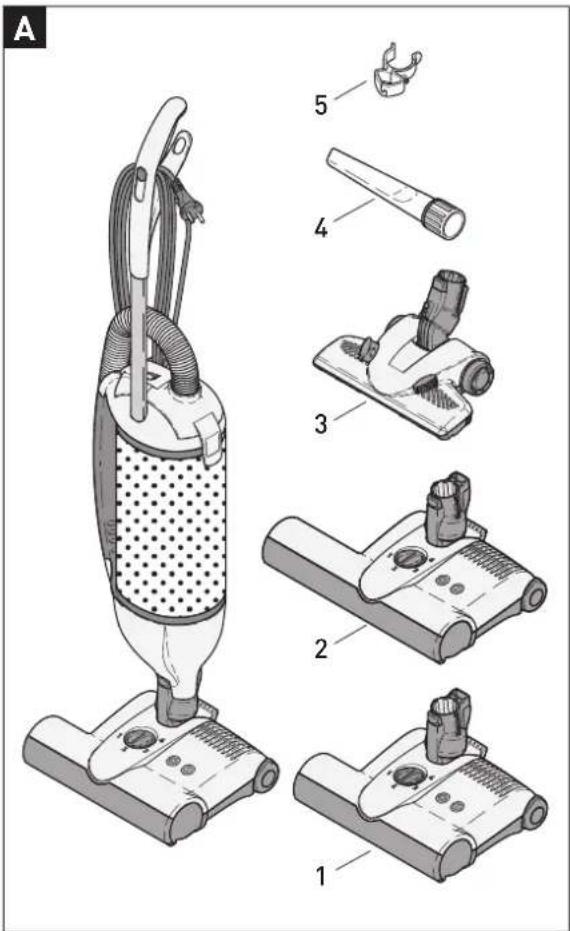
A Zubehör*
1 Elektroteppichbürste 31 cm
2 Elektroteppichbürste 37 cm
3 Kombibodendüse
4 Fugendüse
5 Zubehörclip
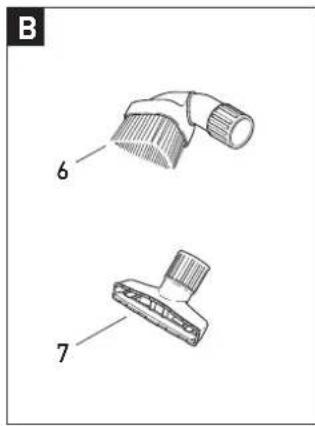
B Sonderzubehör
6 1094 hg Staubpinsel
7 1491 JE Polsterdüse
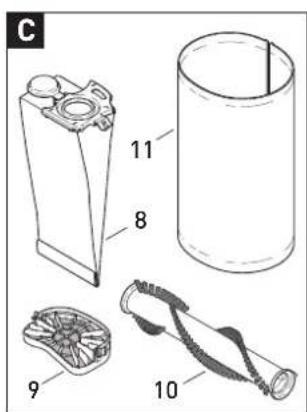
C Service-Teile*
8 7029 ER Filtertüte
9 7012 ER Motorschutzfilter
10 5010 ER Ersatzbürste 31 cm
10 2838 ER Ersatzbürste 37 cm
11 7015 ER Abluftfilter
* je nach Ausstattung.
A Attachments*
1 Power Head 31 cm
2 Power Head 37 cm
3 Combination Nozzle
4 Crevice Nozzle
5 Attachments Clip
B Optional Attachments
6 1094 hg Dusting Brush
7 1491 JE Upholstery Nozzle
C Service Parts*
8 7029 ER Filter Bag
9 7012 ER Motor Protection Filter
10 5010 ER Brush Roller 31 cm
10 2838 ER Brush Roller 37 cm
11 7015 ER Exhaust Filter
* depending on model.
1. Technische Daten
Staubsauger:
Gebläsemotor.... 1000 Watt
max.... 1300 Watt
Unterdruck.... 225 mbar
M (2300 mm WS)
Luftmenge....50 l/s
Filtertüte.... 3,5 liter, 3-lagig
Gewicht.... 4,5 - 7,2 kg*
Vibrationspegel <= 2,5m / s^2
Schalldruckpegel 67,5 - 68,5 dB(A)*
Schutzklasse ...... II, doppelt isoliert
Anschlussleitung.... 9,5 Meter
Elektroteppichbürste\*
Bürstenmotor.... 31 cm, 175 Watt
Bürstenmotor.... 37 cm, 200 Watt
Arbeitsbreite, Elektroteppichbürste..... 31 cm / 37 cm
Bürstenantrieb...... Zahnriemen
Bürstendrehzahl 2700 U/min
* je nach Ausstattung
Arbeiten an der elektrischen Installation dürfen nur von Sachkundigen ausgeführt werden.
1. Technical Details
Vacuum Cleaner:
Vacuum Motor.... 1000 Watt
max.... 1300 Watt
Suction.... 225 mbar
M M(2300 mm WS)
Air Flow....50 l/s
Filter Bag.... 3,5 litres, 3-layer
Weight....4,5-7,2 kg*
Vibration level 2.5 m/s^2
Sound pressure level 67,5 -68,5 dB(A)*
Protection..... double insulated
Cable....9,5 Meter
Power head\*
Brush Motor.... M31 cm, 175 Watt
Brush Motor.... M37 cm, 200 Watt
Working width Power Head.... 31 cm / 37 cm
Brush Drive..... tooth belt
Brush Speed.... 2700 rpm
* depending on model
For Service please contact your supplier or the address below.
M Original Bedienungsanleitung

Lesen Sie bitte diese Gebrauchsanweisung und beachten Sie die darin enthaltenen Gebrauchs-, Sicherheits- und Warnhinweise, bevor Sie das Gerät in Betrieb nehmen.
Vielen Dank, dass Sie sich für einen SEBO entschieden haben. Wir sind sicher, dass Ihnen dieses Gerät gute Dienste leisten wird und Sie viel Freude an ihm haben werden. Ihre Hinweise und Wünsche nehmen wir gerne unter www.sebo.de entgegen.
Ihr neuer SEBO ist ein hochwertiges, langlebiges und innovatives Produkt, Sdas Snach Sneuester STechnologie Sin SDeutschland entwickelt Sund Sgefertigt Swurde. SSeine Seffiziente SSaugleistung und Sseine Sserienmäßig Sintegrierte SS-Klasse-Filtration Sbieten Ihnen außergewöhnlich hohe Standards. Erleben Sie selbst das professionelle Saugerlebnis!
2. Sicherheitshinweise
Die Gebrauchsanweisung bitte gut aufbewahren. Wird das Gerät an Dritte weitergegeben, muss unbedingt Sdie SGebrauchsanweisung mit übergeben werden.
Die Benutzung des Gerätes geschieht auf eigene Verantwortung. Der SHersteller Shaftet Snicht Sfür SSchäden, Sdie Sdurch Sfalsche dienung oder nicht bestimmungsgemäßen Gebrauch verursacht werden.
Bestimmungsgemäße Verwendung
Diese Maschine ist für gewerbliche Zwecke bestimmt. z.B. Hotels, Schulen, Krankenhäusern, Fabriken, Büros, Geschäften.
Dieses SGerät Sist Snicht Sdafür Sbestimmt, Sdurch SPersonen S(einschließlich SKinder) Smit Seingeschränkten Sphysischen, Ssensorischen oder geistigen Fähigkeiten oder mangels Erfahrung und/oder mangels Wissen benutzt zu werden, es sei denn, sie werden durch Seine Sfür Sihre SSicherheit Szuständige SPerson Sbeaufsichtigt oder erhalten von ihr Anweisungen, wie Sdas Gerät Szu benutzen ist.
→ Kinder Ssollten Sbeaufsichtigt Swerden, Sum Ssicherzustellen, dass sie nicht mit dem Staubsauger spielen.
→ Vor Slnbetriebnahme Sdes SStaubsaugers ist Sdieser Sauf Ssichtbare Schäden zu untersuchen und bei Beschädigung nicht in Betrieb zu nehmen.
→ Menschen oder Tiere nicht ab- bzw. aufsaugen.
→ Nicht zur Aufnahme von gefährlichem oder gesundheitsgefährdendem Staub geeignet.
→ Keine scharfen, leicht entflammbaren, explosiven und gesundheitsschädlichen Stoffe oder Gase aufsaugen. Nur zur Reinigung trockener Flächen. Nichts Glühendes oder Heißes aufsaugen.
→ Niemals bei angeschlossenem oder laufenden Gerät an die Bürste* fassen!

Dieser Staubsauger ist nur zur Trockenanwendung bestimmt und darf nicht im Freien und unter nassen Bedingungen verwendet oder aufbewahrt werden.
→ Das Gerät nur an einwandfreien und korrekt abgesicherten elektrischen Installationen betreiben.
→ Nach Benutzung des Gerätes den Staubsauger ausschalten und den Netzstecker ziehen.
* Je nach Modell
Original instruction manual

Please read these instructions and also the Floor maintenance guide carefully before using the machine.
Thank you for choosing a SEBO. We are sure that you will enjoy using your new SEBO machine. We listen to our customers and if you have any suggestions, please contact us at www.sebo.co.uk.
Your Snew SSEBO Sis Sa Shigh Squality, Sreliable, Sinnovative product Sthat Swas Sdeveloped Sin SGermany Swith Sthe Smost modern technology. The S-Class filtration and the effective cleaning power give you the highest standards of cleaning efficiency.
2. Safety Instructions
Please save these instructions. If you pass the machine to a third party, please pass these on as well. The use of the machine is at your own risk. The manufacturer / supplier is not liable for any injury or damage caused by incorrect
\$Be-usage of the machine.
Safe Use
This appliance is suitable for commercial use, e.g. in hotels, schools, hospitals, factories, shops, offices, and rental companies.
This appliance is not intended for use by persons (including children) with reduced physical, sensory or mental capabilities, or lack of experience and knowledge, unless they have been given supervision or instruction concerning use of the appliance by a person responsible for their safety.
→ Children Sand Spets Smust Sbe Sstrictly Ssupervised, Sand must not play with the appliance.
→ Before Susing Sthe Svacuum Scleaner, Salways Scheck Sfor any signs of damage, especially to the mains cable. Do not use a damaged machine.
→ Do not Stouch the Sbrush Sroller* Swhile the Smachine Sis plugged in.
→ Do not use on people or animals.
→ This machine must not be used for picking up hazardous or harmful dust.
→ Do not use in the presence of flammable, explosive or harmful materials and gases.
→ Do not pick up hot material, such as fire ash.

Use on dry surfaces only. Do not store outdoors or in damp conditions.
→ Ensure that the connection data on the data label (voltage and frequency) match the mains electricity supply. The data label is on the bottom of the machine.
→ The machine should only be operated with fault-free and correct electricity supply systems.
→ Do Snot Sconnect Sa Sdamaged Sappliance Sto Sthe Spower supply.
* depending on model.
Sicherer Gebrauch
→ Den Staubsauger nur an den vorgesehenen Griffen transportieren und bedienen. Handgriff während des Betriebes stets festhalten. Das Gerät erst abstellen sobald die rotierende Bürste* komplett zum Stillstand gekommen ist, der Netzschalter ausgeschaltet und der Netzstecker gezogen wurde.
→ Wickeln Sie die SNetzanschlussleitung nach Sdem Betrieb wieder auf, da durch sie eine Stolpergefahr für Personen entsteht.
Technische Sicherheit
→ Den Staubsauger nur gemäß der Anschlusswerte des Typenschildes anschließen und betreiben.
→ Einen Staubsauger mit Defekten nicht anschließen.
→ Die SNetzanschlussleitung Sist Sregelmäßig Sauf SBeschädigung zu untersuchen, wie z.B. Rissbildung oder Alterung. Falls Seine SBeschädigung Sfestgestellt Swird, Smuss Sdiese Leitung vor weiterem Gebrauch des Staubsaugers durch den Hersteller, seinen Kundendienst oder von qualifiziertem Servicepersonal ersetzt werden, um Gefährdungen zu vermeiden. Hierzu darf nur der vom Hersteller festgelegte Leitungstyp verwendet werden.
→ Benutzen Sie das Anschlusskabel oder den Saugschlauch nicht zum Tragen des Gerätes.
→ Netzstecker nicht am Kabel aus der Steckdose ziehen.
→ Netzkabel von scharfen Kanten fern halten.
→ Achten Ssie Sdarauf, Sdass Sdas SNetzkabel Sniemals Seinge quetscht wird.
→ Mit Seingeschaltetem SGerät Snicht Süber Sdie SAnschlussleitung fahren.
→ Den Staubsauger niemals ohne Filtertüte bzw. Filter benutzen. Der SFilterdeckel Sschließt nur mit Skorrekt eingesetzter Filtertüte. Wenden sie keine Gewalt an.
→ Beobachten SSie Sdie SFüllanzeige Sdes SStaubbeutels Sund wechseln Sie diesen bitte rechtzeitig.
→ Vor Hitzequellen, Feuchtigkeit und Wasser schützen und nur trocken oder mit einem leicht feuchten Tuch reinigen.

Vor allen Arbeiten am Staubsauger:
Erst das Gerät ausschalten und den Netzstecker ziehen. Reparaturen und Ersatzteileaustausch am Staubsauger dürfen nur von Fachkräften ausgeführt werden.
Das Gerät darf nur mit original SEBO Filtertüten und original SEBO Ersatz- und Verschleißteilen betrieben werden. Nur die Verwendung von Originalteilen für dieses Produkt berechtigt zu Garantieleistungen und gewährleistet die Betriebssicherheit des Gerätes. Änderungen am Staubsauger sind nicht zulässig.
→ Aus Sicherheitsgründen ist die Elektroteppichbürste* mit einem Selektronischen Süberlastungsschutz Sausgestattet. Bei bestimmten Teppichqualitäten kann eine derart starke Bürstwirkung eintreten, dass sie automatisch abschaltet. Sollte dies der Fall sein: Gerät ausschalten, Netzstecker ziehen und Bürste auf Verunreinigung prüfen. Danach ist es Sratsam, Sdie SSaugleistung Szurückzunehmen Sbzw. Sder Stellknopf der Elektroteppichbürste* auf eine höhere Stufe (bis Stufe 4) zu drehen.
Zubehör
→ Die Steckdose am Staubsauger ist nur für original Zubehör zu verwenden.
* Je nach Modell.
→ Inspect the mains cable at regular intervals for damage or signs of wear. If the mains cable is damaged it must be replaced with a genuine SEBO part. For safety reasons this must be done by a SEBO service representative or an authorised Service technician.
Do Snot Sover Sstretch Sthe cable. When Swinding Sit Son Sthe machine ensure there is some slack where it enters the handle.
→ Do not carry the vacuum cleaner by the cable or hose.
→ Only disconnect from the socket by pulling the plug.
→ Keep the cable away from sharp edges and prevent it becoming trapped or crushed.
→ Do not run over the cable.
→ Always turn off and unplug the machine when it is not in use.
→ Only carry the vacuum cleaner by the carry handle.
→ Always hold the handle when operating the vacuum cleaner.
→ When you finish or interrupt your work, always turn off, unplug the machine and ensure the rotating brush has stopped.*
Do not use the vacuum cleaner without the filter bag or filters. If a filter bag is not fitted, the cover will not close. Never force it.
→ Inspect the filter bag indicator regularly and change the filter bag when necessary. We recommend changing all filters regularly,
→ Electrical appliance, do not expose to liquid, moisture or heat.
→ Only clean with a dry or slightly damp cloth.

Always turn off and unplug the machine before undertaking any maintenance. All repairs within the guarantee period should be performed by an authorised SEBO service representative.
This machine should only be operated with genuine SEBO filter bags, filters and replacement parts. The use of non-genuine parts will waive the warranty for this product and could pose a serious safety risk
For safety, the machine contains an electronic overload protection. The power head* could shut itself off if used on certain carpets. If that should occur, turn off the machine, unplug it, and look for a blockage. If there is no blockage, reduce the load on the brush roller by adjusting the brush height to a higher level (up to 4).
Attachments
→ Use only genuine SEBO Attachments.
* depending on model.
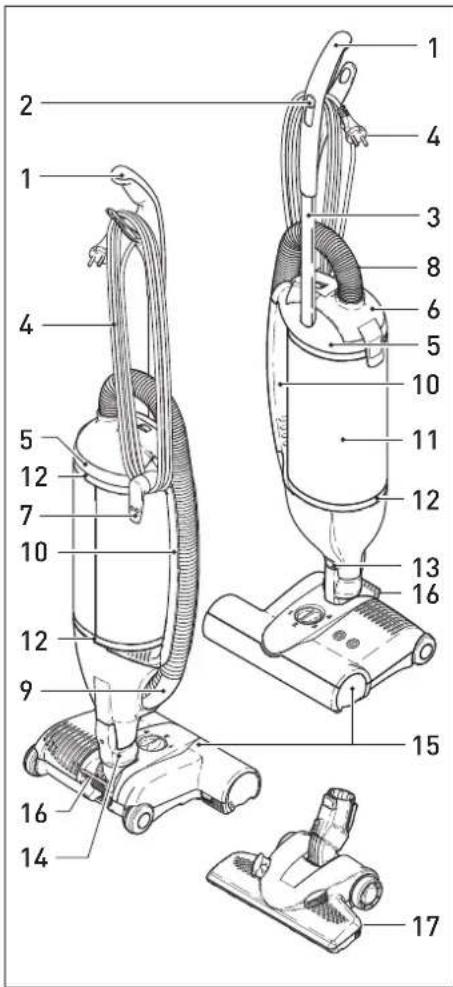
3. Gerätebeschreibung
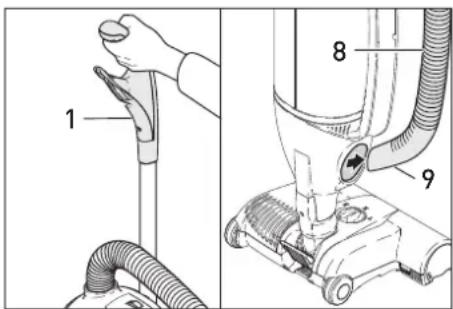
1 Griff
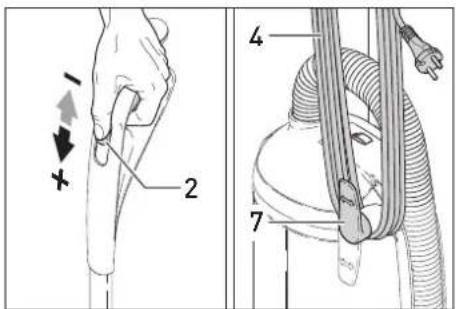
2 Schalter - Ein/Aus*
3 Stiel
4 Anschlussleitung
5 Filtergehäuse
6 Filterdeckel
7 Leitungshaken
8 Schlauch
9 Schlauchdüse
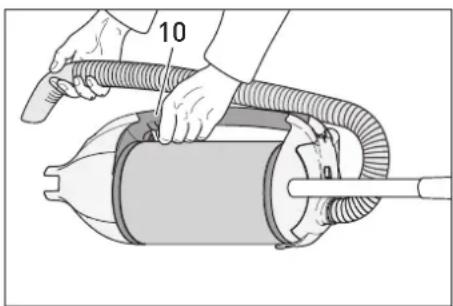
10 Tragegriff
11 Abluftfilter
12 Filterbefestigungsringe
13 Entriegelungstaste
14 Gelenk
15 Elektroteppichbürste*
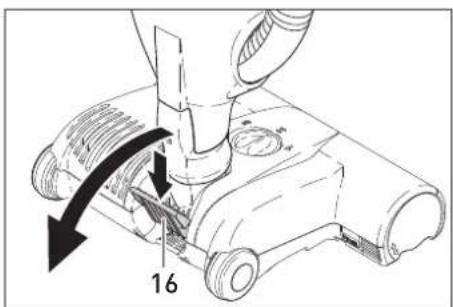
16 Rastpedal
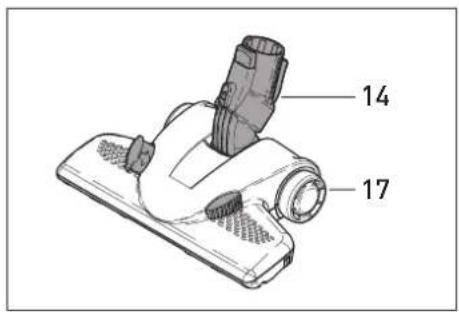
17 Kombibodendüse*
* je nach Ausstattung.
Lesen Sie bitte vor Gebrauch gründlich diese Gebrauchsanweisung und die darin enthaltenen Sicherheits- und Warnhinweise.
4. Inbetriebnahme
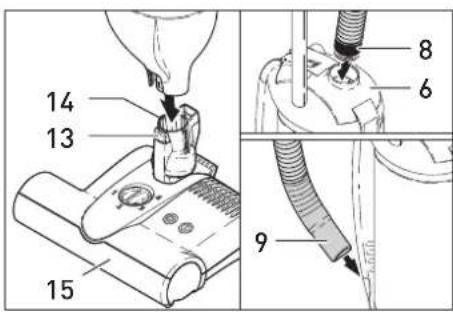
Ihr SEBO kann mit Elektroteppichbürste* (15), SKombibodendüse* S(17) Sbetrieben werden. SStecken SSie Sdazu Sden SStaubsauger vorsichtig auf das Gelenk (14) des jeweiligen Saugvorsatzes bis es einrastet. Bei SBetrieb Smit SElektroteppichbürste* kann Sder SStaubsauger Saufrecht Shingestellt werden.
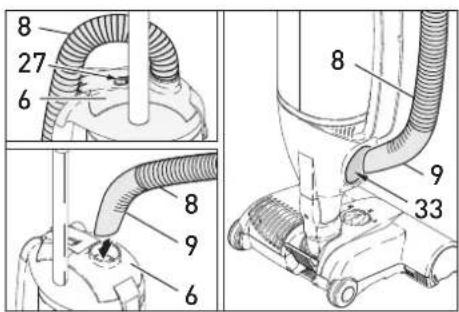
Achten Sie darauf, dass der Staubsauger in der Mittelstellung eingerastet ist, sonst kann Sdas SGerät Sumkippen. SDanach Sden Schlauch S(8) Smit Sder Ssschwarzen SBuchse in die Öffnung am Filterdeckel (6) drücken bis sie einrastet. Schließlich die Schlauchdüse (9) in die seitliche Saugöffnung stekken und den Schlauch andrücken. Fertig!
5. Handhabung
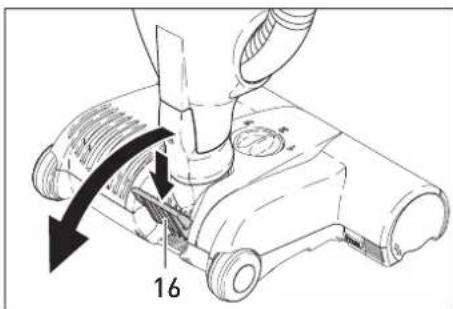
Stellen SSie Ssicher, Sdass Sder SSchalter S12 ausgeschaltet ist. Danach die Anschlussleitung S(4) Sdurch SDrehen Sdes SLeitungshakens S(7) Slösen Sund Sden SNetzstecker einstecken. SSchalten SSie Snun Sdas SGerä ein S(2). SJe Snach SGeräteausstattung Slässt sich die Saugleistung am Griff regulieren. Für Sden SGebrauch Sder SElektroteppichbürste* Szuerst Sdas SRastpedal S(16) Sdrücken. Durch Abkippen des Gelenkes kann nun Sdas SGerät Sbetrieben Swerden S(siehe Abschnitt 6. Elektroteppichbürste*).
* je nach Ausstattung.
3. Machine Description
1 Handle
2 On/Off Switch*
3 Handle Tube
4 Power Supply Cable
5 Dust Bag Housing
6 Filter Cover
7 Cable Hook
8 Hose
9 Hose Handle
10 Carrying Handle
11 Exhaust Filter
12 Filter Retaining Rings
13 Release Button
14 Swivel Neck
15 Power Head*
16 Foot Pedal
17 Combination Nozzle*
* Sdepending on model.
Please read all the instructions before using this machine.
4. Assembly
Your SEBO can be operated with an electric power Sbrush* S(15), Sor SSEBO SKOMBI Scbination Snozzle* S(17). SCarefully Sattach St brush nozzle to the vacuum cleaner through the fitting at the bottom of the vacuum until it locks. The machine can be placed in an upright position when used with the electric power brush. SWhen Slocking Sthe Svacuum the upright position, please ensure the bag housing is clicked in place, facing forward to the centre or the unit could overturn. Push the black end of the hose (8) into the connection on the filter cover (6). Finally, insert the hose handle (9) into the suction opening on the side and press the hose into its place on the side of the machine.
5. Operating Instructions
Please Sensure Sthat Sthe Son/off Sswitch S( is in the OFF position. Then turn the cable hook (7), release the cable (4) and plug it Sinto Sthe Swall Smains outlet. SNow you can start the machine by moving the Son/ off Sswitch Sto Sthe SON Sposition. SDependi on model your machine is equipped with electronic suction control. To use the power Shead*, Spress the Sfoot Spedal S(16) the rear of the power head and lower the machine handle to an angled position. The brush motor will then turn on.
* depending on model.
natural_image
Illustration of a person using a vacuum cleaner with hose and valve (no text or symbols)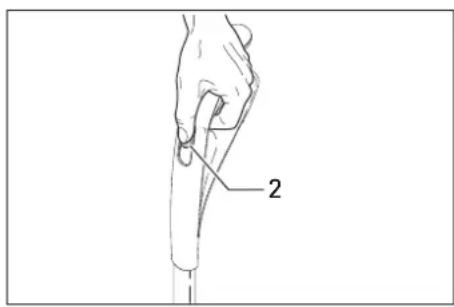

Zur Benutzung des Schlauchs (8) mit Schlauchdüse (9) das Gerät immer in die aufrechte Position stellen!
Durch Herausnehmen der Schlauchdüse (9) aus Sder Sseitlichen SSaugöffnung Skann Sder Schlauch alleine oder mit SEBO Zubehör benutzt werden. Achten Sie bei der Benutzung des SSchlauchs Sstets Sdarauf, Sdass SSie Sder Griff S(1) Sweiterhin Sfesthalten, Sda Sdas SGerät sonst umfallen könnte.
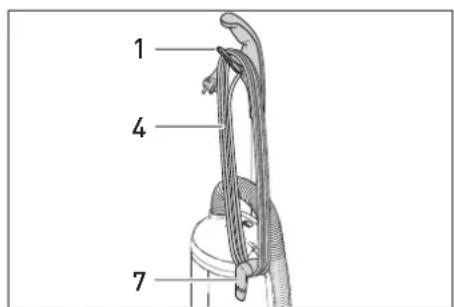
Das Gerät kann auch ohne Saugvorsatz verwendet Swerden. SDazu Skönnen SSie Ses Spro-blemlos am Tragegriff (10) transportieren. Nach SEnde Sdes SGebrauchs Sdas SGerät Saus schalten S(2). SZiehen SSie Sdann Sden SNetzstecker Sund Swickeln Sdie SANschlussleitung (4) über den Griff-(1) und Leitungshaken (7) wieder auf.
6. Elektroteppichbürste\*

Hinweise zum Gebrauch der Elektroteppichbürste*:
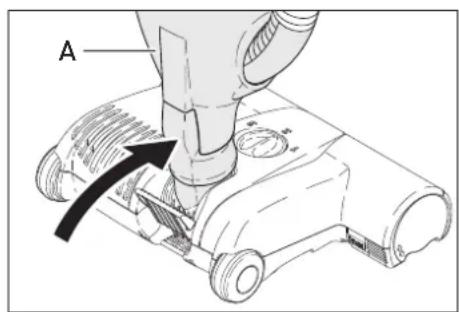
→ Die Bürste der Elektroteppichbürste schaltet nur ab, wenn das Gerät in aufrechten Position (A) eingerastet ist.
→ Im abgekippten Zustand sollte das rät ständig in Bewegung sein. Rotiert die Bürste längere Zeit auf einer Stelle kann die Oberfläche des Bodenbelags beschädigt werden.
→ Bitte achten Sie immer darauf, dass Teppichkanten und –ecken nicht von der Bürste eingezogen werden.
→ Bei sehr empfindlichen Bodenbelägen wie z.B. lose gewebten, extrem langflorigen Teppichen oder sehr weichen, empfindliche Bodenbeschichtungen weisen wir darauf hin, dass durch die Benutzung der Elektroteppichbürste Oberflächenschäden entstehen können. Bitte benutzen Sie bei den oben genannten Bodenbelägen die Kombibodendüse mit aus geschwenkten Borsten, die Parkettdüs oder die Schlauchdüse(9) und eine Düsen aus dem SEBO-Zubehör.
→ Wir raten davon ab, alte und besonders wertvolle handwerklich gearbeitete Teppichbrücken mit der Elektroteppichbürste zu reinigen.
→ Auf unebenen Böden ist der Kontakt mit dem Bodenblech möglich. Vorsicht, können Kratzer entstehen!
→ Das Gerät über hohe Schwellen tragen.

When using the hose (8) and attachments (9), keep the machine in upright position.
The hose handle (9) can be removed from the side of the vacuum and can be used with or without attachments. Also maintain a grasp on Sthe Smachine Swhen Susing Sthe Shose Sas it Scould tip Sif Sthe hose is Spulled too far. The machine can also be Sused without a Spower head* or other floor tool*. You can easily carry the machine by using the carrying handle (10). When Syou Shave Sfinished Susing Sthe Smachine, turn it off by moving the on/off switch (2) into the off position. Then unplug the cable (4) and wind it onto the cable hook (7) and handle (1).
6. Power Head\*

Caution: Important instructions for the use of a power head*
→ The brush roller is off and stopped only when the machine is in an upright position (A) and the handle is complet locked in place. If you have the machine handle at an angle, the brush roller will spin. Leaving the machine in a stationary position for an extended period of time while the brush roller is spinning m cause damage to your floor or carpet.
→ Be sure not to allow carpet edges or fringe into the brush.
→ As with any vacuum with a rotating brush, this machine could cause damage to loosely woven carpets or rugs, wool loop carpets, long piled carpets, or very soft, sensitive floor coverings. Please use the Combination Nozzle or Parquet Brush on these types of flooring or floor coverings.
→ We do not recommend the use of the power head for cleaning old and especially valuable hand-crafted carpets.
→ If you have uneven hard flooring, the metal part underneath the machine may come in contact with the floor, causing scratches.
→ Please carry the machine across high thresholds.
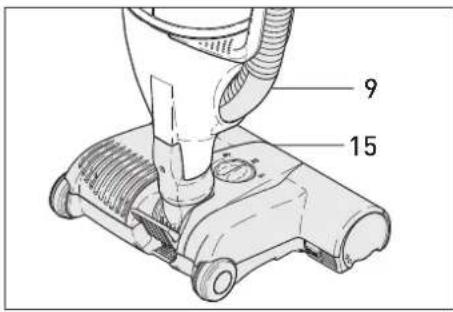
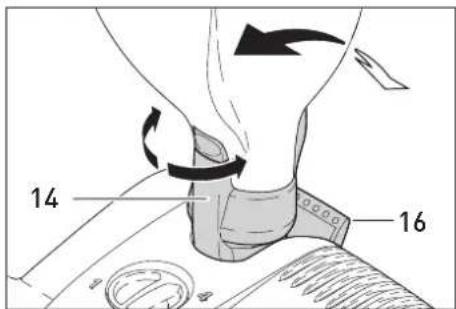
Für Fdie Fprofessionelle Fund Foptimale FReinigung Flhrer FTeppichböden Fempfehlen Fwir Fdie Elektroteppichbürste F(15). FDurch Fein FDreh-Kipp-Gelenk* (14) Fist Fdie FElektroteppichbürste in alle Richtungen beweglich und umsteuert spielerisch jedes Hindernis. Die Elektroteppichbürste ist in der Stärke der FBürstenwirkung variabel und sorgt für eine optimale Reinigung bis zum Rand.
* Fje nach Ausstattung
Das FRastpedal F(16) Farretiert Fdas FGerät Fin senkrechter FRuhestellung Fund Fschaltet Fdie Bürste ab.
Zum FArbeiten FRastpedal F(16) Fbetätigen Fund Gerät Fnach Fhinten Fkippen. FDie FBürste Fläuft jetzt Fan. FEin FArbeiten Fohne FBetätigen Fdes Rastpedals führt auf Dauer zur Beschädigung des Gerätes. Die Bürstenkontrolle überwacht ständig die Funktion der Bürste.
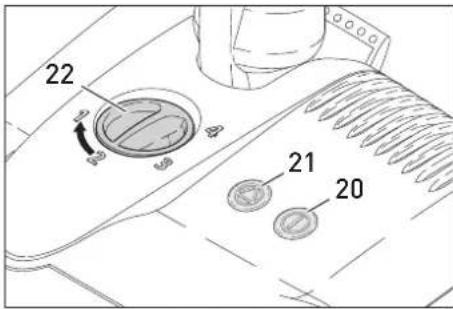
Grün- Gund GRot: FDie FBürstwirkung Fist Fnicht ausreichend. Durch Drehen des Stell-knopfes (22) auf eine niedrigere Position, wird die Bürste Fabgesenkt. FLeuchten Fdas Fgrüne Fund rote Signal Fauch Fauf Stufe 1, so ist die Bürste abgenutzt und muß ausgetauscht werden. Diese Angaben gelten nur für Teppichboden.
Grün: (20) Bürste arbeitet gut. Wir empfehlen für Fden FGebrauch Feine FBürsten-Feinstellung zu wählen, die Fnur Feine FStufe Funterhalb der grün-roten Anzeige liegt.
Für Fmaximale FReinigungsleistung Fkann Fdie Bürste auf die niedrigste Position eingestellt werden.
Rot: F[21] FDie FBürste Fwurde Fblockiert Foder überlastet (siehe Abschnitt 12. Verstopfungen beseitigen). Gerät ausschalten, Netz- stecker ziehen, Bürste auf Verunreinigung prüfen.
* je nach Ausstattung.
7. Entnahme der Rundbürste
Bei Gallen GWartungs- Gund GReinigungsarbeiten: GGerät Gausschalten Gund Netzstecker ziehen.
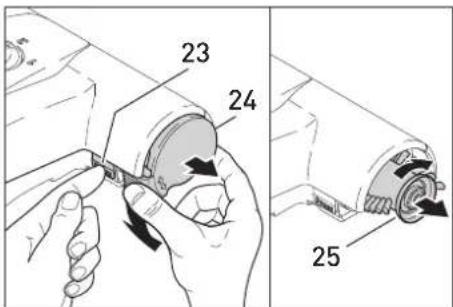
Um die Rundbürste der Elektroteppich- bürste* Fzu Fentnehmen, Fdie FPress-Taste F(23) drücken Fund Fgleichzeitig Fdas FLoslager F(24) nach unten wegdrehen. Die Bürste (25) etwas im FUhrzeigersinn Fdrehen Fund Fherausziehen Es Fempfiehlt Fsich, Fregelmäßig Fdie Fauf Fde Rundbürste aufgewickelten Fäden und Haare zu entfernen.
* je nach Ausstattung
The use of a power head is recommended for the Foptimal Fcleaning Fof Fcarpets. The Frotating design of the swivel neck* [14] allows the power head to move in any direction, making it easily Fmaneuverable Faround Fobstacles. FThe power Fhead Falso Fhas Fan Fadjustable Fbrush height and to-the-edge brush action for effective all round cleaning.
* Fdepending on model.
By Fpushing Fthe Ffoot Fpedal F(16) Fand Flowerir the handle, you Factivate the power head and the brush begins spinning.
Failure to use the foot pedal will cause lasting damage to the machine. The electronic brush control Fconstantly monitors the status of the brush, communicating the status through the lights on top.
Green and red – The brush is not fully engaged Fin Fthe Fcarpet. FThe Fheight Fadjust- Fmen should Fbe Flowered. Flf Fthe Fheight Fadjustmen is at its lowest setting, the brush is worn and needs to be replaced.
Green light only – Brush is working well. We strongly recommend selecting a brush height that Fis Fonly Fone Flevel Fbeneath Fthat Fat Fwhi both the green and red lights are on.
For Fmaximum Fcleaning Fperformance, Fthe brush height adjustment can be lowered to its lowest setting.
Red Glight Gonly G- FThe Fbrush Fis Fblocked. F[below F12.Removing FBlockages] FTurn Foff Fthe machine, unplug it, and then remove the blokkage.
* Fdepending on model.
7. Removing the Brush Roller
Always Gunplug Gthe Gvacuum Gfrom Gt mains Goutlet Gbefore Gdismantling Gan part of the machine.
The remove the brush roller, press the button marked F„PRESS“ F(23) Fand Fturn Fthe Fbearing (24) downward. Turn the brush [25] slightly to the right and pull it out. We recommend to regularly remove threads and hair, which have been wound around the brush roller.
* depending on model.
8. Kombibodendüse\*
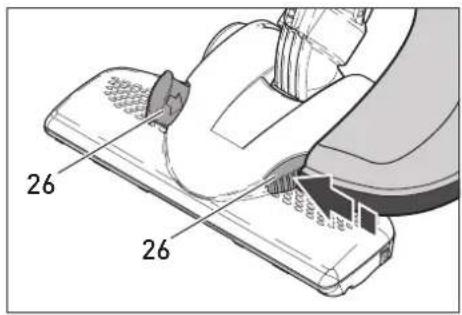
Die Kombibodendüse (17) bietet mit dem 90° Dreh-Kipp-Gelenk (14) größten Saugkomfort. Die FDüse Fverfügt Füber Feinen Ffedernd Fgelagerten Fund Feinfach Fauswechselbaren FNaturborstenstreifen. FMit Fdem FFußschieber F(26) kann die Düse je nach Bedarf auf Hartboden (Borsten raus) oder Teppich- boden F(Borsten rein) eingestellt werden. Sie ist zusätzlich mit eingelassenen Verschleiß- bügeln und einem Bodenblech aus Edelstahl für hohe Beanspruchung ausgestattet.
* Fje nach Ausstattung.
9. Filteranzeige
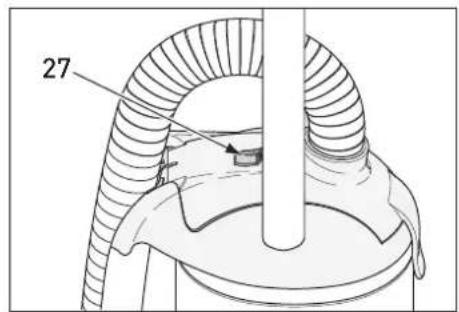
Die orangefarbene Filteranzeige (27) zeigt einen reduzierten Luftstrom an. Entweder liegt eine Verstopfung vor (siehe Abschnitt 12. Verstopfungen beseitigen) oder die Filtertüte muß gewechselt werden. Je nach Art des Füllgutes kann ein Wechsel erforderlich sein, ohne das die Filtertüte bis oben gefüllt ist.
10. Wechsel der Filtertüte
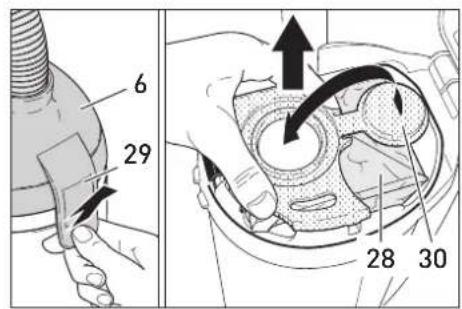
Zum FWechseln der FFiltertüte F(28) Fden FFilter- Fdeckel F(6) Fauf Fder FOberseite Fan Fder Verschlußlasche F(29) Fentriegeln Fund Fauf-schwenken. Die FFiltertüte Fmit Fdem FFilter-tütendeckel (30) schließen und aus dem Fil-terraum herausheben. Legen Sie die neue Filtertüte in den Filterraum ein. Bitte ach- ten Sie hierbei auf die Positionierungspfeile auf der Filtertüte. Diese zeigen die korrekte Positionierung der Filtertüte an. Die grüne Lasche an der linken Seite muss über dem Metallhebel liegen. Beim Schließen des Fil- terdeckels Fwird Fder FMetallhebel Fzur FSeite gedrückt. FDer FVerschlusshebel des FFilter-deckels muss spürbar einrasten. Bei nicht korrekt eingelegter Filtertüte lässt sich der Filterdeckel nicht schließen.
11. Motorschutzfilter Abluftfilter
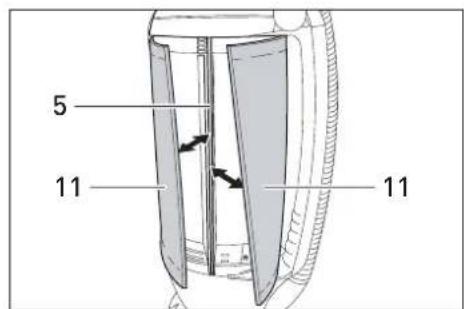
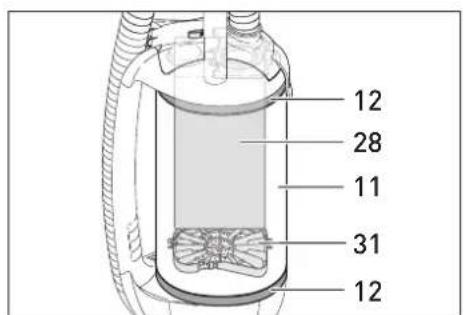
Der FMotorschutzfilter F(31) Fist Fnur Fzugänglich Fnach FEntnahme Fder FFiltertüte. Ziehen Sie Fnun Fden FFilter Fan Fseinem FBügel Fnak oben heraus. Beim Einsetzen Feines neuen Motor- Fschutzfilters muss dieser Ffest angedrückt Fwerden. FDer FMotorschutzfilter muss Fgewechselt Fwerden, Fwenn Fer Fstark verschmutzt Fist Foder Fspätestens Fnach F20 Filtertüten. FGleichzeitig Fsollte auch Fder außen liegende Abluftfilter (11) gewechselt Fwerden. FHierzu Fmüssen Fdie Fbeiden Filterbefestigungsringe F(12) Fvorsichtig Fgelöst und seitlich entfernt werden. Dann die beiden Kunststoffschienen aus der Nut im Filtergehäuse F(5) Fherausziehen Fund Fden Abluftfilter entfernen. Die FMontage erfolgt in Fumgekehrter FREihenfolge. FNur Fwenn der Abluftfilter richtig montiert ist, d.h. die Kunststoffschienen richtig in der Nut liegen und Fdie FFilterbefestigungsringe Fden FFilter abdichten und verschlossen sind, kann der Abluftfilter seine Wirkung entfalten.

Zur GGewährleistung Gder GSicherheit und Grichtigen GFunktion, Gnur GOriginal SEBO GErsatzfilter verwenden. GAlle Filtermedien Gdürfen Gauf Gkeinen GFall gewaschen werden.
8. Combination Nozzle\*
The Combination Nozzle (17) is equipped with a Fturnable Fswivel Fneck F(14) Fand Foffers Fa F range of maneuverability for ease-of-use and comfort. The nozzle has natural bristles that can be easily replaced if worn.
The FCombination FNozzle Fcan Fbe Fadjusted Ff hard floors (bristles out) or carpet (bristles in) through a slider (26).
Furthermore this nozzle is equipped with heavy-duty embedded stainless steel clamps and bottom plate.
* depending on model.
9. Filters
When Fthe Forange Fbag Ffull Findicator F(27) Fis showing, airflow is reduced. This could be because the filter bag is full, the filters clogged, or there may be a blockage (see 12. Removin-blockages).
10. Changing the Filter Bag
To remove the filter bag (28), open the latch on the side of the bag housing (29). FClose the filter bag with the sealing cap (30) and lift it out. Insert the new filter bag into the bag housing. Please ensure that the green bag top is in the correct position. The green flap Fon Fthe Fleft Fside Fof Fthe Ffilter Fbag F should Ffit Fover the Fmetal Fspring Fso Fthat covers it. When the filter bag cover is closed with Fthe Ffilter Fbag Fcorrectly Fin Fplace, Ftl metal Fspring Fwill Fmove Fover Fto Fallow Fit shut and click into place. You cannot close the filter bag cover if the filter bag is fitted incorrectly.
11. Motor Protection Filter and Exhaust Filter
The motor protection filter (31) is only accessible by removing the filter bag. Lift the motor protection filter Fup by Fthe Fbracket. When replacing the motor protection filter make sure that it is pressed in position tightly. The motor protection filter should be changed when it is dirty or Fat Fthe latest Fwhen you Fhave used F20 filter bags.
Change Fthe Fexhaust Ffilter F(11) Fat Fthe Fsam time as the motor protection filter. To do this, carefully Fremove Fthe Ffilter Fretaining Frings (12) Fand Fput Fthem Fto Fthe Fside. FNext Fpull enforcement strips of the exhaust filter out of the Fhousing Fslot F(5) Fand Fremove the Fexhau filter from the housing.
When Freassembling, Fplease Fensure Fthe Fex-haust Ffilter Fis Ffitted Fcorrectly Fin Fthe Fhousi slots and the filter retaining rings are installed correctly. Otherwise the filter will be ineffective. FThe Ffilter Fretaining ring Fclips Fshould Fb placed to the side under the hose guide.

Use only genuine SEBO replacement bags Gand Gfilters Gto Gensure Geffectiveness and safety.
Do not wash any filters.
12. Verstopfungen beseitigen 12. Removing Blockages
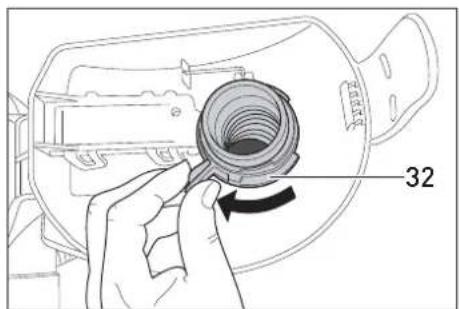
Erscheint das orangefarbene Signal (27) am Filterdeckel F(6) Fbei Fneuwertiger FFiltertüte, kann eine Verstopfung vorliegen. Zuerst den Schlauch (8) an der Schlauch- düse überprüfen. FWenn Fdort Fnur Feine Fgeringe FSaugwikung spürbar ist, ist er verstopft. Zuerst den Schlauch durch Drehen des Sicherungsrings (32) Fan Fder Flnnenseite Fdes FDeckels Flöser Stecken Sie dann die Schlauchdüse (9) in den Schlauchstutzen Fdes FFilterdeckels F(6) Fund saugen sie von der anderen Seite aus. Dazu den FSchlauch Fan Fder FVerstopfung Fdehnen und mit der flachen Hand auf die Öffnung des Schlauches klopfen. Überprüfen Sie auch den Saugkanal an der Einsteckstelle (33) für Fdie Schlauchdüse (9)!

Den Schlauch niemals mit einem Stab reinigen!
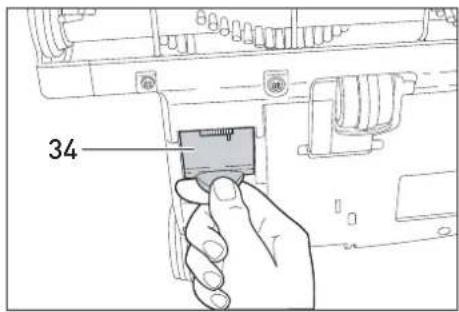
Danach Fdas FGelenk F(14) Fdes FSaugvorsatzes an der Einsteckstelle des Staubsaugers und dann ggf. durch die Klappe (34) auf der Unterseite der Elektroteppichbürste* über- prüfen. Stellen FSie Fsicher, Fdass Fsich Fzwischen Fder Klappe und der Einsteckstelle im Gelenk keine Verstopfung befindet.
* je nach Ausstattung.
If the orange bag full indicator (27) is showing after the filter bag has been changed and the filters are in good condition, there is Flikely Fa blockage in the system. First, check for suction at the end of the hose (8). If you can only feel a small amount of suction, the blockage is Fin Fthe Fhose. FTo Funblock, loosen the Fsafety ring F(32) Fon Fthe Flid. FRemove Fthe Fhose Ffrom the machine and Freverse the airflow through the hose by putting the hose handle (9) in the connecting tube of the filter cover (6). Stretch the hose in the spot where the blockage is and open and close the end of the hose. Also check the suction opening, which the hose handle (9) fits into.

Note - Never clean down the hose with a stick or pointed object.
Other places to check for a blockage include the suction neck (14) of the power head* and the orange trap-door (34) on the bottom of the power Fhead. FAlso Fcheck Fbetween Fthese Ftwo openings in the power head.
* depending on model.
EG-Konformitätserklärung
(CE-Kennzeichnung)
Hiermit erklären wir, dass die unten näher bezeichneten Geräte aufgrund ihrer Konzipierungen und Bauarten, sowie in den von uns in Verkehr gebrachten Ausführungen, den einschlägigen, grundlegenden Sicherheits- und Gesundheitsforderungen folgender EG-Richtlinien entsprechen: 1. Maschinenrichtlinie:
RICHTLINIE 2006/42/EG DES EUROPÄISCHEN PARLAMENTS UND DES RATES vom 17. Mai 2006 über Maschinen und zur Änderung der Richtlinie 95/16/EG
- Elektomagnetische Verträglichkeit
RICHTLINIE 2004/108/EG DES EUROPÄISCHEN PARLAMENTS UND DES RATES vom 15. Dezember 2004 zur Angleichung der Rechtsvorschriften der Mitgliederstaaten über die elektromagnetische Verträglichkeit und zur Aufhebung der Richtlinie 89/336/EWG
Bei nicht mit uns abgestimmten Änderungen der Geräte verliert diese Erklärung ihre Gültigkeit.
Gerätetyp:
Angewandte Normen:
SEBO DART1/ DART2/ DART4
Netzspannung: 220V - 240V 50Hz (EU)
EN 60335-1:2007+A13:2009
EN 60335-2-69:2010
EN 62233:2008+Ber.1:2009
EN 55014-1:2006+A1:2009; EN 550147-2:1997+A1:2001
EN 61000-3-2:2006; EN 61000-3-3:2009
EN 61000-4-2:2009; EN 61000-4-4:2004
EN 61000-4-5:2006; EN 6/000-4-6:2009
Velbert, 21.12 2010
Achim Liffers, Geschäftsführer Stein & Co. GmbH, Velbert
EC-Declaration of Conformity
[CE-Mark]
We herewith declare that the machines described below, because of their designs and construction, conform with the health and safety requirements of following EC directives:
- Machinery Directive
DIRECTIVE 2006/42/EC OF THE EUROPEAN PARALIAMENT AND OF THE COUNCIL of 17.May 2006 on machinery and amending Directive 95/16/EC
- EMC Directive:
DIRECTIVE 2004/108/EC OF THE EUROPEAN PARLIAMENT AND OF THE COUNCIL of 15 December 2004 on the approximation of the laws of the Member States relating to electromagnetic compatibility and repealing Directive 89/336/EEC
This declaration does not apply to machines which have had unauthorised alterations.
Type:
SEBO DART1/ DART2/ DART4
Voltage: 220V - 240V 50Hz [EU]
EN 60335-1:2007+A13:2009
EN 60335-2-69:2010
EN 62233:2008+Ber.1:2009
EN 55014-1:2006+A1:2009; EN 550147-2:1997+A1:2001
EN 61000-3-2:2006; EN 61000-3-3:2009
EN 61000-4-2:2009; EN 61000-4-4:2004
EN 61000-4-5:2006; EN 61000-4-6:2009
13. Hinweis zur Entsorgung
SEBO FGeräte Fsind Flanglebig Fausgelegt Fund Fkönnen meist problemlos und kostengünstig repariert werden. Am Ende seines Nutzungszeitraums können Sie das Gerät kostenlos an jeder öffentlichen Sammelstelle abgeben. Elektroaltgeräte gehören nicht in den Restmüll. Weitere Informationen erhalten Sie durch Ihre Kommune.
13. Note on disposal
FFor Fadvice Fon Fdisposal Fof Fused Fappliances, Fplease contact your local authority.

- GEBRAUCHSANWEISUNG / INSTRUCTION MANUAL
- Inhaltsverzeichnis
- Table of contents
- Technische Daten
- Staubsauger:
- Elektroteppichbürste\*
- Technical Details
- Vacuum Cleaner:
- Power head\*
- M Original Bedienungsanleitung
- Sicherheitshinweise
- Bestimmungsgemäße Verwendung
- Original instruction manual
- Safety Instructions
- Safe Use
- Sicherer Gebrauch
- Technische Sicherheit
- Zubehör
- Attachments
- Gerätebeschreibung
- Inbetriebnahme
- Handhabung
- Machine Description
- Assembly
- Operating Instructions
- Elektroteppichbürste\*
- Power Head\*
- Entnahme der Rundbürste
- Bei Gallen GWartungs- Gund GReinigungsarbeiten: GGerät Gausschalten Gund Netzstecker ziehen.
- Removing the Brush Roller
- Always Gunplug Gthe Gvacuum Gfrom Gt mains Goutlet Gbefore Gdismantling Gan part of the machine.
- Kombibodendüse\*
- Filteranzeige
- Wechsel der Filtertüte
- Motorschutzfilter Abluftfilter
- Combination Nozzle\*
- Filters
- Changing the Filter Bag
- Motor Protection Filter and Exhaust Filter
- Verstopfungen beseitigen 12. Removing Blockages
- Den Schlauch niemals mit einem Stab reinigen!
- Note - Never clean down the hose with a stick or pointed object.
- EG-Konformitätserklärung
- Gerätetyp:
- SEBO DART1/ DART2/ DART4
- EC-Declaration of Conformity
- Type:
- Hinweis zur Entsorgung
- Note on disposal
Marque : Sebo
Modèle : Dart 2
Catégorie : Aspirateur