VT2405LED - Téléviseur VIEWSONIC - Notice d'utilisation et mode d'emploi gratuit
Retrouvez gratuitement la notice de l'appareil VT2405LED VIEWSONIC au format PDF.

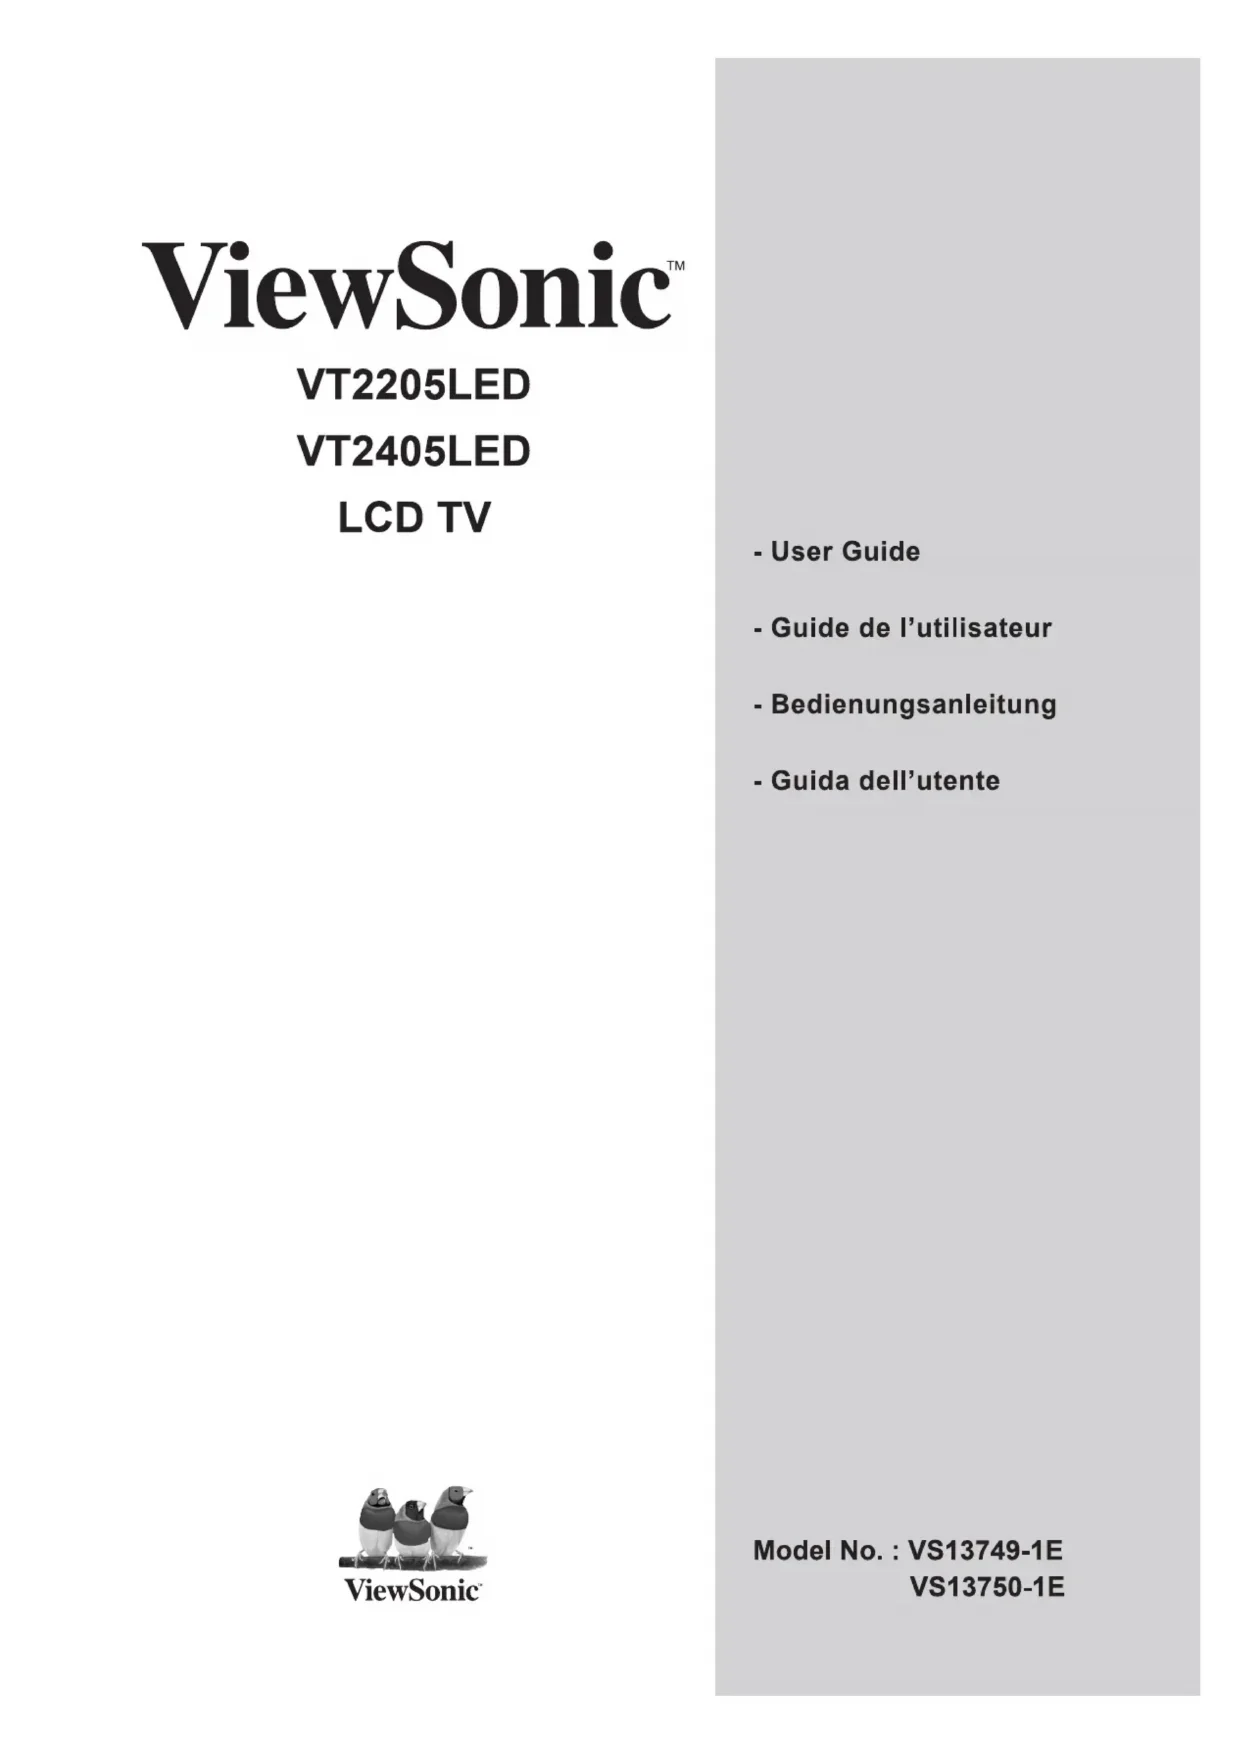
| Type de produit | Téléviseur LED LCD |
| Marque | ViewSonic |
| Modèle | VT2405LED |
| Taille de l'écran (diagonale) | 59,82 cm (23,55 pouces) |
| Résolution native | 1920 x 1080 (Full HD) |
| Format d'image | 16:9 |
| Luminosité typique | 300 cd/m² (nits) |
| Dimensions avec socle (L x H x P) | 563,3 x 413,2 x 218,3 mm |
| Dimensions sans socle (L x H x P) | 563,3 x 358,2 x 39,0 mm |
| Poids avec socle | 4,7 kg |
| Poids sans socle | Non communiqué |
| Alimentation électrique | AC 100-240V, 50/60 Hz |
| Consommation électrique maximale | 38 W |
| Consommation en veille | Environ 0,5 W |
| Haut-parleurs intégrés | 2 x 3 W |
| Entrées vidéo | Composite (AV), S-Vidéo, Composante (YPbPr), SCART, HDMI (x3), VGA (D-Sub) |
| Entrées audio | Audio PC (mini-jack 3,5 mm), Audio L/R (pour Composante et Composite) |
| Sorties audio | Casque (mini-jack 3,5 mm), SPDIF optique |
| Port USB | 1 (pour lecture multimédia et mise à jour) |
| Fonctions principales | Télétexte, Guide électronique des programmes (EPG), Minuterie, Verrouillage parental, Modes d'image et son préréglés, SRS TruSurround HD |
| Formats de fichiers pris en charge (USB) | JPEG, BMP pour photos ; TXT pour texte |
| Systèmes de vidéo | PAL, SECAM, DVB-T |
| Température de fonctionnement | 0°C à 40°C |
| Entretien et nettoyage | Utiliser un chiffon doux et sec ; pour les taches, employer un nettoyant non ammoniaqué et non alcoolisé |
| Sécurité | Ne pas exposer à l'humidité, ne pas obstruer les ouvertures de ventilation, débrancher en cas d'orage |
| Réparabilité | Aucune pièce réparable par l'utilisateur ; contacter un technicien agréé |
FOIRE AUX QUESTIONS - VT2405LED VIEWSONIC
Questions des utilisateurs sur VT2405LED VIEWSONIC
0 question sur cet appareil. Repondez a celles que vous connaissez ou posez la votre.
Poser une nouvelle question sur cet appareil
Téléchargez la notice de votre Téléviseur au format PDF gratuitement ! Retrouvez votre notice VT2405LED - VIEWSONIC et reprennez votre appareil électronique en main. Sur cette page sont publiés tous les documents nécessaires à l'utilisation de votre appareil VT2405LED de la marque VIEWSONIC.
MODE D'EMPLOI VT2405LED VIEWSONIC
ViewSonic
VT2205LED
VT2405LED
LCD TV
-User Guide
- Guide de l'utilisateur
-Bedienungsanleitung
-Guidedellutente
Contents
Compliance Information 1
Important Safety Instructions 2
Declaration of RoHS Compliance 3
Copyright Information 4
Product Registration 4
Antenna Installation Instructions 5
Cleaning the LCD TV 5
Quick Start Guide
- Please read these instructions 6
What's in the Quick Start Guide? 6
What's in the User Manual? 6 - Package contents 6
- Select and prepare the installation location 7
4.Installing the Base 8
5.Disconnecting the base and arm. 9 - Adjust the viewing angle 10
- Connect the antenna cable 10
- Connect the power cable 11
- Activate the remote control 12
12
Battery safety notice 12
Using the remote control 13
- Initialize your TV 14
11.View the TV programs 14
Care and cleaning information 15
What's next? 15
User Manual
Getting to know your TV 16
Front view. 16
Rear view 17
Getting to know the remote control 19
Remote control. 19
Using the remote control 23
Power on, off and standby. 23
Adjusting sound setting 23
Changing channels 24
Adjusting backlight 25
Adjusting aspect ratio 25
Using the Teletext function 27
Connecting video and audio signals 29
Input options 29
Connecting the Composite Video input 29
Connecting the SCART input 30
Connecting the Component Video input. 30
Connecting the S-Video input. 31
Connecting the PC input 31
Connecting the DVI input 32
Connecting the HDMI input 32
Connecting the USB input 33
Connecting the headset audio output 33
Connecting to A/V Device with SPDIF input. 34
OSD (On-Screen Display) menu 35
OSD structure 35
Navigating the OSD menu 37
Operations in the OSD menu 37
PICTURE menu 38
SOUND menu 41
TIME menu 42
OPTION menu 43
LOCK menu 45
CHANNEL menu 46
Connecting Cl(Common Interface) card 47
Media Play - USB Device 48
Precautions when using a USB device 48
Media Screen Display 49
Viewing Photo or Slide Show 50
Display the Text 51
Other Information
VT2205LED Dimensions 52
VT2405LED Dimensions 53
Specifications 54
Supported PC (D-Sub/DVI) input signal resolutions .55
Supported Component Video input signal resolutions 56
Supported HDMI input signal resolutions 56
Setting up appropriate output resolution on PC .57
Safety Precautions 58
Troubleshooting 59
Customer Support 60
Limited Warranty 61
Compliance Information
CE Conformity for European Countries
The device complies with the EMC Directive 2004/108/EC and Low Voltage Directive 2006/95/EC.
Following information is only for EU-member states:
The mark shown to the right is in compliance with the Waste Electrical and Electronic Equipment Directive 2002/96/EC (WEEE).
The mark indicates the requirement NOT to dispose the equipment as unsorted municipal waste, but use the return and collection systems according to local law.
If the batteries, accumulators and button cells included with this equipment, display the chemical symbol Hg , Cd, or Pb, then it means that the battery has a heavy metal content of more than 0.0005% Mercury or more than, 0.002% Cadmium, or more than 0.004% Lead.
Marking for the content condition of chemicals
| Coarse Classification | Chemical Substance Table | |||||
| Pb | Hg | Cd | Cr6+ | PBBs | PBDEs | |
| Front bezel | ○ | ○ | ○ | ○ | ○ | ○ |
| Back-cover | ○ | ○ | ○ | ○ | ○ | ○ |
| LCD panel | ○ | ○ | ○ | ○ | ○ | ○ |
| Power PCBA | exempted | ○ | ○ | ○ | ○ | ○ |
| Main PCBA | exempted | ○ | ○ | ○ | ○ | ○ |
| Keypad-PCBA | ○ | ○ | ○ | ○ | ○ | ○ |
| Stand | ○ | ○ | ○ | ○ | ○ | ○ |
| Power cord | ○ | ○ | ○ | ○ | ○ | ○ |
| I/O cable | ○ | ○ | ○ | ○ | ○ | ○ |
| *:PWBA consisted of bare printed circuit board, soldering and its surface-mounted elements, such as resistors, capacitors, arrays, connectors, chips, etc. NOTE 1: The “○”indicates that the percentage content of the substance to be calculated is not exceeding the reference percentage content of EU RoHS directive (2002/95/EC). NOTE 2: The “exempted” item means that the specified chemical substance corresponds to the items exempted by the EU RoHS directive (2002/95/EC). NOTE 3: The content of Mercury: none of part exceeding 0.1% | ||||||
Important Safety Instructions

- Read these instructions completely before using the equipment.
- Keep these instructions in a safe place.
- Heed all warnings.
- Follow all instructions.
- Do not use this equipment near water. Warning: To reduce the risk of fire or electric shock, do not expose this apparatus to rain or moisture.
- Clean with a soft, dry cloth. If further cleaning is required, see "Cleaning the LCD TV" in this guide for further instructions.
- Do not block any ventilation openings. Install the equipment in accordance with the manufacturer's instructions.
- Do not install near any heat sources such as radiators, heat registers, stoves, or other devices (including amplifiers) that produce heat.
- Do not attempt to circumvent the safety provisions of the polarized or grounding-type plug. A polarized plug has two blades with one wider than the other. A grounding type plug has two blades and a third grounding prong. The wide blade and the third prong are provided for your safety. If the plug does not fit into your outlet, consult an electrician for replacement of the outlet.
- Protect the power cord from being tread upon or pinched, particularly at the plug, and the point where if emerges from the equipment. Be sure that the power outlet is located near the equipment so that it is easily accessible.
- Only use attachments/accessories specified by the manufacturer.
Use only with a cart, stand, tripod, bracket, or table specified by the manufacturer, or sold with the apparatus. When a cart is used, use caution when moving the cart/ apparatus combination to avoid injury from tip-over. - Unplug this equipment when it will be unused for long periods of time.
- Refer all servicing to qualified service personnel. Service is required when the unit has been damaged in any way, such as: if the power-supply cord or plug is damaged, if liquid is spilled onto or objects fall into the unit, if the unit is exposed to rain or moisture, or if the unit does not operate normally or has been dropped.
- This product is only to perform the useful function of entertainment and visual display tasks are excluded.
Declaration of RoHS Compliance
This product has been designed and manufactured in compliance with Directive 2002/95/EC of the European Parliament and the Council on restriction of the use of certain hazardous substances in electrical and electronic equipment (RoHS Directive) and is deemed to comply with the maximum concentration values issued by the European Technical Adaptation Committee (TAC) as shown below:
| Substance | Proposed Maximum Concentration | Actual Concentration |
| Lead (Pb) | 0.1% | < 0.1% |
| Mercury (Hg) | 0.1% | < 0.1% |
| Cadmium (Cd) | 0.01% | < 0.01% |
| Hexavalent Chromium (Cr6+) | 0.1% | < 0.1% |
| Polybrominated biphenyls (PBB) | 0.1% | < 0.1% |
| Polybrominated diphenyl ethers (PBDE) | 0.1% | < 0.1% |
Certain components of products as stated above are exempted under the Annex of the RoHS Directives as noted below:
Examples of exempted components are:
- Mercury in compact fluorescent lamps not exceeding 5mg per lamp and in other lamps not specifically mentioned in the Annex of RoHS Directive.
- Lead in glass of cathode ray tubes, electronic components, fluorescent tubes, and electronic ceramic parts (e.g. piezoelectronic devices).
- Lead in high temperature type solders (i.e. lead-based alloys containing 85% by weight or more lead).
- Lead as an allotting element in steel containing up to 0.35% lead by weight, aluminium containing up to 0.4% lead by weight and as a cooper alloy containing up to 4% lead by weight.
Copyright Information
Copyright © ViewSonic Corporation, 2010. All rights reserved.
ViewSonic, the three birds logo, OnView, ViewMatch, and ViewMeter are registered trademarks of ViewSonic Corporation.
Disclaimer: ViewSonic Corporation shall not be liable for technical or editorial errors or omissions contained herein; nor for incidental or consequential damages resulting from furnishing this material, or the performance or use of this product.
In the interest of continuing product improvement, ViewSonic Corporation reserves the right to change product specifications without notice. Information in this document may change without notice.
No part of this document may be copied, reproduced, or transmitted by any means, for any purpose without prior written permission from ViewSonic Corporation.
Product Registration
To meet your future needs, and to receive any additional product information as it becomes available, please register your product on the Internet at: www.viewsonic.com.
| For Your Records | |
| Product Name: | VT2205LED/VT2405LED ViewSonic LCD TV |
| Model Number: | VS13749-1E(VT2205LED)/VS13750-1E (VT2405LED) |
| Document Number: | VT2205LED-1E_UG_ENG Rev. 1A 07-15-10 VT2405LED-1E_UG_ENG Rev. 1A 07-15-10 |
| Serial Number: | |
| Purchase Date: | |
Product disposal at end of product life
ViewSonic is concerned about the preservation of our environment. Please dispose of this product properly at the end of its useful life. Your local waste disposal company may provide information about proper disposal.
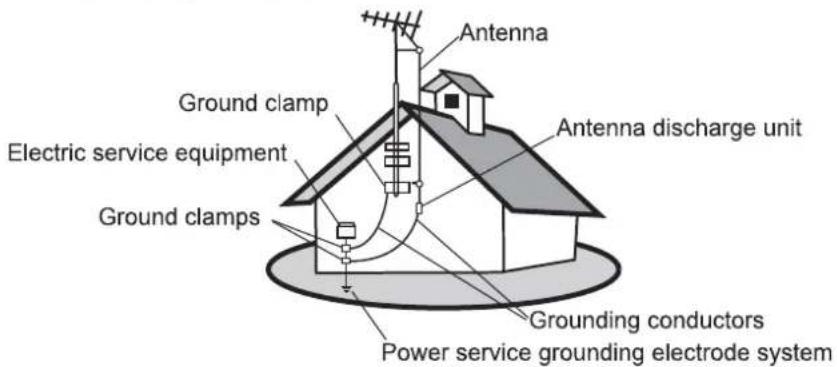
Antenna Installation Instructions
1. Outdoor Antenna Grounding
If an outside antenna or cable system is connected to the product be sure the antenna or cable system is grounded so as to provide some protection against voltage surges and built-up static charges, Article 810 of the National Electrical Code, ANSI/NFPA 70, provides information with regard to proper grounding of the mast and supporting structure, grounding of the lead-in wire to an antenna discharge unit, connection to grounding electrodes, and requirements for the grounding electrode.
2. Lightning
For added protection for this product during a lightning storm, or when it is left unattended and unused for long periods of time, unplug it from the wall outlet and disconnect the antenna or cable system. This will prevent damage to the product due to lightning and power-line surges. Do not disconnect the antenna or the power cord during a heavy storm lighting may strike while you are holding the cable cord, causing serious injury; turn off your LCD TV and wait for the weather to improve.
3. Power Lines
An outside antenna system should not be located in the vicinity of overhead power lines or other electric light or power circuits, or where it can fall into such power lines or circuits. When installing an outside antenna system, extreme care should be taken to keep from touching such power lines or circuits as contact with them might be fatal.
Cleaning the LCD TV
Make sure the LCD TV is turned off.
- Never spray or pour any liquid directly onto the screen or case.
To clean the screen:
- Wipe the screen with a clean, soft, lint-free cloth. This removes dust and other particles.
- If still not clean, apply a small amount of non-ammonia, non-alcohol based glass cleaner onto a clean, soft, lint-free cloth, and wipe the screen.
To clean the case:
- Use a soft, dry cloth.
- If still not clean, apply a small amount of a non-ammonia, non-alcohol based, mild non-abrasive detergent onto a clean, soft, lint-free cloth, then wipe the surface.
Disclaimer
ViewSonic does not recommend the use of any ammonia or alcohol-based cleaners on the LCD TV screen or case. Some chemical cleaners have been reported to damage the screen and/or case of the LCD TV. ViewSonic will not be liable for damage resulting from use of any ammonia or alcohol-based cleaners.
Quick Start Guide
1. Please read these instructions
Congratulations. You have a state-of-the-art flat widenscreen digital LCD TV which should provide you with years of viewing pleasure. Please take a few minutes to read these quick start instructions through before installing and using the TV.
What's in the Quick Start Guide?
Section 1 contains the Quick Start Guide which provides you with enough information to setup the TV. This is section 1.
What's in the User Manual?
Section 2 contains the User Manual which details the features and functions of the TV, and provides product specifications and troubleshooting information for your further assistance. The User Manual also describes how to customise the TV settings so that you can gain the best viewing experience possible to suit your preferences and viewing environment.
2. Package contents
Unpack the TV and check that all the following items are included:
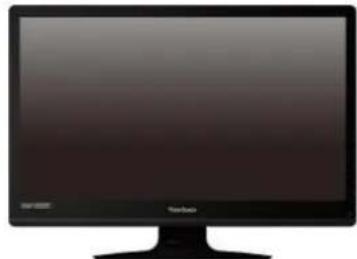
LCD TV (x1)
Power cord (x1)
User Manual (x1)
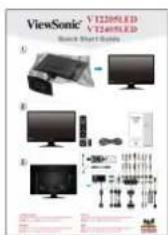
Quick Start Guide (x1)

AAA battery
(x2)
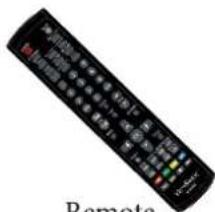
Remote control (x1)
The type of power cable supplied may differ from that illustrated, dependant upon your region of purchase.
If any item is missing or damaged, contact your place of purchase immediately and notify them of the discrepancy. Please keep the product documentation in a safe place for later reference.
Dispose of packaging wisely:
The cardboard carton can be recycled.
- Do not leave plastic bags within reach of young children or babies.
- Check that you haven't left an accessory inside the packaging, before discarding.
For the primary safety of yourself and others, this TV should be handled with care to avoid damage to it or to persons which come into contact with it.
All LCD screens have a very thin protective layer of glass which is liable to marking or scratching, and cracking if struck or pressured. The liquid crystal substrate is also liable to damage under excessive force or extreme temperatures. Please handle with care.
3. Select and prepare the installation location
In order to prevent potential dangers and prolong the service life of the TV, please observe the following points when installing, operating and cleaning the TV.

Do NOT place the display on an uneven, sloping or unstable surface where it may fall and cause damage to itself or others.
Have a qualified technician secure the display where it is placed in case there is an earthquake.

Do NOT place the display near water, like a spa or pool, or in a position which will allow the splashing or spraying of water onto the display, like in front of an open window where rain water may enter.

Do NOT place the display near or above sources of heat, such as radiators, heaters, fuel stoves and other heat-generating items (including audio amplifiers).
Otherwise heat may cause damages to the outer casing as well as the components inside.

If wall mounting, allow appropriate space on top for attaching the display to the wall bracket.

If wall mounting, have a suitable qualified and experienced tradesperson mount it safely. Use only a recommended display wall bracket for this model display and ensure that the mounting bracket (optional accessory) is securely screw fixed to the wall structure, and not just the wall render, lining or cladding. Ensure the bracket is level horizontally. Do not glue the bracket to the wall.

Do NOT place the display in an enclosed place without allowing for ventilation.

All Liquid Crystal Display (LCD) screens have a very thin protective layer of glass which is liable to marking or scratching, and cracking if struck or pressured.
The liquid crystal substrate is also liable to damage under excessive force or extreme temperatures. Please handle with care.

Do NOT cover or block the vents and openings while the display is switched on, as the heat may accumulate inside the display and result in danger.

Do NOT place the display in direct sun or where direct sun or spot lighting will shine onto the display, as the heat may damage the display and the bright light will make viewing the display more difficult than necessary.
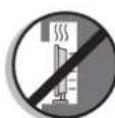
If recessed into a wall opening, you must leave appropriate free space both top and bottom for mounting and removing the display.
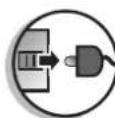
When installing the display, connect the power cord to socket-outlet which must be provided near the display and easily accessible. If a fault should occur during operation of the unit, operate the disconnect device to switch the power supply off, or disconnect the power cord.

Observe all warnings and cautions as labelled on the display.

WARNING
To prevent the spread of fire, keep candles or other open flames away from this product at all times.
4. Installing the Base
Important safety notes
Please pay attention to the following before installing:
- For safety reasons, it is recommended that the installation be carried out by at least two adult persons.
- The LCD panel of the display is extremely fragile and subject to damages easily. Avoid touching the LCD panel when installing or moving the display, and take precautions not be let any objects come into contact with the panel. It is recommended that you use a soft, clean and lint-free towel to protect the display when installing.
Pay attention to the stability of the location where the display will be placed.
Follow the instructions below to install the TV stand:
Open the box, and make sure all necessary parts are in the box. The package contains:
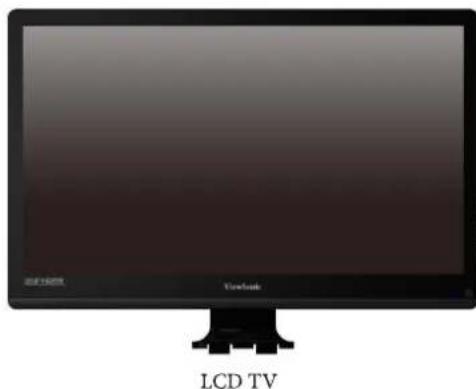
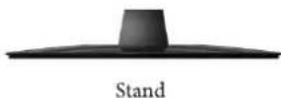
- Cover an even stable surface with a soft cloth. Place the LCD TV unit face down on the cloth. Fit the stand onto the bottom of the LCD TV unit as shown:
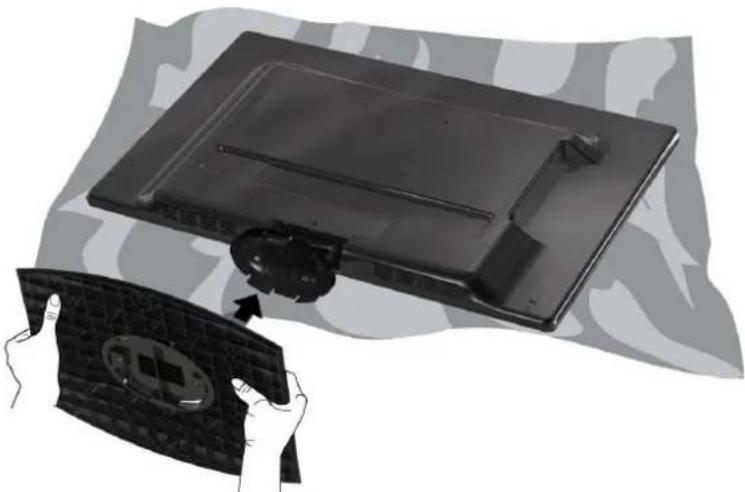
- Then push until stand into the LCD TV's stand socket.
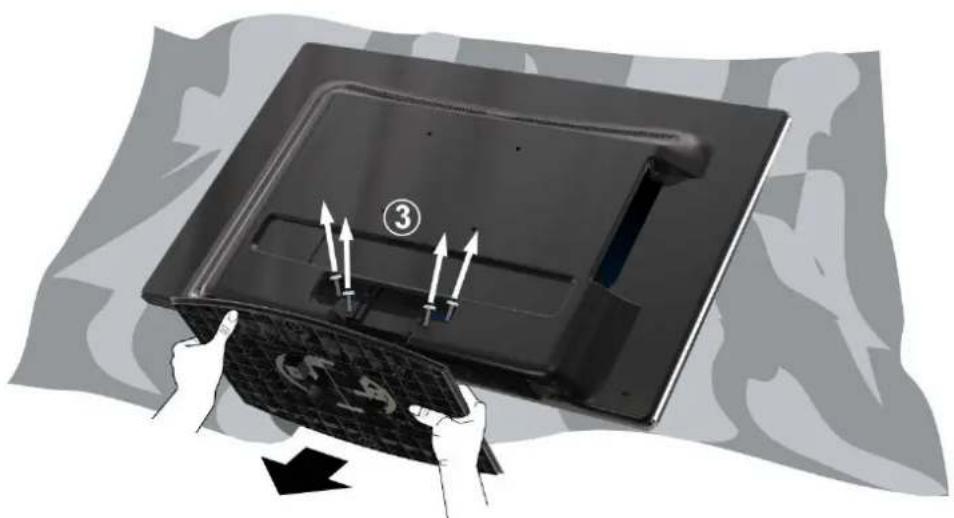
5. Disconnecting the base and arm
- Cover an even stable surface with a soft cloth. Place the LCD Display unit face down on the cloth. Fit the stand onto the bottom of the LCD Display unit as shown:
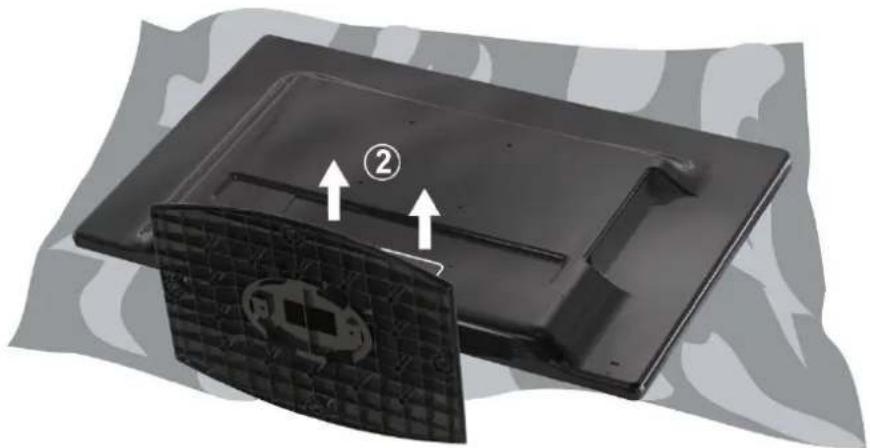
- Pull the hinge cover on the arm upward to remove it, as shown above by (2).
- Remove the 4 screws from the hinge, then pull off the arm slowly, as shown below by (3).
- Removal of the arm from the stand base completed.
6. Adjust the viewing angle
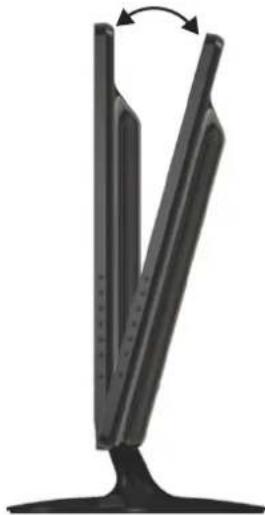
This display is equipped with a adjustable base. If necessary, turn the display screen to an appropriate angle (maximum 20 degrees up and down) for more comfortable viewing.
7. Connect the antenna cable
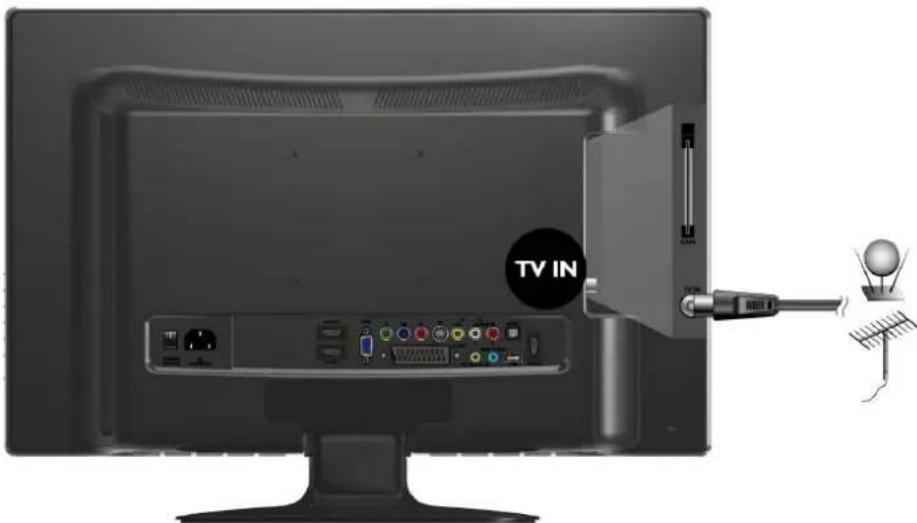
Connect a TV antenna cable fly-lead from your TV antenna system or Cable TV (CATV) to the TV input on the TV. Check to make sure that the cable connection is firmly in place.
- A poor quality TV signal will produce a poor picture and/or sound on your TV. For high quality picture and sound, you will need a high quality TV signal.
Depending upon your location, for best TV signal reception, you should have a properly aligned outdoor TV antenna system. If need be, consult a professional antenna specialist.
8. Connect the power cable
- Locate the power cable from the packaging, and plug the appropriate end into the AC IN socket on the rear of the TV (as illustrated below).
- Connect the other end into an appropriate wall power outlet, and flip the main power switch on the TV to the ON (I) position. The TV will enter standby mode and the power indicator (on the front lower right) will light up orange.
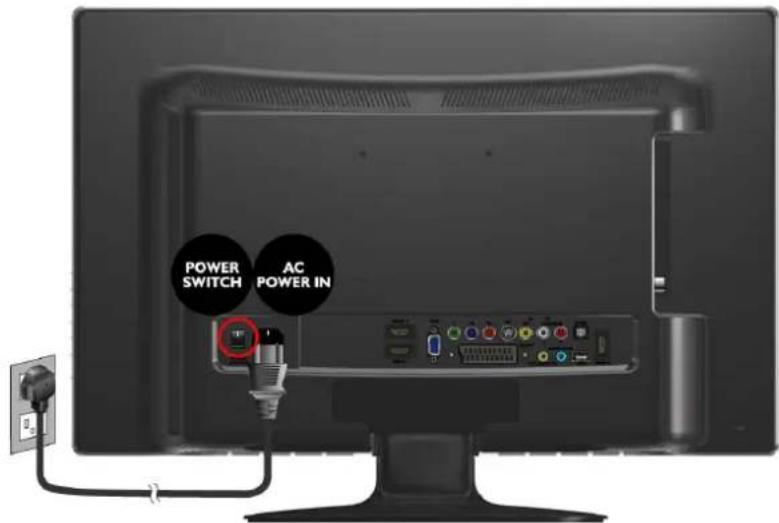
The type of power cable plug and socket illustrated may differ from the type used in your region.
- Only use an appropriate power cable for your region. Never use a power cable which appears damaged or frayed. Never change the plug type on a power cable. Be aware of total loading when using extension cords or multiple outlet power boards.
WARNING:
This TV has been engineered and manufactured with the highest priority on safety, however, IMPROPER HANDLING OR USE CAN RESULT IN POTENTIAL ELECTRICAL SHOCK OR FIRE HAZARD. Please handle this TV with care. If damaged, turn off the power and unplug the power cable from the TV. Please refer the troubleshooting on page 59.
9. Activate the remote control
Installing batteries
- Turn the remote control to reveal its back side, and open the lid of the battery compartment.
- Insert the batteries (supplied) ensuring that the positive and negative marked battery terminals match the (+) and (-) marks in the battery compartment. Note that these batteries are provided for your convenience so that you can operate the display straight away. You should replace them as soon as possible.
- Refit the lid of the battery compartment.
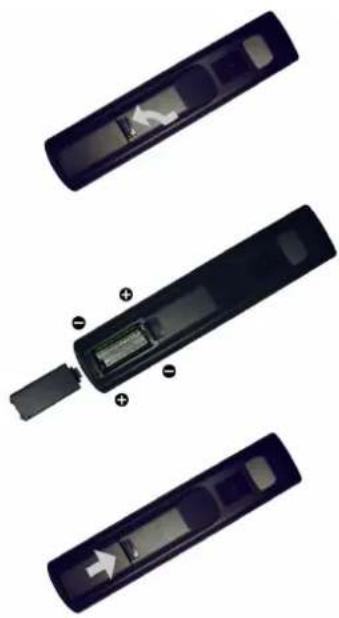
Battery safety notice
The use of the wrong type of batteries may cause chemical leaks and/or explosion. Please note the following:
- Always ensure that the batteries are inserted with the positive and negative terminals in the correct direction as shown in the battery compartment.
- Different types of batteries have different characteristics. Do not mix different types.
- Do not mix old and new batteries. Mixing old and new batteries will shorten battery life and/or cause chemical leaks from the old batteries.
- When batteries fail to function, replace them immediately.
Chemicals which leak from batteries may cause skin irritation. If any chemical matter seeps out of the batteries, wipe it up immediately using a dry cloth. - Due to varying storage conditions, the battery life for the batteries included with your TV may be shortened. Replace them within 3 months or as soon as you can after initial use.
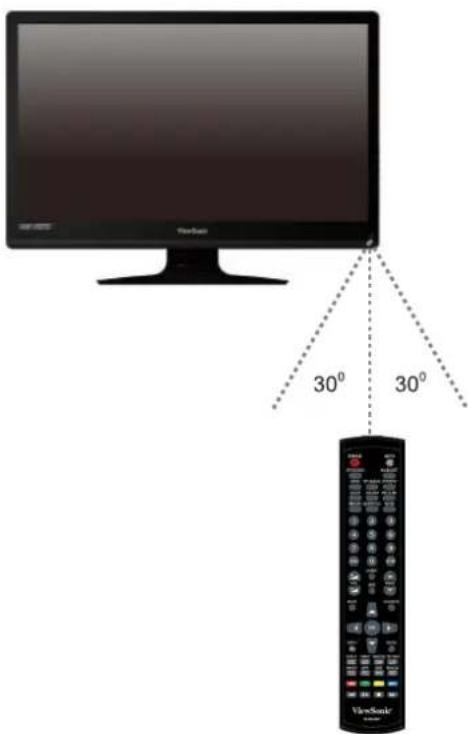
Using the remote control
- Point and aim the top front of the remote control directly at the display when pressing the buttons.
- The remote control must be held at an angle within 30 degrees of the display's remote control sensor window to function correctly. The distance between the remote control and the sensors should not exceed 5 meters.
-
Do not cover the sensor window on the front of the display (below the power indicator lamp), or place objects in front of it which will block the direct line of sight between the remote control and the sensor window on the display.
-
Do not let the remote control become wet, or place it in humid environments (like bathrooms.)
- If the remote control sensor window on the display is in direct sunlight or strong light, the remote control may not operate properly. In this situation, change the light source or readjust the angle of your display, or operate the remote control from a location closer to the remote control sensor window on the display.
10. Initialize your TV
Press Power button on the remote control. The TV will turn on and the power indicator will light up blue. When first turned on (and until tuned), the Initial Menu will display:
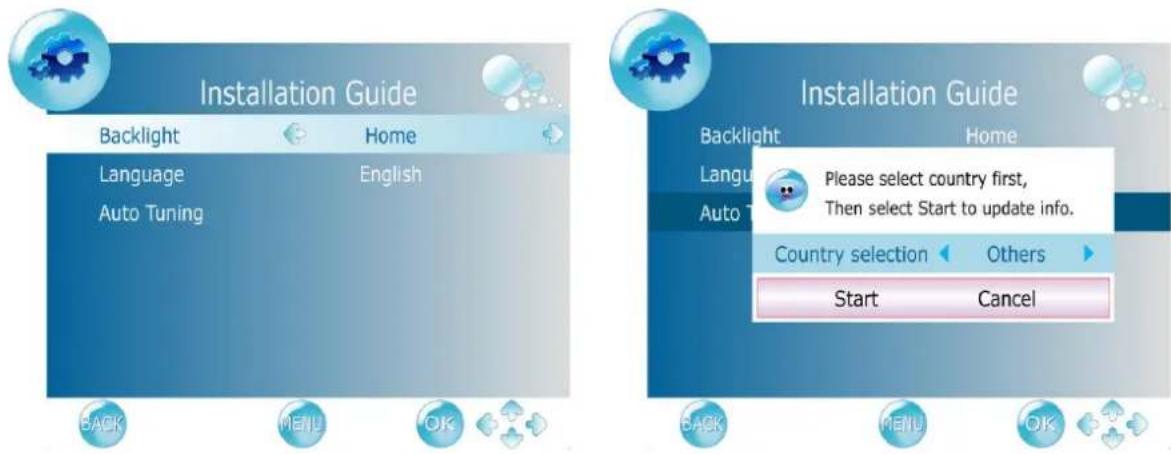
Before you can use your TV to view TV programs, you need to let it search for and tune TV station programs appropriate to your region. This process only needs to be done when the TV is newly installed, or whenever you install it in OSD menu for convenience of operation.
- When Backlight is highlighted, use the or buttons to adjust the backlight.
- Press button to select Language, use the or buttons to select the language displayed on the menu.
- Press button to select Auto Tuning and press the OK button.
- Press or to select the Country where you operate the TV, then select Start and press OK. The Auto Tuning automatically creates a list of receivable channels. Press the BACK button at any time to interrupt the memorization process. (The list cannot be created if interrupted)
11. View the TV programs
- Press PROG▲ or PROG▼ on the remote control to sequentially cycle through your TV channels.
- To select a single- or double-digit channel, press the corresponding channel selection buttons on the remote control. For example, to select channel 8, press 0 and 8 on the remote control.
- Press VOL^± on the remote control to increase volume. The volume indicator will increase in length as volume rises.
- Press MUTE on the remote control to turn off the sound temporarily.
Press MUTE once more, or press VOL+ or VOL- to restore the sound level. - You can press RETURN on the remote control to quickly return to the previous viewed channel.
Care and cleaning information
-
Always turn off the display and disconnect it from the mains power before cleaning.
-
Do NOT use cream, liquid, aerosol or spray cleaners. Use only a slightly damp well wrung-out (drip-free) and lint-free, clean soft cloth and lightly wipe the display. If necessary, use a pH-neutral liquid dish-washing detergent diluted with water on a separate clean lint-free cloth to remove oil or grease marks. Wipe over again with a cleandry lint-free cloth to remove any smear marks.
-
Under close examination and in certain circumstances, you may notice that a few non-active pixels appear on the screen as a fixed point of colour. Please note that this does not affect the performance of your product as it is usually not visible at normal viewing distances.
-
If the display is not going to be used for an extended period of time (like when you are going away for holidays), it should be switched off and unplugged from the wall outlet. You should also consider removing the batteries from the remote control (as they may leak)
-
LCD (Liquid Crystal Display) screens, like plasma and conventional CRT (Cathode Ray Tube) screens, are also susceptible to 'screen burn-in' or 'image retention' which can be found on the screen as visible fixed lines and shades and can't be removed. If the circumstance is caused due to improper use by the user (such as the left and right straight lines occurred from displaying still pictures for long periods of time, the channel logos, etc.), an appropriate service fee should be charged. To avoid such permanent damage to the screen, it is advisable to take the following preventive actions:
(1) Avoid displaying still (inactive) images for more than two hours.
(2) Change the screen image aspect ratio from time to time.
(3) If it is necessary to display still images for a long time, lower the contrast and brightness.
(4) The LCD monitor is designed for use in normal home environment, do not use it in any other place, such as public places.
What's next?
You have reached the end of Section 1: Quick Start Guide. By now, you should have a reasonable understanding of your new LCD TV and its controls, know how to install, connect, turn on and how to care for and maintain it.
Should you wish to maximize your viewing experience pleasure, Section 2 of this booklet contains the User Manual which describes how to customise the display settings to suit your preferences and viewing environment. It details the features and functions of the display and provides product specifications and troubleshooting information for your further assistance.
User Manual
Getting to know your TV
Front view
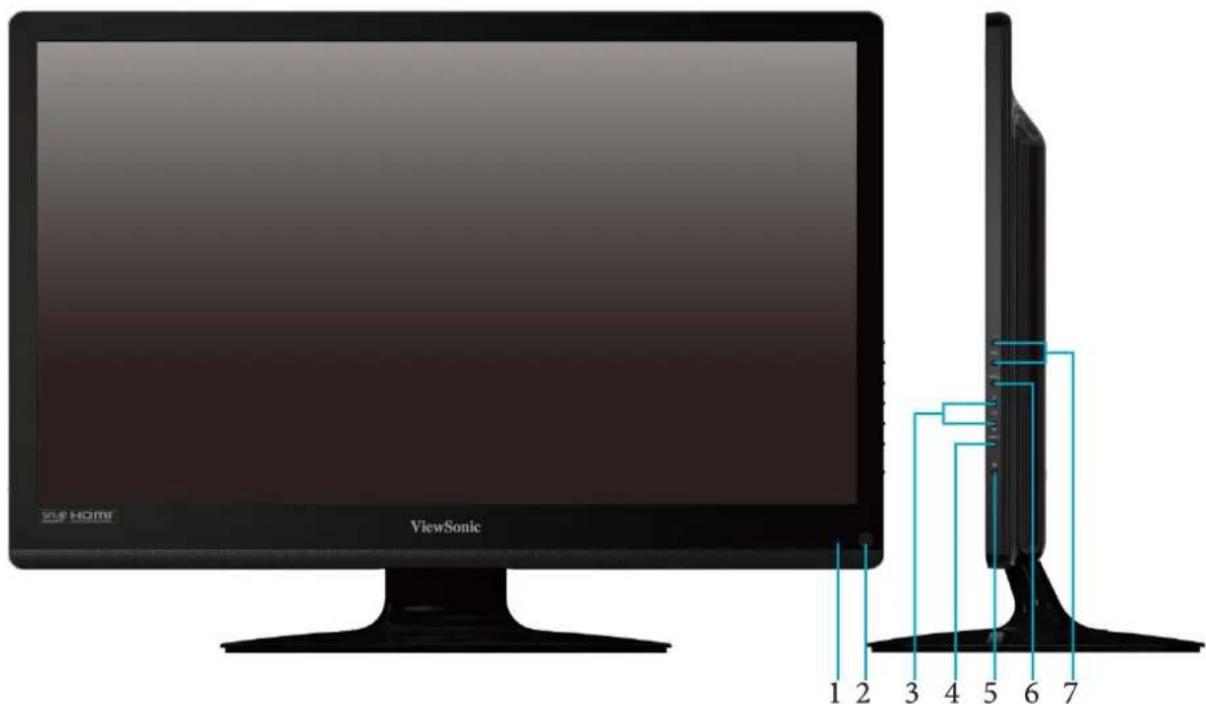
| No. | Name | Description |
| 1 | Power Indicator | •Lights up blue when the diaplay is powered on. •Lights up orange when the diaplay is in standby mode. |
| 2 | Remote Control Receiver | Receives command signals from the remote control. Do not obstruct the sensor by placing any objects in front of it, which will hinder the reception of signals. |
| 3 | CH▲/▼ button | •Press these buttons to sequentially change channels. •In the OSD menu, moves the selection highlight up or down. |
| 4 | INPUT button | •Select input source. •In the OSD menu, confirms the selection. |
| 5 | Power/Standby button | Toggles the display between standby mode and on. |
| 6 | MENU button | Displays the OSD (On-Screen Display) menu if not visible, or exits the current menu if displayed. |
| 7 | VOL +/- button | •Adjusts the volume level of the speakers. •In the OSD menu, moves the selection highlight left or right or changes settings. |
Rear view
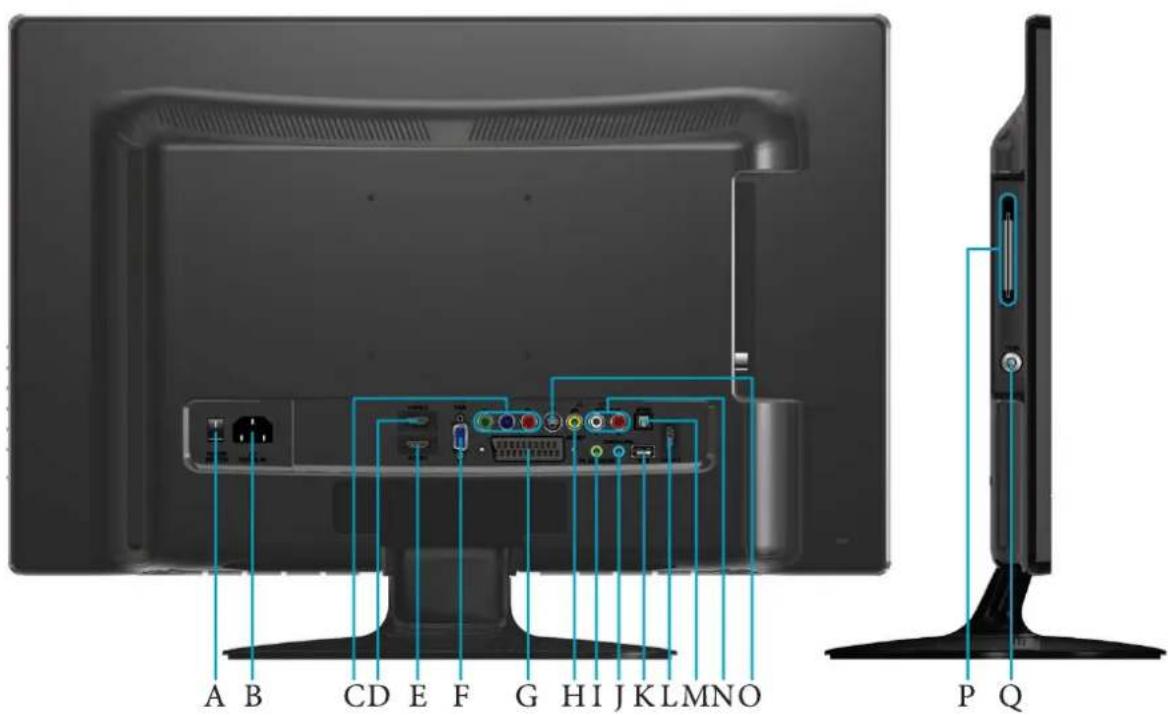
| No. | Name | Description |
| A | AC Power Switch | Use this switch to turn the main power on/off. |
| B | AC Power Input | Connect to a AC power source. |
| C | YPbPr Component Video Input | Connect to the Component video (Y Pb Pr) output of video devices. |
| D | HDMI2 Input Terminal | Connect to the HDMI digital audio/video output on digital video devices. |
| E | HDMI1 Input Terminal | Connect to the HDMI digital audio/video output or DVI digital video output on digital video devices. |
| F | VGA (PC Video Input) | Connect to the RGB video (D-sub) output of PCs. |
| G | SCART Input | Connect to external equipment with scart socket. This scart input allows audio and CVBS/YC/RGB+CVBS. RGB, S-VIDEO from an external devise to be shown on your TV. |
| H | AV Composite Video Input | Connect to the Composite video (AV) output of video devices. |
| I | PC/DVI Audio In | Connect to the audio output of PCs. This jack is used for PC Audio input, when the picture input is connected to VGA or DVI (via HDMI1 input) on the PC. |
| J | Headphone Jack | Connect to your headphones. |
| K | USB Terminal | Connector for software upgrades and Media Play, etc. |
| L | HDMI3 Input Terminal | Connect to the HDMI digital audio/video output on digital video devices. |
| M | SPDIF Optical output | Connect this port to the SPDIF input of A/V device. |
| N | Audio In L/R | Connect to the left/right audio channel output of video devices. |
| O | S-VIDEO Input | Connect to the S-Video output of video devices. |
| P | CAM Card Slot | Plug the CAM Card into this slot. |
| Q | RF Antenna / Cable TV Input | Connect to RF Cable or CATV cable. |
Getting to know the remote control
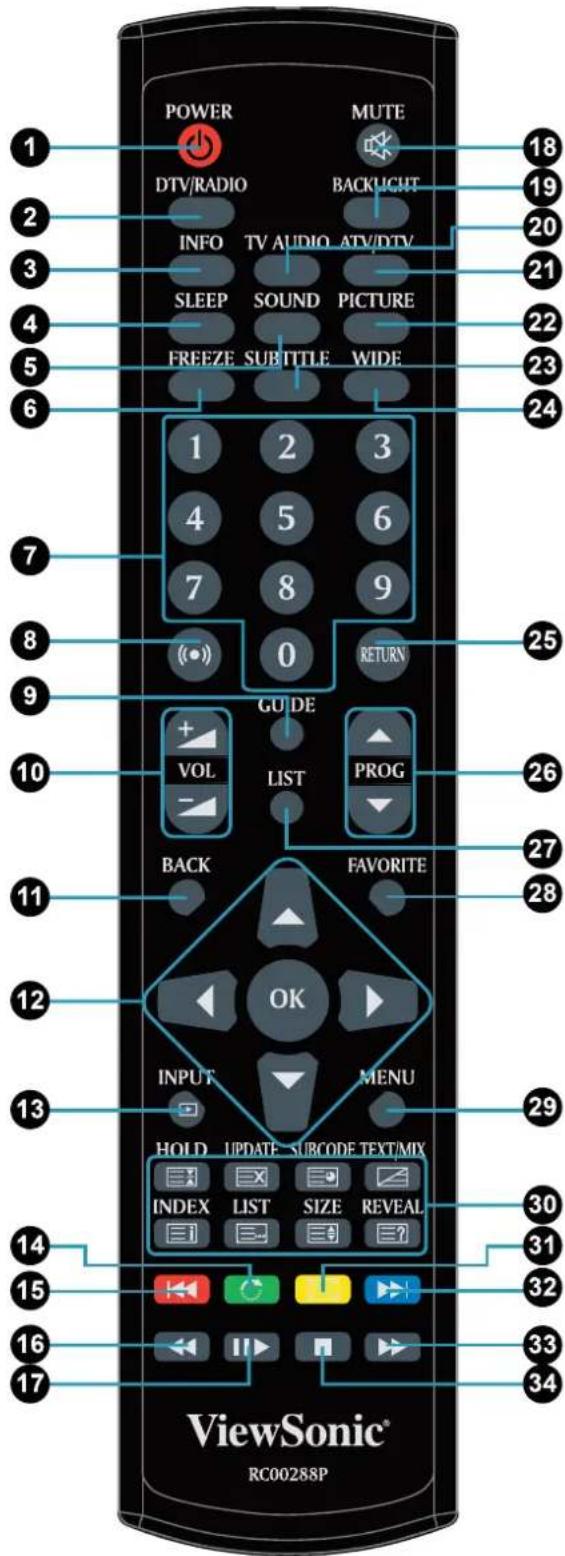
Remote Control
1. POWER
Press this button to power the TV on or put it to the standby mode.
2. DTV/RADIO
Digital TV function. Switch between DTV/RADIO programs.
3. INFO
Press this button to display the input source.
4.SLEEP
Press this button to set the automatic shut-off timer.
5. SOUND
To select sound mode from Standard, Music, Movie, Sports, and User.
6. FREEZE
Press this button to freeze the image on the screen. Press the button again to resume viewing in real ti
7. 0-9 Channel selection
Press these buttons to select the program you wish to view.
8. () SRS
Press to switch on/off SRS TruSurround HD function.
9. GUIDE
Displays the Electronic Program Guide on the screen in DTV mode. Pressing again to turn Guide off.
10. VOL^± / VOL^-
Press these buttons to raise or lower the volume level. information.
11. BACK
In the OSD menu, press this button to return to the previous menu page.
12. ▲/▼/▲/▶/OK
- Press or to change TV programs sequentially.
- Press or to adjust volume.
When the OSD (On-Screen Display) menu displays on-screen:
- Press or to select settings.
- Press or to adjust settings.
- Press OK to execute selections, or to enter a submenu you have selected.
13. INPUT
Press these buttons to sequentially change channels.
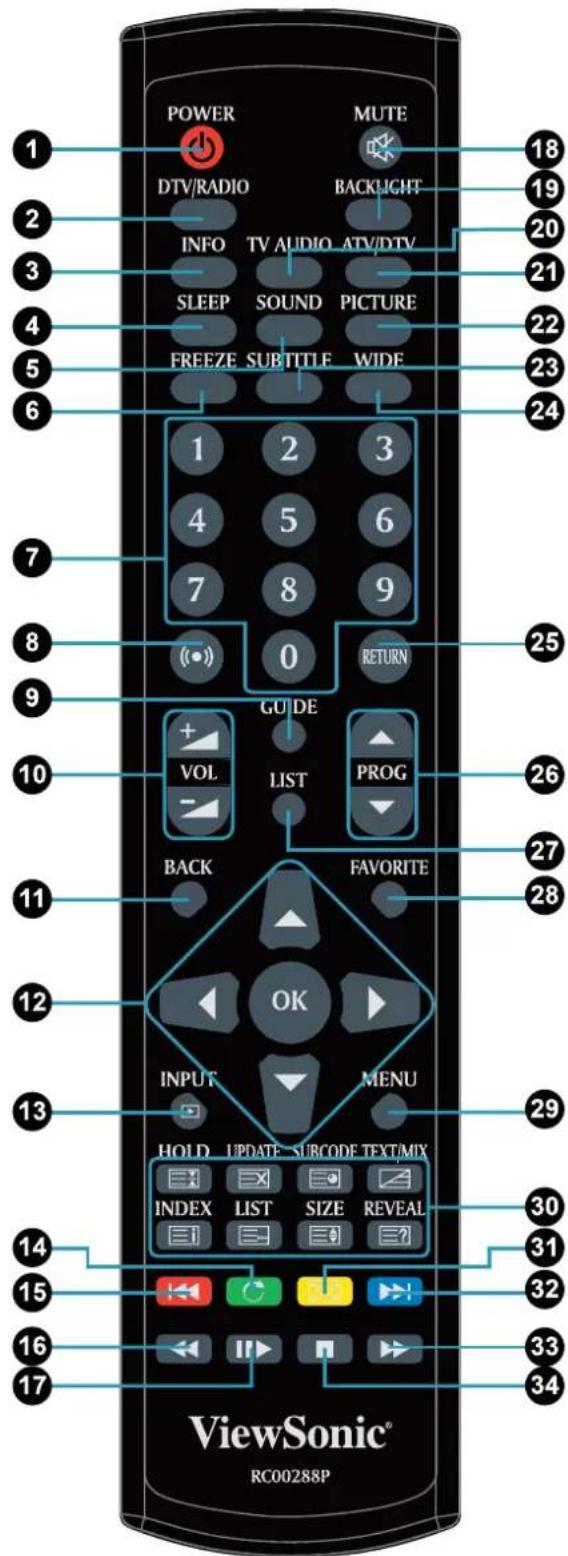
14. Green/Rotate
- Green: Function key for teletext, program edit, or electric program guide.
- Rotate: Rotate the photo 90^ , 180^ , 270^ , 360^ clockwise in Media.
15. Red/ Skip (Backwards)
- Red: Function key for teletext, program edit, or electric program guide.
- Skip: Go to previous chapter/track/file in Media.
16. Scan (Backwards)
Page up for text function.
17. Play/Pause
Start or pause playback of media files in Media.
18. MUTE
Press this button to mute the sound output. Press it again to restore the sound output.
19. BACKLIGHT
Press this button to adjust your desired screen backlight level.
20. TV AUDIO
- Select sound modulation in ATV.
- Select audio language in DTV.
- Select the Left/Right Audio Channels in other sources (except ATV, DTV, and Media)
21. ATV/DTV
Swap between ATV/DTV. Swap to the last TV source when in other source.
22.PICTURE
Press this button to select a desired preset picture mode: Standard, Mild, User, Dynamic.
23. SUBTITLE
- ATV: Switch between available subtitle languages.
- DTV: Display subtitle language selection box.
24.WIDE
Press this button to adjust the screen image aspect ratio.
25. RETURN
Press to toggle between the current channel and the previous one.
26.PROGV/
Press these buttons to sequentially change channels.
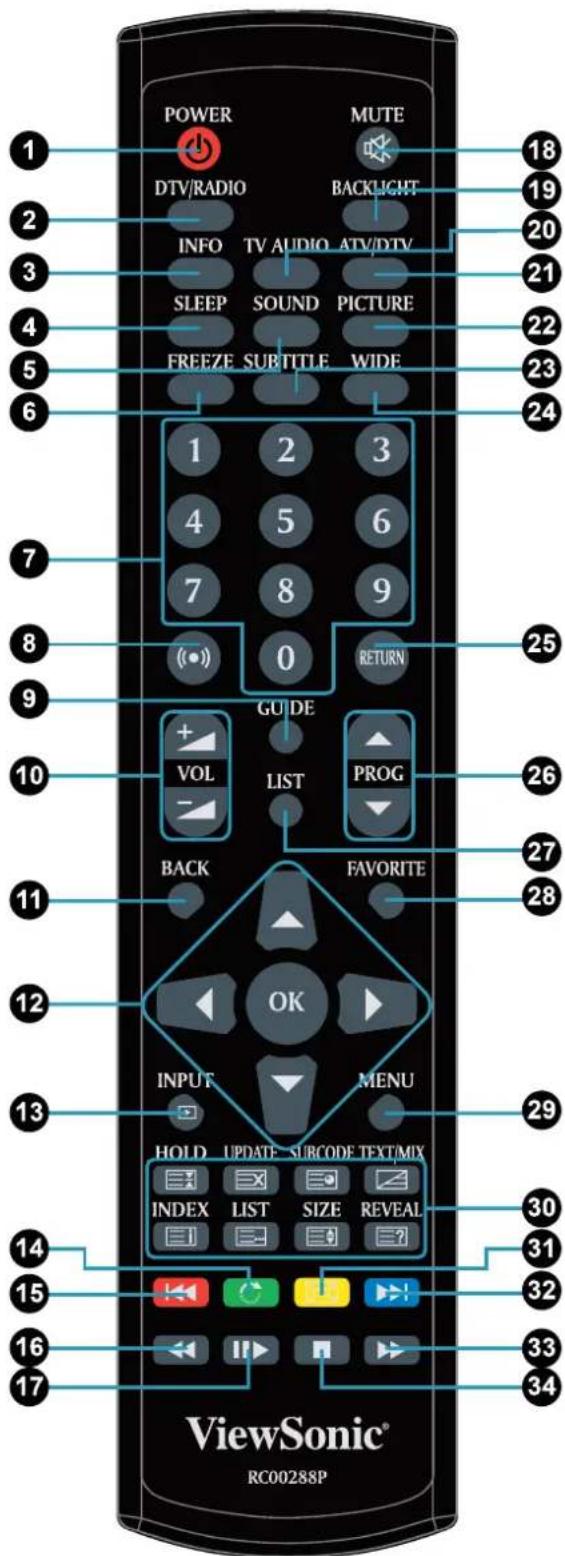
27. LIST
Display channel list.
28. FAVORITE
Press this button to jump to one of the favorite channels you have stored.
29.MENU
Press this button to display the OSD menu for commands and settings. Press it again to close.
30. TELEXT Function
- HOLD: Press this button to remove the information from the display and stop the automatic page change which will occur if a teletext page consists of 2 or more sub pages.
- UPDATE: Input a page number, and then press this button. The teletext page will be closed and will show the update symbol+- on the top left corner. When the update symbol changes to the page number, it means the page is complete downloaded.
- SUBCODE: When a selected Teletext page has hidden sub pages or timed pages, these pages can be seen by using sub code function.
TEXT/MIX: In TV Mode: Press the TEXT/ MIX button to enter the Teletext mode.
In TELETEXT Mode: Press the button again to superimpose a Teletext broadcast onto the screen of current TV program (mixed Mode).
In MIXED Mode: Press the button again to return back to the normal TV Screen (current program).
- INDEX: Press the Index button to return back to index page.
- LIST: Press this button you force the Teletext to LIST Mode. List the pages that you have previously stored in the memory. Press LIST button again to exit from LIST Mode to Teletext.
SIZE: Select double height text under Teletext mode for full screen.
REVEAL: Press this button to display concealed information, such as solutions of riddles or puzzles. Press this button again to remove the information from the display.
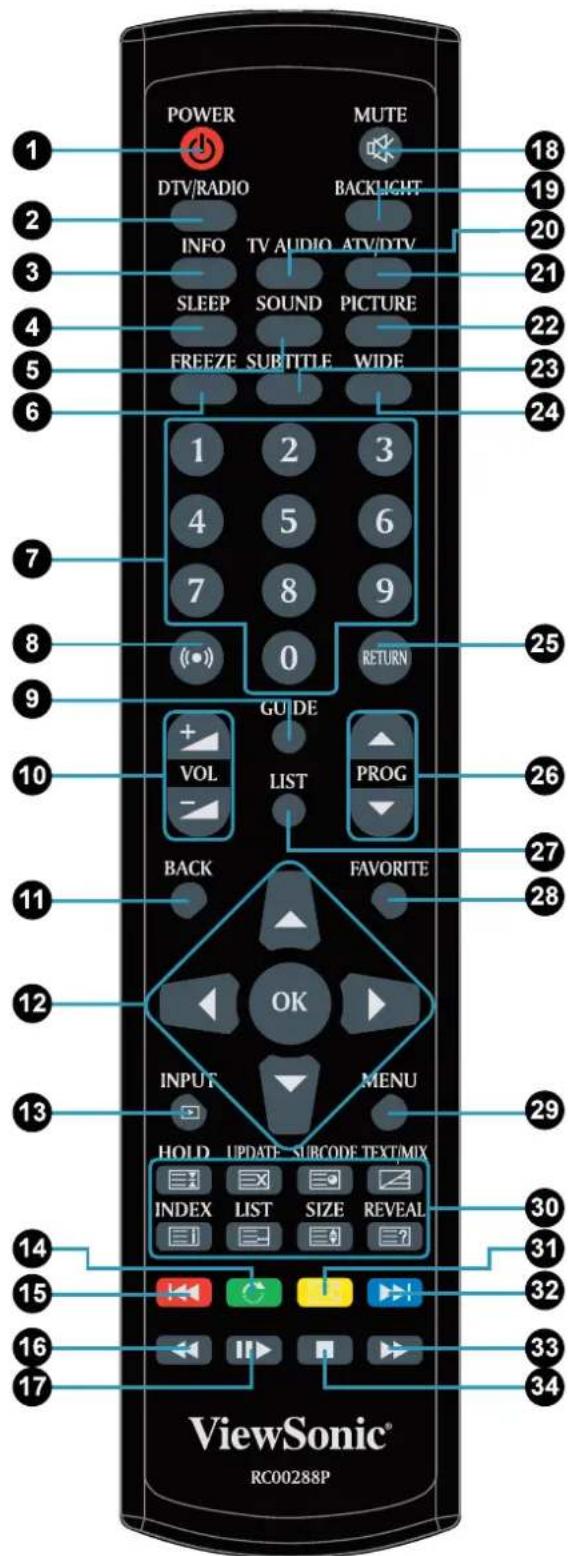
31. Yellow/ Zoom
- Yellow: Function key for teletext, program edit, or electric program guide.
- Zoom: Magnifies the picture contents horizontally and vertically in Media.
32. Blue/ Skip (Forwards)
- Blue: Function key for teletext, program edit, or electric program guide.
- Skip: Go to next chapter/track/file in Media for Photo and Text.
33. Scan (Forwards)
Page down for text function.
34. Stop
Stops playback in Media.
Using the remote control Power on, off and standby
Turning on the TV
After plugging the TV's power cable into a wall outlet, the TV will enter standby mode automatically. The power indicator will light up orange. Press Power on the remote control. The TV will turn on and the power indicator will change to blue.
Putting the display to standby
Press Power on the remote control again, and the TV will return to standby mode. The power indicator will turn orange.
The display still consumes a very small amount of power (about 0.5W ) in standby mode.
Switching inputs
- Turn on all connected equipment or devices before selecting an input.
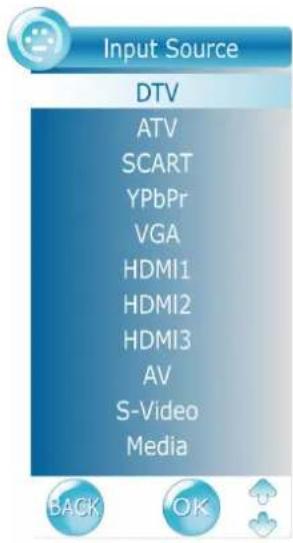
- Press INPUT on the remote control to view the current selected input. Press INPUT button, use button to select your desired input then press OK button to confirm. You can also press INPUT continuously to switch between different input sources.
These options will only appear when corresponding signals are connected to the display.
- Be aware that HDMI input must be HDCP-compliant to be displayed.
When switching to the HDMI inputs, the display needs several seconds to detect the HDCP information from the signal source and no image will be displayed during this period. This is not a malfunction.
Adjusting sound setting
Adjusting volume
- Press VOL^+ on the remote control to increase volume. The volume indicator increases in length as volume rises.
- Press VOL on the remote control to decrease volume. The volume indicator decreases in length as volume falls.
Mute setting
Press MUTE on the remote control to turn off the sound temporarily.
Press MUTE once more, or press VOL+ or VOL- to restore the sound level.
Selecting a TV sound mode
Press TV AUDIO on the remote control to toggle TV sound among available modes. (The modes available will depend on the TV or Video sound system being received).
Selecting a preset audio mode
Press SOUND on the remote control to select a suitable preset audio mode form Standard, Music, Movie, Sports, or User. You can also customise the User mode according to your own preference.
Changing channels
Selecting a channel program directly
To select a program number, press the channel number first using the channel selection buttons, and then press OK.
For example, to select channel 8, press and then OK.
To select channel 28, press 2 , 8 , and then OK.
Changing channels sequentially
Press PROGA or PROGV on the remote control to sequentially cycle through your TV channels.
Selecting channels from Channel List
Press the OK button and the Channel List will be displayed. Press OK key on the channel you wish to watch, and you can be directed to that channel immediately.
Returning to the previous selected channel
The RETURN button on the remote control allows you to quickly switch between the current selected channel and the previous one.
Selecting favorite channels
Press FAVORITE key to display the favorite channels you've added to the FAVORITE LIST. You can use or to select a favourite channel, and then press OK to direct to that channel immediately. To set up favourite channels, select the Program Edit function in CHANNEL menu.
Selecting a picture modes
To select a picture mode, press PICTURE on the remote control. This enables you to select from the following settings:
| Picture mode | Description |
| Standard | Suitable for viewing in environments with normal lighting condition. |
| Mild | Images are displayed with moderate brightness and contrast, making it suitable for prolonged viewing. |
| User | Your own customised picture mode. |
| Dynamic | Suitable for brighter environments. The contrast of the TV display will be adjusted to higher level for better view. |
Using the sleep timer
The sleep timer is useful if you want the display to automatically go into standby mode after a set period of time. Press SLEEP repeatedly on the remote control to select the sleep timer from Off to 240 minutes.
Using Electronic Program Guide (EPG) function
Press the GUIDE button to display the Electronic Program Guide.
Press the or button to scroll up or down the channels, or to change time period. To change date, press the Yellow key first, and then select date with or . You can also pause at a channel and press the INFO key to view the detailed program information, or press OK to switch to that program directly. You can also add a reminder on a program by pressing the Blue button. When the reminder event is about to start, a window will appear to remind you for watching. To check the programs you've added by Reminder, press the Green key to display the SCHEDULE LIST. To delete a Reminder, select with or and press the Red key. Press the BACK button to exit Electronic Program Guide.
Adjusting backlight
To adjust the intensity of your TV's backlight system, press BACKLIGHT on the remote control repeatedly to select a suitable level. When viewing the TV in dimly lit rooms it is recommended to reduce the backlight which will reduce the image brightness and make the dark areas of the image darker, thus maintaining a high contrast image in a dark environment.
Freeze image on screen
Press FREEZE once to stop the screen at the current image, and press again to resume the screen playing.
This function allows you to stop the screen at the current image. However the current video will keep running at the background, and the screen will resume playing from the video signal received at the moment you cancel the fution, not from the freezed image.
- In order to avoid possible "image retention" or "screen burn-in" on the LCD screen, it is recommended that you change the aspect ratio from time to time, and not to display a still image for more than two hours.
Adjusting aspect ratio
Press WIDE on the remote control to cycle through the aspect ratios. The table below shows the resulting images in relation to the input image when different aspects are selected:
| Aspect ratio | Description and usage | Aspect ratio of input video | |
| SD (Resolution for 480i, 480p, 576i and 576p) | HD (Resolution for 720p, 1808i and 1080p) | ||
| ○○○ | ○○○ | ||
| ○○○ | ○○○ | ||
| Full | Stretch an image to16:9 aspect proportions. | ○○○ | ○○○ |
| ○○○ | ○○○ | ||
| Zoom1 | Stretch an image to 16:9 aspect proportions and enlarges the resultant image on the screen. | ||
| Zoom2 | Stretch an image to 16:9 aspect proportions and enlarges the resultant image on the screen. | ||
| Panorama | Only stretch two sides of the image from 4:3 image to 16:9 aspect proportion. | ||
| Auto | To facilitate the handling of various aspect ratios of program material received by TV input. | ||
| 4:3 | Resize the image to 4:3 aspect proportions. | ||
| Under Scan | Displays the original signals on the screen in 1:1 output.Recommended for use when in HDMI-PC source.The Underscan aspect ratio will be only appear when in HDMI input source and the resolution is video timing. | ||
- When viewing PC, only "Full" and "4:3" are available for selection.
- To avoid possible "image retention" or "screen burn-in" on the LCD screen, it is recommended that you change the aspect ratio from time to time, and prevent the display from displaying a static image for a prolonged period of time.
Using the Teletext function
Press TEXT/MIX on the remote control to display Teletext, and again to turn it off.
Teletext is only available when ATV is selected as the input source, and a signal which transmits Teletext is currently displayed. Not all TV stations and video signals broadcast Teletext. If in doubt, please contact the TV station.
When Teletext displays on-screen, you can:
TEXT/MIX/PICTURE
- In TV Mode: Press the TEXT/ MIX/ PICTURE button to enter the Teletext mode.
- In TELETEXT Mode: Press the button again to superimpose a Teletext broadcast onto the screen of current TV program (mixed Mode).
- In MIXED Mode: Press the button again to return back to the normal TV Screen (current program).
SUBCODE
When a selected Teletext page with hidden sub pages or timed pages, these pages can be seen by the following manner:
- Press the sub code button. Screen will show «/ »
- Enter 4 digits number button corresponding to the sub page desired. E.g. 0001 for sub page number 1.
- Wait until the page appears.
UPDATE
- Input a page number, and then press this button. The teletext page will be closed and will show the update symbol+- on the top left corner. When the update symbol changes to the page number, it means the page is complete downloaded.
- Press this button again to open the teletext page.
HOLD
- Press this button to remove the information from the display and stop the automatic page change which will occur if a teletext page consists of 2 or more sub pages.
- To continue press this button again. The number of sub pages and the sub page displayed is, usually, shown on the screen below the time. When this button is pressed the stop symbol is displayed at the left-top corner of the screen and the automatic changing is inhibited.
REVEAL
- Press this button to display concealed information, such as solutions of riddles or puzzles.
- Press this button again to remove the information from the display.
SIZE
Select double height text under Teletext mode for full screen.
- Press this button to enlarge the top half of the page.
- Press this button again to enlarge the bottom half of the page.
- Press this button again to return to the normal display.
LIST
- Press this button you force the Teletext to LIST Mode. It means that row 24 (bottom row of Teletext) will not have transmitting information, only the pages that you have previously stored in the memory.
- Press LIST button again to exit from LIST Mode to Teletext.
INDEX
- Press the Index button to return back to index page.
When you press this button in Teletext mode, a CURSOR appears. This cursor (rectangular box) contains a page number and you can select the desired page simply by using the four colours.
- RED button: Move cursor down.
GREEN button: Move cursor up. - YELLOW button: Change from current page to selected page.
- BLUE button: Exit the CURSOR Mode.
Press the appropriate colour keys to perform corresponding functions.
Press PROGA or PROG to go to the previous or next Teletext page, or to move between subpages when selected.
Connecting video and audio signals Input options
This TV supports the simultaneous connection of several different types of signal sources, and permits you to select whichever one of the available sources you wish to view at any time. You can press INPUT on the remote control to select an input source.
Before connecting any devices, please turn all equipment off.
To obtain the most benefit from the digital LCD screen, you should select the connection method which will provide you with the best possible signal.
- Once connected, please ensure that all plugs are fully inserted and firmly seated. Be aware that if incorrect connections are made, picture quality may be adversely affected.
Connecting the Composite Video input
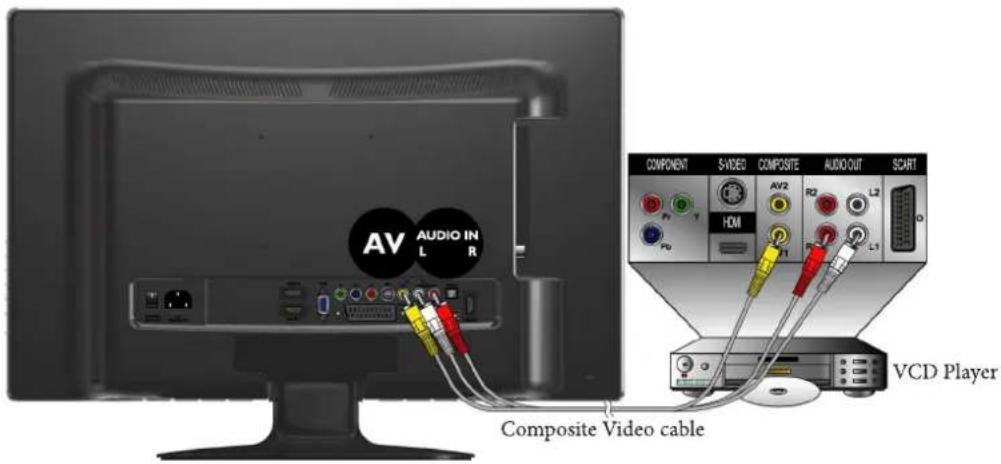
Connect the Composite Video output of your output equipment to the VIDEO and AUDIO L/R terminals on the display using the Composite Video cable as illustrated (not provided). A Composite Video cable consists of three connectors: Yellow (video), White (left channel audio), and Red (right channel audio). Ensure that the colors of the plugs and terminals match when making connection.
To view video image from these inputs, press INPUT and use button to select AV then press OK button.
Composite Video provides the least optimal image quality. Both S-Video and Component Video provide better quality video signals. SCART supports both Composite Video and SVideo signal inputs. If you use S-Video, you cannot use Composite Video for that input.
Connecting the SCART input
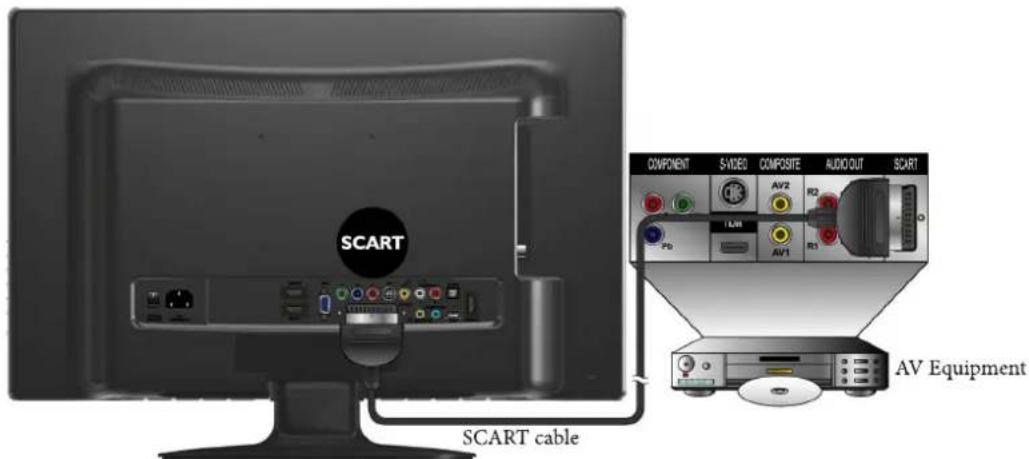
Connect the SCART of your output equipment to the TV's SCART terminal using a SCART cable (not provided).
To view video image from these inputs, press INPUT and use button to select SCART then press OK button.
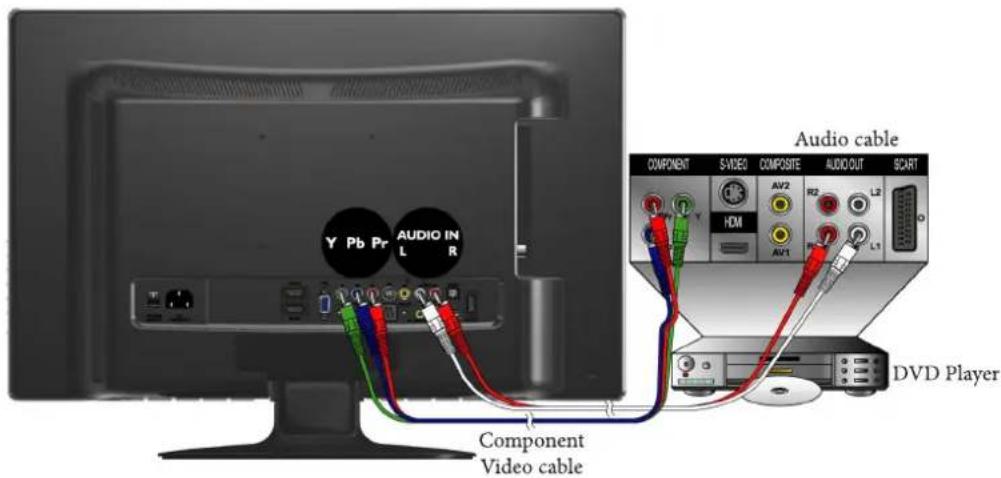
Connecting the Component Video input
- Connect the Component Video output of your output equipment to the TV's YPbPr IN terminals using a Component Video cable (not provided). A Component Video cable consists of three plugs: Green (Y), Blue (Cb/Pb), and Red (Cr/Pr). Ensure that the colours of the plugs and terminals match when making connection.
- Connect the corresponding audio output of your output equipment to the AUDIO INPUT L/R input terminals on the display using an audio cable (not provided).
To view video image from these inputs, press INPUT and use button to select YPbPr then press OK button.
Of the analog video signal types, Component Video offers the best quality. See "Supported Component Video input signal resolutions" on page 56 for supported resolutions.
Connecting the S-Video input
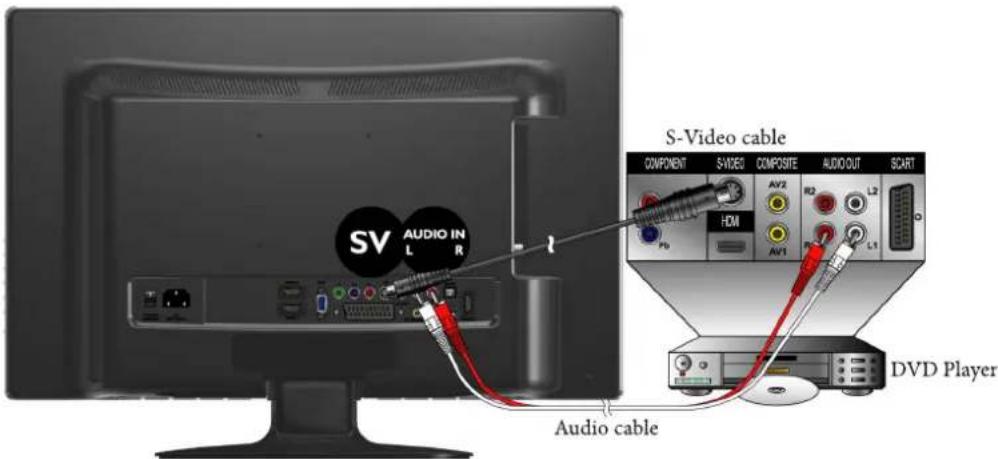
- Connect the S-Video output jack on your output equipment to the S-VIDEO jack on your display using an S-Video cable (not provided). Pay attention to the pins in the plugs when inserting so to keep the pins from bending.
- Connect the S-Video audio output jack of the output equipment to the AUDIO L/R input jacks using a suitable audio cable (or a composite video cable. In this case, the yellow plug will not be used).
To view video image from these inputs, press INPUT and use button to select S-Video then press OK button.
You should not connect both a composite Video and an S-Video from the same device; just one or the other. If you have the choice, use the S-Video instead of composite Video as an S-video signal provides a higher quality signal to that of composite Video.
Connecting the PC input
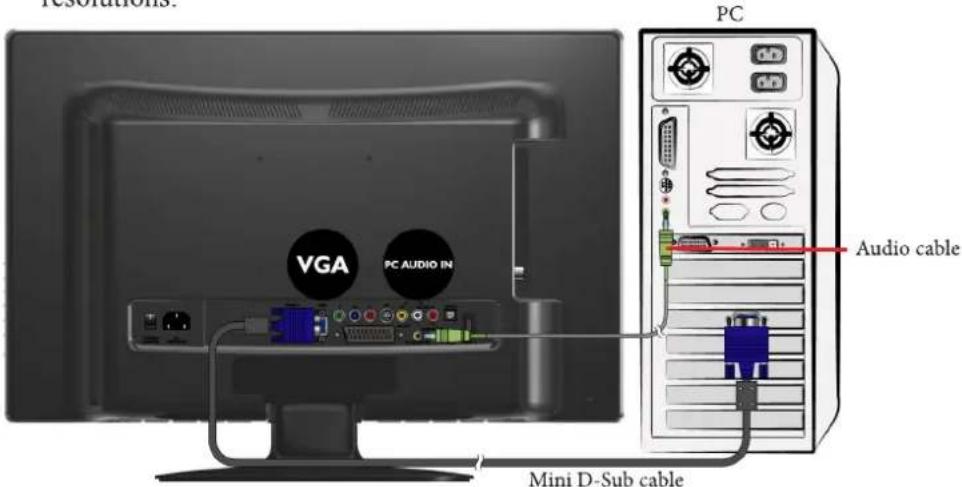
- Connect the VGA output of your PC to the VGA IN terminal on the TV using a mini D-Sub (15-pin) cable (not provided).
- Connect the audio output of your PC to the TV's AUDIO INPUT terminal using an appropriate 3.5mm-diameter Mini-jack stereo audio cable (not provided).
To view video image from this input, press INPUT and use button to select VGA then press OK button.
When you connect the display to a PC, you should adjust the resolution in the display properties of the computer to closely match the native resolution of the display (for example, 1680 × 1050 pixels). See "Supported PC (D-Sub/DVI) input signal resolutions" on page 55 on other supported resolutions.
Connecting the DVI input
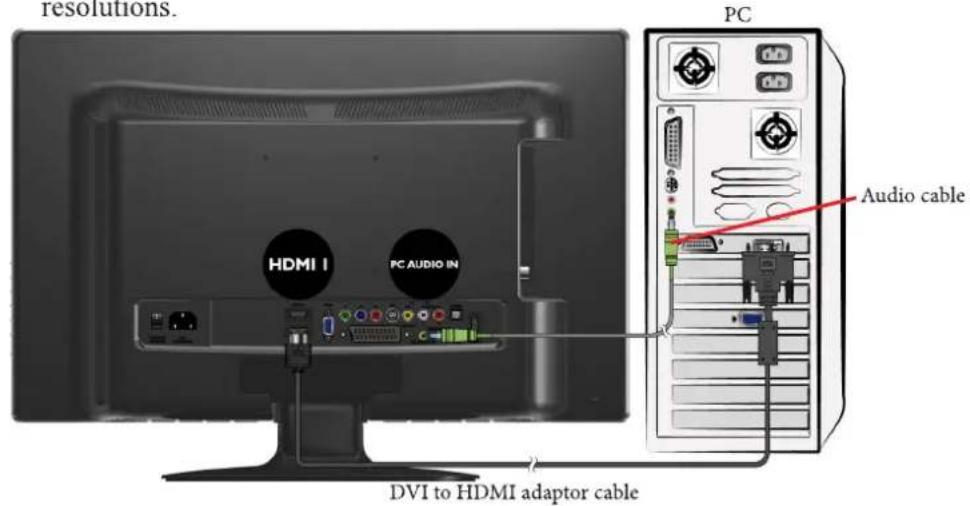
- Connect the digital video output of your output equipment (for example, a PC or digital Set Top Box) to the HDMI1 IN terminal on the TV using a DVI to HDMI adaptor cable (not provided).
- Connect the DVI audio output of your output equipment to the TV's PC AUDIO INPUT terminals using an appropriate audio cable (not provided).
To view video image from this input, press INPUT and use button to select HDMI1 then press OK button.
When connected to a PC, you should adjust the resolution in the display properties of the computer to closely match the native resolution of the display (for example, 1024 × 768 pixels). See "Supported PC (D-Sub/DVI) input signal resolutions" on page 55 on other supported resolutions.
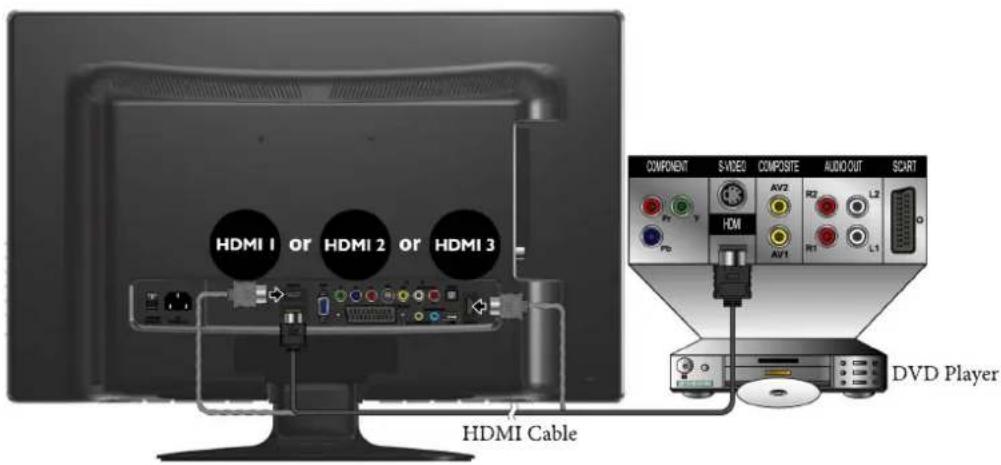
Connecting the HDMI input
Connect the HDMI output of your output equipment to the HDMI1, HDMI2 or HDMI3 IN terminal on the display using an HDMI cable(not provided).
To view video image from this input, press INPUT and use button to select HDMI1, HDMI2 or HDMI3 then press OK button.
HDMI (High-Definition Multimedia Interface) is an all-digital audio/video interface capable of transmitting uncompressed streams. HDMI provides an interface between anyaudio/video source, such as a set-top box, DVD player, or A/V receiver over a single cable. See "Supported HDMI input signal resolutions" on page 56.
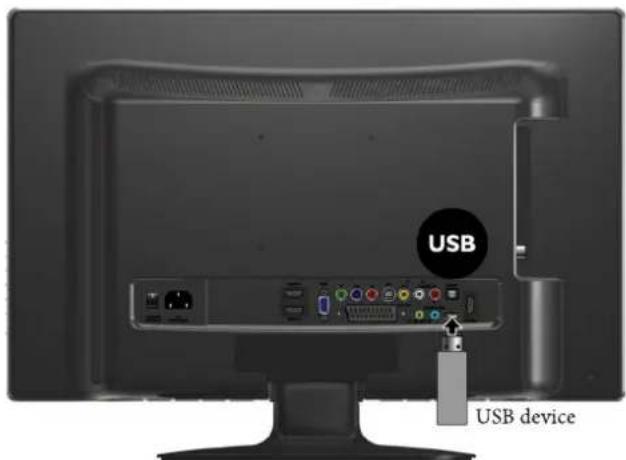
Connecting the USB input
Connect the USB device to the USB IN jack on TV.
To view video image from this input, press 口 INPUT and use button to select Media then press OK button.
This unit can play the media files contained in the USB device.
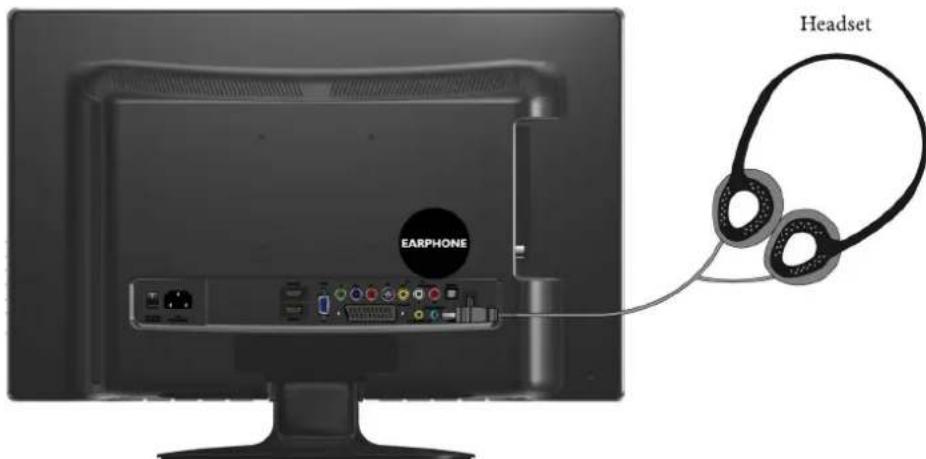
Connecting the headset audio output
This display provides a stereo headset output socket for delivering the audio signal to a stereo headset.
Connect the stereo headset plug (3.5mm Mini-jack type) to the stereo headset output socket on the display using a suitable audio cable.
Once connected, the display speakers will be muted automatically.
Please be aware that excessive and/or extreme volume might damage your hearing ability.
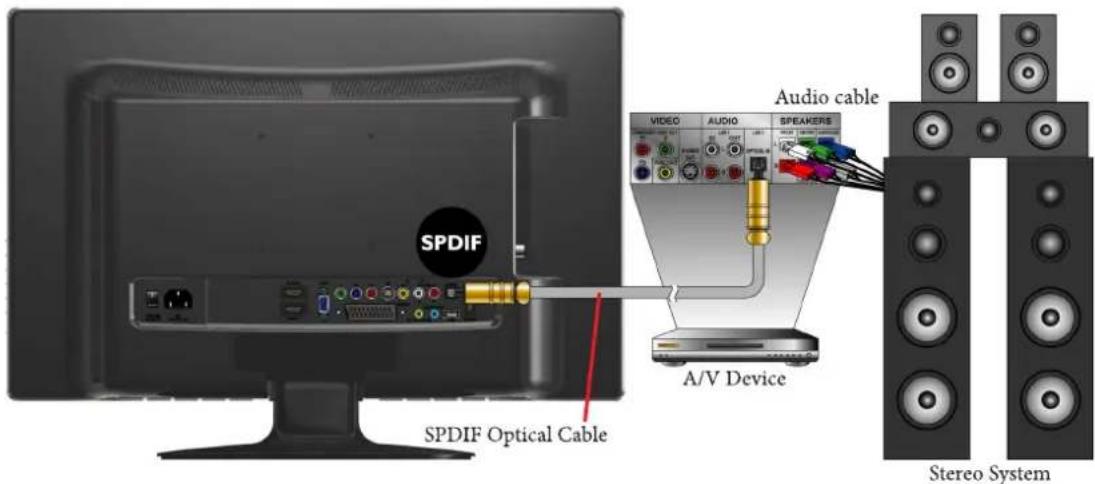
Connecting to A/V Device with SPDIF input
Connect SPDIF optical cable (not provided) from A/V device into the SPDIF output connector of LCD TV.
If you want to enjoy digital broadcasting through your external speakers, connect the SPDIF terminal on the back of TV to a Home Theater (or amp).
OSD (On-Screen Display) menu OSD structure
| Input signal type | |||||||||
| DTV | ATV | SCART | YPbPr | HDMI | AV | S-Video | Media | VGA | |
| PICTURE | ·Picture Mode ·Contrast ·Brightness ·Colour ·Tint ·Sharpness ·Colour Temperature ·Red ·Green ·Blue ·Aspect Ratio ·Skin Tone ·ACE ·Noise Reduction | ·Picture Mode ·Contrast ·Brightness ·Colour ·Tint ·Sharpness ·Colour Temperature ·Red ·Green ·Blue ·Aspect Ratio ·Skin Tone ·Auto Adjust ·H-Position ·V-Position ·Size ·Phase | |||||||
| SOUND | ·Sound Mode ·Balance ·Bass ·Treble ·SRS TruSurround HD ·AVC ·AD Switch ·AD Volume ·Audio only ·SPDIF Output | ||||||||
| TIME | ·Clock ·Off Time ·On Time ·Sleep Timer ·Auto Sleep ·Time Zone | ||||||||
| OPTION | ·Language ·Audio Languages ·Subtitle Language ·Hearing Impaired ·Country ·OSD Time Out ·SCART Input ·Canal+ ·HDMI Audio ·Backlight | ||||||||
| OPTION | •Restore Factory Default | ||||||||
| LOCK | •Lock System •Set Password •Block Program •Parental Guidance | not available | |||||||
| CHANNEL | •Select •Auto Tuning •DTV Manual Tuning •ATV Manual Tuning •Program Edit •CI Information | not available | |||||||
The available menu items are dependent on the input source being selected. Unavailable items will be greyed out or not displayed.
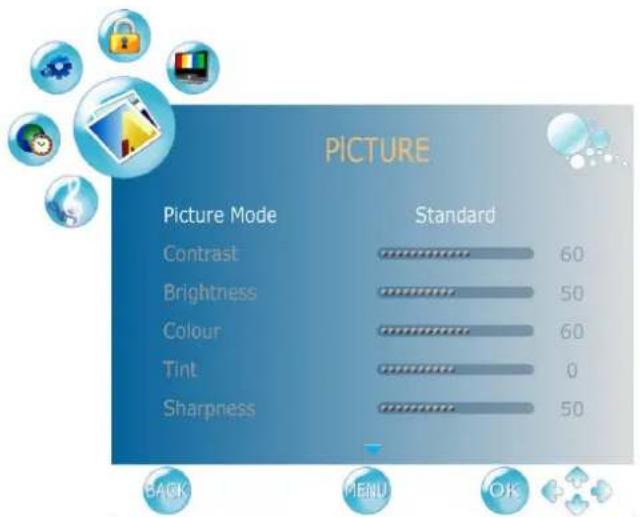
Navigating the OSD menu
You can use the On-Screen Display (OSD) menu to adjust the settings on your display. To display the OSD menu, press MENU on the display:
Operations in the OSD menu
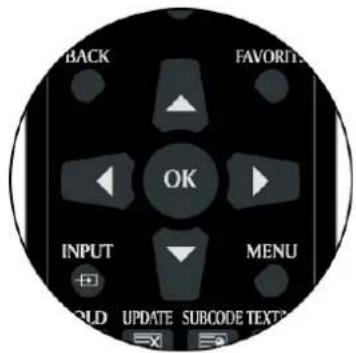
For example, to adjust picture sharpness:
- Press MENU to display the OSD menu on-screen.
- Press or to select your main menu.
- Press OK to enter the submenu.
- Press or to make selection.
- Press or to make adjustment.
- Press MENU to close the OSD menu.
PICTURE menu
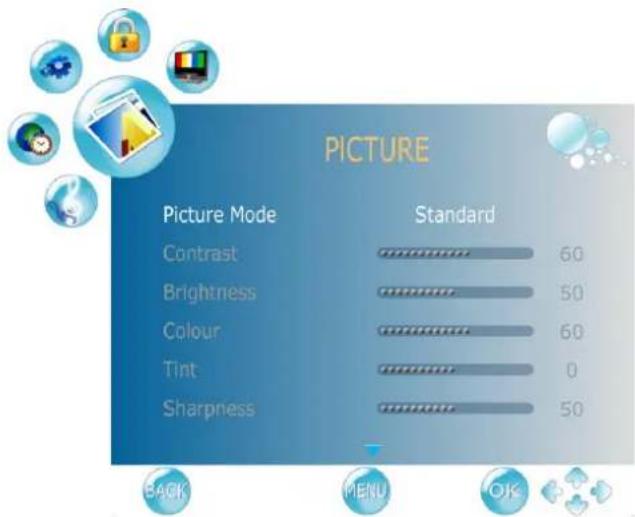
The available menu items are dependent on the input source being selected. The illustration is for reference only.
| Item | Function | Operation | Range |
| Picture Mode | Provides complete preferred setups adjusted for colour, contrast, brightness, tint, and sharpness to suit various viewing situations.If User is selected, you can customize individual picture setting to your satisfaction: Contrast,Brightness, Colour, Sharpness, and Tint. | Press ▲ or ▲ to change selection or make adjustment. | • Standard• Mild• User• Dynamic |
| Contrast | Adjusts image white level so that whites do not wash out surrounding colors. | 0 to 100 | |
| Brightness | Adjusts image black level, so that detail in the dark areas of an image can be seen. | 0 to 100 | |
| Colour | Adjusts image color intensity. | 0 to 100 | |
| Tint | Controls the difference between the green and red regions of the picture. | R50 to G50 | |
| Sharpness | Adjusts image sharpness level. | 0 to 100 | |
| Colour Temperature | Adjusts color components independently to achieve a warm or cool effect: Normal/ Warm/ User/ Cool.• Normal: Increases nature tint• Warm: Increases red tint• User: Allows the user to adjust red, green and blue color component levels independently• Cool: Increases blue tint | • Normal• Warm• User• Cool | |
| Aspect Ratio | Selects through Wide mode settings. | Press or to change selection. | FullZoom1Zoom2PanoramaAuto4:3Under Scan |
| Skin Tone | Skin Color adjust. (0-10) | Press or to change selection or make adjustment. | 0 to 10 |
| ACE | Advance contrast enhance. (Standard, Low, Off, High) | StandardHighOffLow | |
| Noise Reduction | Select to reduce the noise level of connected equipment. | StandardHighOffLow | |
| Auto Adjust | Press the OK button to automatically adjust the display settings to optimize performance based on the VGA mode. | Press OK | |
| H-Position | Adjusts the position of the picture left and right in the window based on the VGA mode. | Press or to change selection. | 0 to 100 |
| V-Position | Adjusts the position of the picture up and down in the window based on the VGA mode. | 0 to 100 | |
| Size | Controls the width of the picture based on the VGA mode. | -30 to +30 | |
| Phase | Controls the signal phase, which can improve focus clarity and image stability based on the VGA mode. | 0 to 100 | |
*Auto Adjust, H-Position, V-Position, Size, and Phase selections will only appear in VGA input source.
Setting up User Picture mode
You can adjust the settings in the Picture menu and save them as your Personal Picture Mode. You can press PICTURE on the remote control to select these modes directly.
- Press MENU to display the OSD menu on-screen.
- Press or to select PICTURE, and then press OK to enter the PICTURE menu.
- Press to select Picture Mode, and then press or to select User.
- Press or to select Contrast, Brightness, Colour, Tint, Sharpness and then press or to adjust the settings to your satisfaction.
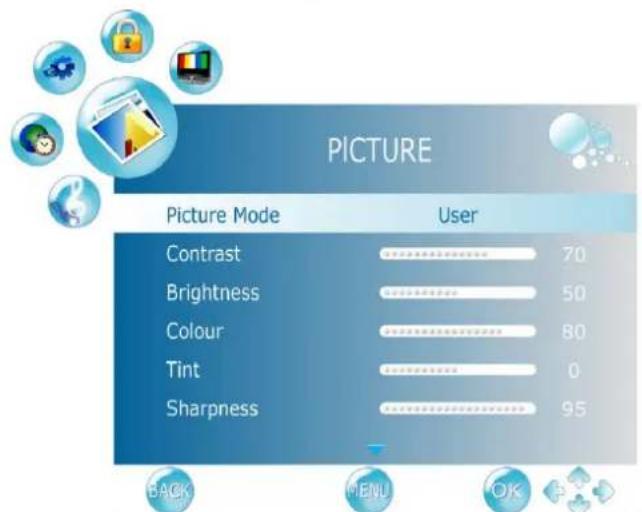
- Press MENU to save the settings and close the OSD menu.
SOUND menu
The available menu items are dependent on the input sourcebeing selected. The illustration is for reference only.

TruSurround HD, SRS and the symbol are trademarks of SRS Labs, Inc.
TruSurround HD technology is incorporated under license from SRS Labs, Inc.
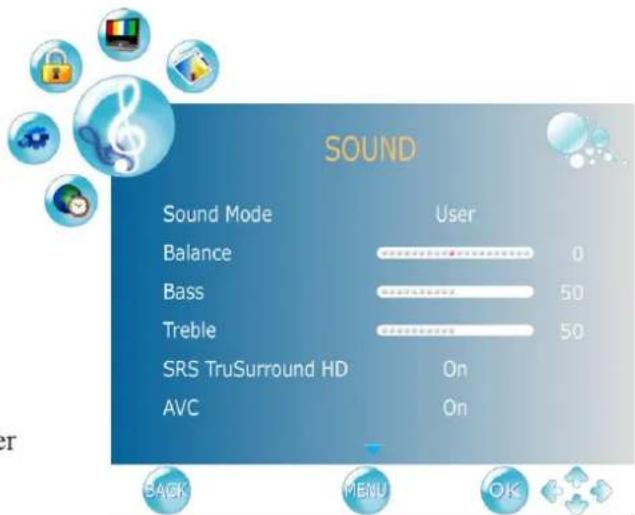
| Item | Function | Operation | Range |
| Sound Mode | Selects a sound type when viewing programs or videos that support multiple sounds.If you select the User mode, you can individually set the Bass and Treble. | Press ↓ or ➔ to change selection or make adjustment. | • User • Standard • Music • Movie • Sports |
| Balance | Adjusts the volume balance of the left or right speaker. | L50 to R50 | |
| Bass | Adjusts bass tones for the User Mode. | 0 to 100 | |
| Treble | Adjusts treble tones for the User Mode. | 0 to 100 | |
| SRS TruSurround HD | SRS TruSurround HDTM creates an immersive, feature-rich surround sound experience from two speakers, complete with rich bass, high frequency detail and clear dialog.SRS TruSurround HD is a patented SRS technology that solves the problem of playing 5.1 multichannelcontent over two speakers.When this selection is On, you are unable to change the sound mode. | • On • Off | |
| AVC | To turn on/ off AVC (automatic volume control) function. | • On • Off | |
| AD Switch | To turn on/off the Audio Descriptor. This function is available only in supported stream in DTV. | • On • Off | |
| AD Volume | Adjusts the volume of Audio Descriptor. | 0 to 100 | |
| Audio only | To turn off the screen picture but keep the sound on. Press any key except VOL+, VOL- or MUTE to restore. | • On • Off | |
| SPDIF Output | To turn on/off the SPDIF audio output and select the supported system. (in DTV, HDMI and Media) | • PCM • AC3 • Off |
*If making any changes on Sound Mode, Bass, or Treble, SRS TruSurround HD will set to off automatically. When setting SRS TruSurround HD from off to on, Sound Mode, Bass, and Treble will change to default value automatically.
TIME menu
The available menu items are dependent on the input sourcebeing selected. The illustration is for reference only.
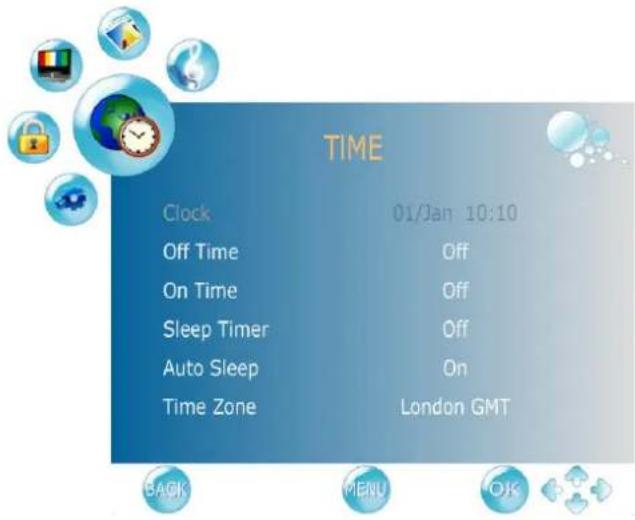
| Item | Function | Operation | Range |
| Clock | Selects to set the current clock. When in DTV input source, Clock cannot be adjusted. The clock will be synchronized with TV broadcasting. | Press OK, use ▲ or ▲ to change selection. | Date Month Year Hour Minute |
| Off Time | Allows to set the Off timers that the TV will switch off automatically at the time you select. | Repeat Hour Minute | |
| On Time | Allows to set the On timers that the TV will switch on automatically and tune to the mode of your choice at the time you select. | Activate Hour Minute Volume Mode | |
| Sleep Timer | Set the Sleep Timer to automatically turn off the display. 1 minute before shutdown, a message will display onscreen. At this time, if you wish to cancel the function, press any button on the remote control. Once the time expires, the display will be put to the standby mode automatically. | Press ▲ or ▲ to change selection. | Off,10,20,30,60,90,120,180,240 (minutes) |
| Auto Sleep | Select on, the TV will be automatically turned off when: 1. Input signal is off for 10 minutes. 2. Function keys or remote control is not used for 3 hours. | On Off | |
| Time Zone | Cycles through the availabetime zones in the country. | Press ▲ or ▲ to change selection. | |
OPTION menu
The available menu items are dependent on the input sourcebeing selected. The illustration is for reference only.
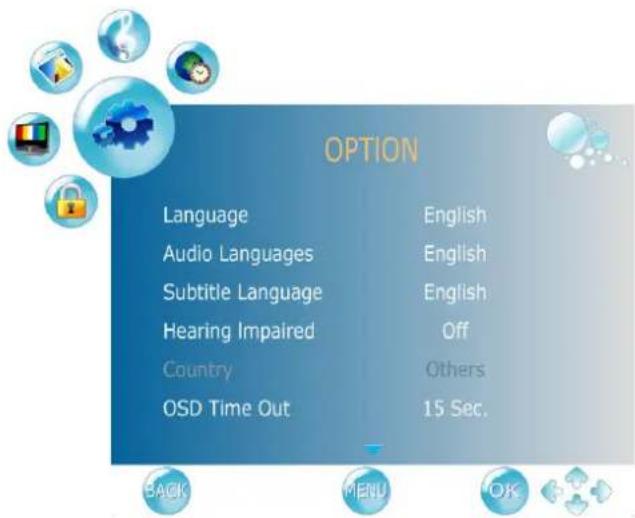
| Item | Function | Operation | Range |
| Language | Select your desired language for the OSD menu. | Press or to change selection. | • English • Espanol • François • Italiano • Nederlands • Portugal • Suomi • Svenska • Deutsch |
| Audio Languages | Select your desired language for audio. (only available in DTV) | • Primary • Secondary | |
| Subtitle Language | Allows to display subtitle on the screen. (only available in DTV) | • Primary • Secondary | |
| Hearing Impaired | To provide close-c captioning function for the hearing impaired, if the program provides it. (only available in DTV) | • On • Off | |
| Country | Displays the country you selected before performing Auto Tuning function. • The country cannot be selected from here. To change country, go to Auto Tuning in the Channel menu. | ||
| OSD Time Out | Allows selection of the display time of the on-screen menu. | Press or to change selection. | Off, 10, 15, 30, 45, 60 (seconds) |
| SCART Input | Allows selection of the SCART signal input. (only available in SCART) | • AV / RGB • SV | |
| Canal+ | To enable SCART connector to support Canal+ Set Top Box (available in French). For normal SCART function, please select OFF. (only available in SCART, AV, S-Video) | • On • Off | |
| HDMI Audio | When in HDMI1 input, select where the audio source comes from Auto, PC In, HDMI. | Press ↓ or ➔ to change selection. | • Auto • PC In • HDMI |
| Backlight | Adjusting the backlight brightness. | • Home • Medium • Low • High | |
| Restore Factory Default | Restores factory settings. | Press OK, use ↓ or ➔ to select "Yes" to confirm. | |
LOCK menu
The available menu items are dependent on the input source being selected. The illustration is for reference only.
Use the function, must enter a four-digit password. The factory password is 0000.
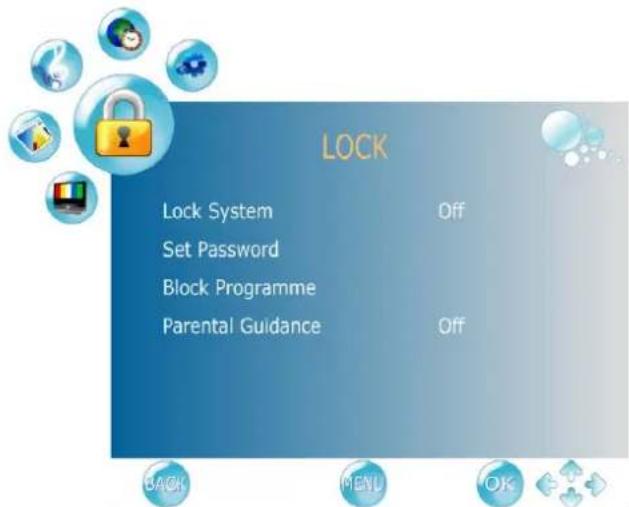
| Item | Function | Operation | Range |
| Lock System | Selects to activate the TV Lock programs. | Press ↓ or ➔ to change selection. | • On • Off |
| Set Password | Allows to set the password. Use the function, must enter a four-digit password. The factory password is 0000. | Press OK to enter. | |
| Block Programme | Selects to setup the TV Program Lock options. | Press OK to enter. | |
| Parental Guidance | Allows to setup the TV Parental Guidance. | Press ↓ or ➔ to change selection. | 4 to 18 year olds, off |
CHANNEL menu
The available menu items are dependent on the input source being selected. The illustration is for reference only.
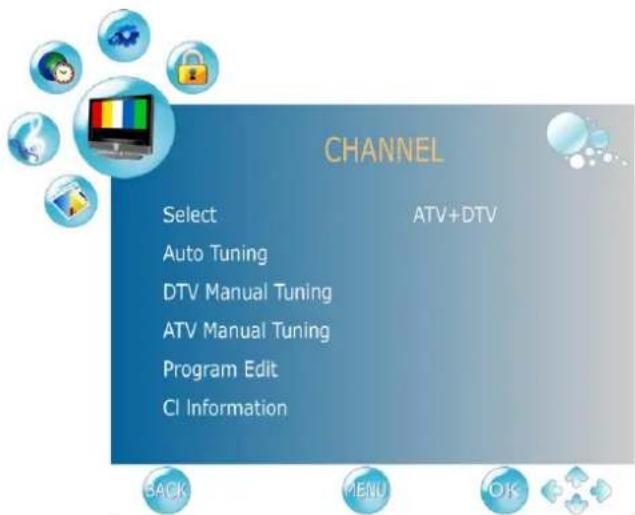
| Item | Function | Operation | Range |
| Select | Selects the Auto Tuning range. | Press or to change selection. | •ATV+DTV •ATV only •DTV only |
| Auto Tuning | Press the OK button, the Auto Tuning automatically creates a list of receivable channels. | Press OK to enter Auto Tuning Menu. | |
| DTV Manual Tuning | Allows adjustment manually for the particular channel with optimal reception. | Press OK to enter DTV Manual Tuning Menu. | |
| ATV Manual Tuning | Allows adjustment manually for the particular channel with optimal reception. | Press OK to enter ATV Manual Tuning Menu. | |
| Program Edit | Allows addition/removal/edition of channels on the channel list. | Press OK to enter Programme Edit Menu. | |
| CI Information | Allows to display the CI information. | Press OK to enter CI Information Menu. | |
Connecting Cl(Common Interface) card
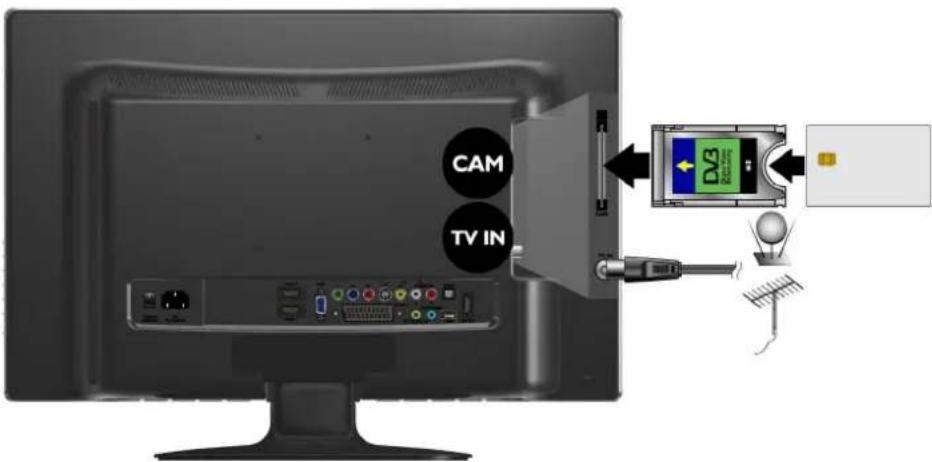
To view the scrambled (pay) services in digital TV mode.
1. TO INSERT A CI CARD
Insert the CI card into the slot in the direction of the arrow until it fits.
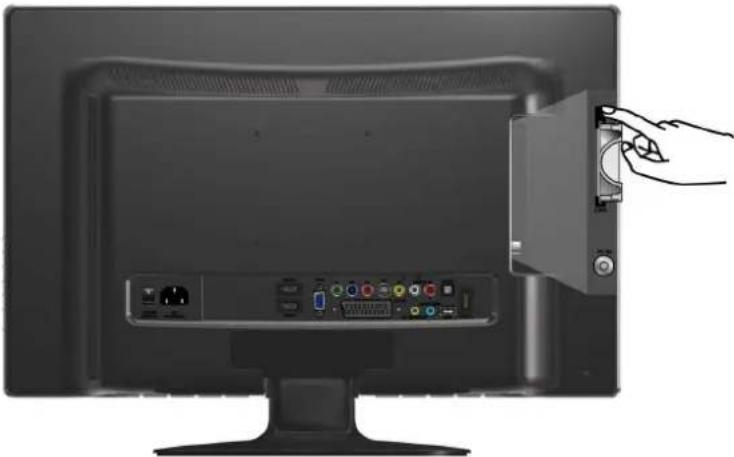
2. TO REMOVE A CI CARD
When removing the CI card, do not attempt to pull it from its slot. Please push the EJECT button as illustrated below.
3. This function enables you to watch the scrambled services (pay services) in some channels.
If you remove the CI Module, you can watch the available digital/analogue programme in some channels.
Media Play - USB Device
Precautions when using a USB device
- MTP (Media Transfer Protocol) is not supported.
- This unit supports only USB Flash Drive with FAT32 format. This TV is not guaranteed the USB Flash Drive with other formats (such as FAT16 or NTFS).
- Certain types of USB Digital camera and audio devices may not be compatible with this TV. Media only guarantees to support USB Flash Drive. Other devices such as flash card reader, USB HDD, USB Digital Camera and audio devices may not be compatible with this TV.
- If a USB device requires high power (more than 500mA or 5V), the USB device may not be supported.
- This TV is not supported the USB device with multiple partitions.
- Please connect directly to the USB port of your TV. If you are using a separate cable connection or through a USB hub, there may be a USB compatibility problem.
- Before connecting your device to the TV, please back up your files to prevent them from damage or loss of data. Any data file damage or data loss is at your own risk.
- The higher the resolution of the image, the longer it takes to display on the screen.
- How fast a USB device is detected differs from device to device.
- For unsupported or corrupted files, the "unsupported File" message is displayed.
- When moving to a photo, loading may take a few seconds. At this point, the loading icon will appear at the screen.
- If USB card reader is connected, its volume may not be detected.
- If USB device does not function properly, please unplug and reconnect it.
- If verify whether the USB device is functioned properly with your PC.
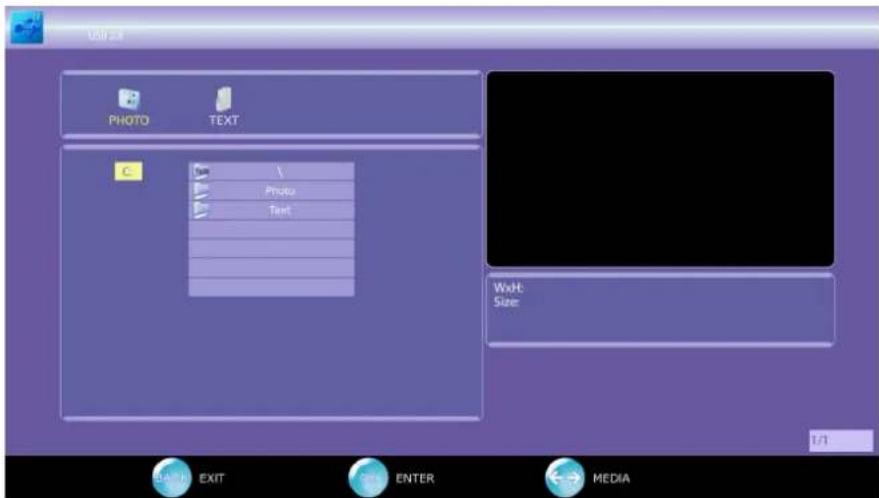
Media Screen Display
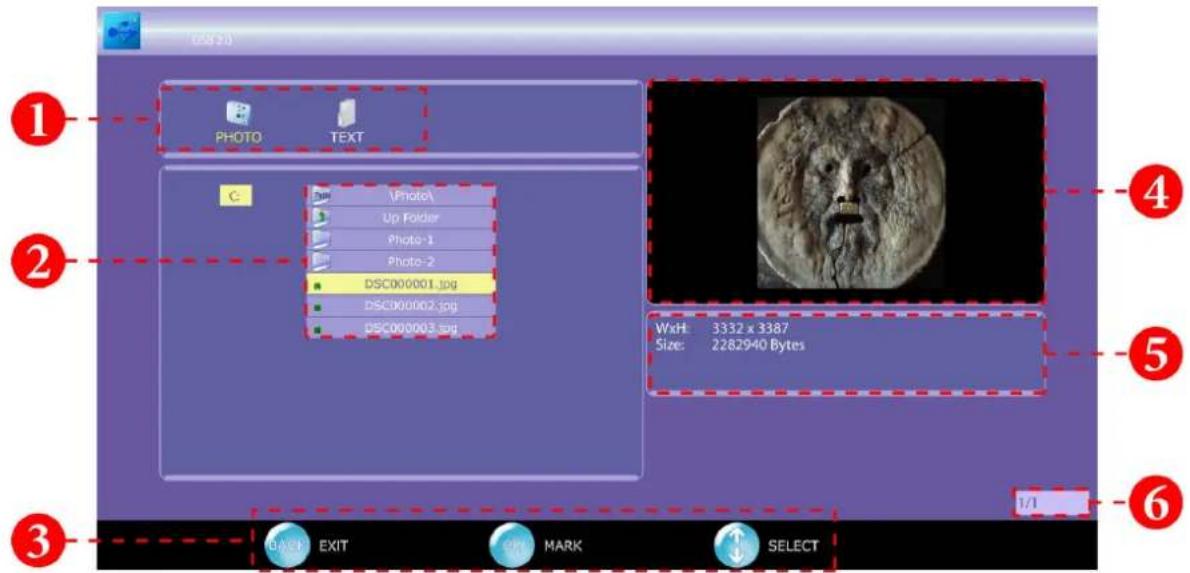
Media List Section: This field shows types of supported Media (Photo and Text).
2 Folder Management Section: Shows the detail information of Folders and File Names.
3Help Items
- BACK button: Exits the current menu and return back to main menu.
-
OK button: Enter the sub-menu or mark (or unmark) the selected files.
-
/ / / button: move the cursor.
Preview Section: This field shows the preview of the media file.
File Information Section: Display the detail information of the media file.
Item Information Section: Shows the number of pages of available folders and files.
Using the Remote Control Button in Media source
| Button | Operations |
| ▲/▼/▲/▼ | Move the cursor and select an item. |
| OK | Select the currently selected item. While playing a slide show. |
| II▲ | Play, pause or resume the slide show of photos. |
| BACK | Exit the current folder. |
| ■ | Stop the current slide show. |
| ←/→ | Page up/ page down for text function. |
| Display next or previous media file. | |
| C | Rotate the current photo clockwise. 90° → 180° → 270° → 360° (normal). |
| Zoom in the current photo. Rate is x2 → x4 → x8 → x1/4 → x1/2 → x1 (normal). |
Viewing Photo or Slide Show
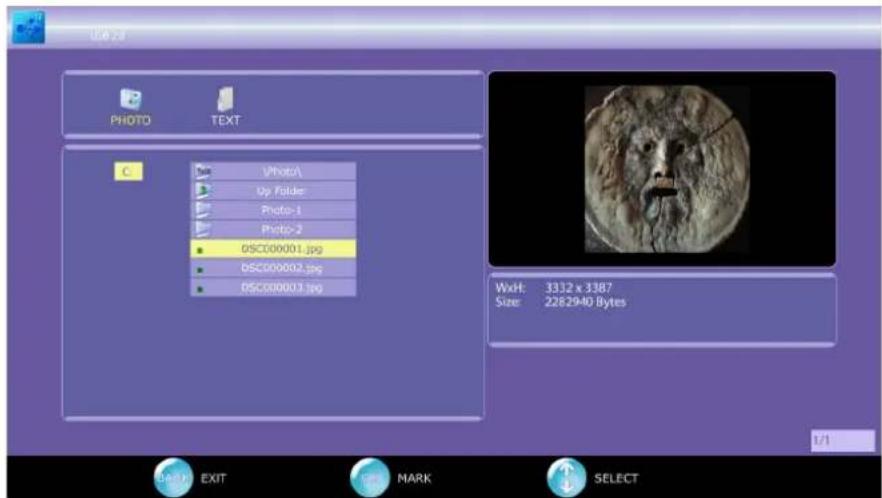
Basic Operating Instruction
- Press or to choose PHOTO icon, then press OK to select.
- Press or to choose the sub folder if necessary, then press OK to enter the folder.
- Press or to move the light-bar cursor, the photo preview will be shown.
Supported Media File
This TV can only support JPEG and BMP files for Photo.
Photo with higher resolution (higher than 1920× 1080 will be downscaled accordingly.
Play a Slide Show within a folder
- Follow the instruction above to enter the desired sub folder.
- Press to start the slide show.
- Photos will be changed every 5 seconds.
- After every photo is displayed, the slide show will be resumed and start from the first photo.
- You may start the slide show from your desired photo by moving the light-bar cursor to the desired file then press
- You may Pause/Resume; Jump to next/previous, Rotate 90^ clockwise, Zoom the current displayed photo.
Perform a Slide Show with only selected files
- Follow the instruction above to enter the desired sub folder.
- Press or to choose the photo. Then press OK to select the photo. The mark will appear to the left of the selected photo.
- Press or again to choose another photo. You may repeat this step until all desired photos are selected.
- Press or and select "UP Folder" to exit the current folder. You may enter other subfolders to select photos for the slide show.
- Once all photos are selected, press to start the slide show.
- You may Pause/Resume; Jump to next/previous, Rotate 90^ clockwise, Zoom the current displayed photo.
- All selected photos will be unmarked once changing source and turning off the TV.
Display the Text
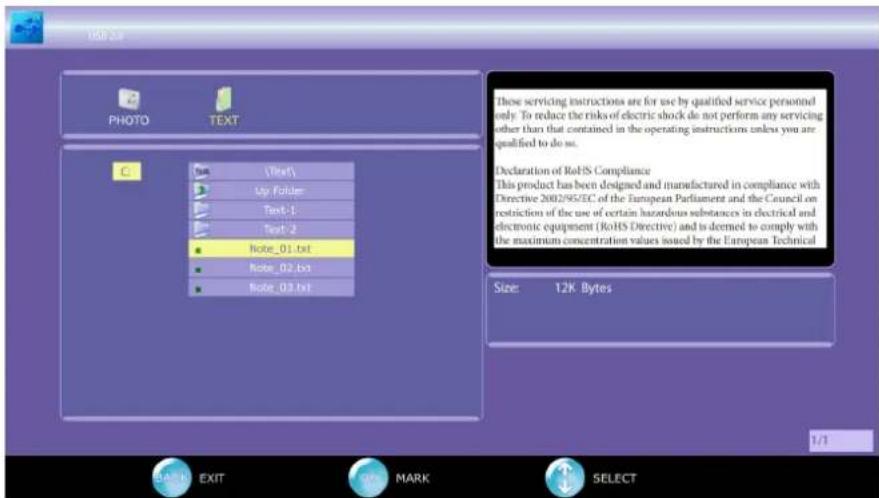
Basic Operating Instruction
- Press or to choose TEXT icon, then press OK to select.
- Press or to choose the sub folder if necessary, then press OK to enter the folder.
- Press or to select the desired media file.
Supported Media File
This TV can only supports .txt formatted files for TEXT.
Display all TEXT files within same folder
- Follow the instruction above to enter the desired sub folder.
- Press to start displaying text.
- The TV will play every supported text file in this folder. When the last text file is played, it will return to the first text file on the list.
- You may wish to start from your desired text. Simply press or to move the light-bar cursor to the desired text file, then press to display the text.
- You may Jump to Next Page/Previous Page, Go to Next Text File/ Previous Text File.
Play only the selected files
- Follow the instruction above to enter the desired sub folder.
- Press or to choose, then press OK to select the text file. The mark will appear to the left of the selected text file.
- You may repeat step #2 until all desired text files are selected.
- Press or and select "UP Folder" to exit the current folder. You may enter other sub folders to select other text files.
- Once all files are selected, press to start playing.
- You may Next Page/Previous Page, Go to Next Text File/ Previous Text File.
- All selected text files will be unmarked once changing source and turning off the TV.
Other Information
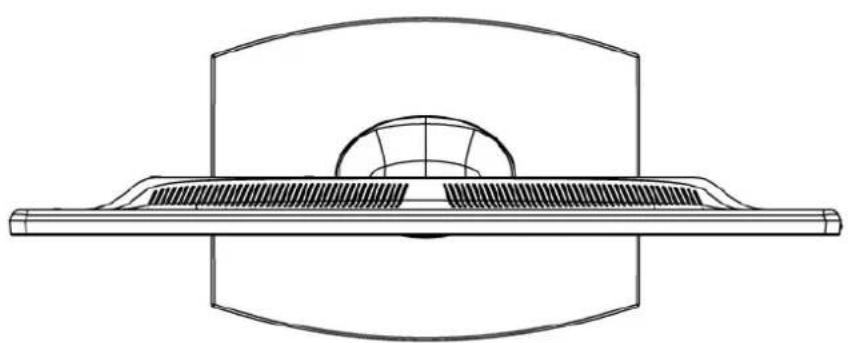
VT2205LED Dimensions
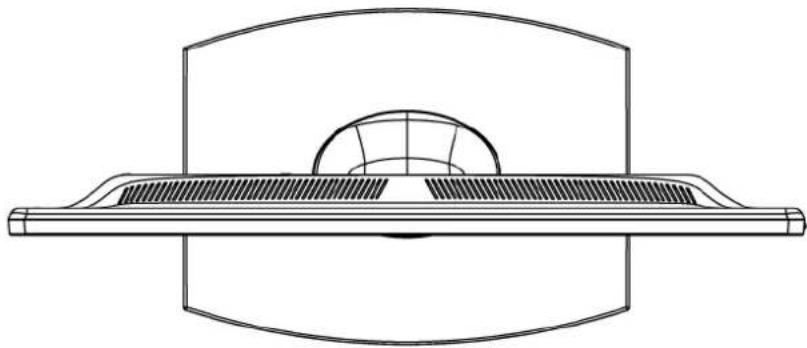
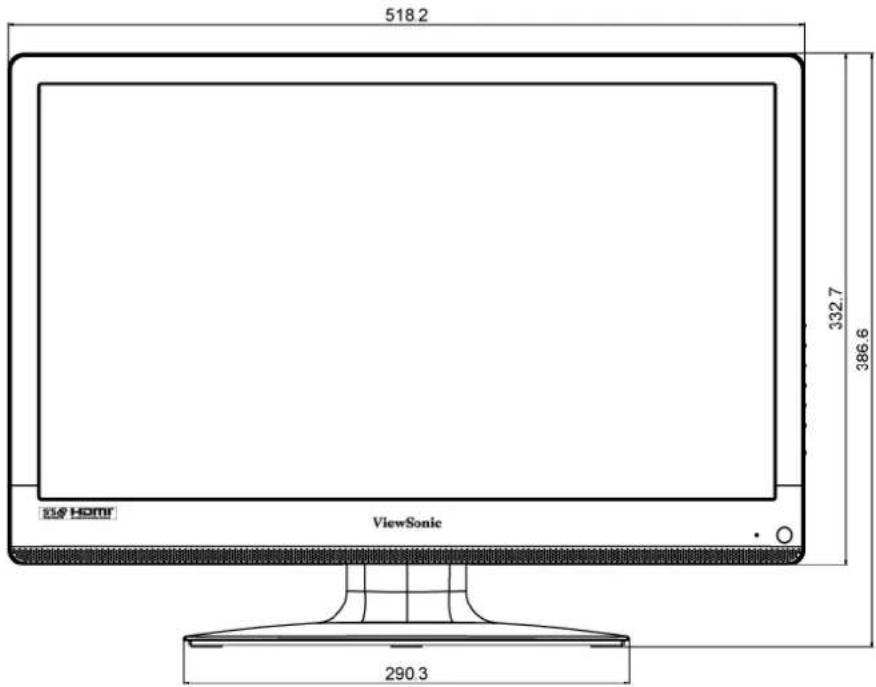
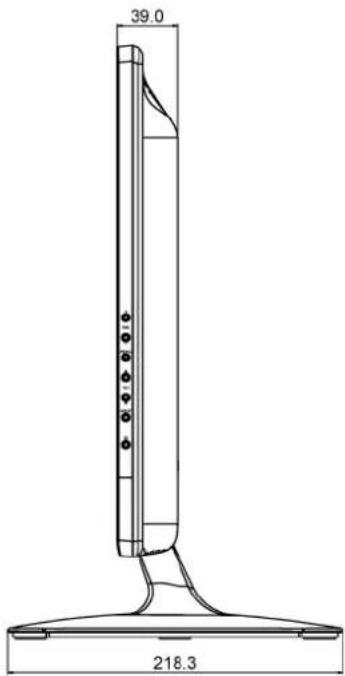
VT2405LED Dimensions
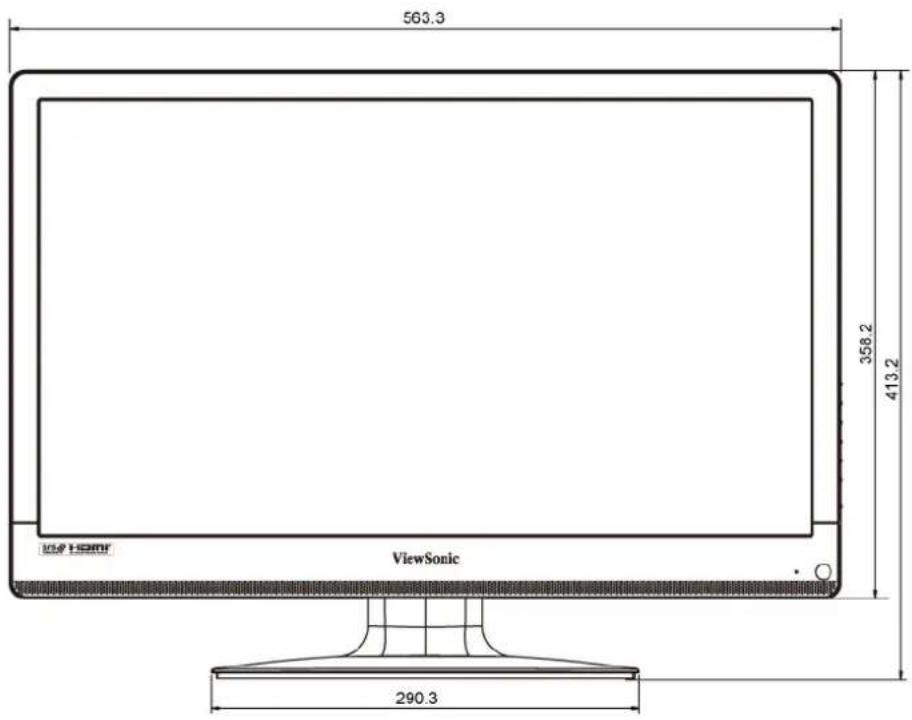
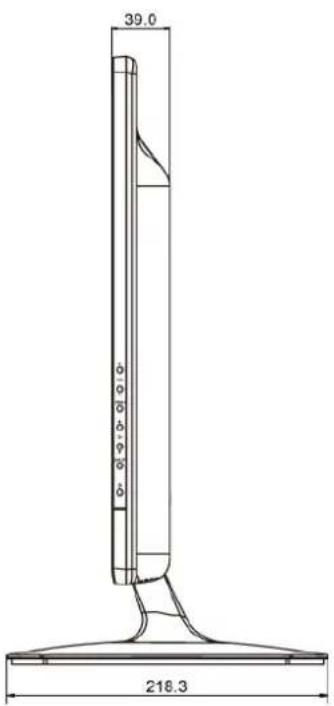
Specifications
| Model | VT2205LED | VT2405LED | |
| Weight (Net) | with stand | 3.9 Kg | 4.7 Kg |
| Dimensions(W × H × D) | with stand | 518.2 x 386.6 x 218.3 mm | 563.3 x 413.2 x 218.3 mm |
| without stand | 518.2 x 332.7 x 39.0 mm | 563.3 x 358.2 x 39.0 mm | |
| LCD panel size (LED Backlight) | 54.69 cm (21.53") | 59.82 cm (23.55") | |
| Aspect ratio | 16:9 | ||
| Native resolution | 1920 x 1080 | ||
| Brightness (typical) | 250 nits | 300 nits | |
| Built-in speakers | 3W x 2 | ||
| Signal input | • Composite Video (AV) × 1 • S-Video × 1 • Component Video (Y Cb/Pb Cr/Pr) × 1 • Audio × 1 • SCART × 1 • USB × 1 • HDMI/DVI × 3 • PC D-Sub × 1 • HDMI/DVI/PC audio × 1 | ||
| Signal output | • Headset × 1 • SPDIF × 1 | ||
| Power supply | AC 100-240V, 60/50 Hz | ||
| Power consumption | 38W (Max.) | ||
| Operating temperature | 0°C ~ 40°C (at sea level) | ||
| Storage temperature | -20°C ~ +60°C (at sea level) | ||
| Video systems | Supports PAL/SECAM and DVB-T formats | ||
Design and specifications are subject to change without notice.
Supported PC (D-Sub/DVI) input signal resolutions
| Resolution | H-Frequency (KHz) | V-Frequency (Hz) | Clock Frequency (MHz) | Note |
| 720 × 400 | 31.469 | 70.080 | 28.320 | VESA |
| 640 × 480 | 31.469 | 59.940 | 25.175 | VESA |
| 640 × 480 | 37.861 | 72.809 | 31.500 | |
| 640 × 480 | 37.500 | 75.000 | 31.500 | |
| 800 × 600 | 35.156 | 56.250 | 36.000 | VESA |
| 800 × 600 | 37.879 | 60.317 | 40.000 | |
| 800 × 600 | 48.077 | 72.188 | 50.000 | |
| 800 × 600 | 46.875 | 75.000 | 49.500 | |
| 1024 × 768 | 48.363 | 60.004 | 65.000 | VESA |
| 1024 × 768 | 56.476 | 70.069 | 75.000 | |
| 1024 × 768 | 60.023 | 75.029 | 78.750 | |
| 1152 x 864 | 67.500 | 75.000 | 108.000 | VESA |
| 1280 x 960 | 60.000 | 60.000 | 108.000 | VESA |
| 1280 × 1024 | 63.981 | 60.020 | 108.000 | VESA |
| 1280 × 1024 | 79.976 | 75.025 | 135.000 | |
| 1440 x 900 | 55.935 | 59.887 | 106.500 | VESA |
| 1400 x 1050 | 65.316 | 59.900 | 121.750 | VESA |
| 1680 x 1050 | 65.290 | 59.954 | 146.250 | VESA |
| 640 x 480 | 35.000 | 66.667 | 30.240 | Apple MAC |
| 832 x 624 | 49.725 | 74.550 | 57.283 | Apple MAC |
| 1152 x 870 | 68.681 | 75.062 | 100.000 | Apple MAC |
| 1920 x 1080 | 67.500 | 60.000 | 148.500 | CEA861B |
Note: Simultaneously press "MENU" and "CH▼" keys on TV panel to switch between similar PC timings.
Similar PC Timing on list below:
- 1400 × 1050@60Hz and 1680 × 1050@60Hz
- 1152 × 900@60Hz and 1440 × 900@60Hz
- 640 × 400@70Hz and 720 × 400@70Hz
Supported Component Video input signal resolutions
| Resolution | II-Frequency (KHz) | V-Frequency (Hz) | Clock Frequency (MHz) | Note |
| 720 × 480 | 15.735 | 60i | 13.5 | SDTV 480i |
| 720 × 480 | 31.25 | 60p | 27 | EDTV 480p |
| 720 x 576 | 15.625 | 50i | 13.5 | SDTV 576i |
| 720 x 576 | 31.25 | 50p | 27 | EDTV576p |
| 1280 × 720 | 45 | 60p | 74.25 | HDTV 720p |
| 1280 × 720 | 37.5 | 50p | 74.25 | HDTV 720p |
| 1920 × 1080 | 28.13 | 50i | 74.25 | HDTV 1080i |
| 1920 × 1080 | 33.75 | 60i | 74.25 | HDTV 1080i |
| 1920 x 1080 | 56.25 | 50p | 148.5 | HDTV 1080p |
| 1920 x 1080 | 67.5 | 60p | 148.5 | HDTV 1080p |
Supported HDMI input signal resolutions
| Resolution | H-Frequency (KHz) | V-Frequency (Hz) | Clock Frequency (MHz) | Note |
| 720 × 480 | 15.735 | 60i | 13.5 | SDTV 480i |
| 720 × 480 | 31.468 | 60p | 27 | EDTV 480p |
| 720 × 576 | 15.625 | 50i | 13.5 | SDTV 576i |
| 720 × 576 | 31.25 | 50p | 27 | EDTV 576p |
| 1280 × 720 | 45 | 60p | 74.25 | HDTV 720p |
| 1280 × 720 | 37.5 | 50p | 74.25 | HDTV 720p |
| 1920 x 1080 | 28.13 | 50i | 74.25 | HDTV 1080i |
| 1920 x 1080 | 33.75 | 60i | 74.25 | HDTV 1080i |
| 1920 x 1080 | 56.25 | 50p | 148.5 | HDTV 1080p |
| 1920 x 1080 | 67.5 | 60p | 148.5 | HDTV 1080p |
- Resolutions outside of these tables are not recognised and will not be displayed.
- When you connect the display to a PC, you should adjust the resolution in the display properties of the computer to closely match the native resolution of the display (for example, 1920 × 1080 pixels).
- To view the best quality picture when using the PC input, you will then need to instruct the display to calibrate itself to the PC signal timing. To do so, select 'Auto' in the 'Picture' menu. See "Auto Adjust" on page 39.
Setting up appropriate output resolution on PC
Before connecting the display to a PC to display PC video, please follow the instructions below (in Windows XP for example) to setup appropriate output resolution.
- On Windows Desktop, right-click and select Properties from the menu that appears.
- Click the Settings tab in the window that follows.
- Drag the Resolution slider and select a compatible resolution according to "Supported PC (D-Sub/DVI) input signal resolutions" on page 55. If your PC supports it, select 1680 × 1050 as the output resolution for the best result.
- Click OK to save the setting and close the window.
- Press INPUT on the remote control and use to select the VGA input then press OK.
Safety Precautions
This LCD TV is manufactured and tested on a ground principle that a user's safety comes first. However, improper use or installation may result danger to the LCD TV as well as to the user. Carefully go over the following WARNINGS before installation and keep this guide handy.
Warnings
- This LCD TV should be operated only at the correct power sources indicated on the label on the rear end of the LCD TV. If you are unsure of the power supply in your residence, consult your local dealer or power company.
- Do not try to repair the LCD TV by yourself as it contains no user-serviceable parts. The LCD TV should be repaired by a qualified technician only.
- Do not remove the LCD TV cabinet. There is high-voltage parts inside that may cause electric shock to human bodies, even when the power cord is disconnected.
- Stop using the LCD TV if the cabinet is damaged. Have it checked by a service technician.
- Put your LCD TV only in a clean dry environment. Unplug the LCD TV immediately if it gets wet, and consult your service technician.
- Always unplug the LCD TV before cleaning it. Clean the cabinet with a clean dry cloth. Apply non-ammonia based cleaner onto the cloth, not directly onto the glass screen.
- Keep the LCD TV away from magnetic objects, motors, TV sets, and transformer.
- Do not place heavy objects on the cable or power cord.
- For PLUG CABLE EQUIPMENT, the Socket-outlet shall be installed near the equipment and shall be easily accessible.
Troubleshooting
Please check the following list for common symptoms you might be facing, and attempt the following steps to diagnose and fix the problem yourself:
| Symptoms | Possible causes |
| The display does not turn ON | ·Check that the power plug is securely inserted into both the AC-IN socket on the display and the wall outlet, and that the wall outlet is switched on (if switched).·Check that power is available from the power outlet by trying another known working appliance (e.g. desk lamp) from that same power outlet. |
| There is no picture or sound | ·Check that the display is turned on (The power indicator should be blue).·Try a different input source to confirm if the symptom is still present or whether the source is at fault.·Check for mis-connection of cables for that input.·Adjust the volume control to check that isn't turned down.·Make sure that the Speaker Out option in the Audio menu is not set to Off. |
| Improper screen position or size | ·Try selecting a different aspect ratio.·Try a different input source to confirm if the symptom is still present or whether the source is at fault. |
| The image appears distorted | ·Ensure the display's aspect ratio is correctly set to suit the image source.·Try a different input source to confirm if the symptom is still present or whether the source is at fault. |
| "Not supported" appears | The PC VGA output signal resolution is set too high. 1920 × 1080 @ 60Hz is the highest acceptable PC timing. |
Customer Support
For technical support or product service, see the table below or contact your reseller.
Note: You will need the product serial number.
| Country/Region | Web Site | |
| Austria | www.viewsoniceurope.com/aus/ | service_at@viewsoniceurope.com |
| Belgium | www.viewsoniceurope.com/befr/ | service_be@viewsoniceurope.com |
| Bulgaria | www.viewsoniceurope.com | service_bg@viewsoniceurope.com |
| Czech Republic | www.viewsoniceurope.com/cz/ | service_cz@viewsoniceurope.com |
| Denmark | www.viewsoniceurope.com/dk/ | service_dk@viewsoniceurope.com |
| Estonia | www.viewsoniceurope.com/fi/ | service_ee@viewsoniceurope.com |
| Finland | www.viewsoniceurope.com/fi/ | service_fi@viewsoniceurope.com |
| France | www.viewsoniceurope.com/fr/ | service_fr@viewsoniceurope.com |
| Germany | www.viewsoniceurope.com/de/ | service_de@viewsoniceurope.com |
| Greece | www.viewsoniceurope.com/gr/ | service_gr@viewsoniceurope.com |
| Hungary | www.viewsoniceurope.com/hu/ | service_hu@viewsoniceurope.com |
| Republic of Ireland | www.viewsoniceurope.com/uk/ | service_ie@viewsoniceurope.com |
| Italy | www.viewsoniceurope.com/it/ | service_it@viewsoniceurope.com |
| Latvia | www.viewsoniceurope.com/lv/ | service_lv@viewsoniceurope.com |
| Lithuania | www.viewsoniceurope.com/lt/ | service lt@viewsoniceurope.com |
| Luxembourg | www.viewsoniceurope.com/lu/ | service lu@viewsoniceurope.com |
| The Netherlands | www.viewsoniceurope.com/nl/ | service NL@viewsoniceurope.com |
| Macedonia | www.viewsoniceurope.com/ru/ | service_mk@viewsoniceurope.com |
| Norway | www.viewsoniceurope.com/no/ | service_no@viewsoniceurope.com |
| Poland | www.viewsoniceurope.com/pl/ | service_pl@viewsoniceurope.com |
| Portugal | www.viewsoniceurope.com | service_ct@viewsoniceurope.com |
| Slovak Republic | www.viewsoniceurope.com/ | service_sk@viewsoniceurope.com |
| Slovenia | www.viewsoniceurope.com/ | service_si@viewsoniceurope.com |
| Russia | www.viewsoniceurope.com/ru/ | service_ru@viewsoniceurope.com |
| Spain | www.viewsoniceurope.com/es/ | service_es@viewsoniceurope.com |
| Sweden | www.viewsoniceurope.com/se/ | service_sc@viewsoniceurope.com |
| Switzerland | www.viewsoniceurope.com/chde/ | service_ch@viewsoniceurope.com |
| Ukraine | www.viewsoniceurope.com/ | service_ua@viewsoniceurope.com |
| United Kingdom | www.viewsoniceurope.com/uk/ | service_gb@viewsoniceurope.com |
Limited Warranty VIEWSONIC LCD TV
What the warranty covers:
ViewSonic warrants its products to be free from defects in material and workmanship, under normal use, during the warranty period. If a product proves to be defective in material or workmanship during the warranty period, ViewSonic will, at its sole option, repair or replace the product with a like product. Replacement product or parts may include remanufactured or refurbished parts or components.
How long the warranty is effective:
ViewSonic LCD TVs are warranted for 1 year for all parts excluding the light source and 1 year for labor from the date of the first customer purchase.
Who the warranty protects:
This warranty is valid only for the first consumer purchaser.
What the warranty does not cover:
-
Any product on which the serial number has been defaced, modified or removed.
-
Damage, deterioration or malfunction resulting from:
a. Accident, misuse, neglect, fire, water, lightning, or other acts of nature, unauthorized product modification, or failure to follow instructions supplied with the product.
b. Repair or attempted repair by anyone not authorized by ViewSonic.
c. Any damage of the product due to shipment.
d. Removal or installation of the product.
e. Causes external to the product, such as electric power fluctuations or failure.
f. Use of supplies or parts not meeting ViewSonic's specifications.
g. Normal wear and tear.
h. Any other cause which does not relate to a product defect.
- Any product exhibiting a condition commonly known as "image burn-in" which results when a static image is displayed on the product for an extended period of time.
- Removal, installation, and set-up service charges.
- When you mount it on the wall, the following must be noticed:
a. The accessories attached with this product are applicable for this product only.
b. When the product is mounted on the wall, holes and fixed screws will remain in the wall body.
c. Wall face may discolor when this product has been mounted on the wall for a long time.
How to get service:
- For information about receiving service under warranty, contact ViewSonic Customer Support (please refer to Customer Support page). You will need to provide your product's serial number.
- To obtain warranted service, you will be required to provide (a) the original dated sales slip, (b) your name, (c) your address, (d) a description of the problem, and (e) the serial number of the product.
- Take or ship the product freight prepaid in the original container to an authorized ViewSonic service center or ViewSonic.
- For additional information or the name of the nearest ViewSonic service center, contact ViewSonic.
Limitation of implied warranties:
There are no warranties, express or implied, which extend beyond the description contained herein including the implied warranty of merchantability and fitness for a particular purpose.
Exclusion of damages:
ViewSonic's liability is limited to the cost of repair or replacement of the product. ViewSonic shall not be liable for:
- Damage to other property caused by any defects in the product, damages based upon inconvenience, loss of use of the product, loss of time, loss of profits, loss of business opportunity, loss of goodwill, interference with business relationships, or other commercial loss, even if advised of the possibility of such damages.
- Any other damages, whether incidental, consequential or otherwise.
- Any claim against the customer by any other party.
Effect of state law:
This warranty gives you specific legal rights, and you may also have other rights which vary from state to state. Some states do not allow limitations on implied warranties and/or do not allow the exclusion of incidental or consequential damages, so the above limitations and exclusions may not apply to you.
Sales outside the U.S.A. and Canada:
For warranty information and service on ViewSonic products sold outside of the U.S.A. and Canada, contact ViewSonic or your local ViewSonic dealer.
The warranty period for this product in mainland China (Hong Kong, Macao and Taiwan Excluded) is subject to the terms and conditions of the Maintenance Guarantee Card.
For users in Europe and Russia, full details of warranty provided can be found in www.viewsoniceurope.com under Support/Warranty Information.
4.3: ViewSonic LCD TV Warranty
LTV_LW01 Rev. 1C 06-25-07

- ViewSonic
- Contents
- Quick Start Guide
- User Manual
- Other Information
- Compliance Information
- CE Conformity for European Countries
- Following information is only for EU-member states:
- Important Safety Instructions
- Declaration of RoHS Compliance
- Copyright Information
- Product Registration
- Product disposal at end of product life
- Antenna Installation Instructions
- Outdoor Antenna Grounding
- Lightning
- Power Lines
- Cleaning the LCD TV
- To clean the screen:
- To clean the case:
- Disclaimer
- Please read these instructions
- What's in the Quick Start Guide?
- What's in the User Manual?
- Package contents
- Select and prepare the installation location
- WARNING
- Installing the Base
- Important safety notes
- Follow the instructions below to install the TV stand:
- Disconnecting the base and arm
- Adjust the viewing angle
- Connect the antenna cable
- Connect the power cable
- WARNING:
- Activate the remote control
- Installing batteries
- Battery safety notice
- Using the remote control
- Initialize your TV
- View the TV programs
- Care and cleaning information
- What's next?
- Getting to know your TV
- Rear view
- Getting to know the remote control
- POWER
- DTV/RADIO
- INFO
- 4.SLEEP
- SOUND
- FREEZE
- 0-9 Channel selection
- () SRS
- GUIDE
- VOL± / VOL-
- BACK
- ▲/▼/▲/▶/OK
- INPUT
- Green/Rotate
- Red/ Skip (Backwards)
- Scan (Backwards)
- Play/Pause
- MUTE
- BACKLIGHT
- TV AUDIO
- ATV/DTV
- 22.PICTURE
- SUBTITLE
- 24.WIDE
- RETURN
- 26.PROGV/
- LIST
- FAVORITE
- 29.MENU
- TELEXT Function
- Yellow/ Zoom
- Blue/ Skip (Forwards)
- Scan (Forwards)
- Stop
- Using the remote control Power on, off and standby
- Turning on the TV
- Putting the display to standby
- Switching inputs
- Adjusting sound setting
- Adjusting volume
- Mute setting
- Selecting a TV sound mode
- Selecting a preset audio mode
- Changing channels
- Selecting a channel program directly
- Changing channels sequentially
- Selecting channels from Channel List
- Returning to the previous selected channel
- Selecting favorite channels
- Selecting a picture modes
- Using the sleep timer
- Using Electronic Program Guide (EPG) function
- Adjusting backlight
- Freeze image on screen
- Adjusting aspect ratio
- Using the Teletext function
- TEXT/MIX/PICTURE
- SUBCODE
- UPDATE
- HOLD
- REVEAL
- SIZE
- LIST
- INDEX
- Connecting video and audio signals Input options
- Connecting the Composite Video input
- Connecting the SCART input
- Connecting the Component Video input
- Connecting the S-Video input
- Connecting the PC input
- Connecting the DVI input
- Connecting the HDMI input
- Connecting the USB input
- Connecting the headset audio output
- Connecting to A/V Device with SPDIF input
- Navigating the OSD menu
- Operations in the OSD menu
- PICTURE menu
- Setting up User Picture mode
- SOUND menu
- TIME menu
- OPTION menu
- LOCK menu
- CHANNEL menu
- Connecting Cl(Common Interface) card
- TO INSERT A CI CARD
- TO REMOVE A CI CARD
- This function enables you to watch the scrambled services (pay services) in some channels.
- Media Play - USB Device
- Precautions when using a USB device
- Media Screen Display
- Viewing Photo or Slide Show
- Basic Operating Instruction
- Supported Media File
- Play a Slide Show within a folder
- Perform a Slide Show with only selected files
- Display the Text
- Display all TEXT files within same folder
- Play only the selected files
- VT2205LED Dimensions
- VT2405LED Dimensions
- Specifications
- Supported Component Video input signal resolutions
- Supported HDMI input signal resolutions
- Setting up appropriate output resolution on PC
- Safety Precautions
- Warnings
- Troubleshooting
- Customer Support
- Limited Warranty VIEWSONIC LCD TV
- What the warranty covers:
- How long the warranty is effective:
- Who the warranty protects:
- What the warranty does not cover:
- How to get service:
- Limitation of implied warranties:
- Exclusion of damages:
- Effect of state law:
- Sales outside the U.S.A. and Canada:
Marque : VIEWSONIC
Modèle : VT2405LED
Catégorie : Téléviseur