BEOVISION LX/L 2502/2802 - Télévision BANG & OLUFSEN - Notice d'utilisation et mode d'emploi gratuit
Retrouvez gratuitement la notice de l'appareil BEOVISION LX/L 2502/2802 BANG & OLUFSEN au format PDF.
| Type de produit | Télévision BANG & OLUFSEN BEOVISION LX/L 2502/2802 |
| Caractéristiques techniques principales | Écran CRT, résolution 1000 lignes, technologie analogique |
| Alimentation électrique | 220-240 V, 50/60 Hz |
| Dimensions approximatives | Largeur : 80 cm, Hauteur : 60 cm, Profondeur : 50 cm |
| Poids | Environ 50 kg |
| Compatibilités | Compatible avec les signaux analogiques, connecteurs SCART |
| Fonctions principales | Réglage automatique de la couleur, télécommande, mode veille |
| Entretien et nettoyage | Nettoyer avec un chiffon doux, éviter les produits abrasifs |
| Pièces détachées et réparabilité | Disponibilité limitée des pièces, service après-vente recommandé |
| Sécurité | Débrancher avant toute intervention, éviter l'exposition à l'humidité |
| Informations générales utiles | Produit vintage, vérifiez la compatibilité avec les sources modernes |
FOIRE AUX QUESTIONS - BEOVISION LX/L 2502/2802 BANG & OLUFSEN
Questions des utilisateurs sur BEOVISION LX/L 2502/2802 BANG & OLUFSEN
0 question sur cet appareil. Repondez a celles que vous connaissez ou posez la votre.
Poser une nouvelle question sur cet appareil
Téléchargez la notice de votre Télévision au format PDF gratuitement ! Retrouvez votre notice BEOVISION LX/L 2502/2802 - BANG & OLUFSEN et reprennez votre appareil électronique en main. Sur cette page sont publiés tous les documents nécessaires à l'utilisation de votre appareil BEOVISION LX/L 2502/2802 de la marque BANG & OLUFSEN.
MODE D'EMPLOI BEOVISION LX/L 2502/2802 BANG & OLUFSEN
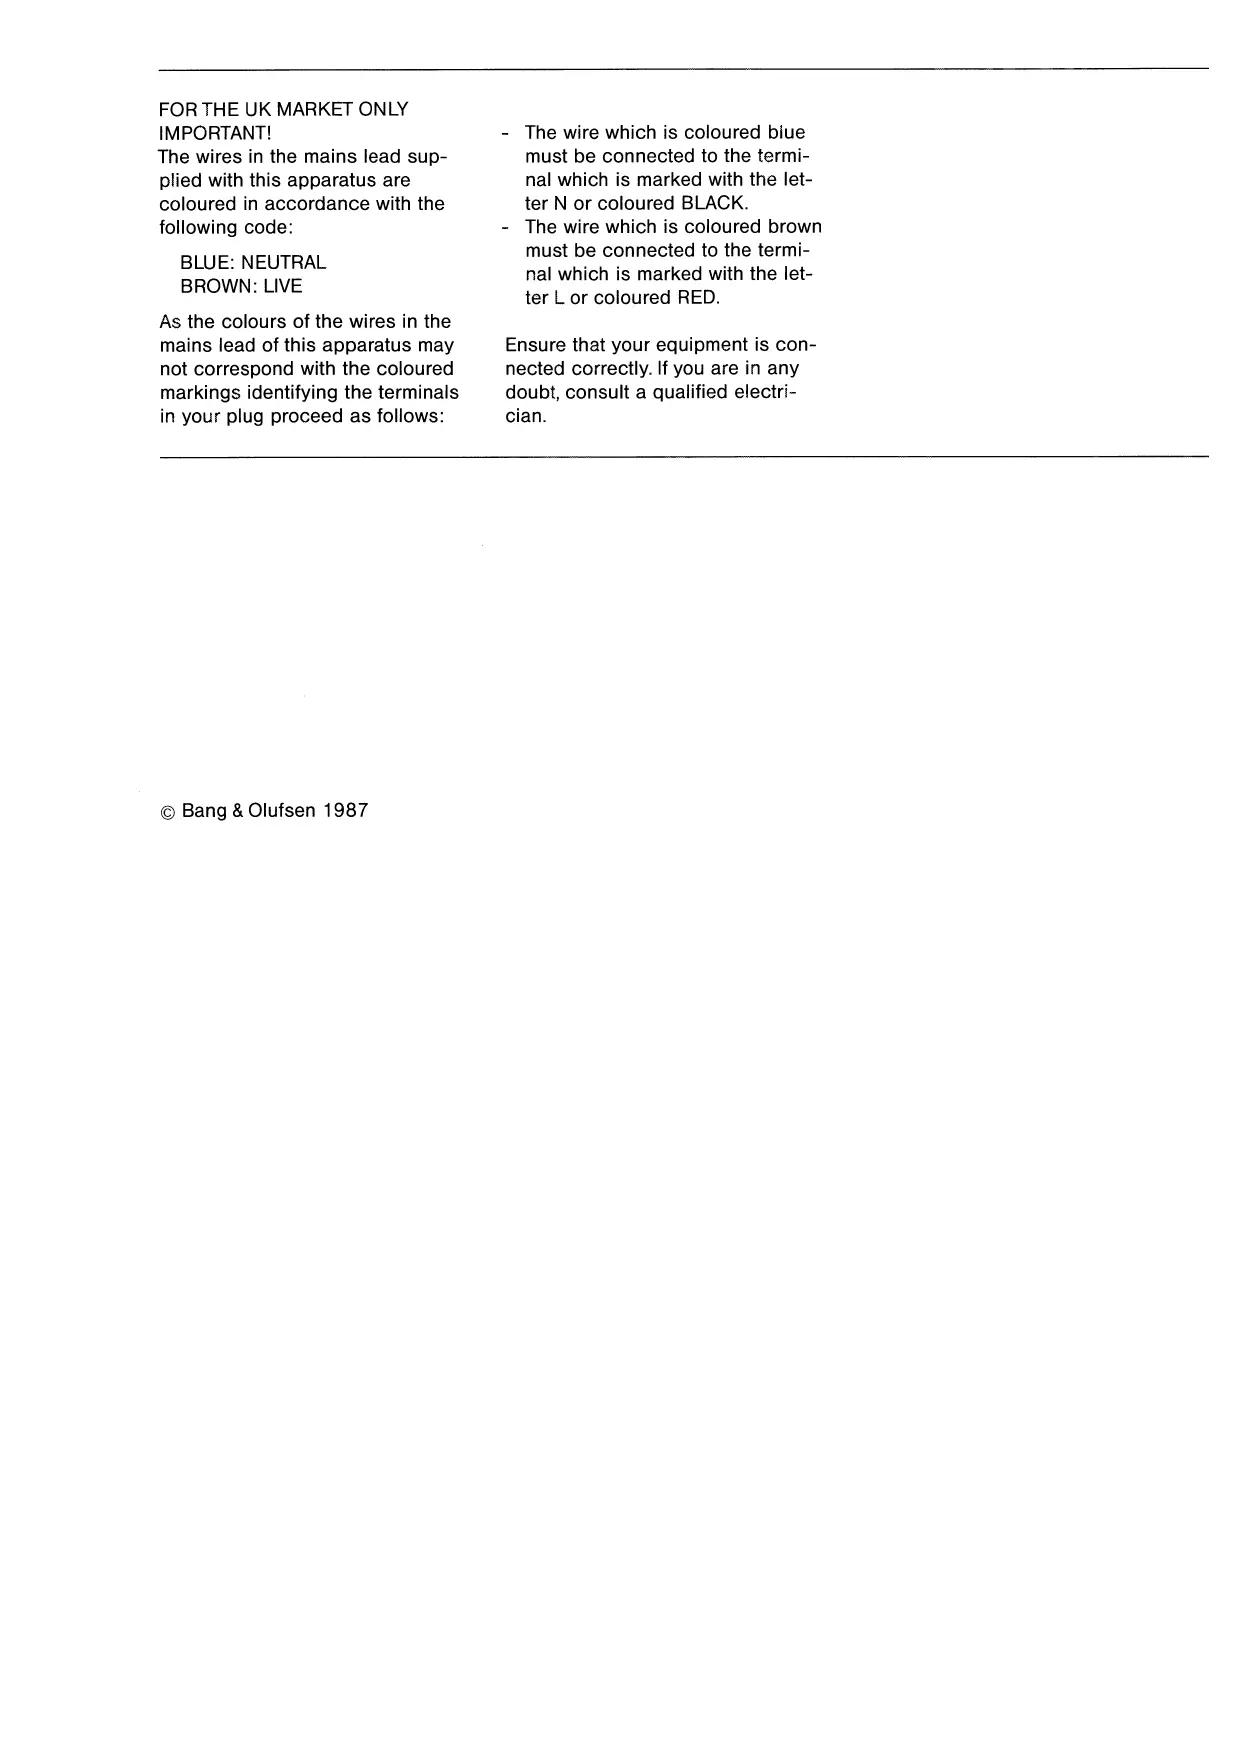
FOR THE UK MARKET ONLY IMPORTANT!
The wires in the mains lead supplied with this apparatus are coloured in accordance with the following code:
BLUE:NEUTRAL BROWN:LIVE
As the colours of the wires in the mains lead of this apparatus may not correspond with the coloured markings identifying the terminals in your plug proceed as follows:
- The wire which is coloured blue must be connected to the terminal which is marked with the letter N or coloured BLACK.
- The wire which is coloured brown must be connected to the terminal which is marked with the letter L or coloured RED.
Ensure that your equipment is connected correctly. If you are in any doubt, consult a qualified electrician.
BEOVISION LX/L 2502/2802
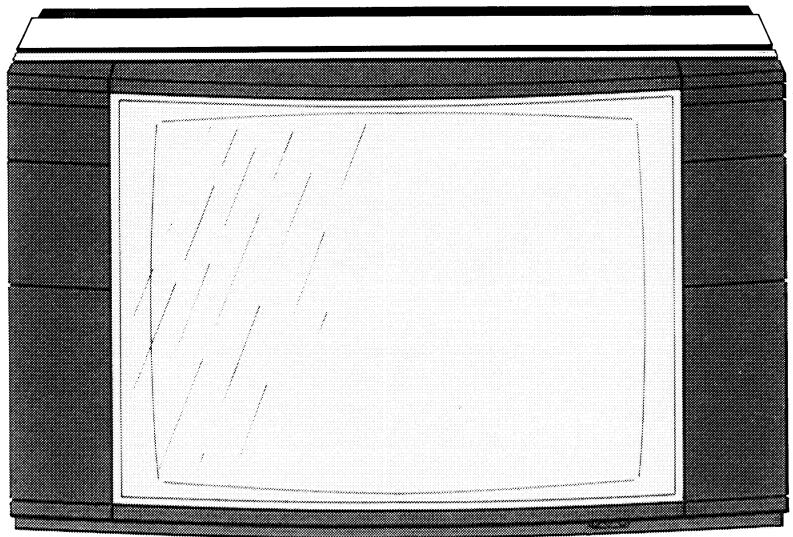
Ingenuity and advanced technology are the key factors in the development and manufacture of your new Bang & Olufsen TV-set, so naturally it produces picture and sound of exceptional quality. On top of that it has a number of equally important features which make it a versatile and future-safe investment.
This manual explains everything you might need to know about setting up and using your TV-set.
If your Bang & Olufsen dealer has carried out the setting up and tuning process for you, you need only cast a quick glance at page 6 where you will find a brief guide to the daily functions of your TV-set.
BEOLINK
The Beovision LX/L 2502/2802 is a so-called Beolink product, which means that it can be used as a master in a Bang & Olufsen Beolink system. In a Beolink system video and audio products are interconnected and they can be operated using only one remote control unit - the Beolink 1000. The Beolink 1000 is the remote control unit supplied with this TV-set. For further information about setting up and operating the Beolink system, please refer to the special Beolink manuals.

TABLE OF CONTENTS
6 QUICK OPERATION GUIDE
8 MAKING YOUR TV-SET READY FOR USE
Setting up
Where to put your TV-set / Connecting the aerial to the TV-set /
Connecting the TV-set to the mains power supply
Tuning
Tuning by automatic search / Tuning by direct frequency selection /
Fine tuning
11 PICTURE AND SOUND ADJUSTMENTS
Brilliance / Colour / Contrast
Volume / Balance / Treble and bass
16 EXPLANATION OF ON-SCREEN DISPLAYS
Displays appearing during tuning Status displays
Displays appearing during picture and sound adjustments
Display colours
18 USING TELETEXT
Selecting pages directly Using the basic teletext functions
Memorizing individual pages for easy recall Using the 'Fastext' facility
Recording teletext subtitles on video tape
24 USING A VIDEO
Connecting the video to the TV-set
Connecting a Bang & Olufsen video to the TV-set
Tuning the TV-set for video playback
28 SPECIAL SOUND FEATURES
Stereo sound Enlarging the sound image
Switching between left and right sound channels
30 MISCELLANEOUS SPECIAL FUNCTIONS
31 SOCKETSONREAR PANEL
32 OPTIONAL ACCESSORIES
○ Headphones ○ Auxiliary speakers ○ Stand
Loop amplifier
34 MAINTENANCE
Cabinet Remote control Contrast screen
36 LIST OF FREQUENCIES
38 INTERNATIONAL GUARANTEE
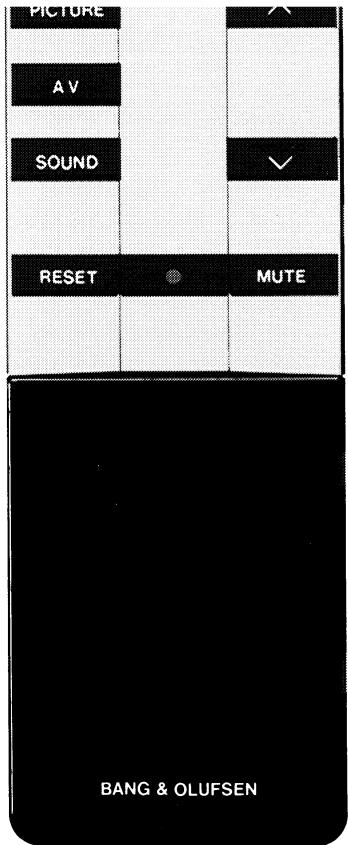
QUICK OPERATION GUIDE
Once your TV-set has been set up and tuned to receive the TV stations available in your area, it is ready for use.
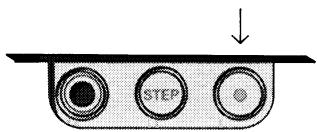
The stand-by indicator in the upper right-hand corner must be lit before you can operate the TV-set using the remote control.
This quick operation guide explains all you need to know about using the daily functions of your TV-set.
| Switch on | Press TV. | SATELLITE RECORD PHONO |
| Select preset TV stations | Key in the appropriate number or press < or > to step through the numbers. | V.TAPE SHIFT A.TAPE |
| LARGE TIME MIX | ||
| Adjust volume | Press ▽ to raise volume. | << PLAY >> |
| Press ▽ to lower volume. | ||
| Return to preset volume level | Press RESET. | TURN STOP GO TO |
| Mute the sound | Press MUTE. | 7 8 9 |
| Press MUTE again to recall the sound. | ||
| Mute the picture | Press PICTURE MUTE. | 4 5 6 |
| Press TV to recall the picture. | ||
| 1 2 3 |
Switch off Press
The stand-by indicator lights up again.
MAKING YOUR TV-SET READY FOR USE
Setting up
Where to put your TV-set
The TV-set must be placed on a firm surface. Allow a space of at least 5cm above and to the sides of the TV-set for adequate ventilation.
The bar enclosed with the TV-set is intended for use with a special stand with castors designed by Bang & Olufsen. The stand is available as an optional accessory. For further details about stands see the section "Optional Accessories".
Connecting the aerial to the TV-set
Connect the aerial to the aerial socket on the rear panel.
If you want to connect a video to your TV-set, you must connect the aerial to the video instead. Then connect the video to the aerial socket on the TV-set using the aerial cable supplied with the video.
Connecting the TV-set to the mains power supply
Connect the TV-set to the mains with the lead provided and depress the power switch located in the lower right-hand corner on the front.
The stand-by indicator in the upper right-hand corner lights up,
indicating that the TV-set is in stand-by mode and ready to be operated with the remote control.
The voltage in your area must correspond to the voltage indicated on the label on the rear of your TV-set.


75 OHM

Tuning
Just like a radio, your TV-set must be tuned to pick up the stations available in your area. Although there is no visible frequency scale on the TV-set, the principle is exactly the same, but to help you the frequencies will be displayed at the top of the screen while you search for a station.
You can preset each station found so that you don't have to go through the tuning process every time you want to watch television. The TV-set can hold up to 32 different stations in its memory on the preset numbers 0-31.
Press TV to switch on the TV-set before you start the tuning process.
This tuning procedure may be used if you don't know where on the frequency scale to find the stations available in your area.
Tuning by automatic search
- Press or once to start searching for a station.
- Wait for the TV-set to find a station.
- Press or once more if this is not the station you want.
- Press STORE once.
- Key in the number on which you want to preset the station found.
- Press STORE a second time to preset the station.
Repeat this procedure to find and preset other stations.
This tuning procedure may be used if you know on which frequencies to find the stations available in your area.
Repeat this procedure to find and preset other stations.
It may be required to fine tune (or detune) a station slightly to obtain a clear and stable picture.
- Press [GOTO].
- Key in the appropriate figure for the frequency of your choice, using three digits (e.g. 075 for 75 MHz).
- Press STORE once.
- Key in the number on which you want to preset the station.
- Press STORE a second time to preset the station.
Fine tuning
- Press GO TO
- Press or one, two or three times to fine tune.
- Press STORE twice to store the fine tuning instruction.
PICTURE AND SOUND ADJUSTMENTS
The TV-set always switches on at specific, preset picture and sound
levels. These preset levels may be adjusted and changed, if required.
Brilliance
Brilliance is an indication of the intensity of light. The higher the brilliance level is, the more light there is in the picture. The brilliance level ranges from a minimum of 0 to a maximum of 62. It is set at 32 when the TV-set leaves the factory.
To adjust brilliance:
- Press PICTURE once.
- Press or while the BRILLIANCE cue is visible until you reach the desired level.
- If you want to preset the new level, press STORE, PICTURE, STORE in quick succession.
Colour
Colour is an indication of the saturation of the colours. The higher the colour level is, the more saturated the colours are. The colour level ranges from a minimum of 0 (black & white) to a maximum of 62. It is set at 32 when the TV-set leaves the factory.
To adjust colour:
- Press PICTURE twice.
- Press or while the COLOUR cue is visible until you reach the desired level.
- If you want to preset the new level, press [STORE], [PICTURE], [STORE] in quick succession.
Contrast is an indication of the difference between black and white. The higher the contrast level is, the sharper the difference is. The contrast level ranges from a minimum of 0 to a maximum of 63. It is set at 44 when the TV-set leaves the factory.
Please note!
Contrast need not be adjusted to changes in the surrounding light which occur during viewing as this is done automatically by the TV-set itself.
Contrast
To adjust contrast:
- Press [PICTURE] three times.
- Press or while the CONTRAST cue is visible until you reach the desired level.
- If you want to preset the new level, press [STORE], [PICTURE], [STORE] in quick succession.

Adjusting and presetting brilliance, colour and contrast may be done in one go by pressing PICTURE only once between each adjustment, and by pressing STORE, PICTURE, STORE only after the last adjustment.
STORE
PICTURE
STORE
The volume level may be adjusted any time during viewing just by pressing or as required. The volume level ranges from a minimum of 0 (muted) to a maximum of 40.
The preset start-up level, which is the volume level at which the TV-set switches on, may also be adjusted to suit your personal taste.
To adjust the preset start-up level:
- Press SOUND once.
- Press or while the VOLUME cue is visible until you reach the desired level.
- Press [STORE], [SOUND], [STORE] in quick succession to preset the new level.
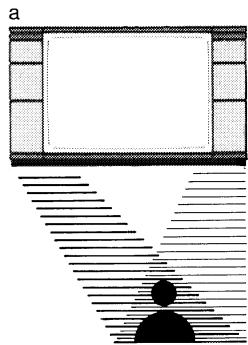
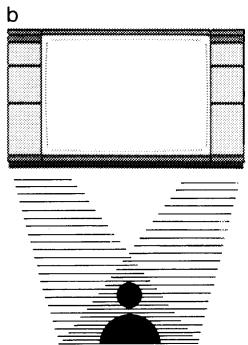
Balance is an indication of the distribution of sound emerging from the speakers on each side of the screen. The distribution is even when balance is set at 0 (b).
To shift balance:
- Press [SOUND] twice.
- Press or while the BALANCE cue is visible.
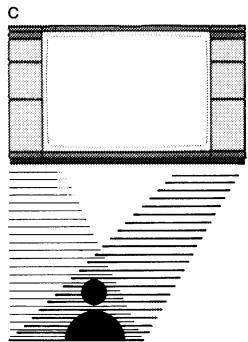
Pressing removes sound from the left-hand speaker and shifts it to the right-hand speaker (c).
Pressing removes sound from the right-hand speaker and shifts it to the left-hand speaker (a).
- If you want to preset the new balance setting, press STORE, SOUND, STORE in quick succession.
Treble and bass are indicators of the high and low tones. The medium setting of treble and bass is at 0.
Treble and bass
To adjust treble and bass:
- Press SOUND three times to obtain the TREBLE cue or four times to obtain the BASS cue.
- Press or while the appropriate cue is visible until you reach the desired level.
- If you want to preset the new level, press STORE, SOUND, STORE in quick succession.
Adjusting and presetting volume, balance, treble and bass may be done in one go by pressing SOUND only once between each adjustment, and by pressing STORE, SOUND, STORE only after the last adjustment.
STORE
SOUND
STORE
EXPLANATION OF ON-SCREEN DISPLAYS Displays appearing during tuning
P followed by a digit (0-31) indicates the current preset number. AFC indicates the presence of the automatic frequency control. AFC 0 indicates that no fine tuning away from the standard frequency has been done. AFC followed by a minus or plus figure indicates the presence of a fine tuning instruction.
F followed by three digits indicates the frequency in Megahertz (MHz) without decimals. The frequency scale in this TV-set ranges from 46 to 855 MHz.
Status displays
Certain TV stations transmit a code which the teletext decoder, if any, converts into a display stating the name of the TV stations. Press TV another time to see this display.
A permanent time display can be inserted in the upper right-hand corner of the TV picture telling you the current time. This facility is supplied by teletext, so in order to be able to use it your TV-set must be provided with a teletext decoder. While watching the TV programme, press PLAY (= TIME) once to see the time display. Press PLAY immediately again for a permanent display, and a third time to remove the display.
Displays appearing during picture and sound adjustments
BRILLIANCE followed by a figure (0-62) indicates the current brilliance level.
COLOUR followed by a figure (0-62) indicates the current colour level.
CONTRAST followed by a figure (0-63) indicates the current contrast level.
PICTURE indicates that you are in the process of storing the current brilliance, colour and contrast levels.
VOLUME followed by a figure (0-40) indicates the current volume level.
BALANCE followed by 0 or by a plus or minus figure indicates the current balance level.
TREBLE followed by 0 or by a plus or minus figure indicates the current level of the treble tones.
BASS followed by 0 or by a plus or minus figure indicates the current level of the bass tones.
SOUND indicates that you are in the process of storing the current volume, balance, treble and bass levels.
Display colours
Green indicates the current status of the memory.
Yellow indicates deviations, if any, from the current status of the memory.
Red indicates the first stage in the storing process. i.e. when you have pressed STORE once. At this stage the storing process may still be discontinued.
USING TELETEXT
Teletext provides a wealth of useful information. Just like a book, it consists of a table of contents (main index) and numbered pages which you can look up.
Please note!
The teletext functions described in this section are not applicable if your TV-set is not provided with a teletext decoder.
Do not forget to press TEXT every time you want to switch to teletext and to select another source, e.g. TV, every time you want to leave teletext.
Selecting pages directly
- Press TEXT to gain access to teletext.
- Press GO TO to proceed to the page selection function.
- Key in the page number of your choice using 3 digits, e.g. 200 , or press < or to step forwards or backwards through the pages.
- Repeat 3 to select other pages.
These simple functions enable you to gain access to all the information available in teletext.
Returning to index page 100: Press RESET.
Superimposing the TV picture on the teletext page: Press ( MIX).
Press again to remove the TV picture.
Enlarging the text:
Press < (=LARGE) to enlarge the upper half of the teletext page.
Press 品 again to enlarge the lower half of the teletext page.
Press < a third time to return to normal size.
Retaining a page:
Press STOP to retain the page.
Press STOP again to cancel the STOP instruction.
Revealing concealed text:
Press SHIFT, TURN to reveal concealed text.
Press SHIFT, TURN again to conceal it.
This function is applicable only if the page concerned is accompanied by a time signal.
- Select page number.
- Press PLAY (= TIME).
- Key in the time you require using four digits, e.g. 0 9 0 0.
- Press SHIFT, GO TO (= UPDATE). The TV picture will return instantly and the cue FOUND will appear at the time you have requested.
-
Press (=MIX) to look at the page.
-
Press (=TIME) again to cancel the time function.
Using the update function
While you are waiting for a page to appear at a specified time or to be updated, do not forget that the TV-set is still in teletext mode. This means that the buttons on the remote control are still dedicated to teletext functions.
- Select page number.
- Press SHIFT, GO TO (= UPDATE). The TV picture will return instantly and the cue FOUND will appear at the top of the screen.
-
Press SHIFT, GOTO if you want to remove the cue FOUND. When the page has been updated, the cue UPDATE will appear.
-
Press (=MIX) to look at the page.
Memorizing individual pages for easy recall
Whenever you press [TEXT] to switch to teletext, you gain access to the four memory pages MEM 1, MEM 2, MEM 3 and MEM 4.
These memory pages may each be occupied by any teletext page of your choice, e.g. page 300 in MEM 1 and page 310 in MEM 2, etc.
The first time you press TEXT after switching on, MEM 1 will appear. Press or to step through the four memory pages, or key in the appropriate number.
- Press [TEXT] to switch to the memory pages.
- Press GO TO
- Key in the page number you want to memorize in MEM1, e.g. 300
- Press STORE twice to memorize page 300 in MEM 1.
After pressing STORE once you may select another memory page by keying in the appropriate number, e.g. 3 for MEM 3.
- Press TEXT to return to the memory pages.
-
Press × to step to any of the other memory pages, i.e. MEM 2, MEM 3 or MEM 4, or key in the appropriate number.
-
Repeat 2, 3, 4, 5 and 6 to fill in the remaining memory pages.
The pages in MEM 1, MEM 2, MEM 3 and MEM 4 may be replaced any time just by entering new page numbers according to the preceding instructions.
Please note!
The memory function is applicable only if you are on one of the preset numbers from 0 to 24.
Using the 'Fastext' facility
The 'Fastext' facility (also known as FLOF - Full Level One Feature) is a facility provided by some teletext broadcasters. It enables the user to step directly to one of four different pages linked to the one currently being viewed. This reduces the access time to these immediate access pages to almost zero, and at the same time it helps the user to find a logical path through the multiplicity of teletext pages.
This TV-set is capable of receiving and handling the 'Fastext' facility wherever it is available.
In order to make use of the 'Fastext' facility, you must first memorize at least one page to which other pages are linked in one of the four memory pages MEM 1, MEM 2, MEM 3 or MEM 4. Then:
- Select the appropriate memory page.
An extra display line will now appear indicating the titles of the four immediate access pages linked to the current page. - Press one of the numbered buttons [1, 2, 3] or [4] to select the immediate access page of your choice.
1 is the first from the left, 2 is the second from the left, etc. -
If you want to see the page you just left, press [0].
-
If you want to see the index of immediate access pages, press RESET.
If there is no index of immediate access pages, you will see the main index page instead.
- If you want to leave the 'Fastext' facility, press e.g. [GOTO] to select other pages, or [or] to select another memory page.
Please note!
The choice of immediate access pages is entirely at the discretion of the teletext broadcasters.
TV programmes may be recorded on video tape along with their subtitles. To do this you must connect your video to the TV-set by a 21-pin A/V cable.
Select the preset number on the TV-set to which the TV programme you want to record is assigned.
Switch the video to A/V mode and start recording as usual.
Press TEXT to switch to teletext and find the page transmitting subtitles. Enlarge the subtitles by pressing < ( = LARGE) twice, if required.
AUX 2
A/V

USING A VIDEO
Connecting the video to the TV-set
The video must be connected to the TV-set by means of the separate aerial cable supplied with the video.
Connect the aerial to the aerial input socket on the video. Connect the separate aerial cable to the aerial output socket on the video and to the aerial input socket on the TV-set.
If you want to use an A/V cable to connect the video to the TV-set, the video must be connected either to the 21-pin A/V socket (AUX 2) or to the 6-pin A/V socket (AUX 3). For information about A/V connection requirements, please refer to the manual supplied with your video.


Connecting a Bang & Olufsen video to the TV-set
If connected to the 21-pin A/V socket (AUX 2) on the TV-set, any of the following Bang & Olufsen videos may be operated with the Beolink 1000 remote control:
Beocord VX 5000
Beocord VHS 91/91.2*
Beocord VHS 82/82.2
Beocord VHS 63/66*
Press V.TAPE to switch on the video.
If you want to connect two of these videos, you must connect one (the primary video) to the 21-pin A/V socket AUX 2 and the other (the secondary video) to the 6-pin A/V socket AUX 3.
Press V.TAPE to switch on the primary video.
Press SHIFT, V.TAPE to switch on the secondary video.
AUX 2
A/V

AUX3
A/V

Bang & Olufsen videos of a less recent model can also be connected to the TV-set and operated with the Beolink 1000 remote control. This applies to:
Beocord VHS 90^ / 65^
Beocord VHS 80*
Beocord VHS 62
Beocord VCR 70/61/60
If connecting any of these videos, you must make special adjustments to the TV-set. This is done via on-screen menu operation.
Press SHIFT, TEXT to gain access to the set-up menu.
Then press twice to step to the first menu for secondary video set-up V.TAPE 2. Press or to select either of the menu options AUX 2 or AUX 3, according to which of the two sockets you have connected the video to. Press STORE twice to store the option of your choice.
Press again to step to the next menu for secondary video set-up.
Press or to select menu option OLD, which is the option required for the TV-set to accommodate any of these videos. Press STORE twice to store the option of your choice.
Switch on the video by pressing SHIFT, V.TAPE.
Please note!
The set-up menus TV: OPTION 1/2 and TV: MASTER/SLAVE preceding the menus for V.TAPE 2 apply only if the TV-set is used in a Beolink/ Master Control Link system.
Tuning the TV-set for video playback
If you do not use an A/V cable, but only an aerial cable, to connect the video to your TV-set, you must prepare one of the TV-set's preset numbers for video playback.
- Start playing a video tape on the video and switch on the TV-set by pressing TV.
- Select an unused preset number on the TV-set.
- Press to start searching for the frequency on which the video is sending its playback signals (usually within the 540-630 MHz range).
- Wait for the TV-set to find the frequency.
The TV-set will have found the correct frequency when you can see the video tape recording on the screen.
- Possibly repeat 3 and 4 until the TV-set has found the correct frequency.
- Press SHIFT, 2 to produce a stable picture.
- Press STORE twice to preset the video frequency.
The cue A/V will appear at the top of the screen.
Whenever you want to play back a video tape, remember to select the preset number you have just prepared for video playback.
SPECIAL SOUND FEATURES
The special sound indicators referred to in this section are all located in the upper right-hand corner of the TV-set.
Stereo sound
Your TV-set will automatically reproduce stereo sound when the source, e.g. a TV programme or a video tape, is in stereo*.
Bad stereo sound from a stereo TV programme which is due to weak signals may be improved by switching to mono. To do so, press . Press again to return to stereo.
The stereo indicator will also light up whenever the 21-pin A/V socket is used as sound input, i.e. even when playing back a mono video tape.
Stereo indicator:

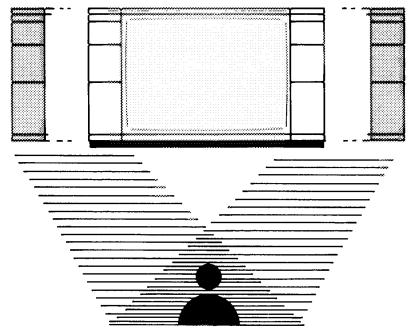
Enlarging the sound image
The sound image of TV programmes can be enlarged by pressing SOUND, TURN, which gives you the impression that the speakers are farther apart than they actually are.
If the sound is in stereo, you obtain what is usually referred to as 'enhanced stereo'.
If the sound is in mono, however, you obtain what is usually referred to as 'pseudo stereo'.
Press SOUND, TURN again to return to normal sound image. Enlarged sound image cannot be obtained if you are watching a video tape.

Enlarged sound image indicator:
Switching between left and right sound channels
This function is useful if e.g. you are watching a dual language TV programme and you want to switch from one language to the other.
Press TURN to switch between the sound channels.
Left sound channel indicator (language A):

Right sound channel indicator (language B):

MISCELLANEOUS SPECIAL FUNCTIONS
The TV-set contains some special functions which are used to carry out a variety of special operation routines. To carry out these functions, press SHIFT and then the appropriate number.
SHIFT,2 Expands the synchronizing area of the appropriate pre-set number. Applicable only when receiving video signals via aerial cable. Referred to in the paragraph "Tuning the TV-set for video playback" on page 26.
Shift, 6 Blocks the control voltage ('play voltage') produced by a video tape recorder, if any. Applicable e.g. if the video tape recorder is connected to another TV-set by an aerial cable and you want to play back a video tape via the additional TV-set and still be able to watch a TV programme on this TV-set.
SHIFT, 8 Allows output of left and right sound channels simultaneously via the 21-pin A/V socket. Applicable when recording dual language video tapes.
SOCKETS ON REAR PANEL
- Sockets for auxiliary loudspeakers. R for right speaker, L for left speaker.
- AMPL, socket for power amplifier, volume adjustable via remote control.
- AUX 1 LINE, input and output socket for Beolink connection or loop amplifier.
- TAPE, output socket for audio tape recorder.
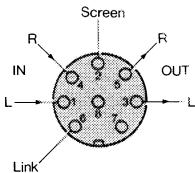
- AUX 3 A/V, 6-pin input and output socket for audio/video equipment, e.g. secondary video tape recorder.
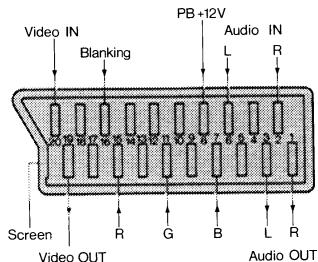
- AUX 2 A/V, 21-pin input and output socket for audio/video equipment, e.g. primary video tape recorder.
- Socket for 75 ohm aerial.

Pin configuration AUX 2:
- audio output, right
- audio input, right
- audio output, left
- earth connection for audio
- earth connection B input
- audio input, left
- B input
- status input 0-2/10-12 V/10 kohms
- earth connection G input
- not connected
- G input
- not connected
- earth connection R input
- not connected
- R input
- fast blanking input 0-0.4/1-3 V/
75 ohms
- earth connection CVBS
- earth connection fast blanking
- CVBS output
- CVBS input
- screening plug
AUX 1
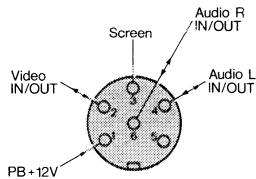
AUX 3
AUX 2
OPTIONAL ACCESSORIES
The accessories referred to in this section are all available as optional extras from your Bang & Olufsen dealer.
Headphones
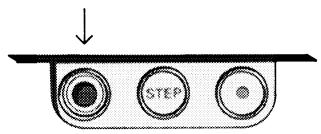
Headphones, e.g. the Bang & Olufsen Form 1 or Form 2 headphones, can be connected to the TV-set via the headphones socket on the front
in the lower right-hand corner. When you plug in headphones, the built-in speakers and auxiliary speakers, if any, are cut out.
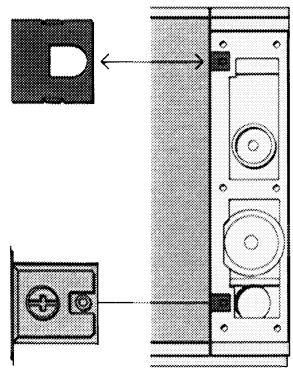
Auxiliary speakers
Auxiliary speakers (8 ohm) can be connected to the TV-set via the speaker sockets on the rear panel (L for left speaker, R for right speaker).
If you connect the speakers as in pos. 1 on the diagram, both sets of speakers (auxiliary and built-in) are cut in.
If you connect the speakers as in pos. 2 on the diagram, the built-in speakers are cut out.
Any adjustment of sound, e.g. volume or balance adjustments, also apply to the sound produced by the auxiliary speakers.
Avoid placing the loudspeakers too close to the TV-set as this may affect the picture quality adversely.
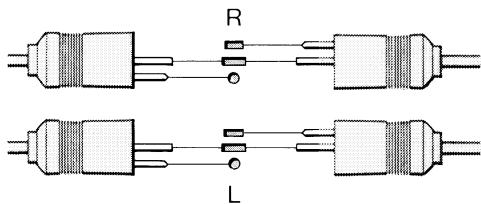
Pos. 1
Pos. 2
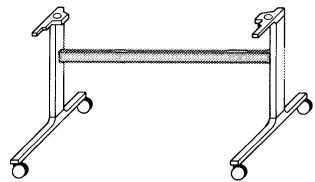
Stand
Ideal placement of the TV-set is on a stand designed specially for the Beovision LX/L.
Type no. 3072: Stand with castors. (Not applicable to the UK market, supplied as standard with TV-set).
Type no. 3073 or 3074: Stand with shelf for Bang & Olufsen video tape recorder.
Loop amplifier
The Bang & Olufsen loop amplifier (type no. 3098) for the hard of hearing can be connected to the TV-set. This enables the sound to be transmitted to a hearing aid that
is provided with a loop/microphone switch. The volume can be adjusted independently of the sound from the TV speakers.
For further information about accessories, please refer to the Bang & Olufsen accessories catalogue.
MAINTENANCE
Cabinet
Wooden cabinet
The wood surfaces may be wiped with a dust cloth. If required, you can treat them with a furniture polish suitable for the type of wood concerned. This treatment should only be applied in accordance with the instructions of the furniture polish used.
White cabinet
The cabinet may be wiped with a firmly wrung soft cloth which you have dipped in a solution of water containing a few drops of mild detergent.
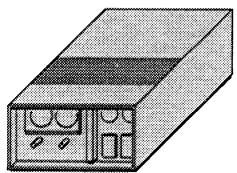
Remote control
The remote control may be wiped with a firmly wrung soft cloth which you have dipped in a solution of water containing a few drops of mild detergent.
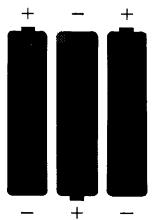
The three batteries in the remote control should be replaced as required. Use 1.5 V (size AAA - Alkaline) batteries.
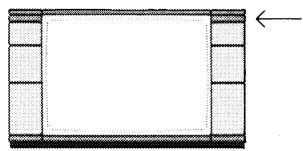
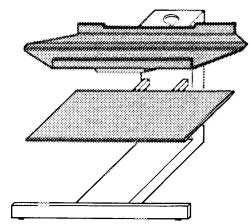
Contrast screen
Normally, it is only necessary to clean the outer surface of the screen. To do so spray the screen with a window cleaner and wipe it with a dry, soft cloth.
In particularly smoky and dusty conditions particles may penetrate the space behind the screen, forming a thin film of dirt on the inner surface. Should this happen, the clarity of the picture may be adversely affected and the screen should be removed and its inner surface and the picture tube cleaned.
- Remove the right-hand speaker cover:
- first gently grip the base and pull slightly outwards.
- then grip the right-hand side and pull slightly outwards.
- finally gently grip the top and pull outwards until it comes off.
- Remove the left-hand speaker cover using the same procedure, but pulling the left-hand side.
- Remove the four square plastic flaps concealing the screws which hold the screen in place by inserting a screwdriver into the holes and levering them off gently. Now the screws holding the screen in place are accessible.
- Undo the two lower screws in each side and then only one of the two upper screws.
- Hold the screen firmly while removing the fourth and final screw.
Take care not to drop the heavy screen
Spray the inner surface of the screen and also the surface of the picture tube with a window cleaner and wipe them with a dry, soft cloth.
Replace the contrast screen using the removal procedure in reverse order.
Remove any resulting finger marks with a soft cloth.
Do not use alcohol or other powerful cleaning fluids to clean any part of the TV-set.
LIST OF FREQUENCIES
This TV-set uses frequencies as reference for tuning. The advantage of this system is that you can select with great precision any frequency on which a TV station or cable TV is transmitting. Such built-in flexibility ensures that the TV-set can cope with variations in transmission practices. This list of frequencies gives you the usual channel designations and their corresponding frequencies.
VHF standard
| Channel designation no | On-screen display MHz | Channel designation no | On-screen display MHz | Channel designation no | On-screen display MHz | Channel designation no | On-screen display MHz |
| E2 | 48 | E10 | 210 | S 5 | 133 | S13 | 245 |
| E3 | 55 | E11 | 217 | S 6 | 140 | S14 | 252 |
| E4 | 62 | E12 | 224 | S 7 | 147 | S15 | 259 |
| E5 | 175 | S 8 | 154 | S16 | 266 | ||
| E6 | 182 | S1 | 105 | S 9 | 161 | S17 | 273 |
| E7 | 189 | S2 | 112 | S10 | 168 | S18 | 280 |
| E8 | 196 | S3 | 119 | S11 | 231 | S19 | 287 |
| E9 | 203 | S4 | 126 | S12 | 238 | S20 | 294 |
UHF standard
| Channel designation no | On-screen display MHz | Channel designation no | On-screen display MHz | Channel designation no | On-screen display MHz | Channel designation no | On-screen display MHz |
| 21 | 471 | 34 | 575 | 46 | 671 | 58 | 767 |
| 22 | 479 | 35 | 583 | 47 | 679 | 59 | 775 |
| 23 | 487 | 36 | 591 | 48 | 687 | 60 | 783 |
| 24 | 495 | 37 | 599 | 49 | 695 | 61 | 791 |
| 25 | 503 | 38 | 607 | 50 | 703 | 62 | 799 |
| 26 | 511 | 39 | 615 | 51 | 711 | 63 | 807 |
| 27 | 519 | 40 | 623 | 52 | 719 | 64 | 815 |
| 28 | 527 | 41 | 631 | 53 | 727 | 65 | 823 |
| 29 | 535 | 42 | 639 | 54 | 735 | 66 | 831 |
| 30 | 543 | 43 | 647 | 55 | 743 | 67 | 839 |
| 31 | 551 | 44 | 655 | 56 | 751 | 68 | 847 |
| 32 | 559 | 45 | 663 | 57 | 759 | 69 | 855 |
| 33 | 567 |
| Ireland | Australia | New Zealand | |||
| Channel designation no | On-screen display MHz | Channel designation no | On-screen display MHz | Channel designation no | On-screen display MHz |
| IA | 45 | 0 | 46 | 1 | 45 |
| IB | 53 | 1 | 57 | 2 | 55 |
| IC | 61 | 2 | 64 | 3 | 62 |
| ID | 175 | 3 | 86 | 4 | 175 |
| IE | 183 | 4 | 95 | 5 | 182 |
| IF | 191 | 5 | 102 | 6 | 189 |
| IG | 199 | 5a | 138 | 7 | 196 |
| IH | 207 | 6 | 175 | 8 | 203 |
| IJ | 215 | 7 | 182 | 9 | 210 |
| 8 | 189 | ||||
| 9 | 196 | ||||
| 10 | 209 | ||||
| 11 | 216 | ||||
INTERNATIONAL GUARANTEE
This Bang & Olufsen product carries a guarantee against defects in workmanship and materials. It is a national guarantee, extended by Bang & Olufsen to the country in which the product was bought. The terms of the guarantee apply principally to the country of purchase but will be met by authorized Bang & Olufsen dealers in other countries. The guarantee period applying to the country of purchase takes priority over guarantee periods applying in other countries, even where differences exist.
In order to obtain service under this guarantee, a certificate stating the following information is required:
If you intend to use your TV-set in a country other than that in which it was bought, it may be necessary for you to have your TV-set modified to suit the TV system used in the country you are moving to. We therefore recommend that you contact your Bang & Olufsen dealer before moving to another country. Any costs incurred in this connection do not fall under the terms of the guarantee.
Please note that your TV-set is not approved for use in the USA and Canada and must not be modified with this purpose in view.
Beng & Clueen
DK-7600 Struer
DENMARK
- Name of product and type number
- Serial number
- Date of purchase
- Guarantee period
- Dealer's or supplier's signature