Oi45EW - Enceinte audio 0 ACOUSTICS - Notice d'utilisation et mode d'emploi gratuit
Retrouvez gratuitement la notice de l'appareil Oi45EW 0 ACOUSTICS au format PDF.
| Marque | 0 Acoustics |
| Modèle | Oi45EW |
| Type de produit | Enceinte extérieure/intérieure avec support orientable |
| Utilisation | Intérieur et extérieur (IPX4 avec bouchons de port) |
| Puissance admissible (RMS) | 80 W (estimation) |
| Impédance | 8 ohms (estimation) |
| Réponse en fréquence | 50 Hz - 20 kHz (estimation) |
| Sensibilité | 88 dB (estimation) |
| Type de haut-parleur | 2 voies avec tweeter et port bass-reflex |
| Orientation d'installation | Verticale ou horizontale |
| Support fourni | Support en C avec réglage d'angle intégré |
| Matériau du boîtier | Plastique résistant aux intempéries (estimation) |
| Dimensions (H x L x P) | Environ 200 x 150 x 150 mm (estimation) |
| Poids | Environ 2 kg |
| Couleur | Blanc ou noir (non spécifié, estimation) |
| Protection contre les intempéries | IPX4 avec bouchons de port en caoutchouc |
| Type de connexion | Bornes à vis, câble jusqu'à 4,0 mm² (AWG 12) |
| Accessoires inclus | Support C, bouchons de port, caches de protection des bornes, adhésif pour grille |
| Garantie | 5 ans (pièces et main-d'œuvre) |
| Entretien et nettoyage | Nettoyage avec un chiffon humide uniquement, sans produits chimiques |
| Sécurité | Ne pas utiliser en milieu marin ; ne pas exposer à des projections d'eau directes sans bouchons de port |
| Pièces détachées et réparabilité | Contacter le revendeur ou le service après-vente |
| Certifications | Conforme aux normes de construction locales (estimation) |
FOIRE AUX QUESTIONS - Oi45EW 0 ACOUSTICS
Questions des utilisateurs sur Oi45EW 0 ACOUSTICS
0 question sur cet appareil. Repondez a celles que vous connaissez ou posez la votre.
Poser une nouvelle question sur cet appareil
Téléchargez la notice de votre Enceinte audio au format PDF gratuitement ! Retrouvez votre notice Oi45EW - 0 ACOUSTICS et reprennez votre appareil électronique en main. Sur cette page sont publiés tous les documents nécessaires à l'utilisation de votre appareil Oi45EW de la marque 0 ACOUSTICS.
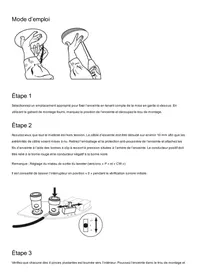
MODE D'EMPLOI Oi45EW 0 ACOUSTICS
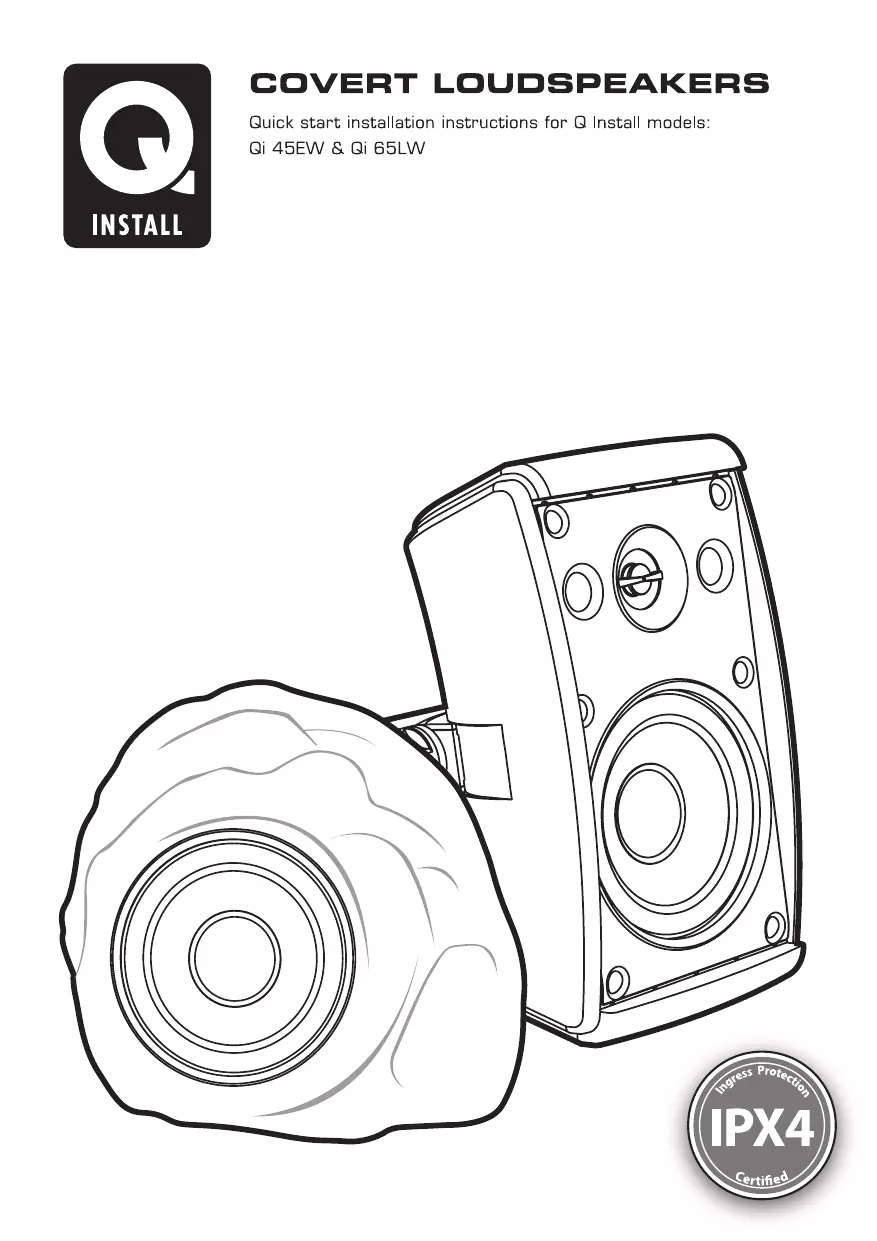
Warning Notices
It is important to ensure that the installation complies with relevant building regulations. If in doubt always consult a qualified installer.
- Before drilling mounting holes or laying speaker cables ensure that there is no conflict with other in-wall/in-ceiling or underground installed items such as water or gas pipes, or electrical cabling etc.
- Ensure that the speaker model is suitable for use in the intended application. Note that these products are not suitable for use in a marine environment where they will be exposed to salt: spray.
- These products should only be cleaned using a damp cloth without the use of chemical cleaning agents. Do not use a garden hose or high pressure water jet as it may damage the speakers.
-
The Qi 45EW should NOT be positioned where water or rain will be driven directly into the grille (Figure 1). The speaker should always be mounted such that water will naturally drain away from the grille. For IPX4 protection in wet environments, the rubber ports plugs must be fitted.
-
The Qi 65LW should NOT be positioned on ground where there is insufficient drainage and risk of being submerged in standing water.
SPEAKER CABLE GENERAL GUIDELINES
[ALWAYS ENSURE LOCAL REGULATIONS ARE MET]
Use speaker cable that has the correct rating, it is important to ensure that the wire gauge is adequate to cope with the longest run of cable required. VWhen running speaker cables outside ensure they are moisture proof and resistant to UV exposure. If burying speaker cables in a trench use additional protection such as PVC piping or a cable rated for direct burial into the ground.
| Distance | A.W.G. | mm2 |
| up to 45m | 12 | 4.0 |
| up to 30m | 14 | 2.5 |
| up to 20m | 16 | 1.6 |
Minimum recommended wire gauges (single run to one speaker)

Qi 45EW Vertical Mounting

Qi 45EW Horizontal Mounting
Figure 1. Qi 45EW installation orientation when exposed to rain.
Sound coverage area:
For large areas multiple pairs speakers may be required to give good stereo results. As a rough guide the recommended maximum area covered by two speakers should be no more than 30 - 40m^2
INSTALLING THE Qi 65LW ROCK SPEAKER
Step 1
Select a suitable location for the speaker taking note of the Warning Notices. The Qi 65LW can be installed directly on the ground, wood decking or a stone patio for example. Where it is mounted on earth it is recommended that a paving slab or similar is laid first to provide a firm horizontal base. This can then be covered with earth to camouflage. For best audio performance it is recommended that at least two speakers are installed. The perforated speaker grille/s should face the normal listening position and not be obstructed with shrubs or other objects (Figure 2) as this will reduce the sound level and audio performance.
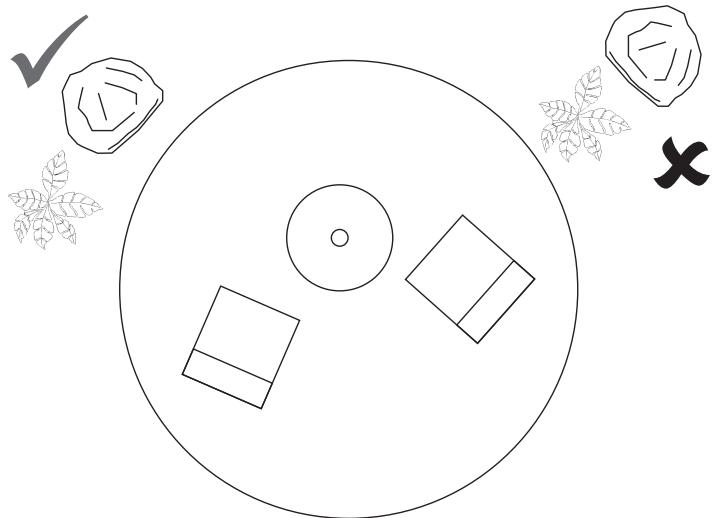
Figure 2. Position speakers clear of acoustic obstructions
Step 2
Make sure all audio equipment is switched off. Remove [unscrew] the square speaker connector cover on the base of the speaker to expose the speaker terminals. Any outer jacket should be trimmed back 50 mm. Feed the speaker wires through the cover and the then strip back the individual speaker conductors 10 mm so that there are bare wire ends. Attach the speaker leads using the pushdown spring clip terminals at the bottom of the speaker. The positive conductor should be connected to the red terminal and the negative conductor to the black terminal (Figure 3).

Figure 3. Qi 65LW Speaker cable connections
Step 3
Re-secure the speaker terminal cover plate. Position the speaker on its base ensuring that the cable exits through the notch at the rear of the speaker. Test the speaker/s with a music source to ensure there are no unwanted buzzes or vibrations from the supporting surface or nearby objects.
INSTALLING THE Qi 45EW INDOOR AND OUTDOOR LOUDSPEAKER
Step 1
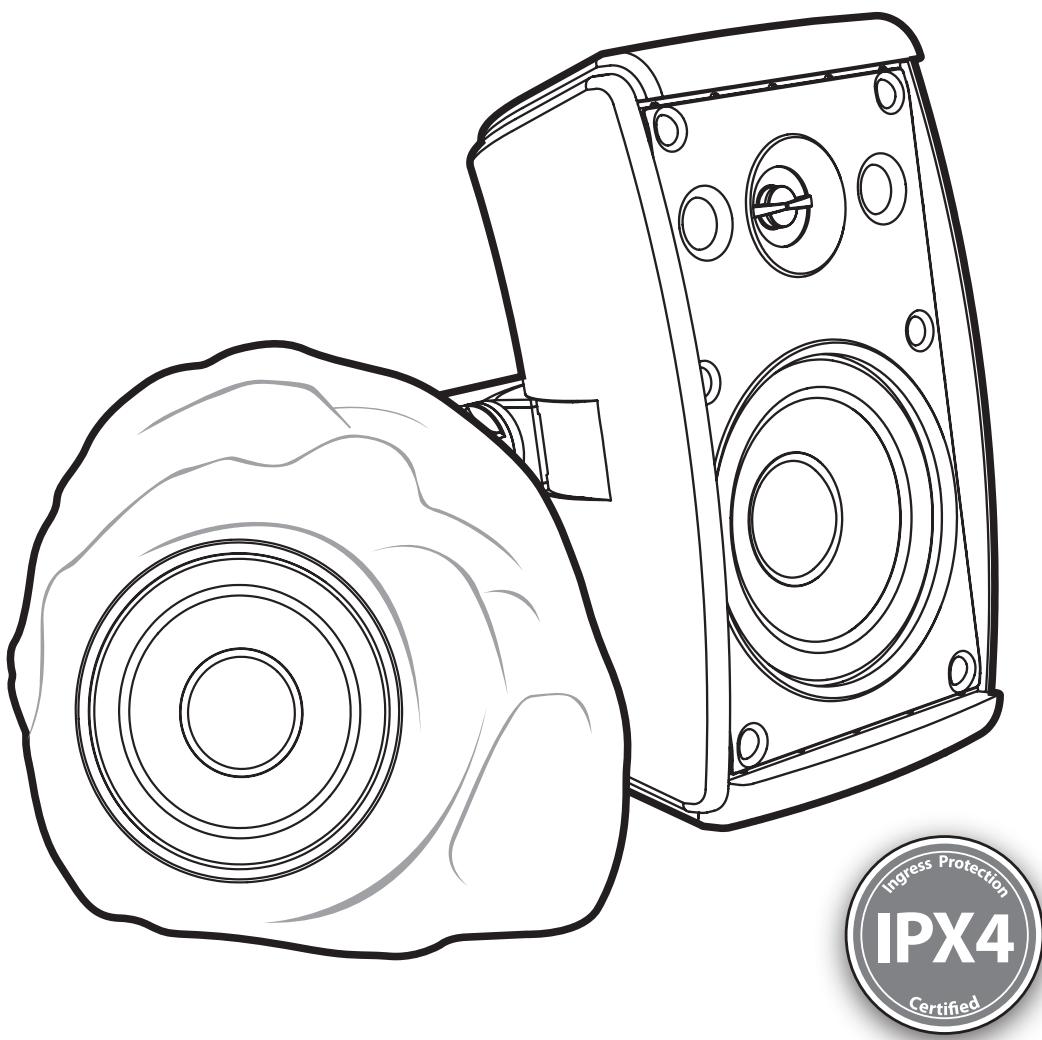
Ensure that the package contains; Speaker, 1 x C-bracket, 2 x C-bracket lock nuts, 2 x rubber port plugs, 2 x speaker terminal weather protection boots and 1 x packet of grille adhesive. The speaker contains a 'C' mounting bracket and integrated angle adjustor that enables the speaker to be easily installed and adjusted in either a vertical or horizontal position.
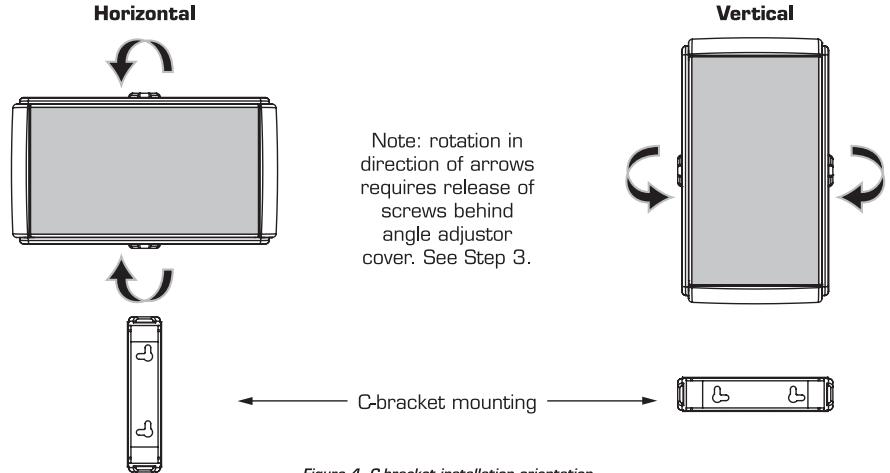
Figure 4. C-bracket installation orientation
Step 2
Decide on the preferred orientation of the speaker ensuring that all relevant Warning Notices are observed. For vertical speaker mounting the C-bracket should be mounted horizontally and for horizontal speaker mounting the C-bracket should be mounted vertically (Figure 4).
Using the bracket (separated from the speaker) as a template mark the position of the two fixing points on the surface to which the speaker is to be secured. It is important to ensure that there is sufficient room to both mount and adjust the angle of the speaker from any adjacent surfaces, so check this before drilling. Fixings should be selected (these are not included) that are appropriate for the mounting surface. Key slots are provided in the C-bracket that will accommodate an M4 sized pan screw head. Drill the holes and fit rawl plugs if required. Drive in the screws leaving 5 mm of screw thread exposed on each. The bracket should be positioned over the exposed screw heads to check that the screws are accurately positioned and of the correct size to locate into the key slots. (Figure 5). The bracket should then be removed for attachment to the speaker in a safe location.

Horizontal

Figure 5. Ensure correct position of screws into key slots
Step 3
If mounting the speaker horizontally or requiring side to side rotation of a vertically mounted speaker (Figure 4), remove the plastic angle adjustor cover at the rear of the speaker by pulling it firmly (Figure 6), this will allow access to 2 locking screws (Figure 7). These should both be unscrewed a couple of turns each so that the angle adjustor can be rotated left or right (up or down) as required.

Figure 6. Qi 45EW removing angle adjustor cover
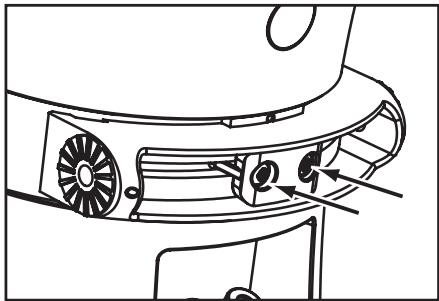
Figure 7. Qi 45EW Angle Adjustor screws DO NOT REMOVE only loosen 2 turns
Note:
With a right angled screw driver it is possible to make adjustments with the speaker mounted on the wall as the cover can be removed and replaced with the C-bracket attached. Once the required angle is obtained the screws can be tightened and the cover clicked firmly back into place.
Step 4
Mount the C-bracket onto the speaker's angle adjustor using the 2 securing lock nuts (Figure 8). Ensure that the C-bracket is the correct way up so that when the speaker is mounted the screws will slot and secure correctly as shown in Figure 5. Tighten both locking nuts once the required C-bracket angle has been set.
Note: The locking nuts can be loosened and further adjustment undertaken when the speaker is on the wall if necessary.
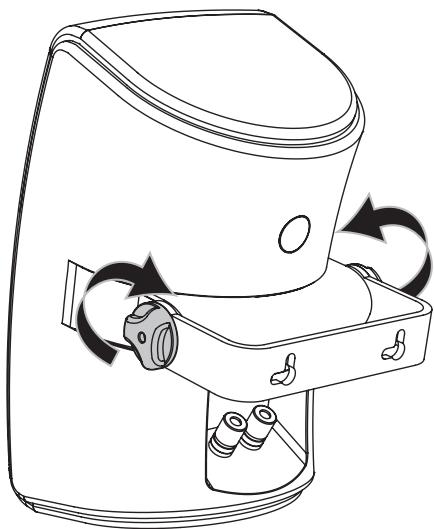
Figure 8. Qi 45EW attach the C-bracket to the speaker
Step 5
If fitted remove the rubber speaker terminal weather protection boots and keep these for use at Step 7.Weather protection boots are also packed separately within the carton.
Step 6
Mount the speaker on to the wall by passing the pre-installed (Step 2) securing screws through the C-bracket and slotting it down behind the screw heads. Using a right angled screwdriver tighten the screws so that the bracket is clamped securely to the wall.
Step 7
Strip back the individual speaker conductors 10mm so that there are bare wire ends. Attach the speaker leads using the screw terminals at the rear of the speaker. The positive conductor should be connected to the red terminal and the negative conductor to the black terminal (Figure 9). Ensure that the weather protection boots are replaced over the terminals and that there are NO shorting strands of copper between the positive and negative terminals.
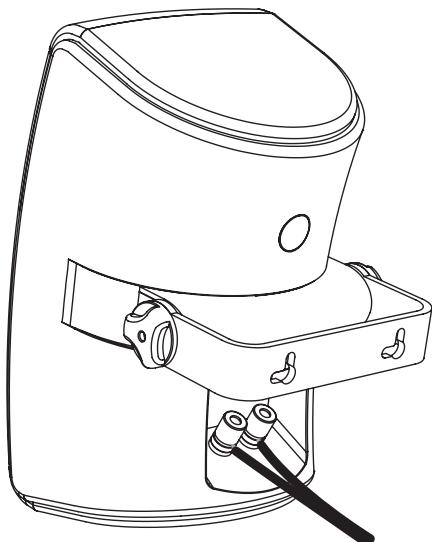
Figure 9. Qi 45EW speaker cable connections
Step 8
Position the speaker at the desired angle and tighten both the 2 rear angle adjusted locking screws (if necessary) and the C-bracket locking nuts.
Step 9
If the speakers are to be used where there is a possibility that water may be blown into the grille, the 'port' holes either side of the tweeter can be plugged using the supplied rubber port plugs. These should be pressed firmly into place (Figure 10).
Note: It is recommended that the plugs are only fitted when it is necessary to comply with IPX4, since the installation will reduce the amount of bass produced by the speaker. To meet IPX4 the port plugs must be fitted.

Figure 10. Insertion of rubber port plugs into port holes
Step 10
Included in the speaker pack is some flexible grille adhesive, this provides additional securing for the grille should it be considered necessary. To use gently pull the grille on both sides and pull away from the speaker (Figure 11). Press 4 pieces of the adhesive into the recess slot as indicated (Figure 12). Replace the grille by first ensuring that all grille edges are inside the bezel moulding and then pushing carefully back into place.
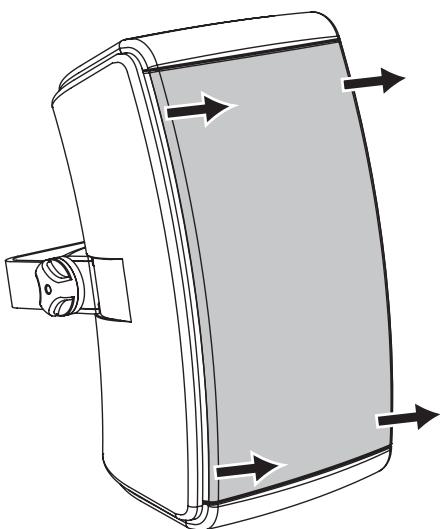
Figure 11. Qi 45EW grille removal

Figure 12. Positioning of adhesive strips before replacing grille
Step 11
Test the speaker to ensure that it is working correctly with no unwanted buzzes or rattles.
Q Install Warranty
Q Install loudspeakers are warranted free of defects in materials and workmanship for a period of 5 years from the date of purchase. During the warranty period Q Install will, at its option, repair or replace any product found to be faulty after inspection by the company or its appointed distributor or agent.
Misuse and fair wear and tear are not covered by the warranty.
Goods for repair should, in the first instance, be returned to the supplying dealer. If this is not possible the item/s should be sent carriage paid, preferably in the original packaging, to Q Install or their appointed regional distributor accompanied by proof of purchase. Damage sustained by goods in transit to the repair centre is not covered by the warranty. Return carriage will be paid by Q Install or their distributor as appropriate.
The warranty does not in any way affect your legal rights.
Appointed Distributor in the UK:
armourHOME
Armour Home Electronics Ltd
Stortford Hall Industrial Park
Bishops Stortford, Herts,
CM23 5GZ
UNITED KINGDOM