
SNH-1010N - Caméra de surveillance SAMSUNG - Notice d'utilisation et mode d'emploi gratuit
Retrouvez gratuitement la notice de l'appareil SNH-1010N SAMSUNG au format PDF.
| Type de produit | Caméra de surveillance intérieure |
| Marque | Samsung |
| Modèle | SNH-1010N |
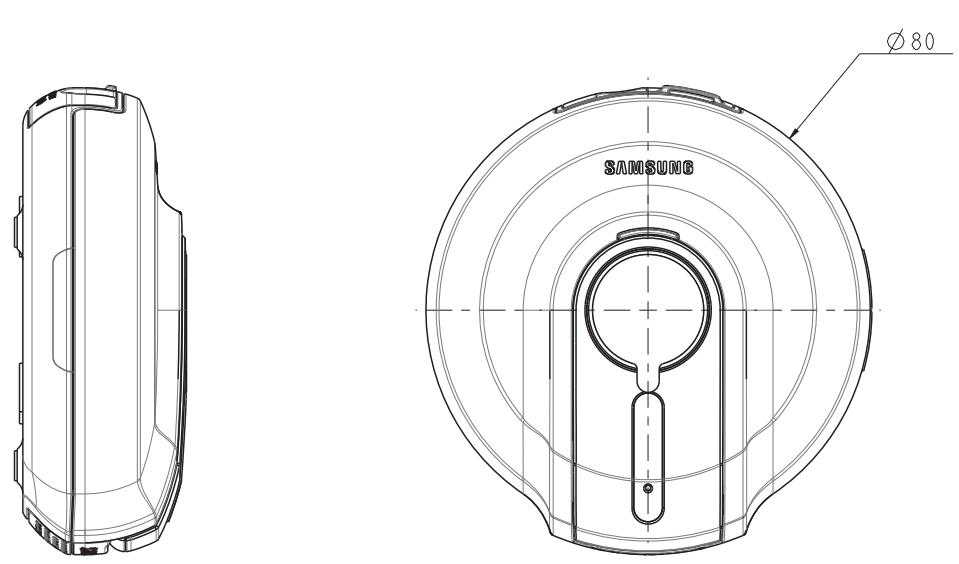
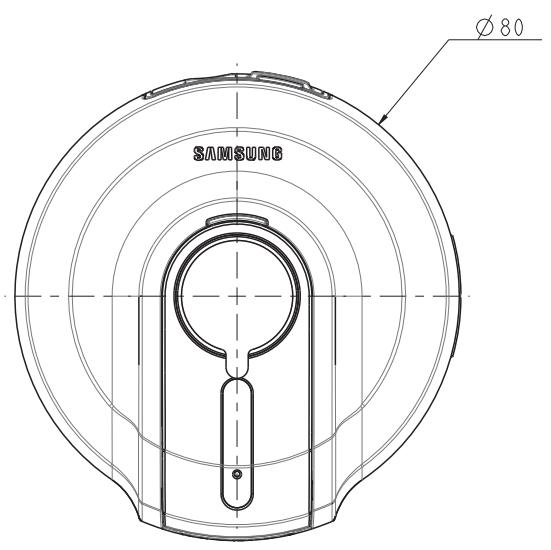
| Dimensions | Diamètre 80 mm, hauteur 29,5 mm |
| Poids | 80 g |
| Alimentation | 5 V DC, 2,2 A (adaptateur fourni) |
| Consommation électrique | Max. 6 W |
| Résolution vidéo max. | 640 x 480 pixels (VGA) |
| Framerate max. | 20 images/s en VGA |
| Compression vidéo | H.264, MJPEG |
| Vision nocturne | Oui, flash IR (portée optimale 1 à 3 m) |
| Audio | Microphone et haut-parleur intégrés, audio bidirectionnel |
| Connectivité réseau | Ethernet 10/100, Wi-Fi 802.11 b/g/n, WPS |
| Protocoles | TCP/IP, DHCP, SMTP, DNS, RTSP, HTTP, etc. |
| Détection de mouvement | Oui, réglable |
| Détection audio | Oui, réglable |
| Notifications | Email, YouTube, Picasa, Twitter, Google Talk, push smartphone |
| Nombre maximal d'utilisateurs | 5 (unicast) |
| Température de fonctionnement | 0 °C à 40 °C |
| Humidité de fonctionnement | 20 % à 80 % HR |
| Entretien et nettoyage | Nettoyer la lentille avec un chiffon doux et sec. Ne pas utiliser de produits abrasifs. Débrancher avant nettoyage. |
| Sécurité | Utiliser uniquement l'adaptateur fourni. Installer hors de portée des enfants. Ne pas exposer à l'humidité. Pour usage intérieur uniquement. |
| Pièces détachées et réparabilité | Produit non conçu pour être réparé par l'utilisateur. Contacter un service agréé Samsung en cas de panne. |
| Informations générales | Caméra IP compacte pour surveillance à distance via smartphone ou PC. Installation sur bureau ou murale (support fourni). |
FOIRE AUX QUESTIONS - SNH-1010N SAMSUNG
Questions des utilisateurs sur SNH-1010N SAMSUNG
0 question sur cet appareil. Repondez a celles que vous connaissez ou posez la votre.
Poser une nouvelle question sur cet appareil
Téléchargez la notice de votre Caméra de surveillance au format PDF gratuitement ! Retrouvez votre notice SNH-1010N - SAMSUNG et reprennez votre appareil électronique en main. Sur cette page sont publiés tous les documents nécessaires à l'utilisation de votre appareil SNH-1010N de la marque SAMSUNG.
MODE D'EMPLOI SNH-1010N SAMSUNG
Samsung SmartCam
User Manual
Copyright
©2012 Samsung Techwin Co., Ltd. All rights reserved.
Trademark

SAMSUNG TECHWIN is the registered logo of Samsung Techwin Co., Ltd.
The name of this product is the registered trademark of Samsung Techwin Co., Ltd. Other trademarks mentioned in this manual are the registered trademark of their respective company.
Restriction
Samsung Techwin Co., Ltd shall reserve the copyright of this document. Under no circumstances, this document shall be reproduced, distributed or changed, partially or wholly, without formal authorization of Samsung Techwin.
Disclaimer
Samsung Techwin makes the best to verify the integrity and correctness of the contents in this document, but no formal guarantee shall be provided. Use of this document and the subsequent results shall be entirely on the user's own responsibility. Samsung Techwin reserves the right to change the contents of this document without prior notice.
SPECIFY SERVICE INSTRUCTIONS AND WARRANTY TERMS
This device complies with Part 15 of the FCC Rules.
Operation is subject to the following two conditions: (1) this device may not cause harmful interference, and (2) this device must accept any interference received, including interference that may cause undesired operation.
FCC NOTE:
THE MANUFACTURER IS NOT RESPONSIBLE FOR ANY RADIO OR TV INTERFERENCE CAUSED BY UNAUTHORIZED MODIFICATIONS TO THIS EQUIPMENT.
SUCH MODIFICATIONS COULD Void THE USER'S AUTHORITY TO OPERATE THE EQUIPMENT.
Instructions & Warranty
The manufacturer is not responsible for any loss or radio/TV interference caused by unauthorized modification of the product.
Such modification will void the warranty of the product as well as the user's right of use.
Warning
- The product must be assembled and installed by an adult.
- Before using, read all instructions on this manual thoroughly and follow operational instructions, warnings on this manual and printed on the product.
- To avoid entangled power cord, do not place it around the baby bed or other infant furniture. Keep this product and its power cord out of children's reach.
- Especially, the power cord should be installed carefully while keeping it out of children's reach.
- Never use the product near bath tub, sink, washing machine and in wet basement to avoid moisture.
- The product is designed for indoor use.
- The product is not designed for medical monitoring, and requires a grown-up's protective supervision on its use.
- To avoid overheating of the product, do not expose the product to direct sunlight; do not install or use near a heat source such as heater, radiator, cooking devices (ex: electric stove or oven) and other warming devices (ex: audio amplifier, TV, etc.).
- Make sure to keep ventilated while using the product.
-
Avoid pillar or furniture that may block ventilation, when installing the product.
-
Make sure to use the power adaptor provided. If used with unidentified adaptor, it may damage the product. The power adaptor must be used with regular household electric supply.
- Avoid sharp, pointed objects around the adaptor's cable, not to damage the cable.
- Be warned and never hold the cable's stripped part when connecting / disconnecting the adaptor to/from the wall outlet.
- To avoid entangled cable lines, avoid using cable extension for adaptor's power cord.
- The product's servicing is allowed only to authorized Samsung Techwin's service personnel.
- When using the product for children's care, be careful to keep the product out of children's reach.
- The product partially contains component which might cause respiration difficulty. Accessories and small parts of the product should be stored keeping out of children's reach.
- The product is not designed to replace responsibility of human supervision on children.
- The product is not equipped with device of immediate notification to adult with accidental/sudden children's move; it requires periodic checks and human supervision.
Contents
GETTING STARTED
Key Features 4
Basic Information 6
INSTALLATION & NETWORK CONNECTION
Installation 8
Network Connection and Settings. 11
MONITORING
Settings 13
Live Video Setting 23
APPENDIX
Specifications 27
Troubleshooting 30
Product and Accessories
System Components
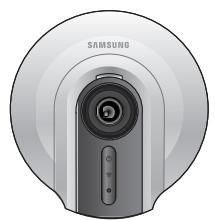
Camera
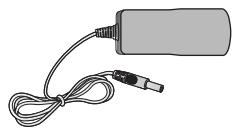
Power Adaptor

Quick Start Guide
License Information
Warranty Card
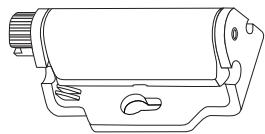
Bracket

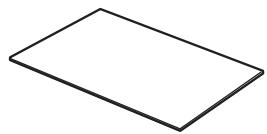
Double-sided Tape
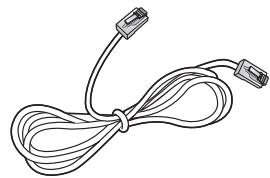
Network Cable
Check for above components when opening the product package.
Basic Information
Product At a Glance
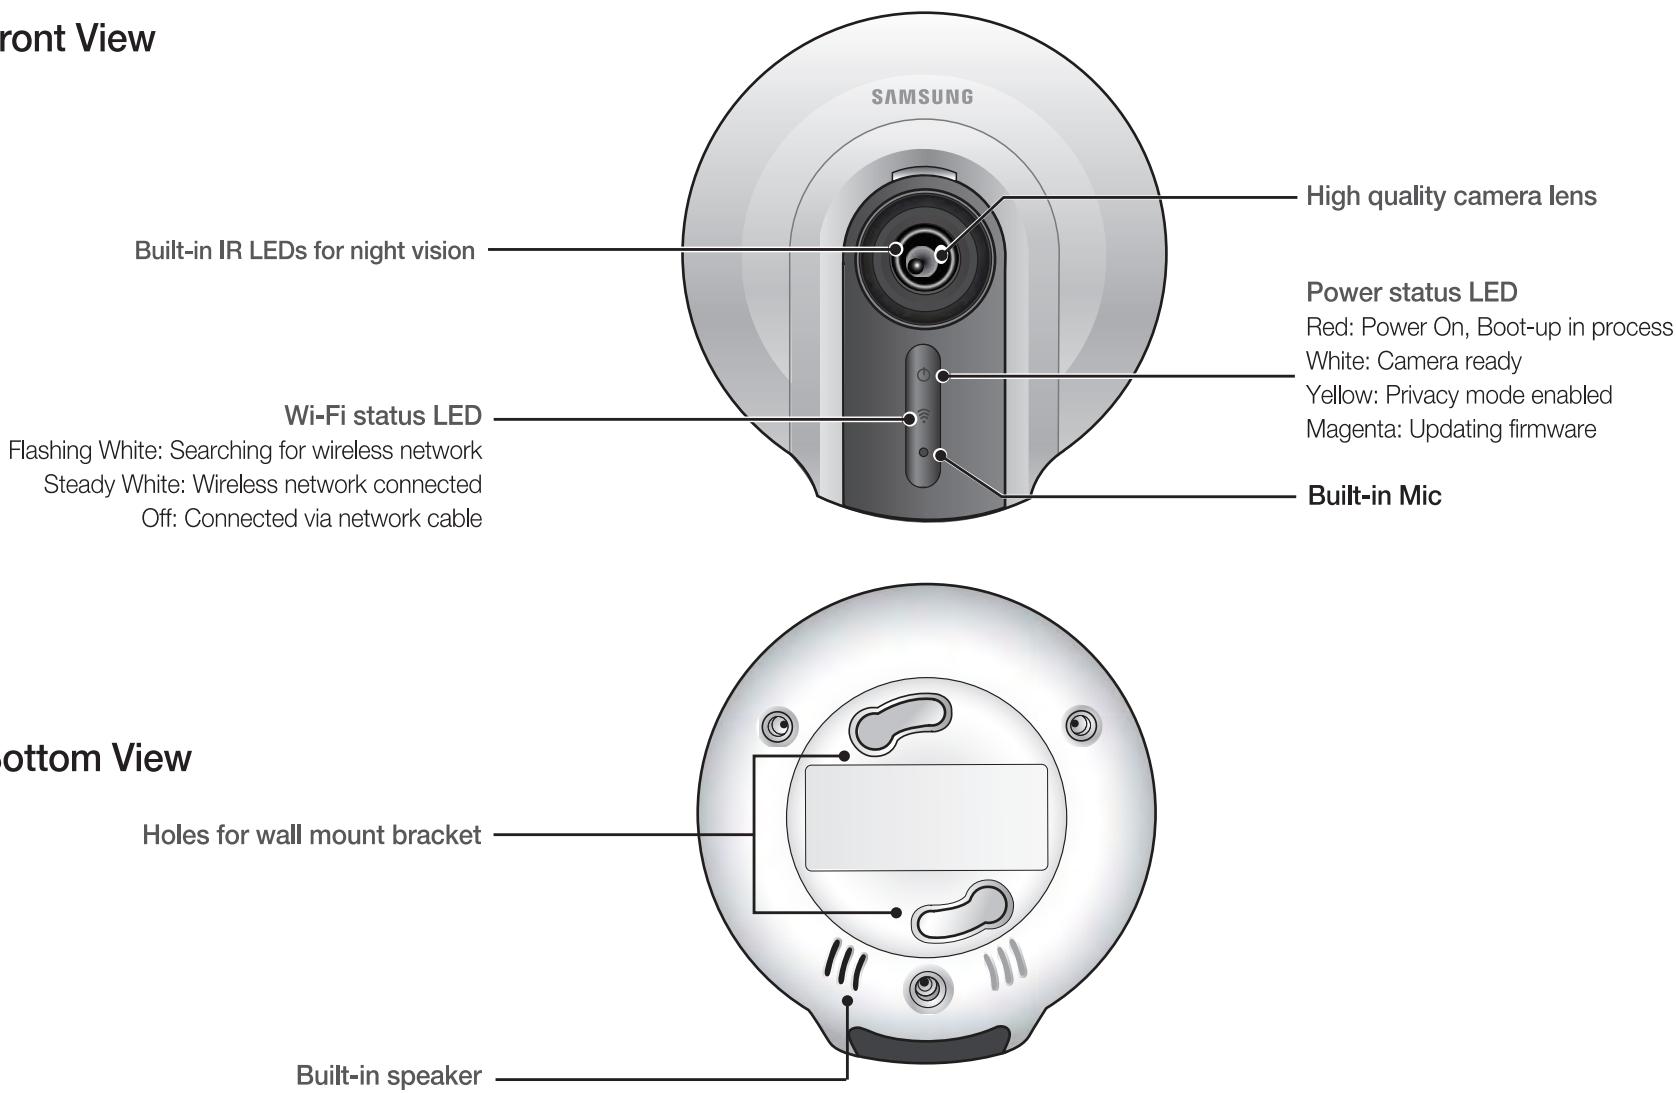
Front View
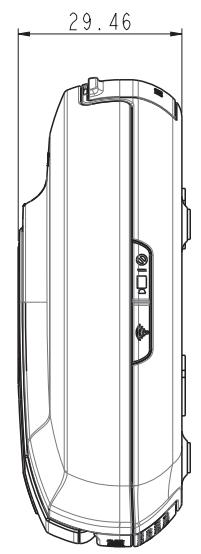
Side View

Privacy button
WPS Button
Used to connect to the Wireless Access Point
Press once to stop transmitting video/audio
Press and hold for 5sec to reset the camera to default settings
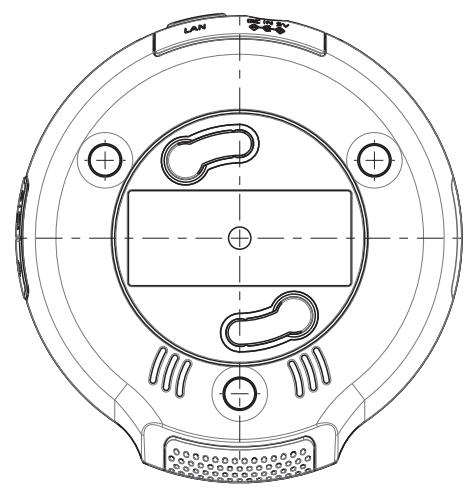
Rear View
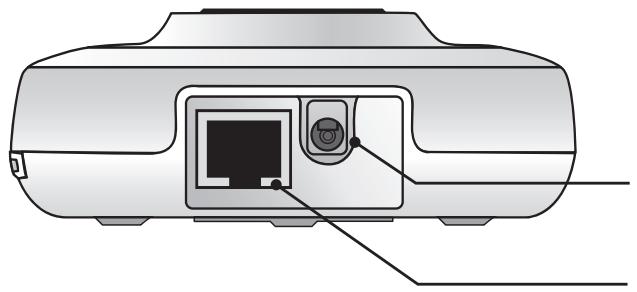
DC 5V Power Input
Network port
Used if WPS is not supported on the Wireless Access Point or if you do not have a Wireless Access Point
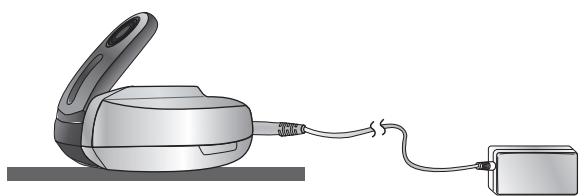
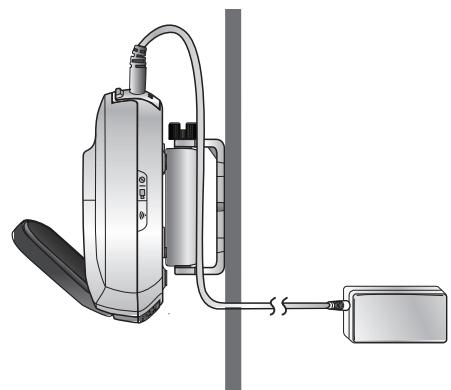
Power Supply
Plug-in the camera power adapter to the wall outlet and connect the camera as shown.
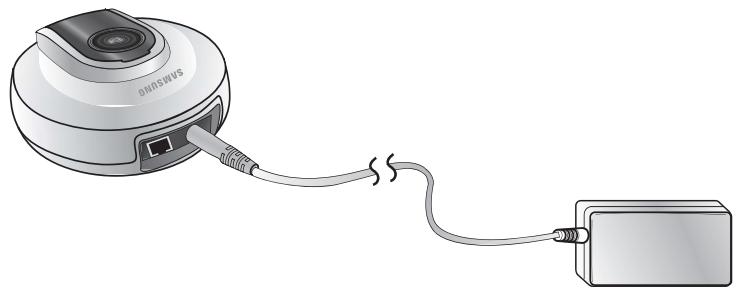

- Make sure to use the provided power adaptor. Otherwise, the product may not operate properly.
It will take about 1min for the camera to boot-up completely.
- When the boot-up is complete, the power LED color will change from red to white.
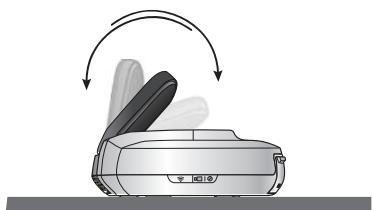
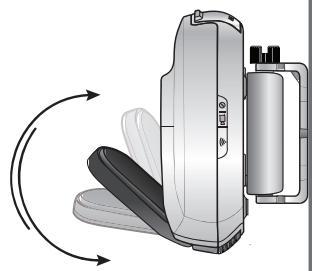
Stand mounting
- Place the camera in a desired position on the surface.
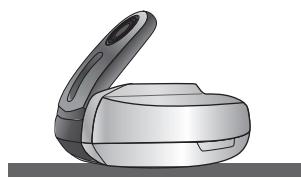
- Adjust the camera's shooting angle as appropriate.

Do not put excessive force. Otherwise, it may cause damage to the camera.
If you use the camera in contact with the base unit, this may cause noise on the video. It is advisable to use the camera in a 5^ to 10^ tilt.
- Connect the power cable.

When done, remove the protective film from the lens.
Wall mounting
- Use a double-sided tape to secure the bracket to a desired position.

- You can use the screws to tighten the camera. (not included)
- The double-sided tape cannot be reused after being used once.
- Keep the installation surface clean before attaching the double-sided tape to the bracket. Otherwise, the adhesive force may be deteriorated, causing a fall of the camera.
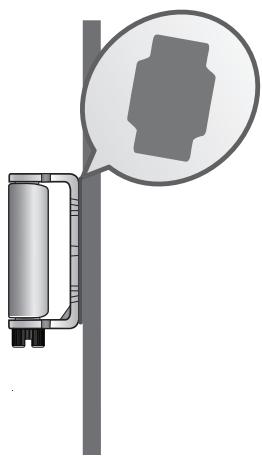
- Fit the protruding points (x2) of the bracket into the corresponding holes of the camera before turning clockwise to fix the camera.
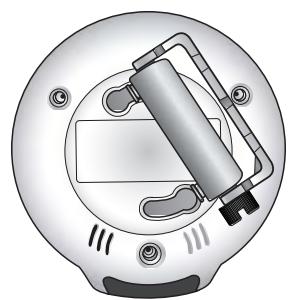
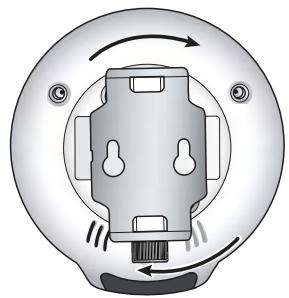
- Adjust the camera's shooting angle as appropriate (left and right) and tighten the screws on the bottom of the bracket.
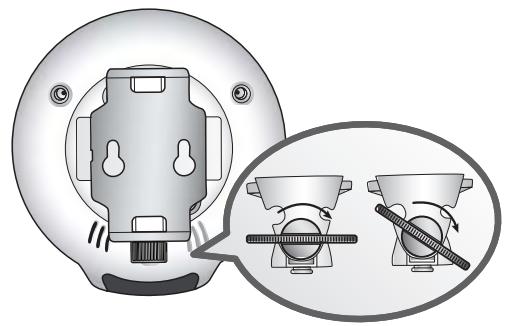

You can also use a coin or flat-head screwdriver to tighten them.
- Adjust the camera's shooting angle (top and bottom).

- Do not put excessive force. Otherwise, it may cause damage to the camera.
If you use the camera in contact with the base unit, this may cause noise on the video. It is advisable to use the camera in a 5^ to 10^ tilt.
- Plug in the power cable and arrange the cables through the bracket holes.

-
When done, remove the protective film from the lens.
-
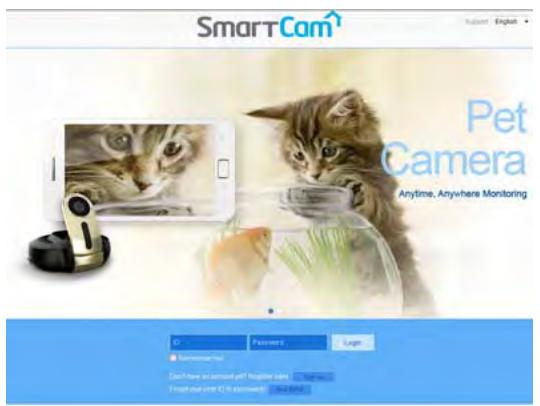
Enter www.samsungsmartcam.com on the web browser's address field.


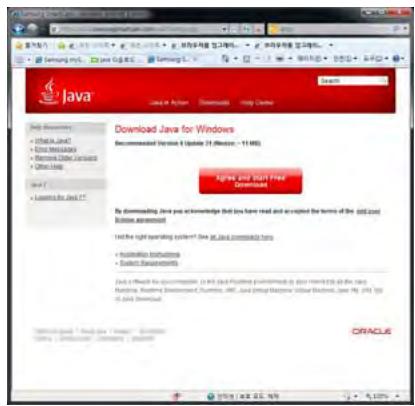
If you do not have Java installed on your computer, you will be asked to click on the link to download the Java plug-in and install. This process may take up to 10 minutes depending on your internet connection speed.
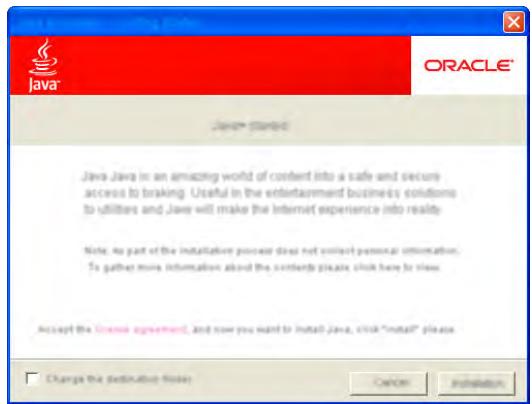

This product is designed to automatically install JAVA but, in many situations, if it is not installed automatically, visit by www.java.com and follow the onscreen instructions to install the product.
Java-uninstalled PC
-
Verify the Java version
-
In the SmartCam Web service access page, make search for JAVA Runtime Environment (hereinafter "JRE") and check if your PC has installed the recommended version of JRE 1.6.10 or later. If not, install the latest version of JRE as recommended by the Company.
-
Move to the Verify Java page
-
If you agree to upgrade the current Java version for a PC installing JRE version 1.6.10 or earlier or a PC not installing JRE yet, you will move to the Java Verify page.
-
If you have not installed Java yet, you will be prompted to install JRE with a message.
-
Start installing Java


-
If you accept the installation of JRE, the installation process will start.
-
Verify Certificate
-
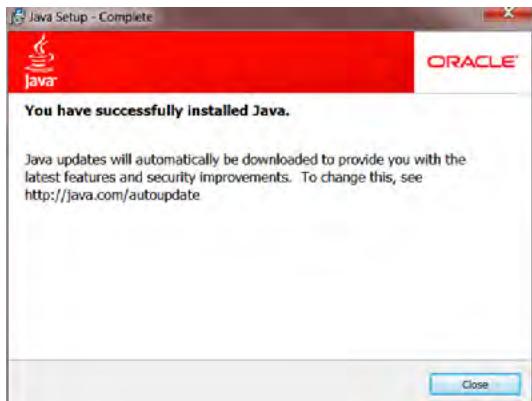
When JRE is installed completely, you will move to the SmartCam Web page. And, you will be prompted to agree to run the application published by Samsung Techwin Co., Ltd.
-
Start the SmartCam Web service
PC having JRE 1.6 or earlier installed
-
Verify the Java version
-
In the SmartCam Web service access page, make search for JAVA Runtime Environment (hereinafter "JRE") and check if your PC has installed the recommended version of JRE 1.6.10 or later. If not, install the latest version of JRE as recommended by the Company.
-
From the Verify Java page, click on the given button to check the Java version.
-
Verifying the Java version
Search for the current version of JRE on the PC - Check the JRE version of the current PC
- Check the current JRE version and download the latest version if necessary (version 6 Update 31 as of 2012/04)
4. Agree to install JRE
- Agree to install the latest version of JRE
5. Move to the Verify Java page
- If you agree to upgrade the current Java version for a PC installing JRE version 1.6.10 or earlier or a PC not installing JRE, you will move to the Java Verify page.
- If you have not installed Java yet, you will be prompted to install JRE with a message.
6. Start installing Java
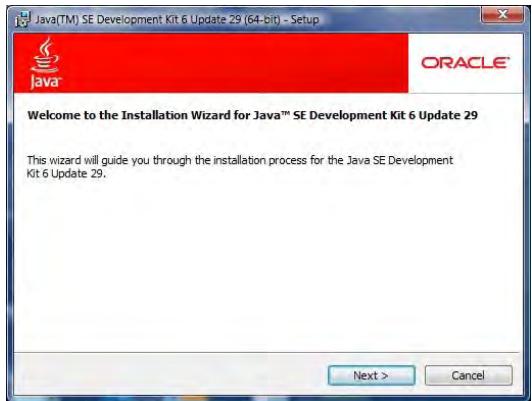

- If you accept the installation of JRE, the installation process will start.
7. Verify Certificate
- Move to the SmartCam Web page (www.samsungsmartcam.com), and you will be prompted to agree to run the application published by Samsung Techwin Co., Ltd.
8. Start the SmartCam Web service

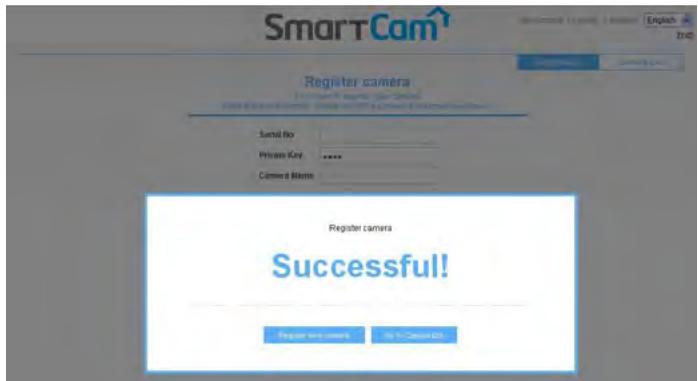
1. Select to register.
After reading the terms of use, check on "Agree", and click
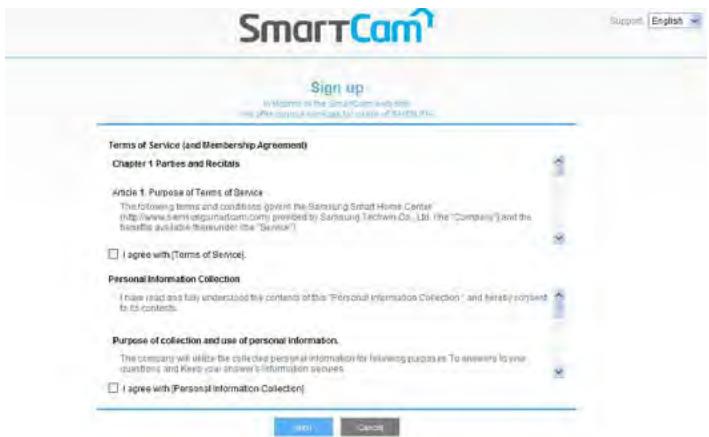
2. Provide the requested information, and click .

- ID: Enter the user ID and perform the duplicate check. Fill in the user ID in 8 ~ 12 alphanumeric characters.
- Password: For security reason, provide the user ID in 8 ~ 12 alphanumeric characters.
- Confirm Password: Please enter the password again for confirmation.
- Name: Enter the user name.
- E-mail: Enter the correct email address as it is used for reference in case you forgot the user ID or password.
- Country: Please select your country.
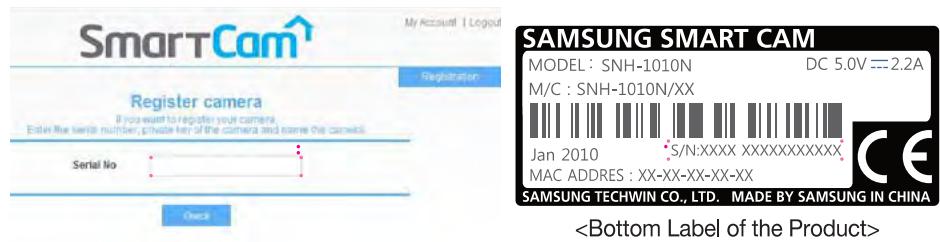
3. Enter the and click the check.
4. Create a .
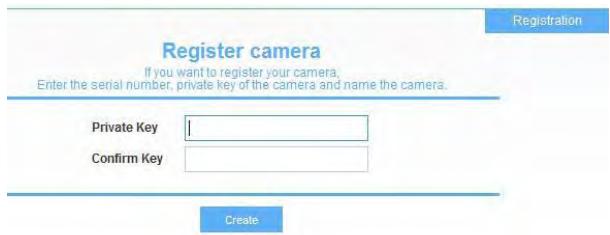

- Private key is required to prevent unauthorized access to the camera.
If you lose the private key, you are not able to access the camera. Refer to thesection of the manual and make the settings again.
You can use one to eight length strings of letters, numbers, and characters except ' -' and '.'
5. Create a .
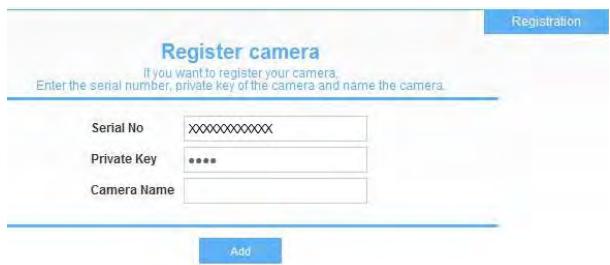
- Camera Name : You can provide the camera name to your preference for identification in the multi-camera network. (ex: Living room, Kitchen...)

You can use one to fifteen length string of letters, numbers, and characters '~!@#$%^&*(_,-I[]',../?'.
6. When done, click .

If you want to change the private key, move to
The private key can be changed only in admin mode.
- Keep the private key in a safe place as it is used for viewing the live screen of the camera or for changing the display settings.
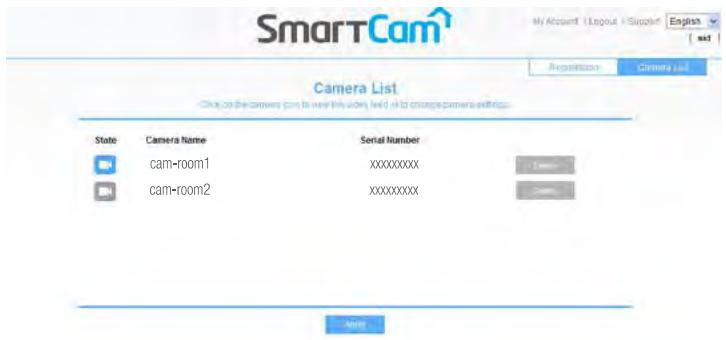
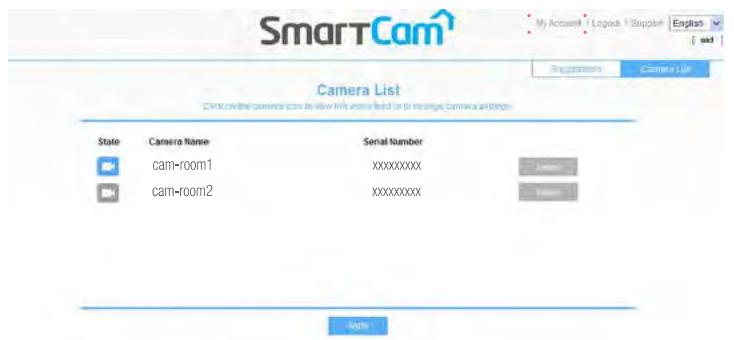
7. Once the camera is successfully registered, you can check the camera in the .
Live Video
- From the
, select the camera to monitor and click <▶>.

The <> icon indicates the camera is inactive so you cannot monitor it right now.
- Enter the Private Key and select preferred language.
SmartCam
To access the camera, enter the private key for the camera you selected.

- When done, click < OK> .
- Select
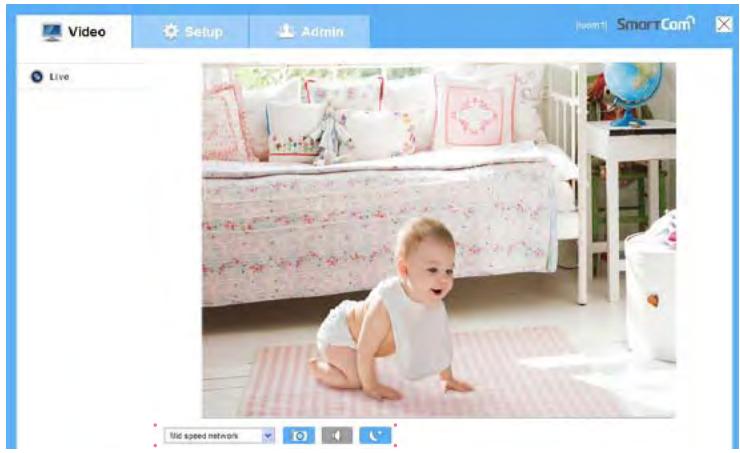
: Select frame rate based on your network speed.
| Profile Name | Resolution | Frame rate | Recommended bandwidth |
| Low Speed Network | VGA | 5 fps | 768Kbps |
| Mid Speed Network | VGA | 10 fps | 1Mbps |
| High Speed Network | VGA | 20 fps | 1.5Mbps |

If the bandwidth provided by the cable service provider is lower than recommended, you may encounter a blurry image or a temporary loss of video signal.
Alarm Settings
Camera has ability to send event notifications when motion or audio is detected. See the notification bar below the live view.
- < : Takes a picture of current live image you are viewing.
- < : When enabled, you can hear what's happening around the camera.

Depending on the policy of the Internet service provider, the sound output may not be supported. (in either 3G UDP or Relay mode)
-
< c^* >: Enable and disable night vision.
-
IR Flash will run for 2 minutes after accessing the live screen.
- Even if you click the IR Flash icon while it is working, it will still run for just two minutes.
- Even if the surrounding brightness increases enough to switch to the color mode while in IR-Flash mode, the IR-Flash icon will be active after 2 minutes.
- If there exists an object near the camera, IR Flash can be activated.

Depending on your internet provider, When the camera can't connect your phone or PC directly, Relay mode show on display screen and the live video viewing may time-out after 1 minute.
The Night Vision video produces a different visibility according to the distance between camera and subject. (See the picture below)

1m distant (1.0 field)
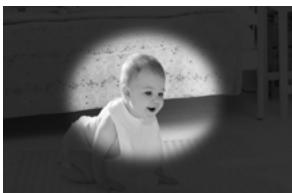
2m distant (0.65 field)
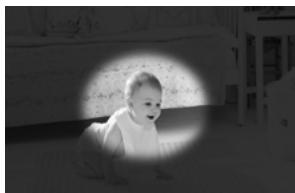
3m distant (0.5 field)
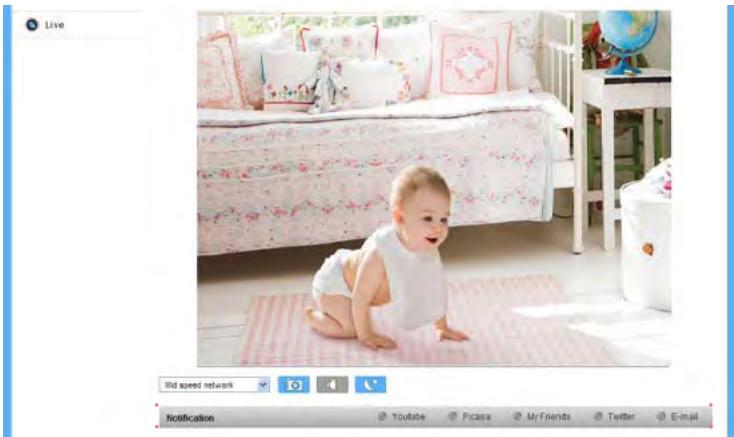
- From the bottom menu bar of the live screen, select to click one of SNS, Messenger, and Email. The context menu should appear.

- Provide the user ID and password that you have created and set in the previous site.
If you fail to synchronize time, no event alarm will occur.
In order to synchronize time, the device should be connected to the Internet.
Notification
When enabled, you can record up to 30 seconds of video to your private YouTube account.
- Select Enable.
- Enter your YouTube user ID and password.
- Select public or private folder to save. By default, it's set to private folder.
- Click Apply.


You can check the recorded video at the YouTube homepage "Video Manager" "Uploaded".
Note that depending on the policies of YouTube, the video may not be uploaded.
If setting to "public", the video may be exposed to the public.
It is advisable to create and use one YouTube account for each camera.
- Even when you have set the YouTube alarm, the video will not be transferred if the event alarm is not set to Enabled (see page 23).
If a continuous motion is detected or the audio alarm occurs, the camera can recognize the next event only after the uploading to YouTube is completed. (In other words, it does not recognize any event until the YouTube upload is finished.)
Notification
When enabled, camera will send a picture of the event to your Picasa account.
- Enter your Picasa user ID and password.
-
Select either public or private folder to save. By default, it's set to private folder.
-
Click Apply.
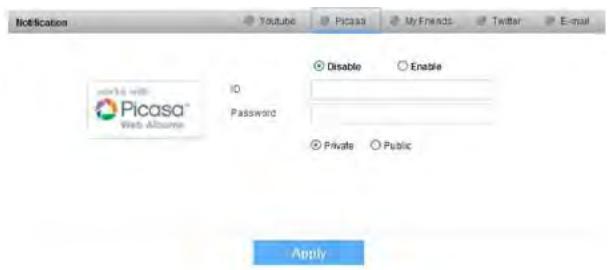

If you have set the private setting of the video image, no image will be found in portal sites.
Refer to the policy of Picasa for the maximum number of uploaded images.
YouTube and Picasa must be enabled to receive notifications.
Notification
When enabled, camera will send event notifications to listed user IDs.
Notifications can be viewed in Smartcam App or Google Talk.
- If this is set to
, the video and image link recorded in YouTube and Picasa will be transferred to the listed friends in real time in the event of an alarm. - The video/image alarm will be transferred only if you have set the YouTube and Picasa enabled. Otherwise, no alarm will be triggered.
- You will have no video displayed if you don't have any YouTube ID and access a private content.
- Even when you access the YouTube site, no video will be played automatically. Be sure to click the Play icon to play a video.
If you fail to play the video, log into the YouTube site and install Flash Player and try again.
- The Friend list will have user IDs registered at the Web site (www.
samsungsmartcam.com). When an alarm occurs, the PUSH alarm will be notified to the respective smart phones via the Web site.
- If you want to receive the notification with Google Talk, follow the instructions below to configure the Google Talk settings.
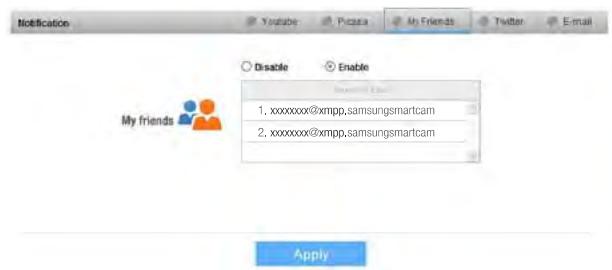
*
- In the friend's list, it shows the IDs that camera is registered to and Google Talk friends that receives real-time notification from the camera.
- When enabled, you can receive real-time event notification through Google Talk messenger and Smartphone push service.
- To receive instant event notification, add the camera as a friend to your Google Talk messenger account. You have to add the following user ID. (camera serial number@ xmpp.samsungsmartcam.com) (i.e.,XXXXXXXXXMpp.samsungsmartcam.com)
- Once camera is invited, you will receive an instant message to enter the private key for authentication. Enter the private key of the camera you are adding.
- Once completed, you can see the Google Talk messenger ID in the camera My Friends list.
- Click Apply.
Notification
When enabled, camera will send a notification as a message to your Twitter account.
- Click on "Request URL".
- Click on Get Token.
- Twitter web page will pop-up for authorization.
- Enter your Twitter user ID and password and click on "authorize app" to get the Access Token.
- You will see the pin number generated. Copy the pin numbers and go back to the camera page and paste the pin number in the Access Token section.
- Click Apply.
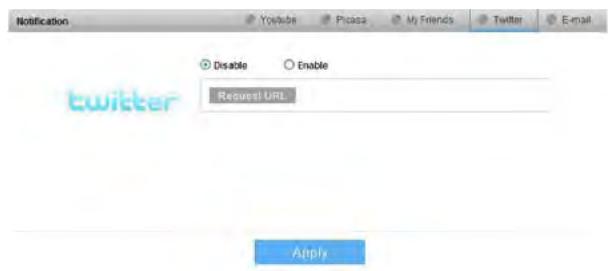

The alarm notification will be sent to the specified user account via Twitter.
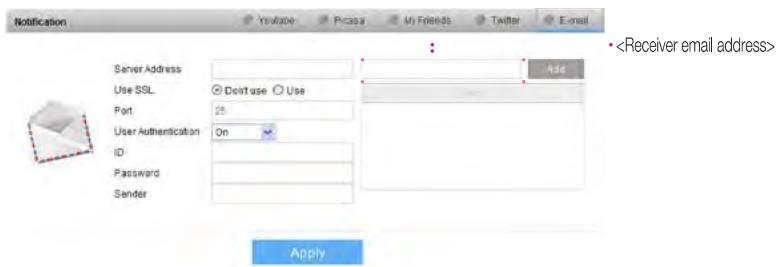
< E-mail> Notification
- Please see the below table for the popular email server information.
| Gmail | Yahoo | Yahoo Plus | |
| Server Address | smtp gmail.com | smtp.mail.yahoo. com | plussmtp.mail.yahoo.com |
| Port | 465 | 25 | 465 |
| Use SSL. | Use | Don’t Use | Use |
| User Authentication | on | on | on |
| ID | Full email address | Only ID without “@yahoo.com” | Only ID without “@yahoo.com” |
| Password | Email password | Email password | Email password |
| Sender | Full email address | Full email address | Full email address |
- If your email provider is not listed, you need to get the email server information from your email provider.
- Add above information and receiver full email address and then click Add button.
Live Video Setting
Setup
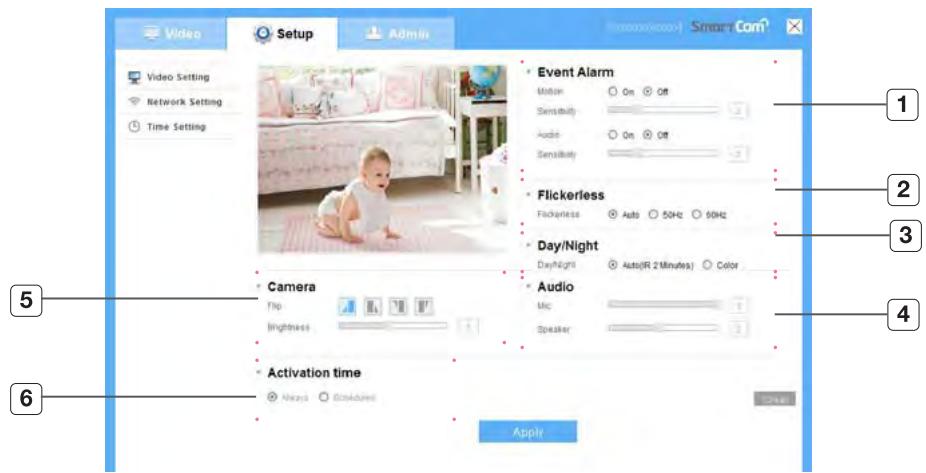
| No. | Description | |
| 1 | Event Alarm | Specify whether to trigger the alarm or not, and specify the sensitivity. The higher the sensitivity is, the subtler motion/sound events will be detected. |
| 2 | Flickerless | This will prevent possible screen distortion due to a mismatch between the vertical sync frequency and the blinking frequency of the lighting. |
| 3 | Day/Night | Set the IR lighting. If you set it to <Auto>, the IR flash will stay active for 2 minutes before turning off in a low contrast scene. In order to reactivate the IR flash, access Video→Live, or press the IR-Flash button at the bottom of the live screen. The IR flash will be active for 2 more minutes. If you set it to <Color>, the camera will not switch to the Day/Night mode. |
| No. | Description | |
| 4 | Audio | Adjust the volume of the built-in microphone and speaker of the camera as appropriate. Note that the Two-way audio transfer function is available only with the smart phone application. |
| 5 | Camera | You can configure the camera-related settings. • Flip: You can flip over the video image. : Disable the screen rotation. : Horizontally mirrors the video image against the vertical axis. : Vertically flips over the video image against the horizontal axis. : Rotate the screen by 180° • Brightness: You can adjust the brightness of the screen image. |
| 6 | Activation Time | You can activate the motion and audio detection at a desired time. • Always: It will work at all times. • Scheduled: You can select the time of activation. |

If you display more than one live video with the Web browser, they can be overlapped in some portion. It is recommended to use one browser at one time.
If camera is capturing a close object, the video analysis capability may degrade. In the following cases, the video analysis function may not produce a proper result on the default event and motion detections.
- The object color or brightness is similar to the background.
- Multiple movements continue occurring at random due to a scene change or other reasons.
- A fixed object continues moving in the same position.
- An object hides other objects behind.
- Two or more objects overlap or one object divides in multiple portions.
- Too fast object (for a proper detection, one object should be found overlapping between contiguous frames).
- Reflection / blur / shadow due to a strong light such as direct sunlight, illumination, or headlamp.
- In severe snow, rain, wind or in dawn / dusk.
- A moving object comes close to the camera.
Network Setup
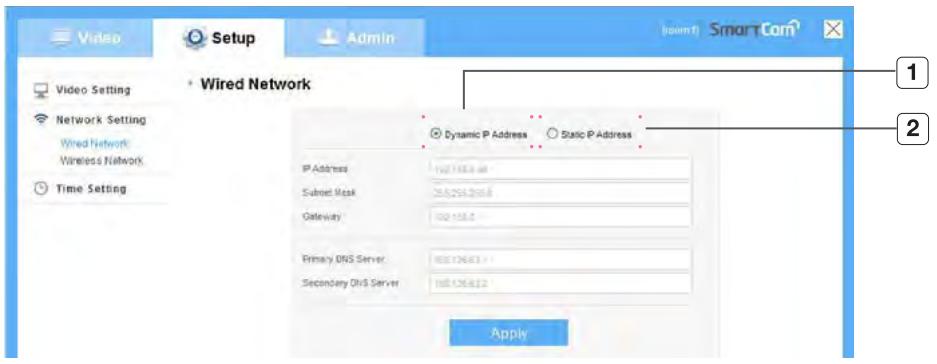
< Wired Network>
| No. | Description | |
| 1 | Dynamic IP Address | If you select “Dynamic IP Address”, the IP address will be obtained automatically. |
| 2 | Static IP Address | You must manually provide the information of: IP address, subnet mask, gateway, DNS server address. |

If any of the manual settings is wrong, the network settings will not be applied.
If you have both cable and wireless network connections simultaneously, the cable network connection is prioritized.
- Press WPS to set the network connection to Wireless regardless of the current network settings. When the system reboots, it will switch to Cable if the cable network connection is already established.
If you switch from the current wireless connection to the cable connection, the network will switch to cable connection accordingly.
- For more information about the router or the wireless connection, refer to the documentation of the router or contact the router manufacturer.
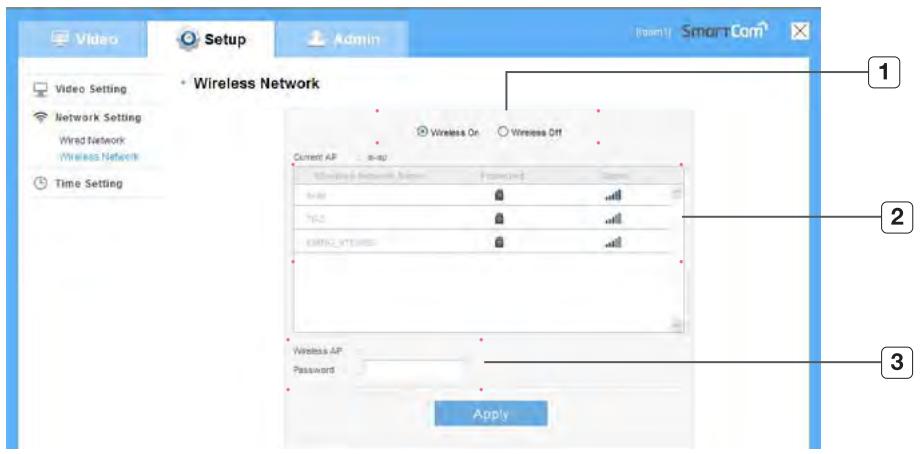
| No. | Description | |
| 1 | Wireless On/Wireless Off | You can select to activate or deactivate the wireless network connection. |
| 2 | AP (Access Point) list | You will see a list of APs (Access Point) available. Select a desired one from the list of APs (Access Point). |
| 3 | AP (Access Point) password | If you select a secured AP (Access Point), you must enter the password before you can access the network. For the password, contact your network administrator. |

If you select a non-secured AP (Access Point), you just can access the network without providing a specific password.
If you entered a wrong password, you cannot access the network whatsoever.
- When the wireless network settings are completed, remove the LAN cable. If you do not remove the LAN cable, the wireless network will not be available.
Time Setting
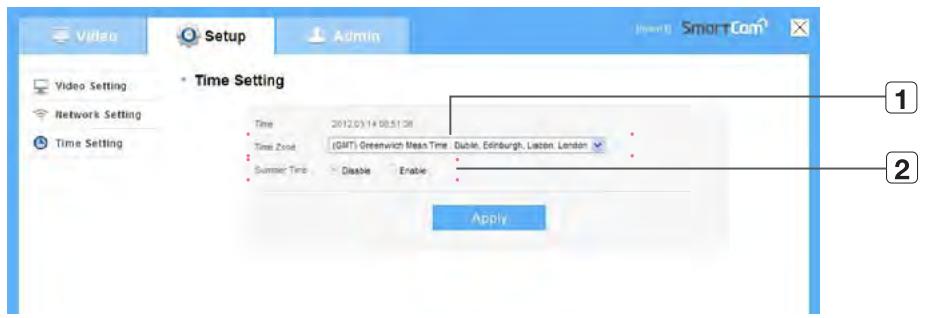
Administrator
| No. | Description | |
| 1 | Time Zone | Select your region. |
| 2 | Summer Time | Check this option if you live in a country or region where DST(Daylight Saving Time) is applied. |

The time will synchronize with the NTP(Network Time Protocol) server automatically.
For this, Internet connection is required.
- You need to set thetimezone correctly to obtain the exact time setting.
The time displayed without Internet connection may not be accurate.
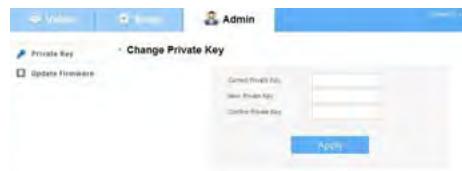
| No. | Description | |
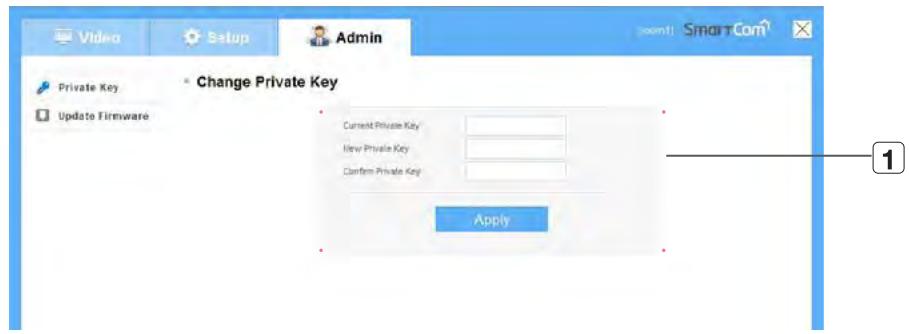
| 1 | Change the private Key | You can change the private Key. Enter the current private Key, and type a new private Key. |

If you change the private key, you will be logged out and return to the private key input page.
The private key can be changed only in admin mode.
- Keep the private key in a safe place as it is used for viewing the live screen of the camera or for changing the display settings.
| No. | Description |
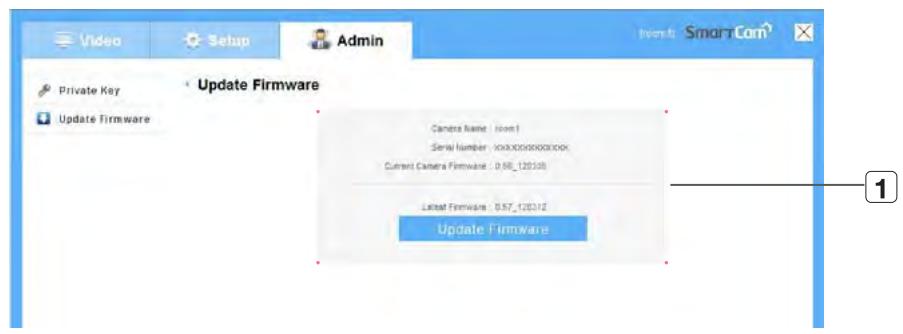
| 1 Update Firmware | Please update your current software version if it is lower than the final version. If the final version is the same as or lower than the current version, the “Update Firmware” button will not be active. No update will proceed. |

Use the cable network if possible to update the firmware.
If the power is off during the update, it will cause a fatal damage to the product.
- The duration of the firmware update depends on the size of the firmware file and the network connection speed.
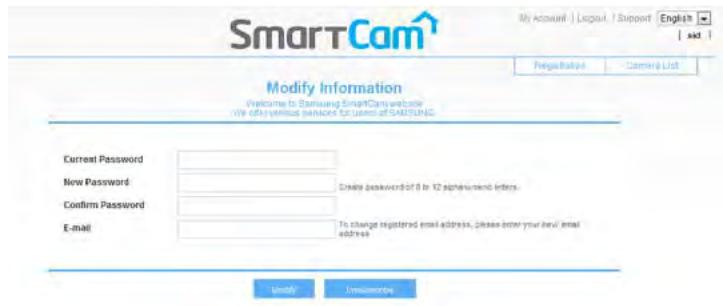

If you want to change your information, move to My account" page and select an item (password and/or email address) and make changes as necessary.
| Item | SNH-1010N |
| Network | |
| Ethernet | RJ-45 (10/100BASE-T) |
| Wireless | Wi-Fi 802.11 b/g/n |
| WPS (Wi-Fi Protected Setup) | Support WPS Button |
| Video Compression Format | H.264, MJPEG |
| Resolution | 640x480, 320x240 |
| Max. Framerate | 20fps (640x480) |
| Video Quality Adjustment | H.264: Compression Level MJPEG: Quality Level Control |
| Audio Compression Format | G.711 |
| Audio Communication | Two-way Audio (Built-in Microphone, Speaker) |
| Protocol | TCP/IP, DHCP, SMTP, DNS, RTSP, TCP, RTP, HTTP, TCP, UDP, STUN, XMPP, SIP, uPNP, ICE, SNTP, IPv4/v6, ICMP |
| Max. User Access | 5 users (Unicast) |
| Web Viewer | Supported Browser : Windows : Internet Explore 7,8 / Firefox / Chrome Mac : Safari / Firefox / Chrome |
| Mobile application support | iPhone 3Gs, 4 Galaxy S, S2 (Recommended Smartphone) |
| Item | SNH-1010N |
| Environmental | |
| Operating Temperature / Humidity | 0°C ~ +40°C (+32°F ~ +104°F)/ 20% ~ 80% RH |
| Electrical | |
| Input Voltage / Current | 5V DC / 2.2A |
| Power Consumption | Max. 6W |
| CPU & Memory | TI DM365 (216Mhz), SDRAM:256MB, NAND : 128MB |
| Mechanical | |
| Color | Body : White and Gray |
| Dimension | Ø80mm, Height : 29.46mm |
| Weight | 80g |
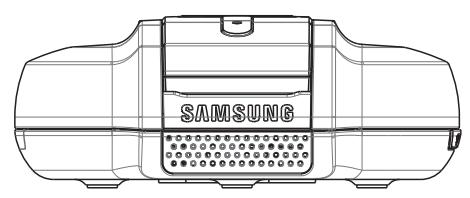
Product Appearance
Troubleshooting
If you encounter a problem with your system, see the table below to solve the problem as quickly and easily as possible. Please follow the instruction below:
| Problem | Action |
| I forgot my user ID/password. | - Move to “Log-in page -> Find ID/PW”, and enter the registered e-mail address to which we will send you the user ID and/or a new password. It can be spammed out depending on the policy of the email server. After logged in, it is advisable to change the temporary password provided. |
| I failed to connect wirelessly with the camera. | - If you encounter a frequent turnoff of the wireless Internet LED, this may be caused by an improper place for the wireless Internet network. Come closer to the AP and try again. - If the wireless network is unstable, you can still make connection via the cable network. |
| After logged in, I failed to register the camera. | - Check if the entered serial number matches with the label on the bottom of the camera. - Please re-enter the valid private key and try again. - If the problem persists, reset the camera to the factory default and start all over again. (To reset the camera to the factory default, press and hold the Privacy button on the side of the camera. The camera will reboot when the factory reset is completed.) |
| The camera is registered, but is not ready for network connection. | - Check if the front LED on the camera turns on. - If the wireless LAN LED turns off, follow the applicable instructions to make the wireless LAN connection using WPS. - If the problem persists even if the wireless LAN LED turns off, move the camera near the wireless AP and try again. - If you use the cable LAN network, the wireless LAN LED should turn off. If the cable LAN is connected, the product will be connected to the server automatically by the AP. |
| Problem | Action |
| The camera video is not uploaded to Youtube. | - Move to Setup → Video → Motion/Audio and adjust the sensitivity as necessary. - From the Notification settings page on the bottom of the live screen, configure the YouTube notification settings. (See page 21 of the manual) - Youtube has different service policies according to the country. The policy for your country may prohibit uploading to Youtube. Please first check the Youtube policy for your country. - According to the Youtube policy, it may limit the uploading size. Check the allowable free space of your Youtube account, and if insufficient, delete the exiting video clips or increase the upper limit. |
| The capture images in the camera will not be uploaded to Picasa. | - Move to Setup → Video → Motion/Audio and adjust the sensitivity as necessary. - From the Notification settings page on the bottom of the live screen, configure the Picasa notification settings. (See page 21 of the manual) - Picasa has different service policies according to the country. The policy for your country may prohibit uploading to Picasa. Please first check the Picasa policy for your country. - According to the Picasa policy, it may limit the uploading size. Check the allowable free space of your Picasa account, and if insufficient, delete the exiting images or increase the upper limit. |
| Notification from the camera is not transferred to Twitter. | - Move to Setup → Video → Motion/Audio and adjust the sensitivity as necessary. - From the Notification settings page on the bottom of the live screen, configure the Twitter notification settings. (See page 22 of the manual) |
| The message of Privacy mode appears and no video is displayed. | - The Company supports the privacy policy or mode for protecting your privacy. The Privacy mode can be set using the button on the side of the product. (See page 7 of the manual) - In Privacy mode, neither camera video will be displayed nor is it transferred outside. - To release the Privacy mode, press the same button again. |
| The video from the camera is temporarily lost. | - The video from the camera will be affected by the illumination of the installation site of the camera. This is why the video from the camera looks lost if the camera is installed in a low illumination environment. - The video from the camera can be delayed according to a network delay. Please check if the camera is installed in a place of proper wireless Internet communications. |
| No sound is output from the video. | - Adjust the volume of the microphone or audio sound in the Setup page of the camera. - Click the Voice icon in the video playback page, or check if the voice is turned On in your smart phone app. - Depending on the policy of the Internet service provider, the sound output may not be supported. (in either 3G UDP or Relay mode) |
| I forgot my Private key. | - You must create a new private key. - Press and hold the Privacy button in the rear of the product for at least 5 seconds to reset to the factory default. - After the factory reset, access the camera and set the Private key again. |
| I want to change my password and/or email address. | - After logging in, move to the “My account” page, select an item (password and/or email address) and make changes as necessary. |

Samsung Techwin cares for the environment at all product manufacturing stages, and is taking measures to provide customers with more environmentally friendly products.
The Eco mark represents Samsung Techwin's devotion to creating environmentally friendly products, and indicates that the product satisfies the EU RoHS Directive.
Correct Disposal of This Product (Waste Electrical & Electronic Equipment)

(Applicable in the European Union and other European countries with separate collection systems)
This marking on the product, accessories or literature indicates that the product and its electronic accessories (e.g. charger, headset, USB cable) should not be disposed of with other household waste at the end of their working life. To prevent possible harm to the environment or human health from uncontrolled waste disposal, please separate these items from other types of waste and recycle them responsibly to promote the sustainable reuse of material resources.
Household users should contact either the retailer where they purchased this product, or their local government office, for details of where and how they can take these items for environmentally safe recycling.
Business users should contact their supplier and check the terms and conditions of the purchase contract.
This product and its electronic accessories should not be mixed with other commercial wastes for disposal.
Correct disposal of batteries in this product

(Applicable in the European Union and other European countries with separate battery return systems.)
This marking on the battery, manual or packaging indicates that the batteries in this product should not be disposed of with other household waste at the end of their working life. Where marked, the chemical symbols Hg, Cd or Pb indicate that the battery contains mercury, cadmium or lead above the reference levels in EC Directive 2006/66. If batteries are not properly disposed of, these substances can cause harm to human health or the environment.
To protect natural resources and to promote material reuse, please separate batteries from other types of waste and recycle them through your local, free battery return system.
SAMSUNG
SALES NETWORK
SAMSUNG TECHWIN CO., LTD.
Samsungtechwin R&D Center, 701, Sampyeong-dong, Bundang-gu, Seongnam-si, Gyeonggi-do, Korea, 463-400
TEL: +82-70-7147-8740~60, FAX: +82-31-8018-3745
SAMSUNG TECHWIN AMERICA Inc.
100 Challenger Rd. Suite 700 Ridgefield Park, NJ 07660
Toll Free: +1-877-213-1222 Direct: +1-201-325-6920
Fax:+1-201-373-0124
www.samsungsv.com
SAMSUNG TECHWIN EUROPE LTD.
Samsung House, 1000 Hillswood Drive, Hillswood Business Park
Chertsey, Surrey, UNITED KINGDOM KT16 OPS
TEL: +44-1932-45-5300 FAX: +44-1932-45-5325