
POWEIRNODE 2 - Streaming amplifier Bluesound - Notice d'utilisation et mode d'emploi gratuit
Retrouvez gratuitement la notice de l'appareil POWEIRNODE 2 Bluesound au format PDF.
| Type d'appareil | Enceinte audio connectée |
| Indicateur de statut | LED avec codes de clignotement |
| Modes réseau | Hotspot, Connexion réseau |
| Connectivité | Wi-Fi, Ethernet (RJ45) |
| Entrées audio | Entrée ligne, USB |
| Sorties audio | Non précisé |
| Contrôles | Touches lecture/pause, volume, navigation |
| Mise à jour | Mode mise à jour logiciel via réseau |
| Réinitialisation | Réinitialisation d'usine par LED |
| Alimentation | Adaptateur secteur |
| Compatibilité | Application dédiée (Bluesound App) |
| Indicateur LED | Couleurs multiples pour différents états |
| Dimensions | Non précisé |
| Poids | Non précisé |
| Matériaux | Non précisé |
| Fonctions spéciales | Mode muet, indexation |
| Garantie | Non précisé |
FOIRE AUX QUESTIONS - POWEIRNODE 2 Bluesound
Questions des utilisateurs sur POWEIRNODE 2 Bluesound
0 question sur cet appareil. Repondez a celles que vous connaissez ou posez la votre.
Poser une nouvelle question sur cet appareil
Téléchargez la notice de votre Streaming amplifier au format PDF gratuitement ! Retrouvez votre notice POWEIRNODE 2 - Bluesound et reprennez votre appareil électronique en main. Sur cette page sont publiés tous les documents nécessaires à l'utilisation de votre appareil POWEIRNODE 2 de la marque Bluesound.
MODE D'EMPLOI POWEIRNODE 2 Bluesound
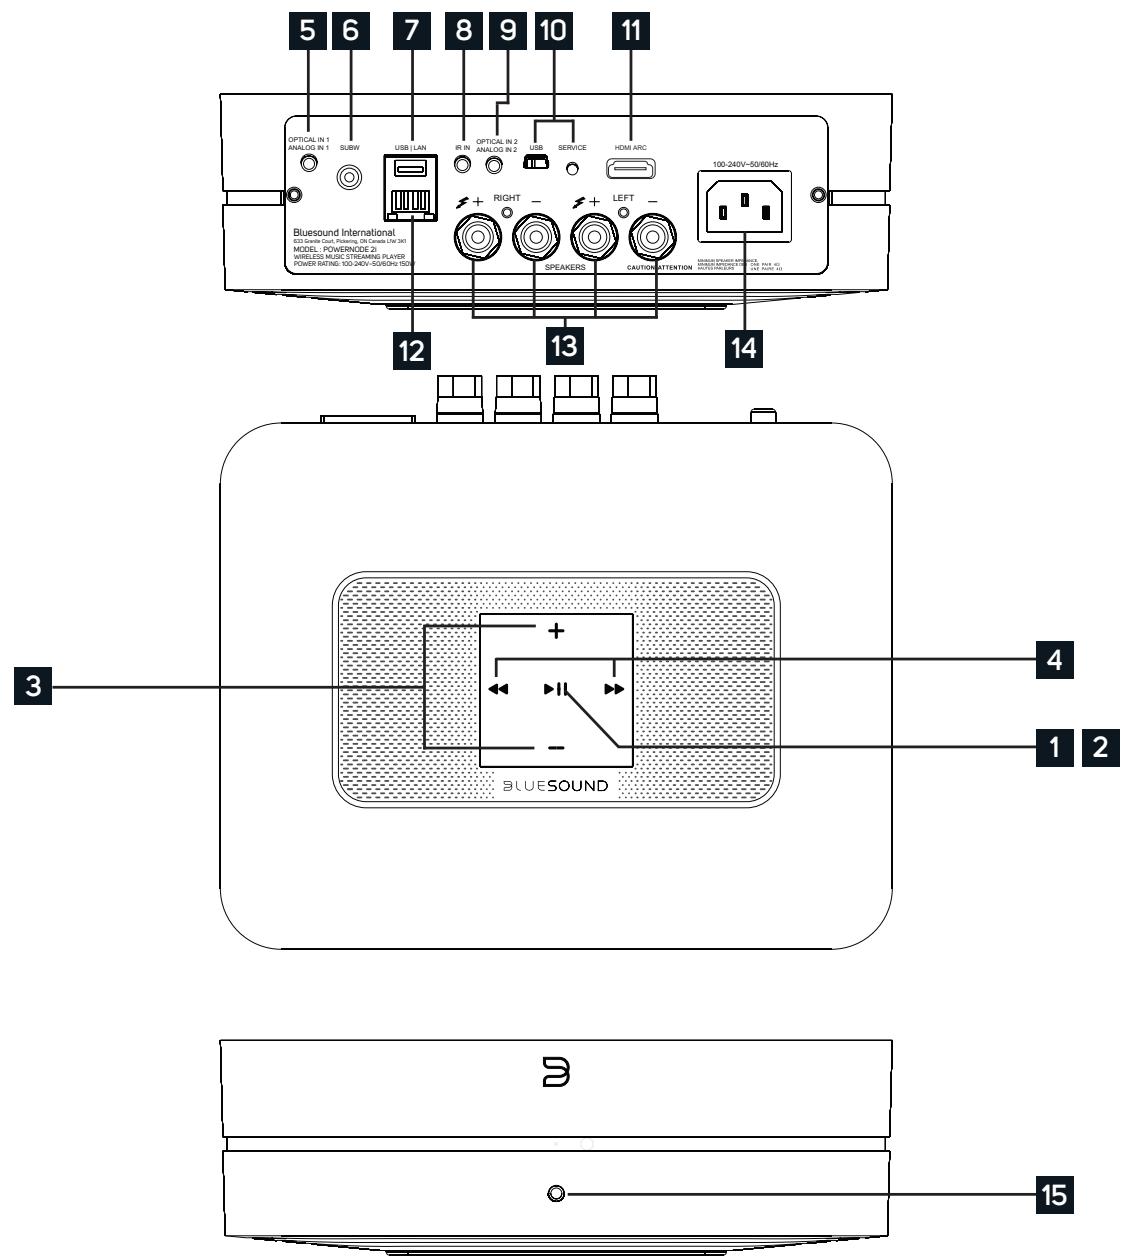
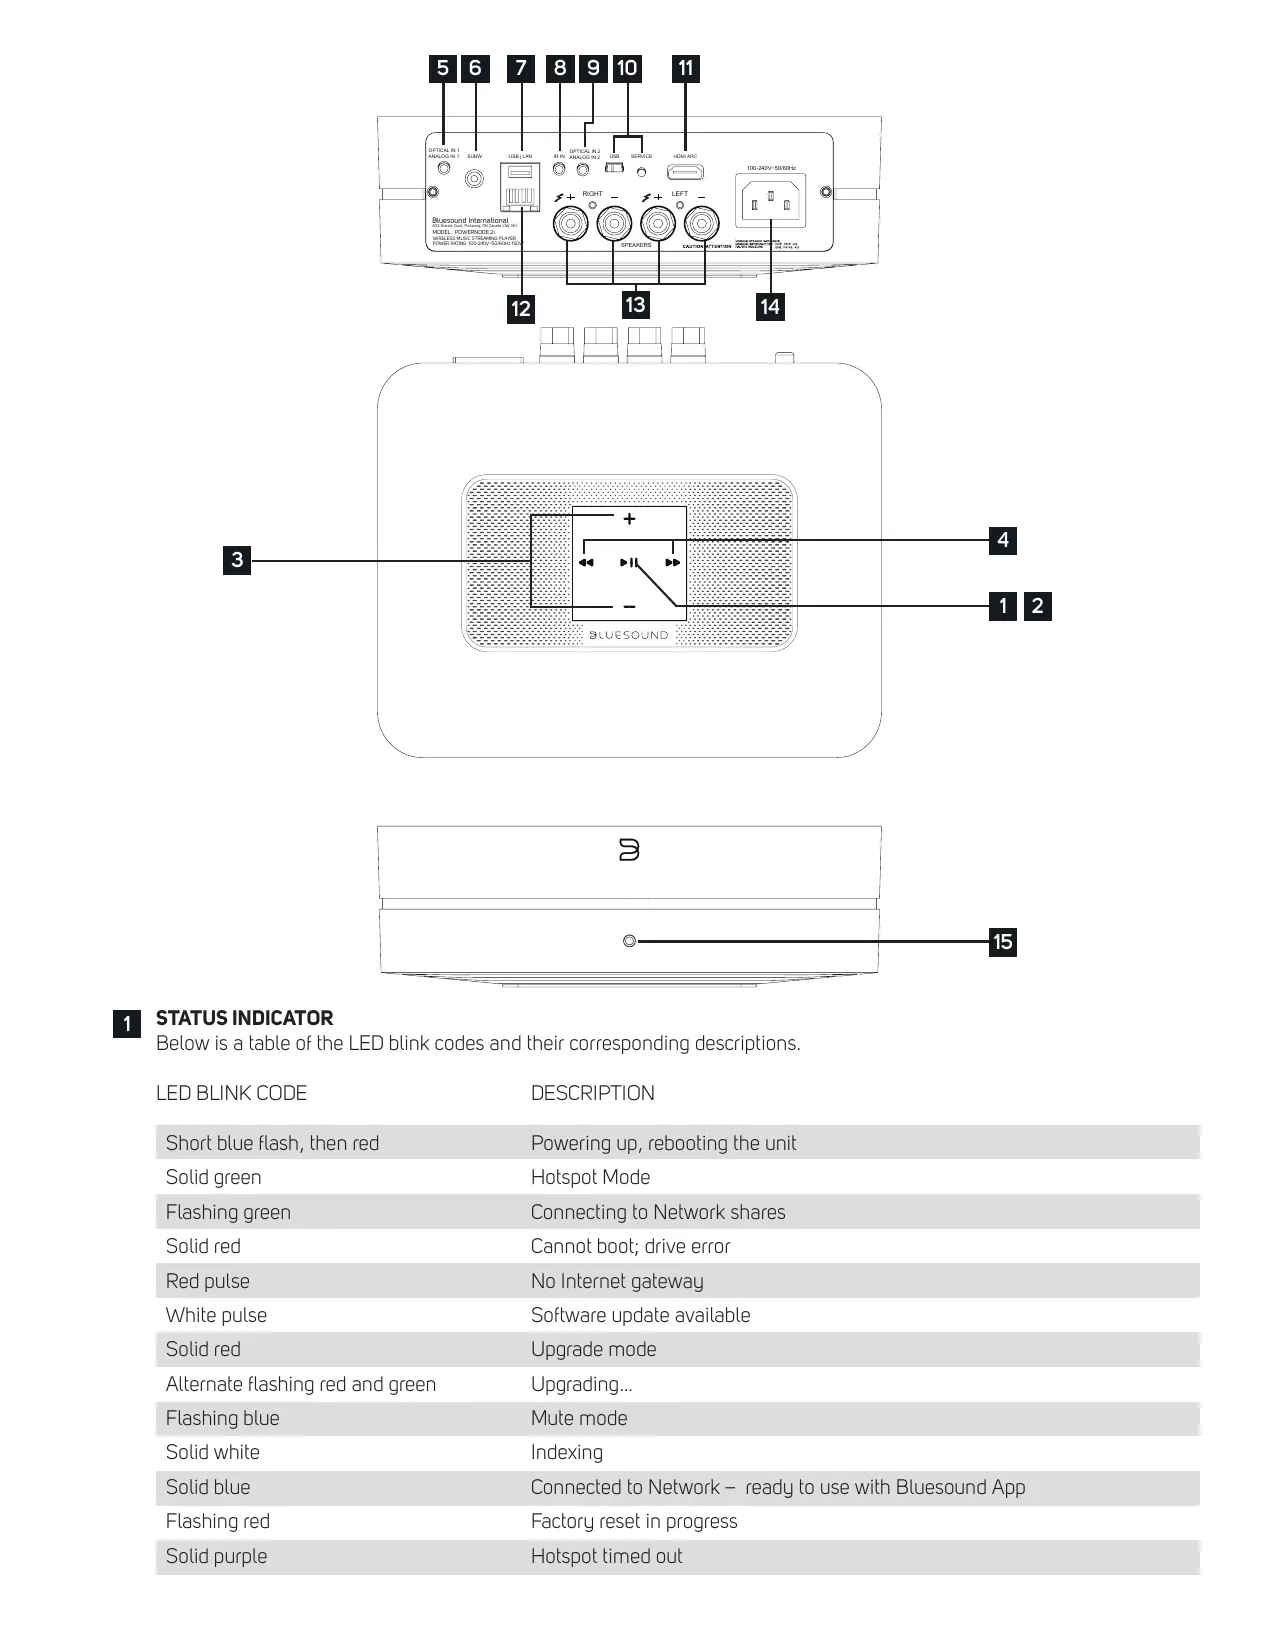
1 STATUS INDICATOR
Below is a table of the LED blink codes and their corresponding descriptions.
| LED BLINK CODE | DESCRIPTION |
| Short blue flash, then red | Powering up, rebooting the unit |
| Solid green | Hotspot Mode |
| Flashing green | Connecting to Network shares |
| Solid red | Cannot boot; drive error |
| Red pulse | No Internet gateway |
| White pulse | Software update available |
| Solid red | Upgrade mode |
| Alternate flashing red and green | Upgrading... |
| Flashing blue | Mute mode |
| Solid white | Indexing |
| Solid blue | Connected to Network – ready to use with Bluesound App |
| Flashing red | Factory reset in progress |
| Solid purple | Hotspot timed out |
2 PLAY/PAUSE BUTTON: This button has multiple functions - a visual indicator of network connectivity and a PLAY/ PAUSE button. For a full listing of LED Blink Codes, please see #1 - Blink Codes. For an ungrouped Player, press the button to Play and Pause the stream. If listening to an Internet radio stream, the Pause function will work for 30 seconds. At this point, the buffer is full and the stream will Stop. When a Player is grouped, pressing the PLAY/PAUSE button will Mute that Player while other Players continue the stream. The Player's LED will flash blue when muted.
3 +, - (VOLUME): Toggle either button to vary volume level. Volume level will not change if you press and hold either button.
(+) : Increase volume level
(-): Decrease volume level
PREVIOUS TRACK/NEXT TRACK: These buttons can be used to go back to the previous track or skip to the next track in your current playlist.
5 OPTICAL IN/ANALOG IN 1: Using a 3.5mm Stereo Audio Cable (not provided), connect one end to the Analog In of the POWERNODE 2i and the other end to the corresponding analog output of other compatible devices. The source will show as an Analog Input 1 in the Navigation Printer of the Bluesound app. Using an Optical to 3.5mm converter (included with the POWERNODE 2i), a digital optical source can also be added. This will appear as Optical Input 1 in the Navigation Printer.
6 SUBW (SUBWOOFER) OUT: A Subwoofer can also be connected directly to the POWERNODE 2i. Connect SUBW OUT to a powered ("active") subwoofer.
7 USB (TYPE A): Connect a USB mass storage device to the USB input. Typical USB mass storage devices compatible with the POWERNODE 2i include portable flash memory devices and external hard drives (FAT32 formatted).
8 IR IN: An infrared extender can be connected to allow for programmable learning remotes to control volume and source selection when a POWERNODE 2i is stored in a way that the front panel IR sensor is not visible.
9 OPTICAL IN/ANALOG IN 2: Using a 3.5mm Stereo Audio Cable (not provided), connect one end to the Analog In of the POWERNODE 2i and the other end to the corresponding analog output of other compatible devices. The source will show as an Analog Input 2 in the Navigation Printer of the Bluesound app. Using an Optical to 3.5mm convertor (included with the POWERNODE 2i), a digital optical source can also be added. This will appear as Optical Input 2 in the Navigation Printer.
10 SERVICE: Use the SERVICE port in conjunction with USB (Type B Mini) to initially load firmware on the Player. This is not for consumer use. Only Authorized Bluesound Service personnel can access this USB port and SERVICE control button.
11 HDMI ARC: Using an HDMI cable, connect one end to the HDMI ARC input of the POWERNODE 2i and the other end to an ARC-enabled HDMI output on your television. You may be required to enable ARC in your TV settings. Consult your user manual for more information. The HDMI source will appear as HDMI in the Navigation Driver of the BluOS App.
12 LAN PORT: The LAN PORT connection can be used with the Ethernet cable provided. This is an optional connection since the POWERNODE 2i can be connected to the network through a Wi-Fi connection to your router. To setup the POWERNODE 2i using the LAN Port a Wired Ethernet connection is required. Using the Ethernet cable provided, connect one end of the Ethernet cable to the LAN port of your wired Ethernet broadband router and the other end to the POWERNODE 2i's LAN port.
13 SPEAKERS: Connect the right speaker to the terminals marked “R+” and “R-” ensuring that “R+” is connected to the “+” terminal on your loudspeaker and “R-” is connected to the loudspeaker’s “-” terminal. Repeat for the left speaker using “L+” and “L-”. Use extra care to ensure that no stray wires or strands cross between posts or terminals at either end.
14 AC MAINS INPUT: The POWERNODE 2i comes supplied with two separate AC power cords. Select the AC power cord appropriate for your region. Before connecting the plug to the wall outlet, connect firmly the other end of the AC power cord to POWERNODE 2i's AC Mains input socket. Never force the plug into a wall outlet. An adaptor may be necessary in certain regions. Always disconnect the plug from the wall outlet first, before disconnecting the cable from the POWERNODE 2i's AC Mains input socket.
15 FRONT PANEL HEADPHONE JACK: A 3.5mm headphone jack is located on the front of the POWERNODE 2i.
WARNING!
THIS IS A FACTORY RESET OF YOUR PLAYER. ALL CUSTOMIZATION INCLUDING WI-FI NETWORK CONFIGURATION, FILE SHARES AND SAVED PLAYLISTS WILL BE LOST. YOU WILL HAVE TO RE-CREATE THESEONCECOMPLETE. THIS PROCESSISONLYRECOMMENDEDIF YOUR PLAYERIS NOTFUNCTIONING AND AN INTERNET FIRMWARE UPGRADE HAS FAILED. FOR ANY QUESTIONS OR CONCERNS CONTACT AN AUTHORIZED BLUESOUND CUSTOMER REPRESENTATIVE BEFORE PROCEEDING!
Steps to Factory Reset:
- Disconnect the player from electrical power.
- Wait 10 seconds
- Reconnect the power
- The LED will flash Blue - once you see it turn Red, touch and hold the Play/Pause icon (it will immediately turn Green and then back to Red) - do not let go of the LED.
- Once the LED turns back to Red, continue to hold the button for 30 seconds.
- After 30 seconds, the LED will begin to blink red - then release the button.
All customization to the Bluesound player will be removed and restored to factory settings.
IMPORTANT: Removing your finger from the LED at any time before the LED begins flashing red will cancel the factory reset and leave the player in Upgrade Mode. Just start the steps again to factory reset the player.
You will know the factory reset is successful if the player returns to Hotspot mode (wireless connection – the LED will turn solid green). If the player is connected to your network through a wired Ethernet connection, it will simply connect as if it was a new player (LED will turn solid blue).