WIZARD TS215 - Drones EACHINE - Notice d'utilisation et mode d'emploi gratuit
Retrouvez gratuitement la notice de l'appareil WIZARD TS215 EACHINE au format PDF.

| Marque | Eachine |
| Modèle | Wizard TS215 |
| Type de produit | Drone quadricoptère FPV |
| Matériau du cadre | Carbone 3K avec transfert d'eau |
| Empattement | 216 mm |
| Contrôleur de vol | STM32F051 (32 bits) |
| ESC | TS40A BLHeli_32, 40A continu, 50A instantané, 2-4S, 2.8g |
| Moteur | 2306 2450KV, 12N14P, 32.9g, axe 4mm, 3-5S compatible |
| Caméra FPV | Module caméra avec objectif noir (module orange) |
| Émetteur FPV | VTX avec bandes A, B, E, F, R, puissance 25/200/500/800 mW |
| DVR | Enregistrement vidéo intégré, résolution jusqu'à 1080p, prise en charge cartes SD jusqu'à 32 Go |
| Antenne | Gain 1.26 dBi, connecteur SMA femelle, 11.3g, 50mm |
| Batterie recommandée | LiPo 2-4S |
| Alimentation | 4.9~5.9 V (via connecteur) |
| Poids total (approx., sans batterie) | Environ 250 g (estimation) |
| Fonctions principales | Vol FPV, enregistrement vidéo, réglage VTX, modes Freestyle/Race, LED RGB |
| Entretien et nettoyage | Nettoyer après vol, vérifier les hélices et les vis, stocker à l'abri de l'humidité |
| Sécurité | Utiliser avec précaution, respecter les réglementations locales, ne pas voler à proximité de personnes |
| Pièces détachées et réparabilité | Bras, moteurs, ESC, contrôleur de vol, caméra, VTX, hélices remplaçables séparément |
| Informations générales | Notice disponible en téléchargement PDF, questions/réponses utilisateurs |
FOIRE AUX QUESTIONS - WIZARD TS215 EACHINE
Questions des utilisateurs sur WIZARD TS215 EACHINE
0 question sur cet appareil. Repondez a celles que vous connaissez ou posez la votre.
Poser une nouvelle question sur cet appareil
Téléchargez la notice de votre Drones au format PDF gratuitement ! Retrouvez votre notice WIZARD TS215 - EACHINE et reprennez votre appareil électronique en main. Sur cette page sont publiés tous les documents nécessaires à l'utilisation de votre appareil WIZARD TS215 de la marque EACHINE.
MODE D'EMPLOI WIZARD TS215 EACHINE
natural_image
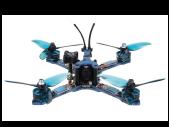
Four-bladed drone with visible propellers and control panels (no text or symbols)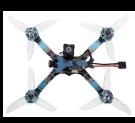

natural_image
Close-up of a blue and white quadcopter drone with visible propellers and control panels (no text or symbols)Frame
Material: 3K pure carbon water transfer Wheelbase: 216 mm
[Non-Text]

natural_image
Close-up of a blue and white quadcopter drone with visible propellers and control panels (no text or symbols)Flight Controller

flowchart
graph TD
    subgraph ECK1
        A["Busbar"] --> B["Relays"]
        C["Relays"] --> D["Microcontroller"]
    end
    subgraph ECK2
        E["Busbar"] --> F["Relays"]
        G["Relays"] --> H["Microcontroller"]
    end
    subgraph ECK3
        I["Busbar"] --> J["Relays"]
        K["Relays"] --> L["Microcontroller"]
    end
    M["Microcontroller"] --> N["Control Unit"]
    O["Control Unit"] --> P["Control Unit"]
    style ECK1 fill:#f9f,stroke:#333
    style ECK2 fill:#ccf,stroke:#333
    style ECK3 fill:#cfc,stroke:#333

natural_image
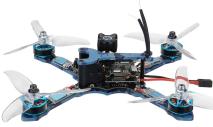
Close-up of a blue handheld device with internal components and wiring (no visible text or symbols)ESC
Product features:
• The 32 bit STM32F051 high speed control chip is used.
- 60A import MOS tube.
• Three in one drive to ensure stability.
- Adopt 6 layers, 3 ounces copper thick high quality PCB, large current and small control signal layering layout, enhance anti-interference ability. More PCB surface gold-plated process, effectively improve the electric current, heat dissipation capacity.
- Integrated RGB multicolored bright LED night lights,
• The original third generation BLHeli_32 firmware supports now DF bpt150/300/600/1200 digital throttle string
anti-interference capability and quick response.
recycle electricity, prolong the endurance time
- By default, the hardware PWM, Damped Light hardware and PWM drive motor will be opened, with less noise and smoother throttle response.
- Damped Light mode, regenerative braking function, so that the motor decelerate more sensitive and effective, control more accurate; active continuous flow technology, let the battery recycle electricity, prolong the endurance time.

| Model | Continuous current | Instantaneous current | BEC | Number of lithium batteries | Weight (without line) | Size (excluding heat shrinkable tube) |
| 40A | 50A | No | 2-4S | 2.8g | 29*14 |
| Motor | |
| Model | 2306 |
| Kv value | 2450 |
| Axis diameter | 4mm |
| Line number | 18# |
| Support lithium electric | 3-5s |
| Slot level | 12n14p |
| Weight | 32.9g |

natural_image
Close-up of a blue industrial turbine or propeller with a black head and metallic shaft (no visible text or symbols)FPV Camera
natural_image
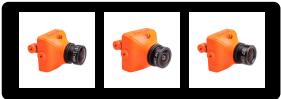
Three identical orange camera modules with black lenses, displayed side by side (no text or symbols visible)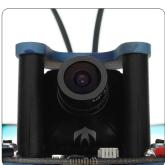
natural_image
Close-up of a black camera lens mounted on a circuit board (no visible text or symbols)FPV Transmitter

- the whole part is divided into flight control board and launching board.
- there are two ways to control the frequency and power of the launches.
Enter the release: FEATURES->VTX SA can enter the following interface.
<1> uses remote control to visualize control, as shown in Figure 1.1
Eighth lines
The CONFIG: function is set into the inside as shown in Figure 1.3

STATX: state information
Introduction to 3.Race and Freestyle Race:
This mode can minimize the launching power of the launch board, avoiding the impact of the excessive power on other flying vehicles. The power break restart will go into the PITMODE, when in this PIT-MODE mode, the display F in Figure 1.1 will display R, showing that the 500 power will display PIR or POR, which is restarted according to your shutdown. The PIT FMODE in Figure 1.3 of the previous
In the PIR mode, the frequency of the transmission corresponds to the BAND CHAN of Fig. 1.1, and the frequency at POR corresponds to the frequency set in Fig. 1.4.
Note: in the POR mode, if the frequency set can not be received, the display device, you can exit the POR mode by pressing the
the display device, you can exit the PITMODE by pressing the button 8s in the launch pad. Return to FREE mode. To quit the PITMODE mode, you can change the Race to Free. and restart
When in pitmode, when the power is adjusted, Band and CHAN will not take effect immediately, it is necessary to enter the SET confirmation in Figure 1.1.
When adjusting power in Free, it can take effect immediately. H
Ever, BAND CHAN still needs SET confirmation. If you do not quit pitmode, you will still enter PITMODE at the n
boot time, regardless of the power adjusted before restart.
You can exit the Race mode. You can modify the power at any time.
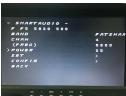
The second line is the state bar, respectively
F:freestyle mode Ff: is now in frequency at F, fifth frequency
P3: is now in frequency at P, with frequency. S820: is now at a frequency of 5820
500: is now transmitting a power of 500MW
Third lines BAND: represents the frequency band, and the BAND can be
modified by the remote control
A (BOSCAM A) B (BOSCAM B) E (BOSCAM E) F (FATSHARK) F (E) Fourth liner
CHAN: represents frequency points, and the 1---8 can be modi-
fied by remote control.
(FREO): indicate the corresponding frequency now, changing
with the band and Chan above.
Sixth lines POWER: represents the transmission power, adjustable
POWER: represents the transmission power, adjustable Seventh lines
SET: enters the YES to confirm the BADN, CHAN, POWER you set,
and takes effect immediately. As shown in Figure 1.2 below.

<< Figure 1.2
OP MODEL
mode adjustment, with free mode and race mode, needs reboot
to take effect.
FSEL MODE: regulates frequency setting mode, CHAN and user, user mode is temporarily invalid.
PIT EMODE:PITMODE mode, PIR and POR mode
In the POR mode, POR FREQ: can enter into any frequency be-
tween 5300-5900, as shown in Figure 1.4.

<< Figure1.4
keypad adjustment
- launches board has a button to adjust, a digital tube display.
Short press can adjust Channel; long press 2S, then short press can adjust hand; long press 4S again short button can adjust
power. Each short button, the corresponding information in-
increases, after reaching the maximum value, return to the min
mum value.
- the digital tube displays band, channel, power in turn in the normal state, and the number displayed in power will flash two
rapidly
The corresponding frequency table is shown in Figure 2.1 below.
and the power is as POWER.
- when the launch board enters the PITMode mode, the power
display P; 4. each time a long low 25 or 45 will enter a new mode of adjust
- each time a long key 23 of 43 will enter a new mode of adjustment. If you enter the convolution head mode, the phenomenon
ment. If you enter the regulation band mode, the phenomenon is that the alphabet of the hand corresponding to the display
is that the alphabet of the band corresponding to the display will quickly flicker for two seconds, and then wait for the 5S time.
In this period, if the short button is short, it will adjust the band.
and refresh the t
| Channel | 1 | 2 | 3 | 4 | 5 | 6 | 7 | 8 | |
| A | 5865 | 5845 | 5825 | 5805 | 5785 | 5765 | 5745 | 5725 | MHz |
| b | 5733 | 5752 | 5771 | 5790 | 5809 | 5828 | 5847 | 5866 | MHz |
| E | 5705 | 5685 | 5665 | 5645 | 5885 | 5905 | 5925 | 5945 | MHz |
| F | 5740 | 5760 | 5780 | 5800 | 5820 | 5840 | 5860 | 5880 | MHz |
| r | 5658 | 5695 | 5732 | 5769 | 5806 | 5843 | 5880 | 5917 | MHz |
Figure 2.1
POWER: 25(1) 200(2) 500(3) 800(4)
DVR
DVR usage tutorial
1, as shown above, connect the camera and flight control by wire
dehnition. Input power SV.
2, insert SD card (maximum support 32 GU.
- turn on the power and put the switch off. 4, the red indicator lights on, indicating that the power has been
turned on
- When the red light is on, wait about 10 seconds or so, and the blue light starts flashing, indicating that the video has been stored
blue light starts hashing, indicating that the video has been stored. 6. after flight turn off the new switch (no previous off) system will
b, after light, turn on the power switch (or power on) system will automatically save the video, the blue light does not flicker to indi-
cate that the storage has been completed.
DVR usage tutorial
1, as shown above, connect the camera and flight control by wire
definition. Input power SV. 2. insert SD card (maximum support 32 GU.
- Turn on the power and put the switch on.
4, the red indicator lights on, indicating that
turned on.
- when the red light is on, wait about 10 seconds or so, and the blue light starts flashing, indicating that the video has been stored
Blue light starts hashing, indicating that the video has been stored. 6. after flight, turn off the power switch (or power off) system will
o, after light, turn on the power switch (or power off) system will automatically saw the video, the blue light does not flicker to indi-
automatically save the video, the blue light cate that the storage has been completed.
File storage path rootx

File storage path rootx----record
| project | Company | Specifications | Remarks |
| complete machine | |||
| on | #01/02-12-03/02 | ||
| dash | 1000 | ||
| Video resolution | #06-170+450 PLA-170+975 | ||
| Coding format | 8,264 | ||
| File format | 491 | ||
| Video time per segment | METHUS | 15 | |
| Binary affinity | ph | #A:1300 linear | |
| Range also weight | mm | 30*08 | |
| GB | |||
| Power parameters range | F | 4.9~5.9p | |
| Rating position current | mm | #A:100 | |
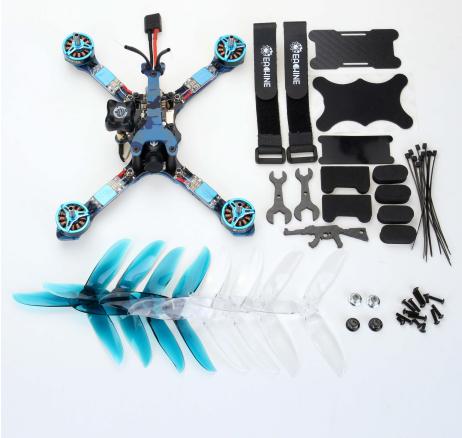
Package
natural_image
Product photo of a multi-rotor drone with attached propeller, frame, and accessories (no visible text or symbols)
natural_image
Close-up of a black plastic mechanical component with a gold connector (no text or symbols visible)Antenna
Features:
High standards for manufacturing and testing
Good class range and signal quality
Ultra compact, light weight
Ultrasonic welding and foam injection cover for collision prot
Double sheath semi rigid cable with heavy impact resistance
technical specifications:
Frequency rang Grain: 1.26 ml/hia
Gain: 1.26ubic Axial ratio: 0.74
Weight: 11.3g
Height: 50mm 3.3
Connector: SMA inner hole