ARCH FAR - Robinet FRANKE - Notice d'utilisation et mode d'emploi gratuit
Retrouvez gratuitement la notice de l'appareil ARCH FAR FRANKE au format PDF.
| Type de produit | Robinet de cuisine |
| Marque | Franke |
| Modèle | ARCH FAR |
| Matériau | Acier inoxydable |
| Hauteur du bec | Élevée pour une grande garde au sol |
| Pression d'eau maximale | 75 PSI (5,2 bar) |
| Température maximale de l'eau chaude | 175 °F (79 °C) |
| Température recommandée de l'eau chaude | 150 °F (66 °C) |
| Raccordements | Tuyaux de cuivre 3/8 po de diamètre extérieur |
| Fonctions principales | Bec orientable, douchette intégrée (selon version), commande par levier |
| Entretien et nettoyage | Chiffon doux, eau et savon ; ne pas utiliser de nettoyants abrasifs |
| Cartouche | Démontable pour entretien (détartrage) |
| Aérateur | Démontable pour nettoyage |
| Garantie | Garantie à vie contre les défauts de fabrication pour le propriétaire d'origine en usage résidentiel |
| Installation | Nécessite de purger les conduites d'alimentation avant montage |
| Accessoires inclus | Douchette, flexible, contrepoids, clé Allen |
FOIRE AUX QUESTIONS - ARCH FAR FRANKE
Questions des utilisateurs sur ARCH FAR FRANKE
0 question sur cet appareil. Repondez a celles que vous connaissez ou posez la votre.
Poser une nouvelle question sur cet appareil
Téléchargez la notice de votre Robinet au format PDF gratuitement ! Retrouvez votre notice ARCH FAR - FRANKE et reprennez votre appareil électronique en main. Sur cette page sont publiés tous les documents nécessaires à l'utilisation de votre appareil ARCH FAR de la marque FRANKE.
MODE D'EMPLOI ARCH FAR FRANKE
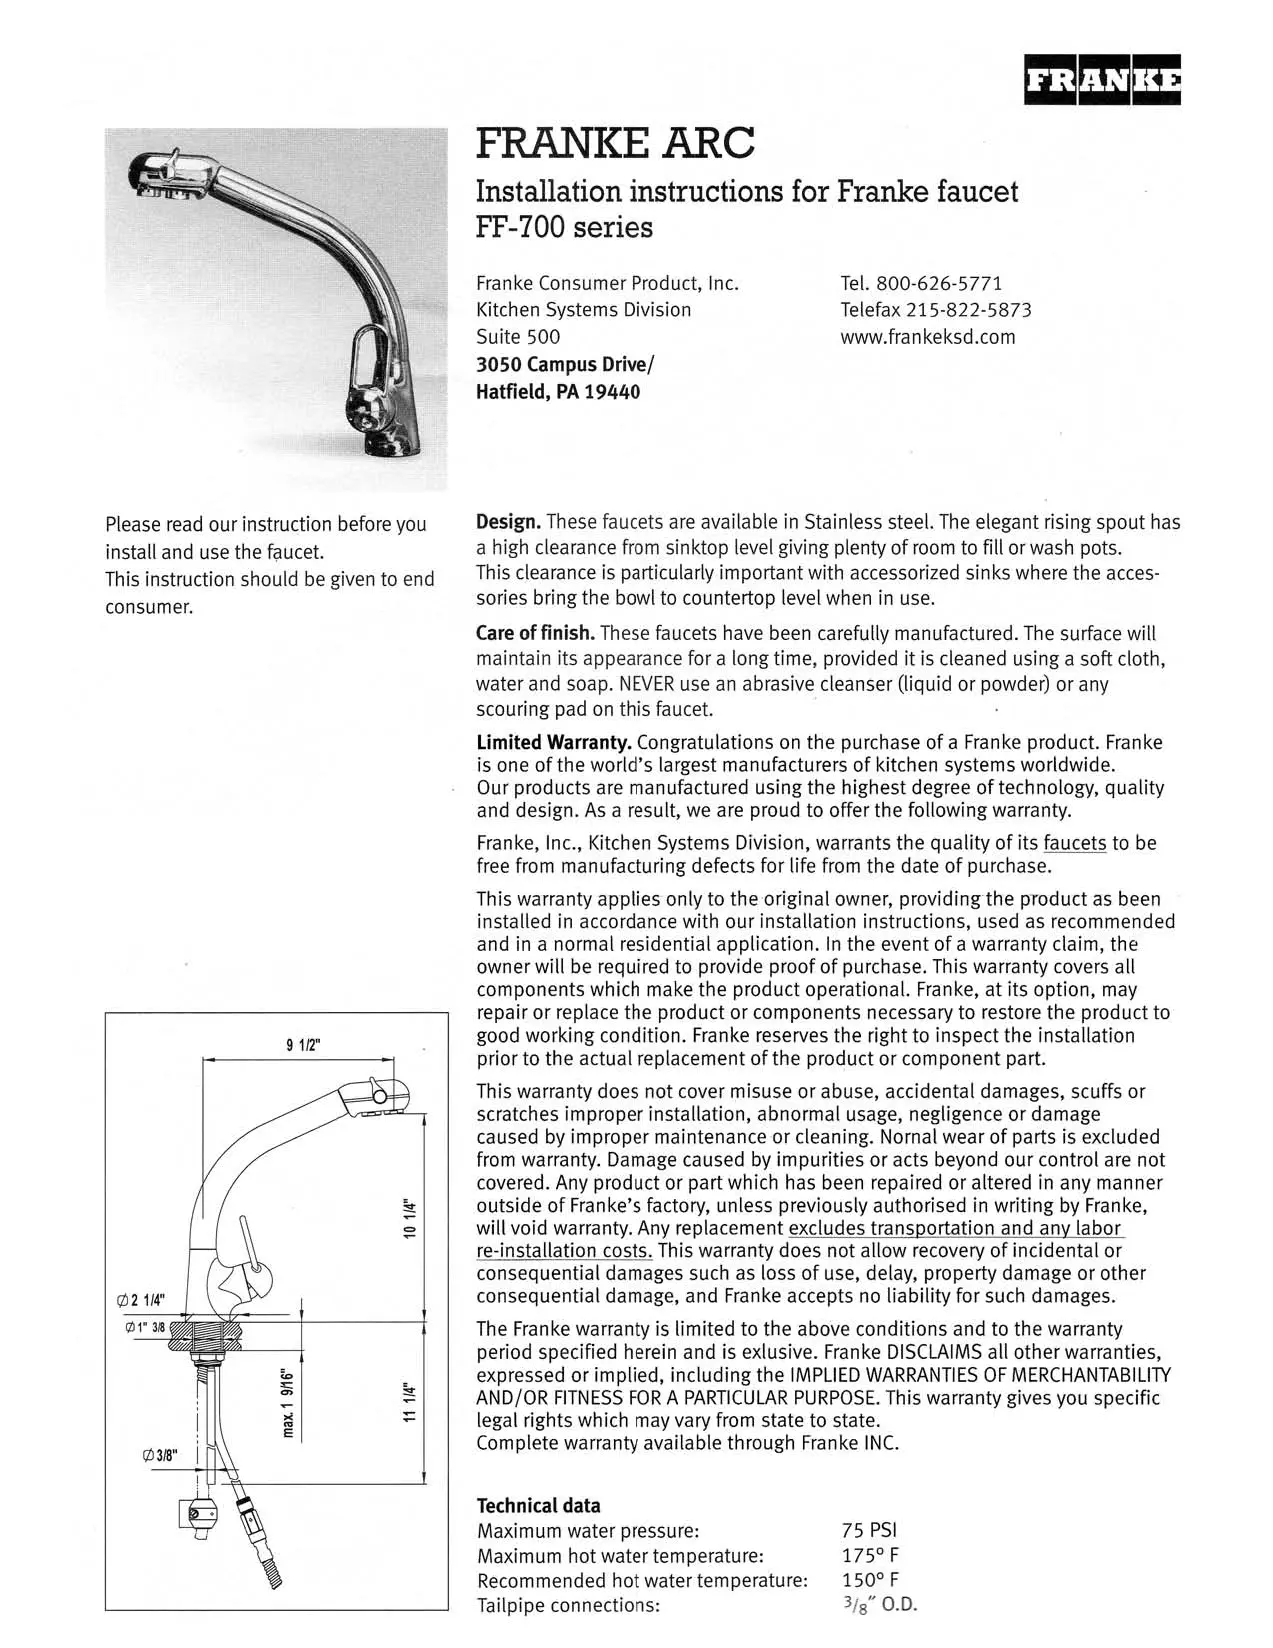
Please read our instruction before you install and use the faucet. This instruction should be given to end consumer.

FRANKEARC
Installation instructions for Franke faucet FF-700 series
Franke Consumer Product, Inc. Tel. 800-626-5771
Kitchen Systems Division Telefax 215-822-5873
Suite 500 www.frankeksd.com
3050 Campus Drive/
Hatfield, PA 19440
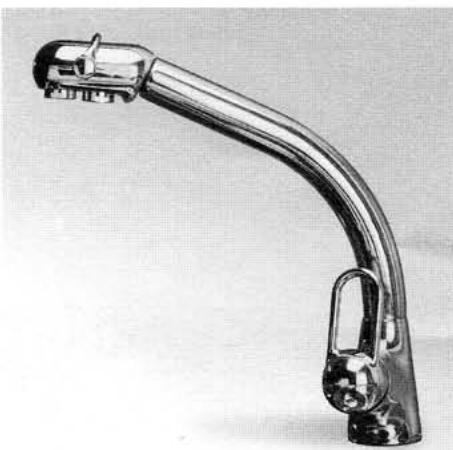
Design. These faucets are available in Stainless steel. The elegant rising spout has a high clearance from sinktop level giving plenty of room to fill or wash pots. This clearance is particularly important with accessorized sinks where the accessories bring the bowl to countertop level when in use.
Care of finish. These faucets have been carefully manufactured. The surface will maintain its appearance for a long time, provided it is cleaned using a soft cloth, water and soap. NEVER use an abrasive cleanser (liquid or powder) or any scouring pad on this faucet.
Limited Warranty. Congratulations on the purchase of a Franke product. Franke is one of the world's largest manufacturers of kitchen systems worldwide. Our products are manufactured using the highest degree of technology, quality and design. As a result, we are proud to offer the following warranty.
Franke, Inc., Kitchen Systems Division, warrants the quality of its faucets to be free from manufacturing defects for life from the date of purchase.
This warranty applies only to the original owner, providing the product as been installed in accordance with our installation instructions, used as recommended and in a normal residential application. In the event of a warranty claim, the owner will be required to provide proof of purchase. This warranty covers all components which make the product operational. Franke, at its option, may repair or replace the product or components necessary to restore the product to good working condition. Franke reserves the right to inspect the installation prior to the actual replacement of the product or component part.
This warranty does not cover misuse or abuse, accidental damages, scuffs or scratches improper installation, abnormal usage, negligence or damage caused by improper maintenance or cleaning. Normal wear of parts is excluded from warranty. Damage caused by impurities or acts beyond our control are not covered. Any product or part which has been repaired or altered in any manner outside of Franke's factory, unless previously authorised in writing by Franke, will void warranty. Any replacement excludes transportation and any labor re-installation costs. This warranty does not allow recovery of incidental or consequential damages such as loss of use, delay, property damage or other consequential damage, and Franke accepts no liability for such damages.
The Franke warranty is limited to the above conditions and to the warranty period specified herein and is exclusive. Franke DISCLAIMS all other warranties, expressed or implied, including the IMPLIED WARRANTY OF MERCHANTABILITY AND/OR FITNESS FOR A PARTICULAR PURPOSE. This warranty gives you specific legal rights which may vary from state to state.
Complete warranty available through Franke INC.
Technical data
Maximum water pressure: 75 PSI
Maximum hot water temperature: 175^
Recommended hot water temperature: 150^
Tailpipe connections: 3/8'' O.D.
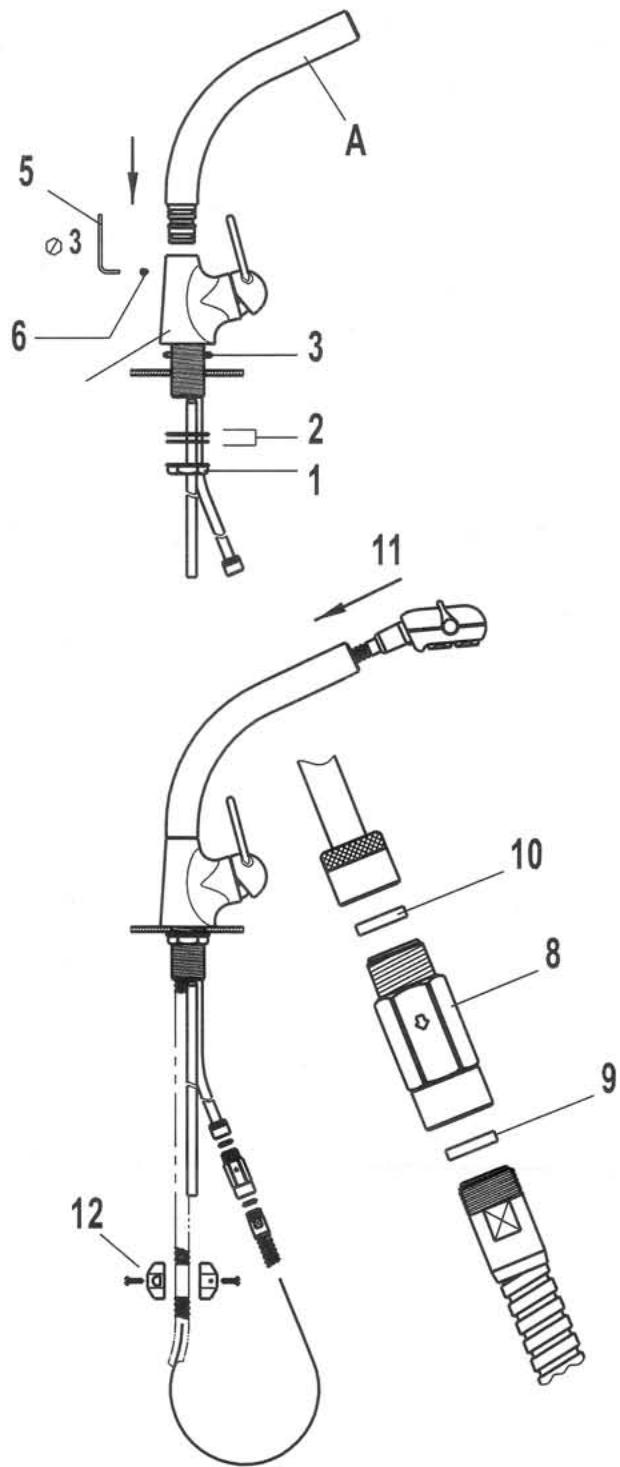
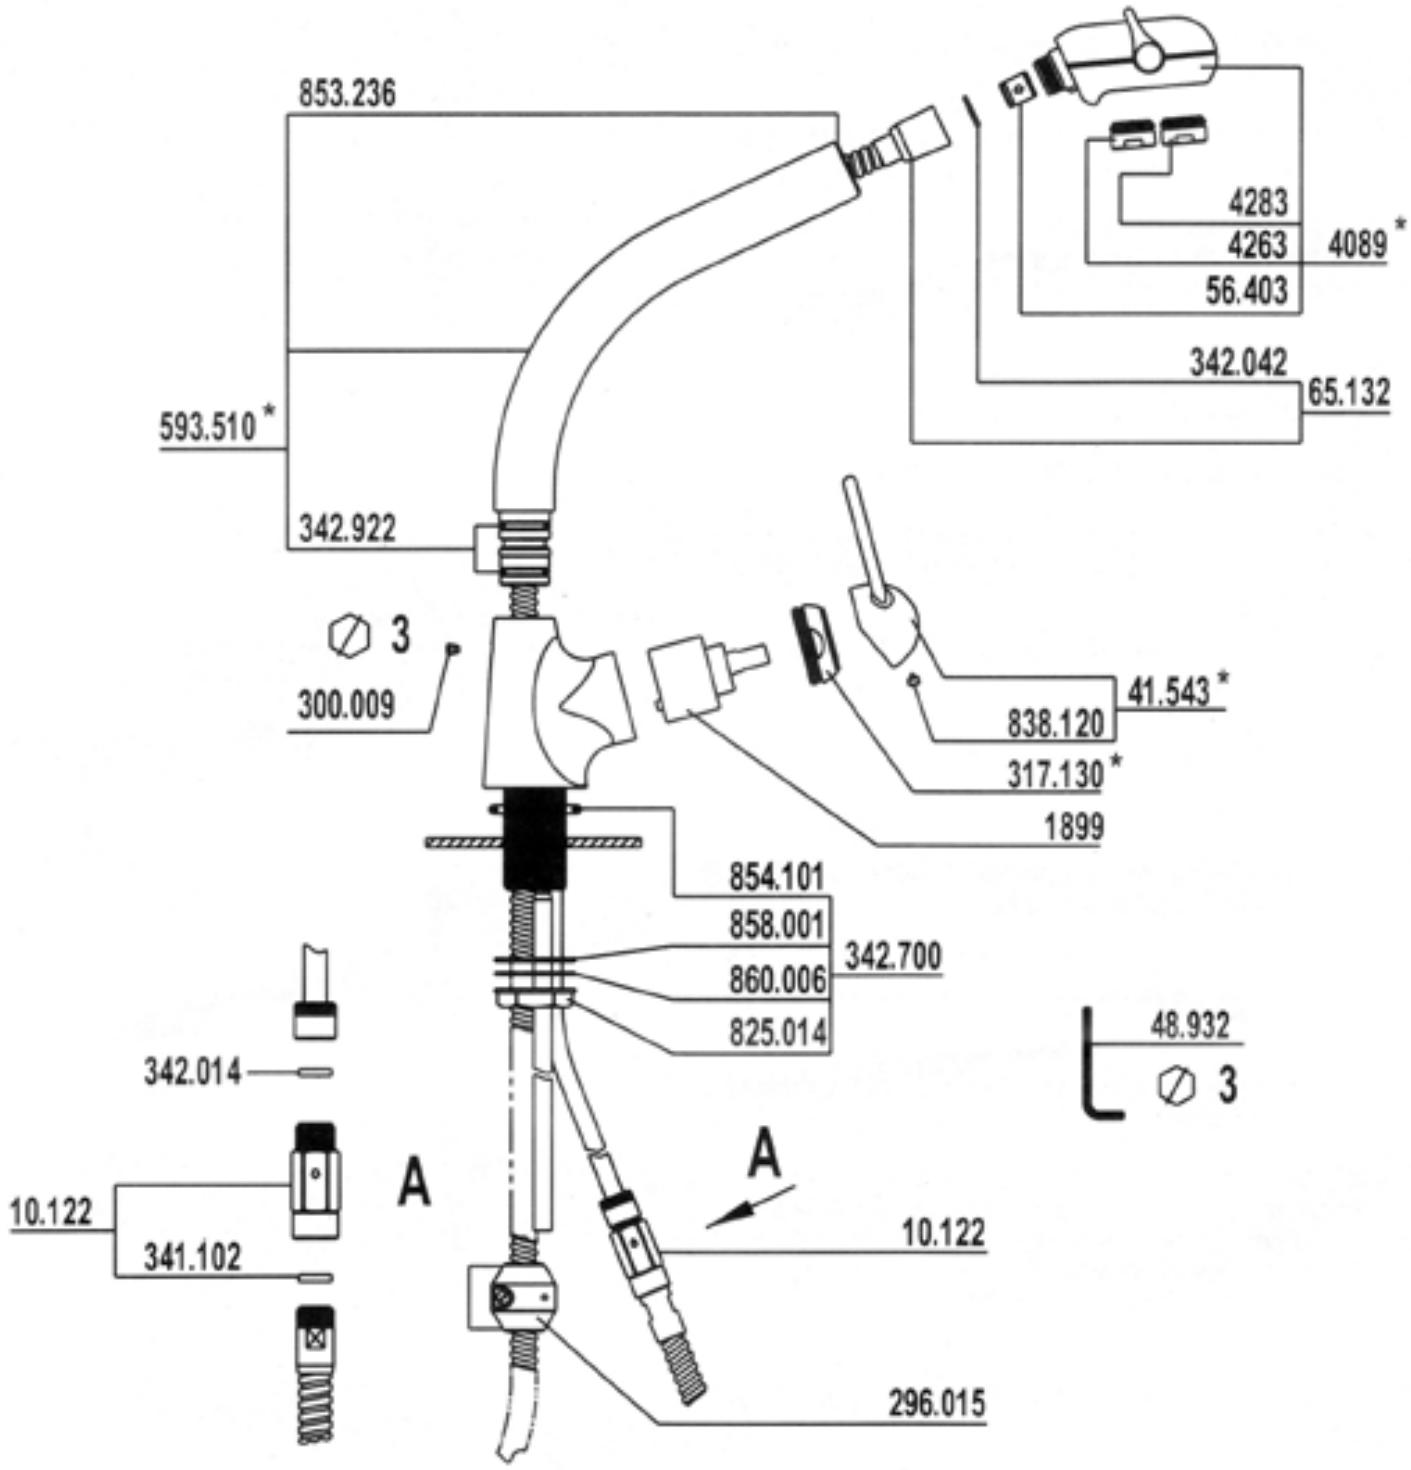
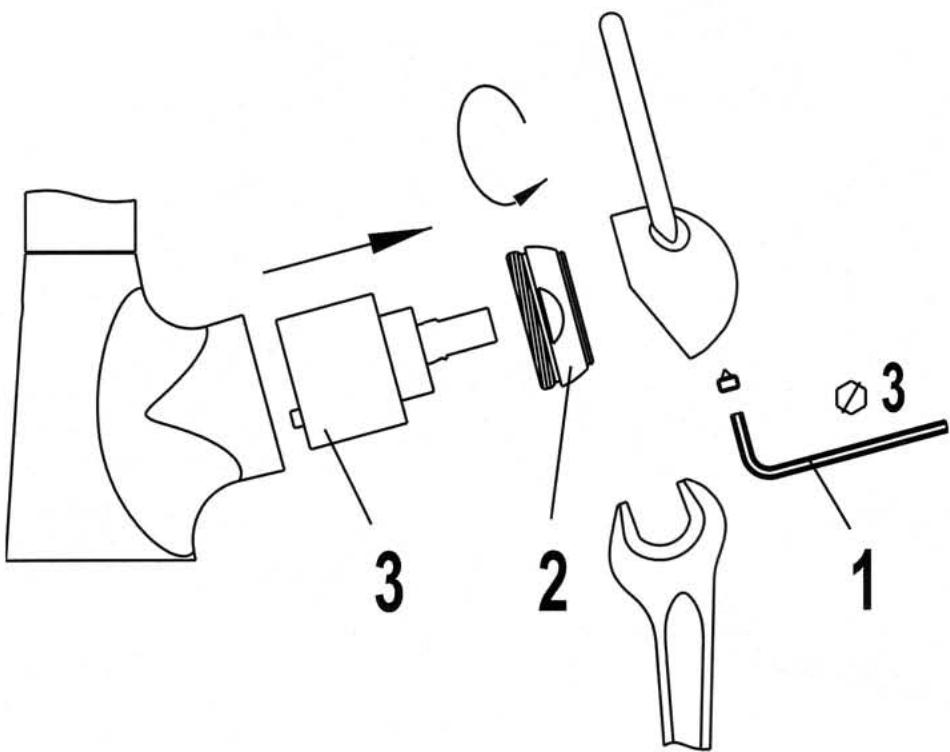
Maintenance on mechanism
Under normal operating conditions, Franke faucets do not require any maintenance. They are unaffected by scaling or corrosion.
The cartridge on Franke faucets can, however, be disassembled for maintenance in the following manner:
1) Turn off the water supply line connections.
2) Remove screw (1) and lever (2) using wrench (3).
3) Unscrew the nut (4) holding the cartridge (5). Remove the entire cartridge from the body, by pulling it out.
4) Clean the cartridge and rinse out the body.
5) Reassemble by reversing the disassembly procedure above, taking special care that the position pins of the cartridge are correctly located in their cavities.
Aerator cleaning: If water outlet is clogged with stain deposit or impurities, you can unscrew the aerator plate (6) to clean it.
Attention: Before installing the faucet SUPPLY LINES MUST BE FLUSHED to remove scale, solder or other impurities and prevent them from entering the faucet.
Installation for model with spray
1) Remove neck, sprayer, Allen key (5) and faucet body from box.
2) On the body unscrew hexagon nut (1), remove metal friction washer and flat washer (2).
3) Insert the body through faucet hole in sink with rubber O-Ring (3) on top, then tighten body down to sink. Flat washer first, then metal friction washer and hexagon nut (1).
4) Connect the faucet copper tailpipes according to red spot/hot water - blue spot/cold water.
5) Take the neck (A) and remove protective cap.
6)Locate set screw (6) on faucet body B. Using Allen key (5),retract set screw being careful not to lose it.
7) Insert the neck into body by slowly rotating and pushing until it clicks into the body. If the neck will not click into place, check to make sure the set screw (6) has been retracted and is not interfering with assembly.
8) Now secure neck by tightening set screw (6).
9) Remove the sprayhead, the flexible hose, the fitting (8) and the counterweight (12) from the bag.
10) Unscrew the fitting (8) from the flexhose being careful not to lose the washer (9). Insert flexhose into the neck. Then screw the fitting (8) on hose end with washer (9).
11) Using seal (10), connect the fitting (8) to the center copper tailpipe.
12) Take the counterweight (12) and screws. Using screws tighten counterweight on the flexible hose at label position. If label is missing, place counterweight at bottom on flexhose loop to assist in retracting the hose an to act as a stop from pulling the unit out too far.
13) Turn water supply back on and check for water tightness. Retighten where necessary, but do not over tighten.