
APM100 - Cadre photo numérique AKAI - Notice d'utilisation et mode d'emploi gratuit
Retrouvez gratuitement la notice de l'appareil APM100 AKAI au format PDF.

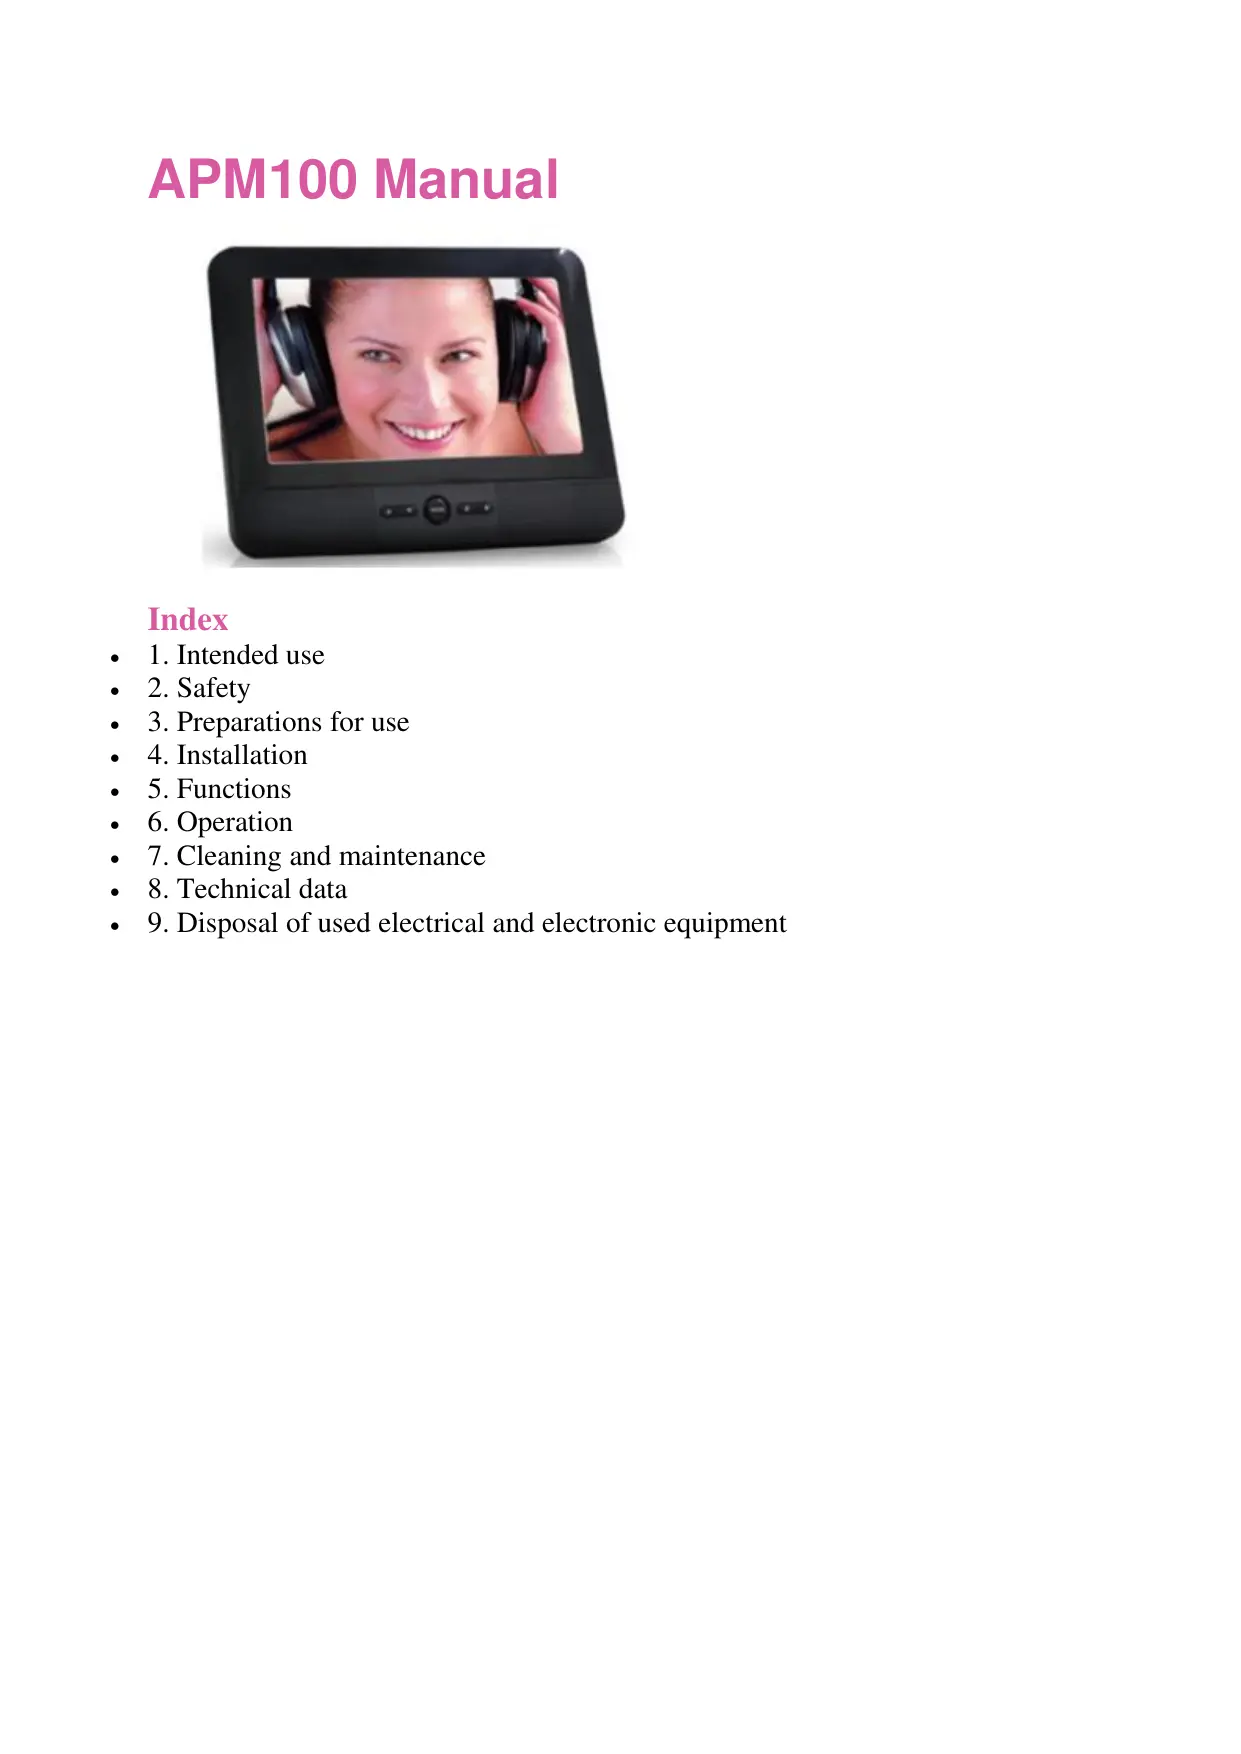
| Type de produit | Cadre photo numérique |
| Taille de l'écran | 7 pouces (17,8 cm), format 16:9 |
| Mémoire interne | 2 Go |
| Formats audio supportés | MP3, WMA |
| Formats vidéo supportés | MPEG4, Xvid |
| Formats image supportés | JPEG |
| Formats texte supportés | TXT |
| Connectique | USB 2.0, lecteur SD/MMC, sortie HDMI, prise casque |
| Alimentation | Adaptateur secteur DC 9V |
| Accessoires inclus | Télécommande, adaptateur secteur, adaptateur 12V voiture, casque, guide de démarrage rapide |
| Entretien et nettoyage | Nettoyer avec un chiffon doux, légèrement humide si nécessaire |
| Sécurité | Ne pas exposer à des sources de chaleur ou au soleil direct |
| Son | Stéréo 2 x 1 Watt |
FOIRE AUX QUESTIONS - APM100 AKAI
Questions des utilisateurs sur APM100 AKAI
0 question sur cet appareil. Repondez a celles que vous connaissez ou posez la votre.
Poser une nouvelle question sur cet appareil
Téléchargez la notice de votre Cadre photo numérique au format PDF gratuitement ! Retrouvez votre notice APM100 - AKAI et reprennez votre appareil électronique en main. Sur cette page sont publiés tous les documents nécessaires à l'utilisation de votre appareil APM100 de la marque AKAI.
MODE D'EMPLOI APM100 AKAI
APM100 Manual

Index
- Intended use
- Safety
- Preparations for use
- Installation
- Functions
- Operation
- Cleaning and maintenance
- Technical data
- Disposal of used electrical and electronic equipment
Intended use
The appliance works as portable media player. With this device it is possible to play music (MP3/WMA3), video (MPEG4 / Xvid), photo (JPEG) and E-book (only .txt) files. These files can be accessed either from external sources (including USB and SD card) or from the internal drive (1.6 GB) of the AMP100. It is also possible to save files on the internal disc.
Read the manual carefully before the first use.
Safety
Labels in this manual
WARNING A warning means that injury or death is possible if the instructions are not obeyed.
A
CAUTION A caution means that damage to the equipment is possible.
i
A note gives additional information, e.g. for a procedure.
General safety instructions

CAUTION Do not spill any liquid on the appliance.
Preparations for use
Unpacking
- Unpack the appliance carefully.
- Check the package contents as described below. If any item is missing, please contact your reseller.
i
We recommend that you retain the original carton and packing materials in case it ever becomes necessary to return your product for service. This is the only way to safely protect the product against damage in transit. If you do dispose of the carton and the packing materials, please remember to recycle with due care to the environment.
Package contents

The following items are included in the received package:
1 x APM100
1 x Remote control
1 x Button cell
1 x Quick start guide
% 1% Headphone
1 x AC adapter
1 x 12V Car adapter

NOTE: the button cell battery has already been inserted in your remote control

If any item is missing, please contact your reseller.
Installation
- Put the appliance on a horizontal flat surface.
- Connect the appliance to the mains.
See for instructions section 3.1
Connect the random equipment to the appliance. Read the paragraph "Connecting external devices".

CAUTION Do not put the appliance near a heat source. Do not expose the appliance to direct sunlight.
Connecting to the mains
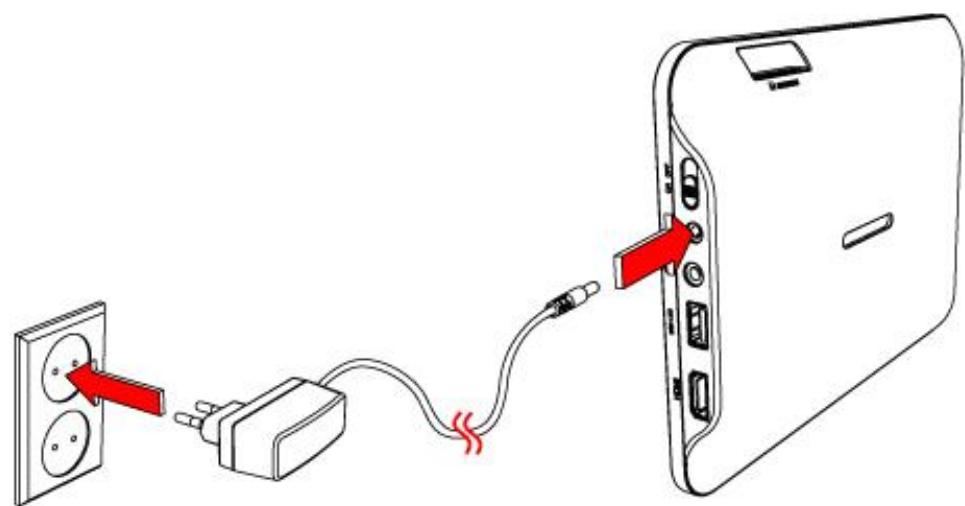
Connect the female plug of the AC adapter to the DC IN jack
- Connect the mains plug to a wall socket.
Connecting external devices


(1)
HDMI (1), USB (2) and SD Card (3) inputs
You can connect the% 1 % to a TV to display the pictures or video files on the TV screen.
Use a standard HDMI cable for this.
For extended instructions, read the paragraph "Operation" further on in this manual.

Connect the headphone
For extended instructions, read the paragraph "CD functions" further on in this manual.
Functions
Remote control

- MUTE button
- AUDIO button
- HOME button
- PHOTO button
- VOLUME - button
- VOLUME + button
- DISPLAYOUT button
- LEFT button
- SETUP button
- ROTATE button
- PLAY/ PAUSE button
- STOP button
- PREV button
- NEXT button
- LCD button
-
SUBTITLE button
-
VIDEO button
- MUSIC button
- BROWSER button
- UP button
- RIGHT button
- OK button
- RETURN button
- DOWN button
- ZOOM + button
- ZOOM - button
- FAST FORWARD button
- FAST BACKWARD button
APM100 Portable Mediaplayer

Stereo sound: 2 × 1 Watt
Operation
Turning the device on and off.

Set the switch in the ON position to turn the equipment on. Set the switch in the OFF position to switch off the device.
HOME-page
After you have turned on your AMP100, the HOME page will be loaded automatically.
Press the OK button .
Select CARD, external USB stick or (internal) hard disc.
DESKTOP will be loaded automatically.

Explorer


-
Select EXPLORER (1) to browse through all types of files on the local disk or other connected sources You can play any type of file.
-
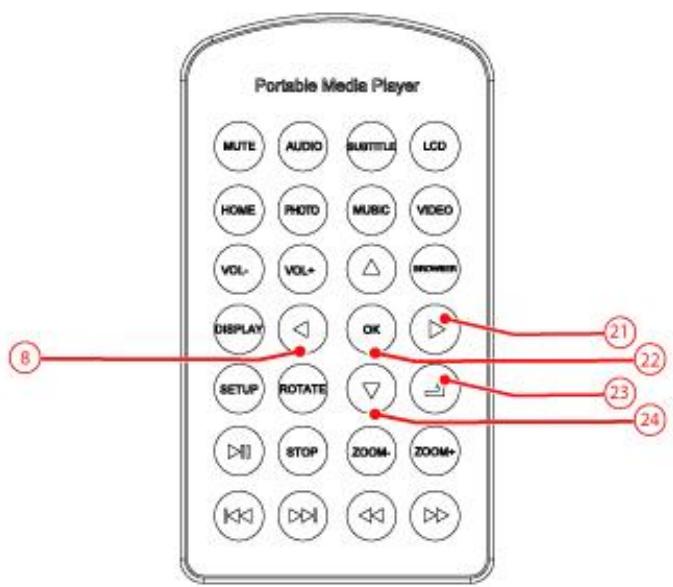
Select the preferred source using the UP (20) and DOWN (24) keys
- Press OK (22) to confirm.
- Select the preferred file
Press OK (22) to confirm.
If it is a video file: see section MOVIE
If it is a music file: see section MUSIC
If it is an image file: see section PHOTOS
If it is a text file: see section: E-BOOK


Select MOVIE (2) to browse your video files
If the selected video file is playing, you can choose from several options. Use the keys SETUP (9) / OK (22) for this.
Use the LEFT (8) and RIGHT (21) keys to navigate within the menu. The menu will automatically disappear, but if you wish to remove it sooner, press RETURN (23)
- PLAY / PAUSE: play or pause the selected file
- PREV: previous file
NEXT: next file - TRACK: select the TRACK of the VIDEO playing (if available)
- SUBTITLE: select the subtitles for the VIDEO file that is playing (if available)
- SCALE: select the VIDEO format (4:3. 16:9, full screen, max)
- MODE: select from the various repeat and programming options
- CHANNEL: Select the desired sound with this view (STEREO, LEFT, RIGHT)
- SUB SIZE/COLOR: select the preferred size and colour of the subtitles.
- Press the SETUP (9) Button or the LEFT (8) Button.
You can now select from the following options:
- Sort: to sort the files alphabetically (A-Z, Z-A)
- Copy/Paste: copies the selected files and pastes them in a desired location
- Delete: to delete selected files
- Cancel: to exit the menu
Music


Select MUSIC (3) to browse your music files
If the selected music file is playing, you can choose from several options. Use the keys SETUP (9) / OK (22) for this.
Use the LEFT (8) and RIGHT (21) keys to navigate within the menu. The menu will automatically disappear, but if you wish to remove it sooner, press RETURN (23)
You can now select from the following options:
- PLAY / PAUSE: play or pause the selected file
- PREV: previous file
NEXT: next file - MODE: select from the various repeat and programming options
- SOUND: select from the various sound effects
DISPLAY: select the cover image or the lyrics of a song (if available) - FAVOR: Allows you to rate your music (1,2,3,4,5 Stars)
- Press the SETUP (9) Button or the LEFT (8) Button.
You can now select from the following options:
- Sort: to sort the files alphabetically (A-Z, Z-A)
- Copy/Paste: copies the selected files and pastes them in a desired location
- Delete: to delete selected files
- Cancel: to exit the menu
Photos
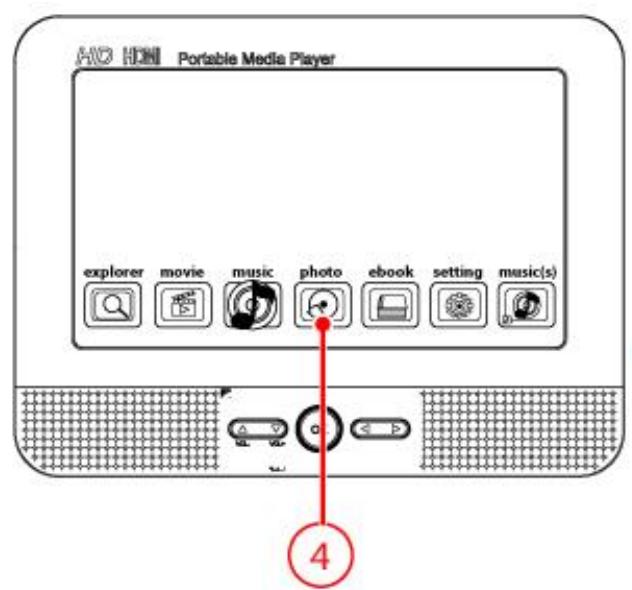

Select PHOTO (4) to browse your photos and images
If your images are displayed, you can choose from several options. Use the keys SETUP (9) / OK (22) for this.
Use the LEFT (8) and RIGHT (21) keys to navigate within the menu. The menu will automatically disappear, but if you wish to remove it sooner, press RETURN (23)
- PLAY / PAUSE: view or pause the slide presentation
• THUMB: this gives you an overview of several images in thumb format
MUSIC: this allows you to add music to your slide presentation - EFFECT: this allows you to select a transition effect for your different photos/images
- TIME SLOT: to set the display time of your images/photos
ORDER: set the sequence of your images/photos -
SET BG: set the selected image/photo as background
-
Press the SETUP (9) Button or the LEFT (8) Button.
You can now select from the following options:
- Sort: to sort the files alphabetically (A-Z, Z-A)
- Copy/Paste: copies the selected files and pastes them in a desired location
- Delete: to delete selected files
- Cancel: to exit the menu


Select E-BOOK (5) to browse your E-BOOK files
If the selected E-BOOK is displayed, you can choose from several options.
Use the keys SETUP (9) / OK (22) for this.
Use the LEFT (8) and RIGHT (21) keys to navigate within the menu.
The menu will automatically disappear, but if you wish to remove it sooner, press RETURN (23)
- PLAY/ PAUSE
- ROTATE: this allows you to rotate the image
SAVE: this allows you to save your bookmarks - JUMP: to open a bookmark
- FONT: to set the font size
- COLOR: select the colour of the letters
BK GRAD: set the background
MUSIC: to play and pause your music
TIME: to set the time display for a page - Press the SETUP (9) Button or the LEFT (8) Button.
You can now select from the following options:
- Sort: to sort the files alphabetically (A-Z, Z-A)
- Copy/Paste: copies the selected files and pastes them in a desired location
- Delete: to delete selected files
- Cancel: to exit the menu
Music(s)

Select MUSIC (S) (7) to directly call the music file that is playing
Copy (general)

Copying a file from one source to another source

NOTE:
Copying must be done from within the Explorer, as this may result in error messages when carried out from other sources.
- Select the preferred file
- Press the LEFT button (8).
The options will appear at the bottom of the screen
- Press the RIGHT button (21).
- Select "file"
Press OK (22) to confirm.
A menu will appear on the right of the screen
- Select "copy"
Use the UP (20) key for this.
Press OK (22) to confirm.
- Press the RETURN button (23).
- Select the preferred location to copy the file to
- Press the LEFT button (8).
-
Select "file" Use the UP (20) key for this.
-
Select "paste"
- Press OK (22) to confirm. The file has been copied

NOTE:
The USB stick you use must be formatted as FAT32 file system. The device does play files from an NTFS formatted USB stick, but the APM100 cannot copy files to it. You must transfer the files to the USB stick via the computer
Setting

Output
You can connect the% 1 % to a TV to display the pictures or video files on the TV screen.
- Connect your APM100 to your TV Use a standard HDMI cable for this.
- Select "settings"
Use the RIGHT (21) key for this.
Press OK (22) to confirm. - Select "outputs"
Use the UP (20) key or the DOWN (24) key.
Press OK (22) to confirm. - Select the desired output mode (LCD or image) Use the UP (20) key or the DOWN (24) key.
Press OK (22) to confirm.

NOTE:
If you select "LCD", the image will be displayed on the AMP100. If you select "aspect ratio" the image will be displayed on TV.
-
Consult the manual of your TV for the correct aspect ratio.
-
Press the RETURN (23) key to exit the menu
- Press the RETURN (23) key again to return to HOME.
Language
- Select "settings"
Use the RIGHT (21) key for this.
Press OK (22) to confirm. - Select "language"
Use the UP (20) key or the DOWN (24) key.
Press OK (22) to confirm. - Select the preferred language
Use the UP (20) key or the DOWN (24) key.
Press OK (22) to confirm.
Press the RETURN (23) key to exit the menu - Press the RETURN (23) key again to return to HOME.
Key tone
- Select "settings"
Use the RIGHT (21) key for this.
Press OK (22) to confirm. - Select 'key tone'. Use the UP (20) key or the DOWN (24) key.
- Select 'on' or 'off'. Use the UP (20) key or the DOWN (24) key.
Press OK (22) to confirm.
Press the RETURN (23) key to exit the menu
- Press the RETURN (23) key again to return to HOME.
System information
- Select "settings"
Use the RIGHT (21) key for this.
Press OK (22) to confirm. - Select 'system information' Use the UP (20) key or the DOWN (24) key.
Press OK (22) to confirm. You will see an overview of:
The capacity of the internal drive.
- The available space for the internal drive.
- The software version.
Press the OK (22) key to exit the menu
- Press the RETURN (23) key to return to HOME.
Restore default settings
- Select "settings"
Use the RIGHT (21) key for this.
Press OK (22) to confirm. - Select 'default'
Use the UP (20) key or the DOWN (24) key.
Press OK (22) to confirm. - Select 'yes' or 'no'
Use the LEFT (8) key or the RIGHT (21) key.
Press OK (22) to confirm. - Press the RETURN (23) key to return to HOME.
Cleaning and maintenance
A
WARNING Before performing any cleaning or maintenance, switch off and unplug the appliance.
Clean the outside of the appliance with a soft cloth. When the appliance is very dirty, dampen the cloth slightly with water and a neutral solution.
Technical data
Power supply:
DC 9V Adapter
16:9 aspect ratio with 17.8 cm screen (7")
Stereo sound: 2 x 1 Watt
MPEG4 / Xvid playback
MP3 / WMA playback
USB 2.0 slot
Slot-in for SD / MMC card
Digital output: HDMI
2G internal memory
Earphone jack

An external hard disc is not compatible with the APM100, you can only use USB memory sticks
Accessories
Remote control
% 1% Headphone
AC/DC Adapter
12V Car adapter
Quick start guide
Disposal of used electrical and electronic equipment

The meaning of the symbol on the material, its accessory or packaging indicates that this product shall not be treated as household waste. Please, dispose of this equipment at your applicable collection point for the recycling of electrical and electronic equipments waste. In the European Union and Other European countries which there are separate collection systems for used electrical and electronic product. By ensuring the correct disposal of this product, you will help prevent potentially hazardous to the environment and to human health, which could otherwise be caused by unsuitable waste handling of this product. The recycling of materials will help conserve natural resources. Please do not therefore dispose of your old electrical and electronic equipment with your household waste.
For more detailed information about recycling of this product, please contact your local city office, your household waste disposal service or the shop where you purchased the product.
For more information and warranty conditions, please visit: www.akai.eu

Do not dispose of batteries as household waste but take them to a battery recycling facility.


- APM100 Manual
- Index
- Intended use
- Safety
- Labels in this manual
- General safety instructions
- Preparations for use
- Unpacking
- i
- Package contents
- Installation
- Connecting to the mains
- Connecting external devices
- Functions
- Remote control
- APM100 Portable Mediaplayer
- Operation
- HOME-page
- Explorer
- Music
- Photos
- Music(s)
- Copy (general)
- Copying a file from one source to another source
- NOTE:
- Setting
- Output
- Language
- Key tone
- System information
- Restore default settings
- Cleaning and maintenance
- Technical data
- Accessories
- Disposal of used electrical and electronic equipment
Marque : AKAI
Modèle : APM100
Catégorie : Cadre photo numérique