
CD 413 - Lecteur audio VDO - Notice d'utilisation et mode d'emploi gratuit
Retrouvez gratuitement la notice de l'appareil CD 413 VDO au format PDF.
| Type de produit | Lecteur audio CD pour automobile |
| Marque | VDO |
| Modèle | CD 413 |
| Dimensions (face avant) | 182 x 53 mm |
| Alimentation | 12 V CC, fusible 10 A (type lame) |
| Puissance de sortie | 4 x 20 W (max.) sur 4 ohms |
| Gammes de fréquences radio | FM (87,5-108 MHz), MW (530-1710 kHz) |
| Fonctions RDS | AF (recherche automatique de fréquence alternative), TA (annonces trafic), PTY (type de programme) |
| Lecture CD | CD audio 12 cm, formats standards |
| Fonctions CD | Lecture aléatoire (RND), répétition (RPT), scan (SCN), recherche avant/arrière |
| Réglages sonores | Préréglages (Jazz, Vocal, Pop, Classic, Rock) + Basses/Aiguës manuels |
| Présélections radio | 5 stations par bande (FM1, FM2, FM AST, MW, MW AST) |
| Protection antivol | Code antivol (activation/désactivation manuelle) |
| Affichage | Écran LCD rétroéclairé |
| Connectique | Connecteurs ISO (A: alimentation, B: haut-parleurs), antenne DIN |
| Entretien | Nettoyage de la tête de lecture avec cassette nettoyante (1 à 2 fois par mois) |
| Fusible de rechange | Type lame 10 A (ne pas utiliser de fusible de valeur différente) |
| Température de fonctionnement | -10°C à +60°C (estimation) |
FOIRE AUX QUESTIONS - CD 413 VDO
Questions des utilisateurs sur CD 413 VDO
0 question sur cet appareil. Repondez a celles que vous connaissez ou posez la votre.
Poser une nouvelle question sur cet appareil
Téléchargez la notice de votre Lecteur audio au format PDF gratuitement ! Retrouvez votre notice CD 413 - VDO et reprennez votre appareil électronique en main. Sur cette page sont publiés tous les documents nécessaires à l'utilisation de votre appareil CD 413 de la marque VDO.
MODE D'EMPLOI CD 413 VDO

CR 213 CR 213-24V
CR 223 CR 223-24V
CD 413 CD 413-24V
CD 423 CD 423-24V
enjoy
user manual
mode d'emploi
bedienungsanleitung
gebruiksaanwijzing
istruzioni d'uso
instruciones de manejo
modo de emprego
bruksanvising
betjeningsvejledning
käytööhje
Proper disposition for all scraps( Please place in bins for electronic parts) for environment protection.
CLASS 1 LASER PRODUCT
CASSETTE: CR 213, CR 223, CR 213-24V, CR 223-24V
CD: CD 413, CD 423, CD 413-24V, CD 423-24V
BEFORE YOU START....
Thank you for purchasing this VDO product which has been designed and manufactured to the highest standards and subjected to rigorous testing.
Kindly familiarise yourself with the product by reading this user manual. Keep this manual handy in your car for future reference.
This manual covers the following models:
| Illum | Supply | Fuse | ||
| CR 213 | Orange | 12V | 5A | |
| CR 223 | Green | 12V | 5A | |
| CD 413 | Orange | 12V | 10A | |
| CD 423 | Green | 12V | 10A | |
| CR 213-24V | Orange | 24V | 5A | |
| CR 223-24V | Green | 24V | 5A | |
| CD 413-24V | Orange | 24V | 5A | |
| CD 423-24V | Green | 24V | 5A | |
ENVIRONMENT
This booklet is printed on low-chlorine recyclable paper.
IMPORTANT
This device has been designed and produced according to applicable Safety Regulations. Please read carefully the instruction manual and use the device as intended.
CONTENTS PAGE
INSTALLATION 4
PREPARATION 4
MOUNTING 5
FRONT PANEL PRESENTATION 6
SECURITY 6
AUDIO 7
RADIO 8
RADIO DATA SYSTEM (RDS) ON FM 8
CASSETTE PLAYER 9
CD PLAYER 9
TROUBLESHOOTING 10
INSTALLATION
If your car is equipped with ISO connectors, simply insert them in the connectors of the car radio. If not, you can use an adaptor cable. Ensure all cables are installed so that they cannot be damaged by sharp edges or moving parts.
PREPARATION
Voltage and polarity: The set must be connected to a 12V/24V car battery with negative terminal to earth (car chassis). Installation in vehicles not fulfilling these requirements could result in malfunction, damage or fire.
Warning: To prevent short-circuiting, disconnect the negative car battery terminal until the set has been mounted and connected (fig.1 See separate installation card).
CONNECTOR A (fig.2)
Power supply connections
- Red wire A7 : Connect to a permanent 12V/24V supply. This is the main power supply. Ensure this connection can handle a current of 10A/5A.
- Yellow/red wire A4: Connect to a switched 12V/24V supply (switched on/off by car ignition).
- Brown wire A8: Connect to earth (car chassis).
This connection set up will enable you to make full use of the ON/OFF LOGIC function of this set limiting the use of the set to 1 hour after removal of the ignition key. If this feature does not appear to be functioning as expected you may require an adaptor cable.
Electronic antenna/Motorised antenna
Connect pin A5 to the power supply for an electronic antenna or the control wire for the relay of an automatic motorised antenna.
Do not use this connection for the supply lead of the aerial motor!
- Pilot light :
When the car headlights are switched on, the backlight to the power key remains illuminated (even when the radio is switched off).
Connect pin A6 to the dashboard illumination wiring of the car.
Note: In certain car (e.g. VW Passat) the dashboard illumination is dimmed by a digitally modulated signal (PWM - Pulse Width Modulation). This PWM signal can disturb the illumination display of the car radio. In this case, connect pin A6 to the switch signal of the low beam headlight. Please consult your car dealers for more information.
- Depending on version
4
CONNECTOR B (fig.3)
Loudspeakers (use 4 ohm loudspeakers only)
- Do not connect any of the loudspeaker leads to earth or directly to a booster/amplifier without high level input or via an external fader! You can connect the loudspeaker leads directly to an amplifier with high level input.
- Connecting 4 loudspeakers:
Front Rear
| Left+ | Green [B5] | White [B7] |
| Left- | Green/black [B6] | White/black [B8] |
| Right+ | Grey [B3] | Blue [B1] |
| Right- | Grey/black [B4] | Blue/black [B2] |
OTHERS CONNECTIONS (fig. 7)
Wired or Steering wheel remote control
You can connect certain wired or car steering wheel mounted remote control to this set via an interface. Please consult your dealer for the correct interface.
MOUNTING
METAL SLEEVE (fig.6)
- Install the metal sleeve (dimension 182 × 53 mm ) in the dashboard. For optimal performance of the CD player*, the metal sleeve should be positioned horizontally (between -10^ and +30^ ).
Fix metal sleeve into place by pressing the metal tags outwards using a screwdriver.
CONNECTING THE RADIO (fig.7)
- Ensure the battery is disconnected.
- Insert aerial plug E in the matching socket. Use hook (J) on back of set to secure fixing. Use only DIN or ISO socket, not both simultaneously.
- Insert power supply connector A into socket A'.
- Insert loudspeaker connector B into socket B'.
MOUNTING RADIO
This radio can be properly installed either from conventional Front Mounting or Rear Mounting, depending on DIN/JIN opening of the car's dashboard.
FRONT MOUNTING
- Slide the radio into the metal sleeve until the springs at either side of the radio snap into the openings of the sleeve (fig.8).
- Finally reconnect the negative car battery terminal (fig.9).
REMOVING RADIO (using the two U-brackets
- Depending on version
supplied)
- Remove the trimplate around the front panel.
- Insert both U-brackets into the holes on the front of the set until they lock. Pull out the radio (fig.10).
REAR MOUNTING (fig.11)
- Remove the trimplate around the front panel and the side springs.
- Select a position where the screw holes of the mounting bracket and the screw holes of the radio become aligned and tighten the screws at 2 places on each side.
- Only use M5 screws that are not longer than 6mm.
REPLACING FUSE (fig. 7)
- Replace with a 10A/5A blade-type fuse. The new fuse must be of exactly this value and type otherwise the set will not be adequately protected. Ignoring this procedure may lead to damage to the set, which will invalidate the guarantee.
INTERFERENCE SUPPRESSION
- Most modern cars have sufficient interference suppression. If you experience interference generated by the car, consult your dealer.
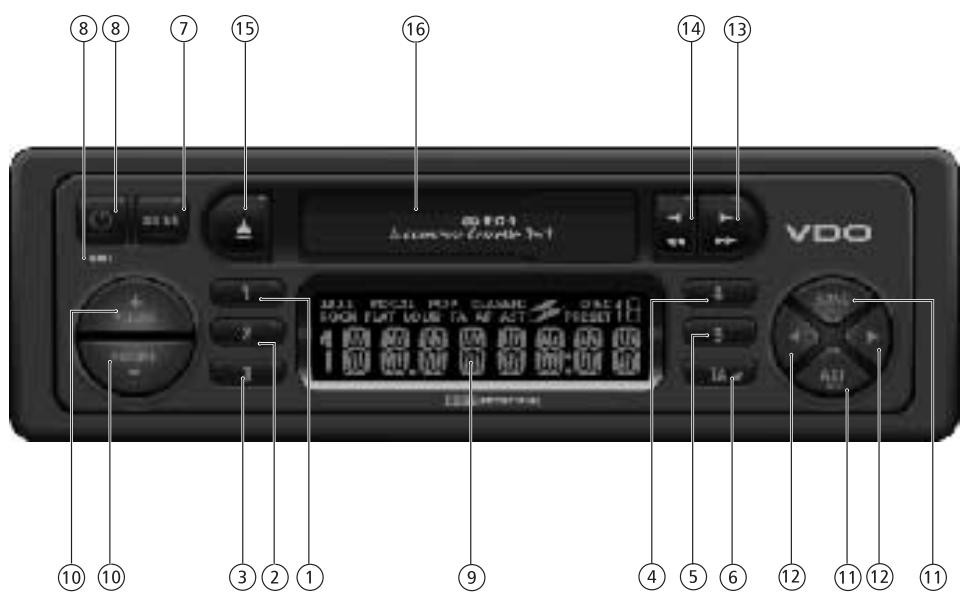
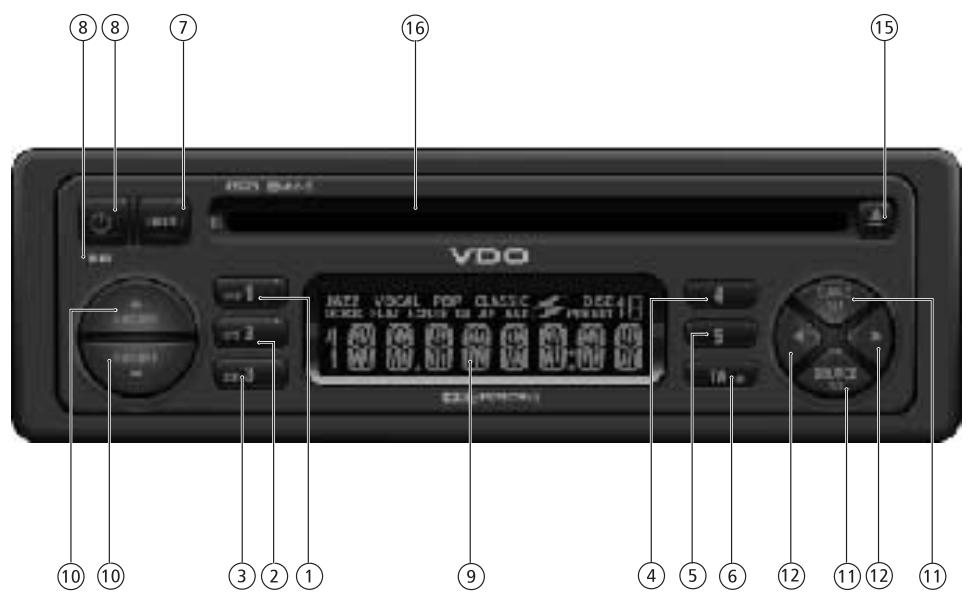
FRONT PANEL PRESENTATION
For illustration, see page 3, figure A.
1 1 Preset button 1 RND* CD random playback on/off
2 2 ...... Preset button 2 RPT* CD repeat track on/off
3 3 Preset button 3 SCN* CD's track scan
4 4 Preset button 4
5 5 Preset button 5
6 TA AF ......... Short press: TA on/off Long press: AF on/off
7 SOUND.....Select sound/audiosyles
8 Short press: Power on Long press: Power off. MUTE ......... Short press: To mute or cancel mute.
9 Display 10 Volume knob; press up/down to adjust the volume;adjust selected audio mode
11 *SOURCE .... Short press: Change source (CD).
RDS ......... Long press: RDS on/off
BAND ......... Short press: To select band
AST ......... Long press: Autostore (CD)
Short press: Autostore (Cassette)
12 Tuner mode Short press:Auto search up/ down Long press: Manual search up/ down Cassette mode: No function CD mode Short press: Next/previous track Long press: Fast forward or fast rewind
13 *Fast forward ( cassette deck)
14 *Fast Rewind ( cassette deck)
15 .Disc eject CD) Eject cassette
16 CD opening / Cassette opening
SECURITY
CHECKING WHETHER THE CODE PROTEC TION IS ACTIVE
If the Code Protection is active, the display briefly shows "CODE" each time the set is switched on.
If the power supply has been interrupted:
If the Code Protection has been activated and the power supply has been interrupted, the set will mute and the display shows "CODE" (anti-theft).
- Enter the code as described in "Entering the code".
Entering the code (stated on the "Security Card", for example 4359):
Action Display - Switch on the set C O D E
- Press the preset 1 key 0 - - -
- Enter the first figure of the code 4 - - - With the or key
- Press the preset 1 key again 40 - -
- Enter the second figure of the code 43 - - With the or key
- Press the preset 1 key again 430 -
- Enter the third figure of the code 435 - With the or key
- Press the preset 1 key again 4350
- Enter the fourth figure of the code 4359 With the or key
- Press the preset 1 key once more
- If the correct code was entered, the set gives a beep and then will function normally.
If an incorrect code was entered, the set gives an error beep. The display shows "WAIT".
This indicates that a waiting period has started.
1 Do not switch off the set when the display shows "WAIT" (The waiting period will start all over again when the set is switched on.)!
2 You must wait until the display shows "CODE". This indicates that waiting period has finished.
3 Enter the correct code as described in "Entering the code".
The waiting period doubled each time an incorrect code is entered (1 minute, 2 minutes, 4 minutes, etc...).
Deactivating the Code Protection
1 While keeping the key pressed, switch on the set. Keep the pressed until you hear a beep.
- Depending on version
2 Enter the code as described in "Entering the code". You will hear two beeps indicating that the Code Protection has been deactivated. If an incorrect code is entered, you have to follow the same procedure as described in "Entering the code".
Activating the Code Protection
While keeping the key pressed, switch on the set. Keep the pressed until the display shows "CODE" and you hear a beep. The Code Protection is now active.
IF THE SET HAS TO BE SENT FOR REPAIR
- Deactivate the Code Protection(as described above), or Write the protection code on a label and attach it to the set. After repair, remove the label from the set.
Note:
Code Protection function is deactivated ex-works.
IDENTIFICATION NUMBER
This set has an identification number (stated on the 'Security card'). Show this card as a proof of ownership, when the set is stolen or when requesting service.
- Do not keep the 'Security Card' in your car.
AUDIO
ON/OFF
- Press to switch on the set. Press for more than 2 seconds to switch off the set.
English
VOLUME
- Press the volume button up/down to adjust the volume. Please make sure you can still hear the traffic (horns, sirens......)
MUTE (Silence)
Short press key to mute or cancel the mute (silence).
Note : The silence period may be interrupted by ALARM announcement or traffic announcement messages (if TA is switched on).
SOUND
Whether you listen to Jazz, Vocal, Pop, Classic or Rock music, the SOUND button is the perfect setting for your choice.
- Press SOUND then the sound button to select BASS-Treb for your own sound style, or adjust the settings with the volume up/down buttons to select one of the pre define sound styles:

AUDIO SETTING
- Press SOUND to select desired audio mode.
- Adjust the settings with the volume up/down buttons:
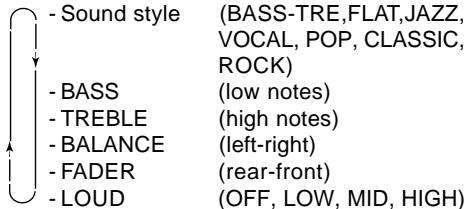
-
Press the volume button to adjust the selected audio mode. After 5 seconds the display goes back to the last mode of operation. Adjustment of Bass and Treble setting is only possible when BASS-TRE is selected as the sound style.
-
Depending on version
*SOURCE
- Press SOURCE to select the desired source :

- Products with cassette mechanism will change source to cassette only when a tape is inserted.
RADIO
WAVEBAND
- Press BAND to select the desired band :

AUTOMATIC SEARCH
Use search tuning to automatically search for a station.
- Press to tune to a station of a lower frequency or to a higher frequency.
- To search for another station, press the key again.
Manual tuning (if you know the frequency of the required station)
- To switch to manual tuning :
Long press the search button or for more than 2 seconds will switch the tuning to manual tuning. - Then press to tune to a station of a lower frequency or to a higher frequency.
- When keys are released, a time-out start to count. After 5 seconds time-out, display 'Auto' for one second and return to automatic search.
PRESELECTED STATIONS
Manually storing stations in a preset
Five stations per band can be stored and recalled using the preset keys (1 to 5)
- Tune in to the desired station.
- Press the desired preset key (1 to 5) for more than 2 seconds to store the current tuned station.
When storing an FM station, the current Program Station Name and the AF mode are stored on the preset ( Some stations use alternating Program Service Name).
Recalling a preset
-
Press the desired preset key (1 to 5) to recall the stored station.
-
Depending on version
8
Automatically storing stations (AUTO-STORE)
You can automatically store 5 strongest FM stations on the FM AST band or 5 strongest MW (AM) stations on the MW(AM) AST band. When you use Auto Store, the new stations replace any stations previously stored in the FM AST band or the MW(AM) AST band.
- Press AST to activate autostore.
- The set gives a beep and then mutes.
- When it has finished, you hear a beep followed by the station stored on preset 1.
- Sometimes it may not be possible to find 5 stations.
RADIO DATA SYSTEM (RDS) ON FM
More and more stations broadcasts RDS informations in order to offer you many advantages including:
PROGRAM SERVICE NAME (PS)
Allows the radio to display the name of the station instead of its frequency.
AUTOMATIC RETUNING (AF):
The set remains tuned to the current station by continually searching the best alternative frequency for best reception.
Note: You can switch AF off.
Activate/Deactivate AF
This set continuously search for other alternative frequencies for the tuned radio station and automatically selects the best frequency for reception. Long press TA for more than 2 seconds to activate/deactivate AF.
ALARM MESSAGES (PTY ALARM)
This set automatically receives emergency messages made by the broadcaster.
- During the messages the display shows 'ALARM' and the station-name alternately.
TRAFFIC ANNouncements (TA)
You can activate the TA modes to give priority so as to hear traffic announcements related to these subjects, (even if you play a cassette*/CD* or mute the set).
Activate/Deactivate TA
- Short press BAND to select an FM band.
- Press TA to activate/deactivate TA.
If you activate TA mode :
-
You will hear the Traffic Announcements when broadcast by station (even if you play a cassette/CD or mute the set).
-
If the tuned station does not enable the reception of Traffic Announcements, the display shows 'NO TA'. The radio automatically searches an appropriate station.
Interrupting Traffic Announcement mode
If you do not wish to continue listening to a particular Traffic Announcement:
- Short press _M key to interrupt Traffic Announcement without switching off the mode.
- The set will return to the previous operating mode.
Note:
You can switch off RDS features if not required.
- Long press RDS key to switch off RDS.
- All RDS related features e.g., TA, etc... will be deactivated when RDS is switch off.
CASSETTE PLAYER *
- Only use good quality cassettes (not longer than C-90).
- To avoid possible tape damage always take out the cassette after use. Protect your cassettes. Put them back in their boxes immediately after use.
- Never expose cassettes to heat or direct sunlight.
PLAYBACK
- Slide the cassette, with the open side to the right into the cassette opening. Playback starts. The direction of playback is shown by indicator .
STOPPING PLAYBACK (▲)
- To stop playback, Press the button fully home.
- The unit will switch over to radio reception.
- The cassette is partially ejected.
REVERSE (before the end of the tape)
- Press the and buttons at the same time halfway in.
FASTREWIND/FASTFORWARD( 一 _ 1 or
The direction of fast winding depends on the direction of play indicated on the display.
Display during Action Key to press playback
| Fast forward | → |
| Fast rewind | ← |
| Fast forward | ← |
| Fast rewind | → |
During fast forward or rewind the radio resumes. If you continue fast winding until the end of the tape, playback restarts automatically.
- Depending on version
TO STOP FAST WINDING
- To stop fast winding before the end of the tape, press the key which is not pressed (or). Playback is then resumed.
English
END OF THE TAPE
At the end of the tape, playback continues in the reverse direction.
MAINTENANCE
After extended use of the cassette player, dust, contamination or grime can accumulate on the playback head.
This results in diminishing high-note reproduction. This can be remedied using a cleaning cassette (once or twice a month) and playing it through like an ordinary cassette.
CD PLAYER*
CD PLAYBACK (CD PLAYER)
This CD player is suitable only for 12cm disc, do not use irregular shaped CD.
- Slide the disc into the slot with label facing upwards. Playback starts.
- If a disc is already inserted : Press SOURCE to select CD as the source. Playback starts.
PREVIOUS/NEXT TRACK (or
- Short press the or button to select the desired track.
-Playback resumes with the chosen track.
FAST REWIND / FAST FORWARD (or
- Long press the or button for more than 2 seconds to quickly move rewind or forward through the disc.
- Normal playback resumes when you release the button.
RANDOM TRACK PLAYBACK
- Press RND to activate/deactivate Random track playback.
REPEAT TRACK
- Press RPT to activate/deactivate Repeat current track.
SCAN TRACK
The scan function enables you to listen to the first few seconds of each track.
- Press SCN to activate/deactivate Scan track.
DISC EJECT (CD PLAYER)
Press to eject the disc.
TROUBLE SHOOTING
There may be times when you suspect that your car radio is not functioning as you would expect it to. Before calling for service, please read the operating / installation instructions and review the following checklists. You may find that an apparent malfunction can easily be rectified. If you still have to send your set for service, always send the complete set (with detachable panel). Do not try to open the set to service it yourself.
Audio
Set does not function. No Display.
- Check fuse (set and car) and connections.
- Check the operating voltage.
Set functions but no sound.
- Adjust the volume of the set.
- Check fader and balance settings.
- Check aerial and its connection.
Radio
Cannot tune to desired station.
- Check that the aerial is fully extended and properly connected.
- Check that the negative terminal (brown lead) is connected to earth (car chassis).
- Desired station is too weak, try Manual Tuning.
Poor tuning reception.
- In some cars (e.g. VW and Seat) there is an active aerial on the roof that needs a 12 Volt supply. Please ask your dealer to check whether a 12 volt is supplied to the antenna.
Display shows frequency (not station name).
- Set is tuned to non-RDS station.
RDS function is switched off.
Radio mutes momentarily while display shows 'SEARCH' and station name/frequency alternately.
- Set is checking a list of Alternative Frequencies (AF) for the tuned radio station as reception is weak. In case no AF is transmitted for the tuned station, switch off AF.
Display shows 'NO TA', and set beeps at intervals. - The tuned station becomes too weak to enable the reception of Traffic Announcements. Use search tuning to find another station.
-
If the TA mode is switched on, search tuning only selects stations which enable the reception of Traffic Announcements.
-
Depending on version
10
Cassette
Display shows 'TAPE ERR'.
- Check cassette for faults.
Cassette playback lacks high-notes or loss of one channel.
- Clean cassette player tape head.
Tape Slack
CD
- Check and make sure any slack in the tape is taken up before inserting the tape into the unit. A loose tape can get caught in the mechanism and cause damage to the unit and tape itself. Tighten the tape by using a pencil or a similar instrument into the spindle hole and turn until all slack has been taken up.
Display shows 'CD ERROR' and set beeps. - Check that the disc have been inserted in the correct way and that you have not inserted a damaged or dirty disc.
Distorted sound during playback. - Player unable to read disc. CD damaged or dirty.
CD player does not function. - If the weather is cold, there may be some condensation on the laser. Use the set in radio mode for about 5 minutes to allow the moisture to evaporate.
Display shows 'NO CD' or 'NO DISC'. - Check that the CD mechanism has been loaded with disc.