
CCHS200MFX - Réfrigérateur CORBERO - Notice d'utilisation et mode d'emploi gratuit
Retrouvez gratuitement la notice de l'appareil CCHS200MFX CORBERO au format PDF.
| Type de four | Encastrable |
| Capacité | Non précisé |
| Type de cuisson | Chaleur tournante, conventionnelle |
| Programmateur | Électronique |
| Commandes | Manettes et écran digital |
| Nettoyage | Non précisé |
| Puissance maximale | Non précisé |
| Classe énergétique | Non précisé |
| Dimensions (HxLxP) | Standard encastrable |
| Type d'ouverture | Abattante |
| Matériau intérieur | Non précisé |
| Fonctions spéciales | Non précisé |
| Éclairage intérieur | Oui |
| Sécurité | Verrouillage enfant possible |
| Alimentation | Électrique |
FOIRE AUX QUESTIONS - CCHS200MFX CORBERO
Questions des utilisateurs sur CCHS200MFX CORBERO
0 question sur cet appareil. Repondez a celles que vous connaissez ou posez la votre.
Poser une nouvelle question sur cet appareil
Téléchargez la notice de votre Réfrigérateur au format PDF gratuitement ! Retrouvez votre notice CCHS200MFX - CORBERO et reprennez votre appareil électronique en main. Sur cette page sont publiés tous les documents nécessaires à l'utilisation de votre appareil CCHS200MFX de la marque CORBERO.
MODE D'EMPLOI CCHS200MFX CORBERO
Corbero
BUILT-IN OVEN HORNO EMPOTRABLE
CCHS100X, CCHS200MFX
USER MANUAL GB MANUAL DE INSTRUCCIONES ES
Dear Customer,
Thank you for relying on this product. We aim to allow you to optimally and efficiently use this environment-friendly product produced in our modern facilities under precise conditions with respect to sense of quality in total.
We advise you to read these operating manual thoroughly before using the oven and keep it permanently so that the features of the built-in oven you have purchased will stay the same as the first day for a long time.
Note: This operating manual is prepared for multiple models. Your appliance may not feature some functions specified in the manual.
The product images are schematic.
This product has been produced in modern environment-friendly facilities without adversely affecting nature.
Products marked with (^*) are optional.
"Complies with WEEE Regulation"
Contents
Important warnings 4
Electrical connection. 12
Introducing the appliance. 13
Accessories 14
Technical specifications. 15
Installation of appliance 15
Control panel. 21
Using the oven. 23
Using the grill 24
Using the chicken roasting 24
Program types. 25
Cooking recommendations 26
Cooking table 27
Baking with pizza stone 28
Maintenance and cleaning 29
Steam cleaning 29
Cleaning and mounting oven door 30
Cleaning oven glass 31
Replacing oven lamp 32
Troubleshooting 33
Handling rules 35
Recommendations for energy saving 35
Environmentally-friendly disposal 36
Package information 36
IMPORTANT WARNINGS
- Installation and repair should always be performed by “AUTHORIZED SERVICE”. Manufacturer shall not be held responsible for operations performed by unauthorized persons.
- Please read this operating instructions carefully. Only by this way you can use the appliance safely and in a correct manner.
- The oven should be used according to operating instructions.
- Keep children below the age of 8 and pets away when operating.
- The accessible parts may be hot during use. Young children must be kept away.
- WARNING: Danger of fire: do not store items on the cooking surfaces.
- WARNING: During use the appliance becomes hot. Care should be taken to avoid touching heating elements inside the oven.
- Setting conditions of this device are specified on the label. (Or on the data plate)
- The accessible parts may be hot when the grill is used. Small children should be kept away.
- WARNING: This appliance is intended for cooking. It should not be used for other purposes like heating a room.
-
To clean the appliance, do not use steam cleaners.
-
Ensure that the oven door is completely closed after putting food inside the oven.
- NEVER try to put out the fire with water. Only shut down the device circuit and then cover the flame with a cover or a fire blanket.
- WARNING: Children less than 8 years of age shall be kept away unless continuously supervised.
- Touching the heating elements should be avoided.
- CAUTION: Cooking process shall be supervised. Cooking process shall always be supervised.
- This appliance can be used by children aged from 8 years and above and persons with reduced physical, sensory or mental capabilities or lack of experience and knowledge if they have been given supervision or instruction concerning use of the appliance in a safe way and understand the hazards involved. Children shall not play with the appliance. Cleaning and user maintenance shall not be made by children without supervision.
- This device has been designed for household use only.
- Children must not play with the appliance. Cleaning or user maintenance of the appliance shall not be performed by children unless they are older than 8 years and supervised by adults.
-
Keep the appliance and its power cord away from children less than 8 years old.
-
Put curtains, tulles, paper or any flammable (ignitable) material away from the appliance before starting to use the appliance. Do not put ignitable or flammable materials on or in the appliance.
- Keep the ventilation channels open.
- The appliance is not suitable for use with an external timer or a separate remote control system.
- Do not heat closed cans and glass jars. The pressure may lead jars to explode.
- Oven handle is not a towel drier. Do not hang towels, etc. on the oven handle.
- Do not place the oven trays, plates or aluminium foils directly on the oven base. The accumulated heat may damage the base of the oven.
- While placing food to or removing food from the oven, etc., always use heat resistant oven gloves.
- Do not use the product in states like medicated and/or under influence of alcohol which may affect your ability of judgement.
- Be careful when using alcohol in your foods. Alcohol will evaporate at high temperatures and may catch fire to cause a fire if it comes in contact with hot surfaces.
- After each use, check if the unit is turned off.
- If the appliance is faulty or has a visible damage, do not operate the appliance.
-
Do not touch the plug with wet hands. Do not pull the cord to plug off, always hold the plug.
-
Do not use the appliance with its front door glass removed or broken.
- Place the baking paper together with the food into a pre-heated oven by putting it inside a cooker or on an oven accessory. (tray, wire grill etc.)
- Do not put objects that children may reach on the appliance.
- It is important to place the wire grill and tray properly on the wire racks and/or correctly place the tray on the rack. Place the grill or tray between two rails and make sure it is balanced before putting food on it.
- Against the risk of touching the oven heater elements, remove excess parts of the baking paper that hang over from the accessory or container.
- Never use it at higher oven temperatures than the maximum usage temperature indicated on your baking paper. Do not place the baking paper on the base of the oven. Against the risk of touching the oven heater elements, remove excess parts of the baking paper that hang over from the accessory or container.
- When the door is open, do not place any heavy object on the door or allow children to sit on it. You may cause the oven to overturn or the door hinges to be damaged.
-
The packaging materials are dangerous for children. Keep packaging materials away from the reach of children.
-
Do not use abrasive cleaners or sharp metal scrapers to clean the glass as the scratches that may occur on the surface of the door glass may cause the glass to break.
- User should not handle the oven by himself.
- During usage, the internal and external surfaces of the oven get hot. As you open the oven door, step back to avoid the hot vapour coming out from the interior. There is risk of burning.
- Do not place heavy objects when oven door is open, risk of toppling.
- Oven supply can be disconnected during any construction work at home. After completing the work, re-connecting the oven shall be done by authorized service.
- User should not dislocate the resistance during cleaning. It may cause an electric shock.
- To prevent overheating, the appliance should not be installed behind of a decorative cover.
- Turn off the appliance before removing the safeguards. After cleaning, install the safeguards according to instructions.
- Cable fixing point shall be protected.
- Please don't cook the food directly on the tray / grid. Please put the food into or on appropriate tools before putting them in the oven.
Electrical Safety
- Plug the appliance in a grounded socket protected by a fuse conforming to the values specified in the technical specifications chart.
- Have an authorized electrician set grounding equipment. Our company shall not be responsible for the damages that shall be incurred due to using the product without grounding according to local regulations.
- The circuit breaker switches of the oven shall be placed so that end user can reach them when the oven is installed.
- The power supply cord (the cord with plug) shall not contact the hot parts of the appliance.
- If the power supply cord (the cord with plug) is damaged, this cord shall be replaced by the manufacturer or its service agent or an equally qualified personnel to prevent a hazardous situation.
- Never wash the appliance by spraying or pouring water on it. There is a risk of electrocution.
- WARNING: To avoid electric shock, ensure that the device circuit is open before changing the lamp.
- WARNING: Cut off all supply circuit connections before accessing the terminals.
- Do not use cut or damaged cords or extension cords other than the original cord.
-
Make sure that there is no liquid or humidity in the outlet where the product plug is installed.
-
The rear surface of the oven also heats up when the oven is operated. Electrical connections shall not touch the rear surface, otherwise the connections may be damaged.
- Do not tighten the connecting cables to the oven door and do not run them over hot surfaces. If the cord melts, this may cause the oven to short circuit and even a fire.
- Unplug the unit during installation, maintenance, cleaning and repair.
- If the power supply cable is damaged, it must be replaced by its manufacturer or authorized technical service or any other personnel qualified at the same level, in order to avoid any dangerous situation.
- Make sure the plug is inserted firmly into wall socket to avoid sparks.
- Do not use steam cleaners for cleaning the appliance, otherwise electric shock may occur.
- An omnipolar switch capable to disconnect power supply is required for installation. Disconnection from power supply shall be provided with a switch or an integrated fuse installed on fixed power supply according to building code.
-
Appliance is equipped with a type "Y" cord cable.
-
Fixed connections shall be connected to a power supply enabling omnipolar disconnection. For appliances with over voltage category below III, disconnection device shall be connected to fixed power supply according to wiring code.
Intended Use
- This product has been designed for domestic use. Commercial use is not permitted.
- This appliance may only be used for cooking purposes. It shall not be used for other purposes like heating a room.
- This appliance shall not be used to heat plates under the grill, drying clothes or towels by hanging them on the handle or for heating purposes.
- The manufacturer assumes no responsibility for any damage due to misuse or mishandling.
- Oven part of the unit may be used for thawing, roasting, frying and grilling food.
- Operational life of the product you have purchased is 10 years. This is the period for which the spare parts required for the operation of this product as defined is provided by the manufacturer.
Electrical Connection
This oven must be installed and connected to its place correctly according to manufacturer instructions and by an authorized service.
Appliance must be installed in an oven enclosure providing high ventilation.
Electrical connections of the appliance must be made only via sockets having earth system furnished in compliance with rules. Contact an authorized electrician if there is no socket complying with the earthed system at where appliance will be placed. Manufacturing company is by no means responsible for damage resulting from connection of non-earthy sockets to appliance.
Plug of your oven must be earthed; ensure that socket for the plug is earthed. Plug must be located in a place that can be accessed after installation.
Your oven has been manufactured as 220-240 V 50/60 Hz. AC power supply compliant and requires a 16 Amp fuse. If your power network is different that these indicated values, refer to an electrician or your authorized service.
When you need to replace the electrical fuse, please ensure that electrical connection is made as follows:
- Phase (to live terminal) brown cable
- Blue cable to neutral terminal
- Yellow-green cable to earth terminal
Oven disconnecting switches must be in an accessible place for final user while oven is in its place.
Power supply cable (plug in cable) mustn't touch hot parts of the appliance.
If supply cord (plug in cable) is damaged, this cord must be replaced by the importer or its service agent or an equally competent personnel to prevent a hazardous situation.
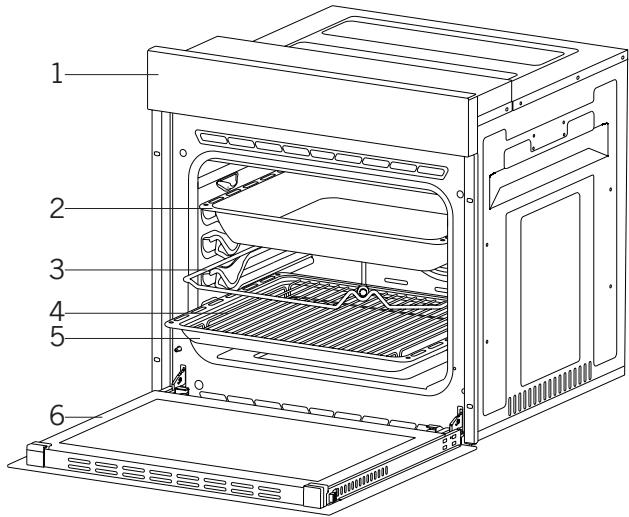
INTRODUCING THE APPLIANCE
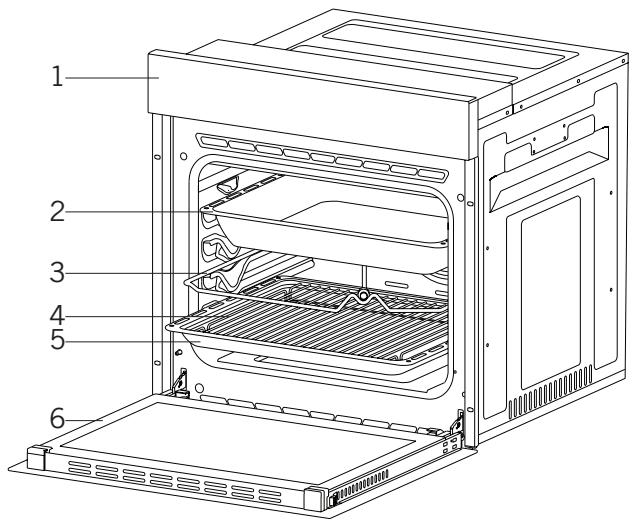
- Control panel
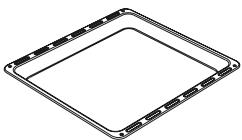
- Deep tray *
-
Roast chicken skewer *
-
In tray wire grill
- Standard tray
- Oven door
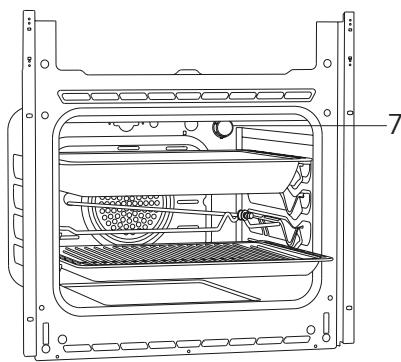
7. Lamp
Accessories (optional)
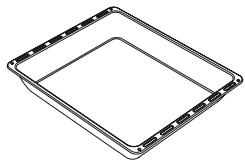
Deep tray *
Used for pastry, big roasts, watery foods. It can also be used as oil collecting container if you roast directly on grill with cake, frozen foods and meat dishes.
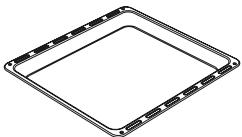
Tray / Glass tray *
Used for pastry (cookie, biscuit etc.), frozen foods.
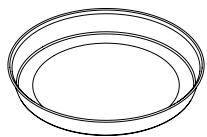
Circular tray *
Used for pastry frozen foods.
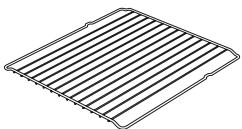
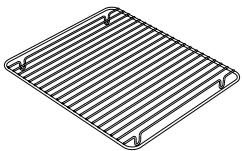
Wire grill
Used for roasting or placing foods to be baked, roasted and frozen into desired rack.
In tray wire grill *
Foods to stick while cooking such as steak are placed on in tray grill. Thus contact of food with tray and sticking are prevented.

Pizza stone and peel *
They are used for baking pastries such as pizza, bread, pancake and removing baked food from the oven.
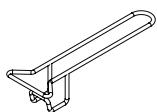
Tray handle *
It is used to hold hot trays.
Technical Specifications
| Specifications | CCHS100X, CCHS200MFX | |||
| Lamp power | 15-25 W | |||
| Thermostat | 40-240 / Max °C | |||
| Lower heater | 1200 W | |||
| Upper heater | 1000 W | |||
| Turbo heater | 1800 W | |||
| Grill heater | Small grill | 1000 W | Big grill | 2000 W |
| Supply voltage | 220V-240 V 50/60 Hz. | |||
Technical specifications can be changed without prior notice to improve product quality.
The values provided with the appliance or its accompanying documents are laboratory readings in accordance with the respective standards. These values may differ depending on the use and ambient conditions.
Figures in this guide are schematic and may not be exactly match your product.
INSTALLATION OF APPLIANCE
Ensure that electrical installation is suitable for operationalising the appliance. If not, call an electrician and plumber to make necessary arrangements. Manufacturing firm can't be hold responsible for damages to arise due to operations by unauthorized people and product warranty becomes void.
WARNING: It is customer's responsibility to prepare the location the product shall be placed on and also have power utility prepared.
WARNING: The rules about electrical local standards must be adhered to during product installation.
WARNING: Check for any damage on the product before installing it. Do not have product installed if it's damaged. Damaged products pose danger for your safety.
ImportantWarnings for Installation:
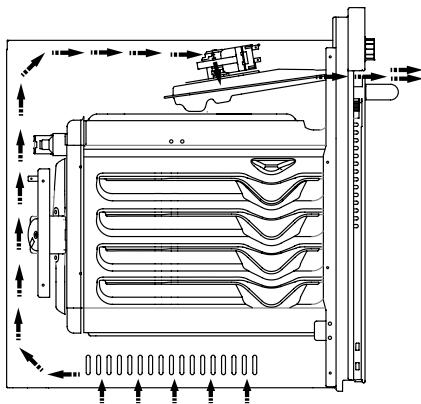
Figure 1
Cooling fan shall take extra steam out and prevent outer surfaces of appliance from overheating during operation of oven. This is a necessary condition for better appliance operation and better cooking. Cooling fan shall continue operation after cooking is finished. Fan shall automatically stop after cooling is completed.
A clearance must be left behind the enclosure where you'll place the appliance for efficient and good operation.
This clearance shouldn't be ignored as it's required for ventilation system of the appliance to operate.
Right Place For Installation
Product has been designed to be mounted to worktops procured from market. A safe distance must be left between the product and kitchen walls or furniture. See the drawing provided on the next page for proper distances. (values in mm).
- Used surfaces, synthetic laminates and adhesives must be heat resistant. (minimum 100^ )
Kitchen cupboards must be level with product and secured. - If there is a drawer below the oven, a rack must be placed between oven and drawer.
WARNING: Do not install the product next to refrigerators or coolers. The heat emitted by the product increases the energy consumption of cooling devices.
WARNING: Do not use door and/or handle to carry or move the product.
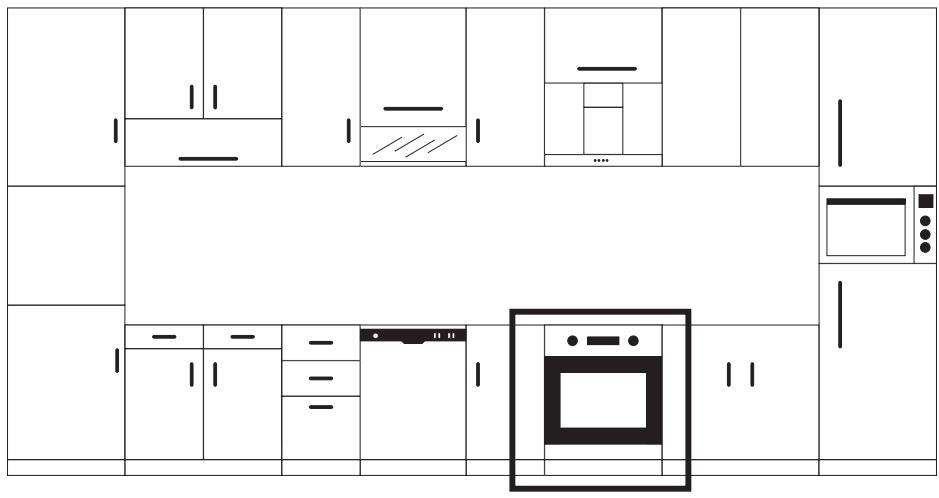
60 cm Built-In Oven Installation And Mounting
Place of use for product must be located before starting installation.
Product mustn't be installed in places which are under the effect of strong air flow.
Carry the product with minimum two people. Do not drag the product so that floor isn't damaged.
Remove all transportation materials inside and outside the product. Remove all materials and documents in the product.
Installation Under Counter
Cabin must match the dimensions provided in figure 2.
A clearance must be provided at the rear part of the cabin as indicated in the figure so that necessary ventilation can be achieved.
After mounting, the clearance between lower and upper part of the counter is indicated in figure 5 with “A”. It’s for ventilation and shouldn’t be covered.
Installation In An Elevated Cabinet
Cabin must match the dimensions provided in figure 4.
The clearances with the dimensions indicated in the figure must be provided at the rear part of cabin, upper and lower sections so that necessary ventilation can be achieved.
Installation Requirements
Product dimensions are provided in the figure 3.
Furniture surfaces for mounting and mounting materials to be used must have a minimum temperature resistance of 100^ .
Mounting cabin must be secured and its floor must be plane for product not to tilt over.
Cabin floor must have a minimum strength that would handle a load of 60kg .
Placing And Securing The Oven
Place the oven into the cabin with two or more people.
Ensure that oven's frame and front edge of the furniture match uniformly.
Supply cord mustn't be under the oven, squeeze in between oven and furniture or bend.
Fix the oven to the furniture by using the screws provided with the product. Screws must be mounted as shown in figure 5 by passing them through plastics attached to frame of the product. Screws mustn't be overtightened. Otherwise, screw sockets might be worn.
Check that oven doesn't move after mounting. If oven isn't mounted in accordance with instructions, there is a risk of tilt over during operation.
Electrical Connection
Mounting place of the product must have appropriate electrical installation.
Network voltage must be compatible with the values provided on type label of product.
Product connection must be made in accordance with local and national electrical requirements.
Before starting the mounting disconnect network power. Do not connect the product to network until its mounting is completed.
Mounting
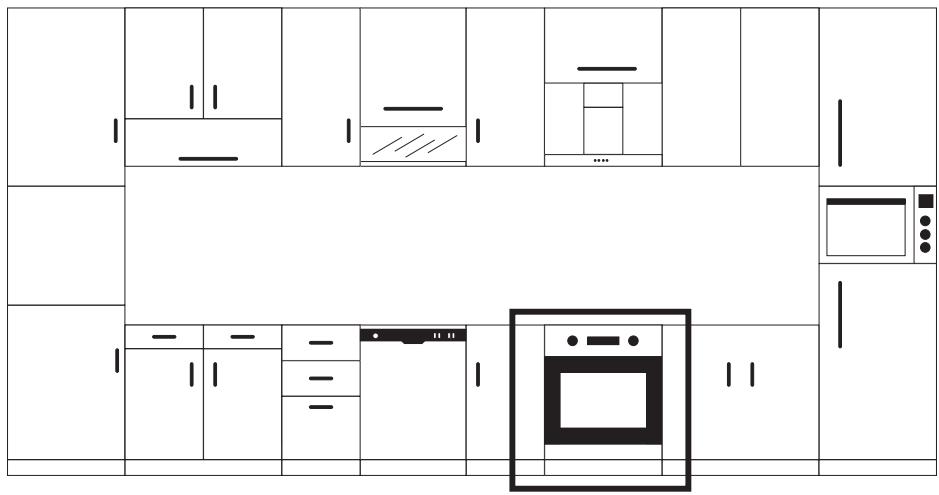
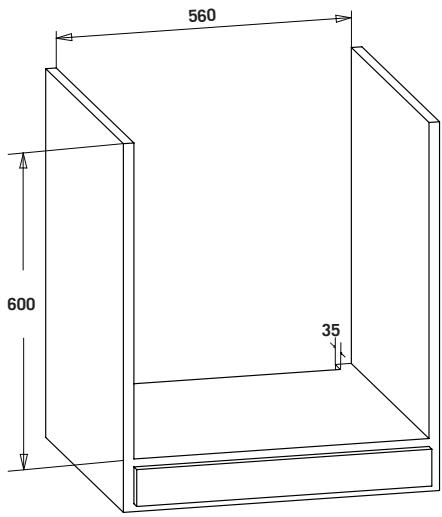
Figure 2
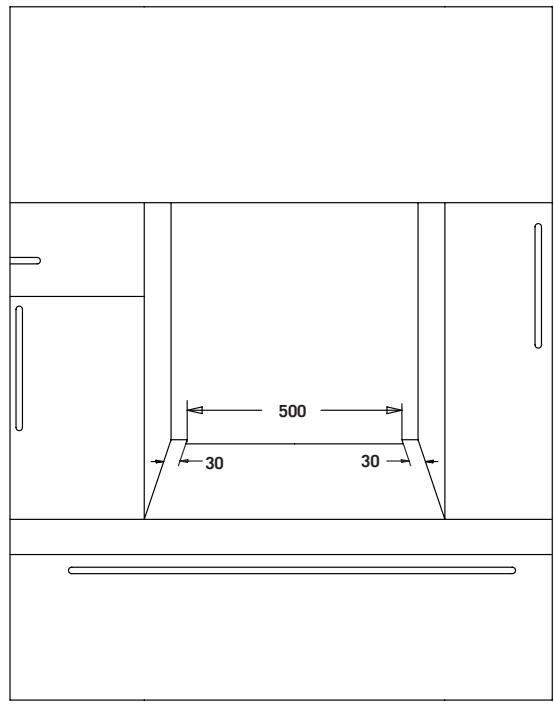
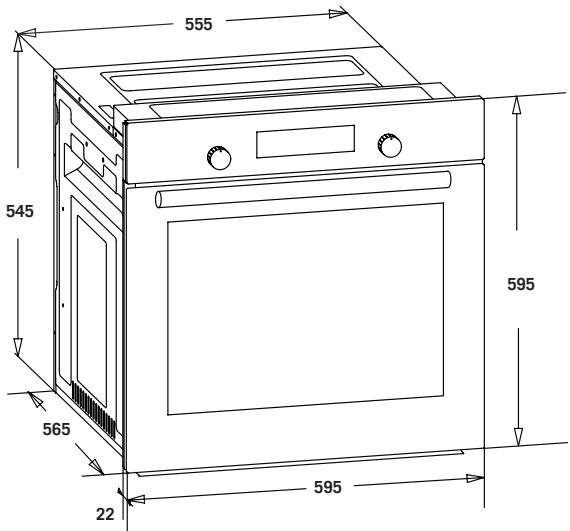
Figure 3

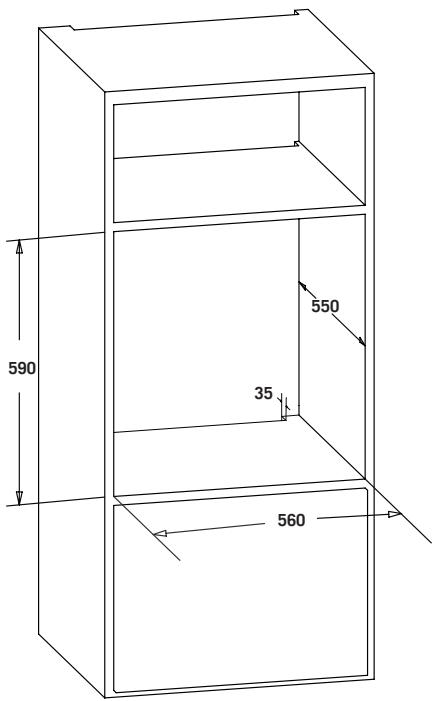
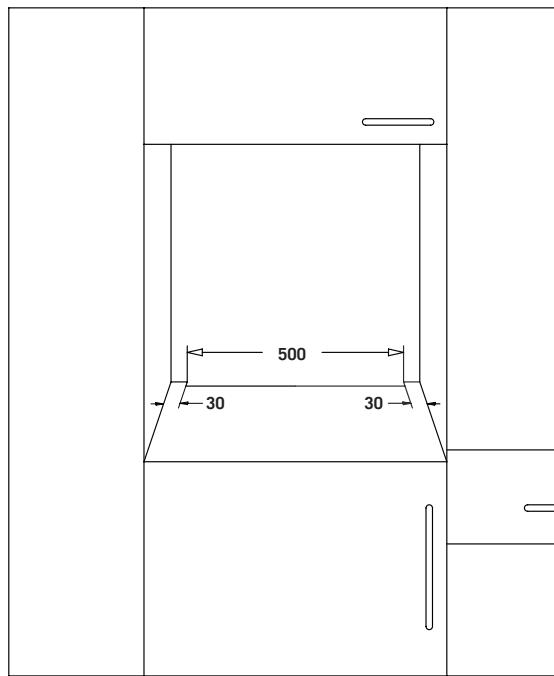
Figure 4

Figure 5
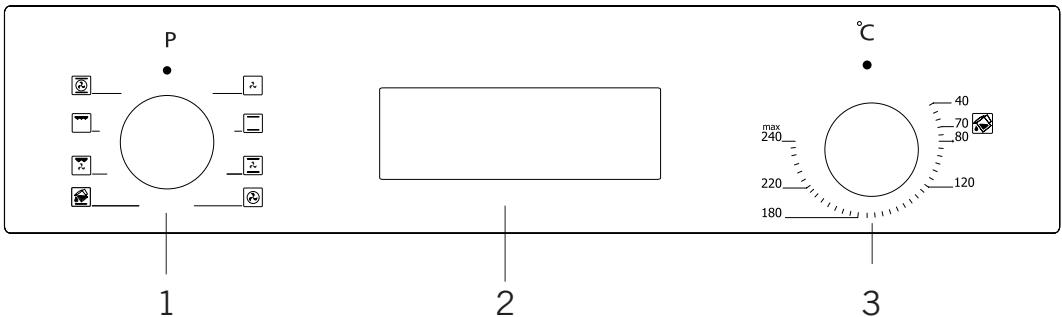
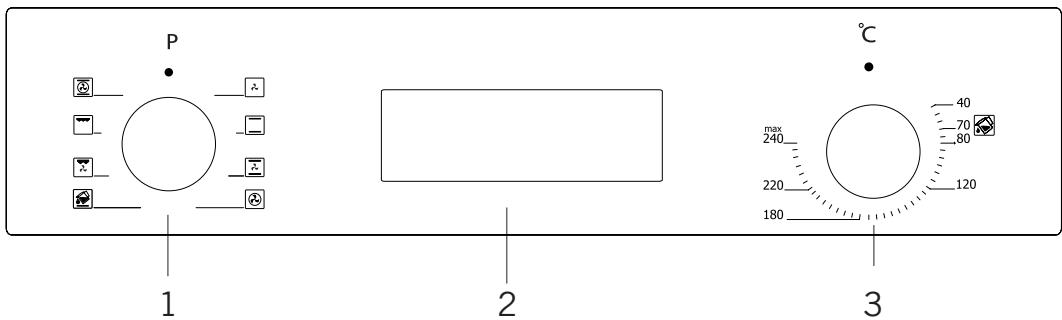
CONTROL PANEL
- Function button
- Mechanical or digital timer
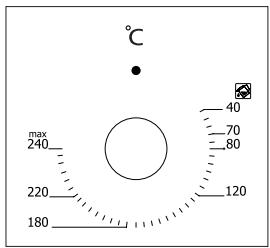
- Thermostat
WARNING: The control panel above is only for illustration purposes. Consider the control panel on your device.
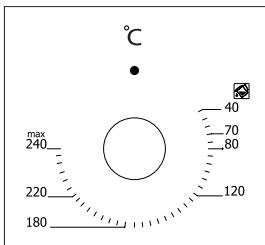
Thermostat Button: Helps to set cooking temperature of the food to be cooked in the oven. You can set the desired temperature by turning the button after placing the food into the oven. Check cooking table related to cooking temperatures of different foods.
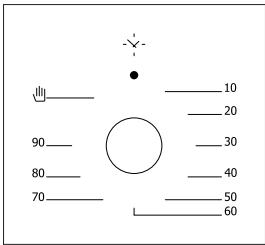
Mechanical Timer Button*: Helps to set time for the food to be cooked in the oven. Timer de-energizes the heaters when set time expires and warns you by ringing. See cooking table for cooking times.
USING THE OVEN
Initial Use Of Oven
Here are the things you must do at first use of your oven after making its necessary connections as per instructions:
- Remove labels or accessories attached inside the oven. If any, take out the protective folio on front side of the appliance.
- Remove dust and package residues by wiping inside of the oven with a damp cloth. Inside of oven must be empty. Plug the cable of appliance into the electrical socket.
- Set the thermostat button to the highest temperature (240 Max. °C) and run the oven for 30 minutes with its door closed. Meanwhile a slight smoke and smell might occur and that's a normal situation.
- Wipe inside of the oven with a slightly warm water with detergent after it becomes cold and then dry with a clean cloth. Now you can use your oven.
Normal Use Of Oven
- Adjust thermostat button and temperature at which you want to cook the food to start cooking.
- You can set cooking time to any desired time by using the button at models with mechanical timer. Timer will de-energize heaters when time expired and provide warning beep as ringing.
- Timer turns the heaters off and provides audible signal when cooking time expires in line with the information entered in the models with digital timer.
- Cooling system of the appliance will continue to operate after cooking is completed. Do not cut the power of appliance in this situation which is required for appliance to cool down. System will shut down after cooling is completed.
Using The Grill
- When you place the grill on the top rack, the food on the grill shall not touch the grill.
- You can preheat for 5 minutes while grilling. If necessary, you may turn the food upside down.
- Food shall be in the center of the grill to provide maximum air flow through the oven.
To turn on the grill;
- Place the function button over the grill symbol.
- Then, set it to the desired grill temperature.
To turn the grill off;
Set the function button to the off position.
WARNING: Keep the oven door closed while grilling.
Using The Chicken Roasting *
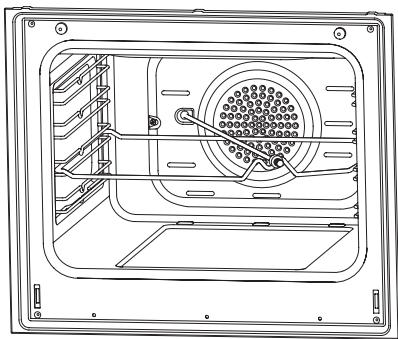
Figure 6
Place the spit on the frame. Slide turn spit frame into the oven at the desired level. Locate a dripping pan through the bottom in order to collect the fast. Add some water in dripping pan for easy cleaning. Do not forget to remove plastic part from spit. After grilling, screw the plastik handle to the skewer and take out the food from oven.
PROGRAM TYPES
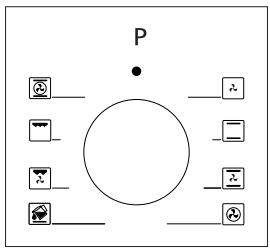
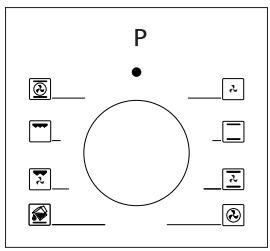
Program Button: Helps to set with which heaters the food placed in oven will be cooked. Heater program types in this button and their functions are stated below. Every model might not have all heater types and thus program types of these heaters.
Heating program types in your appliance and important explanations of them are provided below for you can cook different foods appealing to your taste.
| Lower and upper heating Elements | Fan | ||
| Lower heating element and fan | Turbo heater and fan | ||
| Grill and roast chicken | Lower-upper heating element and fan | ||
| Upper heating element and fan | Grill and fan | ||
| Multifunctional cooking (3D) | Grill | ||
| Lower heating element | Upper heating element | ||
| Small grill and fan | Steam cleaning |
Lower heating element: Select this program towards end of cooking time if lower part of the food cooked will be roasted.
Upper heating element, Upper heating element and fan: Used for post heating or roasting very little pieces of foods.
Lower and upper heating elements: A program that can be used for cooking foods like cake, pizza, biscuit and cookie.
Lower heating element and fan: Use mostly for cooking foods like fruit cake.
Lower and upper heating element and fan: The program suitable for cooking foods like cakes, dried cakes, lasagne. Suitable for cooking meat dishes, as well.
Grill: Grill cooker is used for grilling meat like foods such as steak, sausage and fish. While grilling, tray should be placed in the lower rack and water must be placed in it.
Turbo heater and fan: Suitable for baking and roasting. Keep heat setting lower than "Lower and Upper Heater" program since heat is conveyed immediately via air flow.
Grill, Small grill and fan: Suitable for cooking meat type foods. Do not forget to place a cooking tray in a lower rack inside the oven and a little water in it while grilling.
Multi Functional Cooking (3D): Suitable for baking and roasting. Lower and upper heaters operate as well as quick transmission of heat via air flow. Suitable for cooking requiring single tray and intense heat.
Fan: For defrosting e.g.meat, poultry, bread and cakes. The fan causes the air to circulate around the dish.
Steam cleaning: It enables cleaning the soils softened thanks to the steam to be generated in the oven.
Grill and roast chicken: It is used for roasting poultry animals such as chicken.
COOKING RECOMMENDATIONS
You can find in the following table the information of food types which we tested and identified their cooking values in our labs. Cooking times can vary depending on the network voltage, quality of material to be cooked, quantity and temperature. Dishes to cook by using these values might not appeal to your taste. You can set various values for obtaining different tastes and results appealing to your taste by making tests.
WARNING: Oven must be preheated for 7-10 minutes before placing the food in it.
Cooking Table
CCHS100X, CCHS200MFX
| Food | Cooking function | Cooking temperature (℃) | Cooking rack | Cooking time (min.) |
| Cake | Static / Static+fan | 170-180 | 2-3 | 35-45 |
| Small cake | Static / Turbo+fan | 170-180 | 2 | 25-30 |
| Pie | Static / Static+fan | 180-200 | 2 | 35-45 |
| Pastry | Static | 180-190 | 2 | 20-25 |
| Cookie | Static | 170-180 | 2 | 20-25 |
| Apple pie | Static / Turbo+fan | 180-190 | 1 | 50-70 |
| Sponge cake | Static | 200/150 * | 2 | 20-25 |
| Pizza | Static fan | 180-200 | 3 | 20-30 |
| Lasagne | Static | 180-200 | 2-3 | 25-40 |
| Meringue | Static | 100 | 2 | 50 |
| Grilled chicken ** | Grill+fan | 200-220 | 3 | 25-35 |
| Grilled fish ** | Grill+fan | 200-220 | 3 | 25-35 |
| Calf steak ** | Grill+fan | Max | 4 | 15-20 |
| Grilled meatball ** | Grill+fan | Max | 4 | 20-25 |
- Do not preheat. First half of cooking time is recommended to be at 200^ de while the other half at 150^ .
** Food must be turned after half of the cooking time.
Baking With Pizza Stone
When baking with pizza stone, place pizza stone over wire rack and pre-heat the oven in pizza mode (turbo + lower) at 230^ for 30 minutes. Once pre-heating is completed, without removing pizza stone put pizza over it with the peel (do not place frozen pizza) and bake at 180^ for 20-25 minutes. Once baking is completed, remove the baked pizza from the oven using the peel.
WARNING: Do not place pizza stone in a pre-heated oven.
WARNING: Once baking is completed, do not remove pizza stone when it is hot and do not place on cold surfaces. Otherwise, pizza stone can be cracked.
WARNING: Do not expose pizza stone to humidity.
MAINTENANCE AND CLEANING
- Remove the power plug from electrical socket.
- Do not clean inner parts, panel, trays and other parts of the product with hard tools such as bristle brush, wire wool or knife. Do not use abrasive, scratching materials or detergent.
- Rinse after wiping the parts at inner parts of the product with soapy cloth, then dry thoroughly with a soft cloth.
- Clean glass surfaces with special glass cleaning material.
- Do not clean your product with steam cleaners.
- Never use combustibles like acid, thinner and gas while cleaning your product.
- Do not wash any part of the product in dishwasher.
- Use potassium stearate (soft soap) for dirt and stains.
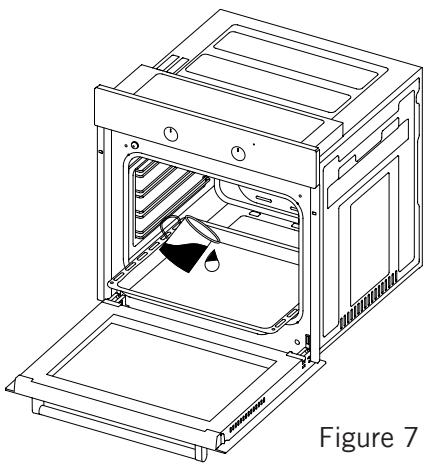
Steam Cleaning *
It enables cleaning the soils softened thanks to the steam to be generated in the oven.
1.Remove all the accessories in the oven.
2. Pour a half litre of water into the tray and Place the tray at the bottom of the boiler.
3. Set the switch to the steam cleaning mode.
4. Set the thermostat to 70^ C degrees and operate the oven for 30 minutes.
- After operating the oven for 30 minutes, open the oven door and wipe the inner surfaces with a wet cloth.
- Use dish-washing liquid, warm water and a soft cloth for stubborn dirt, then dry off the area you have just cleaned with a dry cloth.
Cleaning And Mounting Oven Door
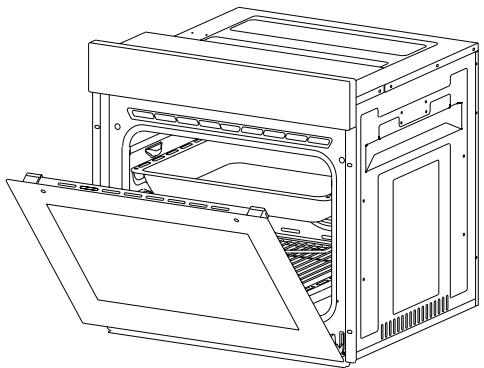
Figure 8

Figure 9
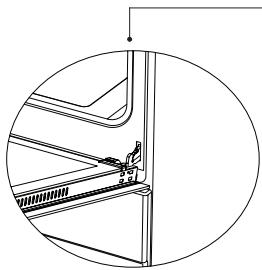
Figure 8.1
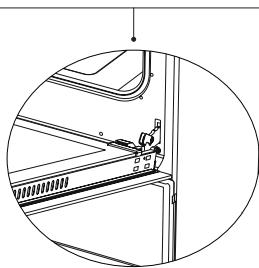
Figure 8.2
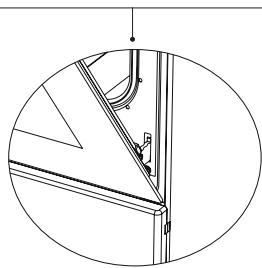
Figure 9.1

Figure 9.2
Open the door fully by pulling the oven door toward yourself. Then perform unlock operation by pulling the hinge lock upwards with the aid of screwdriver as indicated in
figure 8.1.
Set the hinge lock to the widest angle as in figure 8.2. Adjust both hinges connecting oven door to the oven to the same position.
Later, close the opened oven door so that it will be in a position to contact with hinge lock as in figure 9.1.
For easier removal of oven door, when it comes close to closed position, hold the cover with two hands as in figure 9.2 and pull upwards.
Reversely perform respectively what you did while opening door to reinstall oven door back.
Cleaning Of The Oven Glass
Your product may differ. Follow the appropriate step for your product.
- Press the plastic latches on the left and right sides as shown in Figure 10 and lift the the profile by pulling it towards you as shown in Figure 11. Glass will be free after the profile is removed as shown in Figure 12. Carefully pull the glass that has become free toward you. If necessary, the middle glass can also be removed in the same way. The outer glass is fixed to the oven door profile. You may easily clean the glasses after they have been separated. Once the cleaning and maintenance is complete, you can replace the glasses and the profile by performing the removal procedure in reverse. Make sure that the glass is inserted in the correct direction and that the profile is seated properly.
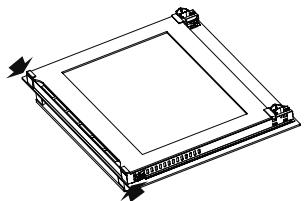
Figure 10
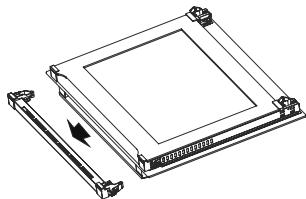
Figure 11
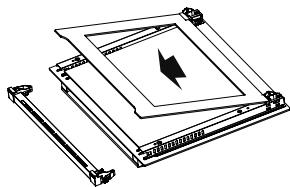
Figure 12
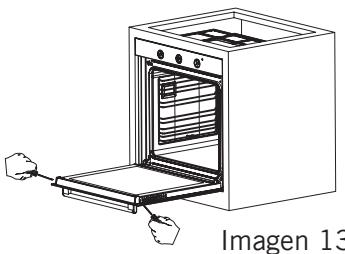
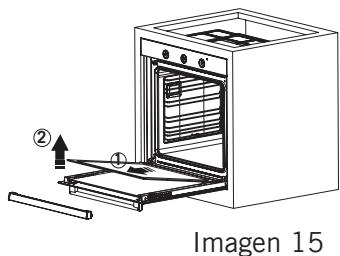
- Remove the screws on the left and right sides as shown in Figure 13. Remove the profile by pulling it towards you as shown in Figure 14. Glass will be free after the profile is removed as shown in Figure 15. Carefully pull the glass that has become free toward you. If necessary, the middle glass can also be removed in the same way. The outer glass is fixed to the oven door profile. You may easily clean the glass once it has been released. Once the cleaning and maintenance is complete, you can replace the glasses and the profile by performing the removal procedure in reverse. Make sure that the glass is inserted in the correct direction and that the profile is seated properly.
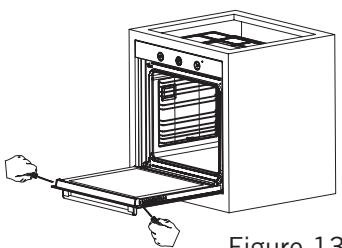
Figure 13
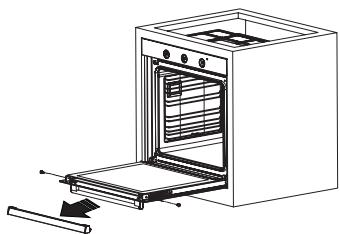
Figure 14
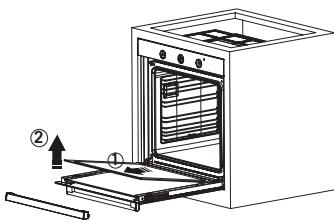
Figure 15
Replacing Oven Lamp
WARNING: To avoid electric shock, ensure that the appliance circuit is open before changing the lamp. (having circuit open means power is off) First disconnect the power of appliance and ensure that appliance is cold.
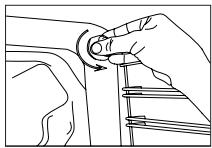
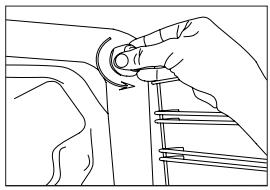
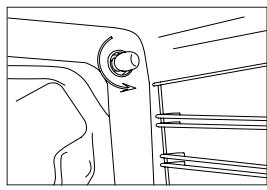
Remove the glass protection by turning as indicated in the figure on the left side. If you have difficulty in turning, then using plastic gloves will help you in turning.
Then remove the lamp by turning, install the new lamp with same specifications.
Reinstall glass protection, plug the power cable of appliance into electrical socket and complete replacement. Now you can use your oven.
Type G9 Lamp
220-240 V, AC
15-25 W
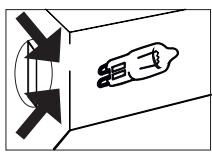
Figure 16
Type E14 Lamp

220-240 V, AC 15 W
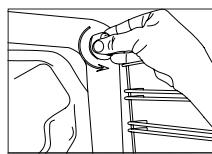
Figure 17
TROUBLESHOOTING
You may solve the problems you may encounter with your product by checking the following points before calling the technical service.
Check Points
In case you experience a problem about the oven, first check the table below and try out the suggestions.
| Problem | Possible Cause | What to Do |
| Oven does not operate. | Power supply not available. | Check for power supply. |
| Oven stops during cooking. | Plug comes out from the wall socket. | Re-install the plug into wall socket. |
| Turns off during cooking. | Too long continuous operation. | Let the oven cool down after long cooking cycles. |
| Cooling fan not operating. | Listen the sound from the cooling fan. | |
| Oven not installed in a location with good ventilation. | Make sure clearances specified in operating instructions are maintained. | |
| More than one plugs in a wall socket. | Use only one plug for each wall socket. | |
| Outer surface of the oven gets very hot during operation. | Oven not installed in a location with good ventilation. | Make sure clearances specified in operating instructions are maintained. |
| Oven door is not opening properly. | Food residues jammed between the door and internal cavity. | Clean the oven well and try to re-open the door. |
| Internal light is dim or does not operate. | Foreign object covering the lamp during cooking. | Clean internal surface of the oven and check again. |
| Lamp might be failed. | Replace with a lamp with same specifications. | |
| Electric shock when touching the oven. | No proper grounding. | Make sure power supply is grounded properly. |
| Ungrounded wall socket is used. | ||
| Water dripping. | Water or steam may generate under certain conditions depending on the food being cooked. This is not a fault of the appliance. | Let the oven cool down and than wipe dry with a cloth. |
| Steam coming out from a crack on oven door. | ||
| Water remaining inside the oven. | ||
| The cooling fan continues to operate after cooking is finished. | The fan operates for a certain period for ventilation of internal cavity of the oven. | This is not a fault of the appliance; therefore you don't have to worry. |
| Oven does not heat. | Oven door is open. | Close the door and restart. |
| Oven controls not correctly adjusted. | Read the section regarding operation of the oven and reset the oven. | |
| Fuse tripped or circuit breaker turned off. | Replace the fuse or reset the circuit breaker. If this is repeating frequently, call an electrician. | |
| Smoke coming out during operation. | When operating the oven for the first time | Smoke comes out from the heaters. This is not a fault. After 2-3 cycles, there will be no more smoke. |
| Food on heater. | Let the oven to cool down and clean food residues from the ground of the oven and surface of upper heater. | |
| When operating the oven burnt or plastic odour coming out. | Plastic or other not heat resistant accessories are being used inside the oven. | At high temperatures, use suitable glassware accessories. |
| Oven does not cook well. | Oven door is opened frequently during cooking. | Do not open oven door frequently, if the food you are cooking does not require turning. If you open the door frequently internal temperature drops and therefore cooking result will be influenced. |
HANDLING RULES
- Do not use the door and/or handle to carry or move the appliance.
- Carry out the movement and transportation in the original packaging.
- Pay maximum attention to the appliance while loading/unloading and handling.
- Make sure that the packaging is securely closed during handling and transportation.
- Protect from external factors (such as humidity, water, etc.) that may damage the packaging.
- Be careful not to damage the appliance due to bumps, crashes, drops, etc. while handling and transporting and not to break or deform it during operation.
RECOMMENDATIONS FOR ENERGY SAVING
Following details will help you use your product ecologically and economically.
- Use dark coloured and enamel containers that conduct the heat better in the oven.
- As you cook your food, if the recipe or the user manual indicates that pre-heating is required, pre-heat the oven.
- Do not open the oven door frequently while cooking.
- Try not to cook multiple dishes simultaneously in the oven. You may cook at the same time by placing two cookers on the wire rack.
- Cook multiple dishes successively. The oven will not lose heat.
- Turn off the oven a few minutes before the expiration time of cooking. In this case, do not open the oven door.
- Defrost the frozen food before cooking.
ENVIRONMENTALLY-FRIENDLY DISPOSAL
Dispose of packaging in an environmentally-friendly manner.
This appliance is labelled in accordance with European Directive 2012/19/EU concerning used electrical and electronic appliances (waste electrical and electronic equipment - WEEE). The guideline determines the frame work for the return and recycling of used appliances as applicable throughout to the EU.
PACKAGE INFORMATION
Packaging materials of the product are manufactured from recyclable materials in accordance with our National Environment Regulations. Do not dispose of the packaging materials together with the domestic or other wastes. Take them to the packaging material collection points designated by the local authorities.
Estimado CLIENTE,
Gracias por confiar en este producto.
Nuestro objetivo es que pueda usar de manière optima y eficiente este producto respetuoso con el medio ambiente fabricado en{nuezas modernas instalaciones bajo conditiones optimas en cuando a la calidad global.
Le acontejos leer este manual de instrucciones en su totalidad antes de usar el hora y guardarlo para siempre para que las caracteristicas del hora incorporado que ha adquirido permanezcan igual que el primer día durante是多么 tiempo.
Note: Este manual de instrucciones sirve para various modelos. Puede que su aparato no cuente con todas las/DDesnas descritas en el manual.
Las imagenes del producto son esquemáticas.
Este produit ha sido fabricado en instalaciones modernas respetuosas con el medio ambiente sin perjudicar la naturaleza.
Los productos con un asterisco (*) son-optionales.
«Cuple con la normativa AEEE»
Contenidos
Advertencias importantes 39
Conexión electrica 48
Presentación del aparato. 49
Accesorios 50
Especificaciones sociales. 51
Instalacion del aparato. 51
Panel de control 57
Uso del hora. 59
Uso de la parrilla 60
Uso del asador de pollo. 60
Tipos de programas 61
Recomendaciones acerca de la coccion 62
Tabla de coccción 63
Hornear con la piedra para pizzas 64
Mantenimiento y limpieza 65
Limpieza con vapor 65
Limpieza y montaje de la puerta del hora. 66
Limpieza del cristal delorno 67
Recambio de la luz del hora. 68
Solucn de problemas 69
Reglas de Manipulacion 71
Recomendaciones para el ahorro de energia 71
Eliminación respetuosa con el medio ambiente. 72
Información sobre el embalaje 72
ADVERTENCIAS IMPORTANTES
- La instalación y la reparación siempre deben ser realizadas por el "SERVICIO AUTORIZADO". El fabricante no se hace responsable de las operaciones realizadas por personas no autorizadas.
- Lea atentamente estas instrucciones de funciona bajo. Solo de esta waya possible usear el dispositivo de forma segura y correcta.
- El hora debe usese de acuerdo con las instrucciones de funcionaimiento.
- Mantenga a los niños menos de 8 años y a las mascotas alejados cuando opere.
- Las partes accesibles peuvent calentarse durante el uso. Los niños deben mantenerse lejos.
- ADVERTENCIA: Peligro de incendio: no almacene articulos que en las superficies de cocción.
- ADVERTENCIA: El aparato se calienta durante su uso. Debe tenerse cuidado de no tocar los calentadores del interior delorno.
- Las conditiones de configuración de este dispositivo se specifiesan en la etiqueta. (O en la placá de datos)
- Las partes accesibles peuvent estar calientes cuando se usa la parrilla. Los niños pequeños deben mantenerse lejos.
-
ADVERTENCIA: Este aparato está Diseñado para cocinar. No debe utilizes para otros propósitos, como para calefaction.
-
Para limpiar el aparato, no use limpiadores de vapor.
- Asegúrese de que la puerta delorno esté Completely cerrada cuando se colocar los alimentos bajo delorno.
- NO TRATE NUNCA de apagar el fuego con agua. Solo apague el circuito del dispositivo y luigo cubra la llama con una cubierta o una manta ignífuga.
- ADVERTENCIA: Los niños menos de 8 años de edad debenmantenerse lejos menos que Sean supervisados continually.
- Debe evitarse tocar los elementos calientes.
- PRECAUCION: El proceso de coccción deben ser supervisado. El proceso de coccción siempre deben ser supervisado.
- Este aparato pueda ser utilisé por niños de 8 años y mayores y las personas con capacities físicas, sensoriales o mentales reduidas o falta de experiencia y conocimiento, si se les ha sido la supervisión o instrucciones relativas al uso del aparato de unaforma segura y comprenden lospeligos involucrados.Los niños no debenigar con el aparato. Los niños no deben realizar la limpieza y elostenimiento sin estar vigilados por parte de unadulto.
-
Este dispositivo ha sido Diseñado solo para uso doméstico.
-
Los niños no deben hacer algo con el aparato. La limpieza o el mantenimiento al aparato por parte del usuario no debe ser realizado por niños a menos que Sean mayores de 8 años y Sean supervisas por niños.
- Mantenga el aparato y su cable de alimentación lejos de niños menos de 8 años.
- Coloque cortinas, tul, papel orialquier material inflamabile (inflammable) lejos del aparato antes de comenzar a usarlo. No colque materiales inflamables encima o dentro del aparato.
- Mantenga abiertos los canales de ventilación.
- El aparato no esADEUCADO para su uso con un temporizador externo o un sistemas de control remoto por分开ado.
- No caliente latas cerradas ni frascos de vidrio. La presión puedeninger a los tarros a explotar.
- El asa del hora no es un colgador de toallas. No suegle toallas, etc. en el asa del hora.
- No coloque las bandejas del hora, platos u hojas de aluminio directamente sobre la base del hora. El calor acumulado pueda darar la base del hora.
- Mientras colocan alimentos o retina alimentos delorno,etc.,siempre use guantes resistentes al calor.
-
No use el producto estando bajo medicación y/o bajo la influencia del alcohol, que pueda afectar su capacité de buenajuanicio.
-
Tenga cuidado al usar alcohol en sus alimentos. El alcohol se evaporará a altas temperatas y pueda prenderse fuego y causar un incendio si entra en contacto con superficies calientes.
- Después de cada uso, verifique si launidad está apagada.
- Si el aparato está defectuoso o tiene un daño visible, no lo haga funciona.
- No toque el enchufe con las manos mojadas. Notire del cable para desconectarlo, siempre sostenga el enchufe.
- No use el aparato con el cristal de la puerta frontal retardado o roto.
- Coloque el papel de hornear junto con la comida en unorno precalentado poniedolo bajo de una olla o en un accesorio de hora (bandeja, parrilla de alambre, etc.).
- No Coloque objetos que poderan alcantar los niños en el aparato.
- Es importante colocar la parrilla de alambre y la bandeja correctamente en los estantes de alambre y/o colocar correctamente la bandeja en el estante. Coloque la parrilla o bandeja entre dos rieles y asegürese de que está equilibrada antes deponer comida sobre ella.
-
Contra el riesgo de tocar los elementos del calentador del hora, retire las partes sobrantes del papel de hornear que@cuelgan del accesorio o contentedor.
-
Nunca lo use a temperatas de hora superiores a la temperature de uso maxima indica en su papel de hornear. No coloque el papel de hornear en la base del hora. Con el fin de evaporar el riesgo de tocar las partes calientes y quemadores del hora, retire el excesso de papel de hornear colgante del accesorio o contentedor.
- Cuando la puerta está abierta, no coloque ningún objeto pesado sobre la puerta ni permitita que los niños se sienten en ella. Puede hacer que elorno vuelque o que las bisagras de la puerta se danen.
- Los materiales de embalaje son peligrosos para los niños. Mantenga los materiales de embalaje lejos del alcance de los niños.
- No utilise limpiadores abrasivos ni raspadores metálicos aflados para limpar el cristal, ya que los arañazos que pueda ocurrir en la superficie del cristal de la puerta pueda hacer que el cristal se rompa.
- El usuario no deben manejar el hora solo.
- Durante el uso, las superficies internas y externas delorno se calientan. Cuando abra la puerta del hora, retroceda para evapor que salga vapor caliente del interior. Hay riesgo de quemaduras.
- No coloque objetos pesados cuando la puerta del hora está abierta, existe el riesgo de que se voltee.
-
El usuario no deben dislocar la resistencia durante la limpieza. Puede causar una descarga electrica.
-
El suministro del hora se pueda desconectar durante在哪quier trabajo de construccion en el hogar. Despues de completar el trabajo,ylvania a conectar el hora debe ser hecho por un serviceo autorizzato.
- Para evaporar el sobrecalentamento, el aparato no debe instalarse detrás de una cubierta decorativa.
- Apague el aparato antes de quitar las protecciones. Después de limpar, instale las protecciones de acuerdo con las instrucciones.
- El punto de fijación del cable debe estar protegado.
- No cocine la comida directamente en la bandeja/ rejilla. Por favor, ponga la comida en las herramrientas adecuadas antes de ponerlas en elorno.
Seguridad electrica
- Conecte el aparato a un enchufe con conexión a tierra protegido por un fusible que cumpla con los valores especializados en el cuadro de specifications sociales.
- Haga que un electricista autorizo instale un equipo de puesta a tierra. NuestraEmpresa no sera responsable por los daños que se incuriránupon al uso del producto sin connexion a tierra de acuerdo con las reglamentaciones locales.
-
Los interruptores automaticos del hora deben colocarse de modo que el usuario final pueda alcanzarlos cuando el hora está instalado.
-
El cable de alimentación (el cable con enchufe) no debe entrada en contacto con las partes calientes del dispositivo.
- Si el cable de suministro de energia (el cable con enchufe) está dañado, este cable debe ser reemplazado por el fabricante o su agente de servicios o un personal igualmente calificado paraataruna situación peligrosa.
- NUNCA lave el producto rociando o vertiendo agua sobre él! Existe el riesgo de electrucución.
- ADVERTENCIA: Paraatardescargaselectricas, aseguesede que el circuitodeldispositivoesté abierto antes dechangiar lalampara.
- ADVERTENCIA: Corte todas las conexiones del circuito de suministro antes de acceder a las terminales.
- No use cables cortados o dañados o cables de extensión que no sean el cable original.
- Asegúrese de que no haya liquido o humedad en el tomacorriente donde está instalado el enchufe del producto.
- La superficie posterior delorno también se calienta cuando se opera el hora. Las conexiones electrolyticas no deben tocar la superficie posterior, de lo contrario, las conexiones podrjan dañarse.
-
No apriete los cables de connexion a la puerta delorno y no los applique sobre superficies calientes. Si el cable se derrite, este peut provocar un cortocircuito en elorno e incluo un incendio.
-
Desenchufe launidad durante la instalación, mantenimiento, limpieza y reparación.
- Si el cable de alimentación está dañado, debe ser reemplazado por su fabricante o servicios专业技术o autorizzato o cualquier(other personal calificado en el mesmo;nivel, para evaporar cualquier situación peligrosa.
- Asegürese de que el enchufe está insertado firmamente en el tomacorriente de la pared para evaporar chispas.
- No use limpiadores a vapor para limpar el aparato, de lo contrary你能ocrurrir una descarga electrica.
- Se requires un interruptor omnipolar capaz de disconnectar la fuente de alimentacion para la instalacion. La desconexión de la fuente de alimentacion debe proporcionarse con un interruptor o un fusible integrado instalado en una fuente de alimentacion fija de acordo con el número de construction.
- El dispositivo está equipado con un cable tipo "Y".
- Las conexiones fijas se deben conectar a una fuente de alimentación que permita la desconexión omnipolar. Para dispositivos con categoria de sobretensión por debajo de III, el dispositivo de desconexión se conectará a la fuente de alimentación fija de acuerdo con el número de cableado.
Uso previsto
- Este aparato está Diseñado para uso en el hogar. El uso comercial del aparato no está permitted.
- Este aparato solo se pueda usar para cocinar. NoDebe usarse paraOthers fines, como calendar una habitación.
- Este aparato no debe usarse para calentar placas debajo de la parrilla, para secar la ropa o las toallas colgándolas en el asa o con fines de calefacción.
- El fabricante no asume ninguna responsabilidad por los días debidos al mal uso o mal manejo.
- La parte del hora de la unidad se pueda usar paradescendingel, asar, freir y asar alimentos.
- La vida operativa del producto que ha comprado es de 10 años. Este es el periodo durante elrial el fabricante proportiónal los recambios你需要os para el funcionaimiento de este producto segun lo definido.
Conexión Eléctrica
Debe instalar y conectar el hora en su situó correctamente según las instrucciones del fabricante de la mano de un servicios técnico autorizzato.
Debe instalar el aparato en una caja para hora con mucha ventilación.
Las conexiones electricas del aparato debenelligence a cabo unicamente con enchufescon conexiona tierra, instalados conforme las normativas. Contacte con un electricista autorizzato si no hay ningún enchufe con conexión a tierra donde vaya a colocarse el aparato. El fabricante no se responsabilizará de ningunaforma por los daños causados por la conexión de enchufes sin conexión a tierra al aparato.
El enchufe delorno debeetenerconexiona tierra.Aseguressede que el enchufeonga conexiona tierra.El enchufedebestearubicado en un lugar alquepuede accederessexpuesde la instalacion.
El hora ha sido fabricado con 220-240 V 50/60 Hz. El aparato cuenta con corriente alterna, para el cual se necesita un fusible de 16 Amp. Si la corriente de la red es diferente a这些东西 valores indicados, consulte con un electricista o un serviceo专业技术o autorizzato.
Cuando necesite sustituir el fusible electrico, por favor, asegúrese de que la connexión electrica se lleve a cabo de lasumaiente manera:
- Cable fásico marrón (a terminal activo)
- Cable azul hacía la terminal neutral
- Cableamarillo-verde hacer la terminal de tierra
Los conmutadores de desconexión del hora deben estar en un situ accable para el usuario final cuando el hora está en su situ.
El cable de alimentación (cable de enchufado) no debe tocar las zonas calientes del aparato.
Si el cable de alimentación (cable de enchufado) está dañado, el importador, su agente de servicios o personal igualmenteriallicadodeferán sustituirlo para evitar situaciones de peligro.
PRESENTACION DEL APARATO
-
Panel de control
2.Bandeja honda *
3.Brocheta para el pollo asado * -
En la parrilla de rejilla de la bandeja
5.Bandeja estárdar
6.Puerta del horno
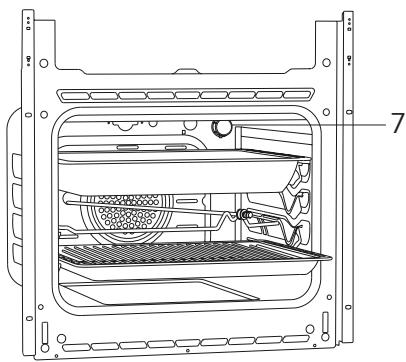
7. Lámpara
Accesorios (optional)
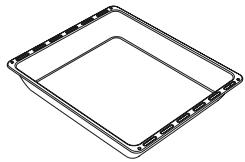
Bandeja profunda *
Se utilizes para pastelería, fritas y guiso. también puede utilizearla como recipiente de acumular aceite cuando se cocina pastel, comida congeladas y comida de carne directamente sobre parrilla.
Bandeja / Bandeja vidrio *
Se utilizes para pastelería (galleta e.t.c) y alimentos congelados.
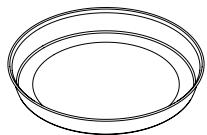
Bandeja redonda *
Se utilizes para pastelería congelada.
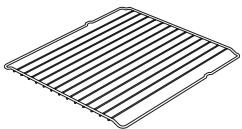
Parrila de alambre
Se utilizes para poder en estantería deseada las comida congeladas, las comida para freir o las comida al hora.
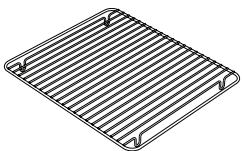
Parrilla de alambre bajo de bandeja *
Los alimentos que peuventPEGAR al cocinar como bistec se pueda cocinar sobre la parrilla de alambre bajo el centro de la bandeja. Así se evita que los alimentos se peguen a la bandeja.
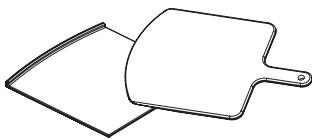
Piedra para pizzas ypelícula\*
Se utilizes para hornear platos como pizzas, pan, tortitas y también para sacar delorno los alimentos.
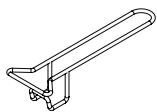
Asa de la bandeja *
Se usa para sostener bandejas calientes.
Especificaiones Tecnicas
| Especificaciones | CCHS100X, CCHS200MFX | |||
| Potencia de la lámpara | 15-25 W | |||
| Termostato | 40-240 / Max °C | |||
| Calefactor inferior | 1200 W | |||
| Calefactor superior | 1000 W | |||
| Calefactor turbo | 1800 W | |||
| Calefactor de la parrilla | Parrilla��ena | 1000 W | Parrilla grande | 2000 W |
| Suministro de corriente | 220V-240 V 50/60 Hz. | |||
Las specifications sociales peuvent modifierse sin previo avis para melhorar la calidad del producto.
Los valores proporcionados con el aparato o los documentos adjuntos son medicaciones realizadas por laboratorios según los estandares correspondientes. Estos valores peuvent variar según el uso y las conditiones ambientales.
Las cifras de esta guía son esquemáticas y puede que no coincidan exactamente con el producto.
INSTALACION DEL APARATO
Asegúrese de que la instalación electrica sea apta para el funcionaimiento del aparato. Si no, llama a un electricista y a un fontanero para realizar los arreglos necessarios. Lairma fabricante no se responsabilizará por los dañosque pueda occasionarseupon al uso por parte de personas no autorizadas y la garantía quedará invalidada.
ADVERTENCIA: Es la responsabilidad del cliente preparar el emplazimiento en el que vaya a colocarse el aparato, como como el suministro electrico.
ADVERTENCIA: Deberán respetarse las normativas electricas locales durante la instalación del aparato.
ADVERTENCIA: Compruebe que no haya daños en el producto antes de instalarlo. No instale el producto si está dañado. Los productos dañados suponen un riesgo para su seguridad.
Advertencias importantes para la instalacion:

Figura 1
El ventilador de refrigeración extraera vape adicional paraatar el sobrecalentimiento de las superficies externas durante elFunciarniento del hora.Esta es una condicion necessaria para una mayor cocción yfunciarniento del aparato. El ventilador de refrigeracion seguirá的功能ando despues de finalizar la cocción. El ventilador se detendra automatisticallyupon de que la refrigeracion haya finalizzato. Debedeojar un espacio detrás del lugar donde coloque el aparato para un funciona
miento buena y eficiente. No ignore este espacio, puesto que es necesario para el funciona el Sistema de ventilacion del aparato.
Colóquelo en el sitio correcto
El producto se ha disnado para montarse en encimeras commerciales. Deje una distancia de seguridad entre el producto y las paredes o los muebles de la comida. Vea la ilustracion en lasumaiente pagea para Obtener las distancias adecuadas. (Los valores son en mm).
- Las superficies realizadas, las láminas sintéticas y adhesivos deben ser resistentes al calor. (minimo 100^ )
- Los armarios de casa deben estar anivelados y fijados con el producto.
- Si hay un Cajón debajo del hora, coloque una revilla entre ambos.
ADVERTENCIA: No coloque el producto al lado de frigorificos o refrigeradores. El calor emitido por el producto augmente el Consumo de energia de los aparatos de refrigeracion.
ADVERTENCIA: No use la puerta y/o asa para llvar o mover el aparato.
Instalacion y montaje delorno incorporado de 60 cm
Deberá escoger el lugar para la instalación del producto antes de empezar la instalación.
No instale el aparato en lugares donde haya fuertes corrientes de aire.
Para el traslado del aparato seran necessities, al menos, dos personas. Para evaporar dañar el suelo, no arrastre el aparato.
Retire todos los materiales de transporte de dentro y fuera del producto. Retire todos los materiales del producto.
Instalación bajo del主義
El armario del hora debe tener las dimensiones indicadas en la figura 2.
Para poder alcancar la ventilacion necessitiesa, deben estar un espacio en la parte posterior del armario tal como se indica en laImagen.
Después de montarlo, el espacio entre la parte inferior y superior del nostrador se indica en la figura 5 con «A». Es para la ventilación y no debe cubrirlos.
Instalación en un armario elevado
El armario del horaDebe tener las dimensiones indicadas en la figura 4.
Deberán Leaveos con las dimensiones indicadas en la imagen en la parte posterior del armario y las partes superiores e inferiores para Obtener la ventilación necesaria.
Requisitos de instalación
Las dimensiones del producto se indican en la figura 3.
Las superficies de los muebles para el montaje y los materiales de montaje deben tener una resistencia de temperatura minima de 100^ .
Deberá fjjar el armario de montaje. La superficie debe ser plana para evitar que el aparato se incline.
La base del armario debe ser lo suficientemente fuerte como para soportar una energia de 60~kg .
Colocar y fjjar elorno
Cologne el hora en el armario con dos o más personas.
Asegúrese de que el marco del hora y el borde frontal de los muebles coincidan deforma uniforme.
El cable de alimentación no debe estar debajo del hora, aparecido entre el hora y los muebles o doblarse.
Fije el hora a los muebles con los tornillos incluidos con el producto. Los tornillos deben colocarse tal como se indica en la figura 5 pasándolos a工程技术 de plásticos fjados en el marco del aparato. No apriete los tornillos en excesso. De lo contrario, pueda que las cavidades de los tornillos se desgasten.
Compruebe que el hora no se mueva afterwards de montarlo. Si no monta el hora según las instrucciones, hay riesgo de que se incline durante el funcionaimiento.
Conexión electrica
El lugar de instalación del producto debecontar con la instalación electrica adecuada.
La tension de redDebe ser compatible con los values indicados en la placar de caracteristicas del aparato.
La connexion del producto deben realizarse según las normativas electricas locales y;nzonales.
Antes de empezar la instalación, desconnecte la red electrica. No conecte el aparato a la red hasta haber finalizo su instalación.
Instalación
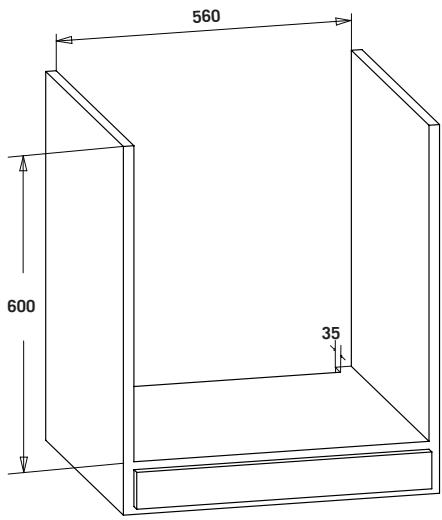
Figura 2
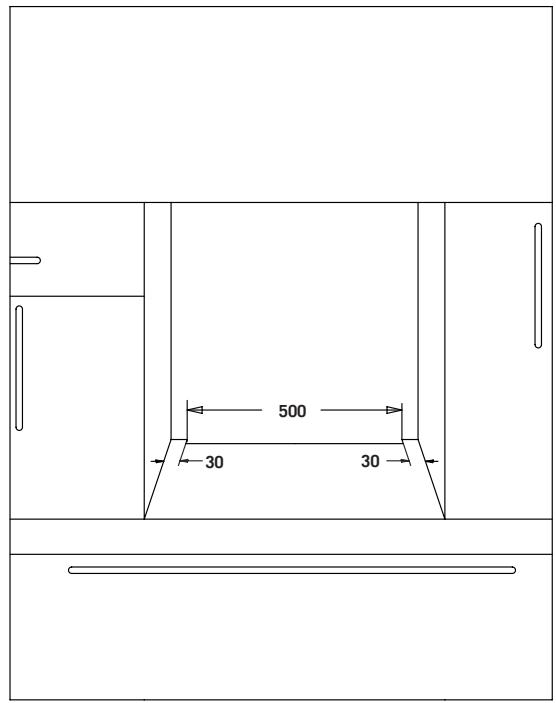
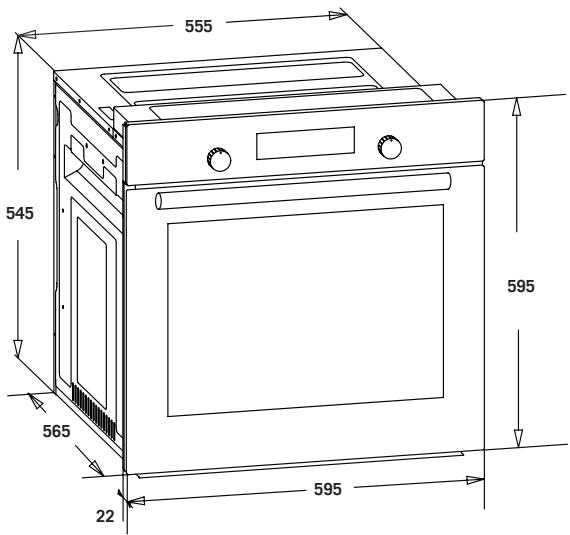
Figura 3
ES
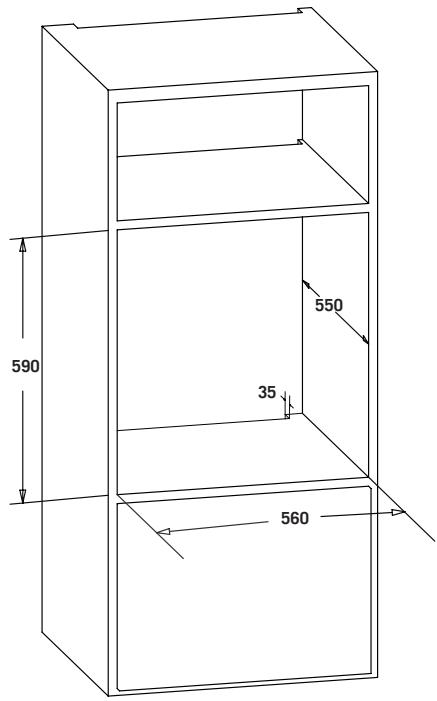
Figura 4
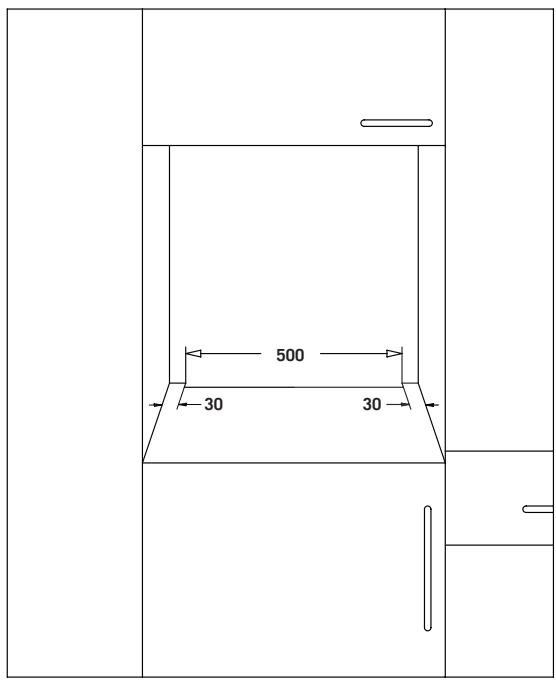
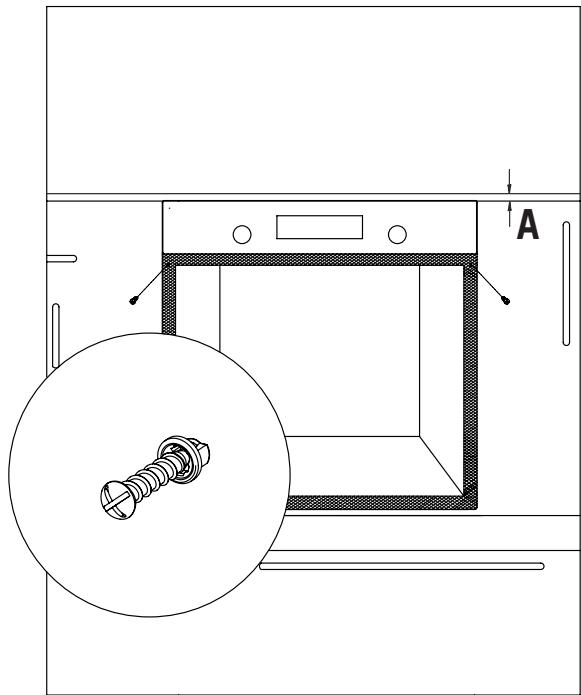
Figura 5
PANEL DE CONTROL
- Botón de funciona
- Temporizador mecánico o digital
- Termostato
ADVERTENCIA: El panel de mandos de arriba es solo para fines ilustrativos. Considere el panel de mandos en su dispositivo.
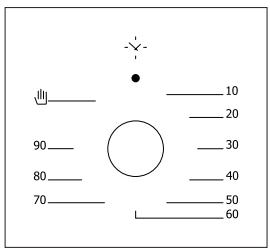
Botón del termostato: Le ayudará a configurar la temperatura de coccción de los alimentos que vayan a cocinarse en el hora. Gire el botón antes de colocar los alimentos en el hora para-establishcer la temperatura眼看ada. Compruebe la tabla relacionada con las temperatas de coccción de various alimentos.
Perilla del temporizador mecánico*: Le ayudará a configurar el tiempo de coccción de los alimentos que vayan a cocinarse en el hora. El temporizador desactiva los calefactores cuando finaliza el tiempo establecido y le avisará dearlo con un tiempo. Consulte los tiempos de coccción en la tabla de coccción.
USO DEL HORNO
Uso inicial del hora
Deberá hacer lo siguientes cuando use elorno por primera vez y lleve a cabo las conexiones necessities según las instrucciones:
- Retire las etiquetas o los accesos de dentro delorno. Si los hay, retire el folio de proteccion del bajo frontal del aparato.
- Retire el polvo y los restos del embalaje limpiando el interior con un pañó humedo. El interior delorno debe estarvacío.Enchufe el cable del aparato en la toma de corriente.
3.Ajuste el botón del termostato a la temperatura más alta (Máx. 240 °C) y haga funciona el hora durante 30 Minutes con la puerta cerrada. Mientras, pueda que se produzca un poco de humano y mal olor, lo que es normal. - Limpie el interior delorno con agua ligeramente Templada con detergente afterwards de que se haya enfriado. Luego,seoelcon un paño limpio.Ahora podra usar el hora.
Uso normal delorno
- Ajuste el botón del termostato y la temperatura a la cuales desee preparar los alimentos para empezar la cocción.
- Podrá FIRAR el tiempo de coccción como(desee con el botón de los modelos del temporizador mecánico. El temporizador desactivará los calefactores cuando el tiempo haya finalizzato y emitirá un pitio como advertencia auditiva.
- El temporizador desactivará los calefactores y emitirá una seals auditiva cuando el tiempo de coccción haya finalizzato de acuerdo a la información introducida en los modelos con temporizador digital.
- El sistemas refrigerante del aparato seguirá的功能ando antes de completar la cocción. No corte el suministro electrico del aparato en este situación, ya que esnecessary para que este se enfié. El sistemas se apagará una vez el enfiambre se haya completado.
Uso De La Grill
- Cuando coloque la grill en el estante superior, la comida en la grill no toca rla grill.
- Puede precalentar durante 5关键时刻,michas asa a la grill. Si es necessitiesario,puede voltear la comida boca abajo.
- La comida debe estar en el centro de la grill para proportionar el Tmaximo flujo de aire a trovés del hora.
Para encender la grill:
- Coloque el botón de funciona sobre el símbolo de la grill.
- Luego, ajustelo a la temperatura deseada de la grill.
Para apagar la grill:
Coloque el botón de funciona en la posición de apagado.
ADVERTENCIA: Mantenga la puerta del hora cerrada cuando cocina a la grill.
Uso Del Asador De Pollo *

Figura 6
Coloque el asador en el marco. Deslice y gire el marco en elorno al nivel deseado. Ponga una sartén en la parte inferior para recoger los restos. Añada un poco de agua a la sartén para limpiarla más fácilmente. No olvide quitar la parte de plástico del asador. Después de terminar con la parrilla, atornille la asa de plástico a la brocheta y saque la comida del hora.
TIPOS DE PROGRAMAS
Botón del programa: Le ayudará a establisher con qué calefactores se coccerán los alimentos colocados en elorno. A continuación se indicaten los temas de programas de calefaction y sus sistemas. Puede que no todos los modelos tengan todos los temas de calefactores y, por consiguiente, los temas de这些东西 calefactores.
A continuación se indicate los temas de programas de calefaction del aparato y explicaciones importantes para que pueda cocinar various alimentos según sus gustos personales.
| = | Funciones de calentimientos inferiores y superiores | Ventilador | |
| ? | Función de calentimiento inferior y ventilador | Calefactor turbo y ventilador | |
| ← | Grill y pollo asado | Función de calentimiento inferior-superior y ventilador | |
| → | Función de calentimiento inferior y superior y ventilador | Grill y ventilador | |
| Coccción multifunción (3D) | Grill | ||
| - | Función de calentimiento inferior | - | Función de calentimiento superior |
| Grill inteligente y ventilador | Limpieza con vapor |
Función de calentimiento inferior: Selección este programa hacía el final del tiempo de coccción si va a asar la parte inferior de los alimentos.
Función de calentimiento superior, Función de calentimiento superior ventilador: Se usa para calentar o asar posteriormente cantidades muy pequeñas de alimentos.
Función de calentimiento inferior y superior: Un programa que pueda usarse para cocinar alimentos como por exemple pasteles, pizza y galletas.
Función de calentimiento inferior y ventilador: Se usa principalmente para cocinar alimentos tales como pasteles de fruta.
Función de calentimiento inferior y superior y ventilador: El programa es apto para cocinar alimentos como por exemple pasteles, bizcocho, lasaña. Apto también para cocinas platos de carne.
Grill: La parrilla se usa para asar platos de carne como por exemple estofados, salchichas y pescado. Mientras está en la parrilla, la bandeja debe está colocada en el estante inferior con agua bajo.
Calefactor turbo y ventilador: Apto para hornear y asar. Mantenga el ajuste de calor más bajo que el programa «del calefactor inferior y superior», ya que el calor se mueve inmediamente a工程技术 del flujo de aire.
Grill, Grill intelligente y ventilador: EsADEUCADO para cocinar alimentos cárnicos.No se olvide de colocar una bandeja de cocción en una revilla inferior bajo del hora y un poco de agua.
Cocación multifunción (3D): Apto para hornear y asar. Los calefactores inferiores y superiores functionan también con la transmisión<rapida de calor a性和 de flujos de aire. Es apto para las cocaciones que requieran una única bandeja y calor intenso.
Ventilador: Paradescendingar, porejemplo, carne, aves de corral, pan y tortas. El ventilador hace que el aire circule alrededor del plato.
Limpieza con vape: Le permitirá lavar los restos solidos ablandados gratías al vape generado en el hora.
Grill y pollo asado: Se utilizes para asar aves de corral como el pollo.
RECOMENDACIONES PARA LA COCCION
En lasuma tabletaouldrencountr inforrmacion acerca de los tips de alimentos que hemos probado y de los cuales hemos identificado sus valores de cocciudad en nuestros laboratorios. Los tiempos de cocciudaduenvariar segun la tension de red,la calidad,lacantidad y la temperatura del material a cocinar.Puede que los platos que pueda preparar con这些valores no sean de su gusto. Puedeajustardifferentesvaluesporsu cuenta para Obtener varios sabores y resultados a su gusto realizando pruebas.
ADVERTENCIA: Deberá precalentar el hora durante 7-10 horas antes de colocar alimentos en el.
Tabla De Cocción
CCHS100X, CCHS200MFX
| Alimentos | Función de coccción | Temperatura de coccción (°C) | Parrilla de coccción | Tiempo de coccción (min.) |
| Pastel | Estáttico / Estáttico+ventilador | 170-180 | 2-3 | 35-45 |
| Pastel(PCB) | Estáttico / Turbo+ventilador | 170-180 | 2 | 25-30 |
| Tarta | Estáttico / Estáttico+ventilador | 180-200 | 2 | 35-45 |
| Pastelería | Estáttico | 180-190 | 2 | 20-25 |
| Galletas | Estáttico | 170-180 | 2 | 20-25 |
| Tarta de manzana | Estáttico / Turbo+ventilador | 180-190 | 1 | 50-70 |
| Bizcocho | Estáttico | 200/150 * | 2 | 20-25 |
| Pizza | Ventilador(PCB) | 180-200 | 3 | 20-30 |
| Lasañá | Estáttico | 180-200 | 2-3 | 25-40 |
| Merengue | Estáttico | 100 | 2 | 50 |
| Pollo asado ** | Parrilla+ventilador | 200-220 | 3 | 25-35 |
| Pescado a la parrilla ** | Parrilla+ventilador | 200-220 | 3 | 25-35 |
| Bistec de ternera ** | Parrilla+ventilador | Máx | 4 | 15-20 |
| Albóndigas a la parrilla ** | Parrilla+ventilador | Máx | 4 | 20-25 |
- No precalentar. Se recomienda que la prima mitad de la cocción sea a 200^ ,@mientras que la othera mitad se lleve a cabo a 150^ .
** Deberá dar la vuelta a los alimentos una vez transcurrida la mitad del tiempo de coccción.
Hornear Con La Piedra Para Pizzas *
Cuando cocine con piedra para pizza, coloque está sobre la parrilla y precaliente el hora en el modo pizza (turbo + inferior) a 230^ durante 30 horas. Una vez que se haya precalentado y sin quitar la piedra para pizza, colque la pizza sobre ella con la lámina (no colque pizzas congeladas) y hornee a 180^ durante 20-25 horas. Al finalizar la cocción, retire la pizza del hora el hora con la película.
ADVERTENCIA: No colocque la piedra para pizzas en unorno precalentado.
ADVERTENCIA: Al finalizar la cocción, no saque la piedra para pizas cuando está caliente y no lo colque sobre superficies frías. De lo contrario, se pueda agrietar.
ADVERTENCIA: No exponga la piedra para pizza a la humedad.
MANTENIMIENTO Y LIMPIEZA
- Retire el enchufe de la toma de corriente.
- No limpie las piezas internas, el panel, las bandejas y除外as piezas del aparato con herramientos solidas tales como un cepillo de cerras, lana de acero o cuchillo. No use materiales abrasivos o raspantes ni detergente.
- Tras la limpieza de las partes interiores delorno con un paño jabonoso, enjuaguelo y bajo sequelo bien con un paño suave.
- Limpie las superficies de cristal con produits de limpieza espécíficos para cristal.
- No limpie el hora con limpiadores a vapor.
- No utilise nuncaPRODUCTOS inflamables como acido, disolvente y gas,maintras limpie el aparato.
- Nunca laveyinguna parte del producto del aparato.
- Use estearato de potasio (jabón suave) para la suciedad y manchas.

Limpieza Con Vapor *
Le permittedar lavar los restos solidos ablandados gratias al vapor generado en el hora.
- Retire todos los accesorios delorno.
- Vierta medio litro de agua en la bandeja y colóquela en la parte inferior del calentador.
-
Fije el interruptor en el modo de limpieza con vapor.
4.Fije el termostato a 70^ y utilizes el hora durante 30 Minutes. -
Después de utiliser el hora durante 30 Minutes, abra la puerta del hora y limpie las superficies internas con un paño humedo.
- Use un liquido para lavar platos, agua tibia y un paño suave para la suciedad más incrustada. Luego,SEO que acaba de limpiar con un paño seco.
Limpieza Y Montaje De La Puerta Del Horno
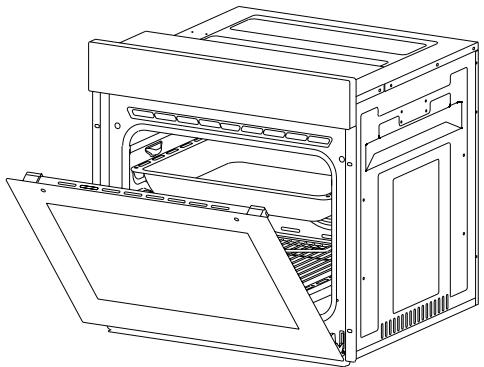
Figura 8
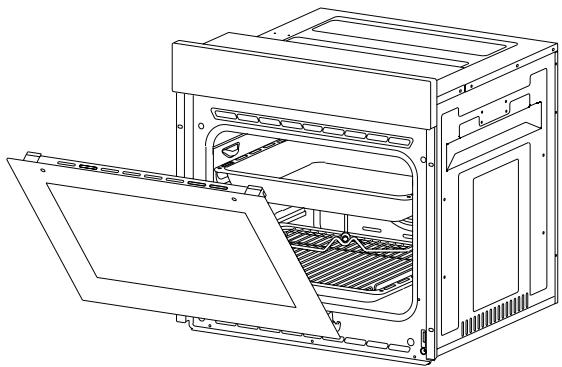
Figura 9
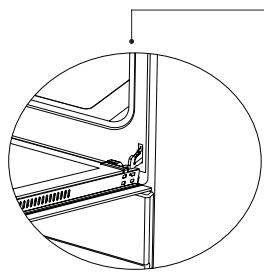
Figura 8.1
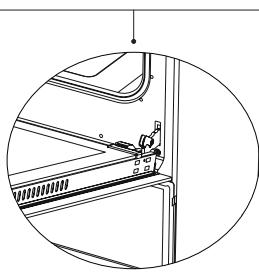
Figura 8.2
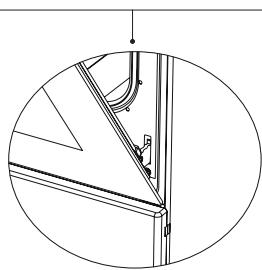
Figura 9.1
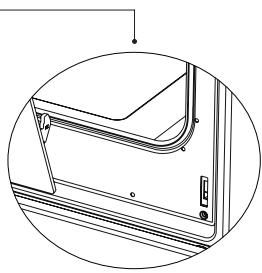
figura 8.1.
Figura 9.2
Abra la puerta
totallymente tirando
de ella hacía
usted. Luego,
desbloqueela
tirando del
bloqueo de bisagra
hacia arriba con
latipsa de un
destornillador tal
como se indica
en la
Fije el bloqueo de bisagra al mayor ángulo tal como se indica en la figura 8.2. Ajuste a la misma posición las dos bisagras que conectan la puerta con elorno.
Más adelante, cierre la puerta para que quede en una posición en contacto con el bloqueo de la bisagra tal como se muestra en la figura 9.1.
Para poder(retar la puerta del hora fácilmente, cuando seaproximea la posicion de cierre, coja la cubierta con las dos manos tal como se muestra enla figura9.2 y tire hacia arriba.
Haga lo mesmo que征求意见 en orden inverso@m我以为 la puerta paravoltar a colocar la puerta del hora.
Limpieza del Cristal del Horno
Su produit可以选择 ser différente. Siga el paso correspondiente para su produit.
- Presione los pestillos de plástico en los lados izquierdo y derecho como se muestra en laImagen 10 y levante el perfil tirando de el hacerastedo como se muestra en laImagen 11. El cristal quedará libre afterwards de que se retire el perfil, como se muestra en laImagen 12. Tire con cuidado del cristal liberado hacíausted. Si es necesario, el cristal central también puede ser retirado de la mismaforma. El cristal exterior está fijiado al perfil de la puerta del hora. Puede limpar fácilmente los cristales附加值es despues de que theseos hayan sido分开ados. Una vez que se haya completado la limpieza y elostenimiento,可以更好 replazar los cristales y el perfil siguiendo el procedimiento anterior en la forma inversa. Asegúrese de que el cristal se coloca en la posicion correcta y que el perfil quede bien colocado.
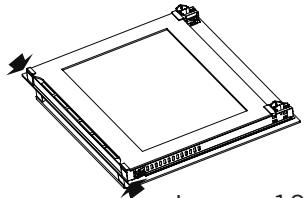
Imagen 10
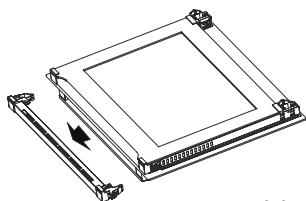
Imagen 11
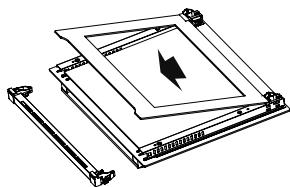
Imagen 12
- Retire los tornillos de los lados izquierdo y derecho como se muestra en laImagen 13. Retire el perfil tirando de él hacía usted como se muestra en laImagen 14. El cristal quedará libre afterwards de que se retire el perfil, como se muestra en laImagen 15. Tire con cuidado del cristal liberado hacía usted. Si esnecessary, el cristal central también puede ser retirado de la mismaforma. El cristal exterior está fijado al perfil de la puerta del hora. Puede limpiar fácilmente el cristal una vez que se haya retirado. Una vez que se haya completado la limpieza y elostenimiento, pueda reemplazar los cristales y el perfil siguiendo el procedimiento anterior en la forma inversa. Asegúrese de que el cristal se coloca en la posición correcta y que el perfil quede bien colocado.

Recambio De La Luz Del Horno
ADVERTENCIA: Para evaporar descargas electricas, asegúrese de partir el circuito del aparato antes de Cambiar la luz. (tener el circuito abierto significía que el suministro electrico está desactivado)
En primer lugar, desconecte el suministro electrico del aparato y asegúrese de que el aparato está frío.
Retire la proteccion de cristal girandolo tal como se indica en la figura lateral izquierda. Si tiene alguna dificultad para realizar el giro, usar guantes de plastico le ayudará.
Luego, gire la lámpara para retirarla y coloque la nuevo lámpara de la mismaforma. Lascharacteristicasde la lámpara son lassiguales;
Vuelve a colocar la proteccion de cristal del aparato en la toma de corriente y finalice la sustitucion. Ahora podra usar el hora.
Tip G9 Lampara
220-240 V, AC
15-25 W
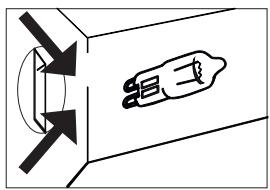
Figura 16
Tipoe14Lampara
220-240 V, AC 15 W
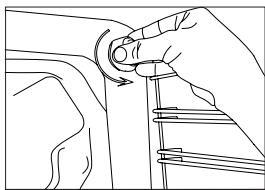
Figura 17
SOLUTION DE PROBLEMAS
Puede resolver los problemas que pueda encontrar con su producto al verificar los siguientes puntos antes de llamar al servicios técnico.
Puntos de verificacion
En caso de que experimente un problema con el hora, primero revise la tabla a continuación y pruebe las sugerencias.
| Problema | Causa probable | Qué hacer |
| El hora no funciona. | Suministro electrico no disponible. | Verifique el suministro de energia. |
| El hora se detiene durante la cocción. | El enchufe se sale de la toma de corriente. | Vuelva a instalar el enchufe en la toma de corriente. |
| Se apaga durante la cocción. | Operación continua demasiado larga. | Deje que el hora se enfríde afterwards de largos ciclos de cocción. |
| El ventilador no funciona: | Escuche el sonido del ventilador de enfiambre. | |
| Horno no instalado en un lugar con buena ventilación. | Asegúrese de que guardar los espaciosLibres indicados en el man-ual de instructcciones. | |
| Más de un enchufe en un enchufe de corriente. | Use solo un enchufe para cada en-chufe de corriente. | |
| Superficie exterior del hora se calienta mucho durante su func-strumento. | Horno no instalado en un lugar con buena ventilación. | Asegúrese de que guardar los espaciosLibres indicados en el man-ual de instructiones. |
| La puerta del hora no se abre cor-rectamente. | Restos de alimentos atascados en- tre la puerta y la cavidad interna. | Limpiar bien el hora yatar de volver a partir la puerta. |
| La luz interna es débil o no funciona. | Objeto extraño que cubre la lámpara durante la cocción. | Limpie la superficie interna del hora y revise;nuevamente. |
| La lámpara所提供ía estar fallando. | Reemplace con una lámpara con las mismas caraterísitcas tícnicas. | |
| Choque electrico al tocar el hora. | Sin una connexion a tierra adeca-da. | Asegúrese de que la red electricaonga una correcta toma a tierra. |
| Se usa una toma de corriente sin connexión a tierra. | ||
| Goteo de agua | El agua o el vapor se pueda tener bajo ciertas conditionesdependiendo de la comida que se cocina. Este no es un error del aparato. | Deje que elorno se enfríe y luego sequelo con un trapo de cucina. |
| Sale vapor de una grieta en la puerta del hora. | ||
| Hay agua dentro del hora. | ||
| El ventilador de refrigeración seguirá fácilmente funcionalmente. | El ventilador funcionalmente un cierto periodo para la ventilaciónde la calidad interna del hora. | Este no es una falla del aparato;por lo tanto noDebe preocuparse. |
| El hora no calienta. | La puerta está abierta. | Cierre la puerta y reinicie. |
| Controles del hora no ajustadoscorrectamente. | Lea la sección sobre el functionamien-to del hora y reinicie el hora. | |
| Fusible disparado o interruptorautomático apagado. | Sustituya el fusible o reinicie elinterruptor. Si este se repite confrecuencia, llame a un electricista. | |
| Humo que sale durante el functiOnamento. | Cuando utilise el hora por prim-era vez | El humo sale de los calentadores. Este no es una falta. Después de2-3 ciclos, no habrás más humano. |
| Comida en el calentador. | Deje que el hora se enfríe y limpie los residuos de comida del sueledo hora y la superficie del calen-tador superior. | |
| Cuando utilise el hora, saldrá olor a quemado o plácico. | Se usesn accesos plácicos uotROS accesos no resistentes alcalor Dentro del hora. | A altas temperatas, deben usaccesorios de cristalería adecuados. |
| El hora no cocina bien. | La puerta del hora se abre confrecuencia durante la cocción. | No abra la puerta del hora confrecuencia, si la comida que estácocinando no requires ser volteada. Si abre la puerta concretu%-cia, la temperatura interna dis-minuirá y, por lo tanto this influiráen el resultado de la cocción. |
REGLAS DE MANIPULación
- No use la puerta y/o el asa para transporte o mover el aparato.
- Realice el movimiento y el transporte en el embalaje original.
- Preste la(Maxima atencion al aparato@m间隙es es cargoado/descargado y manipulado.
- Asegürese de que el embalaje está bien cerrado durante la Manipulación y el transporte.
- Proteja de factores externos (como humedad, agua, etc.) que pueda darar el embalaje.
- Tenga cuidado de no dañar el aparato debido a golpes, colisiones, caías, etc.@msteadas lo manipula y transporte,y no lo rompa ni lo deforme durante el funcionaimiento.
RECOMENDACIONES PARA EL AHORRO DE ENERGIA
Los siguientes detalles le ayudaran a usar su producto ecologica y economicamente.
- Use envases de color oscuro y esmalte que conducen mejor el calor en el hora.
- Mientras cocina su comida, si la receta o el manual del usuario indica que se requires precalentar, precaliente el hora.
- No abra la puerta del hora con fecuencia cuando cocina.
- Trate de no cocinarmultipleplatossimultaneamente en el hora. Puede cocinar al本身就是 tiempo colocando dos hornillas en el estante de rejilla.
- Cocine multiples platos sucesivamente. El hora no perderá calor.
- Apague el hora uno horas antes del tiempo de Cadillac de la cocción. En este caso, no abra la puerta del hora.
- Descongele la comida congelada antes de cocinar.
ELIMINACION RESPETUOSA CON EL MEDIO AMBIENTE
Deshágase del embalaje de unamania respetuosa con el medio ambiente.
El aparato está etiquetado según la directiva europea 2012/19/EU sobre aparatos electricos y electrónicos usados (residuos de equipo electrico y electrónico - WEE por sus siglas en inglés). La directiva establiece el marco para la devolución y el reciclaje de aparatos usados como corresponde en toda la UE.
INFORMACION SOBRE EL EMBALAJE
El embalaje del aparato se fabrica con materiales reciclables, de(acuerdo con是我国 Reglamento Nacional sobre Medio Ambiente. No elimine los materiales de embalaje junto con los residuos domesticos o de othero tipo. Llevelos a uno de los+puntos de reciclaje designado por las autoridades locales.
CERTIFICADO DE GARANTÍA
Imprescindible la presentacion de la factura de compra acomañada del presente certificado de garantía.
Riesgos cubiertos.
Este aparato está garantizo contra cualquier defecto de funciona,mayo que se destine a uso domestico, procediendo a su reparacion bajo el plazo de garantia y solo por la red de SAT autorizados.
Nuestros electrodomesticos Corberó cuenta con la garantía legal del fabricante que cubreequalia o defecto durante 36
meses, desde su Fecha factura de 1 de enero del 2022.En caso de que fuera necessario,nosotros nos occupiesamos deequalquier possible
incidencia siempre que se deba a un componente defectuoso o fallo de fabricacion.
Exceptiones de garantía.
- Que la Fecha del certificado no coincida con la Fecha de vente de la factura original.
- Averías produidas por golpe, por caía orialquier othera causa de fuerza mayor.
- Si el aparato ha sido Manipulado por personal no autorizzato.
- Las averías producidas o derivadas como consecuencia de un uso inadequado, por defectos de instalación, por introducir modificaciones en el aparato que alteren su funciona.
- Puestos en marcha, mantenimiento, limpiezas, componentes sujetos a desgaste, lámparas, piezas estéticas, oxidaciones, plácicos, gomas, carcasas y cristales.
- Los hornos microondas (a exception de los integrables) y los hornos sobremesa en el caso de qualquier incidencia de configuracion, deben de llvarse al serviceo的技术ico mas proximo por parte del cliente. No se recoen ni reparan en el domicilio.
- Garantía termos electricos. Garantía de 3 años incluyendo los costes de desplazimiento y mano de obra que correspondan de la reparación del producto, teniendo que tener un mantenimiento una vez cada 12 meshes. Especiallymente si Ud. ha instalado un aparato a gas,onga presente como titular de la instalación, la obligatoriedad de realizar una revisión completa de los equipos, (según Real decreto 238 / 2013, del 5 Abril. RITE. IT3, M. Lo temos electricos y calderas que incluyen depósitos acumuladores de agua caliente, para que se aplique la prestación de la Garantía, es obligatorio que el anodo de magnesio está operativo y que realize la función de protección adecuadamente. Paraarlo es recommendable que el anodo se revise bianuallynte por el Servicio Oicial y sea renovado cuando fuera Neededo. Periodicidad que deben ser annual en aquellas zonas con aguas criticas (como do CaCO3 superiores a 200mg / L , es decide a partir de 20^ de dureza). Depósitos sin el correcto estado del anodo de protección, no-town la cobertura de la garantía. Independientelement del tipo de depóstito o producto, todas las valvulas de sobreprésentacion de calefaction o a.c.s.,deferan ser canalizadas para evacitar daños en la vivienda por descargas de agua. La garantía del producto no asume los daños causados por la no canalizacion del agua derramada por esta valvula.
"ESTAS EXCEPCIONES ANULAN LA GARANTÍA, SIENDO LA REPARACION CON CARGO AL CLIENTE"
Periodo amparado en aparatos según ley de garantias en la vente de bienes de consumo Ley vigente es "RD 7/2021"
Sevicio Técnico Oficial: 911 08 08 08
CERTIFICATE OF GUARANTEE
The presentation of the purchase invoice accompanied by this guarantee certificate is essential.
Covered Risks.
This appliance is guaranteed against any malfunction, provided that it is intended for domestic use, proceeding to its repair within the warranty period and only by the authorized SAT network.
Our Corberó appliances have the manufacturer's legal warranty that covers any breakdown or defect for 36 months, from the invoice date of January 1, 2022. If necessary, we take care of any possible incident whenever it is due to a defective component or manufacturing fault. Warranty Exceptions
Warranty Exceptions
- That the date of the certificate does not coincide with the date of sale of the original invoice.
- Faults produced by blow, by fall or any other cause of force majeure.
- If the device has been manipulated by unauthorized personnel.
- Faults produced or derived as a consequence of improper use, installation defects, or modifications to the device that alter its operation.
- Start-up, maintenance, cleaning, components subject to wear, lamps, aesthetic parts, oxidation, plastics, rubbers, housings and crystals.
- Microwave ovens (with the exception of built-in ones) and tabletop ovens in the event of any incident of operation, they must be taken to the nearest technical service by the customer. They are not collected or repaired at home.
Electric thermos guarantee. 3-year warranty including travel and labor costs that correspond to the repair of the product, having to have maintenance once every 12 months. Especially if you have installed a gas appliance, keep in mind as the owner of the installation, the obligation to carry out a complete review of the equipment, (according to Royal Decree 238 / 2013, of April 5. RITE. IT3, M. Lo thermos electrical and boilers that include hot water storage tanks, for the benefit of the Guarantee to apply, it is mandatory that the magnesium anode is operational and that it performs the protection function adequately. For this, it is recommended that the anode be checked biannually by the Official Service and is renewed when necessary Periodicity that must be annual in those areas with critical waters (CaCO3 content greater than 200mg/L , that is, from 20^ of hardness) Deposits without the correct state of the protection anode are not covered by the warranty Regardless of the type of tank or product, all heating or DHW overpressure valves must be channeled to avoid damage and n the house due to water discharges. The product warranty does not cover damages caused by not channeling the water spilled by this valve.
"THESE EXCEPTIONS Void THE WARRANTY, THE REPAIR BEING CHARGED TO THE CUSTOMER"
Period covered in devices according to the law of guarantees in the sale of consumer goods Current law is "RD 7/2021"
Official Technical Service: 911 08 08 08