034003601 - Four électrique encastrable PYRAMIS - Notice d'utilisation et mode d'emploi gratuit
Retrouvez gratuitement la notice de l'appareil 034003601 PYRAMIS au format PDF.

| Type d'appareil | Four encastrable |
| Largeur | 60 cm |
| Alimentation | Électrique |
| Capacité | Non précisé |
| Nombre de fonctions de cuisson | Non précisé |
| Type de commande | Manettes et écran digital |
| Type de porte | Abattante |
| Type de cavité | Standard |
| Type de nettoyage | Non précisé |
| Classe énergétique | Non précisé |
| Dimensions (HxLxP) | Non précisé |
| Poids | Non précisé |
| Accessoires inclus | Non précisé |
| Type d'installation | Encastrement |
| Sécurité enfant | Non précisé |
| Fonction minuterie | Oui |
FOIRE AUX QUESTIONS - 034003601 PYRAMIS
Questions des utilisateurs sur 034003601 PYRAMIS
0 question sur cet appareil. Repondez a celles que vous connaissez ou posez la votre.
Poser une nouvelle question sur cet appareil
Téléchargez la notice de votre Four électrique encastrable au format PDF gratuitement ! Retrouvez votre notice 034003601 - PYRAMIS et reprennez votre appareil électronique en main. Sur cette page sont publiés tous les documents nécessaires à l'utilisation de votre appareil 034003601 de la marque PYRAMIS.
MODE D'EMPLOI 034003601 PYRAMIS
BUILT-IN OVEN
60cm
Electrical
natural_image
Simple line drawing of a kitchen oven with two circular handles (no text or symbols)USER MANUAL GB BEDIENUNGSANLEITUNG DE
Dear Customer,
Thank you for relying on this product.
We aim to allow you to optimally and efficiently use this environment-friendly product produced in our modern facilities under precise conditions with respect to sense of quality in total.
We advise you to read these operating manual thoroughly before using the oven and keep it permanently so that the features of the built-in oven you have purchased will stay the same as the first day for a long time.
NOTE:
This Operating Manual is prepared for multiple models. Your appliance may not feature some functions specified in the manual.
The product images are schematic.
This product has been produced in modern environment-friendly facilities without adversely affecting nature.
Products marked with (*) are optional.
"Complies with AEEE Regulation"
CONTENTS
Important Warnings.... 4
Introducing The Appliance.... 6
Technical Specifications.... 7
Installation Of Appliance.... 7
Important Warnings....13
Control Panel....14
Program Types....16
Cooking Recommendations....17
Cooking Table....17
Using The Oven....18
Replacing Oven Lamp....19
Cleaning Oven Glass....19
Cleaning And Mounting Oven Door....20
Maintenance And Cleaning....21
Steam Cleaning....21
Accessories....22
Troubleshooting....23
Environmentally-Friendly Disposal....23
Package Information....23
IMPORTANT WARNINGS
- WARNING: To avoid electric shock, ensure that the appliance circuit is open before changing the lamp.
- WARNING: All supply circuit connections must be disconnected before accessing terminals.
- WARNING: The accessible parts may be hot during use of grid. Children must be kept away.
- WARNING: Fire hazard; do not store materials on cooking surface.
- WARNING: If the surface is cracked, open the appliance circuit to avoid risk of electric shock.
- WARNING: Appliance and its accessible parts are hot during operation.
- Setting conditions of this appliance are specified on the label.(Or on the data plate)
- Accessible parts might be hot during use of grill. Small children should be kept away.
- WARNING: Appliance is intended for cooking only. It should not be used for other purposes like heating a room.
- There are additional protective tools avoiding contact with oven doors. This part must be attached when it's likely that there are children around.
- Do not use steam cleaners to clean the appliance.
-
NEVER try to put out the fire with water. Only shut down the appliance circuit and then cover the flame with a cover or a fire blanket.
-
Hard and abrasive cleaners or hard metal scrapers should not be used to clean the oven glass door, as these can scratch the surface and cause breaking.
- Ensure that door is fully closed after food is placed.
- Children under 8 years of age should be kept away, if they cannot be monitored continuously.
- Touching the heating elements should be avoided.
- This appliance can be used by children over 8 years of age, people with physical, hearing or mental challenges or people with lack of experience or knowledge; as long as control is ensured or information is provided regarding the dangers.
- The appliance hasn't been designed for operation with an external time or a separate remote control system.
- This device has been designed for domestic use.
- Cleaning and user maintenance can't be made by children without adult supervision.
- Children must not play with the appliance. Cleaning and user maintenance shouldn't be made by children unless they are older than 8 years old and under adult supervision.
- Make sure that children at and under 8 can't reach appliance and appliance cable.
- Keep curtains, tissue paper or combustible (inflammable) materials away from appliance before starting to use it. Do not place inflammable or combustible materials in or on the appliance.
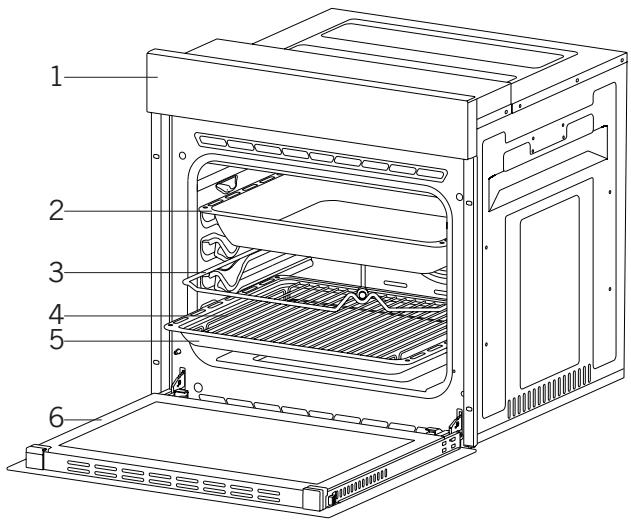
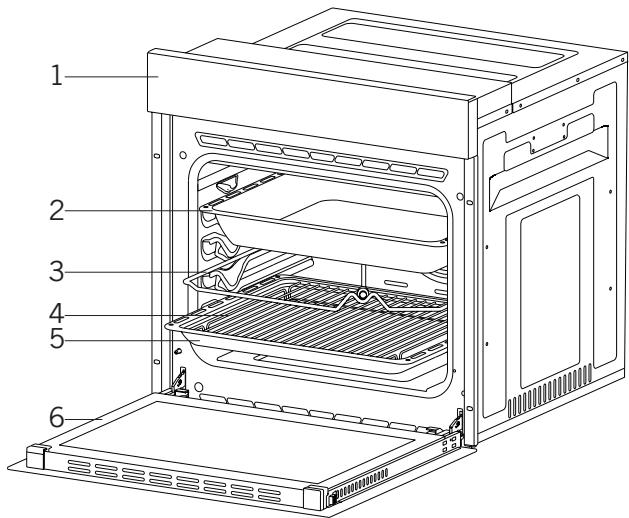
INTRODUCING THE APPLIANCE
text_image
Technical diagram of an oven with numbered parts for identification-
Control Panel
2.Deep Tray*
3.Roast Chicken Skewer -
In Tray Wire Grill
- Standard Tray
6.Oven door
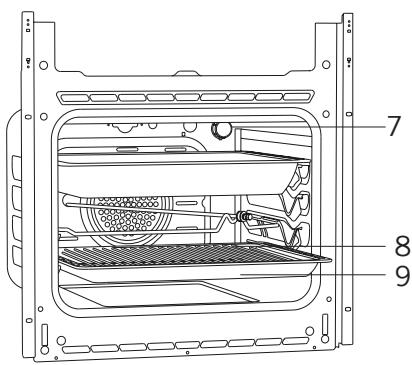
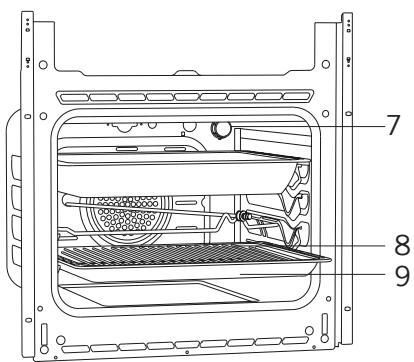
text_image
Technical diagram of an oven with numbered components labeled 7, 8, and 9- Lamp
- In Tray Wire Grill
- Standard Tray
TECHNICAL SPECIFICATIONS
| SPECIFICATIONS | 60 cm Built-In Oven | |||
| Lamp Power | 15W | |||
| Thermostat | 40-240 / Max °C | |||
| Lower Heater | 1200W | |||
| Upper Heater | 1000W | |||
| Turbo Heater | 1800W | |||
| Grill Heater | Small Grill | 1000W | Big Grill | 2000W |
| Supply Voltage | 220V-240V 50/60 Hz | |||
Technical specifications can be changed without prior notice to improve product quality.
The values provided with the appliance or its accompanying documents are laboratory readings in accordance with the respective standards. These values may differ depending on the use and ambient conditions.
Figures in this guide are schematic and may not be exactly match your product.
INSTALLATION OF APPLIANCE
Ensure that electrical installation is suitable for operationalising the appliance. If not, call an electrician and plumber to make necessary arrangements. Manufacturing firm can't be hold responsible for damages to arise due to operations by unauthorized people and product warranty becomes void.
WARNING: It is customer's responsibility to prepare the location the product shall be placed on and also have power utility prepared.
WARNING: The rules about electrical local standards must be adhered to during product installation.
WARNING: Check for any damage on the product before installing it. Do not have product installed if it's damaged. Damaged products pose danger for your safety.
Important Warnings for Installation:
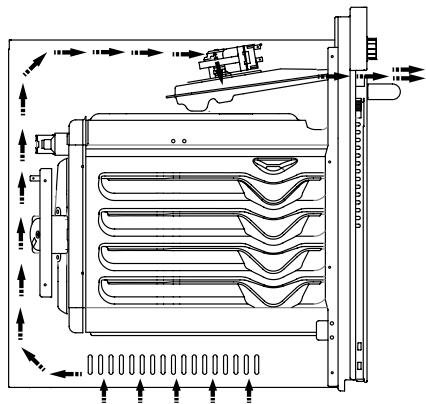
natural_image
Technical line drawing of a mechanical or electrical component with internal channels and directional arrows (no text or symbols)Figure 1
Cooling fan shall take extra steam out and prevent outer surfaces of appliance from overheating during operation of oven. This is a necessary condition for better appliance operation and better cooking.
Cooling fan shall continue operation after cooking is finished. Fan shall automatically stop after cooling is completed.
A clearance must be left behind the enclosure where you'll place the appliance for efficient and good operation. This clearance shouldn't be ignored as it's required for ventilation system of the appliance to operate.
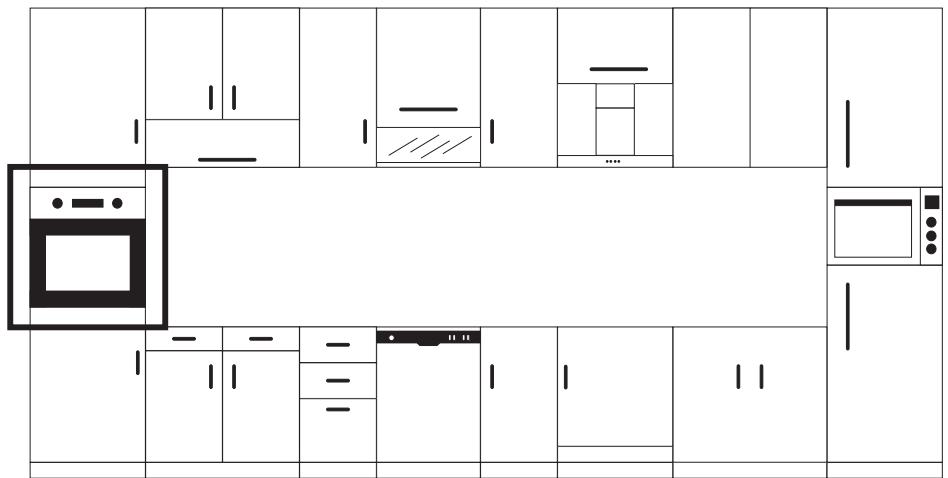
Right Place For Installation
Product has been designed to be mounted to worktops procured from market. A safe distance must be left between the product and kitchen walls or furniture. See the drawing provided on the next page for proper distances. (values in mm).
- Used surfaces, synthetic laminates and adhesives must be heat resistant. (minimum 100°C).
- Kitchen cupboards must be level with product and secured.
- If there is a drawer below the oven, a rack must be placed between oven and drawer.
WARNING: Do not install the product next to refrigerators or coolers. The heat emitted by the product increases the energy consumption of cooling devices.
WARNING: Do not use door and/or handle to carry or move the product.
60 cm Built-In Oven Installation and Mounting
Place of use for product must be located before starting installation.
Product mustn't be installed in places which are under the effect of strong air flow.
Carry the product with minimum two people. Do not drag the product so that floor isn't damaged.
Remove all transportation materials inside and outside the product. Remove all materials and documents in the product.
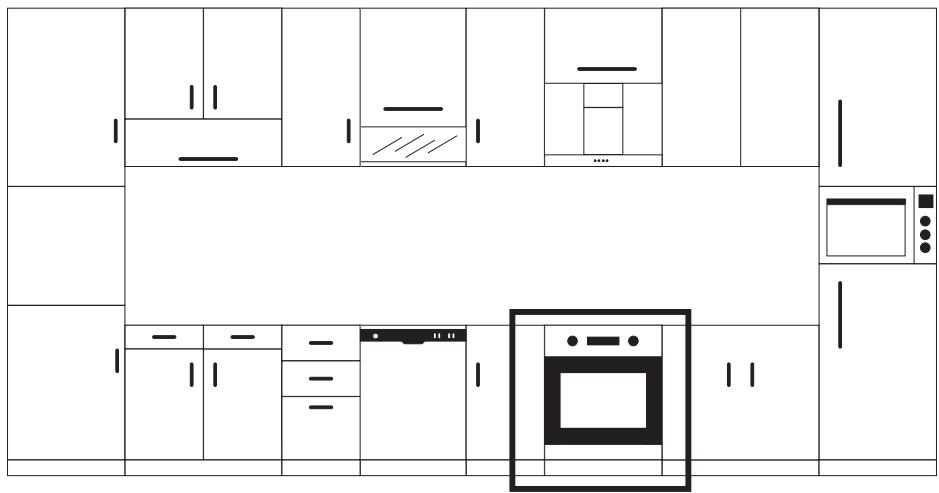
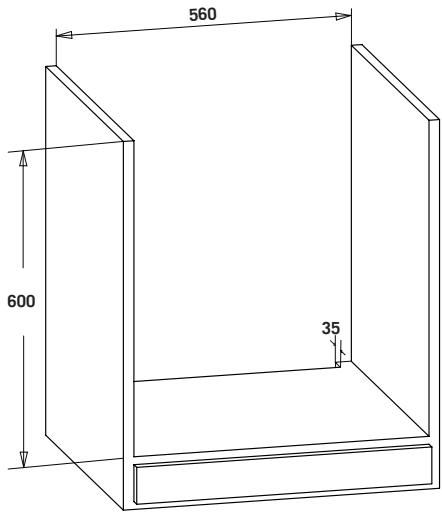
Installation Under Counter
Cabin must match the dimensions provided in Figure 2.
A clearance must be provided at the rear part of the cabin as indicated in the figure so that necessary ventilation can be achieved.
After mounting, the clearance between lower and upper part of the counter is indicated in Figure 5 with "A". It's for ventilation and shouldn't be covered.
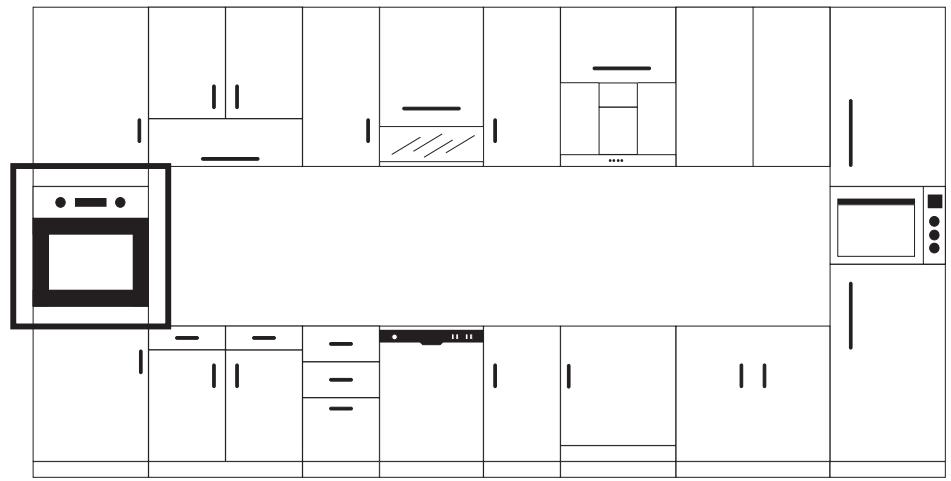
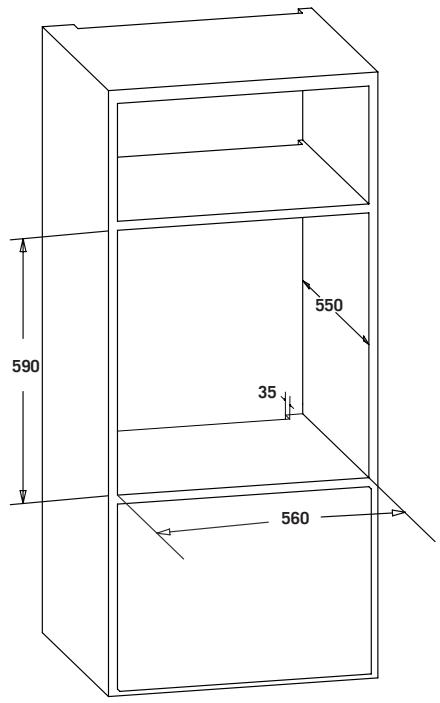
Installation In An Elevated Cabinet
Cabin must match the dimensions provided in Figure 4.
The clearances with the dimensions indicated in the figure must be provided at the rear part of cabin, upper and lower sections so that necessary ventilation can be achieved.
Installation Requirements
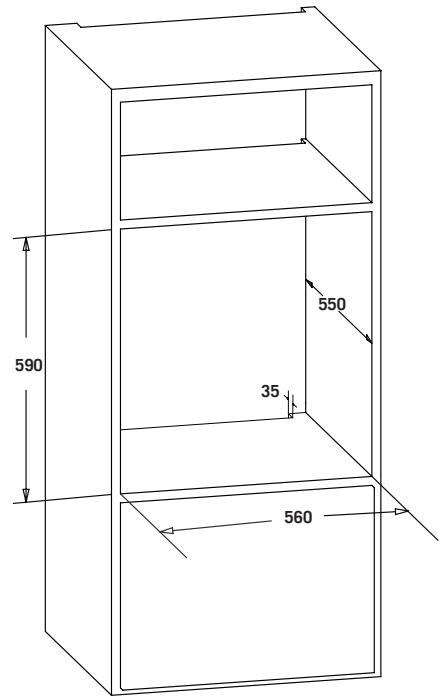
Product dimensions are provided in the Figure 3.
Furniture surfaces for mounting and mounting materials to be used must have a minimum temperature resistance of 100 °C .
Mounting cabin must be secured and its floor must be plane for product not to tilt over.
Cabin floor must have a minimum strength that would handle a load of 60 kg.
Placing and Securing the Oven
Place the oven into the cabin with two or more people.
Ensure that oven's frame and front edge of the furniture match uniformly.
Supply cord mustn't be under the oven, squeeze in between oven and furniture or bend.
Fix the oven to the furniture by using the screws provided with the product. Screws must be mounted as shown in Figure 5 by passing them through plastics attached to frame of the product. Screws mustn't be overtightened. Otherwise, screw sockets might be worn.
Check that oven doesn't move after mounting. If oven isn't mounted in accordance with instructions, there is a risk of tilt over during operation.
Electrical Connection
Mounting place of the product must have appropriate electrical installation.
Network voltage must be compatible with the values provided on type label of product.
Product connection must be made in accordance with local and national electrical requirements.
Before starting the mounting disconnect network power. Do not connect the product to network until its mounting is completed.
Mounting
text_image
Architectural floor plan of a kitchen with labeled cabinets, fixtures, and oven illustrationsFigure 2
text_image
560 600 35
text_image
500 30 30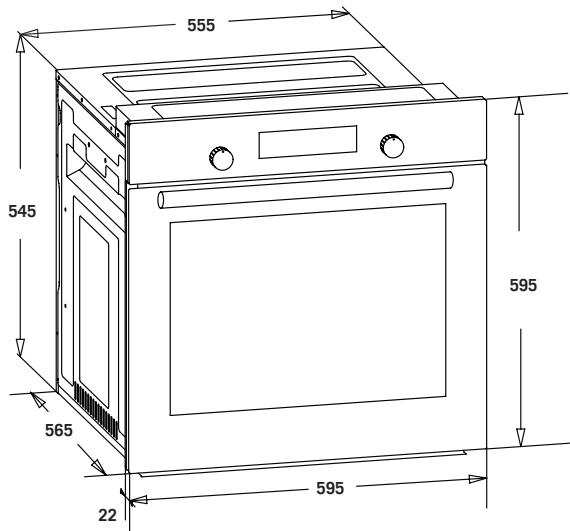
text_image
555 545 565 22 595 595Figure 3
GB
natural_image
Line drawing of a modern kitchen interior with cabinets, ovens, and appliances (no text or symbols)Figure 4
text_image
590 35 560 550
text_image
500 30 30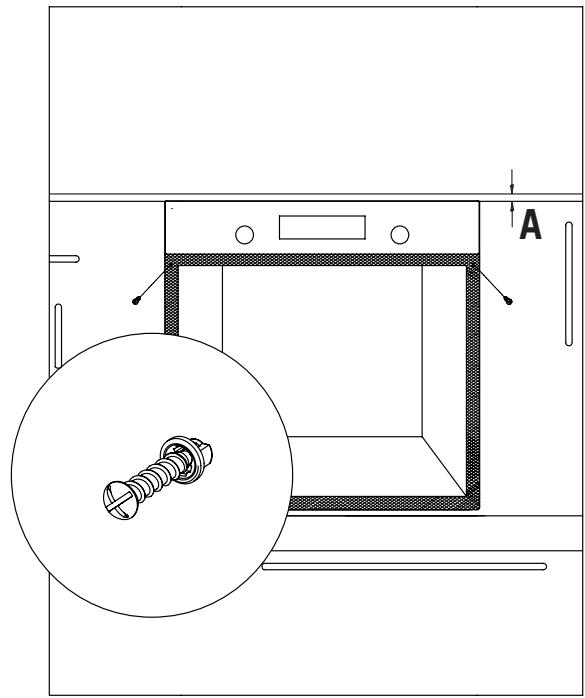
natural_image
Technical line drawing of a mechanical assembly with a circular component and labeled section A (no text or symbols beyond basic lines)Figure 5
IMPORTANT WARNINGS
Electrical Connection and Safety
This oven must be installed and connected to its place correctly according to manufacturer instructions and by an authorized service.
Appliance must be installed in an oven enclosure providing high ventilation.
Electrical connections of the appliance must be made only via sockets having earth system furnished in compliance with rules. Contact an authorized electrician if there is no socket complying with the earthed system at where appliance will be placed. Manufacturing company is by no means responsible for damage resulting from connection of non-earthed sockets to appliance.
Plug of your oven must be earthed; ensure that socket for the plug is earthed. Plug must be located in a place that can be accessed after installation.
Your oven has been manufactured as 220-240 V 50/60 Hz. AC power supply compliant and requires a 16 Amp fuse. If your power network is different that these indicated values, refer to an electrician or your authorized service.
When you need to replace the electrical fuse, please ensure that electrical connection is made as follows:
• Phase (to live terminal) brown cable
- Blue cable to neutral terminal
• Yellow-green cable to earth terminal
Oven disconnecting switches must be in an accessible place for final user while oven is in its place.
Power supply cable (plug in cable) mustn't touch hot parts of the appliance.
If supply cord (plug in cable) is damaged, this cord must be replaced by the importer or its service agent or an equally competent personnel to prevent a hazardous situation.
CONTROL PANEL
text_image
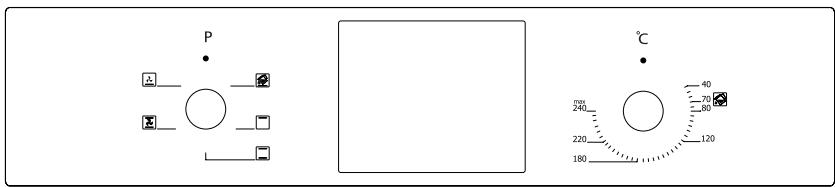
P °C 240 220 180 70 80 40 120Digital Panel Visual
text_image
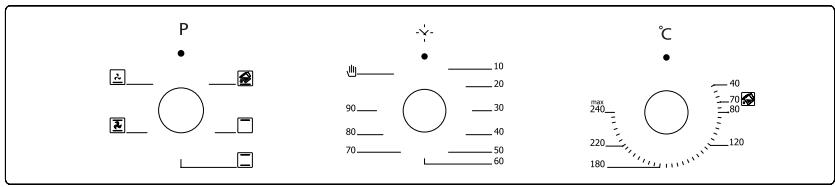
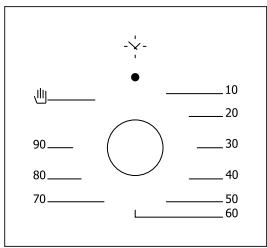
P 90 80 70 10 20 30 40 50 60 °C 240 220 180 40 70 80 120Mechanical Panel Visual
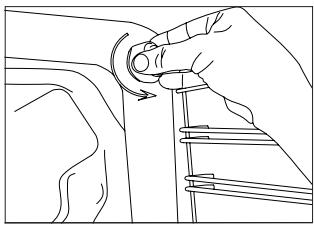
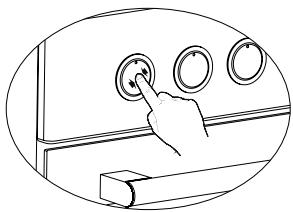
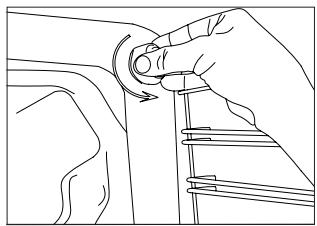
Adjustment can be made only when button is popped for models with pop-up button.

natural_image
Line drawing of a hand pressing a button on a control panel (no text or symbols)Figure 6 *
Make sure that button is popped by pressing on the button as shown in the figure at left side.

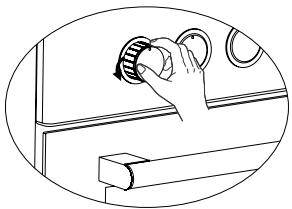
natural_image
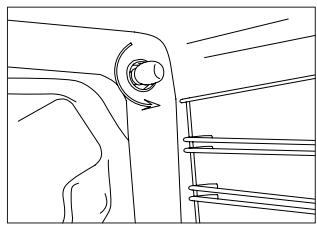
Line drawing of a hand holding a rotary knob on a cabinet (no text or symbols)Figure 7*
You can make necessary adjustments by turning right or left when button is popped enough.
text_image
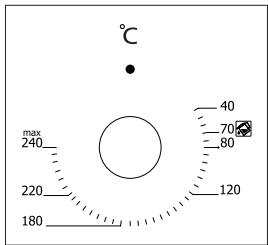
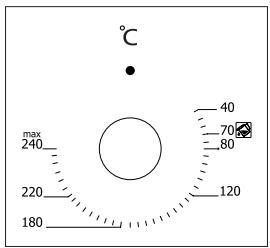
°C max 240 220 180 40 70 80 120Figure 8
Thermostat Button: Helps to set cooking temperature of the food to be cooked in the oven. You can set the desired temperature by turning the button after placing the food into the oven. Check cooking table related to cooking temperatures of different foods.
text_image
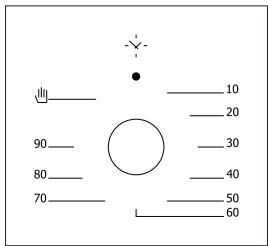
10 20 30 40 50 60Figure 9
*Mechanical Timer Button: Helps to set time for the food to be cooked in the oven. Timer de-energizes the heaters when set time expires and warns you by ringing. See cooking table for cooking times.
flowchart
graph TD
    P["•"] --> A["○"]
    A --> B["+"]
    A --> C["-"]
    A --> D["×"]
    A --> E["-"]
    A --> F["□"]
    A --> G["-"]
Figure 10
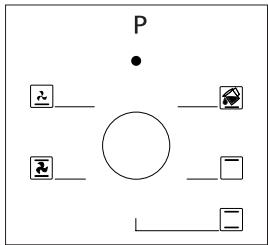
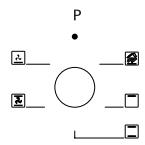
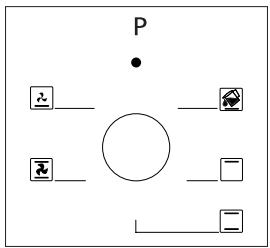
Program Button: Helps to set with which heaters the food placed in oven will be cooked. Heater program types in this button and their functions are stated below. Every model might not have all heater types and thus program types of these heaters.
PROGRAM TYPES
Heating program types in your appliance and important explanations of them are provided below for you can cook different foods appealing to your taste.
 | Lower and Upper Heating Elements |  | Fan |
 | Lower Heating Element and Fan |  | Turbo Heater and Fan |
 | Grill and Roast Chicken |  | Lower-Upper Heating Element and Fan |
 | Upper Heating Element and Fan |  | Grill and Fan |
 | Multifunctional Cooking |  | Grill |
 | Lower Heating Element |  | Upper Heating Element |
 | Small Grill and Fan |  | Steam Cleaning |
Lower heating element: Select this program towards end of cooking time if lower part of the food cooked will be roasted.
Upper heating element: Used for post heating or roasting very little pieces of foods.
Lower and upper heating elements: A program that can be used for cooking foods like cake, pizza, biscuit and cookie.
Lower heating element and fan: Use mostly for cooking foods like fruit cake.
Lower and upper heating element and fan: The program suitable for cooking foods like cakes, dried cakes, lasagne. Suitable for cooking meat dishes, as well.
Grill: Grill cooker is used for grilling meat like foods such as steak, sausage and fish. While grilling, tray should be placed in the lower rack and water must be placed in it.
Turbo heater and fan: Suitable for baking and roasting. Keep heat setting lower than “Lower and Upper Heater” program since heat is conveyed immediately via air flow.
Grill and fan: Suitable for cooking meat type foods. Do not forget to place a cooking tray in a lower rack inside the oven and a little water in it while grilling.
Multi Functional Cooking: Suitable for baking and roasting. Lower and upper heaters operate as well as quick transmission of heat via air flow. Suitable for cooking requiring single tray and intense heat.
COOKING RECOMMENDATIONS
You can find in the following table the information of food types which we tested and identified their cooking values in our labs. Cooking times can vary depending on the network voltage, quality of material to be cooked, quantity and temperature. Dishes to cook by using these values might not appeal to your taste. You can set various values for obtaining different tastes and results appealing to your taste by making tests.
WARNING: Oven must be preheated for 7-10 minutes before placing the food in it.
COOKING TABLE
| Food | Cooking Function | Cooking Temperature (°C) | Cooking Rack | Cooking Time (min.) |
| Cake | Static / Static+Fan | 170-180 | 2-3 | 35-45 |
| Small Cake | Static / Turbo+Fan | 170-180 | 2 | 25-30 |
| Pie | Static / Static+Fan | 180-200 | 2 | 35-45 |
| Pastry | Static | 180-190 | 2 | 20-25 |
| Cookie | Static | 170-180 | 2 | 20-25 |
| Apple Pie | Static / Turbo+Fan | 180-190 | 1 | 50-70 |
| Sponge cake | Static | 200/150* | 2 | 20-25 |
| Pizza | Static Fan | 180-200 | 3 | 20-30 |
| Lasagne | Static | 180-200 | 2-3 | 25-40 |
| Meringue | Static | 100 | 2 | 50 |
| Grilled Chicken** | Grill+Fan | 200-220 | 3 | 25-35 |
| Grilled Fish** | Grill+Fan | 200-220 | 3 | 25-35 |
| Calf Steak** | Grill+Fan | Max | 4 | 15-20 |
| Grilled Meatball** | Grill+Fan | Max | 4 | 20-25 |
* Do not preheat. First half of cooking time is recommended to be at 200°C de while the other half at 150°C.
** Food must be turned after half of the cooking time.
USING THE OVEN
Initial Use of Oven
Here are the things you must do at first use of your oven after making its necessary connections as per instructions:
- Remove labels or accessories attached inside the oven. If any, take out the protective folio on front side of the appliance.
- Remove dust and package residues by wiping inside of the oven with a damp cloth. Inside of oven must be empty. Plug the cable of appliance into the electrical socket.
- Set the thermostat button to the highest temperature (240 Max. °C) and run the oven for 30 minutes with its door closed. Meanwhile a slight smoke and smell might occur and that's a normal situation.
- Wipe inside of the oven with a slightly warm water with detergent after it becomes cold and then dry with a clean cloth. Now you can use your oven.
Normal Use of Oven
- Adjust thermostat button and temperature at which you want to cook the food to start cooking.
- You can set cooking time to any desired time by using the button at models with mechanical timer. Timer will de-energize heaters when time expired and provide warning beep as ringing.
- Timer turns the heaters off and provides audible signal when cooking time expires in line with the information entered in the models with digital timer.
- Cooling system of the appliance will continue to operate after cooking is completed. Do not cut the power of appliance in this situation which is required for appliance to cool down. System will shut down after cooling is completed.
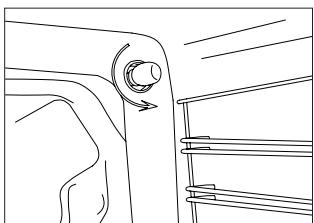
REPLACING OVEN LAMP
WARNING: To avoid electric shock, ensure that the appliance circuit is open before changing the lamp. (having circuit open means power is off)
natural_image
Line drawing of a hand adjusting a mechanical component with a circular arrow indicating rotation (no text or symbols)Figure 11
First disconnect the power of appliance and ensure that appliance is cold.
Remove the glass protection by turning as indicated in the figure on the left side. If you have difficulty in turning, then using plastic gloves will help you in turning.
natural_image
Line drawing of a vehicle's side profile showing the wheel and seat (no text or symbols)Figure 12
Then remove the lamp by turning, install the new lamp with same specifications. Lamp specifications must be as follows;
-220-240 V 50/60 Hz AC, -15 W, -Type E14
Reinstall glass protection, plug the power cable of appliance into electrical socket and complete replacement. Now you can use your oven.
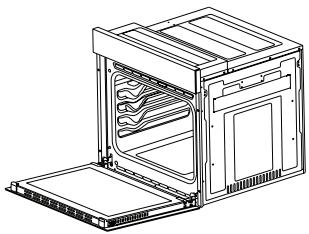
CLEANING OVEN GLASS
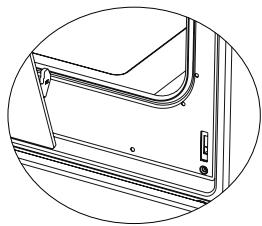
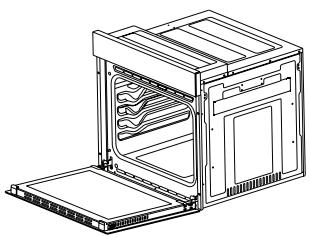
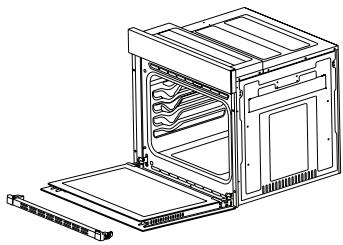
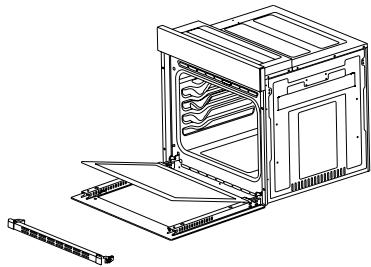
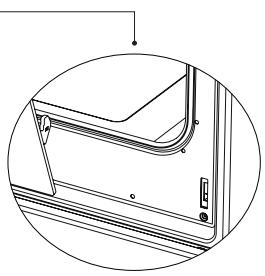
Lift by pressing on plastic latches on left and right side as shown in Figure 13 and pulling the profile toward yourself as in Figure 14. Glass is released after profile is removed as shown in Figure 15. Remove the released glass by pulling toward yourself carefully. Outer glass is fixed to oven door profile. You can perform glass cleaning easily after glasses are released. You can mount glasses back by performing the operations reversely after cleaning and maintenance are completed. Ensure that profile is seated properly in place.
natural_image
Line drawing of an oven with internal rack and door (no text or symbols)Figure 13
natural_image
Line drawing of an open oven with internal rack and door (no text or symbols)Figure 14
natural_image
Line drawing of an oven with internal air ducts and a separate rack unit (no text or symbols)Figure 15
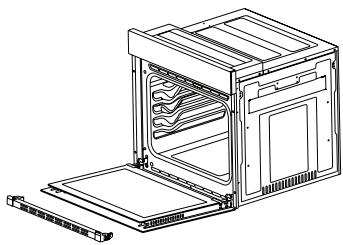
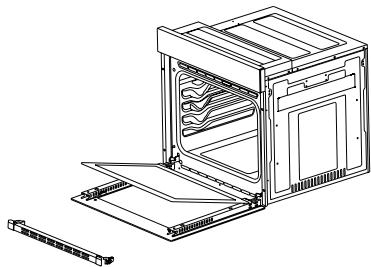
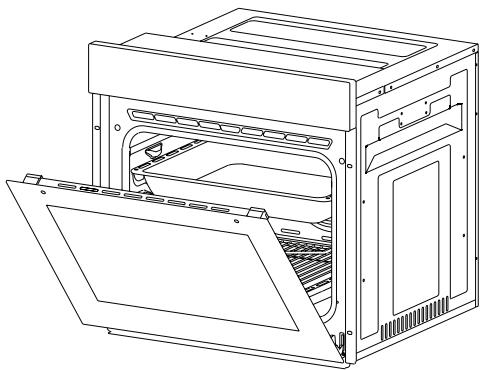
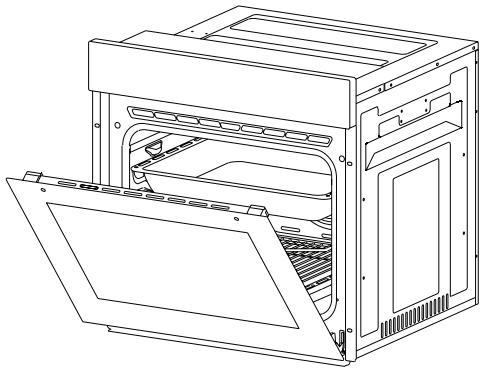
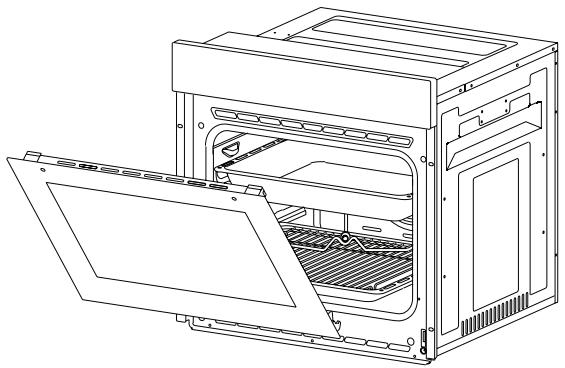
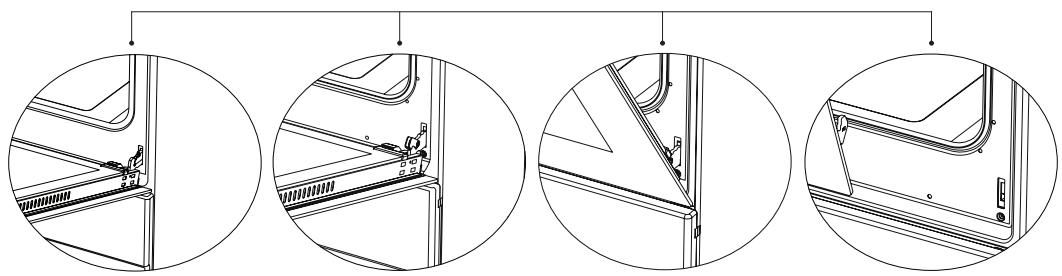
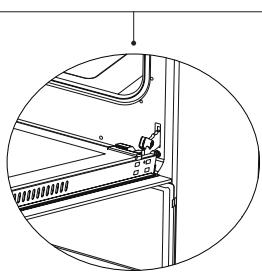
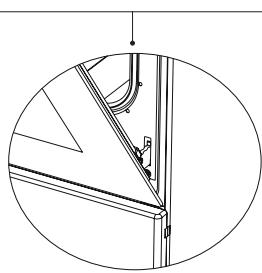
CLEANING AND MOUNTING OVEN DOOR
natural_image
Line drawing of an open oven with internal compartments and ventilation slots (no text or symbols)Figure 16
natural_image
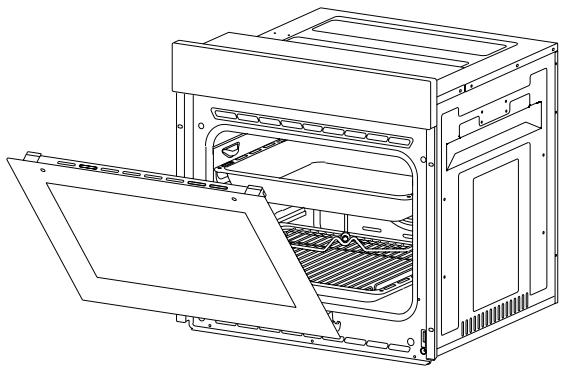
Line drawing of an open oven with internal grating and ventilation slots (no text or symbols)Figure 17
natural_image
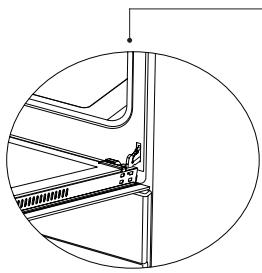
Technical line drawing of a mechanical assembly inside a circular frame (no text or symbols)Figure 16.1
natural_image
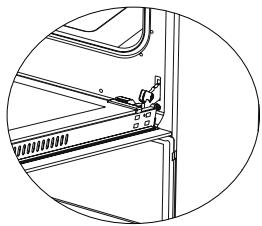
Technical line drawing of a mechanical assembly or bracket (no text or symbols)Figure 16.2

natural_image
Pure technical line drawing of a mechanical assembly without any text, numbers, or symbolsFigure 17.1
natural_image
Technical line drawing of a mechanical component or bracket (no text or symbols)Figure 17.2
Open the door fully by pulling the oven door toward yourself. Then perform unlock operation by pulling the hinge lock upwards with the aid of screwdriver as indicated in
Figure 16.1.
Set the hinge lock to the widest angle as in Figure 16.2. Adjust both hinges connecting oven door to the oven to the same position.
Later, close the opened oven door so that it will be in a position to contact with hinge lock as in
Figure 17.1.
For easier removal of oven door, when it comes close to closed position, hold the cover with two hands as in Figure 17.2
and pull upwards.
Reversely perform respectively what you did while opening door to reinstall oven door back.
MAINTENANCE AND CLEANING
- Remove the power plug from electrical socket.
- Do not clean inner parts, panel, trays and other parts of the product with hard tools such as bristle brush, wire wool or knife. Do not use abrasive, scratching materials or detergent.
- Rinse after wiping the parts at inner parts of the product with soapy cloth, then dry thoroughly with a soft cloth.
- Clean glass surfaces with special glass cleaning material.
- Do not clean your product with steam cleaners.
- Never use combustibles like acid, thinner and gas while cleaning your product.
- Do not wash any part of the product in dishwasher.
- "Use potassium stearate (soft soap) for dirt and stains."
You can perform cleaning with a soft textured cloth not to scratch surfaces according to the figures below.
STEAM CLEANING*

natural_image
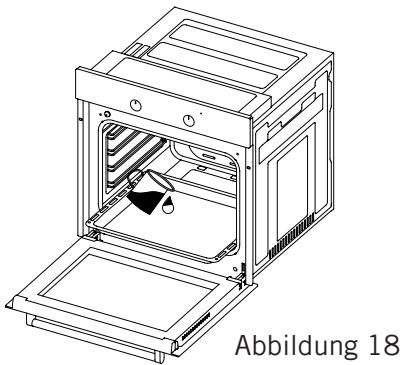
Line drawing of an oven with a door open, showing internal structure and a labeled section (Figure 18)It enables cleaning the soils softened thanks to the steam to be generated in the oven.
- Remove all the accessories in the oven.
- Pour a half litre of water into the tray and Place the tray at the bottom of the boiler.
- Set the switch to the steam cleaning mode.
-
Set the thermostat to 70^ C degrees and operate the oven for 30 minutes.
-
After operating the oven for 30 minutes, open the oven door and wipe the inner surfaces with a wet cloth.
- Use dish-washing liquid, warm water and a soft cloth for stubborn dirt, then dry off the area you have just cleaned with a dry cloth.
ACCESSORIES (Optional)
natural_image
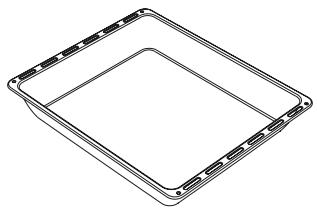
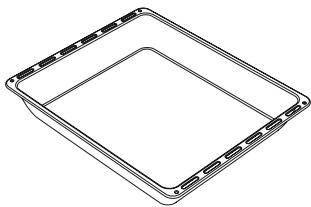
Simple line drawing of a square frame with side tick marks (no text or symbols)Deep Tray \*
Used for pastry, big roasts, watery foods. It can also be used as oil collecting container if you roast directly on grill with cake, frozen foods and meat dishes.
natural_image
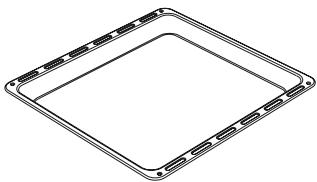
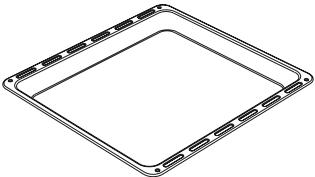
Pure geometric diagram of a square frame with no text, numbers, or symbolsTray
Used for pastry (cookie, biscuit etc.), frozen foods.
natural_image
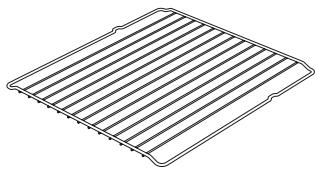
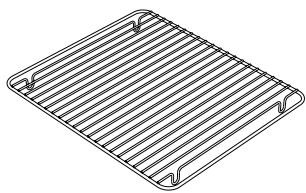
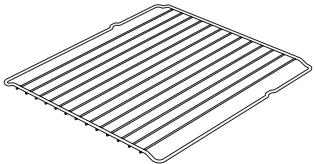
Line drawing of a rectangular grid pattern with parallel lines, no text or symbols presentWire Grill
Used for roasting or placing foods to be baked, roasted and frozen into desired rack.
natural_image
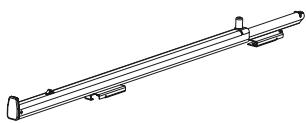
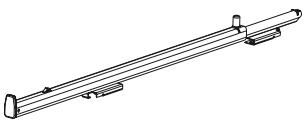
Technical line drawing of a mechanical support bracket (no text or symbols)Telescopic Rail\*
Trays and wire racks can be removed and installed easily thanks to telescopic rails.
natural_image
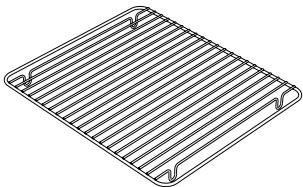
Line drawing of a rectangular metal grate with slats and rivets (no text or symbols)In Tray Wire Grill \*
Foods to stick while cooking such as steak are placed on in tray grill. Thus contact of food with tray and sticking are prevented.
natural_image
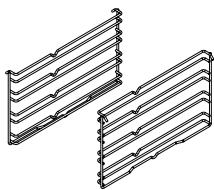
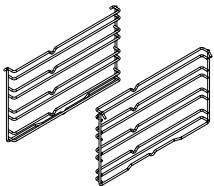
Pure technical line drawing of two identical mechanical or structural components with parallel grooves (no text or symbols)Wire Racks\*
You can place deep tray and tray on lower and upper wire racks while cooking.
TROUBLESHOOTING
You can solve the problems you can face with your product by checking the following points before calling the technical service.
If Oven Doesn't Work;
- Check if electrical cable of the oven is plugged.
- Safely check if there is power in the network.
- Check the fuses.
- Check if electrical cable of the oven is damaged.
ENVIRONMENTALLY-FRIENDLY DISPOSAL
natural_image
Symbol of a trash bin crossed with no text or labels, representing waste sorting or disposal (no text present)Dispose of packaging in an environmentally-friendly manner.
This appliance is labelled in accordance with European Directive 2012/19/EU concerning used electrical and electronic appliances (waste electrical and electronic equipment - WEEE). The guideline determines the frame work for the return and recycling of used appliances as applicable throughout to the EU.
PACKAGE INFORMATION
Packaging materials of the product are manufactured from recyclable materials in accordance with our National Environment Regulations. Do not dispose of the packaging materials together with the domestic or other wastes. Take them to the packaging material collection points designated by the local authorities.
Sehr Geehrter Kunde,
Vielen Dank, dass Sie auf dieses Produkt vertrauen.
Wir haben das Ziel, Ihnen einen optimalen und effizienten Einsatz dieses umweltfreundlichen Produktes zu ermöglichen, das unter Berücksichtigung eines ganzheitlichen Qualitätsansatzes unter strengen Bedingungen in unseren modernen Anlagen hergestellt wurde.
Sie sollten diese Bedienungsanleitung vor der Inbetriebnahme des Ofens aufmerksam durchlesen und sicher aufbewahren, damit die Merkmale und Funktionen des von Ihnen erworbenen Einbauofens lange Zeit optimale Dienste leisten.
Hinweis:
Diese Anleitung wurde für mehrere Modelle geschrieben. Ihr Gerät verfügt möglicherweise nicht über alle in der Anleitung angegebenen Funktionen.
Die Produktabbildungen sind schematisch.
Dieses Produkt wurde ohne negative Auswirkungen auf die Natur in modernen, umweltfreundlichen Anlagen gefertigt.
Mit (*) markierte Produkte sind optional.
„Konformität mit AEEE-Richtlinie“
INHALT
Wichtige Warnhinweise....26
Vorstellung Des Gerätes....29
Technische Daten....30
Installation Des Gerätes....30
Wichtige Warnhinweise....37
Bedienfeld....38
Programmarten....39
Zubereitungsempfehlungen....40
Zubereitungstabelle....41
Ofen Verwenden....41
Ofenbeleuchtung Auswechseln....42
Ofenglas Reinigen....43
Ofentür Reinigen Und Montieren....44
Wartung Und Reinigung....45
Dampfreinigung....45
Zubehör......46
Problemlösung....47
Umweltgerechte Entsorgung......47
Informationen Zur Verpackung......47
WICHTIGE WARNHINWEISE
- Warnung: Stellen Sie zur Vermeidung von Stromschlägen sicher, dass der Geräteschaltkreis offen ist, bevor Sie das Leuchtmittel auswechseln.
- Warnung: Alle Verbindungen des Versorgungsschaltkreises müssen getrennt werden, bevor Sie auf die Anschlüsse zugreifen.
- Warnung: Zugängliche Teile können sich beim Einsatz des Rosts erhitzen. Kinder müssen ferngehalten werden.
- Warnung: Brandgefahr; bewahren Sie nichts auf der Herdfläche auf.
- Warnung: Falls die Fläche springt, öffnen Sie zur Vermeidung von Stromschlaggefahr den Geräteschaltkreis.
- Warnung: Das Gerät und zugängliche Teile werden im Betrieb heiß.
- Die Installationsbedingungen dieses Gerätes sind am Typenschild (oder am Datenschild) angegeben.
- Zugängliche Teile können sich beim Einsatz des Grills erhitzen. Kleine Kinder sollten ferngehalten werden.
- Warnung: Das Gerät ist ausschließlich zum Garen vorgesehen. Verwenden Sie es nicht zu anderen Zwecken, wie bspw. als Raumheizung.
-
Es gibt zusätzliche Schutzvorrichtungen, die einen Kontakt mit der Ofentür verhindern. Solche Artikel sollten angebracht werden, wenn kleine Kinder im Haushalt leben.
-
Verwenden Sie zur Reinigung des Gerätes keine Dampfreiniger.
- Versuchen Sie NIEMALS, ein Feuer mit Wasser zu löschen. Schalten Sie stattdessen den Geräteschaltkreis aus und decken Sie die Flamme mit einem Deckel oder einer Löschdecke ab.
- Reinigen Sie das Glas der Ofentür nicht mit rauen oder scheuernden Reinigern bzw. harten Metallschabern, da diese die Oberfläche verkratzen und Sprünge verursachen können.
- Stellen Sie sicher, dass die Tür vollständig geschlossen ist, nachdem Sie Lebensmittel in den Ofen gegeben haben.
- Kinder unter 8 Jahren sollten ferngehalten werden, sofern keine lückenlose Beaufsichtigung gewährleistet ist.
- Berühren Sie keine Heizelemente.
- Dieses Gerät kann von Kindern ab 8 Jahren, Hörgeschädigten und Personen mit körperlichen oder mentalen Beeinträchtigungen oder einem Mangel an Erfahrung oder Wissen verwendet werden, sofern sie beaufsichtigt werden oder mit den damit verbundenen Gefahren vertraut gemacht wurden.
-
Das Gerät ist nicht auf den Betrieb mit einem externen Timer oder separaten Fernsteuerungssystem ausgelegt.
-
Dieses Gerät wurde speziell für den Einsatz im Haushalt, nicht für den kommerziellen Einsatz entwickelt.
- Reinigung und Nutzerwartung dürfen nicht von Kindern ausgeführt werden, sofern sie nicht beaufsichtigt werden.
- Kinder dürfen nicht mit dem Gerät spielen. Reinigung und Nutzerwartung sollten nicht von Kindern ausgeführt werden, sofern sie nicht älter als 8 Jahre sind und von einem Erwachsenen beaufsichtigt werden.
- Achten Sie darauf, dass Gerät und Gerätekabel für Kinder bis einschließlich 8 Jahren unzugänglich sind.
- Stellen Sie vor Inbetriebnahme des Gerätes sicher, dass sich keine Vorhänge, Papiertücher oder brennbaren (entflammbaren) Materialien in seiner Nähe befinden. Platzieren Sie entflammbare oder brennbare Materialien nicht im oder auf dem Gerät.
VORSTELLUNG DES GERÄTES
text_image
Technical diagram of an oven with numbered parts for identification- Bedienfeld
- Tiefes Blech*
-
Bratspieß
-
Bratenrost
- Standardblech
- Ofentür
text_image
Technical diagram of an oven with numbered labels pointing to internal components- Beleuchtung
- Bratenrost
- Standardblech
TECHNISCHE DATEN
| Technische Daten | Einbauofen, 60 cm | |||
| Beleuchtungsleistung | 15W | |||
| Thermostat | 40 – 240 / Max. °C | |||
| Unteres Heizelement | 1200W | |||
| Oberes Heizelement | 1000W | |||
| Turboheizelement | 1800W | |||
| Grillheizelement | Kleiner Grill | 1000W | Großer Grill | 2000W |
| Versorgungsspannung | 220 – 240 V, 50/60 Hz | |||
Technische Daten können zur Verbesserung der Produktqualität ohne Ankündigung geändert werden.
Die mit dem Gerät oder seinen Begleitdokumenten bereitgestellten Werte sind Laborwerte, die in Übereinstimmung mit den entsprechenden Standards ermittelt wurden. Diese Werte können je nach Nutzungs- und Umgebungsbedingungen variieren.
Die Abbildungen in dieser Anleitung sind schematisch und stimmen möglicherweise nicht exakt mit Ihrem Produkt überein.
INSTALLATION DES GERÄTES
Stellen Sie sicher, dass die Elektroinstallation für die Inbetriebnahme des Gerätes geeignet ist. Falls nicht, lassen Sie von einem Elektriker und/oder Klempner die erforderlichen Maßnahmen durchführen. Der Hersteller kann nicht für Schäden aufgrund von Tätigkeiten durch unautorisierte Personen gemacht werden; zudem erlischt in solchen Fällen die Garantie.
WARNUNG: Die Vorbereitung des Aufstellungsortes und die Gewährleistung einer angemessenen Netzversorgung liegen in der Verantwortung des Kunden.
WARNUNG: Bei der Produktinstallation müssen Vorschriften über lokale elektrische Standards eingehalten werden.
WARNUNG: Prüfen Sie das Produkt vor der Installation auf jegliche Schäden. Lassen Sie ein beschädigtes Produkt nicht installieren. Beschädigte Produkte bergen Sicherheitsrisiken.
Wichtige Warnhinweise zur Installation:

natural_image
Technical line drawing of a mechanical or electrical component with internal channels and directional arrows (no text or symbols)Abbildung 1
Der Lüfter soll überschüssigen Dampf ableiten und verhindern, dass die Außenflächen des Ofens während des Betriebs überhitzen. Dies ist eine notwendige Bedingung zur Verbesserung des Gerätebetriebs und der Garergebnisse.
Der Lüfter arbeitet nach dem Garen noch einige Zeit weiter. Nach Abschluss der Kühlung stoppt er automatisch.
Halten Sie am Aufstellungsort hinter dem Gerät einen ausreichenden Abstand ein, damit das Gerät effizient und gut arbeiten kann. Dieser Freiraum muss aufgrund des Belüftungssystems des Gerätes unbedingt beachtet werden.
Der richtige Aufstellungsort
Das Produkt wurde zur Montage unter marktüblichen Arbeitsplatten entwickelt. Halten Sie zwischen dem Produkt und Küchenwänden oder -möbeln einen Sicherheitsabstand ein. Beachten Sie dazu die in der Abbildung auf der nächsten Seite angegebenen Abstände (Werte in mm).
- Verwendete Oberflächen, synthetische Schichtstoffe und Klebstoffe müssen hitzeresistent sein (mindestens 100 °C).
- Küchenschränke müssen mit dem Produkt auf gleicher Höhe und gesichert sein.
- Falls sich eine Schublade unter dem Ofen befindet, muss ein Gestell zwischen Ofen und Schublade platziert werden.
WARNUNG: Installieren Sie das Produkt nicht neben Kühl- oder Tiefkühlgeräten. Die vom Produkt abgegebene Wärme erhöht den Energieverbrauch von Kühlgeräten.
WARNUNG: Transportieren oder verschieben Sie das Produkt nicht an der Tür und/oder am Griff.
Einbauofen (60 cm) installieren und montieren
Entscheiden Sie sich vor Beginn der Installation für einen Aufstellungsort.
Das Produkt darf nicht an Orten installiert werden, die einem starken Luftstrom ausgesetzt sind.
Das Produkt muss von mindestens zwei Personen getragen werden. Ziehen Sie das Produkt nicht über den Boden, da dieser andernfalls beschädigt werden könnte.
Entfernen Sie alle Transportmaterialien inner- und außerhalb des Produktes. Entfernen Sie alle Materialien und Dokumente im Produkt.
Unter einer Arbeitsplatte installieren
Der Schrank muss mit den in Abbildung 2 angegebenen Abmessungen übereinstimmen.
Im hinteren Bereich muss zur Gewährleistung der erforderlichen Belüftung wie abgebildet ein ausreichend großer Freiraum vorhanden sein.
Der Abstand zwischen dem unteren und oberen Teil der Arbeitsplatte nach der Montage wird mit „A“ in Abbildung 5 angezeigt. Er dient der Belüftung und sollte nicht verdeckt werden.
In einem erhöhten Schrank installieren
Der Schrank muss mit den in Abbildung 4 angegebenen Abmessungen übereinstimmen.
Im hinteren Teil des Schranks sowie im oberen und unteren Bereich müssen zur Gewährleistung der erforderlichen Belüftung wie abgebildet ausreichend große Freiräume vorhanden sein.
Installationsanforderungen
Die Produktabmessungen finden Sie in Abbildung 3.
Möbelflächen zur Befestigung sowie Montagematerialien müssen eine Hitzebeständigkeit von mindestens 100 °C aufweisen.
Der Schrank muss gesichert sein und über einen ebenen Boden verfügen, damit das Produkt nicht umkippt.
Der Schrankboden muss ein Gewicht von mindestens 60 kg aushalten.
Ofen positionieren und befestigen
Positionieren Sie den Ofen im Schrank; dazu werden mindestens zwei Personen benötigt.
Stellen Sie sicher, dass der Rahmen des Ofens und die Vorderkante des Möbels bündig sind.
Das Netzkabel darf nicht unter dem Ofen oder zwischen Ofen und Möbel eingeklemmt bzw. übermäßig gebogen werden.
Befestigen Sie den Ofen mit den mitgelieferten Schrauben am Möbel. Die Schrauben müssen wie in Abbildung 5 gezeigt montiert werden; führen Sie sie dazu durch die am Rahmen des Produktes angebrachten Kunststoffteile. Die Schrauben dürfen nicht zu fest angezogen werden. Andernfalls könnten die Gewinde beschädigt werden.
Stellen Sie nach der Montage sicher, dass sich der Ofen nicht bewegt. Falls der Ofen nicht entsprechend den Anweisungen montiert wird, besteht die Gefahr, dass er während des Betriebs umkippt.
Elektrischer Anschluss
Der Aufstellungsort des Produktes muss über eine angemessene Elektroinstallation verfügen.
Die Netzspannung muss mit den am Typenschild des Produktes angegebenen Werten übereinstimmen.
Der Produktanschluss muss in Übereinstimmung mit den lokalen und nationalen elektrischen Anforderungen erfolgen.
Trennen Sie vor Beginn der Montage die Stromversorgung. Schließen Sie das Produkt erst nach Abschluss der Montage an.
Montage

text_image
Architectural floor plan of a kitchen with labeled cabinets, fixtures, and oven diagramAbbildung 2

text_image
560 600 35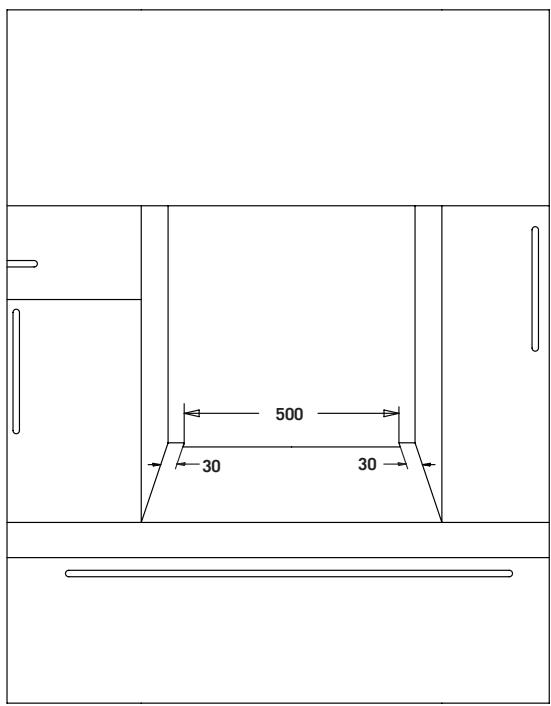
text_image
500 30 30
text_image
555 545 565 22 595 595Abbildung 3
text_image
Architectural floor plan of a kitchen with labeled cabinets, ovens, and appliancesAbbildung 4
text_image
590 550 35 560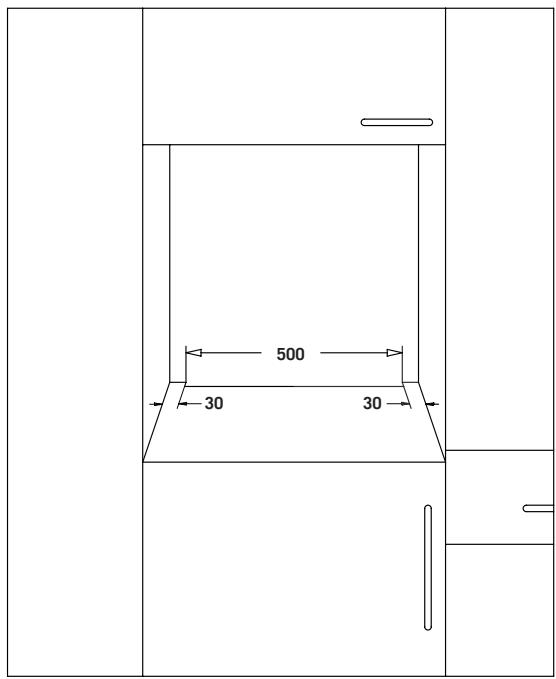
text_image
500 30 30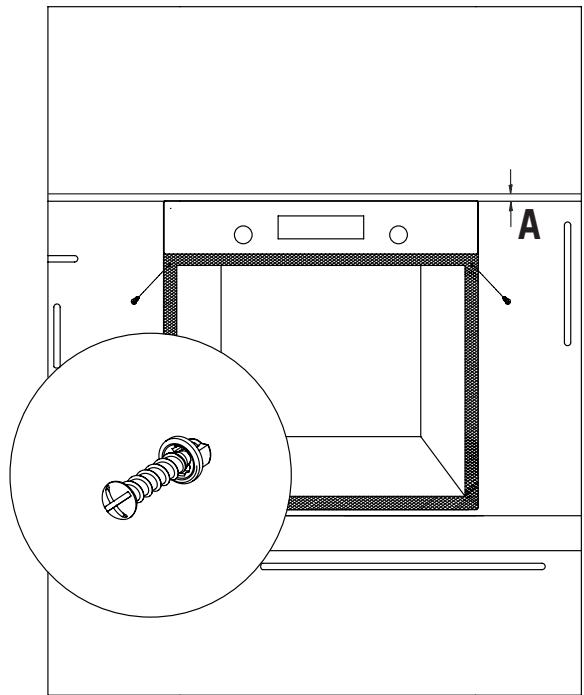
text_image
Technical diagram showing a mechanical assembly with a washer and mounting bracket, labeled with dimension 'A'Abbildung 5
WICHTIGE WARNHINWEISE
Elektrischer Anschluss und elektrische Sicherheit
Dieser Ofen muss von einem autorisierten Serviceanbieter sachgemäß in Übereinstimmung mit den Anweisungen des Herstellers installiert und angeschlossen werden.
Das Gerät muss in einem Ofengehäuse installiert werden, das eine angemessene Belüftung bereitstellt.
Der elektrische Anschluss des Gerätes muss über Schutzkontaktstecker (Schukostecker) mit Schutzerde und gemäß elektrotechnischen Vorgaben erfolgen. Wenden Sie sich an einen autorisierten Elektriker, falls am Aufstellungsort des Gerätes kein entsprechender Anschluss mit Schutzerde vorhanden ist. Der Hersteller übernimmt unter keinen Umständen Verantwortung für Schäden aufgrund des Anschlusses an nicht geerdete Steckdosen.
Der Stecker Ihres Ofens muss geerdet sein; stellen Sie sicher, dass die Steckdose für den Stecker geerdet ist. Der Stecker muss auch nach der Installation zugänglich sein.
Ihr Ofen ist auf 220 bis 240 V bei 50/60 Hz ausgelegt. Es muss sich um eine Wechselstromversorgung mit einer 16-Ampere-Sicherung handeln. Falls Ihre Stromversorgung nicht mit den angezeigten Werten übereinstimmt, wenden Sie sich an einen Elektriker oder autorisierten Serviceanbieter.
Wenn Sie die elektrische Sicherung ersetzen müssen, nehmen Sie den elektrischen Anschluss wie folgt vor:
- Braunes Phasenkabel an stromführende Klemme
- Blaues Kabel an Nullleiterklemme
• Gelb-grünes Kabel an Erdungsklemme
Trennvorrichtungen des Ofens müssen für den Endanwender nach der Installation zugänglich sein.
Das Netzkabel darf keine heißen Teile des Gerätes berühren.
Falls das Netzkabel beschädigt ist, muss es zur Vermeidung von Gefahren vom Importeur, seinem Serviceagenten oder einer ähnlich qualifizierten Person ersetzt werden.
BEDIENFELD
flowchart
graph TD
    P["•"] --> A["Circle"]
    A --> B["Box 1"]
    A --> C["Box 2"]
    A --> D["Box 3"]
    A --> E["Box 4"]
natural_image
Empty white square with a thin black border (no text or symbols)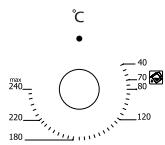
text_image
°C max 240 220 180 40 70 80 120Darstellung digitale Blende
flowchart
graph TD
    P["•"] --> A[" "]
    A --> B[" "]
    B --> C[" "]
    C --> D[" "]
    D --> E[" "]
    E --> F[" "]
text_image
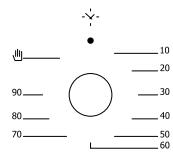
10 20 30 40 50 60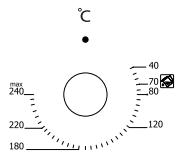
text_image
°C max 240 220 180 40 70 80 120Darstellung mechanische Blende
Bei Modellen mit herausspringenden Knöpfen können Einstellungen erst vorgenommen werden, nachdem der jeweilige Knopf herausgesprungen ist.
natural_image
Line drawing of a hand pressing a button on a control panel (no text or symbols)Abbildung 6 *
Drücken Sie dazu wie in der Abbildung links gezeigt auf den jeweiligen Knopf.
natural_image
Line drawing of a hand adjusting a circular component on a cabinet (no text or symbols)Abbildung 7 *
Drehen Sie den herausgesprungenen Knopf zur Durchführung der erforderlichen Anpassungen nach rechts oder links.
text_image
°C max 240 220 180 40 70 80 120Abbildung 8
Thermostatknopf: Dient der Einstellung der Gartemperatur der im Ofen zuzubereitenden Lebensmittel. Stellen Sie die gewünschte Temperatur durch Drehen des Knopfes ein, nachdem Sie die Lebensmittel in den Ofen gegeben haben. Prüfen Sie die Zubereitungstabelle bezüglich der Gartemperaturen verschiedener Lebensmittel.
text_image
10 20 30 40 50 60Abbildung 9
*Mechanischer-Timer-Knopf: Dient der Einstellung der Zeit für die im Ofen zuzubereitenden Lebensmittel. Nach Ablauf der eingestellten Zeit werden die Heizelemente ausgeschaltet und es ertönt ein Signal. Garzeiten entnehmen Sie bitte der Zubereitungstabelle.
flowchart
graph TD
    A["○"] --> B["左"]
    A --> C["右"]
    A --> D["中"]
    A --> E["下"]
    A --> F["中"]
    A --> G["下"]
    H["P"] --> I["●"]
Abbildung 10
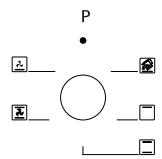
Programmknopf: Dient der Festlegung der gewünschten Heizelemente, mit denen die Lebensmittel im Ofen gegart werden sollen. Nachstehend werden die Programmtypen und ihre Funktionen erläutert. Möglicherweise bietet nicht jedes Modell alle Heizelemente und damit auch nicht alle Programmtypen.
PROGRAMMTYPEN
Nachstehend erfahren Sie mehr über die Programmtypen sowie wichtige Erläuterungen zu diesen, damit Sie verschiedene Lebensmittel ganz nach Geschmack zubereiten können.
 | Unteres und oberes Heizelement | Gebläse | |
 | Unteres Heizelement und Gebläse | Turboheizelement und Gebläse | |
 | Grill und Bratspieß | Unteres/oberes Heizelement und Gebläse | |
 | Oberes Heizelement und Gebläse | Grill und Gebläse | |
 | Multifunktionsgaren | Grill | |
 | Unteres Heizelement | Oberes Heizelement | |
 | Kleiner Grill und Gebläse | Dampfreinigung |
Unteres Heizelement: Wählen Sie dieses Programm gegen Ende der Zubereitung, wenn die Unterseite der Lebensmittel stärker gegart werden soll.
DE
Oberes Heizelement: Zum Nachheizen oder Rösten kleiner Portionen.
Unteres und oberes Heizelement: Ein Programm zur Zubereitung von Speisen wie Kuchen, Pizza, Plätzchen und Keksen.
Unteres Heizelement und Gebläse: Dient vorwiegend der Zubereitung von Speisen, wie Früchtekuchen.
Unteres und oberes Heizelement und Gebläse: Das Programm eignet sich zur Zubereitung von Speisen, wie Kuchen, Trockenkuchen und Lasagne. Auch für unterschiedliche Fleischgerichte geeignet.
Grill: Das Grillelement dient dem Grillen von Fleisch, wie Steaks und Würstchen, und Fischgerichten. Beim Grillen sollte ein mit Wasser gefülltes Blech in den unteren Einschub eingeschoben werden.
Turboheizelement und Gebläse: Zum Backen und Braten geeignet. Bei diesem Programm können Sie mit geringerer Hitze als bei Oberhitze / Unterhitze garen, da die Hitze durch den Luftstrom direkt an die Speisen gelangt.
Grill und Gebläse: Für unterschiedliche Fleischgerichte geeignet. Vergessen Sie nicht, beim Grillen ein mit etwas Wasser gefülltes Blech im unteren Einschub zu platzieren.
Multifunktionsgaren: Zum Backen und Braten geeignet. Oberes und unteres Heizelement sind in Betrieb, der Luftstrom sorgt für eine schnelle Hitzeübertragung. Geeignet zum Garen von Speisen, die ein einzelnes Blech und intensive Hitze erfordern.
ZUBEREITUNGSEMPFEHLUNGEN
Die nachstehende Tabelle enthält Informationen zu Lebensmittelarten, die wir in unseren Labors getestet und hinsichtlich ihrer Zubereitungswerte untersucht haben. Die Garzeiten hängen von der Netzspannung, den Speisen selbst, der Menge und der Temperatur ab. Eventuell gelingen Gerichte nicht ganz nach Ihrem Geschmack, wenn Sie sich eng an die Empfehlungen halten. Experimentieren Sie ein wenig mit unterschiedlichen Werten, bis die Speisen so schmecken, wie es sein soll.
WARNUNG: Der Ofen muss 7 bis 10 Minuten vorgeheizt werden, bevor Sie Lebensmittel hineingeben.
ZUBEREITUNGSTABELLE
| Lebensmittel | Zubereitung Funktion | Zubereitungs Temperatur (°C) | Einschub | Zubereitungs Zeit (Min.) |
| Kuchen | Statisch / Statik+Gebläse | 170-180 | 2-3 | 35-45 |
| Kleine Kuchen | Statisch / Turbo+ Gebläse | 170-180 | 2 | 25-30 |
| Pastete | Statisch / Statik+Gebläse | 180-200 | 2 | 35-45 |
| Feingebäck | Statisch | 180-190 | 2 | 20-25 |
| Kekse | Statisch | 170-180 | 2 | 20-25 |
| Apfelkuchen | Statisch / Turbo+ Gebläse | 180-190 | 1 | 50-70 |
| Biskuitkuchen | Statisch | 200/150* | 2 | 20-25 |
| Pizza | Statik+ Gebläse | 180-200 | 3 | 20-30 |
| Lasagne | Statisch | 180-200 | 2-3 | 25-40 |
| Schaumgebäck | Statisch | 100 | 2 | 50 |
| Grillhähnchen** | Grill+ Gebläse | 200-220 | 3 | 25-35 |
| Gegrillter Fisch** | Grill+ Gebläse | 200-220 | 3 | 25-35 |
| Kalbsteak** | Grill+ Gebläse | Max | 4 | 15-20 |
| Gegrilltes Fleisch Balls** | Grill+ Gebläse | Max | 4 | 20-25 |
* Nicht vorheizen. Die erste Hälfte der Garzeit sollte bei 200 °C, die zweite Hälfte bei 150 °C erfolgen.
** Lebensmittel müssen nach der Hälfte der Garzeit gewendet werden.
OFEN VERWENDEN
Erste Inbetriebnahme des Ofens
Bitte befolgen Sie vor der ersten Benutzung Ihres Ofens die nachstehenden Anweisungen:
- Entfernen Sie die im Ofen angebrachten Etiketten und Zubehörteile. Lösen Sie außerdem jegliche Schutzfolie an der Vorderseite des Gerätes, falls vorhanden.
-
Beseitigen Sie Staub und Verpackungsreste, indem Sie die Innenseite des Ofens mit einem feuchten Tuch abwischen. Das Innere des Ofens muss leer sein. Schließen Sie das Gerätekabel an eine Steckdose an.
-
Stellen Sie den Thermostatknopf auf die höchste Temperatur (max. 240 °C) ein und lassen Sie den Ofen 30 Minuten lang bei geschlossener Tür arbeiten. Dabei kann es zu einer schwachen Geruchs- und Rauchentwicklung kommen; dies ist völlig normal.
DE
- Wischen Sie die Innenseite des Ofens mit einem leicht mit warmem Wasser und einem Reinigungsmittel angefeuchteten Tuch aus, nachdem sich das Gerät abgekühlt hat; trocknen Sie die Flächen anschließend mit einem sauberen Tuch ab. Nun können Sie Ihren Ofen benutzen.
Normale Benutzung des Ofens
- Stellen Sie zunächst über den Thermostatknopf die Temperatur ein, bei der Sie die Lebensmittel garen möchten.
- Bei Modellen mit mechanischem Timer können Sie die Garzeit wie gewünscht über den Knopf einstellen. Sobald die eingestellte Zeit abgelaufen ist, schaltet das Gerät die Heizelemente aus und es ertönt ein Signal.
- Bei Modellen mit digitalem Timer werden nach Ablauf der eingestellten Zeit die Heizelemente abgeschaltet und es ertönt ein Signal.
- Das Kühlsystem des Gerätes arbeitet nach Abschluss der Zubereitung noch einige Zeit weiter. Unterbrechen Sie in diesem Fall nicht die Stromversorgung des Gerätes, da andernfalls auch die Kühlung unterbrochen wird. Nach Abschluss der Kühlung schaltet sich das System ab.
OFENBELEUCHTUNG AUSWECHSELN
WARNUNG: Stellen Sie zur Vermeidung von Stromschlägen sicher, dass der Geräteschaltkreis offen ist, bevor Sie das Leuchtmittel auswechseln. (Ein offener Schaltkreis bedeutet, dass die Stromversorgung unterbrochen ist)
Trennen Sie zunächst die Stromversorgung des Gerätes und stellen Sie sicher, dass das Gerät abgekühlt ist.
Entfernen Sie den Glasschutz, indem Sie ihn wie links abgebildet drehen. Falls sich das Drehen als schwierig erweist, sollten Sie Kunststoffhandschuhe anziehen.
Drehen Sie dann die Lampe heraus; installieren Sie eine neue Lampe mit den gleichen Spezifikationen. Die Spezifikationen der Lampe müssen wie folgt sein:
220 bis 240 V Wechselspannung, 50/60 Hz, 15 W, Typ E14
Bringen ie den Glasschutz wieder an und schließen Sie das.
Netzkabel des Gerätes an eine Steckdose an; damit ist der Austausch abgeschlossen. Nun können Sie Ihren Ofen wieder benutzen.
natural_image
Line drawing of a hand adjusting a mechanical component with a circular arrow indicating rotation (no text or symbols)Abbildung 11
natural_image
Line drawing of a mechanical component with a knob and frame (no text or symbols)Abbildung 12
OFENGLAS REINIGEN
Entfernen Sie das Profil, indem Sie die Kunststofffriegel auf der linken und rechten Seite eindrücken (vgl. Abbildung 13) und das Profil zu sich ziehen (vgl. Abbildung 14). Nachdem Sie das Profil entfernt haben, können Sie das Glas herausnehmen (vgl. Abbildung 15).
Entfernen Sie das Glas, indem Sie es vorsichtig zu sich ziehen. Das Außenglas ist am Profil der Ofentür befestigt. Nachdem Sie das Glas entfernt haben, können Sie es mühelos reinigen. Setzen Sie das Glas nach der Reinigung und Warten wieder ein, indem Sie die Schritte in umgekehrter Reihenfolge befolgen. Stellen Sie sicher, dass das Profil richtig sitzt.
natural_image
Line drawing of an open oven with internal rack and ventilation slots (no text or symbols)Abbildung 13
natural_image
Line drawing of an open oven with internal cooling ducts and ventilation slots (no text or symbols)Abbildung 14
natural_image
Line drawing of an oven with internal cooling ducts and a side panel (no text or symbols)Abbildung 15
OFENTÜR REINIGEN UND MONTIEREN
natural_image
Line drawing of an open oven with internal compartments and ventilation grilles (no text or symbols)Abbildung 16
natural_image
Line drawing of an open oven with internal compartments and ventilation slots (no text or symbols)Abbildung 17
natural_image
Four-panel line drawing showing mechanical assembly steps: front, side, top, and side views (no text or symbols)Abbildung 16.1
natural_image
Technical line drawing of a mechanical assembly with no visible text or symbolsAbbildung 16.2
natural_image
Pure technical line drawing of a mechanical component without any text, numbers, or symbolsAbbildung 17.1
natural_image
Technical line drawing of a door frame with mounting holes and a button (no text or symbols)Abbildung 17.2
Öffnen Sie die Ofentür vollständig, indem Sie sie zu sich ziehen. Ziehen Sie den Scharnierverschluss zum Entriegeln mit Hilfe eines Schraubendrehers nach oben; beachten Sie dazu Abbildung 16.1.
Stellen Sie den Scharnierverschluss, wie in Abbildung 16.2 gezeigt, auf den breitesten Winkel ein. Passen Sie beide Scharniere, die die Ofentür mit dem Ofen verbinden, auf die gleiche Position an.
Schließen Sie die geöffnete Ofentür anschließend, bis sie wie in Abbildung 17.1 gezeigt mit dem Scharnierschloss in Kontakt steht.
Zum einfacheren Entfernen der Ofentür halten Sie die Abdeckung wie in Abbildung 17.2 gezeigt mit beiden Händen, sobald sie sich fast in geschlossener Position befindet. Anschließend ziehen Sie sie nach oben weg.
Bringen Sie die Ofentür wieder an, indem Sie die Schritte zur Demontage in umgekehrter Reihenfolge befolgen.
WARTUNG UND REINIGUNG
- Ziehen Sie den Netzstecker aus der Steckdose.
- Reinigen Sie Innenteile, Blende, Bleche und andere Teile des Produktes nicht mit harten Utensilien, wie harten Bürsten, Stahlwolle oder Messern. Verwenden Sie keine scheuernden oder kratzenden Materialien oder Reinigungsmittel.
- Reinigen Sie die Innenteile des Produktes mit einem mit Seife und Wasser angefeuchteten Tuch, anschließend Seifenreste beseitigen; trocknen Sie die Teile mit einem weichen Tuch ab.
- Reinigen Sie Glasflächen mit speziellen Glasreinigern.
- Reinigen Sie Ihr Produkt nicht mit Dampfreinigern.
- Verwenden Sie zur Reinigung Ihres Produktes niemals Brennstoffe, wie Säure, Verdünner und Gas.
- Reinigen Sie kein Teil des Produktes im Geschirrspüler.
- Verwenden Sie bei hartnäckigen Verschmutzungen Kaliumstearat (Schmierseife).
Verwenden Sie zur Reinigung ein weich texturiertes Tuch, damit die Flächen nicht verkratzt werden; beachten Sie die nachstehenden Abbildungen.
DAMPFREINIGUNG*
natural_image
Line drawing of an oven with a lid and door, labeled 'Abbildung 18' (no other text or symbols)Durch den im Ofen erzeugten Dampf lassen sich hartnäckige Verschmutzungen aufweichen.
- Entfernen Sie jegliches Zubehör aus dem Ofen.
- Gießen Sie einen halben Liter Wasser in das Blech und platzieren Sie das Blech auf dem Ofenboden.
-
Stellen Sie den Schalter auf den Dampfreinigungsmodus ein.
-
Stellen Sie die Temperatur über den thermostatknopf auf 70 °C ein und lassen Sie den Ofen 30 Minuten arbeiten.
- Öffnen Sie nach 30-minütigem Betrieb die Ofentür und wischen Sie die Innenflächen mit einem feuchten Tuch ab.
- Verwenden Sie bei hartnäckigen Verschmutzungen Spülmittel, warmes Wasser und ein weiches Tuch; trocknen Sie den gerade gereinigten Bereich anschließend mit einem trockenen Tuch ab.
ZUBEHÖR (optional)
 | Tiefes Blech*Für Feingebäck, große Braten, wässrige Lebensmittel. Kann auch als Sammelbehälter verwendet werden, wenn Sie Kuchen, gefrorene Lebensmittel oder Fischgerichte direkt auf dem Rost zubereiten. |
 | BlechFür Feingebäck (Kekse, Biskuit usw.), gefrorene Lebensmittel. |
 | GrillrostZum Braten oder Erwärmen (gefrorener) Lebensmittel im gewünschten Einschub. |
 | Teleskopschiene*Bleche und Grillroste können dank der Teleskopschienen mühelos entfernt und installiert werden. |
 | Bratenrost*Das Bratenrost empfiehlt sich bei Lebensmitteln, die bei der Zubereitung anhaften, wie z. B. Steaks. Dadurch berühren die Lebensmittel nicht das darunter befindliche Blech und haften nicht an. |
 | Einschubgitter*Während der Zubereitung können Sie Bleche und Roste an den Einschubgittern einschieben. |
PROBLEMLÖSUNG
Prüfen Sie bei Problemen mit Ihrem Produkt die nachstehenden Punkte, bevor Sie sich an den technischen Support wenden.
Der Ofen funktioniert nicht:
- Prüfen Sie, ob das Netzkabel des Ofens angeschlossen ist.
- Stellen Sie sicher, dass die Stromversorgung funktioniert.
- Prüfen Sie die Sicherungen.
- Prüfen Sie das Netzkabel des Ofens auf Schäden.
UMWELTGERECHTE ENTSORGUNG
natural_image
Symbol of a trash bin crossed with no text or labels, representing waste sorting or disposal (no text present)Bitte entsorgen Sie Verpackungen auf umweltfreundliche Weise.
Dieses Gerät ist gemäß der Europäischen Richtlinie 2012/19/EU in Bezug auf gebrauchte elektrische und elektronische Geräte (elektrische und elektronische Altgeräte, WEEE) gekennzeichnet. Die Richtlinie bestimmt den Gesetzesrahmen für die Rücknahme und Wiederverwertung von Altgeräten in der EU.
INFORMATIONEN ZUR VERPACKUNG
Die Verpackungsmaterialien dieses Produktes wurden in Übereinstimmung mit nationalen Umweltrichtlinien aus recyclingfähigen Materialien hergestellt. Entsorgen Sie die Verpackungsmaterialien nicht mit dem Hausmüll oder anderen Abfällen. Bringen Sie sie zu von den örtlichen Behörden zugewiesenen Sammelstellen für Verpackungsmaterialien.