
EBO 9611 IX - Four électrique BOMANN - Notice d'utilisation et mode d'emploi gratuit
Retrouvez gratuitement la notice de l'appareil EBO 9611 IX BOMANN au format PDF.

| Type de produit | Four électrique encastrable |
| Marque | BOMANN |
| Modèle | EBO 9611 IX |
| Dimensions extérieures (H x L x P) | 59,5 x 59,5 x 53,0 cm |
| Dimensions intérieures (H x L x P) | env. 33,0 x 47,0 x 43,0 cm |
| Dimensions d'encastrement (H x L x P) | 60,0 x 56,0 x 58,0 cm |
| Poids net | 28,0 kg |
| Alimentation électrique | 220-240 V~, 50/60 Hz |
| Puissance de raccordement | 3100 W |
| Protection par fusible | 16 A |
| Classe d'efficacité énergétique | A+ |
| Indice d'efficacité énergétique | 81,9 |
| Consommation d'énergie (conventionnel) | 0,72 kWh/cycle |
| Consommation d'énergie (chaleur tournante) | 0,65 kWh/cycle |
| Capacité du four | 58 L |
| Nombre de cavités | 1 |
| Source de chaleur | Électricité |
| Fonctions de cuisson | Chaleur tournante, chaleur voûte/sole, gril, gril combiné, décongélation, éclairage |
| Plage de température | 50 °C à 250 °C |
| Type de commande | Rotative + tactile (minuterie numérique) |
| Éclairage intérieur | Ampoule 25 W (type G9, résistante jusqu'à 300 °C) |
| Accessoires fournis | 1 plateau standard, 1 grille, 1 set télescopique (droite/gauche), matériel d'installation |
| Porte amovible pour nettoyage | Oui |
| Vitre intérieure démontable | Oui |
| Grilles latérales amovibles | Oui |
| Sécurité enfants | Non spécifié (mais les sélecteurs sont encastrés pour éviter une utilisation non intentionnelle) |
| Pièces détachées disponibles | Set télescopique (réf. 8 996 110) |
| Niveau sonore | 50 dB(A) |
| Garantie | Selon les conditions du fabricant |
FOIRE AUX QUESTIONS - EBO 9611 IX BOMANN
Questions des utilisateurs sur EBO 9611 IX BOMANN
0 question sur cet appareil. Repondez a celles que vous connaissez ou posez la votre.
Poser une nouvelle question sur cet appareil
Téléchargez la notice de votre Four électrique au format PDF gratuitement ! Retrouvez votre notice EBO 9611 IX - BOMANN et reprennez votre appareil électronique en main. Sur cette page sont publiés tous les documents nécessaires à l'utilisation de votre appareil EBO 9611 IX de la marque BOMANN.
MODE D'EMPLOI EBO 9611 IX BOMANN
HOUSEHOLD- BUILT-IN OVEN EBO 9611 IX
Contents
Introduction.. Page 3
General Notes.
Special safety Information for this Unit.
Unpacking the Appliance.. Page 5
Appliance Equipment.. Page 5
Installation.. Page 5
Startup / Operation.. Page 6
Cleaning and Maintenance.. Page 10
Troubleshooting.. Page 11
Technical Data.. Page 12
Disposal. Page 13
Introduction
Thank you for choosing our product. We hope you will enjoy using the appliance.
Symbols in these Instructions for Use
Important information for your safety is specially marked. It is essential to comply with these instructions in order to avoid accidents and prevent damage to the machine:

WARNING:
This warns you of dangers to your health and indicates possible injury risks.

CAUTION:
This refers to possible hazards to the machine or other objects.

NOTE: This highlights tips and information.
General Notes
Read the operating instructions carefully before putting the appliance into operation and keep the instructions including the warranty and the receipt. If you give this device to other people, please also pass on the operating instructions.
NOTE: The illustrations in this instruction manual can deviate from the original appliance.
- The appliance is designed exclusively for private use and for the envisaged purpose. This appliance is not fit for commercial use.
- The appliance is only to be used as described in the user manual. Do not use the appliance for any other purpose. Any other use is not intended and can result in damages or personal injuries.
- Operate the appliance only properly installed.
- Do not use it outdoors. Keep it away from sources of heat, direct sunlight and humidity.
- Do not operate the appliance without supervision.
- When not in use, for cleaning, user maintenance works or with disruption, switch off the appliance and disconnect the plug (pull the plug itself, not the lead) or turn off the fuse.
- The appliance and if possible the mains lead have to be checked regularly for signs of damage. If damage is found the appliance must not be used.
- For safety reasons, alterations or modifications of the appliance are prohibited.
- In order to ensure your children's safety, please keep all packaging (plastic bags, boxes, polystyrene etc.) out of their reach.

WARNING:
Do not allow small children to play with the foil. There is a danger of suffocation!
Special safety information for this Unit

WARNING: Danger from electrical current! Contact with live leads or components can be fatal!
- Make sure that the appliance is turned off from the power supply (fuse) before changing the bulb in the oven.
- The use of high-pressure cleaners or steam cleaners is prohibited. Ingress of liquids can lead to electric shock. Put the appliance never under water.

WARNING: Hot surface! Risk of Burning!
- During operation the appliance will be hot. Special caution is required to avoid touching heating elements inside the oven.
- Accessible parts may be very high during operation of the appliance. Keep small children away.
- Grasp the oven only on the door handle and switches. Use potholders if you want to remove or insert the accessories.
- Let the appliance cool down before cleaning or maintenance.

WARNING: Risk of Fire!
Overheated fats and oils can ignite easily. Never walk away from fat and oil when heating them. If Oil/fat ignites, NEVER extinguish it with water. Immediately turn off the appliance and cover the flame carefully e.g. with a lid or a fire blanket.
- Make sure that with installing adequate air circulations ensured and the ventilation slots are not blocked.
- This appliance can be used by children aged from 8 years and above and persons with reduced physical, sensory or mental capabilities or lack of experience and knowledge if they have been given supervision or instruction concerning use of the appliance in a safe way and understand the hazards involved.
- Children who are younger than 8 years must be kept away from the appliance.
- Children shall not play with the appliance.
- Cleaning and user maintenance shall not be made by children, unless they are older than 8 years and are supervised.
- Do not use harsh abrasive cleaners or sharp metal objects for cleaning the glass surface. The glass can be scratched or destroyed.
- Do not try to repair the appliance on your own. Always contact an authorized technician. If the supply cord is damaged, it must be replaced by the manufacturer, its service agent or similarly qualified persons in order to avoid a hazard.
Unpacking the Appliance
- Remove the appliance from its packaging.
- Remove all packaging material, such as foils, fillers and cardboard packaging.
- To prevent hazards, check the appliance for any transport damage.
- In case of damage, do not put the appliance into operation. Contact your distributor.
NOTE:
Production residue or dust may have collected on the appliance. We recommend cleaning the appliance according to chapter “Cleaning and Maintenance”.
Appliance Equipment

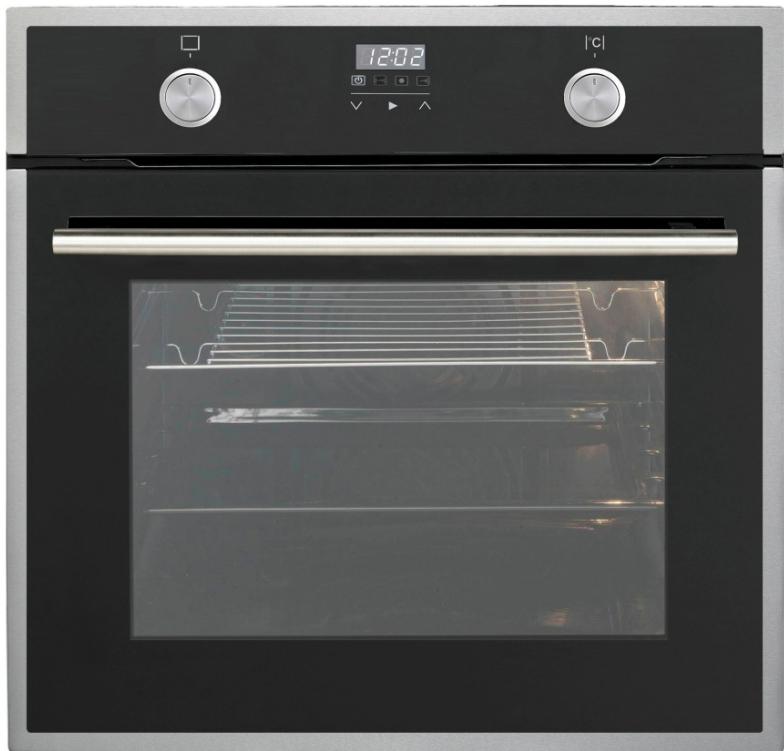
Appliance Overview
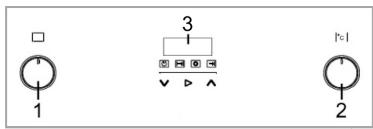
1 Control panel
5 Display
2 Door handle
6 Function control
3 Viewing window
lamps
4 Full glass door
7 Touch control
Delivery scope
1 x standard tray, 1 x grill grid, 1 x telescopic set (right/left), installation material
Installation
WARNING:
The appliance must not be connected to the mains during installing. Otherwise there is danger to life or electric shock hazard!
CAUTION:
- The worktop, the cabinet, veneers, plastic coatings, used adhesives etc. must be sufficient heat-resistant.
- The device must be installed so that heat can be dissipated. The ventilation openings must not be blocked.
- Keep a distance to the appliances back in order to guarantee a sufficient air circulation.
- Do not fix any heat protection strips in order to ensure an adequate supply of cooling air.
NOTE: Recommendations!
- When installing, ask another person to assist.
- Wear protective gloves to avoid injuries at possible sharp edges.
- When carrying the appliance use the recessed handles at the housing sides.
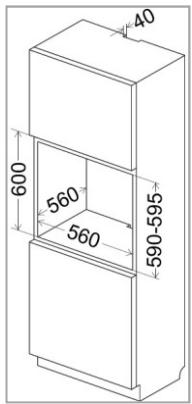
Cabinet opening and appliance dimensions Fig. 1
Prepare the cabinet opening according to the dimensional drawings.
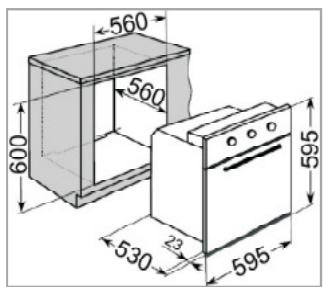
Dimensions in mm:
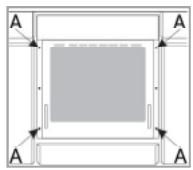
Installing the oven
- Put the appliance with the connecting cable first into the prepared cabinet not completely.
- Connect the appliance to the main power, see "Electrical connection".
- Insert the oven into the cabinet opening completely. Make sure that the cable does not restricted (bent, squeezed or twisted).
- Attach and secure the oven by using the sup
plied screws on the side walls of the cabinet.
The provided mounting holes (A) are visible after opening the oven door on the left and right frame.
Electrical connection
WARNING:
- The installation to the mains supply must conform to the local standards and regulations.
- Improper connection may cause an electric shock!
- Do not use multiple sockets or extension cords.
- It is not allowed to modify the plug provided with the appliance. If the plug does not fit properly to the outlet, let install a proper outlet by an authorized specialist.
- If possible, the accessibility of the power plug must be ensured in order to disconnect the appliance from the power supply in case of an emergency.
- Ensure that your mains power corresponds with the specifications of the appliance. The specifications are printed on the rating label.
- Connect the mains cable to a properly installed and earthed wall outlet.
- If the plug after installation is not accessible, a corresponding disconnect device with a contact separation of at least 3mm must be available to meet the relevant safety regulations.
Startup / Operation
Before initial use
-
Clean the oven interior with all therein located accessories. Follow the instructions that we give you in the chapter "Cleaning and Maintenance".
-
Heat the closed oven for approx. 30 minutes at 250^ in order to burn any manufacturing residue. Use the heating function [Upper/ lower heat].
I NOTE:
The occurring odor and possibly a slight smoke development cannot be avoided. Ensure for a good ventilation of the room during heating.
Operation / Switching on and off
After connecting to the power supply the display indicates the factory setting [12:00]. Adjust the current time first, see "Setting the time", in order to put the appliance into operation.
1 Oven function selector switch

The function selector switch is used to set the type of heating.
Rotate the function selector switch until the icon for the desired type of heating points upwards. The switch may be rotated clockwise and counterclockwise.
2 Oven temperature selector switch

The temperature selector switch is used to adjust the oven temperature.
The thermostat allows the temperature setting from 50^ to 250^ .
CAUTION:
Turn the temperature selector switch only clockwise and back again. Otherwise the switch will be damaged.
Manual operation
Press the button (▶) for a few seconds and the appliance switches to the manual operation (operation without setting the timer functions). As long as the symbol is lighting, the manual mode is activated.
Select the desired heating function and temperature with the respective selector switches and the manual operation starts.
Press the button () to switch off the operation. Turn the selector switches back to the off position.
i NOTE:
Countersink the selector switches to protect against unwanted operation.
Temperature control
The symbol indicates the heating operation. If the symbol goes off, the set oven temperature is reached.
During operation, the oven must continuously reheat in order to keep the temperature stable. During reheating the symbol is lighting (thermostat function of the oven).
I NOTE:
If the recipe recommends putting the food in the preheated oven only, this should not be done before the symbol goes off for the first time.
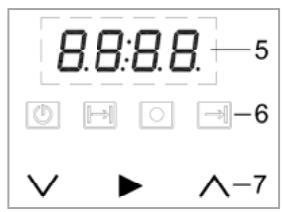
3 Display
Via the display the current time and the various functions of the digital timer can be set. Use the buttons (V) and (A) to make the settings:
reduce the time / increase the time
Setting the time
Set the current time of day:
- Press the button () , the hour digits is flashing in the display. Make the adjustment with the buttons () and () .
- Press the button () until the minute digits is flashing in the display. Make the adjustment with the buttons () and () .
- Confirm the time by pressing the button () .
GENERAL NOTES to the functions of the digital timer
- By repeatedly pressing the button (▶) you switch from hour to minute and to the next function.
- While the hour or minute digit is flashing, the setting can be over write.
- A while after the last button press or by immediately pressing the button (▶) the setting is saved. The symbol of the corresponding operating function lights up continuously.
- The saved settings will be canceled by pressing the button (▶) again.
Using the timer as automatic switch off and cooking time delay
Using the timer to switch off the operation after XX:XX hours
- Press the button (▶) until the symbol and the hour or minute digit [0:00] are flashing.
- Set the cooking time between 00:01 and 23:59 hours, using the buttons (√) and ( ∧ ).
- Select the required heating function and temperature. The operation starts after a few seconds.
- The display shows the remaining duration time.
Using the timer as reminder function after XX:XX hours
Alarm function without oven operation. The setting is made as with "Using the timer to switch off the operation after XX:XX hours". The selector switches remains in the off position.
Using the timer to switch off the operation at XX:XX o'clock
- Press the button (▶) until the symbol → and the hour or minute digit [12:00] are flashing.
- Set the time of day at which the operation must be switched off, using the buttons (V) and (A).
- Select the required heating function and temperature. The operation starts after a few seconds.
- The display shows the time of day.
Using the timer as reminder function at XX:XX o'clock
Alarm function without oven operation. The setting is made as with "Using the timer to switch off the operation at XX:XX o'clock". The selector switches remains in the off position.


Using the timer to delay the cooking time and h off the operation at XX:XX o'clock
- Set the cooking time first, as described under "Using the timer to switch off the operation after XX:XX hours".
- Now set the time at which the operation must be switched off as with "Using the timer to switch off the operation at XX:XX o'clock".
- Select the required heating function and temperature.
- By using the previously set cooking time, the appliance calculate the time of day at which the operation will be started automatically in order to achieve the selected time of day for switch off.
-
The display shows the time of day.
-
At the end of the set cooking time or when reaching the preset time of day, the operation automatically switches off and several beeps sounds.
- The symbol of the corresponding operational function is flashing until any button is pressed.
I NOTE:
Turn both selector switched back to the off position in order to switch off the appliance completely. Otherwise, the operation continues automatically once the manual operation has been activated.
Oven lighting
The oven lighting automatically turns on as soon as the oven is in operation. However, if the oven is not in use, the oven lighting can be turned on separately via the function selector switch.
Using the accessory
Inside the oven are side racks for inserting the accessories. A fixed supplied telescopic-set facilitates the insertion and extraction. The accessories are safely used between the side rack levels.

CAUTION:
Always insert the accessory completely into the oven; otherwise the glass door can be scratched.
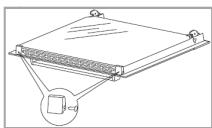
Displacing the telescopic-set
It is possible to fix the telescopic-set in each side rack level.
- Remove the side racks; see "Cleaning the side racks".
- Loosen the telescopic from the side racks by gently bending the metal rods together.
- Displace the telescopic to the desired level, the right and left telescopic must always be set at the same height.
You can order additional telescopic-sets from your dealer or in our online accessories shop,
www.bomann.de. To order, use the reference number found under "Technical Data".
Oven functions
The oven is equipped with various functions. Cooking can be done with upper heat, lower heat, grill heat and heated air (convection).
| Symbol | Description |
| 0 | Off-Position: Switching the oven off. |
| Oven lamp: The oven lighting can be turned on independently of the oven operation, e.g. for cleaning the oven chamber. | |
| 5 | Defrost: The air circulation at room temperature allows rapid defrosting of frozen food (without the use of heating elements). It is a gentle but quick way to speed up the defrosting. |
| Upper/ lower heat: The heating is done in a conventional manner. The dish gets evenly heated from the top and bottom. Suitable for baking and roasting on one level. | |
| Upper/ lower heat with fan: In this type of heating the heat produced by the upper and lower heat is evenly distributed by an additional fan. | |
| Lower heat: The heating is done with active bottom heat. The dish gets heated from the bottom. Use when re-baking from below. | |
| Heated air (convection): With an additional heating behind the oven fan the dish gets heated evenly from all sides by a heated airflow. Suitable for simultaneous baking on several levels. | |
| Grill-Combi: Here comes the heat from the grill element and upper heat from the oven top. It is especially suitable for grilling flat pieces of meat. | |
| Grill-Combi with fan (all-round grill): The grill element, the upper heat and the fan are turned on. This helps to speed up the grilling process. | |
| Heated air (convection) with lower heat (intensive heating): Particularly suitable for baking pizza and bread. Preheating is not necessary. |
Notes for baking and cooking in the oven
NOTE:
- In principle, you may use any heat-resistant cookware for your food.
- Unsuitable is cookware of bright, shiny aluminum, unglazed clay and tableware made of plastic or with plastic handles.
- Use the included accessory.
NOTE:
- Follow the instructions for the duration of the completion in your recipes and preparation instructions on the product packaging.
Baking
- For good baking results, preheating is recommended up to the desired temperature.
- After finishing the baking process, we recommend resting the food for about 5 minutes in the oven.
- Before removing the cake, check if it is done by using a wooden stick. When the cake is done, no dough residue will stick to the wooden stick.
Cooking and roasting meat & fish
- Only cook meat of maximum 1 kg in the oven. We recommend roasting or cooking smaller portions on the cooking hob.
- For roasting, the use of refractory dishes, which should also have heat-resistant handle, is recommended.
- When using the grate or grill rack for roasting, we recommend placing a baking sheet with some water on the lower side rack level.
- You should turn the roast at least once, e.g. after half of the cooking time has elapsed. During roasting, pour some of the roasting liquid or hot salty water over the roast once in the while; do not use cold water.
Grilling

CAUTION:
Grill exclusively with the oven door closed!
When grilling, the food will be cooked with the infrared beams of the heated grill element.
To switch the grill on:
- Turn the function selector switch to the position marked with the grill symbols,
- Preheat the oven for approx. 5 minutes.
- Insert the universal baking sheet with the food to be cooked into the desired side rack level. When
using the grill grid for grilling, insert an empty baking sheet right below the grill grid for collecting dripping grease. That keeps the oven clean.
Energy saving tips
- Only preheat if it is specified in the recipe.
- Use dark, black painted or enamelled tins. They absorb the heat particularly well.
- Open the oven door as less as possible during operation.
- Use the residual heat after cooking process. Switch the oven off a few minutes before ending the cooking time. So your cooking product even cooked in the stored oven heat.
Cleaning and Maintenance
WARNING:
- Always switch off the appliance completely and where required, disconnect the plug or turn off / unscrew the fuse before cleaning and user maintenance.
- Allow the appliance to cool down sufficient before cleaning.
- Do not use steam cleaners for cleaning the appliance; moisture could enter electrical components. Risk of electric shock! Hot steam could damage the plastic parts.
- Never use flammable substances, such as thinner, kerosene, gasoline or acids for cleaning
- The appliance must be dry before restarting operation.
CAUTION:
- Do not use a wire brush or other sharp, abrasive items.
- Do not use harsh abrasive cleaners or sharp metal objects for cleaning the glass surface. The surfaces can be scratched or destroyed.
- Always consider the application and safety notes of the detergent.
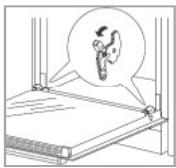
Removing the oven door
You may remove the oven door to facilitate cleaning and to get better access to the oven interior.
- Open the door completely.
- Push the folding clamps of the hinges on both sides upwards.
- Slightly close the door and then lift it up to remove it.
- When reinstalling the door, make sure the notch of the hinge is properly aligned with the protrusion of the hinge holder.
- Then press down the folding clamps again, otherwise the hinges could get damaged when closing the oven door.
Cleaning the oven
NOTE:
By cleaning after each use, you avoid that food residuals and soiling will be burning-in at the next operation. Then the cleaning is only possible with a lot of effort.
- Clean the appliance and accessories depending on the soiling degree and depending on the surface only with a soft, damp cloth and commercially, food safe cleaners.
- Soak heavily soiled areas first with some warm soapy water or a vinegar cleaner.
- Wipe off grease residues from the sealing framed the cooking chamber.
- Use a soft absorbent cloth for drying after cleaning.
Cleaning the side racks
Always remove the side racks, if you want to clean the oven walls thoroughly. Heavily soiled side racks can be soaked in the dismounted condition and thus facilitate the cleaning.
- Loosen the racks from the upper and lower bolt by gently bending the respective metal rod.
- Remove the rack to the oven centre from the middle mounting holes.
- Insert the side racks after cleaning between the bolts properly again.
Cleaning the glass panel
If necessary, clean the inside of the glass panel.
- Open the oven door.
- Remove the supports by loosening the screws laterally of the supports.
Take off the glass carefully forward. - Replace the glass panel and fasten the supports after you've cleaned the glass and dried it thoroughly.
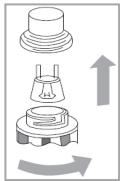
Reverse the bulb
WARNING:
- Make sure that the appliance is turned off from the power supply (fuse).
- Allow the lamp to cool down before replacing the bulb. There is risk of burns!
NOTE:
Use the correct bulb, heat resistant up to 300^ :
1 x 25 W (type G9)
- Unscrew the lamp cover anti-clockwise and clean it with a dry cloth.
- Change the bulb.
- Reattach the lamp cover and screw it tight in a clockwise direction.
- Check the functionality.
Troubleshooting
Before you contact an authorized specialist
| Problem | Possible causes | What to do |
| Appliance does not work. | The power supply is disconnected. | Check the fuse of your domestic wiring system. |
| Problem | Possible causes | What to do |
| The oven lamp does not work. | The bulb is defective, has been inserted incorrectly or not firmly. | Check the bulb, see “Reverse the bulb”. |
iNOTE:
If a problem still persists after following the steps above, contact your distributor or an authorized technician.
Technical Data
| Measures H x W x D / Weights | ||
| Oven | cm | 59.5 x 59.5 x 53.0 |
| Oven interior | cm | ca. 33.0 x 47.0 x 43.0 |
| Built-in dimension (cutout) for cabinet | cm | 60.0 x 56.0 x 58.0 |
| Net weight | kg | 28.0 |
| Electrical connection | ||
| Connection power | W | 3100 |
| Connection voltage | V~ / Hz | 220-240 / 50/60 |
| Fuse protection | A | 16 |
| Protection class / degree of protection | I / IP20 | |
| Available accessory | ||
| Telescopic-Set (right/left) | Art-No. | 8 996 110 |
The right to make technical and design modifications in the course of continuous product development remains reserved.
Product data sheet for household ovens according to regulation (EU) No. 65/2014
| Brand | BOMANN |
| Model | EBO 9611 IX |
| Energy efficiency index | 81.9 |
| Energy efficiency class | A+ |
| Energy consumption per cycle in conventional mode kWh | 0.72 |
| Energy consumption per cycle in forced air mode kWh | 0.65 |
| Number of cavity | 1 |
| The heat source per cavity | Electricity |
| Oven capacity I | 58 |
| Built-in | • |
| Noise emission dB(A) re 1 pW | 50 |
This appliance has been tested according to all relevant current CE guidelines, such as electromagnetic compatibility and low voltage directives, and has been constructed in accordance with the latest safety regulations.
Disposal
Meaning of the "Dustbin" Symbol
Protect our environment; do not dispose of electrical equipment in the domestic waste.
Please return any electrical equipment that you will no longer use to the collection points provided for their disposal.
This helps avoid the potential effects of incorrect disposal on the environment and human health. This will contribute to the recycling and other forms of reutilization of electrical and electronic equipment.
Information concerning where the equipment can be disposed of can be obtained from your local authority.
WARNING:
Remove or disable any existing snap and bolt locks, if you take the appliance out of operation or dispose it.
BOMANN®
C. Bomann GmbH
www.bomann.de
Made in P.R.C.
- HOUSEHOLD- BUILT-IN OVEN EBO 9611 IX
- Contents
- Introduction
- Symbols in these Instructions for Use
- WARNING:
- CAUTION:
- General Notes
- Special safety information for this Unit
- WARNING: Danger from electrical current! Contact with live leads or components can be fatal!
- WARNING: Hot surface! Risk of Burning!
- WARNING: Risk of Fire!
- Unpacking the Appliance
- NOTE:
- Appliance Equipment
- Delivery scope
- Installation
- NOTE: Recommendations!
- Cabinet opening and appliance dimensions Fig. 1
- Installing the oven
- Electrical connection
- Startup / Operation
- Before initial use
- I NOTE:
- Operation / Switching on and off
- Oven function selector switch
- Oven temperature selector switch
- Manual operation
- Temperature control
- Display
- Setting the time
- GENERAL NOTES to the functions of the digital timer
- Using the timer as automatic switch off and cooking time delay
- Using the timer to switch off the operation after XX:XX hours
- Using the timer as reminder function after XX:XX hours
- → Using the timer to switch off the operation at XX:XX o'clock
- Using the timer as reminder function at XX:XX o'clock
- Using the timer to delay the cooking time and h off the operation at XX:XX o'clock
- Oven lighting
- Using the accessory
- Displacing the telescopic-set
- Oven functions
- Notes for baking and cooking in the oven
- Baking
- Cooking and roasting meat & fish
- Grilling
- Energy saving tips
- Cleaning and Maintenance
- Removing the oven door
- Cleaning the oven
- Cleaning the side racks
- Cleaning the glass panel
- Reverse the bulb
- x 25 W (type G9)
- Troubleshooting
- iNOTE:
- Disposal
- Meaning of the "Dustbin" Symbol
- BOMANN®
Marque : BOMANN
Modèle : EBO 9611 IX
Catégorie : Four électrique