3CW5178N0 - Lave-linge BALAY - Notice d'utilisation et mode d'emploi gratuit
Retrouvez gratuitement la notice de l'appareil 3CW5178N0 BALAY au format PDF.

| Type d'appareil | Four encastrable |
| Capacité | Non précisé |
| Type de cuisson | Chaleur tournante, convection naturelle |
| Puissance | Non précisé |
| Nombre de fonctions | Plusieurs fonctions de cuisson |
| Type de commande | Manettes et/ou boutons |
| Affichage | Non précisé |
| Nettoyage | Pyrolyse ou catalyse possible |
| Type d'installation | Encastrable |
| Consommation énergétique | Classe énergétique non précisée |
| Dimensions | Standard encastrable |
| Matériau intérieur | Émail ou inox |
| Accessoires inclus | Grille, lèchefrite |
| Sécurité | Verrouillage enfant possible |
| Type d'ouverture | Abattante |
| Éclairage intérieur | Oui |
FOIRE AUX QUESTIONS - 3CW5178N0 BALAY
Questions des utilisateurs sur 3CW5178N0 BALAY
0 question sur cet appareil. Repondez a celles que vous connaissez ou posez la votre.
Poser une nouvelle question sur cet appareil
Téléchargez la notice de votre Lave-linge au format PDF gratuitement ! Retrouvez votre notice 3CW5178N0 - BALAY et reprennez votre appareil électronique en main. Sur cette page sont publiés tous les documents nécessaires à l'utilisation de votre appareil 3CW5178N0 de la marque BALAY.
MODE D'EMPLOI 3CW5178N0 BALAY
instruction manual
Table of contents
Safety information 5
Before installation 5
Information for your safety 6
Items that may damage the appliance .... 7
Your new oven 9
Control panel 9
Function selector 10
Buttons and display 11
Temperature knob 11
Cooking compartment 12
Racks 12
Before using your oven for the first time ..... 14
Confirming the indicator 14
Heating the oven 14
Cleaning the accessories 14
Programming the oven 15
Type of heating and temperature 15
Rapid heating 16
Setting the time-setting options 17
Timer 17
Cooking time 18
Childproof lock 20
Care and cleaning 20
Cleaning products 21
Light 22
Removing the oven carriage 23
Table of contents
Fitting and removing the glass panels 23
Troubleshooting 25
Malfunction table 25
Changing the light bulb at the top of the oven ..... 26
Protective glass panels 26
Technical Assistance Service 27
Energy-saving and environmental protection tips 28
Saving energy 28
Environmentally-friendly disposal of waste ..... 28
Tables and tips 29
Safety information
Read the instructions in this manual carefully. Keep the operation and installation instructions. The corresponding manual must be passed on to any subsequent owner.
This instruction manual is for use with both stand-alone ovens and oven-hob combinations. Read the instruction manual supplied with the hobs of oven-hob combinations to find out how their hob controls work.
Before installation
Transport damage
Check the appliance after removing it from its packaging. Do not connect an appliance that has been damaged in transit.
Electrical connection
Only an authorised technician may connect the appliance. The guarantee will be void if damage is caused by incorrect connection.
Before using the appliance for the first time, you must ensure that your domestic electrical system is earthed and meets all the current safety regulations. An authorised technician should install and connect your appliance.
Use of this appliance without an earth connection or if incorrectly installed can cause serious injuries (i.e. an injury or death from electrocution), although this is very rare.
The manufacturer accepts no responsibility for any malfunction or damage which is caused by unsuitable electrical installations.
Information for your safety
This appliance is intended for domestic use only. This appliance must only be used for food preparation.
Adults and children must not operate the appliance without supervision,
■ if they are physically or mentally incapable of doing so or
■ if they lack the knowledge and experience.
Never let children play with the appliance.
Oven door
The oven door must remain closed when the oven is switched on. As a precaution, we recommend that you keep the oven door closed even when the oven is switched off.
Hot cooking compartment
There is a risk of burns.
Never touch the interior surfaces of the cooking compartment or the heating elements. Open the appliance door carefully. Hot steam may escape.
Small children must be kept at a safe distance from the appliance.
There is a risk of fire.
Never store combustible items in the cooking compartment.
Never open the appliance door if there is smoke inside. Switch off the appliance. Pull out the mains plug or switch off the appliance by the fuse in the fuse box.
There is a risk of short-circuiting.
Never trap connecting cables of electrical appliances in the hot appliance door. The cable insulation could melt.
There is a risk of scalding
Never pour water into the hot cooking compartment.
This will cause hot steam.
| There is a risk of burns.Never prepare food containing large quantities of drinks with a high alcohol content. Alcoholic vapours can catch fire in the cooking compartment. Only use small quantities of drinks with a high alcohol content and open the appliance door carefully. | |
| Hot accessories and ovenware | There is a risk of burns.Never remove ovenware and accessories from the cooking compartment without an oven cloth or oven gloves. |
| Incorrect repairs | There is a risk of electric shock.Incorrect repairs are dangerous. Repairs may only be carried out by one of our experienced after-sales engineers.If the appliance is defective, pull out the mains plug or switch off the appliance by the fuse in the fuse box.Call the after-sales service. |
| Enhanced safety for the door | With certain recipes which require extended use of the oven at high temperatures, the oven door may become extremely hot.If you have small children at home, keep an eye on them while the oven is on.A safety device which prevents direct contact with the oven door is also available. This optional accessory (671383) may be obtained from our Technical Assistance Service. |
Items that may damage the appliance
Accessories, pans, film, greaseproof paper or aluminium foil on the oven floor
Do not place any accessory on the oven floor. Do not cover the oven floor with any type of film or paper. Do not place any cookware on the oven floor if the temperature is set at more than 50^ C. It will get too hot. Oven and cooking times will be inaccurate and the enamel will be damaged.
| Water in a hot oven | Do not pour hot water into a hot oven. Steam will be produced. The resulting changes in temperature may damage the enamel and/or accessories. |
| Liquid foods | Do not keep liquid foods for an extended period inside the oven with the door closed. This would damage the enamel. |
| Fruit juices | Do not overfill the tray when baking pies containing juicy fruits. Fruit juice spilling from the tray will cause stains that will be impossible to remove.Use the deep enamel tray whenever possible. |
| Leaving the door open when the oven is cooling down | The oven must only be left to cool with the door closed. Even if the oven door is left only slightly open, the fronts of nearby kitchen units may be damaged over time. |
| Dirty oven seal | A very dirty oven seal will prevent the oven door from remaining properly closed during operation. The fronts of nearby kitchen units may be damaged. Keep the oven door seal clean at all times. |
| The oven door as a support surface | Do not rest or sit on the oven door when it is open. Do not place any cookware or accessory on the oven door. |
| Moving the appliance | Do not use the door handle to move or secure the appliance;■ the handle cannot take the weight of the appliance and may break■ the glass panel of the oven door might move, causing a misalignment between the front panel and the glass panel. |
Your new oven
We will now describe your new oven. This chapter explains the functions of the control panel and its individual elements. Information is also provided about the oven's accessories and internal components.
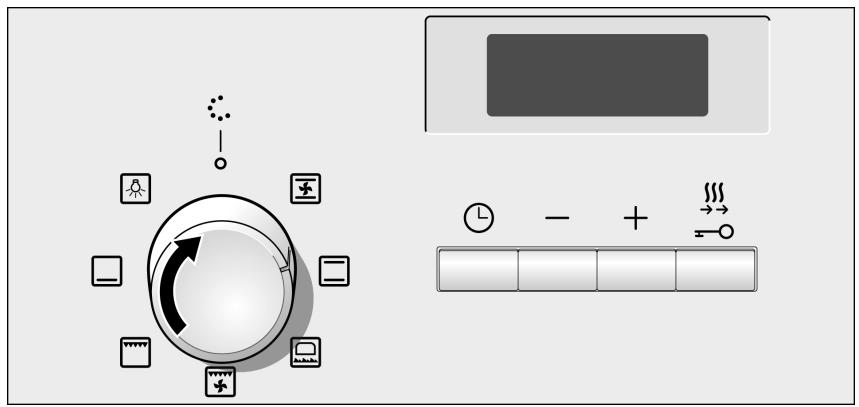
Control panel
Here is an overview of the control panel. The display never shows all of the symbols at the same time. Discrepancies in the data are possible, depending on the appliance model.

text_image
Function selector Buttons and display Temperature selector 188 min 50 270 grill 200 150 100Function selector
| Setting | Use the function selector to set the type of heating. | |
| ○ | Off position | The oven is switched off. |
| ✕ | Hot air* | For cakes and pastries.The fan distributes the heat of the ring heating element in the rear wall evenly throughout the cooking compartment. |
| □ | Top/bottom heating* | For cakes, bakes and lean joints of meat, e.g. beef or game, on one level.The heat is emitted evenly from the top and bottom. |
| ✕ | Wood-fire oven | For fresh, chilled and frozen pizza, puff pastry, pies or pasties and pastries, e.g. fairy cakes.This heating setting operates the lower heat level and fan.The food is heated from the bottom upwards, with the most intense heat reaching the underside of the food and a lower heat level at the top. |
| ✕ | Hot air grilling | For roasting meat, poultry and whole fish.The grill element and the fan switch on and off alternately. The fan circulates the hot air around the food. |
| ✕ | Grill, large area | For grilling steaks, sausages, toast and pieces of fish.The entire area under the grill element becomes hot. |
| □ | Bottom heating | For preserving, browning and final baking stage.The heat is emitted from below. |
| ✕ | Oven light | Switches on the oven light. |
* The type of heating with which the energy efficiency class was determined in accordance with EN50304.
When you make settings, the oven light in the cooking compartment switches on.
Buttons and display
You can use the buttons to set various additional functions. You can read the values that you have set in the display.
| Button | Use | |
| L | Time setting options | Selects the timer 🔒 or cooking time I→I. |
| - | Minus | Decreases set values. |
| + | Plus | Increases set values. |
| ∞ | Rapid heating | Heats up the oven particularly quickly. |
| Childproof lock | Locks and unlocks the control panel. | |
The time setting option that is currently selected in the display is indicated by the arrow ▶ next to the corresponding symbol.
Temperature knob
The temperature knob is used to select the temperature or the grill power level.
| Setting | Meaning | |
| ● | Zero setting | The oven does not heat up |
| 50-270 | Temperature range | The temperature inside the oven in °C |
| I, I, I | Grill power levels | The grill settings for the grill, large area 📄.I = level 1, lowI = level 2, mediumI = level 3, high |
When the oven is heating the ▶ symbol lights up on the display. This light goes off when the oven reaches the required temperature. The symbol does not light up with the light function 🙏.

If grilling for more than 15 minutes, turn the temperature knob to the low setting.
Cooking compartment
The oven light is located in the cooking compartment. A cooling fan protects the oven from overheating.
Cooling fan
The cooling fan switches on and off as required. The hot air escapes above the door. Caution. Do not cover the ventilation slots. Otherwise the oven will overheat.
So that the cooking compartment cools down more quickly after operation, the cooling fan continues to run for a certain period afterwards.
Oven light
During operation, the oven light in the cooking compartment is on. The ⚙️ setting on the function selector can be used to switch on the light without heating the oven.
Racks
Racks may be positioned in the oven at 5 different heights.
Racks are positioned in the slots on the left and right hand sides.
When positioning the racks, ensure that they have been securely placed in the slots before releasing them, or they could fall.
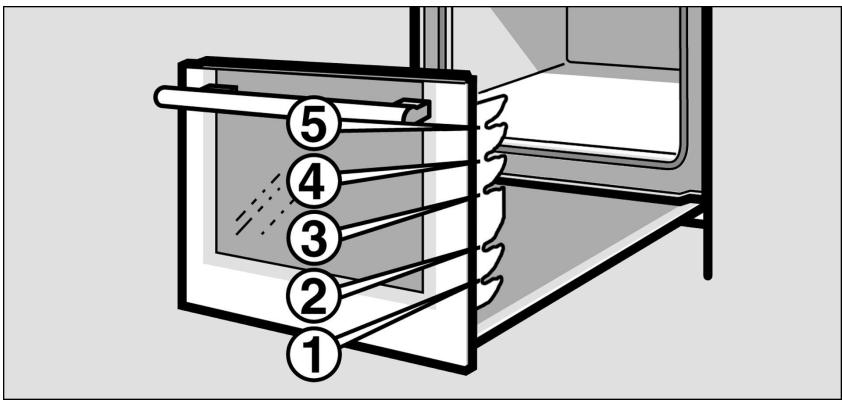
text_image
Diagram of a heating or cooling system with numbered components, likely illustrating a thermal or mechanical process.Racks may deform as they heat up. Once they have cooled, the deformation disappears and their operation is unaffected.
Your oven is supplied with only some of the following accessories.
Accessories may be purchased from the Technical Assistance Service or from specialist retailers. Please refer to the commercial catalogue for the available accessories.
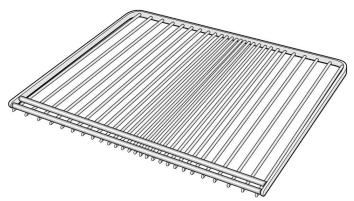
natural_image
Line drawing of a rectangular grid structure with evenly spaced vertical lines (no text or symbols)Shelf
For pans, cookware, baking tins, roasts, items placed directly on a shelf and frozen meals.

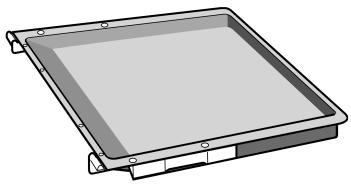
natural_image
3D rendering of a rectangular tray or tray with mounting holes and side supports (no text or symbols)Flat enamel baking tray
For cakes and biscuits.
Place the baking tray in the oven with its raised lip facing the door.
natural_image
3D rendering of a rectangular tray or enclosure with mounting brackets and a central slotted area (no text or symbols)Deep enamel baking tray
For runny cakes, pastries, frozen meals and large joints for roasting. This can also be used as a tray to collect the fat when roasting directly on the shelf.
Place the deep enamel baking tray in the oven with its raised lip facing the door.
Before using your oven for the first time
The steps that must be followed before using your oven for the first time are shown below.
First read the chapter entitled Safety Information.
Confirming the indicator
After connecting, a zero lights up on the display. Press the ⏻ button to confirm. The display switches off.
Heating the oven
To remove the "new" smell, heat the oven empty with the door closed. The most effective option is to heat the oven for one hour with the top and bottom heating elements ☐ set at 240°C.
Check that no packaging has been left inside the oven.
-
Select top and bottom heating ☐ using the function control knob.
-
Select 240^ C with the temperature knob.
Turn the oven off after one hour. To do this, turn the function control knob to zero.
Cleaning the accessories
Before using the accessories for the first time, clean them thoroughly using a cloth, hot water and a little soap.
Programming the oven
Note
There are several ways to program the oven. The section below details how to program the cooking method and the temperature or grill power level. The oven can be used to program the cooking time (duration). For further information, see the chapter entitled Programming the timing functions.
It is recommended that you preheat the oven before putting food in to avoid excess condensation on the glass.
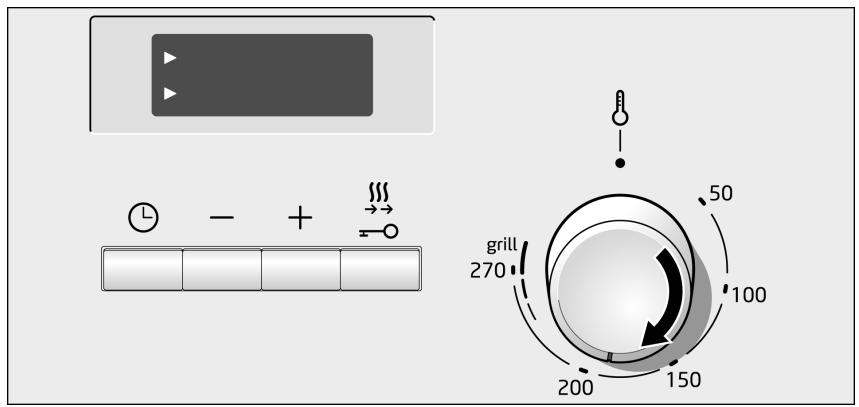
Type of heating and temperature
Example in the picture: top and bottom heat at 190^ C
- Select the type of heating using the function control knob.
flowchart
graph TD
    A["Input Data"] --> B{Rotation}
    B --> C["Device 1"]
    B --> D["Device 2"]
    B --> E["Device 3"]
    B --> F["Device 4"]
    B --> G["Device 5"]
    B --> H["Device 6"]
    B --> I["Device 7"]
    B --> J["Device 8"]
    B --> K["Device 9"]
    B --> L["Device 10"]
    B --> M["Device 11"]
    B --> N["Device 12"]
    B --> O["Device 13"]
    B --> P["Device 14"]
    B --> Q["Device 15"]
    B --> R["Device 16"]
    B --> S["Device 17"]
    B --> T["Device 18"]
    B --> U["Device 19"]
    B --> V["Device 20"]
    B --> W["Device 21"]
    B --> X["Device 22"]
    B --> Y["Device 23"]
    B --> Z["Device 24"]
    B --> AA["Device 25"]
    B --> AB["Device 26"]
    B --> AC["Device 27"]
    B --> AD["Device 28"]
    B --> AE["Device 29"]
    B --> AF["Device 30"]
- Select the temperature or grill power level with the temperature knob.
text_image
Diagram showing a control panel with time and + inputs, a grill display with numeric values, and a rotary dial indicating 50 to 150.The oven starts to heat up.
Turning off the oven
Altering the settings
Set the function control knob to the zero position.
The type of heating and the temperature and grill power levels may be altered at any time using the corresponding control knob.
Rapid heating
With rapid heating, your oven reaches the temperature selected particularly quickly.
Use rapid heating when temperatures above 100 °C are selected. The following types of heating are suitable:
Hot air
Top/bottom heating
Wood-fire oven
■ Bottom heating
To ensure an even cooking result, do not place your dish in the cooking compartment until rapid heating is complete.
- Setting the type of heating and temperature.
- Briefly press button ↗.
In the display, symbol »\\\$ lights up. The oven begins to heat up.
The rapid heating process is complete
A signal sounds. Symbol »» on the display goes out. Put your dish in the oven.
Cancelling rapid heating
Briefly press button ⌘. Symbol »§§ on the display goes out.
Setting the time-setting options
Your oven has various time-setting options. You can use the ⏻ button to call up the menu and switch between the individual functions. All the time symbols are lit when you can make settings. The ▶ arrow shows you the time-setting option that is active. A time-setting option which has already been set can be changed directly with the + or − button when the ▶ arrow is next to the time symbol.
Timer
The operation of the timer does not depend on the operation of the oven. The timer has its own alarm. In this way, you can distinguish between the timer finishing and the oven automatically switching off (cooking time duration).
- Press the ⏻ button once.
The time symbols light up on the indicator panel, the arrow ▶ appears in front of the ⏰.
- Program the time on the timer using the + or - buttons.
+ button, value suggested = 10 minutes
- button, value suggested = 5 minutes
The programmed time is shown after a few seconds. The timer starts to count down. The ▶ symbol lights up on the indicator panel and the timer shows the time counting down. The other timing symbols are off.
The time on the timer has elapsed
You will hear a high-pitched sound. The indicator panel shows 0. Switch off the timer using the ⏻ button.
Changing the time on the timer
Change the time on the timer using the + or - buttons. The changed time is shown after a few seconds.
Cancelling the timer.
Reset the time on the timer to 0 using the — button. The changed time is shown after a few seconds. The timer switches off.
Checking the timer settings
If various timer functions have been programmed, the corresponding symbols will light up on the indicator panel. The timer will count down in the foreground. The arrow ▶ is in front of the symbol 🔒 and shows the time on the timer counting down.
To check the timer 🔒 or the cooking time duration I→I, press the ⏻ button repeatedly until the arrow ▶ is in front of the required symbol. The corresponding value is shown on the indicator panel after a few seconds.
Cooking time
The cooking time for your dish can be set on the oven. When the cooking time has elapsed, the oven switches itself off automatically, so you do not have to interrupt other work to switch off the oven. The cooking time cannot be accidentally exceeded.
Example in figure: Cooking time of 45 minutes.
- Use the function selector to set the type of heating.
- Use the temperature selector to set the temperature or grill setting.
- Press the ⏻ button twice. 0 is shown in the display. The time symbols light up and the ▶ arrow is next to I→I.

text_image
0 min + - + ↑-
Use the + and - buttons to set the cooking time.
-
button default value = 30 minutes
- button default value = 10 minutes
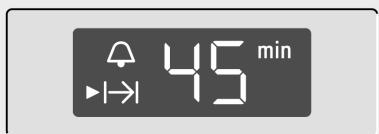
text_image
45 min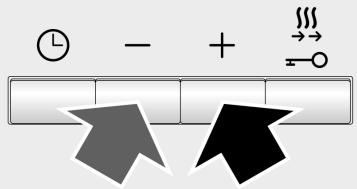
text_image
Diagram showing clock, minus sign, and directional arrows with symbols like 'Time', '+', and '→'The oven will start up after a few seconds. You will see the cooking time counting down in the display and the I→I symbol lights up. The other time symbols go out.
The cooking time has elapsed
A signal sounds. The oven stops heating. 0 is showing in the display.
Press the Ⓛ button. The + or - button can be used to set a new cooking time.
Or press the Ⓛ button twice and turn the function selector to the off position. The oven switches off.
Changing the cooking time
Use the + or - button to change the cooking time. After a few seconds, the change will be adopted. If the timer has been set, first press the Ⓛ button.
Cancelling the cooking time
Use the — button to set the cooking time back to 0. After a few seconds, the change will be adopted. The cooking time is cancelled. If the timer has been set, first press the ⏻ button.
Calling up the time settings
If several time functions have been set, the corresponding symbols light up in the display. The ▶ arrow is next to the symbol for the time function that is visible in the display.
To check the timer 🔒 or the cooking time duration I→I, press the ⏻ button repeatedly until the arrow ▶ is in front of the required symbol. The corresponding value is shown on the indicator panel after a few seconds.
Childproof lock
| The oven has a childproof lock to prevent children from switching the oven on accidentally.The oven controls are deactivated. The timer may be programmed when the childproof lock is activated.When the cooking method and the temperature or grill power level have been programmed, the childproof lock interrupts the heating process. | |
| Activating the childproof lock | The oven cannot be programmed to switch off automatically.Press the ∞ button for approximately four seconds.The —○ symbol will appear on the indicator panel.The childproof lock is now activated. |
| Deactivating the childproof lock | Press the ∞ button for approximately four seconds.The —○ symbol disappears from the indicator. The childproof lock is now deactivated. |
Care and cleaning
| Suggestions and warnings | If cleaned and properly cared for, your oven will keep its bright appearance and operating performance for many years to come. Advice on how to care for and clean your oven is provided below.Different colours may be seen in your front panel due to the various materials used in its manufacture, such as glass, plastic and metal.Dark patches in the door’s glass panel may seem to be dirt but they are in fact reflections from the oven light.Enamel burns at very high temperatures. This may cause slight discolouration. This is normal and does not affect the oven’s operation.The edges of thin baking trays may not be completely enamelled. They may therefore feel slightly rough, although their corrosive protection will be unaffected. |
Cleaning products
Follow the information provided in the table to avoid damaging the various oven surfaces by using unsuitable cleaning products.
Do not use:
■ abrasive or acidic cleaning products,
■ scourers or hard sponges,
- high-pressure or steam cleaners.
Wash new cloths thoroughly before use.
| Zone | Cleaning products |
| Front panel | Hot water and a little soap:Clean with a dishcloth and dry with a soft cloth. |
| Stainless steel | Hot water and a little soap:Clean with a dishcloth and dry with a soft cloth. Immediately remove any water marks, grease, cornflower or egg white stains since corrosion could occur underneath these.Special products for the care of stainless steel and which are suitable for hot surfaces may be obtained from Technical Assistance Service centres and specialist retail outlets. Use a very fine soft cloth to apply the cleaning product. |
| Glass panel | Glass cleaning products:Clean using a soft cloth.Do not use a glass scraper. |
| Display | Glass cleaning products: Clean using a soft cloth.Do not use alcohol, vinegar or other abrasive or acidic cleaning products. |
| Glass panel | Glass cleaning products:Clean using a soft cloth.Do not use a glass scraper. |
| Glass cover for the oven light | Hot water and a little soap:Clean with a dishcloth. |
| Seal(do not remove) | Hot water and a little soap:Clean with a dishcloth. Do not rub. |
| Wire shelves | Hot water and a little soap:Soak them clean using a dishcloth or a brush. |
| Accessories | Hot water and a little soap:Soak them clean using a dishcloth or a brush. |
Cleaning the oven's catalytic surfaces
The inside rear and side walls and ceiling of some ovens may comprise a highly porous ceramic lining. This lining absorbs splashes produced during baking and roasting, dissolving them while the oven is on. This cleaning will be most effective at higher temperatures and during longer cooking times.
Slight discolouration of the lining does not affect its self-cleaning performance.
Suggestions and warnings
Never use abrasive detergents. These would scratch and impair the highly porous lining.
Never use oven cleaning products on ceramics. If any oven cleaning product accidentally falls on these surfaces, immediately remove it with a sponge and plenty of water.
To clean the oven's enamelled bottom and walls
Use a cleaning cloth and hot water with a little soap or vinegar.
If very dirty, use a fine steel scourer or a special oven cleaning product. These must only be used on a cold oven.
Do not use metal scourers or special oven cleaning products on self-cleaning surfaces.
Light
The oven light can be turned on manually to facilitate cleaning.
Connecting the oven bulb
Turn the function control knob to the 🔊 position.
The light will come on. The temperature knob must be turned off.
Turning the oven light off
Turn the function control knob to the o position.
Removing the oven carriage
Pull the oven carriage out to the stop, raise it slightly, then pull it out and store it carefully.
After cleaning, re-install the oven door, following the instructions in reverse order.
Fitting and removing the glass panels
Removing
To make cleaning easier, the glass panel can be removed from the oven carriage.
- Remove the oven carriage.
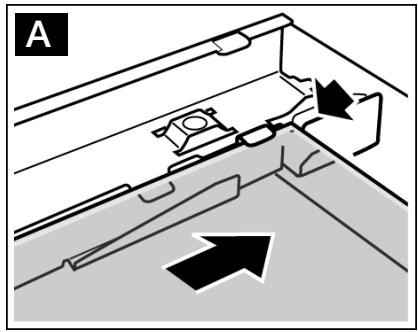
- Remove the upper cover from the oven carriage. To do this, first unscrew the screws on the left and right hand sides. (Figure A)
- Support the glass panels manually (on the left and right hand sides) and move them upwards to remove them. (Figure B)
Place them on a cloth, with the handle pointing downwards.
The inner glass panel with clips should not be removed from the oven carriage.
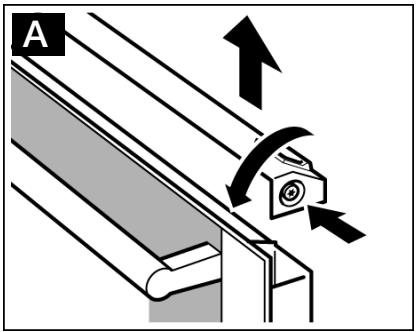
text_image
A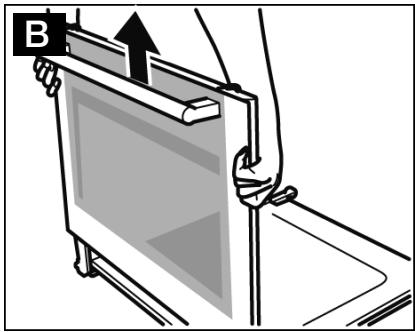
text_image
BIn doors with three glass panels, the following step will also be necessary:
- Press outwards on the front mounting springs on the left and right hand sides, one after the other.
If it is difficult to press the clips on one side, use a spoon.
Remove the upper glass panel.
(Figure C)
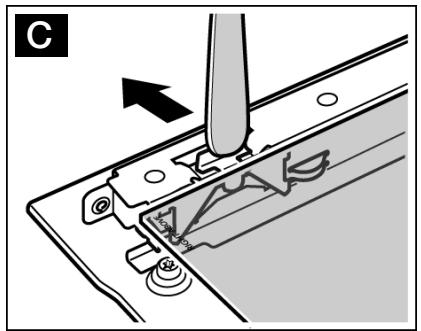
natural_image
Mechanical assembly diagram showing a needle inserted into a component with a tool, no text or symbols presentClean the glass panels using a glass cleaning product and a soft cloth.
Do not use abrasive or corrosive cleaning products, glass scrapers, or hard metal scourers, as these could damage the glass.
Reassembly
Follow steps 4 to 6 for doors that have two glass panels.
- Insert the glass panel by tilting it backwards.
(Figure A)
Check that the words "Right above" are on the top on the right-hand side. - Press outwards on the mounting springs on the left and right hand sides, so that the glass panel is positioned on top.
- Press on the front section of the glass panel so that it fits into place. Check that the glass panel is correctly seated. (Figure B)
natural_image
Diagram of a mechanical assembly with directional arrows indicating movement or force (no text or symbols present)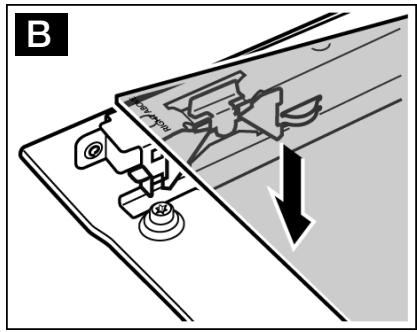
text_image
B- Insert the glass panels in the carriage support.
- Fit and tighten the screws on the cover. If the cover cannot be screwed in, check that the glass panels are correctly positioned in the support.
- Close the oven carriage.
Once the glass panels have been correctly fitted, the oven is ready to use.
Troubleshooting
Malfunctions often have simple explanations. Before you call the after-sales service, please try to rectify the fault yourself using the table.
Malfunction table
| Problem | Possible cause | Remedy/information |
| The oven does not work. | Blown fuse. | Look in the fuse box and check that the fuse is in working order. |
| Power cut. | Check whether the kitchen light or other kitchen appliances are working. | |
| A zero lights up in the display. | Power cut. | Confirm with the ⏻ button. |
| The oven does not heat up. | There is dust on the contacts. | Turn the control knobs backwards and forwards several times. |
| Error message | If the error message with appears in the display, press the ⏻ button. The message disappears. Any time function that has been set is cleared.Observe the following information in order to eliminate the cause. | |
| Error message | Possible cause | Remedy/information |
| A button was pressed for too long or is covered. | Press all buttons individually. Check whether a button has jammed or is covered or dirty. | |

There is a risk of electric shock.
Incorrect repairs are dangerous. Repairs may only be carried out by one of our experienced after-sales engineers.
Changing the light bulb at the top of the oven
The oven light bulb must be replaced if damaged.
Replacement heat-resistant light bulbs are available from the Technical Assistance Service or from specialist retail outlets.
Only use lights obtained from the above.

- Risk of electric shock! Switch the appliance off at the mains. Ensure that it has been switched off.
- Place a dishcloth into the cold oven to avoid damage.
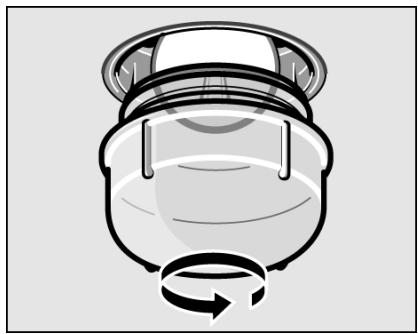
- Remove the protective glass panel by unscrewing it to the left.
natural_image
Illustration of a mechanical component with a rotating arrow, no text or symbols present- Replace the light bulb with a similar one.
- Replace the glass protective glass panel.
- Remove the dishcloth and switch the oven back on at the mains.
Protective glass panels
Damaged protective glass panels must be replaced. Protective glass panels may be obtained from the Technical Assistance Service. Please quote your appliance's product number and production number.
Technical Assistance Service
Our Technical Assistance Service is available for repairs to the appliance, to provide spare parts or accessories, and to answer any queries in connection with our products or services.
The Technical Assistance Service contact details are provided in the attached documentation.
Product number and production number
When contacting our Technical Assistance Service, please quote the appliance's product number (E) and production number (FD).
The specifications label with the corresponding numbers can be found on the right-hand side of the oven door.
To save you any inconvenience in the future, we recommend that you record the details for your appliance and the telephone number of the Technical Assistance Service in the boxes below.
Product number.
FD N.°:
Technical Assistance Service
Energy-saving and environmental protection tips
In this chapter we offer you some advice about how to save energy when baking or roasting and how to properly dispose of the appliance.
Saving energy
Preheat the oven only if this is required by a recipe or is indicated in the tables.
Use dark, lacquered or black enamel baking tins. These are more efficient at absorbing heat.
Open the oven door as little as possible when cooking, baking or roasting.
When baking several cakes, these should be preferably baked one after the other. The oven will still be hot, thereby reducing the cooking time for the second cake. Two rectangular baking tins may also be inserted at the same time.
In the case of long cooking times, the oven may be turned off 10 minutes prior to the specified time, allowing the item to continue to cook but taking advantage of the oven's residual heat.
Environmentally-friendly disposal of waste
Dispose of packaging with the environment in mind.
This appliance is identified according to the Waste Electrical and Electronic Equipment Directive WEEE 2002/96/EC.
This directive defines the framework for the recycling and reuse of appliances used in the EU territory.
Tables and tips
Cakes and pastries
The temperature and cooking time you select depends on the quantity and type of pastry. This is why “ranges” are given in the tables.
| Cakes in tins | Tin on the wire grill | Level | Heating | Temperature °C | Time |
| Sponge cake | Large/rectangular tin | 2 | 170-190 | 50-60 min. | |
| Traditional sponge mixture | Springform cake tin | 1 | 160-170 | 40-45 min. | |
| Hot water sponge mixture | Springform cake tin | 2 | 160-180 | 30-40 min. | |
| Short pastry base (fruits cake) | Springform cake tin | 1 | 180-200 | 25-35 min. | |
| Caramel custard (water bath) | Baking tin for custard in saucepan with water | 1 | 200-210 | 40-55 min. | |
| Frozen/chilled pizza | Pizza tray | 2 | 200-220 | 20-30 min. |
| Cakes on the tray | Tray | Level | Heating | Temperature °C | Time |
| Fresh pizza/Pie | Enamel | 2 | / | 180-190 | 20-25 min. |
| Muffins | Enamel | 3 | / | 160-170 | 30-35 min. |
| Biscuits | Tray | Level | Heating | Temperature °C | Time |
| Shortbread | Enamel | 3 | 160-170 | 20-30 min. |
Meat, poultry, fish and gratins
The tables apply to insertion into a cold oven. The time specifications are provided as guidelines only and depend on the type and quality of the meat. The weights indicated in the table “Poultry” refer to oven-ready poultry (without stuffing).
Advice on roasting
The roasting result depends on the type and quality of meat. Meat should be turned half way through the cooking time. Turn whole poultry after two thirds of the grilling time.
Advice on grilling
If possible, use pieces of meat which are of the same thickness. They should be at least 2 to 3 cm thick.
You should also insert the enamel tray at level 1. The meat juices are collected here and the oven is kept clean. Turn the pieces of meat after two thirds of the cooking time indicated.
| Meat | Weight | Ovenware | Level | Heating | Temperature in °C grill | Time |
| Roastbeef | 1 kg | Uncovered | 1 | 220-240 | 45 min. | |
| Pork with rind (e. g. shoulder, leg) | 1.5 kg | 1 | 180-200 | 170 min. | ||
| Leg of lamb | 1.5 kg | Uncovered | 1 | 180-200 | 120 min. | |
| Sausage | approx. 750g | Wire rack* | 4 | 3 | 15 min. |
| Poultry | Weight | Ovenware | Level | Heating | Temperatur e°C | Time |
| Whole chickens | 1 kg each | Wire rack | 2 | 190-210 | 50-80 min. | |
| 200-220 | 60-70 min. | |||||
| 2 turkey drumsticks | 800 g each | Wire rack | 2 | 190-210 | 90-110 min. | |
| 200-220 | 80-120 min. | |||||
| Chicken halves, 1 to 4 | 400 g each | Wire rack | 2* | 200-220 | 50-40 min. |
| Fish | Weight | Ovenware | Level | Heating | Temperature°C | Time |
| White/mix fish (whole piece) e. g. gilt-head seabream | 600 g | Enamel | 3 | 180-190 | 45-55min. | |
| Oily fish (small pieces) e. g. salmon | Wire rack | 2 | 180-190 | 45-55 min. | ||
| Stuffed hake | 1 Kg | Enamel | 3 | 180-190 | 55-65 min. |
| Gratins | Ovenware | Level | Heating | Temperature in °C, grill | Time |
| Toast with topping | Wire rack | 4 | 3 | 5-8 min. |
* Insert the aluminium tray at level 1.

text_image
b BalayBSH Electrodomésticos España, S.A.
CIF: A-28893550
Itaroa 1 • 31620 Huarte-Pamplona (Navarra) • ESPAÑA
9000372418 (1W0A93) 00-8901
www.balay.es