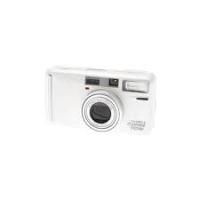
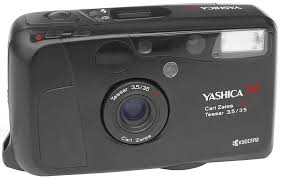
ZOOMATE 165EF - Appareil photo YASHICA - Notice d'utilisation et mode d'emploi gratuit
Retrouvez gratuitement la notice de l'appareil ZOOMATE 165EF YASHICA au format PDF.
| Type de produit | Appareil photo 35 mm autofocus avec zoom motorisé |
| Marque | YASHICA |
| Modèle | ZOOMATE 165EF |
| Catégorie | Appareil photo |
| Film utilisé | Film 135 (35 mm) |
| Format d'image | 24 mm × 36 mm |
| Objectif | KYOCERA ZOOM LENS 38 mm f/6,7 – 165 mm f/13,1 (10 éléments en 8 groupes) |
| Plage de mise au point | 38 mm : 0,9 m – ∞ ; 165 mm : 1,1 m – ∞ ; mode macro : 0,45 m – 0,6 m |
| Obturateur | Électronique programmé, 2 à 1/300 s (mode portrait nuit : 1 à 1/300 s) |
| Contrôle d'exposition | Automatique programmé, plage EV5 – EV16 (ISO 100) |
| Modes flash | Auto, réduction d'yeux rouges, désactivé, fill-in |
| Modes de prise de vue | Auto, portrait de nuit, paysage, macro |
| Viseur | Zoom réel, correction dioptrique de -3 à +1 |
| Sensibilité film | DX automatique ISO 100, 200, 400, 800 (par défaut ISO 100 sans code DX) |
| Alimentation | 1 pile lithium 3 V (CR123A ou DL123A) |
| Dimensions (L × H × P) | 119 × 64 × 51 mm |
| Poids (sans pile) | 230 g |
| Entretien et nettoyage | Nettoyer l'objectif avec un chiffon doux et du produit pour lentilles ; corps avec un chiffon sec. Éviter les solvants. |
| Sécurité | Ne pas utiliser en environnement humide, ne pas regarder le soleil dans le viseur, tenir hors de portée des enfants. |
| Pièces détachées et réparabilité | Pile CR123A (standard), télécommande infrarouge R-4 en option, accessoire de flash externe non fourni. |
| Informations générales | Appareil photo compact argentique 35 mm autofocus avec zoom 38–165 mm et flash intégré. Fabriqué par Kyocera/Yashica. |
FOIRE AUX QUESTIONS - ZOOMATE 165EF YASHICA
Questions des utilisateurs sur ZOOMATE 165EF YASHICA
0 question sur cet appareil. Repondez a celles que vous connaissez ou posez la votre.
Poser une nouvelle question sur cet appareil
Téléchargez la notice de votre Appareil photo au format PDF gratuitement ! Retrouvez votre notice ZOOMATE 165EF - YASHICA et reprennez votre appareil électronique en main. Sur cette page sont publiés tous les documents nécessaires à l'utilisation de votre appareil ZOOMATE 165EF de la marque YASHICA.
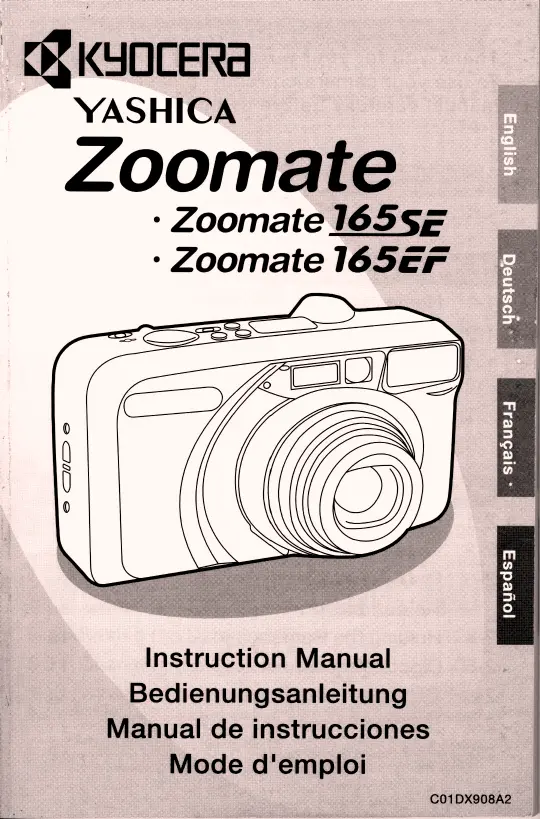
MODE D'EMPLOI ZOOMATE 165EF YASHICA
YASHICA
Zoomate
- Zoomate 165SE
- Zoomate 165EF
natural_image
Line drawing of a digital camera with no text or symbolsInstruction Manual
Bedienungsanleitung
Manual de instrucciones
Mode d'emploi
Thank you for your purchase of this camera. To use your camera correctly, please read this manual carefully before using it.
Contents
1. Introduction 3
1-1 Names of Parts 3
1-2 Camera care & Precautions 5
1-3 Photographic Concepts 7
• Regarding the Film 7
• Possible Distance for Shooting …… 8
2. Basic Operations 8
2-1 Load the battery 8
2-2 Load the film 9
2-3 Press the main switch to turn
the camera power "ON" 10
2-4 Holding the Camera 10
2-5 Diopter Adjustment 11
2-6 Compose Your Picture 11
2-7 Shutter Button 11
2-8 Remove the film 12
3. Photography Tips 13
3-1 Use Focus lock 13
3-2 Close-up Photography 14
3-3 Use Tripod 14
4. Advanced Techniques 15
4-1 Use the Flash Modes 15
• Auto-Flash Mode 15
• Red-eye Reduction Auto-Flash Mode 15
- Flash-off Mode 16
- Fill-in Flash Mode 16
4-2 Use the Photography Modes.... 17
• Night Portrait Mode 17
• Landscape Mode 17
• Macro Mode 18
4-3 Self-timer/Remote Control Photography 19
4-4 Spot AF Mode 20
4-5 Panorama Photography 21
5. Imprinting the Date and Time (Only model with dating unit) 22
5-1 Setting the Date and Time 22
5-2 Changing the Order of the Date 23
6. Trouble shooting 24
7. Specifications 25
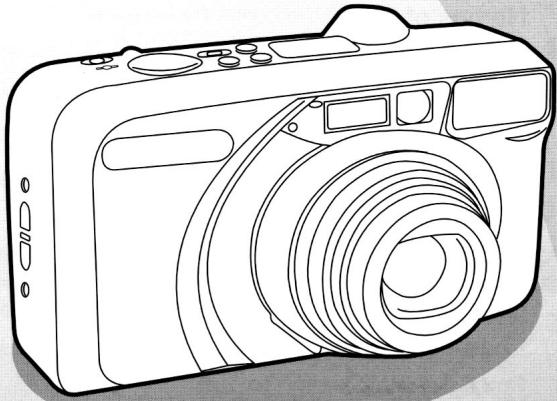
1. Introduction
1-1 Names of Parts

text_image
Select Button Flash Mode Button Self-timer/ Remote Control Button Date Mode Button* Shutter Release Button Manual Rewind Button Main Switch Flash Remote Control Sensor Self-timer indicator Display Panel Auto-focus Windows / Light Sensor Viewfinder Window Flash Strap Lug Taking Lens / Lens Cover ①Date*Film CounterDisplay Panel
text_image
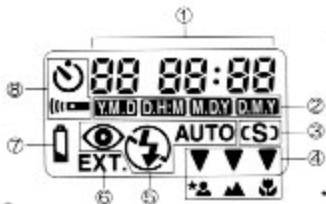
8:00:00 Y.M.D.O.H.M.M.D.Y.D.M.Y. EXT. AUTO.CSJ ① ② ③ ④ ⑤ ⑥①Date*/Film Counter
②Date Mark*
③Spot AF Mark
④Photography Mode Mark
Night Portrait Mode*
Landscape Mode"
Macro Mode
⑤Flash Mode Mark
Auto-Flash Mode* \$ auto.
Red-eye Reduction Mode" 5 AUTO"
Flash-off Mode"
Fill-in Flash Mode* \$
EXT. Indicator (Only Zoomate 165EF)
⑦Battery Warning Mark
Self-timer/Remote Control Mark
*......Only model with dating unit
text_image
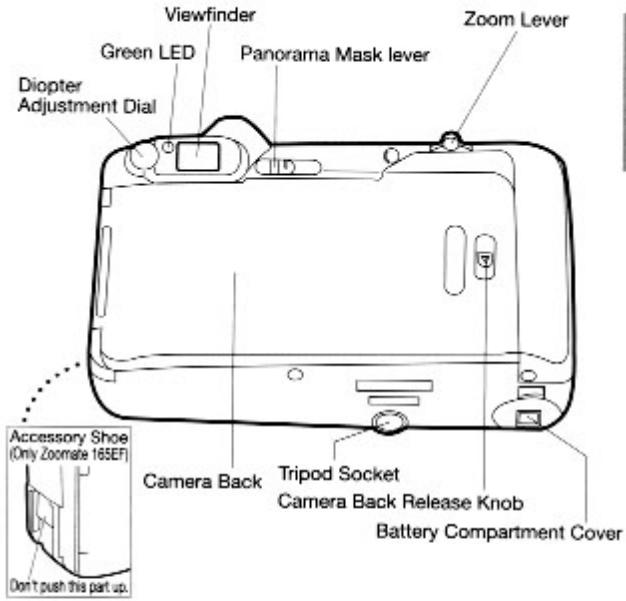
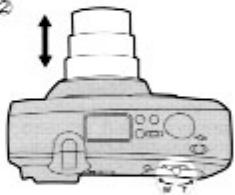
Viewfinder Green LED Diopter Adjustment Dial Panorama Mask lever Zoom Lever Camera Back Tripod Socket Camera Back Release Knob Battery Compartment Cover Don't push this part up. Accessory Shoe (Only Zoomset 165EF)Finder
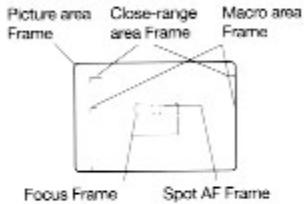
text_image
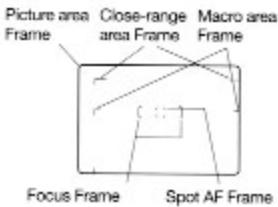
Picture area Frame Close-range area Frame Macro area Frame Focus Frame Spot AF Frame Attaching the Strap
text_image
Diagram showing cable connection with labeled components and directional arrows1-2 Precautions
| △ CAUTION | The symbol indicates the possible risk of personal injury to the product's user and / or others, and the possible occurrence of physical damages if the product is not used properly. |
| ⚠ WARNING | The symbol indicates the possibility of fatal accidents and /or serious injury if the product is not used properly. |
< Camera Care >
- Fingerprints and dirt on the lens and other areas can affect the accuracy of the camera. If the camera is soiled, wipe off gently. Clean the surfaces with a soft lens cleaning tissue moistened with lens-cleaning solution. Remove dust off with a blow brush.
- Use a soft cloth to clean the camera body. Never use organic solvents such as thinner or benzene.
| ⚠ CAUTION | · Clean the unit well when using it at beach or in some other dustyenvironments. A sea breeze / briny air may corrode metals, causingshort circuit, and may result in smoke or fire. In addition, dust causes malfunction to the internal mechanism.· The lens may become misty when suddenly brought into a warm room from a cold environment. The mist will clear in a short while. However, if such incidents occur repeatedly, water drops may be left inside the body or the lens. Water drops may cause short circuit, and may result in smoke or fire. Avoid sudden changes of temperature as much as possible.· The Camera is a delicate electronic device: avoid dropping or shocks that may cause smoke, fire, or damages to its structure due to short circuit of the unit.· Make sure to test shoot and / or double check the operational functions prior to the important events, such as wedding, overseas travelling, and so on. Take some extra batteries along with you, too. |
| ⚠ WARNING | · If any defect is found with the unit while using it (e.g. external body of the unit becomes extremely hot, smoke comes out, or it smells of burning, etc.), immediately stop using it, switch off the power, and remove the batteries: it may cause a fire hazard or burn. (Be careful not to get burned when taking the batteries out.) |
| WARNING | Do not use the unit in a very humid environment, or places whereit may get wet. Do not operate it with wet hands: the unit may bedamaged due to corrosion, fire, smoke overheating, short circuit,or electric shocks. (Special caution is required when operating inrain, snowing period, at the beach, and near water.)A high voltage circuit is built into the product; therefore, NEVER touch the internal parts of the unit when it is damaged due to a falland so forth: there is a risk of causing electric shocks. (the unit witha built-in flash)When taking pictures with flash, Do Not use the flash-light close to people's eyes (specially at infants' eyes): emitting the flash-lightclose to eyes may carry a risk of visual problem.Do not look at the sun or other strong light sources directly throughthe camera finder: there is a risk of visual problem.Do not take pictures whilst in motion: taking pictures while moving, especially looking into the finder while moving, may result in an accident.Be sure to pay attention to surroundings as well, instead of only looking at the objects, while taking pictures.Keep the product out of the reach of children. Be sure to pay careful attention, and do not leave the unit carelessly while using it around infants and children: infants and children do not understand safety warning and precaution. Moreover, there are risks of accidents listed as follows:- Getting injured by dropping or knocking off the unit.- Getting choked by accidentally tying the strap around the neck.- Getting their fingers caught in as the motor turns. |
< Storage of the Camera >
- Do not leave the camera and film for a long time in a hot place (on an ocean beach in summer, in a closed car under direct sunlight, etc.) as the camera, film and battery may be adversely affected.
- If you are unlikely to use the camera for long period, remove the batteries to prevent damage due to battery leakage.
| ⚠ CAUTION | · Store the unit in a well ventilated place. Avoid humid or dusty environments or places with chemicals (e.g. laboratory or drawer with moth repellents): circuit break down or short circuiting may occur, resulting in smoke or fire. |
- Battery performance will be reduced temporarily in low temperatures. If you are shooting in cold weather, keep the camera warm inside your jacket and take it out only when needed. Battery performance reduced by cold temperature will return to normal under normal temperature conditions.
- Poor contact may result if battery poles are soiled with sweat or grease. Wipe both poles clean before loading the battery.
| CAUTION | · Do not touch the battery with an electric conductive object (e.g. metallic tweezers). it will not only wear the battery out quickerbut it is also dangerous, causing a short circuit. |
| WARNING | · NEVER DO what is listed below: damaging the batteries will cause personal injury, fire, or damage to surroundings.(1)Do not use batteries other than the ones specified to this unit.(2)Do not insert the battery with incorrect matching of the polarities (+ and -).(3)Never throw the battery into fire, or recharge short disassemble, or heat up the battery.(4)The 3V lithium(CR123A/DL123A) battery can not be recharged.· When disposing of the battery, stick a tape or something on the terminalsfor insulation purpose. Contacting with metals after disposing of the batterymay cause explosion or fire.· Keep the battery out of the reach of children. In case a child swallows a battery, consult a doctor immediately: a broken battery may leak its fluid and harm the stomach and intestines. |
1-3 Photographic Concepts
This instruction manual refers to general photographic concepts in addition to the specifications of Zoomate165SE/EF.
The time, place, and occasion to select the film
Film speed means that the film is the speed which is sensitive to light. ISO 100 or 400, and so forth are indicated on the film box. A large ISO value means high sensitivity. Such films can be used in locations with poor ambient lighting or with fast shutter speeds, but it has coarser grain and therefore poorer image quality.
For flash photography, use ISO 400 film which increases the flash distance. (See the details about the distance which could be reached using flash on Page 8.)
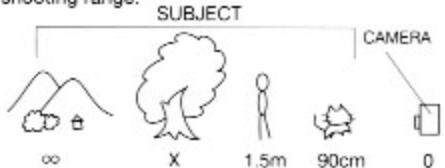
Possible Distance for Shooting
Possible distance for shooting means the distance between the camera and the subject. (Strictly speaking, this means the distance between the subject and the film plane.) Possible distance for shooting of this camera is from 90cm to (infinity), but the following shooting situations may limit the shooting range.
text_image
SMOCCING TARGET SUBJECT CAMERA ∞ X 1.5m 90cm 0When the distance from the camera to the subject is within 1.5m, this is called close-up photography. The camera can shoot as close as 90cm for wide-angle, and 1.1 for telephoto.
With this type of camera, there is a difference with what yousee in the viewfinder when taking close-up photography and the actual picture. (This is called Parallax.) In order to avoid this, compose the subject by using the close-range area frame. (See the details on pages 64 about this.)
There is a distance limit when using the flash.
This distance varies depending on film ISO or zooming.
| Film Speed | Wide-Angle | Telephoto |
| ISO100 | 0.9m~3.9m | 1.1m~2.1m |
| ISO400 | 0.9m~7.9m | 1.1m~4.2m |
2. Basic Operations
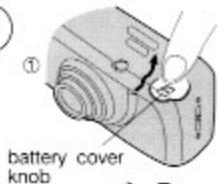
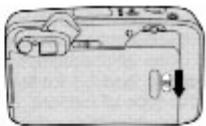
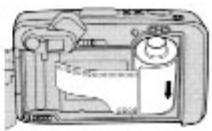
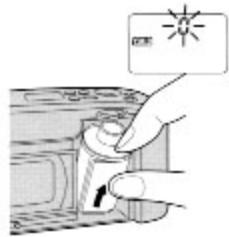
2-1 Load the battery
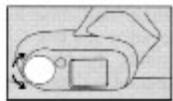
①Press the battery cover knob in the direction of the arrow to open the cover.
②Load the battery (CR123A or DL123A) facing the directions indicated by the label inside the battery compartment, then close the battery cover.
text_image
① battery cover knob
natural_image
Illustration of a kitchen appliance with a circular button and handle (no text or symbols)When the * 🔒 * mark is displayed on the display panel, it is time to replace the battery. Switch off the camera power and replace the battery.

Key Point
- Reset the date and time after loading a new battery

text_image
ACCESS AUTOLighted…The battery should be changed as soon as possible.

text_image
ICE AUTOBlinking…The camera no longer operates
2-2 Load the film
①Open the Camera Back by pushing down the Camera Back Release Knob.
- Please avoid changing the film in bright light.
①
natural_image
Simple line drawing of a folder with a mouse pointer and arrow indicating direction (no text or symbols)②Insert the film cassette slantwise with its bottom end first.
②
natural_image
Diagram of a digital camera showing the internal components and sound waves (no text or symbols)③Pull the tip of the film up to the "I◆FILM" mark and place it on the top of the spool. Be careful at this time that the film does not float up from the spool.
③
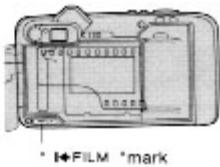
text_image
FILM *mark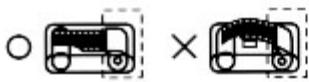
text_image
Diagram showing a truck with a bus and a cross symbol, likely illustrating a equivalence or comparison between the two vehicles.
natural_image
Hand holding a small object with motion arrows indicating movement (no text or symbols)
Key Point
- If the film leader is too long, please rewind the film as shown in the figure.
④Close the Camera Back securely. As soon as the Camera Back is closed, the film will automatically advance and stop when the Exposure Counter shows *1*.

Key Point
- If the counter does not show '1', the film is not advancing properly. Open the Camera Back and load the film correctly again.

flowchart
graph TD
    A["接收"] --> B["返回"]
    B --> C["结束"]
2-3 Press the main switch to turn "ON" the camera power
When you press the main switch, the camera power comes "ON" and you are now ready to take pictures.
- When you press the main switch again, the lens retracts, the lens barrier closes, and the camera power goes off.
- Make it a rule to switch off the power when you do not use the camera soon. This prevents accidental shooting.
To conserve the battery power, if the camera is left unused for about 2 minutes with the power-on, the lens retracts, the lens barrier closes, and the camera power goes off.
text_image
Diagram of a car air conditioner unit with directional arrows and labeled buttons for 'AUTO' function2-4 Holding the Camera
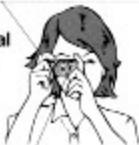
Basically, hold the camera with both hands. Find the camera holding techniques that suit you best referring to the following illustration. Be sure your fingers do not obstruct or rest on the lens, flash and etc.
Gently depress the shutter release without straining yourself.
Horizontal Position
natural_image
Illustration of a person holding a camera (no text or symbols visible)Vertical Position

natural_image
Line drawing of a person holding a camera, no text or symbols presentDo not cover the lens or flash with your fingers.
Keep your elbows tucked in to steady the camera.
2-5 DIOPTER ADJUSTMENT
Turn the diopter adjustment dial until the viewfinder display becomes clear.
natural_image
Simple line drawing of a device with a circular button and rectangular body (no text or symbols)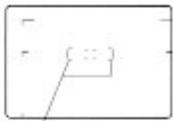
natural_image
Simple line drawing of a rectangular object with a diagonal line extending from it (no text or symbols)Focus Frame
2-6 Compose Your Picture
①Aim the focus frame at the subject you want to focus.
②Turn the zoom lever to determine the size of the field.
WIDE

natural_image
Simple line drawing of a person standing on a balcony overlooking a landscape with birds and clouds (no text or symbols)TELE

natural_image
Simple line drawing of a person sitting on a bench with birds and mountains in the background (no text or symbols)①

natural_image
Illustration of a girl standing on a bridge with birds and sky in the background (no text or symbols)②
natural_image
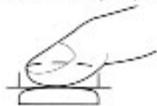
Illustration of a camera with no visible text or symbols2-7 Shutter Button
The shutter button has two positions.
①To set the focus frame on your selected image, press the shutter button lightly. This is called half shutter.
①Half shutter
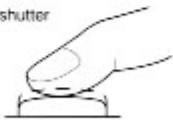
text_image
shutter②After confirming that the green LED is illuminated, press the shutter button the rest of the way.
②The Shutter is fully depressed
natural_image
Simple line drawing of a hand pressing a button (no text or symbols)| Lighted | It is in focus.(Depress the shutter release button fully, the shutter trips.) |
| Blinking | It is out of focus./Flash is charging.(Depress the shutter release button fully, the shutter does not trip.) |
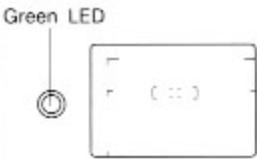
text_image
Green LED ( : : )AF assist flash
When the subject is dimly lighted or its contrast is low, The flash may partially emit prior to the shutter closing for auto focus in low light conditions. Please do not mistake this for the flash when the shutter will actually release.
2-8 Remove the film
As soon as the last frame is exposed, the film will automatically start to wind itself back into its cassette. While it is rewinding, the Exposure Counter will count down. When it has wound itself back completely, it will stop automatically and the Exposure Counter will show "0", and blink. After making sure the Exposure Counter blinks at "0", open the Camera Back and take out the film.
- While the film is rewinding, other camera features will not function.
• If you obtain more exposures than stated on the film pack, the last exposure may be cut in the process of developing.
text_image
Diagram showing a hand pressing a button on a device with a warning symbol and Chinese text label '注意' (Attention)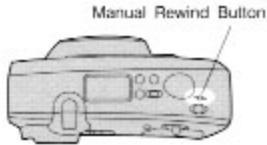
text_image
Manual Rewind Button3. Photography Tips
3-1 Use Focus Lock
When you take a snap shot, in most cases the subject you want to focus might be in the center of the focusing frame.
Please try to take a photograph with the subject off center.
For example, when you take a photograph like this.

natural_image
Cartoon illustration of a person in a hat and coat standing beside a castle with a tower in the background (no text or symbols)①Aim the focusing frame at the subject and press the shutter release button halfway. This is called "Focus Lock."

natural_image
Simple line drawing of a hand pressing a button (no text or symbols)①

natural_image
Illustration of a smiling girl in traditional attire with decorative elements, set against a stylized cityscape background (no text or symbols)②Move the camera to recompose the picture without lifting your finger off the halfway position, then take the picture by depressing the shutter release button all the way.

natural_image
Simple line drawing of a hand pressing a button (no text or symbols)②
natural_image
Illustration of a girl with a starry face in front of a castle and trees, no text or symbols present
Key Point
• The camera features a multi-auto focus. Even if the subject is not centered, as long as they are in the focus frame, they will be in focus.
3-2 Close-up Photography
When the distance between the subject and camera is within 1.5m, this is 'Close-up Photography'. (You can shoot as close as 90cm at wide angle and 1.1m at telephoto.) When you look at the viewfinder, you can see the 'Close-range area frame' in the viewfinder. Use this frame to compose your picture.

text_image
90cm-1.5m (at wide angle side)- Shooting panorama photos with a distance to the subject of less than 1.5 meters is not recommended.
①Look at the viewfinder and compose the picture in the picture area frame. Then press the shutter release button half-way down to lock the focus.
②Move the camera slightly left in order to shift the composition which has been set ① to the Close-range area Frame. And press the shutter release button all the way.
3-3 Use Tripod
text_image
Picture area Frame Close-range area Frame Macro area Frame Focus Frame Spot AF Frame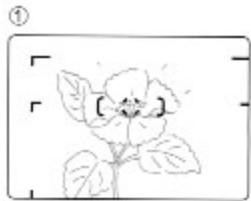
natural_image
Simple line drawing of a flower with leaves and a small mouth, enclosed in a rectangular frame (no text or symbols)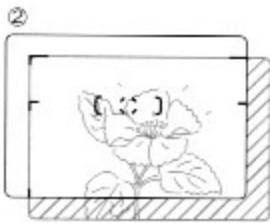
natural_image
Simple line drawing of a flower with leaves and stem, enclosed in a rectangular frame (no text or symbols)When you take a picture during an evening or night scene making use of natural light without flash, or for indoor picture making use of natural light, the shutter speed will slow down. Use a tripod in this case in order to prevent camera shake.
If a tripod is necessary in any explanation in this instruction manual, then *Tripod* mark is printed on the manual.
4. Advanced Techniques
Take a picture using various built-in features.
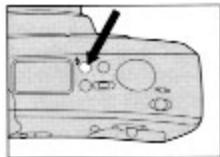
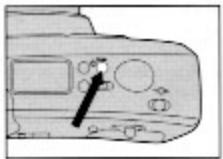
4-1 Use the Flash Modes
Each time * 50° is pressed, the flash mode changes (see illustration). The selected mode is displayed in the display panel. Set your desired mode and shoot.
natural_image
Line drawing of a device casing with control buttons and a black arrow pointing to the component (no text or symbols)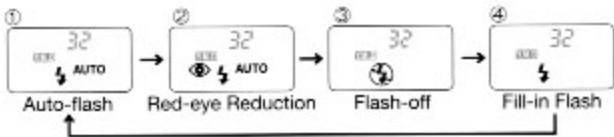
flowchart
graph LR
    A["① AUTO"] --> B["② Red-eye Reduction"]
    B --> C["③ Flash-off"]
    C --> D["④ Fill-in Flash"]
    A -->|32 AUTO| B
    B -->|32 AUTO| C
    C -->|32 AUTO| D
Auto-flash Mode AUTO
When the camera power is turned on, the camera is set to this mode. In dim light, the flash automatically fires to take pictures.
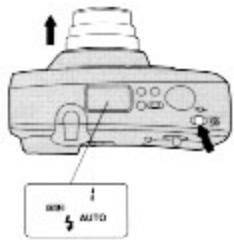
Red-eye Reduction Auto-flash Mode Ⓞ AUTO
If a person or pet are photographed in dim light using a flash, the pupils of their eyes may turn out red in the picture (red-eye effect.) This mode is useful for reducing the red-eye effect.
①Press "4", and displays "⊕ 5 AUTO".
②Inform your subjects that the 'Flash will fire twice', then press the shutter release button.

natural_image
Simple line drawing of a cat with closed eyes and whiskers (no text or symbols)- In this mode, the flash fires twice. After the flash fires for the first time, the shutter trips when it fires for the second time. Please do not move the camera before the second flash, and also be sure your subjects do not move.
- The conditions where the flash will go off are the same as the auto flash mode.
Flash-off Mode

Tripod
If you want to take pictures without flash such as twilight scenes or indoor sites such as museums, set the camera to this mode.
①Press "4" and displays "3".
②Press the Shutter release button.
- Shutter speed will be slower in low light conditions. Use a tripod to prevent camera shake.
natural_image
Simple line drawing of a stadium with a flagpole and decorative elements (no text or symbols)Fill-in Flash Mode
The fill-in flash mode gives a better balanced lighting of the person as well as the background in outdoor photography, portrait pictures with shadows of the subjects, in bright sunlight or backlight, or indoor photography with bright, fluorescent light. Please pay attention to the working range of the flash.
①Press "5" and displays "4".
②Press the shutter release button.

natural_image
Cartoon illustration of a character with a hat and palm tree in a tropical setting (no text or symbols)
natural_image
Simple line drawing of a person relaxing on a beach with palm trees and a flag (no text or symbols)4-2 Use the Photography Modes
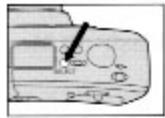
By pressing "SELECT", you can cycle through the different photo modes as shown in the illustration. Please choose the mode that you would like to use.
natural_image
Close-up of a camera lens with control buttons and a black arrow pointing to the lens (no text or symbols visible)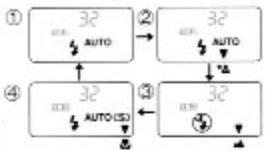
flowchart
graph TD
    A["① AUTO"] --> B["② AUTO"]
    B --> C["③ AUTO"]
    C --> D["④ AUTO (ISO)"]
Night Portrait Mode

Tripod
Use this mode for shooting outdoors in evening, or a night scene if you want to have both the subject and the background beautifully exposed.
①Press "⚡" to change to "⚡ AUTO".
②Press "SELECT" to change to night portrait mode.
③Press the shutter button.

Key Point
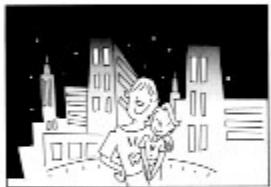
natural_image
Illustration of a person holding a baby in front of a city skyline at night (no text or symbols)- The shutter speed for night portrait mode is reduced from 2 seconds to 1 second. This is because of possible camera movement when the camera is hand held during slow shutter speeds. To reduce camera movement when the camera is hand held, hold the camera firmly with both hands. To eliminate camera movement, use of a tripod is strongly recommended.
Landscape Mode

Tripod
Use this mode when you shoot far away landscape with sharper image.
①Press ^ select ^ and displays the landscape mode.
②Press the shutter release button. In this mode, the camera is set to the "Flash off mode" automatically.

Key Point

natural_image
Simple line drawing of a landscape with houses, trees, and clouds (no text or symbols)- In this mode, the lens is focused at infinity regardless of the proximity of any foreground subjects.
Macro Mode

This mode is useful when you wish to take close up photos. The closest recommended distances for standard photography are 90~cm for wide angle and 1.1 meters for telephoto, however, macro mode lets you get as close as 50~cm .
text_image
Picture area Frame Close-range area Frame Macro area Frame Focus Frame Spot AF Frame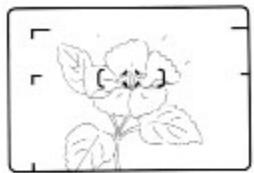
natural_image
Simple line drawing of a flower with leaves and a central bud (no text or symbols)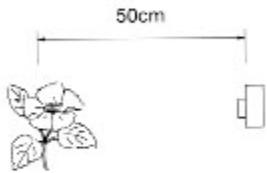
text_image
50cm①Press "SELECT", to change to Macro mode.
② Center the subject in the focus frame and press the shutter halfway to lock the focus.
③You can now reposition the subject as desired in the macro area frame and press the shutter completely.
- In Macro mode, the lens will automatically adjust to the macro position and the auto focus will change to spot AF.
- It is not possible to zoom while in Macro mode.
- Panorama mode is not recommended for Macro mode photography.
- The camera will be able to focus on the subject between 45cm and 60cm. If you are too close, the shutter will not release.

natural_image
Simple line drawing of a flower with leaves and stem, no text or symbols present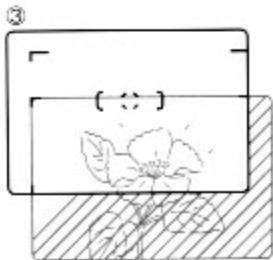
natural_image
Simple line drawing of a flower inside a rectangular frame with hatched base (no text or symbols)4-3 Self-timer / Remote Control Photography
Use this mode if you want to get into the picture yourself.
①Self-timer/Remote Control Button
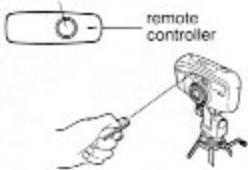
Remote Control Photography
If the Remote Controller is not included with your camera, you'll have to buy it separately.
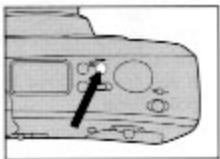
①Press the " 🔊" button. " 🔊 " is displayed on the display panel. Notes: Use a tripod tohold the camera securely.
②Compose the image and press the transmitting button on the remote controller. The lens will focus and the self-timer LED on the front of the camera will blink. The shutter is released 2 seconds later.
- If the remote controller is not operated for about five minutes, the camera power goes off.
• In rare cases of strong backlighting or under inverter type fluorescent lighting, the remote control function may not operate.
• In order to prevent problems with future pictures, please turn off the remote control/self timer mode after you are finished with them.
Self-timer Photography
①Press the "○" button. * is displayed on the display panel. Notes: Use a tripod to hold the camera securely.
natural_image
Diagram of a vehicle's front panel with a hand pointing to the dashboard (no text or symbols visible)② transmitting button
text_image
remote controller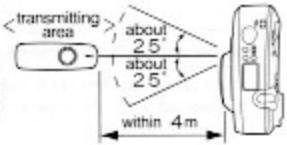
text_image
①Self-timer/Remote Control Button
natural_image
Diagram of a device's internal components with no visible text or symbols②Aim at your subject, and press the shutter release button. The shutter will be released 10 seconds after the shutter release.
- Focus and exposure will be locked during self-timer countdown.
• To cancel the self-timer after it has been activated, press the * 📋 button again.
• After the shutter is released in self timer mode, the camera will automatically revert to normal photography mode and turn off the self timer mode.
- Note that when it is impossible for the autofocus mechanism to operate in spite of the auto-focus assisting flash function, the self-timer LED will not blink and exposure will not take place.
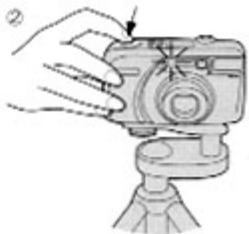
natural_image
Illustration of a hand using a camera to press or install a device on a stand (no text or symbols visible)4-4 Spot AF mode
Spot AF mode is useful when you want to specifically focus on a portion of your subject. Simply center the Spot AF frame on the subject and press the shutter button.
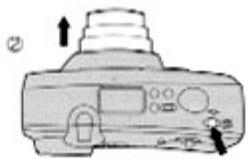
①Turn the camera off
②Press the main switch until "c\$0" is displayed on the display panel (about 2 seconds).
③When the focus mode has changed to Spot AF, the camera will turn on.
natural_image
Illustration of a camera with control buttons and an upward arrow (no text or symbols)(3)

text_image
AUTO AUTO ($)④Simply center the subject in the Spot AF frame and press the shutter button halfway.
⑤After the green lamp is illuminated, press the shutter button completely.
- Spot AF will be turned off automatically when the camera is turned off.
④

natural_image
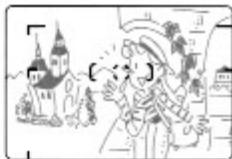
Illustration of a girl with a hat and scarf, standing in front of a village scene with houses and a church (no text or symbols)4-5 Panorama Photography
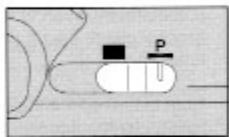
①Move the Panorama Mask lever to * P *.
②The viewfinder will change to panorama format as shown in the illustration. Please frame your subject in the view-finder and press the shutter button.
- You can not use the auto date function with panorama mode.
①
natural_image
Simple line drawing of a mechanical or electrical component with no text, numbers, or symbols②

text_image
r [ : : ]Panorama Format

Key Point
- Please use a minimum distance of 1.5 meters for panorama photography. For distances less than 1.5 meters, the film image may differ from the viewfinder image
About Panorama Photography
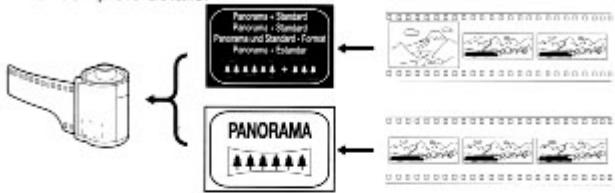
- With panorama photography, one standard frame of film has the top and bottom trimmed to leave an image 12x35mm in size which can be printed up to 89x256mm in size.
- To take better panoramic shots, use zoom out to wide angle, step back and try to include a wide field in your shot.
About Panorama Prints
When processing your panorama shots, be sure to label your film canister according to the following table before sending it in to be processed.
| Film Format | Label |
| Panorama and standard photography | Mixed Panorama |
| Panorama photography only | All Panorama |
- Processing of panorama prints typically takes longer than standard photos. The cost may also be different. Please consult your processor for complete details.
flowchart
graph LR
    A["Power Supply"] --> B["Panorama - Standard"]
    A --> C["Panorama - Standard"]
    A --> D["Panorama und Standard - Formal"]
    A --> E["Panorama - Eolantar"]
    B --> F["Wave Graph 1"]
    C --> G["Wave Graph 2"]
    D --> H["Wave Graph 3"]
    E --> I["Wave Graph 4"]
5. Imprinting the Date and Time (Only model with dating unit)
5-1 Setting the Date and Time
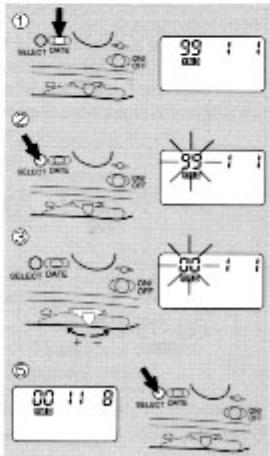
Set the Date Mode with the main switch off.
①Press “DATE” and shows “Year/month/day”.
②Press " SELECT" and the number which you want to set blinks.
③Press the Zoom Lever and set the number.
④Repeat the operation of ② and ③ and set all numbers.
⑤When you finish to set up to 'Day', press " ○ " again to finish.
text_image
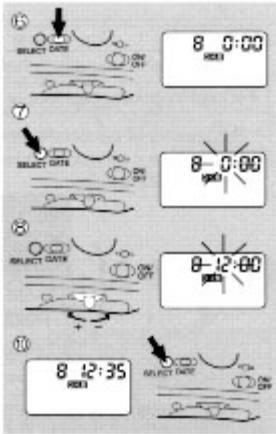
① SELECT DATE ON OFF 99 00 ② SELECT DATE ON OFF 99 00 ③ SELECT DATE ON OFF 00 11 8 ④ SELECT DATE ON OFF©Press "DATE" and shows 'Day/Hour/Minute'.
⑦Press "SELECT" and the number which you want to set blinks.
⑧Press the Zoom Lever and set the number.
⑨Set the number of "Minute" by operation of ⑦ and ⑧.
⑩Press "SELECT" to finish the time setting.
- The blinking display will release and the LCD will return to normal after 8 seconds.
- If you take more than the number of photos listed on the canister, the final frame may not contain a complete image.
text_image
8 0:00 SELECT DATE ON ON 8 0:00 SELECT DATE ON ON 8 12:00 SELECT DATE ON ON 8 12:35 SELECT DATE ON ON5-2 Changing the Order of the Date
You can print the date or time on your photographs.
Set the date mode with main power switch off.
- Date or Time is displayed only during Date Mode Button is pressed with main power switch on.
- Date or Time is displayed for 8 seconds when the main power switch off and the Date Mode Button is pressed.
①Each time the Date Mode Button is pressed, the date mode changes as shown in the chart. Set the desired mode.
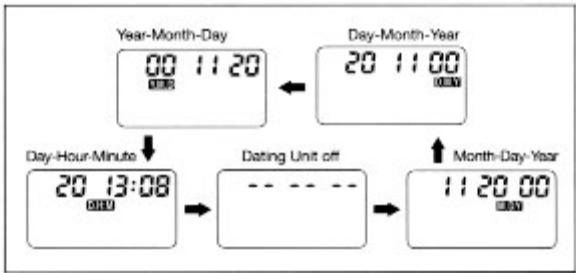
flowchart
graph TD
    A["Year-Month-Day 00:00"] --> B["Day-Month-Year 20:00"]
    B --> C["Day-Hour-Minute 20:13:08"]
    C --> D["Dating Unit off 20:00"]
    D --> E["Month-Day-Year 11:20"]
②With the main power switch on, depress the Shutter Release to take pictures.
6. Troubleshooting
| Symptom | Cause | Action | Page |
| The shutter will not release | The power switch is turned off. | Turn the power switch on. | 10 |
| The battery is weak. | Replace with fresh battery. | 8 | |
| Battery is inserted incorrectly. | Confirm the battery is inserted correctly. | 8 | |
| The camera is set to remote control / self timer mode | Change the mode to a different setting. | 19 | |
| The display panel is blank | The power switch is turned off. | Turn the power switch on. | 10 |
| The battery is are weak. | Replace with fresh battery. | 8 | |
| Battery is inserted incorrectly. | Confirm the battery is inserted correctly. | 8 | |
| The green light is flashing | The camera is too close to the subject. | Follow the minimum distance requirements. | 14 |
| The flash is charging. | Wait till the charging lamp goes out. | 12 | |
| The flash goes off when the shutter is pushed halfway. | In low light conditions where there is not enough ambient light to focus, normally the auto focus uses light from the flash to set the focus. | Push the shutter button completely to release the shutter. | 12 |
| The flash will not flash. | The camera is set to flash-off mode | Change to a different flash mode. | 16 |
| The camera is set to landscape (long distance) mode | Change to a different camera mode. | 17 |
7. Specifications
| Type: | Fully automatic 35mm lens shutter camera with built-in zoom lens. |
| Film Used: | 135 Film |
| Picture size: | 24mm x 36mm |
| Lens: | KYOCERA ZOOM LENS 38mm F6.7 - 165mm F13.1 (10 elements in 8 groups). |
| Shutter: | Programmed electronic shutter, 2-1/300 seconds.(At Night portrait mode: 1-1/300 seconds.) |
| Focusing range: | 38mm....0.9m/3.0ft. -∞.165mm....1.1m/3.6ft. -∞.macro mode....0.45m/1.5ft. -0.6m/2.0ft. |
| Exposure control: | Programmed automatic exposure. |
| Exposure range: | EV5 - EV16 (ISO 100) |
| Metering Method: | External |
| Film speed: | Automatic setting with DX-coded ISO 100, 200, 400, 800 film.Film speed automatically set to ISO 100 with non-DX coded film. |
| Focusing: | passive type, 5 point Multi Auto Focus/Spot AF |
| Viewfinder: | Real-image zoom viewfinder. |
| Magnification: | 0.44-1.67X |
| Field of view: | 80% |
| Diopter Adjustment: | Correctable range -3--+1 |
| Display in | |
| Viewfinder: | Focus frame, Spot AF frame, Picture area frame, close-range area frame, Macro area frame. |
| Display beside | |
| Viewfinder eyepiece: | Focusing/Flash indicator (green LED). |
| Display panel: | Flash mode marks (Auto-flash, Red-eye Reduction Auto-flash, Flash-off, Fill-in Flash)data mark, battery warning mark, Exposure counter/self-timer count down, self-timer/remote control mark, date & time, Spot AF mark, EXT. indicator (only Zoomate 165EF) |
| Film loading: | Auto loading (film automatically advances to the first frame) |
| Film advance: | Automatic. |
| Film rewinding: | Auto return/auto stop and a mid-roll film can be rewound. |
Exposure Counter: Automatic additive type
Self-timer: Electronic, with 10-sec. delay (self-timer indicator blinks while it is operating); exposure counter shows remaining time in seconds.
Flash: Built-in, with guide-number control.
| Flash range: | (ISO 400) | At 38mm: 0.9m/3.0ft. - 7.9m/25.9ft.At 165mm: 1.1m/3.6ft. - 4.2m/13.8ft. |
| (ISO 100) | At 38mm: 0.9m/3.0ft. - 3.9m/12.8ft.At 165mm: 1.1m/3.6ft. - 2.1m/ 6.9ft. |
Recycle time: about 2 sec. - 10 sec.
Auto dating unit (for models with dating unit only): Built-in LCD displayquartz watch (automatic calendar).
| Date imprinting method: | 1year-month-day, 2day-hour-minute,3dating unit off, 4month-day-year, 5day-month-year. |
Battery for dating unit: Power supply from camera body battery.
Battery: 3 V Lithium battery 1 pc. (CR123A or DL123A); about 15 rolls of 24-exposure film can be exposed with 50% flash.
Dimensions: (165SE) 114(W) x 64(H) x 51(D) mm
4.5(W) x 2.5(H) x 2.0(D) in.
(165EF) 119(W) x 64(H) x 51(D) mm
4.7(W) x 2.5(H) x 2.0(D) in.
Weight: (165SE) 220 g / 7.8 oz. (without battery). (165EF) 230 g / 8.1 oz. (without battery).
Remote Control R-4
| Format: | Infared remote control |
| Effective distance: | Within 4 meters of the front of the camera |
| Battery life: | About 50000 usesBattery can be replaced at an authorized service center. |
| Dimensions: | 64mm (W) x 22mm (H) x 9mm (D) / 2.5(W) x 0.9(H) x 0.4(D)in. |
| Weight: | 7.5g / 0.26oz. (without the battery) |
Specifications and design are subject to change without notice. All data are based on KYOCERA's Test method.