
FS752TP - Switch réseau NETGEAR - Notice d'utilisation et mode d'emploi gratuit
Retrouvez gratuitement la notice de l'appareil FS752TP NETGEAR au format PDF.

| Type de produit | Switch réseau manageable (Smart Switch) |
| Marque | NETGEAR |
| Modèle | FS752TP |
| Dimensions (L × P × H) | 440 × 260 × 44 mm (format rack 1U) |
| Poids | 5,2 kg |
| Nombre de ports | 48 ports 10/100 PoE+ + 4 ports combo Gigabit/SFP |
| Alimentation | Interne, 100-240 VAC, 50-60 Hz |
| Budget PoE total | 370 W (PoE+ sur 48 ports) |
| Fonctions principales | VLAN, QoS, IGMP snooping, Link Aggregation, Storm Control, DHCP client, SmartWizard Discovery |
| Capacité de commutation | 17,6 Gbit/s |
| Table d'adresses MAC | 8000 entrées |
| Adresse IP par défaut | 192.168.0.239 (DHCP sinon) |
| Mot de passe par défaut | password (en minuscules) |
| Gestion | Interface Web, utilitaire SmartWizard GearDiscovery |
| Mise en réseau | Support DHCP, IP statique, VLANs, priorisation du trafic |
| Sécurité | Contrôle d'accès par mot de passe, filtrage MAC, Storm Control |
| Entretien et nettoyage | Nettoyer l'extérieur avec un chiffon sec et doux. Débrancher avant nettoyage. Vérifier les ventilations. |
| Pièces détachées et réparabilité | Alimentation interne non remplaçable par l'utilisateur. Ventilateurs remplaçables par un technicien. |
| Température de fonctionnement | 0°C à 40°C |
| Humidité | 10% à 90% (sans condensation) |
FOIRE AUX QUESTIONS - FS752TP NETGEAR
Questions des utilisateurs sur FS752TP NETGEAR
0 question sur cet appareil. Repondez a celles que vous connaissez ou posez la votre.
Poser une nouvelle question sur cet appareil
Téléchargez la notice de votre Switch réseau au format PDF gratuitement ! Retrouvez votre notice FS752TP - NETGEAR et reprennez votre appareil électronique en main. Sur cette page sont publiés tous les documents nécessaires à l'utilisation de votre appareil FS752TP de la marque NETGEAR.
MODE D'EMPLOI FS752TP NETGEAR
Start Here
Follow these instructions to set up your smart switch.
Prepare to Install Your Smart Switch
Prepare a PC with an Ethernet adapter and a CD ROM drive.
- Before proceeding with the smart switch installation, familiarize yourself with the contents of the Resource CD, especially the manuals.
First, Install the Smartwizard Discovery Utility on a PC
- Power on your PC, let the operating system boot up completely, and log in as needed.
- Insert the Resource CD for the Smart Switch Series into your CD-ROM drive. The CD main page shown below will load.
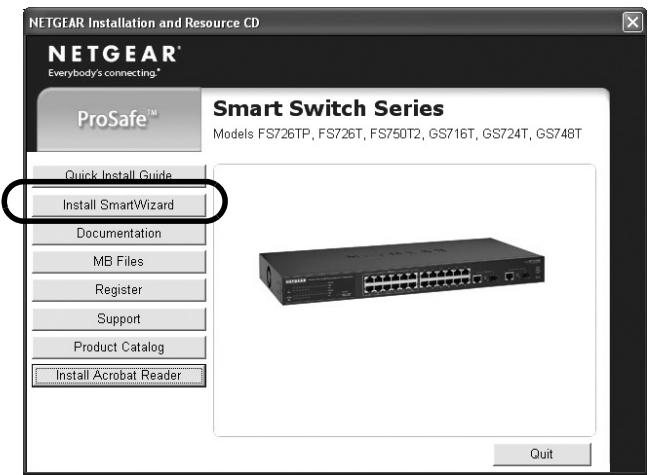
- Click Install SmartWizard. Follow the prompts to complete the installation of the SmartWizard GearDiscovery utility.
- Click OK when done.
Next, Connect Your Smart Switch in the Correct Order
Note: These instructions assume you are using DHCP in your network. If you are using static IP addressing in your network, configure the switch IP address before connecting it to your network. In the absence of a DHCP server, the switch will default to 192.168.0.239 for its IP address. To configure the switch before connecting it to your network, set up the PC with an IP address in the 192.168.0.x subnet, and connect the PC to the switch. Then, use the Smartwizard Discovery utility as illustrated below to configure the switch.
1. Connect the smart switch to your network.
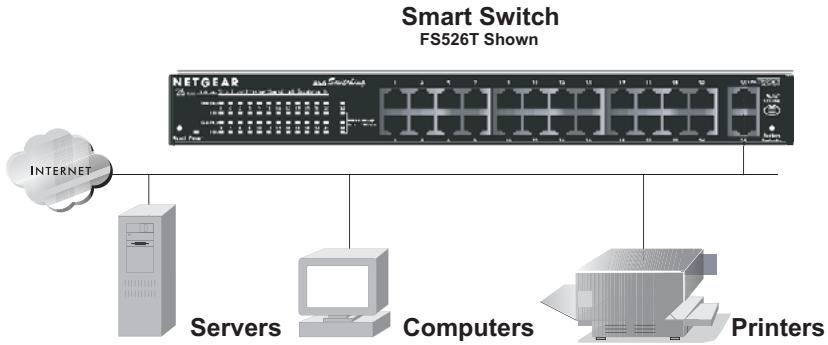
- Power on the switch.
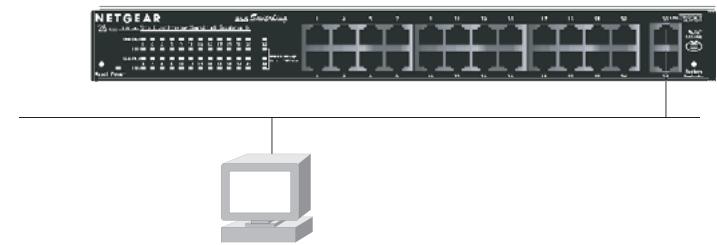
- Verify that the PC with the SmartWizard GearDiscovery utility is on the same subnet as the switch.
Smart Switch
FS526T Shown
PC with SmartWizard Discovery Utility
Now, Configure the Switch with the SmartWizard Discovery Utility
- Double click the SmartWizard GearDiscovery icon on your desktop or in Windows Start menu Programs to run the utility and view this screen.
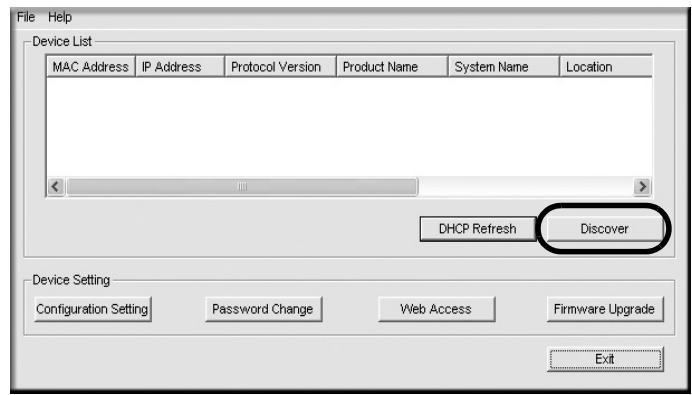
- Click Discover to find your switch in the network.
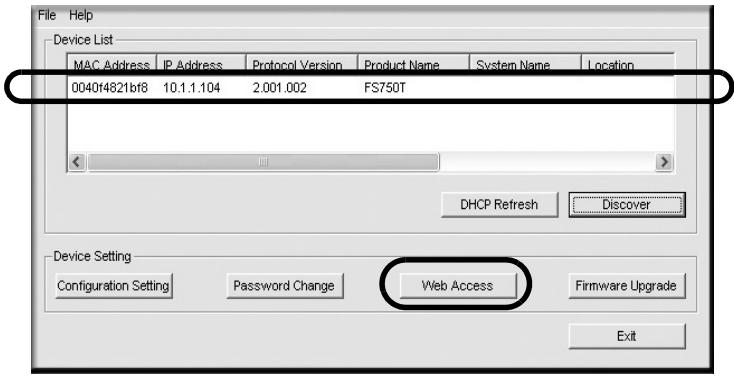
The SmartWizard GearDiscovery utility finds the switch and displays its MAC Address, IP Address, and model number. If you cannot configure your switch, verify that the cable connections are secure, that the IP address configuration of the PC is in the same subnet as the switch, and click the Discover button.
- Click to select the line displaying the details of your switch. If there are multiple smart switches in your network, be sure to select the one you want to configure.
- Click Web Access to view the switch log in screen.
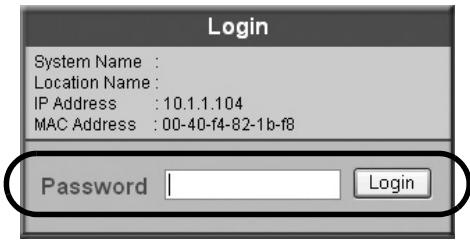
- Enter the default password of password in lower case letters and click Login. The switch will display the switch settings main page. Configure the switch for your network. Consult the manual on the CD or the online help in the switch for assistance with configuration procedures.
After you log in to the switch, the main Web Access menu displays.
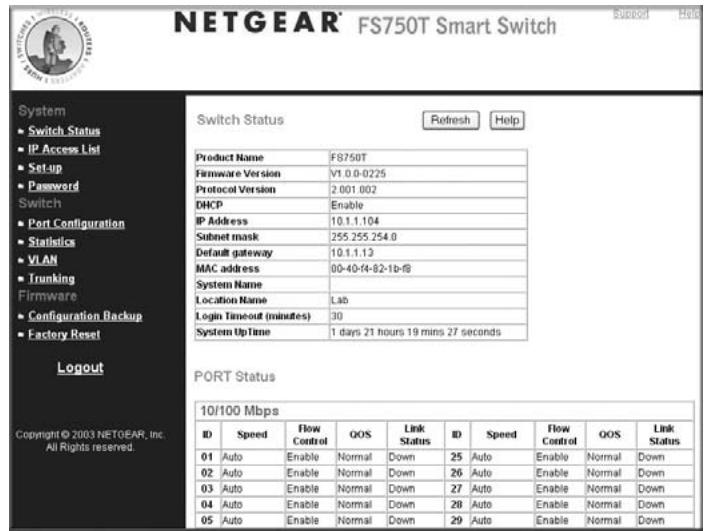
Use the configuration menu options to configure your switch.
Power Over Ethernet Option
If your switch includes the Power over Ethernet option, such as the FS726TP, you can use it to power Ethernet devices like VoIP desk phones or suitably equipped wireless access points. Simply plug a Cat5 or better cable into the port and the switch will determine if it is safe to provide power along with the data. See the hardware guide for more details.
Troubleshooting Tips
Here are some tips for correcting simple problems you may have.
Be sure to power on your PC and smart switch in the correct sequence.
Follow this sequence. Turn off the smart switch and computer. First, turn on the smart switch and wait two minutes. Next turn on the computer.
Make sure the Ethernet cables are securely plugged in.
For each powered on computer connected to the smart switch with a securely plugged in Ethernet cable, the corresponding smart switch LAN port status light will be lit.
Make sure the network settings of the computer are correct.
In most cases, computers should be configured to obtain an IP address automatically via DHCP. For help with this, please see the animated tutorials on the CD or the Reference Manual Appendix C on the CD.
If your network uses static IP addresses, be sure the switch and computer are configured with valid IP addresses.
Technical Support
Thank you for selecting NETGEAR products.
Register Your Product
To register, go to: http://www.NETGEAR.com/register
Go to http://www.NETGEAR.com/support for support information.

