
DT11 - Minuterie INTERMATIC - Notice d'utilisation et mode d'emploi gratuit
Retrouvez gratuitement la notice de l'appareil DT11 INTERMATIC au format PDF.
| Type de produit | Minuterie numérique |
| Marque | INTERMATIC |
| Modèle | DT11 |
| Catégorie | Minuterie |
| Fonctions principales | Programmation automatique, minuterie de décompte, mode aléatoire, marche/arrêt manuel |
| Programmation | Jusqu'à 14 paires d'heures marche/arrêt, intervalle minimum de 1 minute |
| Affichage | LCD avec indicateurs AM/PM, symbole heure d'été, numéro de programme |
| Alimentation | Secteur via prise électrique standard |
| Piles de sauvegarde | 2 piles alcalines L1154 (remplaçables), durée de vie >3 ans |
| Modes | Auto, Manuel (On/Off), Décompte (15/30/45/60/75 min), Aléatoire |
| Fonction aléatoire | Allume aléatoirement 4 à 12 fois par jour, durée de 5 à 60 minutes |
| Heure d'été | Commutation manuelle via bouton DS |
| Compatibilité | Lampes incandescentes, lampes PAR, stéréos, climatiseurs, etc. |
| Entretien | Débrancher avant toute intervention ; remplacer les piles si l'affichage est faible |
| Sécurité | Ne pas utiliser pour couper l'alimentation lors de réparations ; toujours couper au tableau électrique |
| Garantie | 1 an (défauts de fabrication) |
| Service après-vente | Intermatic Incorporated, Intermatic Plaza, Spring Grove, IL 60081-9698, USA |
FOIRE AUX QUESTIONS - DT11 INTERMATIC
Questions des utilisateurs sur DT11 INTERMATIC
0 question sur cet appareil. Repondez a celles que vous connaissez ou posez la votre.
Poser une nouvelle question sur cet appareil
Téléchargez la notice de votre Minuterie au format PDF gratuitement ! Retrouvez votre notice DT11 - INTERMATIC et reprennez votre appareil électronique en main. Sur cette page sont publiés tous les documents nécessaires à l'utilisation de votre appareil DT11 de la marque INTERMATIC.
MODE D'EMPLOI DT11 INTERMATIC
NTERMATIC
DT11 Digital Timer Installation and Operating Instructions

Features
Automatic or manual operation. Push PROG ON/OFF to switch the plugged in light(s) on or off at any time.
Program up to 14 on/off time pairs
Minimum setting interval 1 minute.
- Random feature turns the switch on randomly for from 5 to 60 minutes from 4 to 12 times a day.
- Batteries (replaceable) save the time and program settings when the unit is unplugged or there is a power outage.
Introduction
Simply plug the DT11 Digital Timer into an electrical outlet (1), then plug your incandescent lights, (PAR lamps), stereo, or appliances (such as an air conditioner) into the DT11 (2).
The DT11 is then your programmable timer, random timer, countdown timer and manual switch.
AD MAINTENANCE
WARNING DO NOT USE THE TIMER TO TURN OFF POWER FOR MAINTENANCE (repairs, removing broken bulbs, etc.). ALWAYS TURN POWER OFF AT THE SERVICE PANEL BY REMOIVING A FUSE OR CIRCUIT BREAKER BEFORE DOING ANY CIRCUIT REPAIRS.
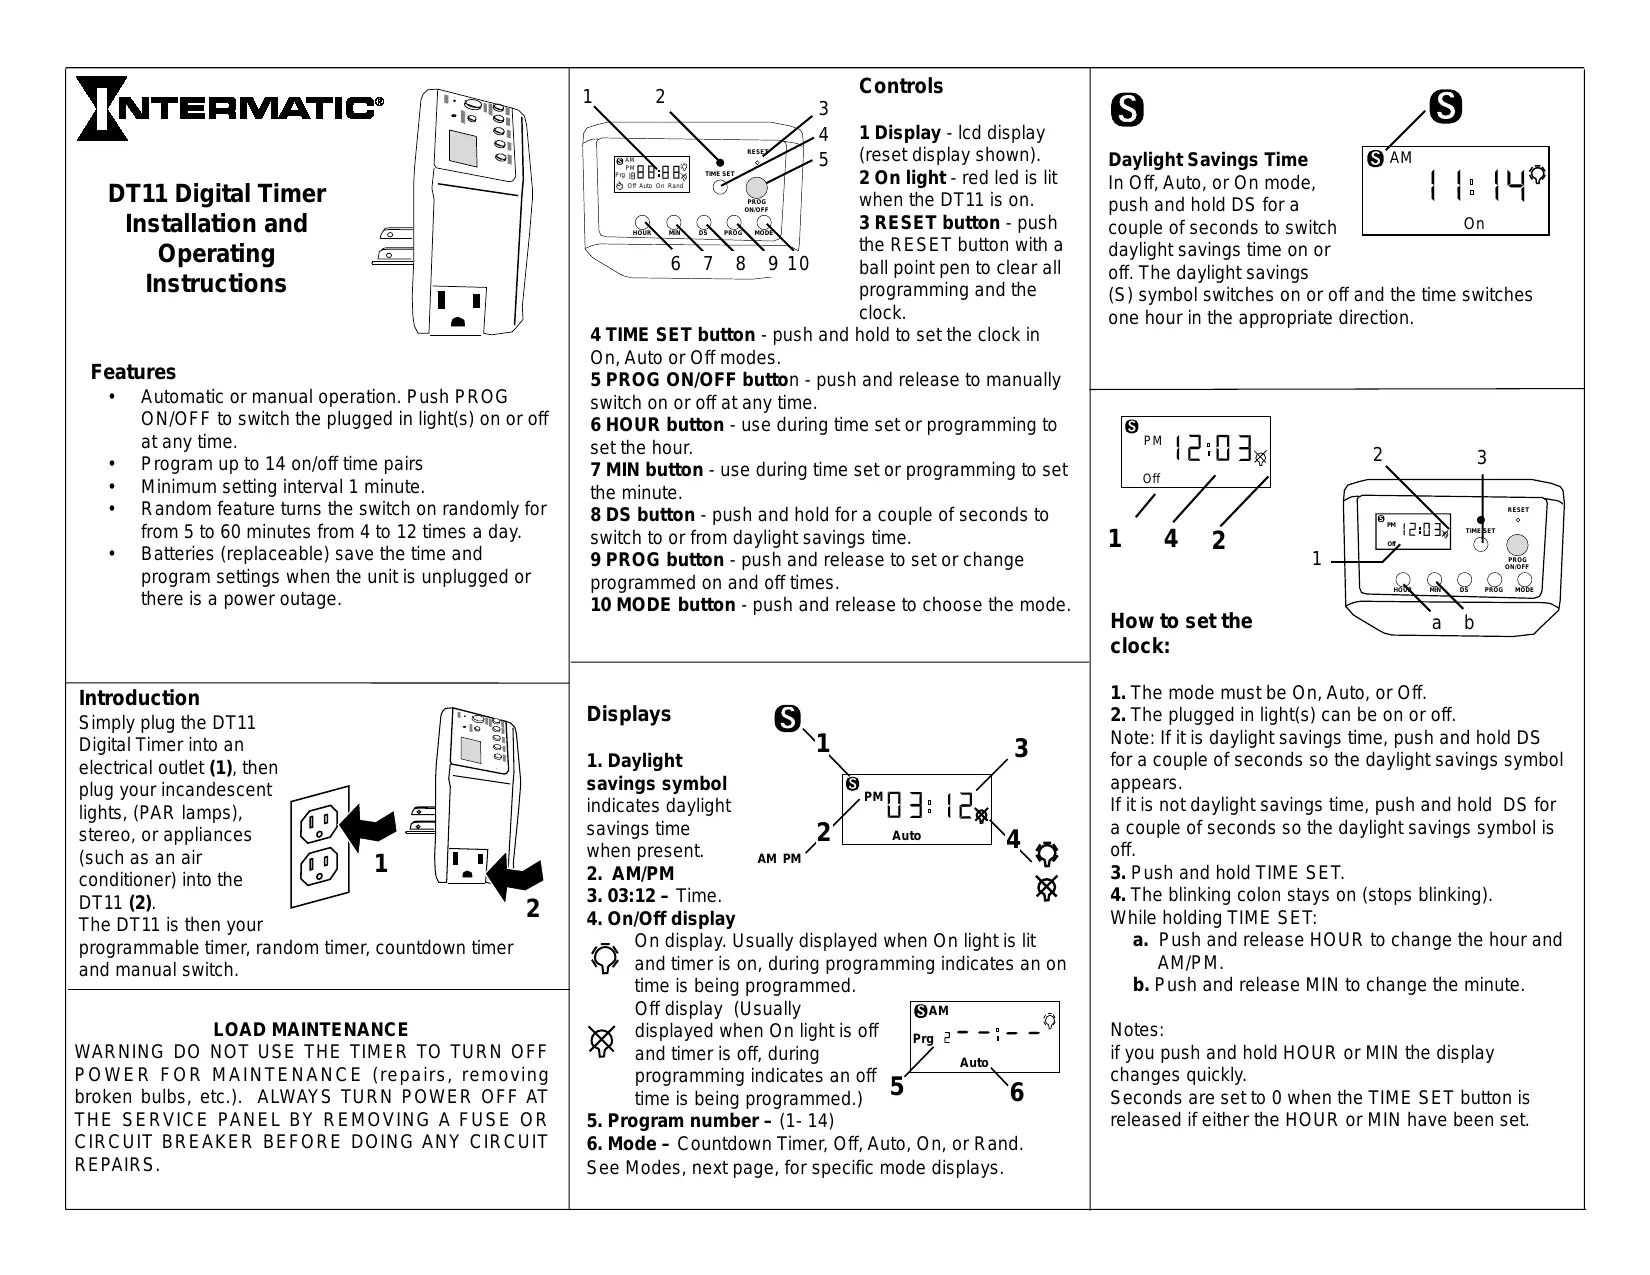
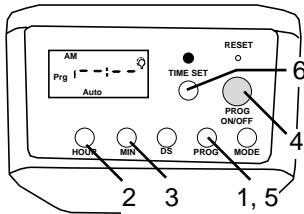
Controls
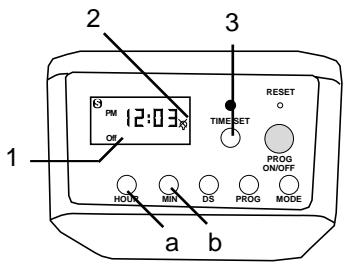
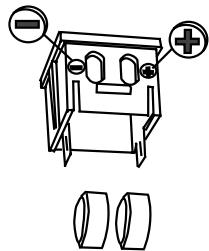
1 Display -LCD display (reset display shown).
2 On light - red led is lit when the DT11 is on.
3 RESET button - push the RESET button with a ball point pen to clear all programming and the clock.
4 TIME SET button - push and hold to set the clock in On, Auto or Off modes.
5 PROG ON/OFF button - push and release to manually switch on or off at any time.
6 HOUR button - use during time set or programming to set the hour.
7 MIN button - use during time set or programming to set the minute.
8 DS button - push and hold for a couple of seconds to switch to or from daylight savings time.
9 PROG button - push and release to set or change programmed on and off times.
10 MODE button - push and release to choose the mode.
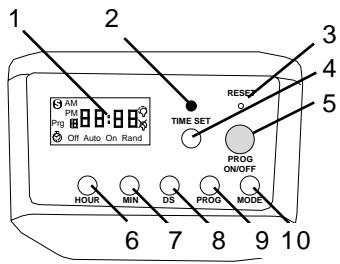
Displays
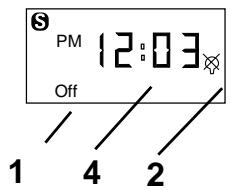
- Daylight savings symbol indicates daylight savings time when present.
- AM/PM
3.03:12-Time. - On/Off display
On display. Usually displayed when On light is lit and timer is on, during programming indicates an on time is being programmed.
Off display (Usually displayed when On light is off and timer is off, during programming indicates an off time is being programmed.)
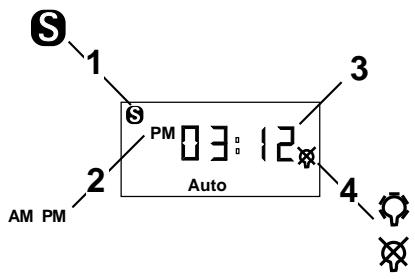
5. Program number - (1- 14)
6. Mode - Countdown Timer, Off, Auto, On, or Rand. See Modes, next page, for specific mode displays.
s
Daylight Savings Time
In Off, Auto, or On mode, push and hold DS for a couple of seconds to switch daylight savings time on or off. The daylight savings
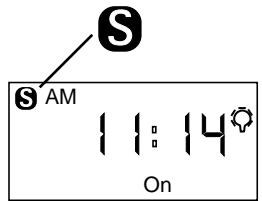
(S) symbol switches on or off and the time switches one hour in the appropriate direction.
How to set the clock:
- The mode must be On, Auto, or Off.
- The plugged in light(s) can be on or off.
Note: If it is daylight savings time, push and hold DS for a couple of seconds so the daylight savings symbol appears.
If it is not daylight savings time, push and hold DS for a couple of seconds so the daylight savings symbol is off.
- Push and hold TIME SET.
- The blinking colon stays on (stops blinking). While holding TIME SET:
a. Push and release HOUR to change the hour and AM/PM.
b. Push and release MIN to change the minute.
Notes:
if you push and hold HOUR or MIN the display changes quickly.
Seconds are set to 0 when the TIME SET button is released if either the HOUR or MIN have been set.
MODE
Push and release MODE to change the mode.
The modes are Countdown timer, Off, Auto, On, and Rand.
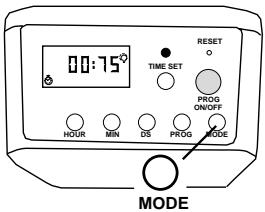
Countdown timer mode
In countdown timer mode the clock symbol is displayed (a).
When countdown timer mode is entered the countdown time is set to 75 minutes (b).
And the plugged in light(s) are tuned on (c).
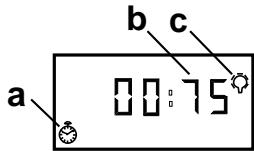
The countdown timer can be set to turn the plugged in light(s) on or off after 75, 60, 45, 30 or 15 minutes. That lets you, for example, set the timer to turn the plugged in light(s) off an hour after you have left the room. The flashing alarm clock symbol indicates the DT11 is in countdown timer mode.
To set the countdown timer:
Push and release MODE until the countdown timer clock is displayed. (75 minutes is selected.)
If desired, push and release MIN to switch change the countdown to 60, 45, 30, 15 or 0 minutes.
If desired, push and release PROG ON/OFF to switch the initial state of the plugged in light(s).
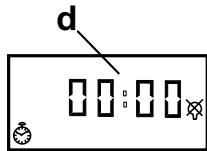
Wait ten seconds or push and release TIME SET to start the countdown.
While counting down the countdown timer clock symbol flashes, and you can push TIME SET to switch between the countdown the current time.
When the countdown reaches 00:00 the connected light(s) are switched and the clock display remains 00:00 (d).
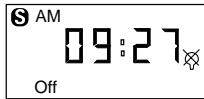
Off mode
In the Off mode the plugged in light(s) are off. You can push PROG ON/OFF to switch to ON mode and turn the plugged in light(s) on.
Auto mode
In auto mode the programmed on and off times automatically switch the plugged in light(s) on and off. See how to program the timer, below for how to enter or change the automatic program times.
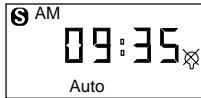
You can push PROG ON/OFF while in Auto mode to manually
override the program and turn the plugged in light(s) on or off. The programmed switching times remain. The timer stays in auto mode.
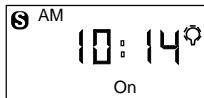
On mode
In the On mode the plugged in light(s) are on. Push PROG ON/OFF to turn the plugged in light(s) off and switch the mode to Off.
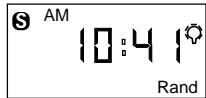
Rand mode
In Random mode the DT11 randomly switches the connected light(s) on and off. A random on period is from 5 to 60 minutes. The number of random switches per day is from 4 to 12.
How to program the timer:
You can program the timer in Auto, On or Off modes. The program is followed in Auto mode.
- Push and release PROG to start the programming. Prg 1 is displayed and the display shows
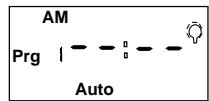
--: -- or the programmed time for Prg 1. timer on (lit light bulb symbol on).
--: -- display means there is nothing programmed for that Prg number and on / off time.
Note: You can push and release ON/OFF to switch between the Prg # on time and the Prg # off time. The light bulb symbol switches on or off but the plugged in light(s) do not.
- Push and release HOUR to choose the hour.
- Push and release MIN to choose the minute.
- When correct, push PROG ON/OFF to switch between programming on time and off time for that Prg number.
- Push PROG to Prg 2, Prg 3, ... up to Prg 14, to program additional on and/or off times.
- Push TIME SET or wait 15 seconds to exit programming.
Note: In case of a conflict (for example you have programmed the timer to be on from 7 to 9 pm in program 1 and also programmed the timer to be off from 8 to 10 pm in program 3) the higher program number is followed. In case of a conflict within a program number Off is followed rather than On.
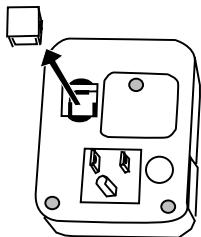
Battery replacement
Batteries retain the program during power outages. Batteries should last 3 years or more if the timer is left plugged in. If the display is dim, weak or unreadable when the timer is unplugged from the outlet replace the batteries. After removing the batteries from the unit, you have a minimum of 15 seconds to insert new batteries without losing existing program."
The DT11 uses two L1154 alkaline
batteries.
Purchase fresh batteries. Unplug the DT11.
Remove the battery carrier.
Replace the batteries.
Replace the battery carrier.
Plug the DT11 into the outlet.
Reprogram the DT11 if needed.

FULL ONE YEAR WARRANTY
If within one (1) year from date of purchase, this product fails due to a defect in materials or workmanship, Intermatic Incorporated will repair or replace it free of charge.
The warranty does not apply to: (a) damage caused by accident, abuse, mishandling, dropping; (b) units which have been subject to unauthorized repair, opened, taken apart; (c) units not used in accordance with directions; (d) damages exceeding the cost of the product. Some states do not allow a limitation of damages, so the foregoing limitation may not apply to you. This warranty gives you specific legal rights, and you may have other rights which vary from state to state.
This warranty service is available by either: a) returning the product to the dealer from whom the product was purchased or (b) mailing postage prepaid to the authorized service station listed below. Be sure to wrap the product securely when mailing to avoid shipping damage. This warranty is made by Intermatic Incorporated, Spring Grove, Illinois, 60081-9698.
ART129
AUTHORIZED SERVICE STATION
INTERMATIC INCORPORATED
INTERMATIC PLAZA
SPRING GROVE, ILLINOIS 60081-9698
- NTERMATIC
- DT11 Digital Timer Installation and Operating Instructions
- Features
- Introduction
- AD MAINTENANCE
- Controls
- Displays
- s
- Daylight Savings Time
- How to set the clock:
- MODE
- Countdown timer mode
- To set the countdown timer:
- Off mode
- Auto mode
- On mode
- Rand mode
- How to program the timer:
- Battery replacement
- FULL ONE YEAR WARRANTY
Marque : INTERMATIC
Modèle : DT11
Catégorie : Minuterie