
ADIC SCALAR 100 - Serveur de stockage QUANTUM - Notice d'utilisation et mode d'emploi gratuit
Retrouvez gratuitement la notice de l'appareil ADIC SCALAR 100 QUANTUM au format PDF.


| Type de produit | Serveur de stockage à bandes (bibliothèque de bandes) |
| Marque | QUANTUM |
| Modèle | ADIC Scalar 100 |
| Forme | Montage en rack 19 pouces |
| Hauteur | Environ 4U à 6U (selon configuration) |
| Poids | Environ 25 kg (selon nombre de lecteurs) |
| Alimentation | 100-240 V CA, 50-60 Hz, alimentation interne |
| Interface | SCSI LVD (basse tension différentielle) ou HVD (haute tension différentielle) |
| Lecteurs de bandes | Jusqu'à 5 lecteurs (AIT ou LTO selon configuration) |
| Capacité maximale | Variable selon les cartouches et lecteurs installés |
| Fonctions principales | Chargement automatique des cartouches, gestion de bibliothèque, opérations robotisées |
| Panneau de commande | Panneau opérateur avec écran LCD, touches softkey et indicateurs d'état |
| Indicateurs d'état | Zone d'information (en ligne/hors ligne, date/heure), zone de statut des lecteurs, zone de messages, indicateurs de casier (mailbox) |
| Alimentation (détail) | Interrupteur d'alimentation à l'arrière et à l'avant |
| Sécurité | Porte avant avec verrou, clé sur panneau arrière, protection SCSI |
| Entretien | Nettoyage des têtes des lecteurs, retrait des matériaux d'emballage intérieurs et de la bande de sécurité du bras robotisé |
| Installation | Installation des lecteurs dans les emplacements, connexion SCSI en chaîne, terminaison, câblage vers le contrôleur et l'hôte |
| Accessoires inclus | Câbles SCSI, terminaisons, chargeurs (magazines), cartouches de démonstration |
| Configuration réseau | Option SNC (Storage Networking Controller) pour l'intégration réseau, installation par personnel qualifié |
| Pays d'origine | États-Unis (marque QUANTUM) |
FOIRE AUX QUESTIONS - ADIC SCALAR 100 QUANTUM
Questions des utilisateurs sur ADIC SCALAR 100 QUANTUM
0 question sur cet appareil. Repondez a celles que vous connaissez ou posez la votre.
Poser une nouvelle question sur cet appareil
Téléchargez la notice de votre Serveur de stockage au format PDF gratuitement ! Retrouvez votre notice ADIC SCALAR 100 - QUANTUM et reprennez votre appareil électronique en main. Sur cette page sont publiés tous les documents nécessaires à l'utilisation de votre appareil ADIC SCALAR 100 de la marque QUANTUM.
MODE D'EMPLOI ADIC SCALAR 100 QUANTUM
ADIC® Scalar® 100 Quick Start Guide
If your library configuration contains a SNC (Storage Networking Controller), the installation and set-up must be performed by ADIC-qualified personnel.

If you have drives to install, install them now by following steps 2 and 3. Otherwise, skip to step 4.

Beginning with the bottom slot (drive module 1), find the lowest available drive slot(s). Loosen the two thumbscrews on the filler plate(s) and remove the filler plate(s).
For AIT libraries, install drives into slots two through five, beginning with slot two.

Slide the drive(s) into position and tighten the two captive thumbscrews.
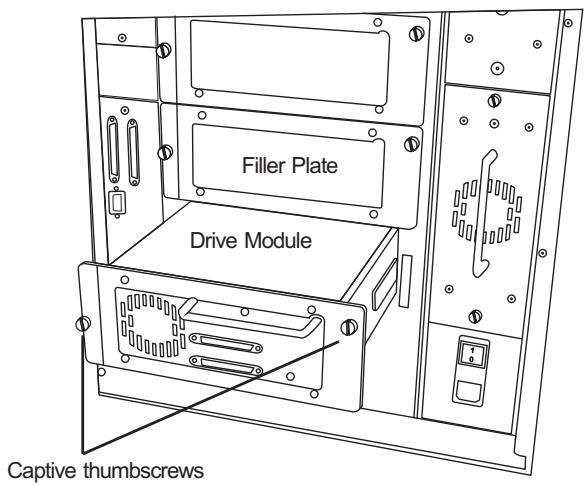

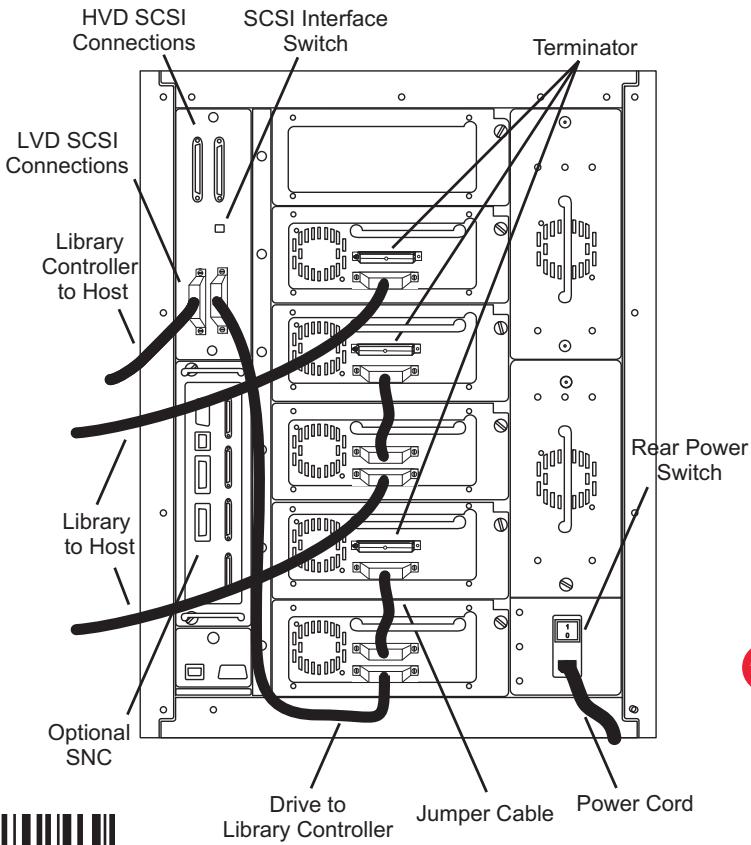
Depending on your host SCSI bus type, set the SCSI interface switch to LVD or HVD.

On the bottom-most drive, connect a jumper cable to the top SCSI connector and then to the bottom SCSI connector on the drive above it. Repeat this for all the drives.
If you have more than two drives, split the drives between SCSI buses.

Terminate the SCSI bus(es) with an appropriate terminator (LVD or HVD).

Install the cables between the bottom drive and the Library Controller and between the Library Controller and the host.
If you have more than one SCSI bus, connect a cable between the bottom drive on the SCSI bus and the host.

Remove the key from the back panel. Unlock and open the front door. Remove the interior packing and securing material.
Be sure to remove the rubber band that secures the picker.

Install tape cartridges into magazines. Close and lock the front door.

Connect the power cord to the power outlet on the rear of the library.

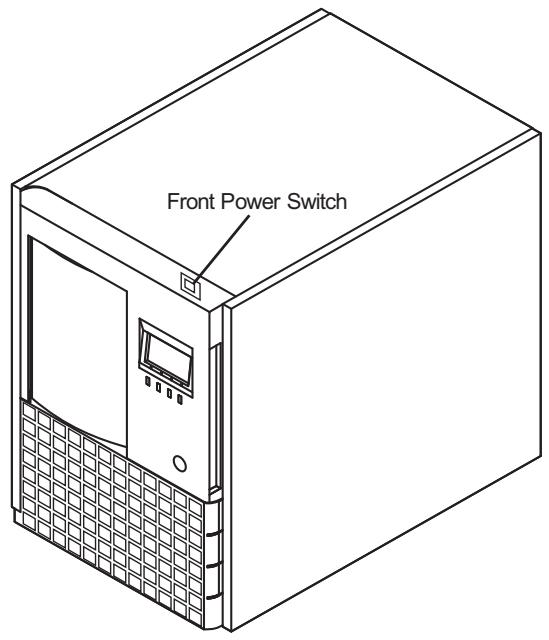
Turn on the rear power switch and then turn on the front power switch.

Power up your host system and verify communication with all devices on the bus.
Your library is now ready.
Selected Indicators and Controls
Operator Panel
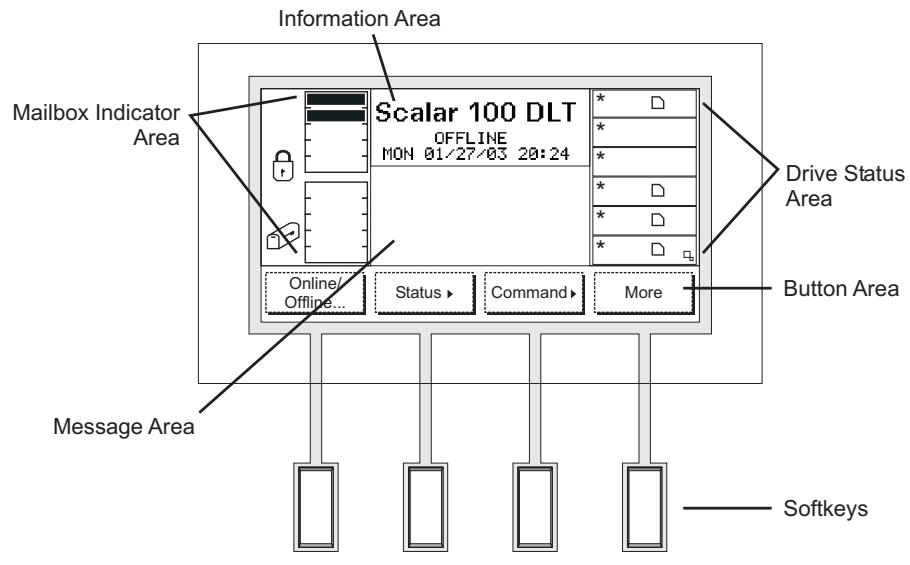
Your screen may differ depending on you library configuration and drive type.
Explanations
The information area provides general library information such as online/offline status and the date and time.
The drive status area provides constant drive status. Each box represents a drive. The symbols within represent the state of the drive.
The button area is a dynamic area of the Operator Panel. Depending on the menu, the buttons available here will change. To make a selection, press the softkey below the button in the button area.
The message area gives status and library messages. It also prompts you for information.
The mailbox indicator area provides constant Mailbox status. Each Mailbox slot is represented. These slots display whether or not that Mailbox slot is full or empty. The icons to the left of the slots give additional Mailbox information.
For more information, see the Scalar 100 User's Guide.
Marque : QUANTUM
Modèle : ADIC SCALAR 100
Catégorie : Serveur de stockage