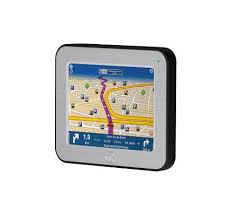
CHICAGO SW - GPS Navigation ROUTE 66 - Notice d'utilisation et mode d'emploi gratuit
Retrouvez gratuitement la notice de l'appareil CHICAGO SW ROUTE 66 au format PDF.

| Type de produit | GPS de navigation |
| Marque | ROUTE 66 |
| Modèle | CHICAGO SW |
| Catégorie | GPS Navigation |
| Fonctions principales | Navigation GPS avec guidage vocal, planification d'itinéraire avec étapes, points d'intérêt (POI), gestion des favoris, récepteur TMC, vues 2D et 3D, alarme de vitesse, personnalisation des couleurs |
| Cartographie | Cartes NAVTEQ préchargées sur carte mémoire, extensible via CD d'installation |
| Écran | Tactile, avec stylet, affichage en orientation paysage ou portrait |
| Alimentation | Batterie rechargeable intégrée, charge via adaptateur secteur ou USB |
| Instructions vocales | Multilingue selon version achetée, réglage du volume |
| Langues de l'interface | Sélectionnable parmi plusieurs langues (selon achat) |
| Types d'itinéraires | Le plus rapide, le plus court, pour voiture/camion/pieton; évitement autoroutes, péages, ferries |
| Points d'intérêt (POI) | Catégories prédéfinies et personnalisables, alarme POI à l'approche |
| Gestion des favoris | Ajout, renommage, suppression; accès rapide à domicile et bureau |
| Informations de trafic (TMC) | Réception via RDS ou Internet, actualisation automatique, recalcul d'itinéraire |
| Fonctions de sécurité | Alarme de vitesse configurable, modes jour/nuit, recommandation de ne pas manipuler en conduisant |
| Entretien et nettoyage | Calibration de l'écran, formatage de la carte mémoire, installation de cartes via CD |
| Pièces détachées et réparabilité | Carte mémoire, stylet, chargeur; support client par email (support@66.com), garantie 2 ans sur le matériel |
| Informations générales | Logiciel version 1.3, copyright 1993-2006 ROUTE 66 |
FOIRE AUX QUESTIONS - CHICAGO SW ROUTE 66
Questions des utilisateurs sur CHICAGO SW ROUTE 66
0 question sur cet appareil. Repondez a celles que vous connaissez ou posez la votre.
Poser une nouvelle question sur cet appareil
Téléchargez la notice de votre GPS Navigation au format PDF gratuitement ! Retrouvez votre notice CHICAGO SW - ROUTE 66 et reprennez votre appareil électronique en main. Sur cette page sont publiés tous les documents nécessaires à l'utilisation de votre appareil CHICAGO SW de la marque ROUTE 66.
MODE D'EMPLOI CHICAGO SW ROUTE 66
ROUTE 66 Chicago
User manual

Version 1.3
November 2006
Copyright © 1993-2006 ROUTE 66. All rights reserved. ROUTE 66 and the ROUTE 66 logo are registered trademarks. Data copyright © NAVTEQ B.V. IMPORTANT REMARK: No part of this publication may be multiplied, be stored in a databank and electronically, mechanically, through photocopying, on sound carriers or in any other way be copied, without the explicit written approval of ROUTE 66. All other marks are the property of their respective owners. The information contained in this document is subject to change without prior notice.
ROUTE 66: Best by a Mile!
Table of contents
CONVENTIONS AND ABBREVIATIONS 5
INTRODUCTION 6
WELCOME 6
YOUR FIRST TRIP:NAVIGATE TO A DESTINATION 7
FIRST STEPS 8
PREPARE YOUR DEVICE 8
UNDERSTANDING THE NAVIGATION SCREEN 8
MOVING AROUND THE MENUS 10
MOVING AROUND THE MAP 10
USING THE KEYBOARD 11
USING THE FILTER 11
USING THE TOUCH SCREEN AND STYLUS 11
MAIN MENU 12
NAVIGATE TO A LOCATION 13
WORKING WITH LOCATIONS 14
NAVIGATE TO YOUR HOME ADDRESS 15
NAVIGATE TO YOUR OFFICE ADDRESS 15
FIND AN ADDRESS AND NAVIGATE TO IT 16
NAVIGATE TO A FAVOURITE LOCATION 17
NAVIGATE TO A RECENTLY VISITED LOCATION (HISTORY) 18
NAVIGATE TO A POI AROUND YOUR GPS POSITION 19
NAVIGATE TO A POI AROUND YOUR DESTINATION 20
FIND A POINT ON THE MAP AND NAVIGATE TO IT 21
NAVIGATE TO A DESTINATION VIA INTERMEDIATE POINTS (NAVIGATE VIA) 22
PLAN A ROUTE 24
TMC INFORMATION 27
CUSTOMIZE YOUR NAVIGATION 28
SOUND ON / SOUND OFF 28
MAP OPTIONS 29
DAY COLOURS/NIGHT COLOURS 29
2D PERSPECTIVE / 3D PERSPECTIVE 30
SET 3D ANGLE 31
SHOW FAVOURITES / HIDE FAVOURITES 32
SHOW SCALE / HIDE SCALE 33
SELECT MAP 34
LEGEND 35
POINTS-OF-INTEREST (POI) 36
ZOOM TO 37
CHANGE SETTINGS 38
BACKLIGHT 38
LANGUAGE 39
UNITS 40
VOLUME 41
ROUTE TYPE 42
AVOID MOTORWAYS 43
AVOID TOLL ROADs 43
AVOID FERRIES 43
AUTOMATIC ZOOMING 44
CONFIGURE ALARM 45
SPEED 46
SET DATE/TIME 47
VERTICAL TURN ARROWS/HORIZONTAL TURN ARROWS 48
CALIBRATE SCREEN 49
CONFIGURE TMC 50
DEFINE YOUR NAVIGATION EXPERIENCE 51
POINTS-OF-INTEREST (POI) 51
MAINTAIN POI 51
ADD AS POI 51
RENAME POI 52
REMOVE POI 53
MAINTAIN POI CATEGORY 54
ADD POI CATEGORY 54
RENAME POI CATEGORY 55
REMOVE POI CATEGORY 56
POI ALARM 57
FAVOURITES 59
SET HOME ADDRESS 59
SET OFFICE ADDRESS 60
ADD FAVOURITE 61
RENAME FAVOURITES 62
REMOVE FAVOURITES 63
APPENDIX 64
INSTALLING OTHER GEOGRAPHIC MAP(S) AND VOICE INSTRUCTIONS ON THE MEMORY
CARD 64
FORMATTING YOUR MEMORY CARD 65
HOW DOES GPS WORK? 66
QUICK REFERENCE CARD - NAVIGATE TO A LOCATION 67
CUSTOMER SUPPORT 69
LICENSE AGREEMENT 69
DISCLAIMER 70
Conventions and abbreviations
These are the conventions used in this user manual:
| Step-by-step instructions. | |
| Locations, Change settings | Menu and submenus in your ROUTE 66 product. |
| , , , | Icons in your ROUTE 66 product. |
| , | Examples. |
| Warnings or important information. | |
These are the abbreviations used in this user manual:
| 2D | Bi-dimensional |
| 3D | Three-dimensional |
| GPRS | General Packet Radio Services (technology) |
| GPS | Global Positioning System |
| IT | Information Technology |
| POI | Point-of-interest |
| RDS | Radio Data System (technology) |
| TMC | Traffic Message Channel (technology) |
| USB | Universal Serial Bus |
Introduction
Welcome
Congratulations! You have just purchased your ROUTE 66 product. You are the owner of an all-in-one, GPS-enabled navigation solution that contains easy-to-use on-board software, the most comprehensive map coverage currently available on the market, and state-of-the-art technology.
Easy-to-use software:
- You don't have to be an experienced driver or an IT specialist to use this product. Our professional solution is simple and user-friendly.
- Let the product do all the calculations for you. Meanwhile, concentrate on the road ahead of you and enjoy your trip.
Behind the wheel. On your bike. Or simply walking. Our solution adapts to your needs and lifestyle. - Customize! Customize! Customize! It has never been easier to define your navigation the way you like it! Switch from day view to night view. Browse your route in the classical 2D view, or fly like a bird over the map in the more challenging 3D perspective. Change map colours. Set speed limits and speed alerts. Pick the language of the voice instructions and the user interface. Take advantage of the extensive collection of points-of-interest. Keep your expenses under control...
- Do you want to navigate from A to B? Would you rather prefer a detour from the initial route? What about longer trips, with many stopovers? Your ROUTE 66 product can do this!
Comprehensive map coverage:
The geographic data is provided by NAVTEQ, a world leader in premium-quality digital map data.
Street-level or major roads. National or Pan-European coverage. It's up to you!
- Choose from an impressive collection of points-of-interest, including restaurants, hotels and petrol stations.
Start navigating now! It's that simple!
Your first trip: Navigate to a destination
With your ROUTE 66 product, you can travel more easily and much faster. Let's say that you wish to travel to a restaurant in Amsterdam:


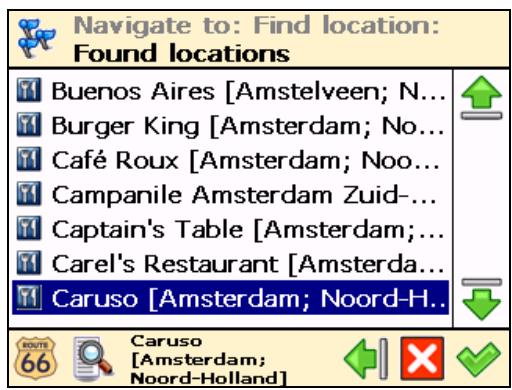
3 Type Amsterdam restaurant, or just amst rest and confirm your choice
4 From the list of results, select the location that best suits your needs, for example Caruso Amsterdam and confirm your choice.
That's all! Now you can start navigating to your destination.
First steps
Prepare your device
To start using your ROUTE 66 product, you have to carry out the following 4 steps:
Charge the battery of the device.
2 Insert the memory card into your device.
Switch on your device and wait for a fixed GPS position.
Launch your ROUTE 66 product.
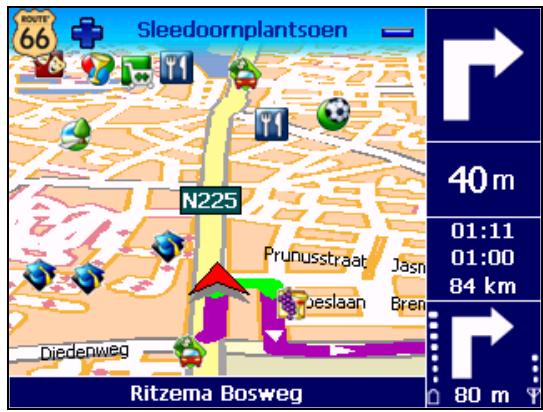
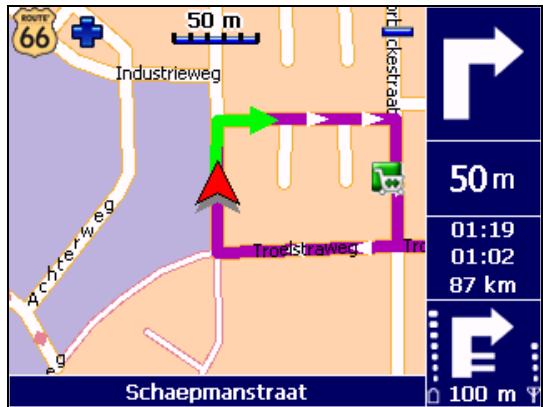
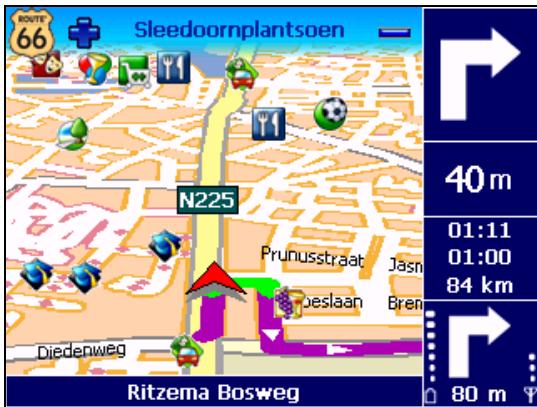
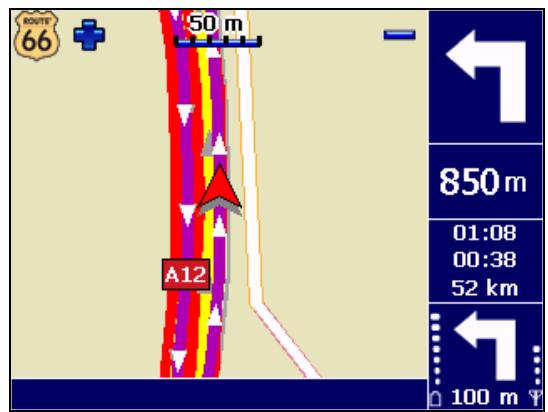
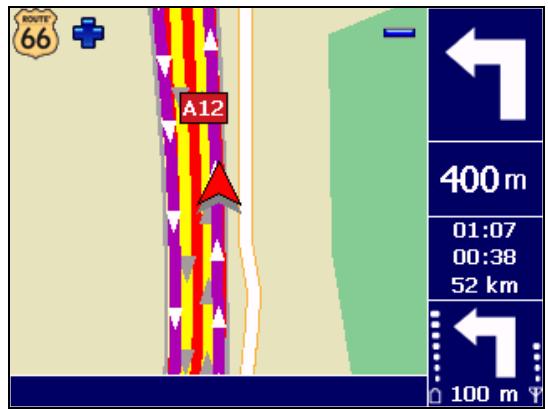
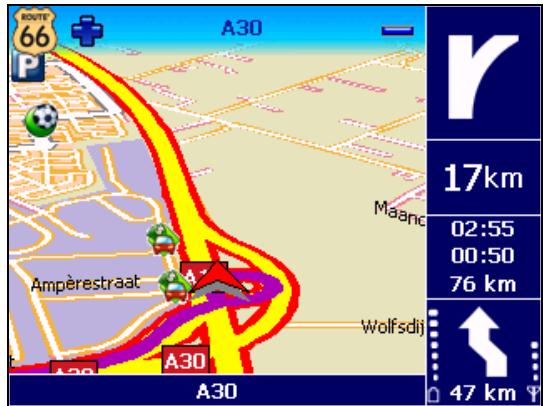
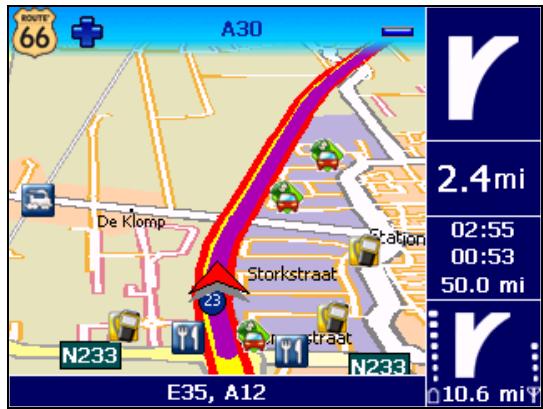
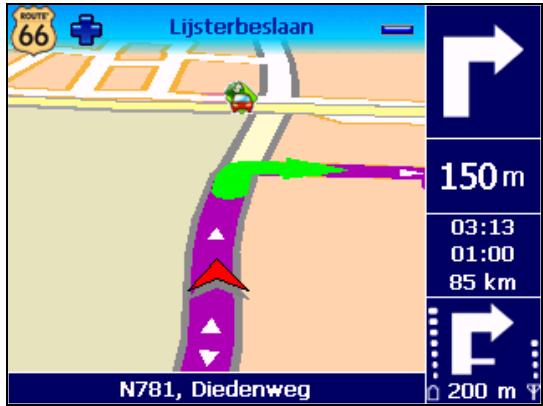
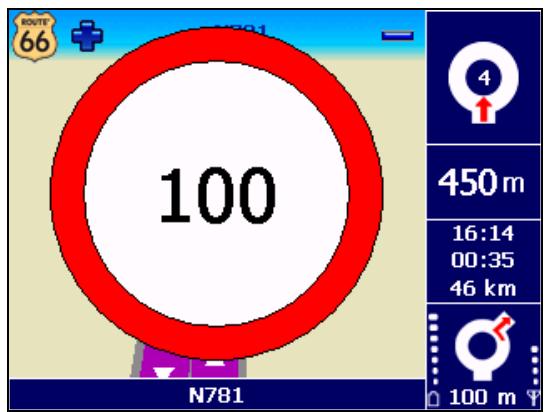
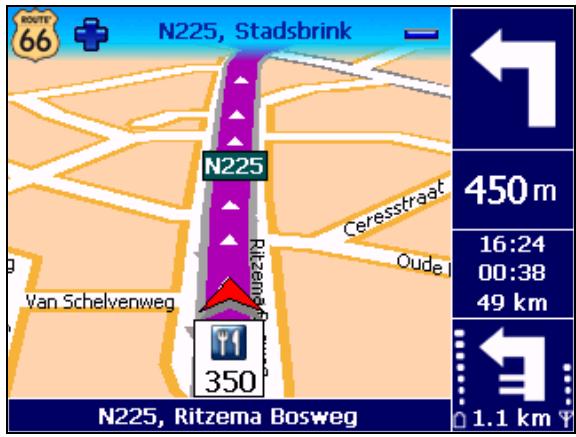
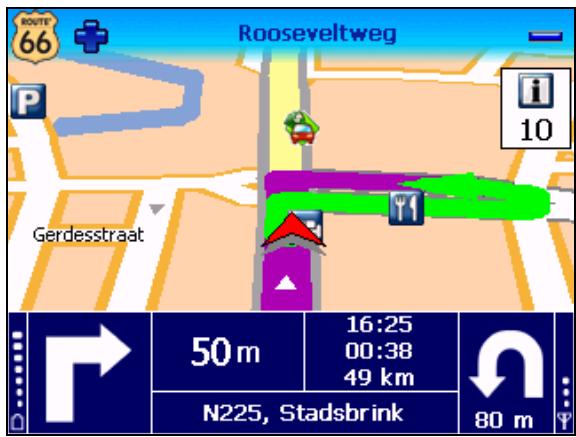
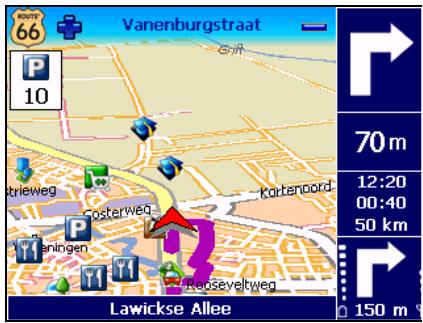
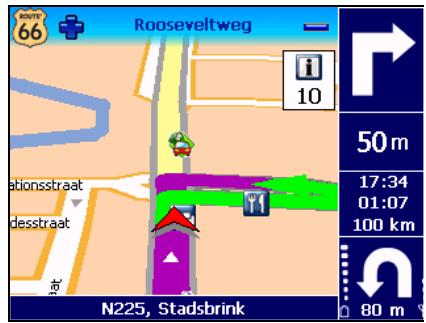
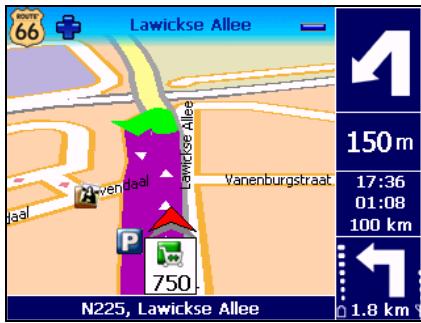
Understanding the navigation screen
The main elements of the navigation screen are presented below.
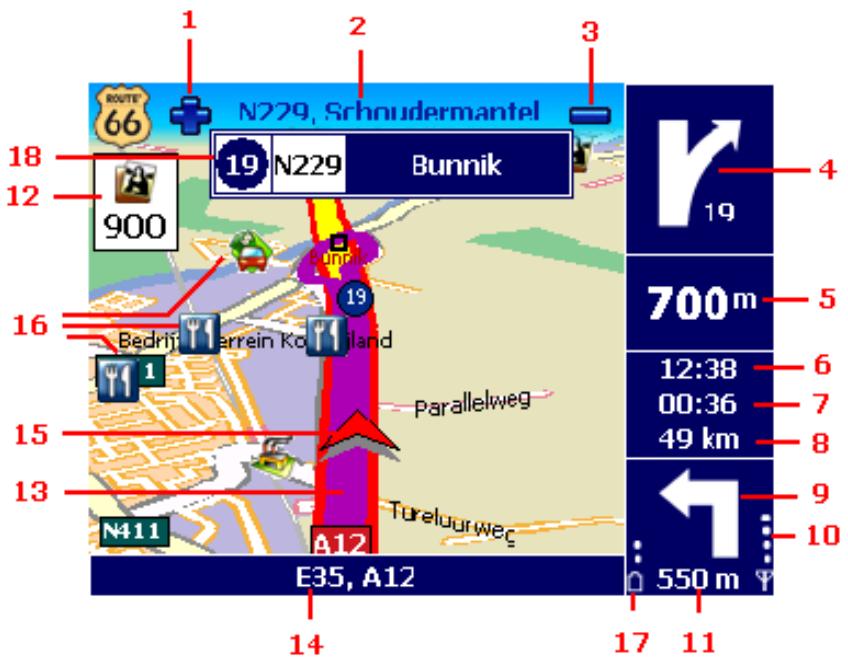
| Element | Description | Element | Description |
| 1 | Zoom in | 10 | Strength of GPS signal |
| 2 | Next street | 11 | Remaining distance to the next turn |
| 3 | Zoom out | 12 | POI alarm |
| 4 | Current turn | 13 | Current route |
| 5 | Remaining distance to the current turn | 14 | Current street |
| 6 | Estimated time of arrival | 15 | GPS arrow (current position) |
| 7 | Remaining time to destination | 16 | Point-of-interest |
| 8 | Remaining distance to destination | 17 | Battery level |
| 9 | Next turn | 18 | Exit information |
You can tap several areas of the navigation screen and display additional information:
- Tap the map area to open the Main Menu screen.
- Tap the top-right area (4) to repeat the last voice instruction.
- Tap the middle-right area (including 5, 6, 7 and 8) to display the Statistics screen.
- Tap the bottom-right area (including 9, 10, 11 and 17) to display the GPS information screen.
Depending on your preferences and the specifications of your device, the navigation screen will be displayed as follows:
Moving around the menus
Use the following buttons to move through the product:
| Button | Action |
| ♥ | Go to the next screen or confirm choices made on the current screen. For example, confirm language selection or start navigating. |
| ◇ | Return to the previous screen or abort the current action. For example, return to the route type selection or cancel a search action. |
| × | Jump to the main navigation screen, regardless of the current screen. |
| □ | (De)Select an item or option. |
| ← | Move one screen up. |
| → | Move one screen down. |
| Filter long lists of search results. | |
| Delete the selected item in a list. | |
| Delete all items in a list. |
Depending on the specifications of your device, the menus will be displayed as follows:
Landscape orientation
Portrait orientation
You can also use the joystick, if available.
Moving around the map
To view the map in a more convenient way, use the following buttons:
| Button | Action |
| + | Enlarge the map view (zoom in). As you zoom in, more details will de displayed on the map. |
| - | Decrease the map view (zoom out). As you zoom out, less details will de displayed on the map. |
You can scroll the map by selecting & holding the map and dragging it in the desired direction. You can also use the joystick, if available.
Using the keyboard
The keyboard is displayed automatically when you want to enter a name (numbers, letters, or both), for example an address.
To display letters, select ABC.
To display numbers and other symbols, select 123.
To delete characters, select Backspace
Using the filter
In longer lists, select the filter to narrow your search results.
Enter a letter, a group of letters, or a word.
That keyword is searched for in all items of the list.
The keyword can be detected anywhere in the list: at the beginning, in the middle or at the end of an item.

Using the touch screen and stylus
The touch screen allows you to make selections, browse the map or enter data. Touch the desired object on the screen, with the stylus or simply with one of your fingers.
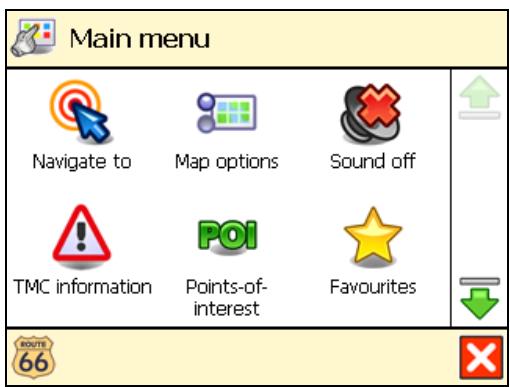
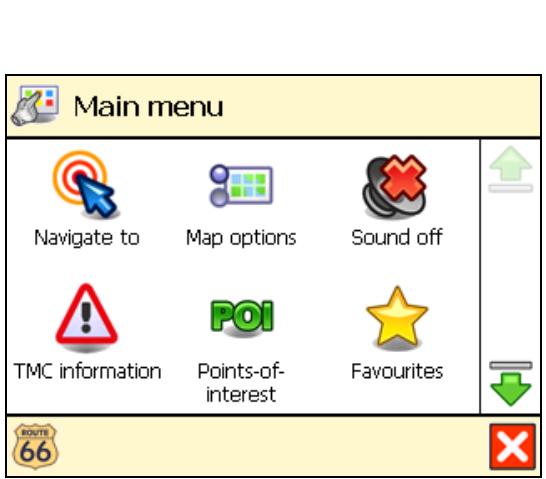
Main menu
First of all, spend a few minutes and read the following overview of the main features of your ROUTE 66 product.
| Icon | Name | Description |
| Navigate to | Select this button to select a destination and start navigating to it. Just select your home address or your office address; type the name of a particular location; pick a Favourite location or a recently visited address (History); browse a huge collection of points-of-interest around your current position or around your destination. Browse the map, select a location and start navigating to it. | |
| Map options | Select this button to customize your travelling experience. Switch from day view to night view. Display your route in 2D or 3D perspective. Set the map perspective. Show or hide your favourites or the map scale. View the legend and change colours. Choose which points-of-interest you want to display on the map. | |
| Sound on / Sound off | Switch the speaker on or off. | |
| POI | Points-of-interest | Select this button to define and maintain categories of points-of-interest. Fill these POI categories with locations you visited or discovered during your trips. Set alerts. |
| ★ | Favourites | Select this button to store and maintain addresses or destinations that you visit frequently or that are of great importance to you. Save them as favourites. Add favourites to your trips. |
| Zoom to | Think of this button as a powerful tool to locate a particular location on the map. | |
| Change settings | Customize the overall functioning of the product. Set the language of the user interface and the voice instructions. Set the backlight, the time indicator or the automatic zooming. Switch from metric units to imperial units. Control the sound volume of the voice instructions. Specify the preferred type of route for travelling. Set safety indicators, including alarm and speed. Specify what to avoid along your route (motorways, toll roads, ferries). | |
| Plan a route | Choose your departure location, your destination location and, optionally, as many stopovers (intermediate locations) as you need. Then, calculate the route, read the route description and start navigating. | |
| Navigate via | Select this button to compose a route that contains one or several stopovers and start navigating. Choose at least the departure location and destination location; if your route includes several stopovers (intermediate locations), add each of them as another waypoint to your route. | |
| TMC information | Select this button to receive the latest traffic messages on your device. In this way, you can avoid traffic jams, road works or accidents that occur along your route. | |
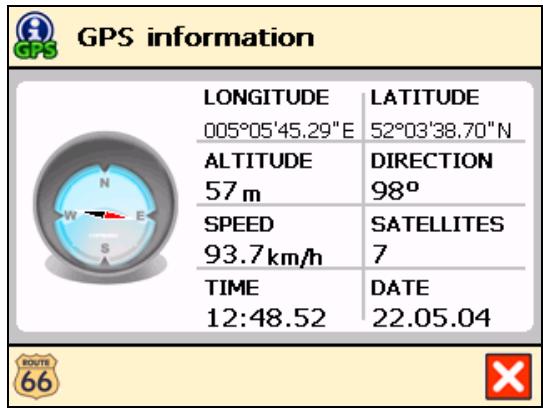
| GPS | GPS information | Check the status of the GPS receiver. |
| Help | Access the list of help topics and the copyright information. | |
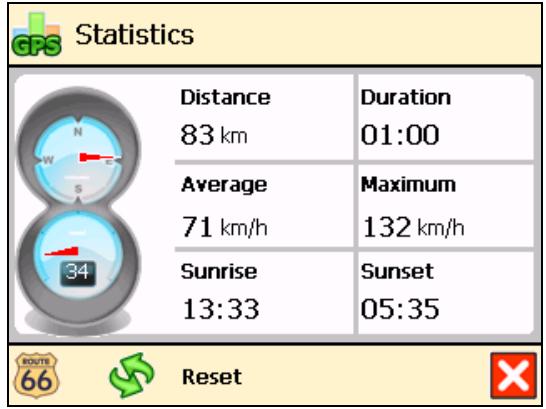
| GPS | Statistics | View statistical data about your current trip. |
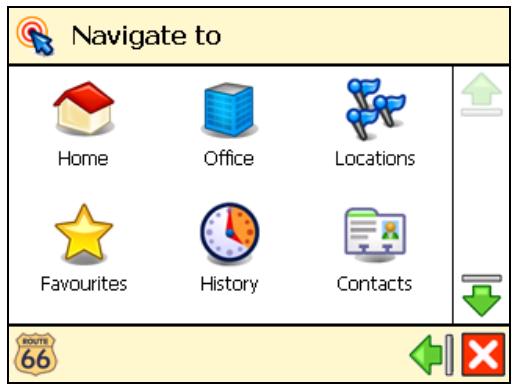
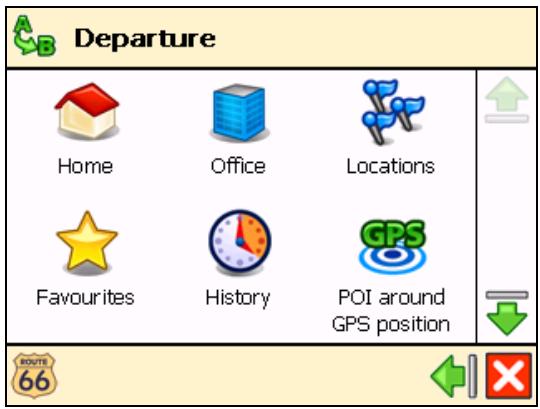
Navigate to a location
Now you are ready for your first trip. Select a destination and start navigating.

When you are in the Navigate to screen, select:
| Icon | Name | Description |
| Home | This is an address or location you frequently navigate to, for example your home address. | |
| Office | This is an address or location you frequently navigate to, for example your company headquarters. | |
| Location | Search for a location by typing its name. | |
| Favourites | These are the addresses or locations you saved for future trips. Instead of searching for a location each time you need it, you can save it as a favourite and select it as often as you want. | |
| History | Here you can find the locations that you have visited recently. | |
| GPS | POI around GPS position | These are points-of-interest (POI) around your current GPS position. |
| POI around destination | These are points-of-interest (POI) near the destination of your trip. | |
| Point on map | Browse the map and indicate any location. | |
For details about finding locations, read the Working with locations chapter.
Working with locations
Locations. Addresses. Places. Points on the map. These are the basic elements that you can use to compose a new trip. A location can be your departure, your destination, or any intermediate waypoint.
How to take advantage of the available locations?
- search locations by name;
- search the categories of points-of-interest around your current location or around your destination
define your home address or your office address - customize your favourites
- organize the locations you visited recently (History)
from your address book, select a contact - scroll over the map and indicate any location.
The possibilities are endless!
Navigate to your home address
Imagine that you have just finished a business meeting far away in the countryside or in an unknown city. And all you want to do now is to go home. Wouldn't it be nice to select Home and start navigating to your destination? That's possible now!
1 In Main Menu , select Navigate to
2 Select Home
That's all! Now you can start navigating to your home address.
This option is available only if you have defined your home address before!
Navigate to your office address
With your ROUTE 66 product, it's so easy to start travelling to your workplace, be it an office, a university or a construction site.
1 In Main Menu , select Navigate to
2 Select Office
That's all! Now you can start navigating to your office address.

This option is available only if you have defined your office address before!
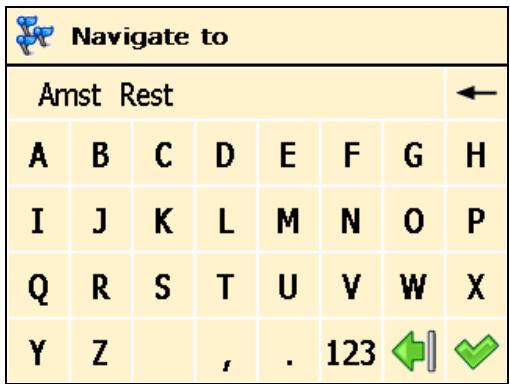
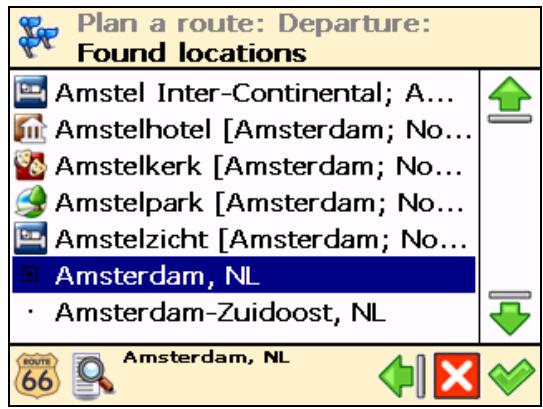
Find an address and navigate to it
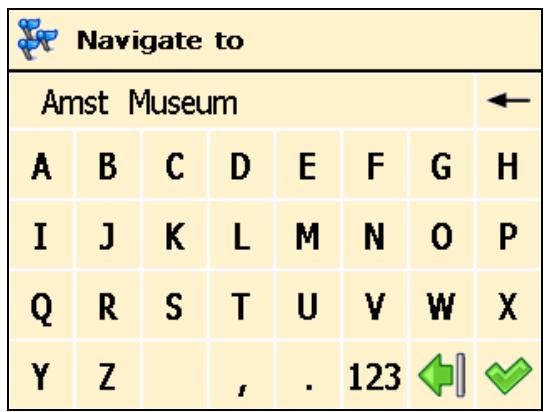
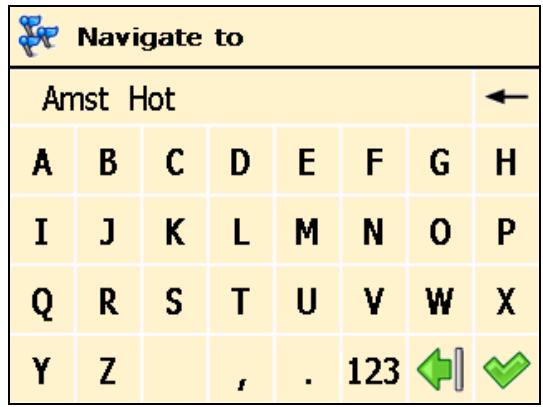
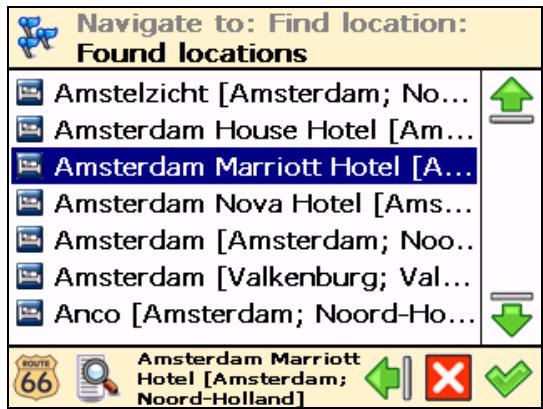
You are driving to an important meeting. But, suddenly, your secretary informs you that there is a last-minute change: the meeting will take place in another city and in another hotel. Switch on your device, search for this location, and start navigating to it. All in a few seconds!
1 In Main Menu

, select Navigate to

2 Select Locations

3 Type the name of the city, for example Amsterdam or just amst. Because the list of possible locations could be large, narrow your search by typing another keyword, for example hotel or just hot. When you have entered all search strings, confirm them .
4 Wait for a few seconds. When the list of results is displayed, pick out the location that you are looking for. Confirm your choice

If no result is found, repeat step 3 and enter another search string!
That's all! Now you can start navigating to your destination.
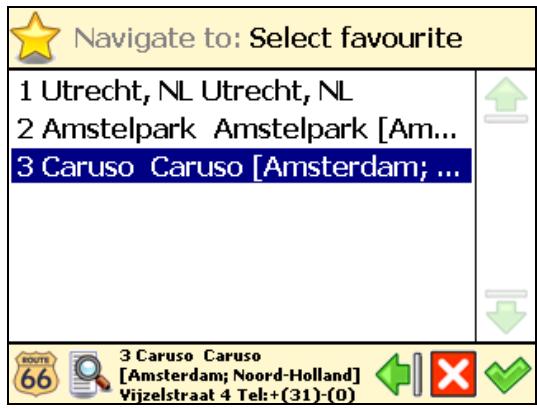
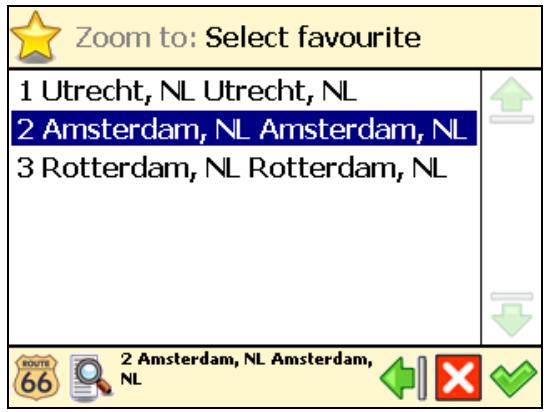
Navigate to a favourite location
Let's say that you frequently travel to the same location, for example a gas station, a ski resort or a cinema. These are your favourite locations. Would you like to store them into a personal folder? You will never lose them again! Your ROUTE 66 product lets you carry them with you, find them quickly, and easily navigate to them.

In Main Menu

, select Navigate to


Select Favourites

The list of locations you have saved before as favourites is now displayed on the screen. Select the filter if necessary. Select the location you need and confirm your choice.

If no favourite location was saved before, the list of favourites is empty!
That's all! Now you can start navigating to your destination.
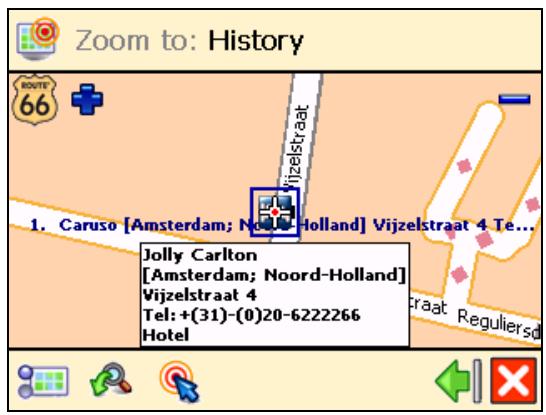
Navigate to a recently visited location (History)
Let's say that last week you had a great time visiting a national park in the mountains. This weekend you would like to go to that same location again. You can try to remember all travelling details, but that's not always easy. Or, you can simply go to your History list and find the address you visited last week. Then, select it as your destination for this weekend.
In Main Menu, select Navigate to
Select History
The list with the locations you have visited recently is now displayed on the screen. Select the filter if necessary. Select Delete to delete the selected item; select Delete all to delete all items. Select an item in the list and confirm your choice.
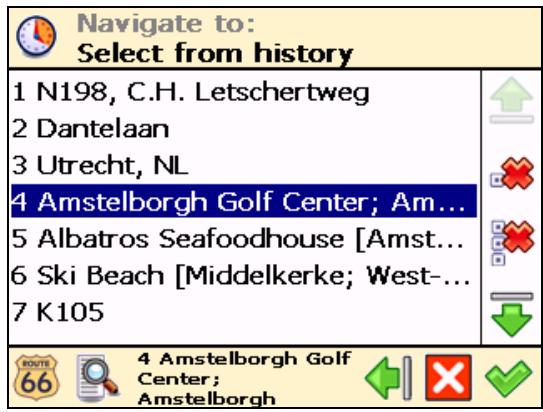

If this is your first trip, the Select from history list is empty!
That's all! Now you can start navigating to your destination.
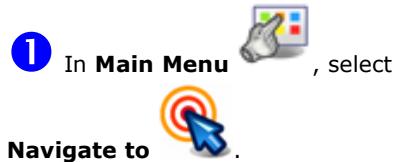
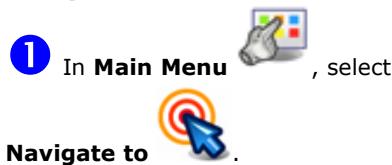
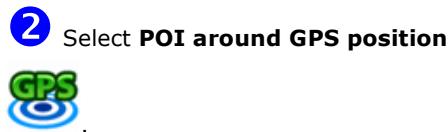
Navigate to a POI around your GPS position
Let's say that you are spending your holiday in an unknown city (which is now your current GPS position). You would like to visit as many points-of-interest as possible, for example museums, casinos and libraries. You could ask the hotel personnel for details and driving instructions, but that takes time. Or, you can use your device to select a POI category and then a specific POI. Then, it's up to you to decide which location you want to visit first!
1 In Main Menu

, select Navigate to

2 Select POI around GPS position

3 Select a relevant POI category, for example Casino and confirm your choice
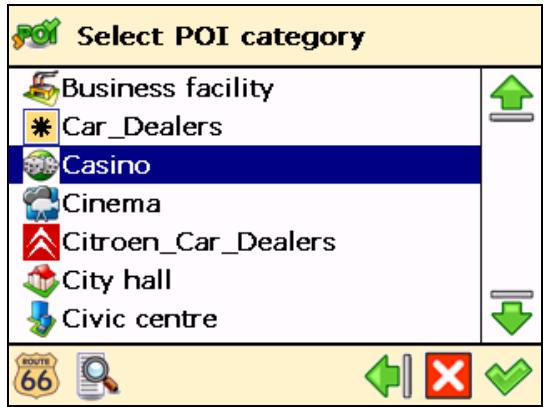
The results are sorted by distance: the first POI in the list is the closest to your GPS position. Select the filter if necessary. Select an item from the list and confirm your choice.
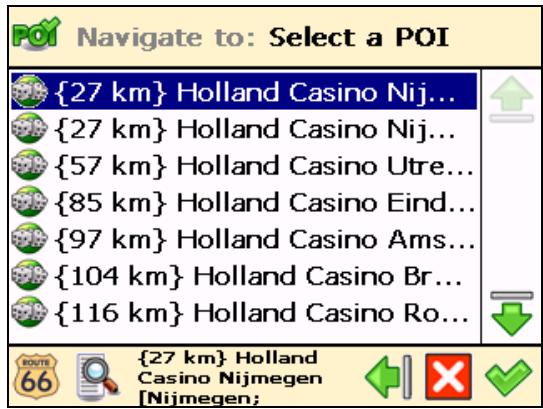

If there is no location that meets your search criteria, the No search results! message is displayed!
That's all! Now you can start navigating to your destination.
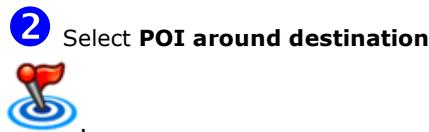
Navigate to a POI around your destination
Let's say that next week you will have a business trip to an unknown city (your future destination for a few days). You would like to know in advance where to find a bank, an ATM or the convention centre. You could ask the hotel personnel for details and instructions, but that takes time. Or, you can use your device to select a POI category and then an address. Then, it's up to you to update your agenda.
0 In Main Menu

2 Select POI around destination

3 Select a relevant POI category, for example Rental car agency and confirm your choice
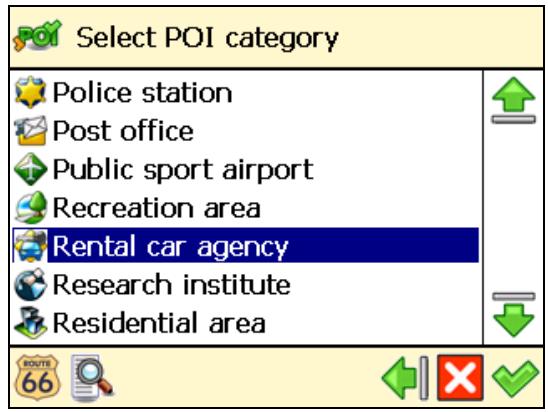
The results are sorted by distance: the first POI in the list is the closest to your destination. Select the filter if necessary. Select an item from the list and confirm your choice.


If there is no location that meets your search criteria, the No search results! message is displayed!
That's all! Now you can start navigating to your destination.
Find a point on the map and navigate to it
Let's say that you are on holiday in a region you visited last year. You have great memories about a particular location with a superb panorama, but you can't remember its name. All you remember is the approximate location on the map. On the screen, browse the map, see where you are right now (your current GPS position), then search and select that special location. Then start navigating to that location. Fast and simple!
1 In Main Menu , select Navigate to
2 Select Point on map
The map and your current position (GPS position) are displayed. Zoom in to display more details on the map. Zoom out to view a larger section of the map. Select & hold and drag the map in the desired direction. When you see on the map the location of your memories, select it. The pointer indicates this location on the map.
4 Select Navigate to to choose this location as your destination.
That's all! Now you can start navigating to your destination.
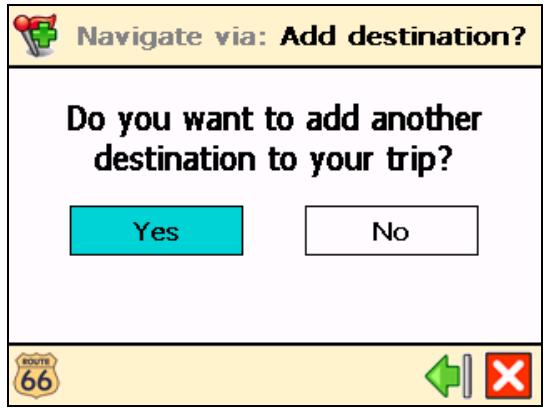
Navigate to a destination via intermediate points (Navigate via)
Let's say that today you have a very busy program. You have to drive to your office; you have a business lunch; you must drive home and pick up your family and go shopping; and finally, you want to go to the cinema. Think of each location as a destination: when you reach the first location, the second location becomes your next destination; and so on. Add each location as another stopover to your trip. It's simple and fast!

In Main Menu

, select Navigate via

The Overview of waypoints screen contains a list of locations you have selected before, or locations you intend to include into your next trip. Select a single waypoint and then confirm your choice.
Optionally, you can:
- Select Save route, type a relevant name and then confirm your choice to save the current group of waypoints.
- Select Load waypoints and then confirm your choice to load a group of waypoints, saved during a previous trip.
- Select Move up to move a location up in the list. This means that the selected location will precede other locations during your trip.
- Select Move down to move a location down in the list. This means that the selected location will follow other locations during your trip.
- Select Delete to delete a location from the list.
- Select Delete all to delete all locations from the list.
3 Select Yes and go to step 4 if you want to add other locations as additional stopovers to your trip. Select No to start navigating.
In Add waypoint, select another location for your trip, for example your office address. When you added all waypoints, confirm them and then select No. For details about finding locations, read the Working with locations chapter.
Repeat step 4 as many times as necessary! Following the example above, also add a restaurant for the business lunch, your home address, a shopping centre and finally a cinema.
That's all! Now you can start navigating to your destination.
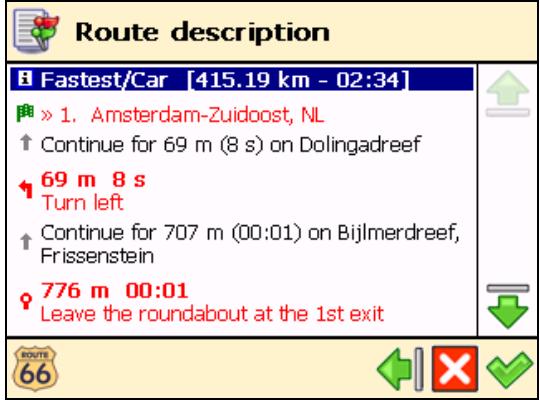
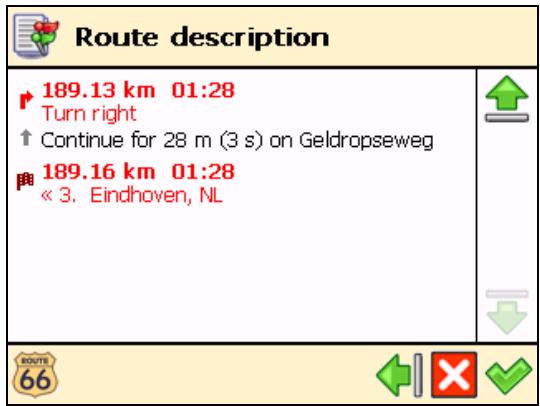
Plan a route
Let's say that you intend to spend your holiday in the Benelux. You start your trip in Amsterdam and you want to visit Rotterdam and Eindhoven. It takes time and energy to browse paper maps and select the best route that covers all locations you want to visit. Instead, you can plan your route with your ROUTE 66 product, in a matter of seconds. And you can change your holiday plans over and over again!

In Main Menu

, select Plan a route

Add your departure location (Amsterdam) and confirm your choice. For details about finding locations, read the Working with locations chapter.
3 Add your first destination location (Rotterdam) and confirm your choice.
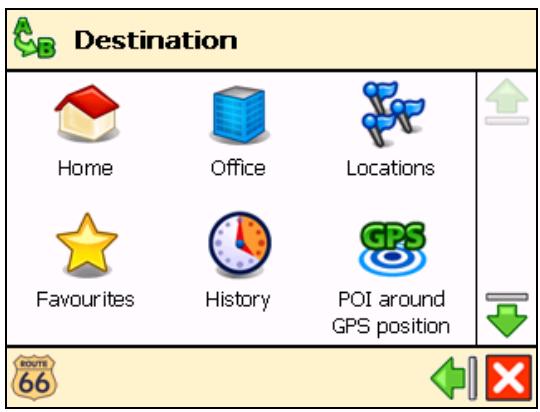
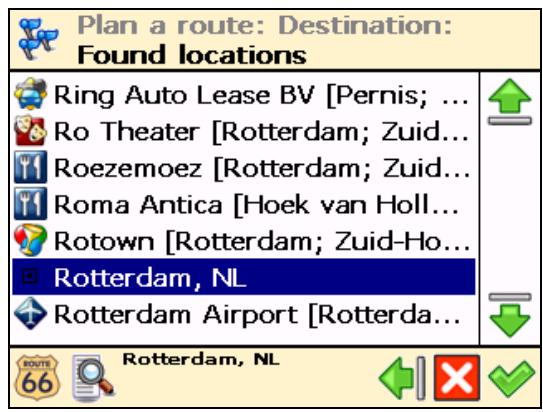
4 Select Yes and go to step 5 if you want to add other stopovers (intermediate waypoints) to your trip. Select No and go to step 6 to display the map and the departure location.
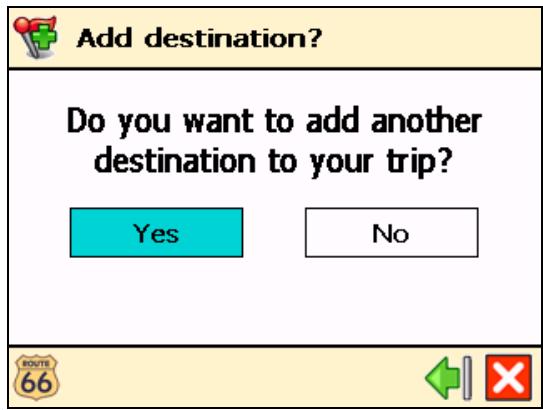
In the Destination screen, select the next stopover (intermediate waypoint) for your trip (Eindhoven).
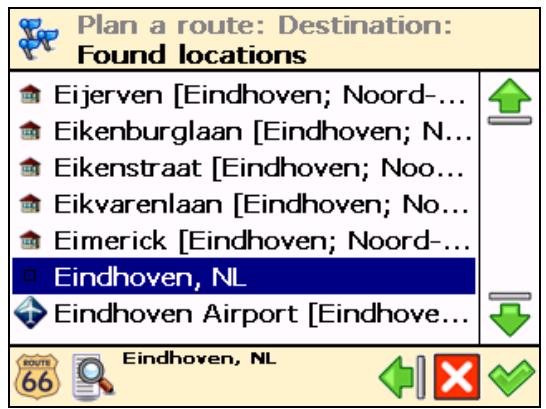

Repeat step as many times as necessary!
The route is calculated. The entire route is shown on the map. Select Navigate to travelling along the route you planned.

to start
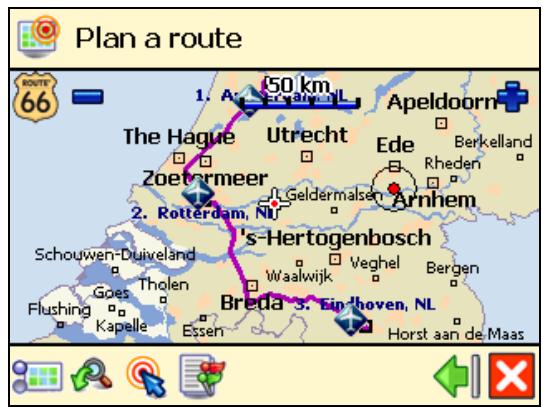
Optionally, you can:

and then Destination

to display the final destination of
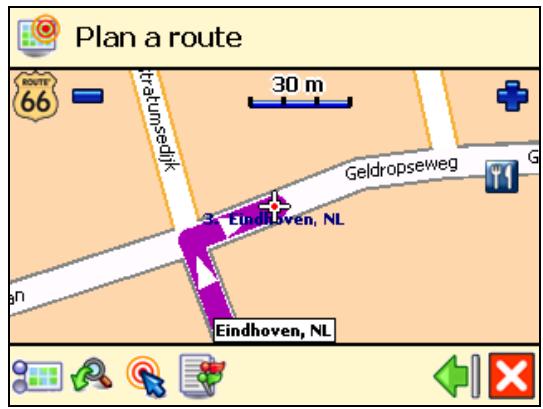
- Select Route description to display a list with all driving instructions of the route you planned. Select a turn arrow and confirm it to show that turn on the map.
The green flag represents the departure.
The red flag represents the destination.
That's all! Now you can start navigating to your destination.
TMC information
Your ROUTE 66 product allows you to receive the latest traffic messages on your device. Thus, you can avoid traffic jams, road works or accidents that occur along your route.
The traffic information is gathered by specialized traffic-monitoring centres. Then, the information is broadcast via the Traffic Message Channel (TMC). Depending on the device you use, you can choose one of the following solutions to update your list of traffic messages:
TMC information via RDS
Currently, the Radio Data System (RDS) technology is supported by most Personal Navigation Devices (PNDs), Windows Mobile smartphones and PocketPCs. The TMC messages are received by drivers via an RDS receiver (built-in or stand-alone). An external antenna is also required. The information is continuously updated.
TMC information via Internet
Most Windows Mobile smartphones and certain PocketPCs (only in case of Windows Mobile for Pocket PC Phone Edition) use a GPRS (internet) connection to receive traffic information. The information is updated at a time interval specified by the user.
The available traffic messages are sorted by country and then alphabetically.

Traffic information is available for selected countries and selected products!
1 In Main Menu

, select TMC information

From the list of available traffic messages, select a relevant message.
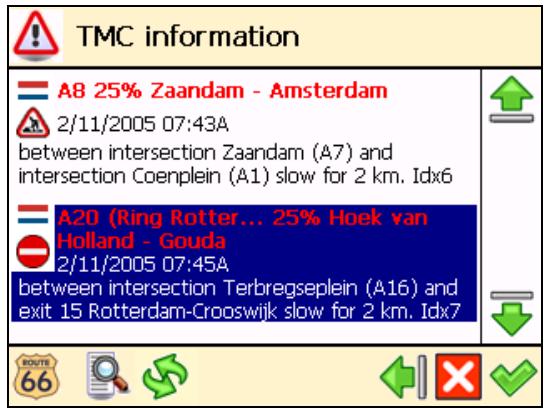
Select Refresh to update the list of available traffic messages!
3 Select to view the selected message on the map.
To fully take advantage of the traffic messages, use the options in the Configure TMC menu!
Customize your navigation
You are on holiday, enjoying yourself and having a great time, still a few hours from your destination. Why not use the many customisation options to adapt the device to your own personal preferences?
Read the following sections and take advantage of the powerful settings in your ROUTE 66 product.
Sound on / Sound off
1 Go to Main Menu

Choose Sound on

Sound off

and on if you want to listen to the voiceif you want to turn off the voice instructions.

For safety reasons, we recommend you to keep the sound switched on and listen to the voice.
tions! This way, you can concentrate on the road ahead of you and avoid any unpleasant driving
ons!
Map options
Day colours / Night colours
1 In Main Menu

, select Map options

Choose Day colours

when navigating during the day (the device screen is brighter).
Choose Night colours

when navigating during the night (the device screen is less intense).
2D perspective / 3D perspective
In Main Menu

, select Map options

Choose 2D perspective to view the map from above, as you look at a printed map.
Choose 3D perspective you.

to have a panoramic view, as you are actually seeing the road ahead of
Set 3D angle
In Main Menu

2 Select Set 3D angle
3 Select and hold the slider. Drag it to the left (3D) to increase the viewing angle. Drag it to the right (2D) to decrease the viewing angle.

4 Confirm your choice

You can use the Set 3D angle option only when the 3D perspective option is also selected!
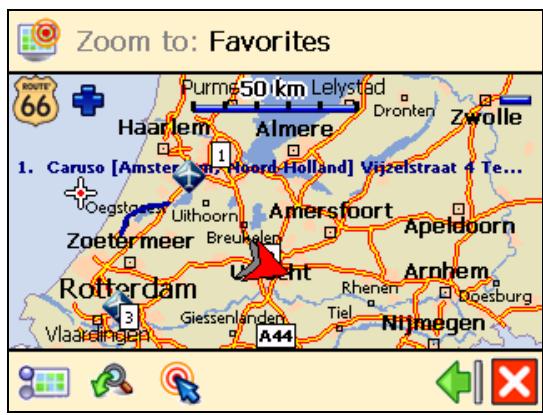
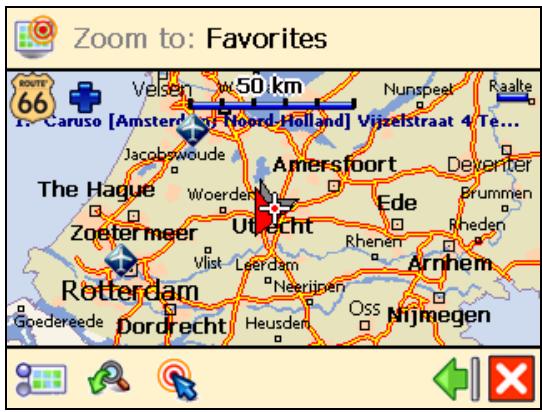
Show favourites / Hide favourites

In Main Menu

, select Map options


Choose Show favours
to show your personal favourites on the map. Choose Hide
favourites

to remove your favourites from the map.
For example, if you have the following list of favourites:
then you can show the favourites on the map or remove them from the map:
Show scale / Hide scale
1 In Main Menu

, select Map options

2 Select Show scale to display the scale of the map at the top of the screen. When you zoom in or zoom out, the distance value above the scale is updated accordingly.
Select Hide scale

to remove the scale.

The scale is available only in 2D perspective!
Select map
In Main Menu

Choose Select map

The list of available maps is displayed, with the active map highlighted. Select a map and confirm your choice.
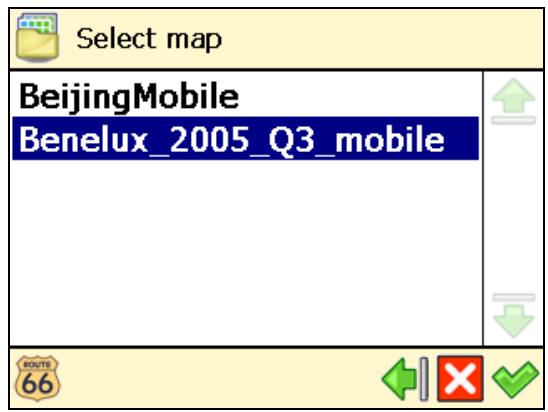
The memory card included in this product is preloaded with the map of the country (or group of countries) of your purchase. Depending on the product that you have bought, you can install other maps from the enclosed CD.
The number of maps you can install on your memory card depends on the size of the memory card: a bigger memory card can store more maps!
When you select another map, only the POI categories and points-of-interest that belong to that map are available!
Before you can use a map, first you must activate it!
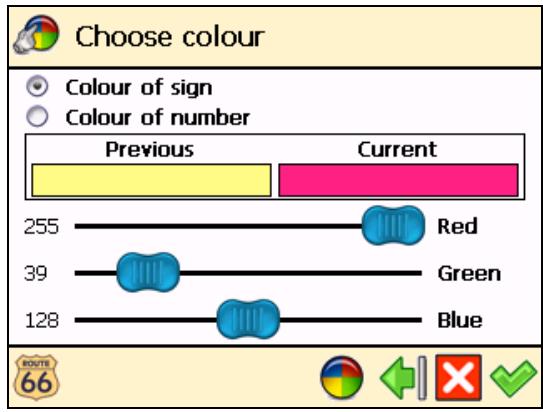
Legend
1 In Main Menu

, select Map options

2 Select Legend

In the Legend screen, select:
- Cities/Symbols for cities and road numbers.
Roads for different types of roads.
Areas/GPS for areas and arrows. - Icons for points-of-interest.

You can change the default colours for Cities/Symbols, Roads and Areas/GPS. Select Cities/Symbols, Roads or Areas/GPS and select an item from the list. In the Choose colour screen, combine the shades of red, green and blue to compose your favourite colour. Move the slider either to the left or to the right. Optionally, select Default to return to the default colours. Confirm your changes. From now on, your ROUTE 66 product will use your new colours.
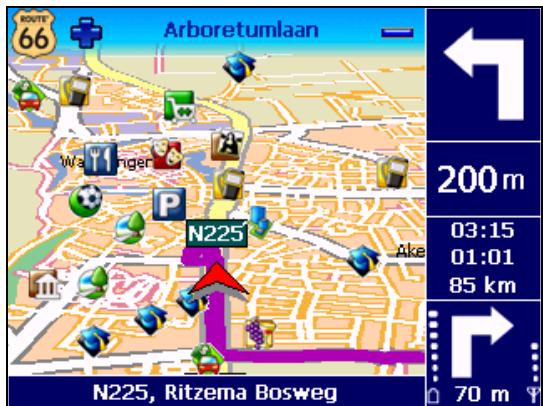
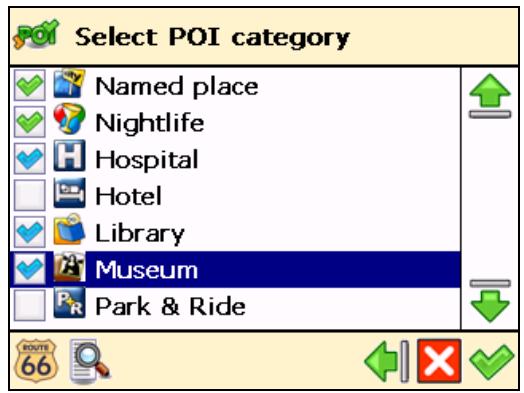
Points-of-interest (POI)
In Main Menu

, select Map options

Choose Points-of-interest (POI)

A list with all POI categories is displayed. Select those POI categories whose points-of-interest you want to display on the map. Deselect those POI categories whose points-of-interest you do not want to display on the map. Select the filter if necessary.
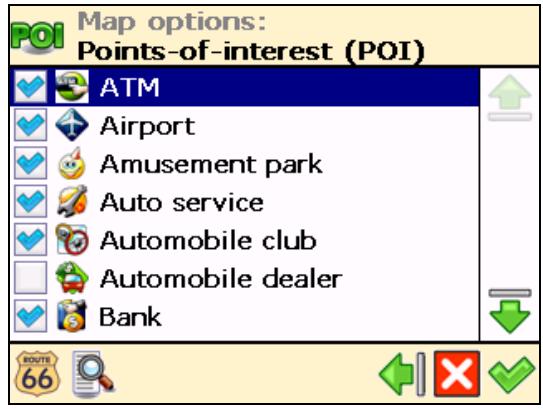
4 Confirm your choice
Zoom to
Let's say that, before you start a new trip, you would like to see a particular location on the map and the points-of-interest around this location. You can browse the map, zoom in to see more details, zoom out to cover a larger area, or drag the map in the desired direction. Or, you can simply specify a location and your ROUTE 66 product displays it on the map. Then, start your trip to that particular location!
1 In Main Menu, select Zoom to
2 Decide which location to display on the map. For details about finding locations, read the Working with locations chapter.
The Zoom to screen is displayed.
-
Select Map options to change your navigation preferences.
-
Select Zoom to to open the Zoom to screen.
-
Select Navigate to to start navigating to the selected location.
Change settings
Backlight
1 In Main Menu

, select Change settings

Choose Backlight

3 Move the slider to the left (Min) to decrease the brightness of the navigation screen. Move the slider to the right (Max) to increase the brightness of the navigation screen.
3 When the During navigation option is selected, the screen is illuminated if you are navigating to a particular destination.
When the During navigation option is unselected, the device is illuminated for a few seconds; then, the device enters into the power saving mode and the screen turns off.
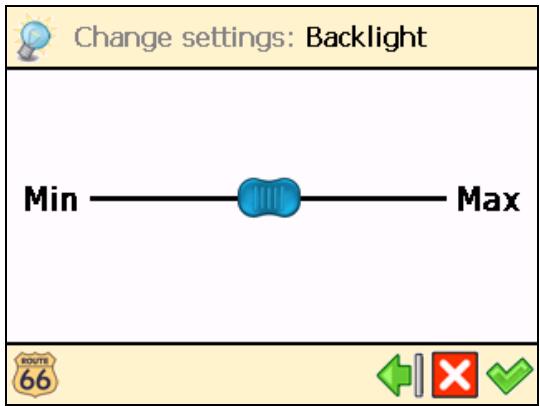
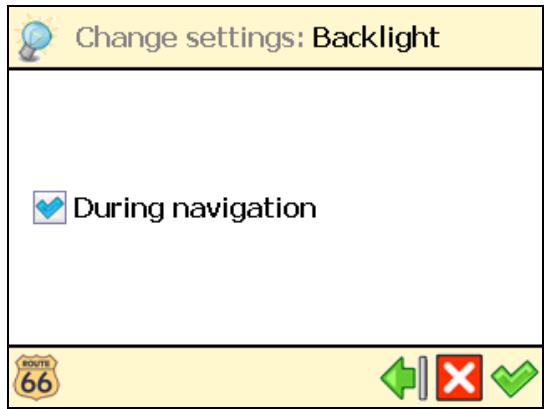
4 Confirm your choice
Language
In Main Menu

, select Change settings

Choose Language

A list of available languages is shown. These are the languages for the user interface and the voice instructions. Select a language and confirm your choice
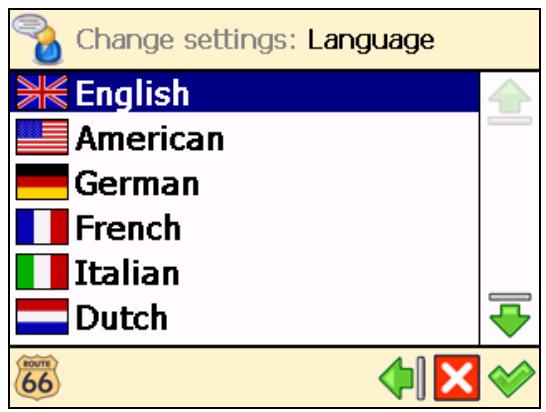

The number of available languages depends on the product that you have bought!
Units
1 In Main Menu

, select Change settings

Choose Units

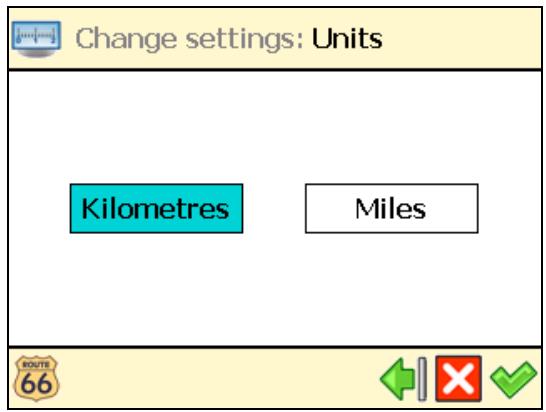
3 Select Kilometres if you want to display the distance information in metric units (kilometres and metres):
Select Miles if you want to display the distance information in imperial units (miles and yards):
Volume

In Main Menu

, select Change settings


Choose Volume


- Select & hold and drag the slider to the left (Min) to lower the volume of the voice instructions.
- Act & hold and drag the slider to the right (Max) to increase the volume of the voice instructions.
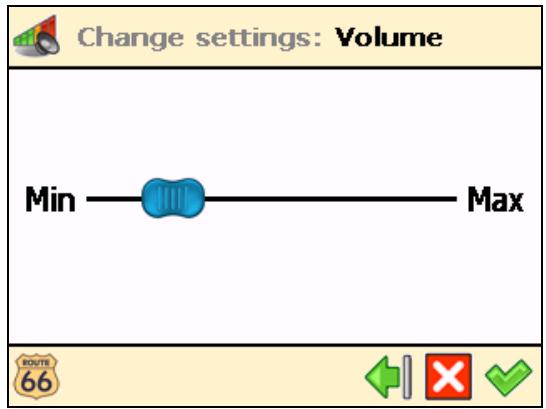

Confirm your choice
For safety reasons, we recommend you to keep the sound switched on and listen to the voice instructions! This way, you can concentrate on the road ahead of you and avoid any unpleasant driving situations!
Route type
1 In Main Menu

, select Change settings

Choose Route type

3 Select the type of route that best reflects your navigation style:
- Fastest/Car - navigate to your destination, by car, along the fastest route.
- Shortest/Car - navigate to your destination, by car, along the shortest route.
- Fastest/Lorry - navigate to your destination, by lorry (truck), along the fastest route.
- Shortest/Lorry - navigate to your destination, by lorry (truck), along the shortest route.
- Pedestrian - walk to your destination.

4 Confirm your choice
Avoid motorways
1 In Main Menu

Choose Avoid motorways

3 Select On if you want to exclude motorways from your route. Select Off if you do not want to exclude motorways from your route.
Avoid toll roads
1 In Main Menu

Choose Avoid toll roads

3 Select On if you want to exclude toll roads from your route. Select Off if you do not want to exclude toll roads from your route.
Avoid ferries
1 In Main Menu

Choose Avoid ferries

3 Select On if you want to exclude ferries from your route. Select Off if you do not want to exclude ferries from your route.
Automatic zooming
In Main Menu

, select Change settings

Choose Automatic zooming
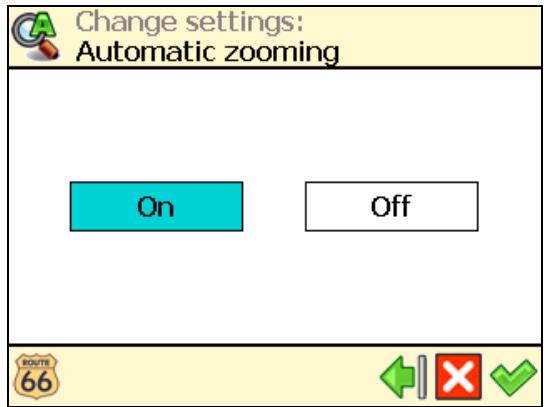
3 Select On if you want to automatically enlarge the map (zoom in) and see more details of the road when approaching street junctions.
Select Off if you want to manually select the zoom level you need; the zoom level you selected is preserved until you manually change it.
Configure alarm
Never underestimate the safety measures! Use this option to set a safety speed: when you navigate and reach this speed, an alarm warns you that you are driving too fast.
1 In Main Menu, select Change settings
Choose Configure alarm
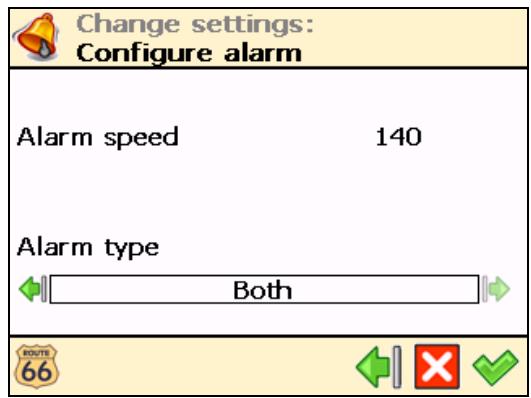
3 Select the numeric value (for example, 140). In the Alarm speed screen, type a different value and confirm your choice.
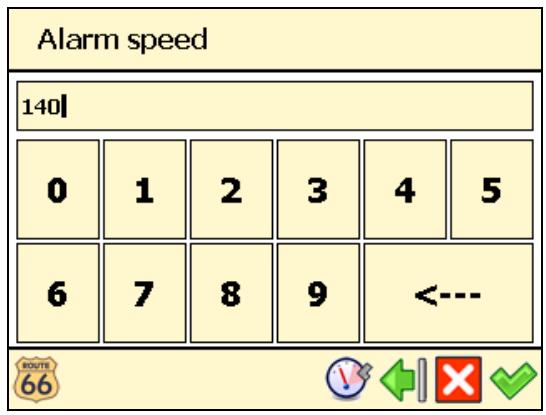
In the Alarm type section, select the left arrow or the right arrow to select the type of warning that automatically starts when you drive too fast:
- None - no warning
Acoustic alarm - a sound warning
Visible alarm - a blinking warning - Both - a sound warning and a blinking warning
5 Confirm your choice
Speed
Feel free to further customize your navigation! You can indicate the speed you prefer for each type of road. These values will be considered when calculating a route, the estimated travel time and the estimated time of arrival. Please note that if you change the speed setting, the calculated routes will be different.
1 In Main Menu, select Change settings
Choose Speed
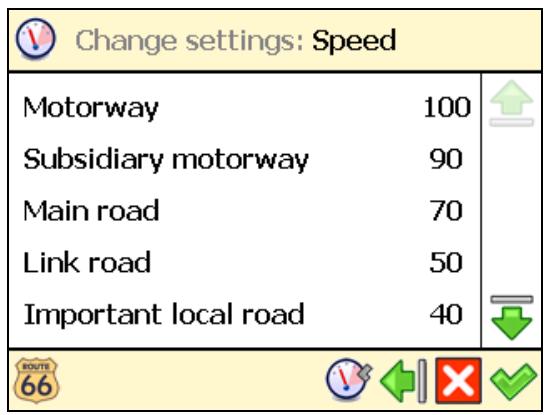
3 Select a type of road (for example Motorway). Select the numeric value (for example 100). In the Alarm speed screen, type a different value and confirm your choice.
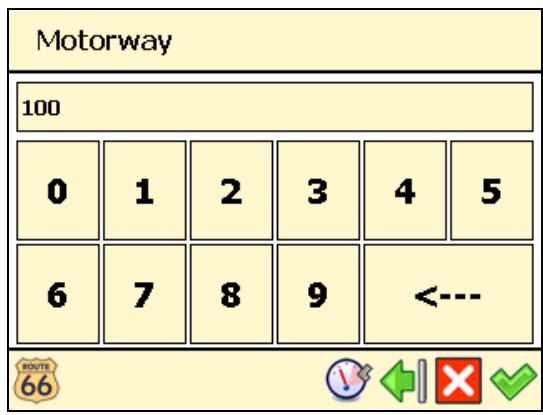
When you configured all speed values, confirm them .
Set date/time
You can modify the date and time displayed by your ROUTE 66 product.
1 In Main Menu, select Change settings
Choose Set date/time
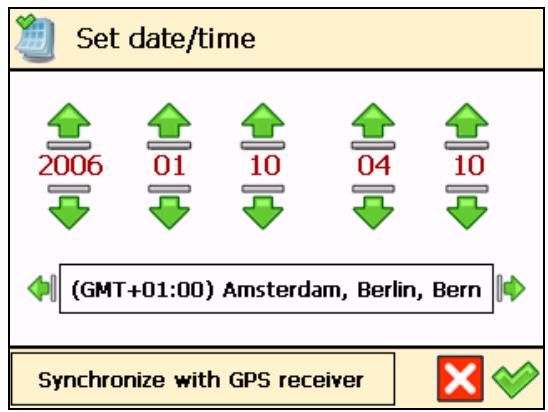
The first three controls represent the date (year-month-day). The last two controls represent the time (hour-minutes). Use the up arrow or the down arrow to select the correct values.
Use the back arrow or the next arrow to select your time zone.
5 Select Synchronize with GPS receiver to set the date and time, based on the selected time zone and the available GPS information.
6 Confirm your choice
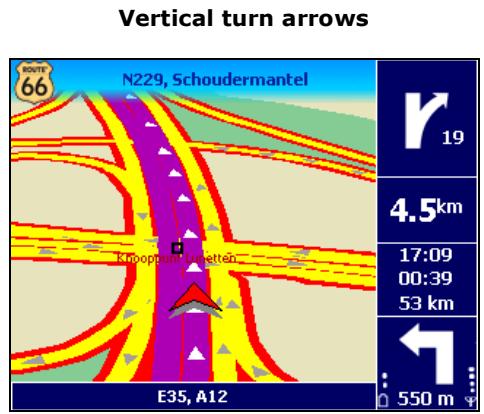
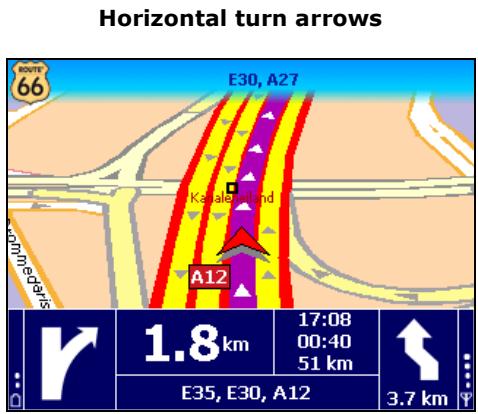
Vertical turn arrows / Horizontal turn arrows
Would you prefer to see the driving instructions (turn arrows) on the right side of the navigation screen, or at the bottom of the navigation screen? Choose the option you prefer.
In Main Menu, select Change settings

Choose Vertical turn arrows screen.

to display the driving instructions on the right side of the
Choose Horizontal turn arrows screen.

to display the driving instructions at the bottom of the

This option is available only for certain devices!
Calibrate screen
To be sure that the screen of your device works properly, you must calibrate your screen when necessary. Calibrating means adjusting the precision and reaction of the screen.

In Main Menu

, select Change settings


Choose Calibrate screen

3 Select & hold your stylus on the cross icon ^+ . You must select the screen 5 times: first in the centre, then in the 4 corners of the screen.
align screen
Tap the target firmly and accurately at each location on the screen. The target will continue to move until the screen is aligned.

Select the screen again to save your settings.
Configure TMC
Unfortunately, the traffic conditions change all the time! Unexpected traffic jams, roadblocks and accidents can ruin a perfectly planned holiday. Use our traffic messages (TMC) and make your journey more enjoyable!
1 In Main Menu, select Change settings
Choose Configure TMC
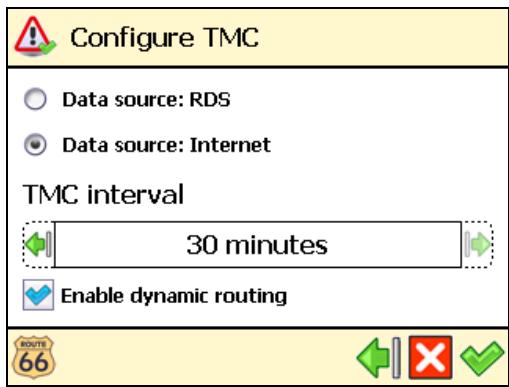
The traffic information is gathered by specialized traffic-monitoring centres. Then, the information is broadcast via the Traffic Message Channel (TMC). Depending on the device you use, you can choose one of the following solutions to update your list of traffic messages:
Data source: RDS
Currently, the Radio Data System (RDS) technology is supported by most Personal Navigation Devices (PNDs), Windows Mobile smartphones and PocketPCs. The TMC messages are received by drivers via an RDS receiver (built-in or stand-alone). An external antenna is also required. The information is continuously updated.
Data source: Internet
Most Windows Mobile smartphones and certain PocketPCs (only in case of Windows Mobile for Pocket PC Phone Edition) use a GPRS (internet) connection to receive traffic information. The information is updated at a time interval specified by the user.
3 Set your TMC interval:
- Never - it means that the traffic messages are not updated automatically on your device.
- Every ... minutes - it means that new traffic messages are automatically updated on your device, every ... minutes.
You can manually update the list of available traffic messages! In Main Menu , select TMC information

and select Refresh

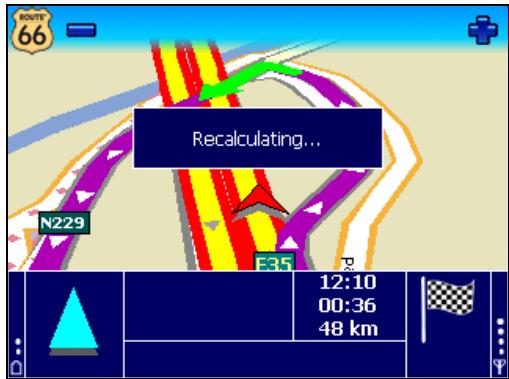
4 Select Enable dynamic routing if you want to use the traffic messages during navigation. When something happens on the road, your ROUTE 66 product analyzes the situation and automatically recalculates the best possible route. Unselect Enable dynamic routing if you do not want to use traffic messages.
5 Confirm your choice
Define your navigation experience
Points-of-interest (POI)
Well, you travelled a lot and saw many wonderful places. Now it's the right moment to organize the locations you visited during your trips. Define your personal categories of points-of-interest. Add locations to your POI categories. Set advanced warnings.
Maintain POI
Add, rename or remove points-of-interest.
Add as POI
1 In Main Menu

Choose Maintain POI

Choose Add as POI

4 Select a user-defined POI category and confirm your choice. Any POI must belong to a POI category.
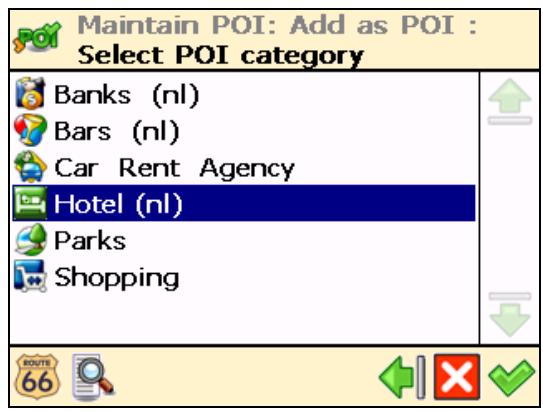

You cannot continue if there isn't at least one user-defined POI category!
5 Decide how to find the POI you want to add. For details about finding locations, read the Working with locations chapter. Confirm to save the selected location as a POI to the current category.
Rename POI
In Main Menu

, select Points-of-interest (POI)

Choose Maintain POI

Choose Rename POI

4 Select a user-defined POI category and confirm your choice
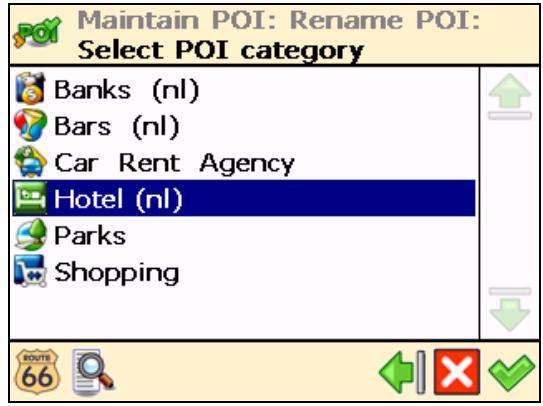
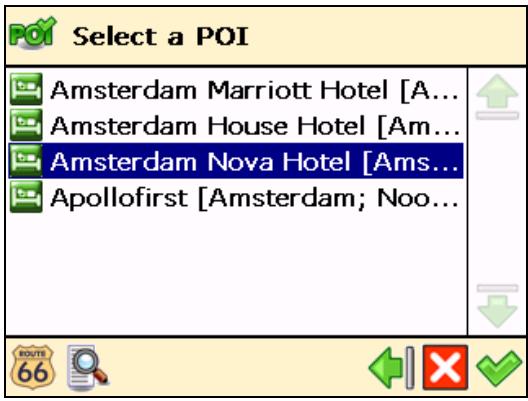
5 Select the point-of-interest you want to rename, then confirm your choice
Change the name of the selected POI.
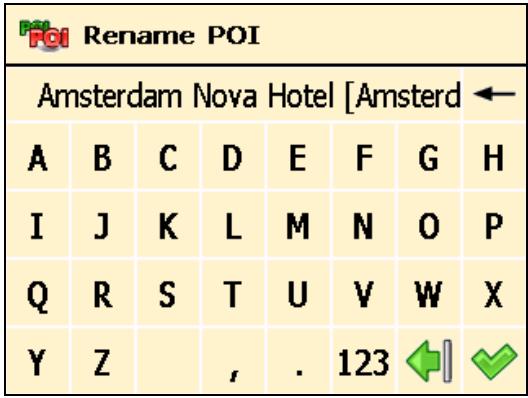
7 Confirm your choice
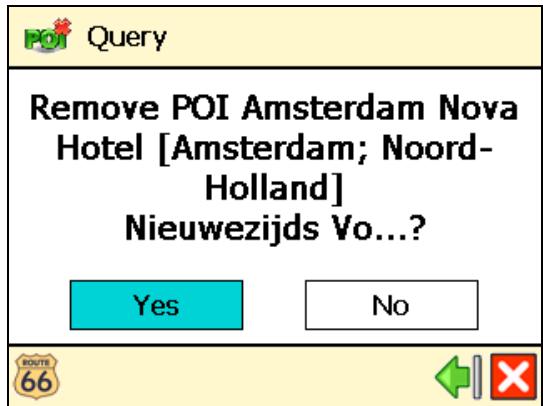
Remove POI
In Main Menu

, select Points-of-interest (POI)

Choose Maintain POI

Choose Remove POI

4 Select a user-defined POI category and confirm your choice

5 Select the point-of-interest you want to delete, then confirm your choice
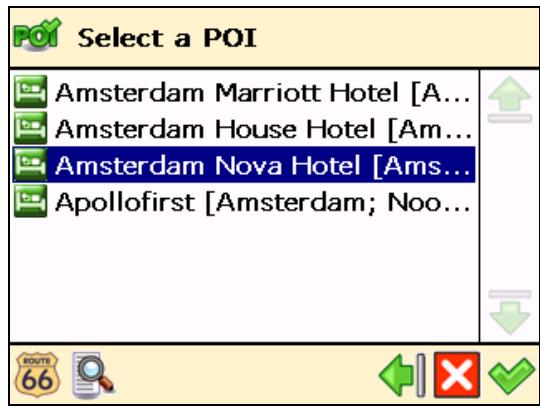
6 Select Yes to confirm that you really want to delete this POI.
Maintain POI category
Add, rename or remove POI categories.
Keep in mind that there are two kinds of POI categories:
- pre-installed categories - These POI categories belong to the geographic map. You cannot modify or remove them.
- user-defined categories - You can add and modify these POI categories.
Add POI category
1 In Main Menu, select Points-of-interest (POI)
Choose Maintain POI category
Choose Add POI category
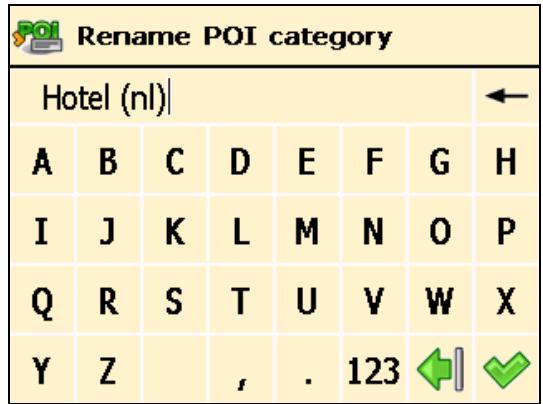
Type the name of the new category, for example Hotel (nl). Confirm your choice
| Hotel (nl) | ← | ||||||
| A | B | C | D | E | F | G | H |
| I | J | K | L | M | N | O | P |
| Q | R | S | T | U | V | W | X |
| Y | Z | , | . | 123 | |||
5 Select a relevant icon for the new POI category, and confirm your choice
| Select an icon | |
Rename POI category
In Main Menu

, select Points-of-interest (POI)

Choose Maintain POI category

Choose Rename POI category

4 Select a user-defined POI category and confirm your choice
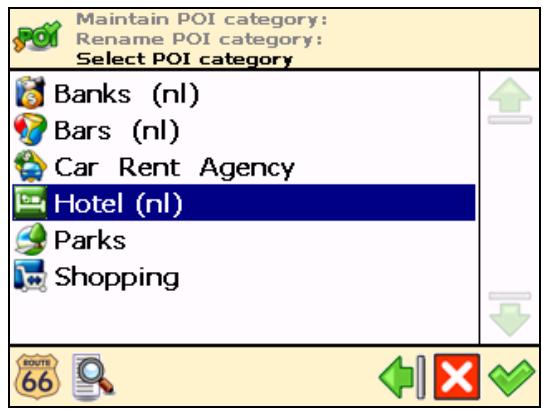
Change the name of the selected POI category and confirm your choice
Remove POI category
In Main Menu

, select Points-of-interest (POI)

Choose Maintain POI category

Choose Remove POI category

4 Select the user-defined POI category you want to delete, then confirm your choice
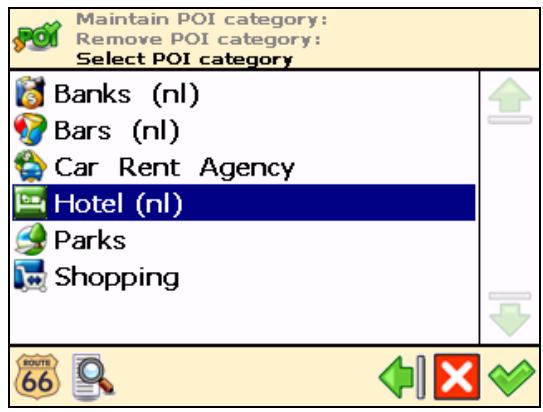
5 Select Yes to confirm that you really want to delete this POI category.
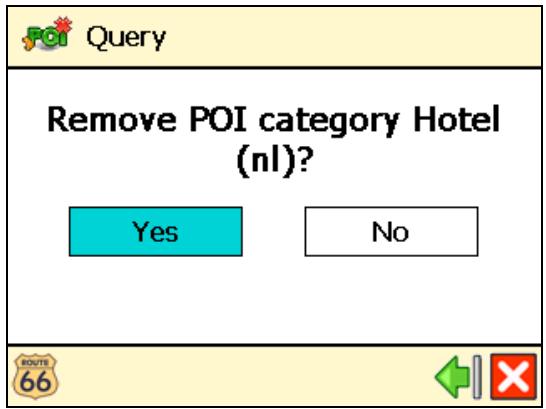

When you delete a POI category, all points-of-interest belonging to that category are also deleted!
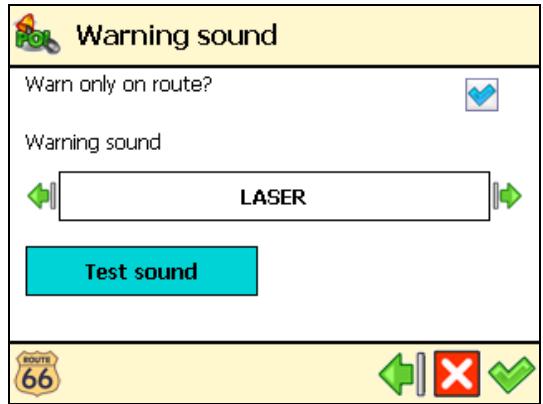
POI alarm
You are on holiday. You are driving to your holiday destination. Wouldn't it be nice to know, in advance, that a gas station or a hotel is 1 km ahead of you, along your route? Activate your POI alarm! You will never miss an important location.
1 In Main Menu

Choose POI alarm

3 Select a POI category and confirm your choice. This means that, during navigation, you will be warned in advance that you are approaching points-of-interest from this POI category along your route. For example, select the POI category Museum; this means that you will be warned when you
are approaching a museum. Each category has its own icon, for example H for Hospital, for Library or for Museum.
- means a POI category previously configured for POI alarm.
- means a POI category you have just selected for POI alarm.
- means a POI category that is currently ignored by the POI alarm.

You can select and configure several categories at the same time! The same warning type, warning state and warning sound will be applied to all categories you selected!
4 Select the type of warning you prefer and confirm your choice
Icons and distance in top left corner
Icons and distance in top right corner
Icons and distance at GPS location
5 Select at which distance from the point-of-interest you want to receive a warning and confirm your choice .
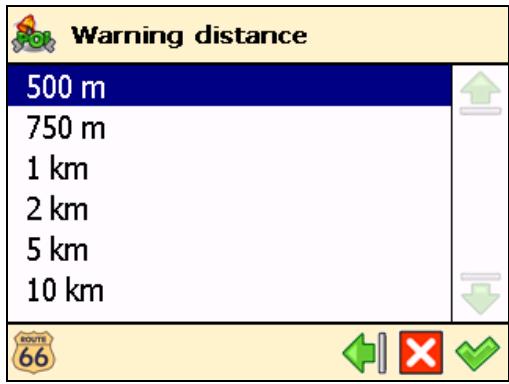
6 Select the warning sound and confirm your choice
- Warn only on route? - When selected, you will be warned only about points-of-interest along your route; when deselected, you will be warned about any points-of-interest along and around the route.
- Warning sound - Select a sound that you like. Select the left arrow or the right arrow to scroll the list of available sounds.
Test sound - Select and listen to the selected sound.
Favourites
There are many locations that you visit frequently and are of great importance to you. Save these locations as your favourites - one time only! Add these favourites to your trips - over and over again!
Use the Favourites menu to set your home address and your office address. You can also add favourites, rename favourites and remove favourites.
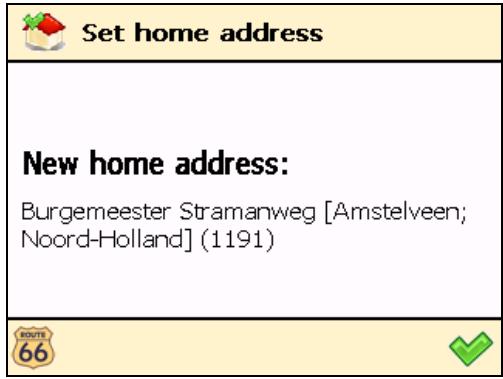
Set home address
1 In Main Menu

, select Favourites

Choose Set home address

3 Type the name of the location you want to find and confirm your choice

In the list of results, select the address that you want to add as your home address. Select the filter if necessary. Confirm your choice to continue.
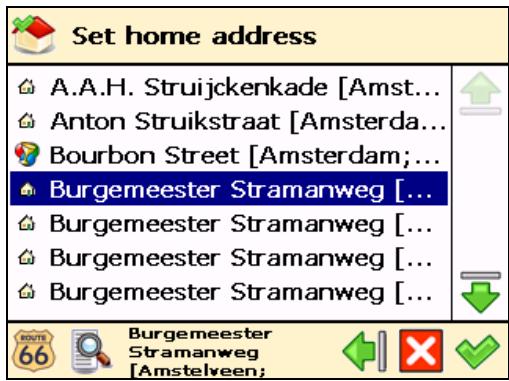
A summary report is displayed. Select to finish.
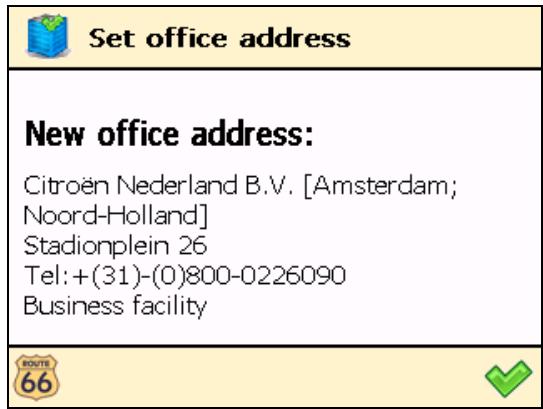
Set office address
In Main Menu

, select Favourites

Choose Set office address

3 Type the name of the location you want to find and confirm your choice
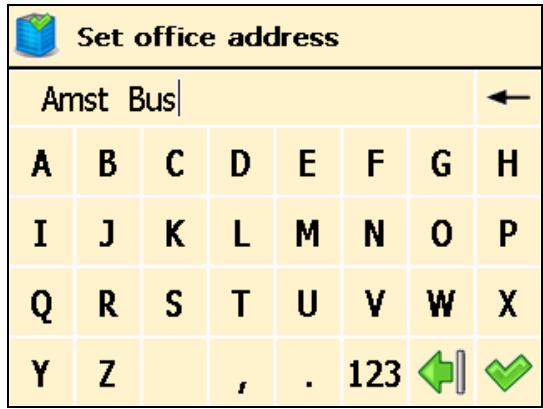
In the list of results, select the address that you want to add as your office address. Select the filter if necessary. Confirm your choice to continue.

A summary report is displayed. Select to finish.
Add favourite

In Main Menu

select Favourites


Choose Add favourite

3 Decide how to find the favourite you want to add. For details about finding locations, read the Working with locations chapter.
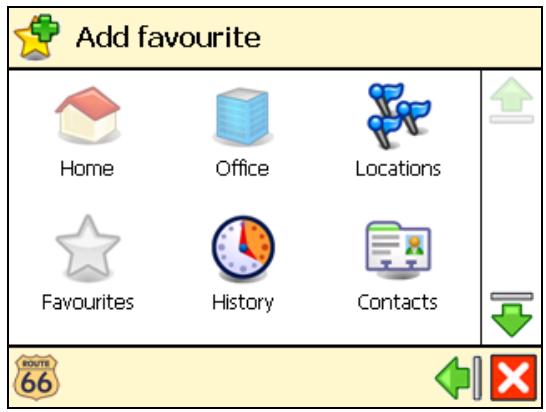

Select to save the selected location as a favourite location.
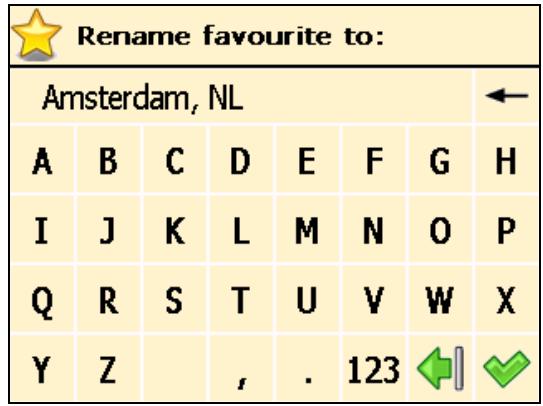
Rename favourites
In Main Menu

select Favourites

Choose Rename favourites
3 Select the favourite destination you want to rename and confirm your choice
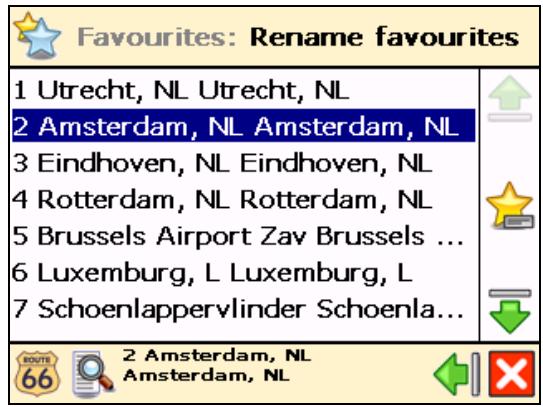
Change the name of the selected favourite and confirm your choice
Remove favourites
1 In Main Menu

select Favourites

Choose Remove favourites
In the list of results:
- Select Delete to delete the selected favourite;
- Select Delete all to delete all favourites.
| Favours: Remove favourites | |
| 1 Utrecht, NL Utrecht, NL | |
| 2 Amsterdam, NL Amsterdam, NL | |
| 3 Eindhoven, NL Eindhoven, NL | |
| 4 Rotterdam, NL Rotterdam, NL | |
| 5 Brussels Airport Zav Brussels ... | |
| 6Luxemburg, L Luxemburg, L | |
| 7 Schoenlappervlinder Schoenla... | |
4 Select Yes to confirm that you really want to delete this favourite.
| Confirm! | |
| Do you really want to delete this favourite? | |
| Yes | No |
Appendix
Installing other geographic map(s) and voice instructions on the Memory Card
You can (re)install the navigation software, geographic map(s) and voice instructions from the enclosed backup CD(s) onto your memory card.
When you use the installation CD(s) for the first time, you first have to manually format your memory card (see Formatting your Memory Card below for how to do this). If you have completed an earlier installation using the CD(s), you can immediately proceed with the steps below.
- Connect the memory card reader & writer to the USB port of your computer, then insert the memory card into the memory card reader & writer and the CD into the CD drive.
- The installation should start automatically. If it does not start, please run setup.exe from the CD(s).
- Select the language you want the installation to be performed in, e.g., "English", and click Next.
- Click Next to continue.
- Select the drive where the files should be installed. Click Next to continue.
- Read the license agreement carefully, select the first option and click Next to continue.
If geographic map(s) and voice instructions are already installed on your memory card, choose the relevant option and click Next to continue:
- Modify to select new components to install or the components to remove (see steps 7 to 10 below).
Repair to reinstall the components that were previously installed (see steps 7 to 10 below). -
Remove to remove the installed components (see step 10 below).
-
Select the language of the voice instructions (e.g., "English") you want to install onto the memory card. Note: The default language is identical to the Setup Language. Click Next to continue.
- Select the geographic map(s) you want to install onto the memory card (e.g., "United Kingdom & Ireland"). Click Next to continue.
- Click Install to start installing the geographic map(s) and the voice instructions onto the memory card. (For products with more than one CD: please note that not all CDs are necessarily asked for during the installation process. This depends on which map(s) you have selected for installation in step 8).
- Click Finish to complete the installation / maintenance process. The geographic map(s) and voice instructions are now installed on your memory card and can be used for navigation.
Formatting your Memory Card
Formatting the memory card maximizes the free space on the memory card and optimizes the speed of reading and writing files from/onto the memory card.
Warning:
Formatting will erase ALL data on the memory card. Note that your ROUTE 66 product can always be restored on your memory card using the CD(s), but you may want to backup other data (e.g., photographs or MP3s) that you have stored on the memory card.
- Insert your memory card into the memory card reader & writer.
- Connect your memory card reader & writer to a USB port of your PC.
- Open (double-click) My Computer on your PC. The corresponding memory card appears in the Devices with Removable Storage section as "Removable Disk". Make sure this is the correct memory card (e.g., disconnect the memory card reader & writer and verify that the disk disappears from the list; next, reconnect your memory card reader & writer).
- Click on the right button of the mouse on the identified Removable Disk and choose "Format..." Select "FAT" (not "FAT32") under "File system" and click Start. Take good notice of the contents of the warning message. If you agree, click OK. The memory card will be formatted, erasing ALL data on it!
- The "Format Complete" dialog appears after 10 seconds. Click OK, then click Close.
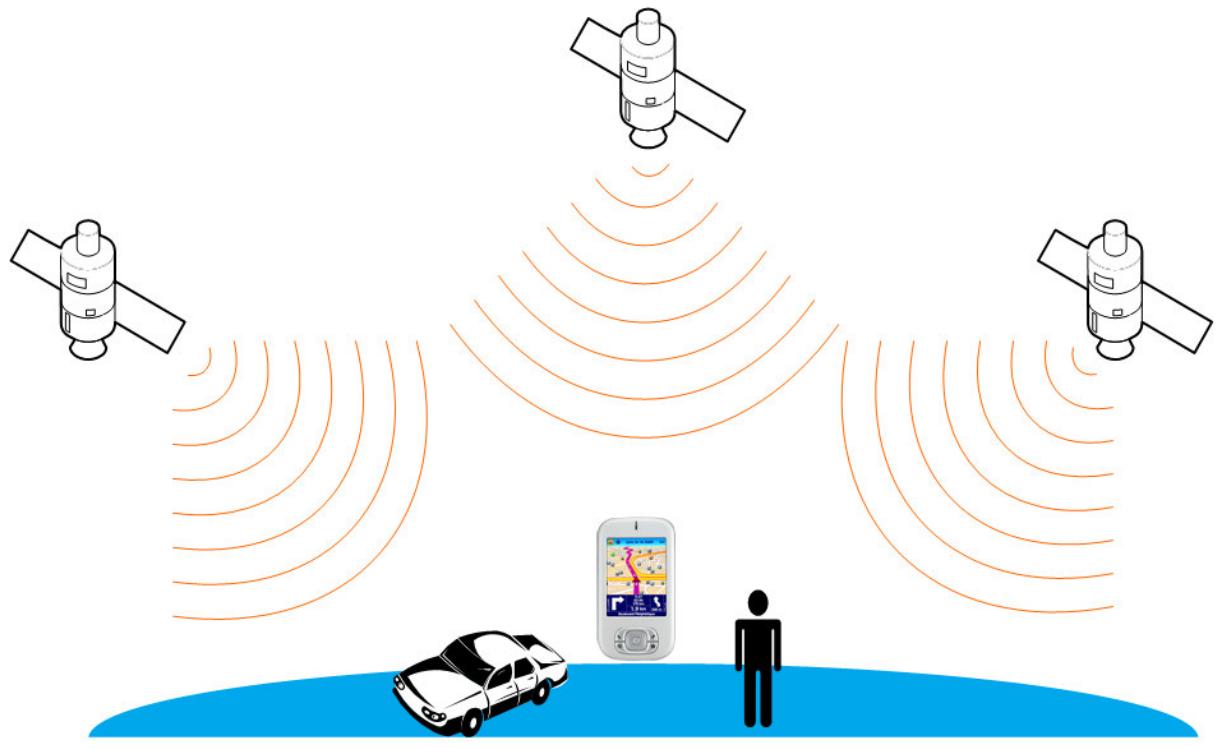
How does GPS work?
The Global Positioning System (GPS) is a satellite-based navigation system made up of a network of 24 satellites placed into Earth's orbit. GPS works in any weather condition, anywhere in the world, 24 hours a day. There are no subscription fees or setup charges to use GPS.
A GPS receiver must be locked on to the signal of at least three satellites to calculate a 2D position (latitude and longitude) and track movement. With four or more satellites in view, the receiver can determine your 3D position (latitude, longitude and altitude).
Quick Reference Card - Navigate to a location
Use this printable Quick Reference Card to easily find the steps to follow in order to navigate to a location.
Navigate to your home address


Navigate to your office address

Find an address and navigate

3 Type the name of the city. When you have entered all search strings, confirm them .
Wait for a few seconds. When the list of results is displayed, pick out the location that you are looking for. Confirm your choice .
Navigate to a favourite location

The list of locations you have saved before as favourites is now displayed on the screen. Select the location you need and confirm your choice
Navigate to a recently visited location (History)

The list with the locations you have visited recently is now displayed on the screen. Select an item in the list and confirm your choice.
Navigate to a POI around your GPS position
3 Select a relevant POI category and confirm your choice
4 Select an item from the list and confirm your choice.
Navigate to a POI around your destination

3 Select a relevant POI category and confirm your choice
4 Select an item from the list and confirm your choice
Find a point on the map and navigate to it
2 Select Point on map
The map and your current position are displayed. Select & hold and drag the map in the desired direction. When you see on the map the location of your memories, select on it. The pointer indicates this location on the map.
4 Select Navigate to to add this location as your destination.
Navigate to a destination via intermediate points (Navigate via)
1 In Main Menu , select
Navigate via
2 Select a single waypoint and then confirm your choice
3 Select Yes and go to step 4 if you want to add other locations as additional stopovers to your trip. Select No to start navigating.
4 In Add waypoint, select another location for your trip. When you added all waypoints, confirm them and then select No.
Plan a route
Add your departure location.
3 Add your first destination location.
4 Select Yes and go to step 5 if you want to add other locations as additional stopovers to your trip. Select No and go to step 6 to display the map and the departure location.
In the Destination screen, select the second destination for your trip
The route is calculated. The entire route is shown on the map. Select
Navigate to

to start travelling
along the route you planned.
Customer Support
If you have any questions regarding the use of your ROUTE 66 product, please send an e-mail to support@66.com. You can also visit the ROUTE 66 web site (http://www.66.com/) from time to time in order to stay informed about free updates and our latest offers.
License agreement
This is a legal agreement between you, the end user, and ROUTE 66 Geographic Information BV, Ridderkerk, The Netherlands ("ROUTE 66").
IF YOU DO NOT AGREE TO THE TERMS OF THIS AGREEMENT, PROMPTLY RETURN THE CD-ROM/FLOPPY DISK/DOWNLOAD PACKAGE, THE HARDWARE AND ACCOMPANYING ITEMS - PROVIDED THEY HAVE NOT BEEN USED - TO THE PLACE YOU OBTAINED THEM. IF YOU HAVE ALREADY PAID FOR THE SOFTWARE AND/OR HARDWARE ROUTE 66 OR ITS AUTHORIZATION DISTRIBUTOR FROM WHOM YOU OBTAINED THE SOFTWARE AND/OR HARDWARE, WILL REFUND YOU THE PURCHASE PRICE PROVIDED YOU PROVIDE ROUTE 66 WITH PROOF OF PURCHASE AND PAYMENT.
BY BREAKING THE SEAL OF THE CD-ROM/FLOPPY DISK, PRESSING THE "I AGREE" BUTTON FOR A DOWNLOAD, OR BY USING THE SOFTWARE AND/OR HARDWARE YOU ARE AGREEING TO BE BOUND BY THE TERMS OF THIS AGREEMENT.
YOU REPRESENT AND WARRANTY THAT YOU HAVE THE RIGHT AND THE AUTHORITY TO ENTER INTO THIS LICENSE AGREEMENT AND THAT YOU ARE OVER THE AGE OF MAJORITY. IF NOT, YOU MAY NOT USE THE SOFTWARE AND/OR HARDWARE.
The License is subject to Law of the Netherlands and the District Court of Rotterdam is the only competent court for disputes related to this License or the use of the Software and/or Hardware. The United Nations Convention on Contracts for the International Sales of Goods is hereby excluded from application to this License.
1) GRANT OF LICENSE: This ROUTE 66 License Agreement ("License") permits you to use the ROUTE 66 computer program and the digital (map) data included in the accompanying package acquired with this License on any single computer, provided the Software is installed on only one computer at any time and provided the Software is combined only with one (1) navigation system. This License is non-exclusive and non-transferable.
This License does not imply any rights to future upgrades or updates of the Software. The use of any upgrades or updates of the Software is governed by this License and may be subject to additional payments.
2) COPYRIGHT: The copyrights and other intellectual or proprietary rights to the Software and Hardware are owned by ROUTE 66 or its suppliers. You may either (a) make one copy of the Software solely for backup or archival purposes, or (b) transfer the Software to a single medium provided you keep the original solely for backup or archival purposes. You may not copy the product manual(s) or written materials accompanying the Software. You only become the owner of the material data carrier and you do not acquire the ownership of the Software.
3) OTHER RESTRICTIONS: The hiring, lending, public performance and broadcasting of Software and Hardware are prohibited. You are not permitted to fully or partly modify the Software, to analyze it by means of reverse-engineering, to decompile or disassemble the Software, or to make products derived from it. If you wish to obtain information that is necessary to ensure the interoperability of the Software with third party software, please contact ROUTE 66 at support@66.com. You are explicitly prohibited from downloading the digital maps and programs contained in the Software or from transferring these to another data carrier or computer.
4) CONFIDENTIALITY: You acknowledge and agree that the Hardware and Software was developed at considerable time and expense by ROUTE 66 and is confidential to and a trade secret of ROUTE 66. You agree to maintain the Software in strict confidence and not to disclose or provide access thereto to any person. If you would nevertheless grant another person (unauthorized) access to the Hardware and/or Software, you guarantee that such person accepts the terms and conditions of this License and you will indemnify ROUTE 66 and its authorized distributors against any claim of such person.
LIMITED WARRANTY
WARRANTOR
Non-U.S. and non-Canadian purchases: If you have made your purchase outside the United States and Canada, this Limited Warranty is granted by and this Limitation of Liability is stipulated for the benefit of ROUTE 66 Geographic Information Systems B.V., Brouwerstraat 36, NL-2984 AR Ridderkerk (The Netherlands).
WHAT THIS WARRANTY COVERS
1) ROUTE 66 Geographic Information Systems B.V. ("ROUTE 66") warrants to you that the Hardware will be free from defects in workmanship and materials under normal use ("Defects") for a period of two (2) years from the date that the Hardware was first purchased by you ("Warranty Period"). During the Warranty Period the Hardware will be repaired or replaced at ROUTE 66's choice ("Limited Warranty") without charge to you for either parts or labour. This Limited Warranty covers the replacement of the Hardware only. If the Hardware is repaired after the Warranty Period has expired, the Warranty Period for the repair will expire six (6) months after the date of repair.
WHAT THIS WARRANTY DOES NOT COVER
2) The Limited Warranty does not apply to normal wear and tear, does not apply when the Hardware is opened or repaired by someone not authorized by ROUTE 66 and does not cover repair or replacement of any Hardware or part thereof damaged by: misuse, moisture, liquids, proximity or exposure to heat and accident, abuse, non-compliance with the instructions supplied with the Hardware, neglect or misapplication. The Limited Warranty does not cover physical damage to the surface of the Hardware. This Limited Warranty does not cover any software that may accompany or be installed on the Hardware.
HOW TO MAKE A WARRANTY CLAIM
3) In order to make a claim of a Defect, you must contact ROUTE 66 by email during the Warranty Period via www.66.com to explain the Defect and to obtain an RMA number (Return Materials Authorization) if necessary. You must return the Hardware during the Warranty Period, along with an explanation of the Defect, to the address provided to you by ROUTE 66. If a defect arises and a valid claim under this Limited Warranty is received by ROUTE 66 after the first one hundred and eighty (180) days of the Warranty Period, ROUTE 66 is entitled to charge you for any reasonable shipping and handling costs made in connection with the repair or replacement of the Hardware. You must comply with any other return procedures stipulated by ROUTE 66, if any.
YOUR LEGAL RIGHTS
4) Some countries may not allow the exclusion or limitation of damages. If any part of this Limited Warranty is held to be invalid or unenforceable, the remainder of the Limited Warranty shall nonetheless remain in full force and effect.
5) This Limited Warranty is the only express warranty made to you and is provided in lieu of any other express warranties or similar obligations (if any) created by any advertising, documentation, packaging, or other communications.
6) Except for the Limited Warranty and to the maximum extent permitted by applicable law, ROUTE 66 and its suppliers provide the Hardware "AS IS AND WITH ALL FAULTS", and hereby disclaim all other warranties and conditions, whether express, implied or statutory, including, but not limited to, any (if any) implied warranties, duties or conditions of satisfactory quality, of fitness for a particular purpose, of reliability or availability, of accuracy or completeness of responses, of results, of workmanlike effort, of lack of viruses, and of reasonable care and skill, all with regard to the Hardware, and the provision of or failure to provide support or other services, information, software, and related content through the Hardware or otherwise arising out of the use of the Hardware. Also, there is no warranty or condition of quiet enjoyment, quiet possession, or non-infringement with regard to the Hardware. This exclusion does not apply to (i) any implied condition as to title and (ii) any implied warranty as to conformity with description.
7) This Limited Warranty does not affect any legal rights under applicable national legislation governing the sale of consumer goods.
8) This Limited Warranty cannot be transferred to any other person.
LIMITATION OF LIABILITY
9) Neither ROUTE 66 nor its suppliers shall be liable to you or to any third party for any damages either direct, indirect, incidental, consequential or otherwise (including in each case, but not limited to, damages for the inability to use the equipment or access data, loss of data, loss of business, loss of profits, business interruption or the like) arising out of the use of or inability to use the Hardware even if ROUTE 66 has been advised of the possibility of such damages.
10) Notwithstanding any damages that you might incur for any reason whatsoever (including, without limitation, all damages referenced herein and all direct or general damages in contract or anything else), the entire liability of ROUTE 66 and any of its suppliers shall be limited to the amount actually paid by you for the Hardware.
11) ROUTE 66 shall not be liable for (i) any fraud on the part of its employees and/or agents; or (ii) any fraudulent misrepresentation on the part of its employees and/or agents.
12) Notwithstanding the above, neither party's liability for death or personal injury resulting from its own negligence shall be limited.
Disclaimer
- Location measurement with a GPS receiver should not be used for precise location measurement. Therefore you should never rely solely on the location measurement by the GPS receiver.
-
All digital cartography is to a certain degree inaccurate and incomplete. Therefore you should never rely solely on the cartography provided by this product.
-
You agree that the personal data you provide by using this product may be used to provide the services of this product to you and that these personal data may be transferred outside the European Union.
- When you are using hardware and software navigation aids like this product in a vehicle, it is your sole responsibility to place, secure, and use these aids in such a manner that they will not cause accidents, personal injury or property damage, or in any manner obstruct your view. You, the user of this product, are solely responsible for observing safe driving practices at all time. While driving keep your hands on the wheel and your eyes on the road. Do not manipulate this product while driving but park the vehicle first. ROUTE 66 AND ITS SUPPLIERS HEREBY DISCLAIMER ALL LIABILITY FOR ANY USE OF THIS PRODUCT IN A WAY THAT MAY CAUSE ACCIDENTS, DAMAGE OR VIOLATION OF THE LAW.