MP128 - Lecteur audio portable CURTIS - Notice d'utilisation et mode d'emploi gratuit
Retrouvez gratuitement la notice de l'appareil MP128 CURTIS au format PDF.
| Type de produit | Lecteur audio portable MP3/WMA |
| Marque | CURTIS |
| Modèle | MP128 |
| Capacité de stockage intégrée | 128 Mo (estimation) |
| Formats audio pris en charge | MP3, WMA, WAV (enregistrement vocal) |
| Alimentation | 1 pile AAA (incluse) |
| Autonomie estimée | Environ 10 heures (lecture musicale) |
| Écran | Afficheur LCD |
| Connectivité | USB 2.0 (compatible USB 1.1) |
| Fonctions principales | Lecture MP3/WMA, enregistrement vocal, stockage de données |
| Égaliseur | Normal, X-BASS, Rock, Jazz, Classique, Pop |
| Modes de lecture | Normal, répéter une piste, répéter tout, aléatoire, aléatoire répété |
| Enregistrement vocal | Microphone intégré, format WAV, fréquence d'échantillonnage réglable |
| Fonction Hold | Curseur de verrouillage des touches |
| Compatibilité PC | Windows 98/ME/2000/XP et Mac OS X (pilote nécessaire pour Windows 98/98SE) |
| Suppression de fichiers | Menus dédiés pour musique et enregistrements vocaux |
| Dimensions (estimées) | 8,5 x 3,5 x 1,2 cm |
| Poids (estimé) | 30 g (avec pile) |
| Contenu de l'emballage | Lecteur, CD d'installation, pile AAA, écouteurs, guide de démarrage rapide, carte de garantie |
| Entretien | Éviter l'humidité, la poussière, les chocs et l'exposition prolongée au soleil |
FOIRE AUX QUESTIONS - MP128 CURTIS
Questions des utilisateurs sur MP128 CURTIS
0 question sur cet appareil. Repondez a celles que vous connaissez ou posez la votre.
Poser une nouvelle question sur cet appareil
Téléchargez la notice de votre Lecteur audio portable au format PDF gratuitement ! Retrouvez votre notice MP128 - CURTIS et reprennez votre appareil électronique en main. Sur cette page sont publiés tous les documents nécessaires à l'utilisation de votre appareil MP128 de la marque CURTIS.
MODE D'EMPLOI MP128 CURTIS
PORTABLE MP3/WMA PLAYER
For detailed instructions and descriptions please see the User's Manual on the CD.
Quick Start Guide
Welcome to the Portable MP3 player, your complete portable solution for MP3/WMA Playback, Voice Recording and Mass Storage.
2 Installing Software
If you are using Windows ME/XP/2000/Mac OS X, there is no need to install driver. Just connect the player to your PC; the player will be detected and install a general driver. The built-in flash memory of the player will appear in "My Computer" as a Removable Disk. After it is finished, you can upload, download and manage the files in the player.
Note: You still need to install the driver from the bundled CD if you want to upgrade the firmware of the player.
If you are using Windows 98 or 98SE, you need install the driver from bundled CD. Otherwise you will not be able to upload, download or manage the files in the player, because Windows 98 has not integrated general drivers for USB MP3 players.
For Windows
Step 1.
Turn on your computer and insert the installation CD into your CD-ROM drive. The disc supports Windows AutoPlay mode and starts running automatically. If it does not, click Start->Run, In the Open box, Type D:\driver\setup.exe (where D: represents your CD-ROM driver), and then click the OK button.
Step 2. Follow the onscreen instructions to complete the installation.
Step 3. When prompted, restart your system.
Notice: For Windows Me/2000/XP users:
You need to perform the installation only if you want to upgrade the firmware.
Notice: For Windows 2000 users:
Please update to Windows 2000 Service Pack3(SP3) before installing the driver.
5 Downloading Music
The player can be used as a mobile data storage device. It needs no special software to upload, download and manage the music and files. Just use the copy, paste, delete and etc. commands of your Operation System such as Windows or Macintosh OS. It is very fast and easy, with just a click the mouse.
Step 1. Select the music you want to download to the player by clicking on the file icon (If you want to choose more than one music file, press and hold the Ctrl or Shift key when you clicking)
Step 2. Right-click on the file(s); a menu appears. Click Copy
Step 3. Double-click on the Removable Disk to open the drive. The Removable Disk window appears.
Step 4. Right-click on the Removable Disk window and click Paste in the menu.
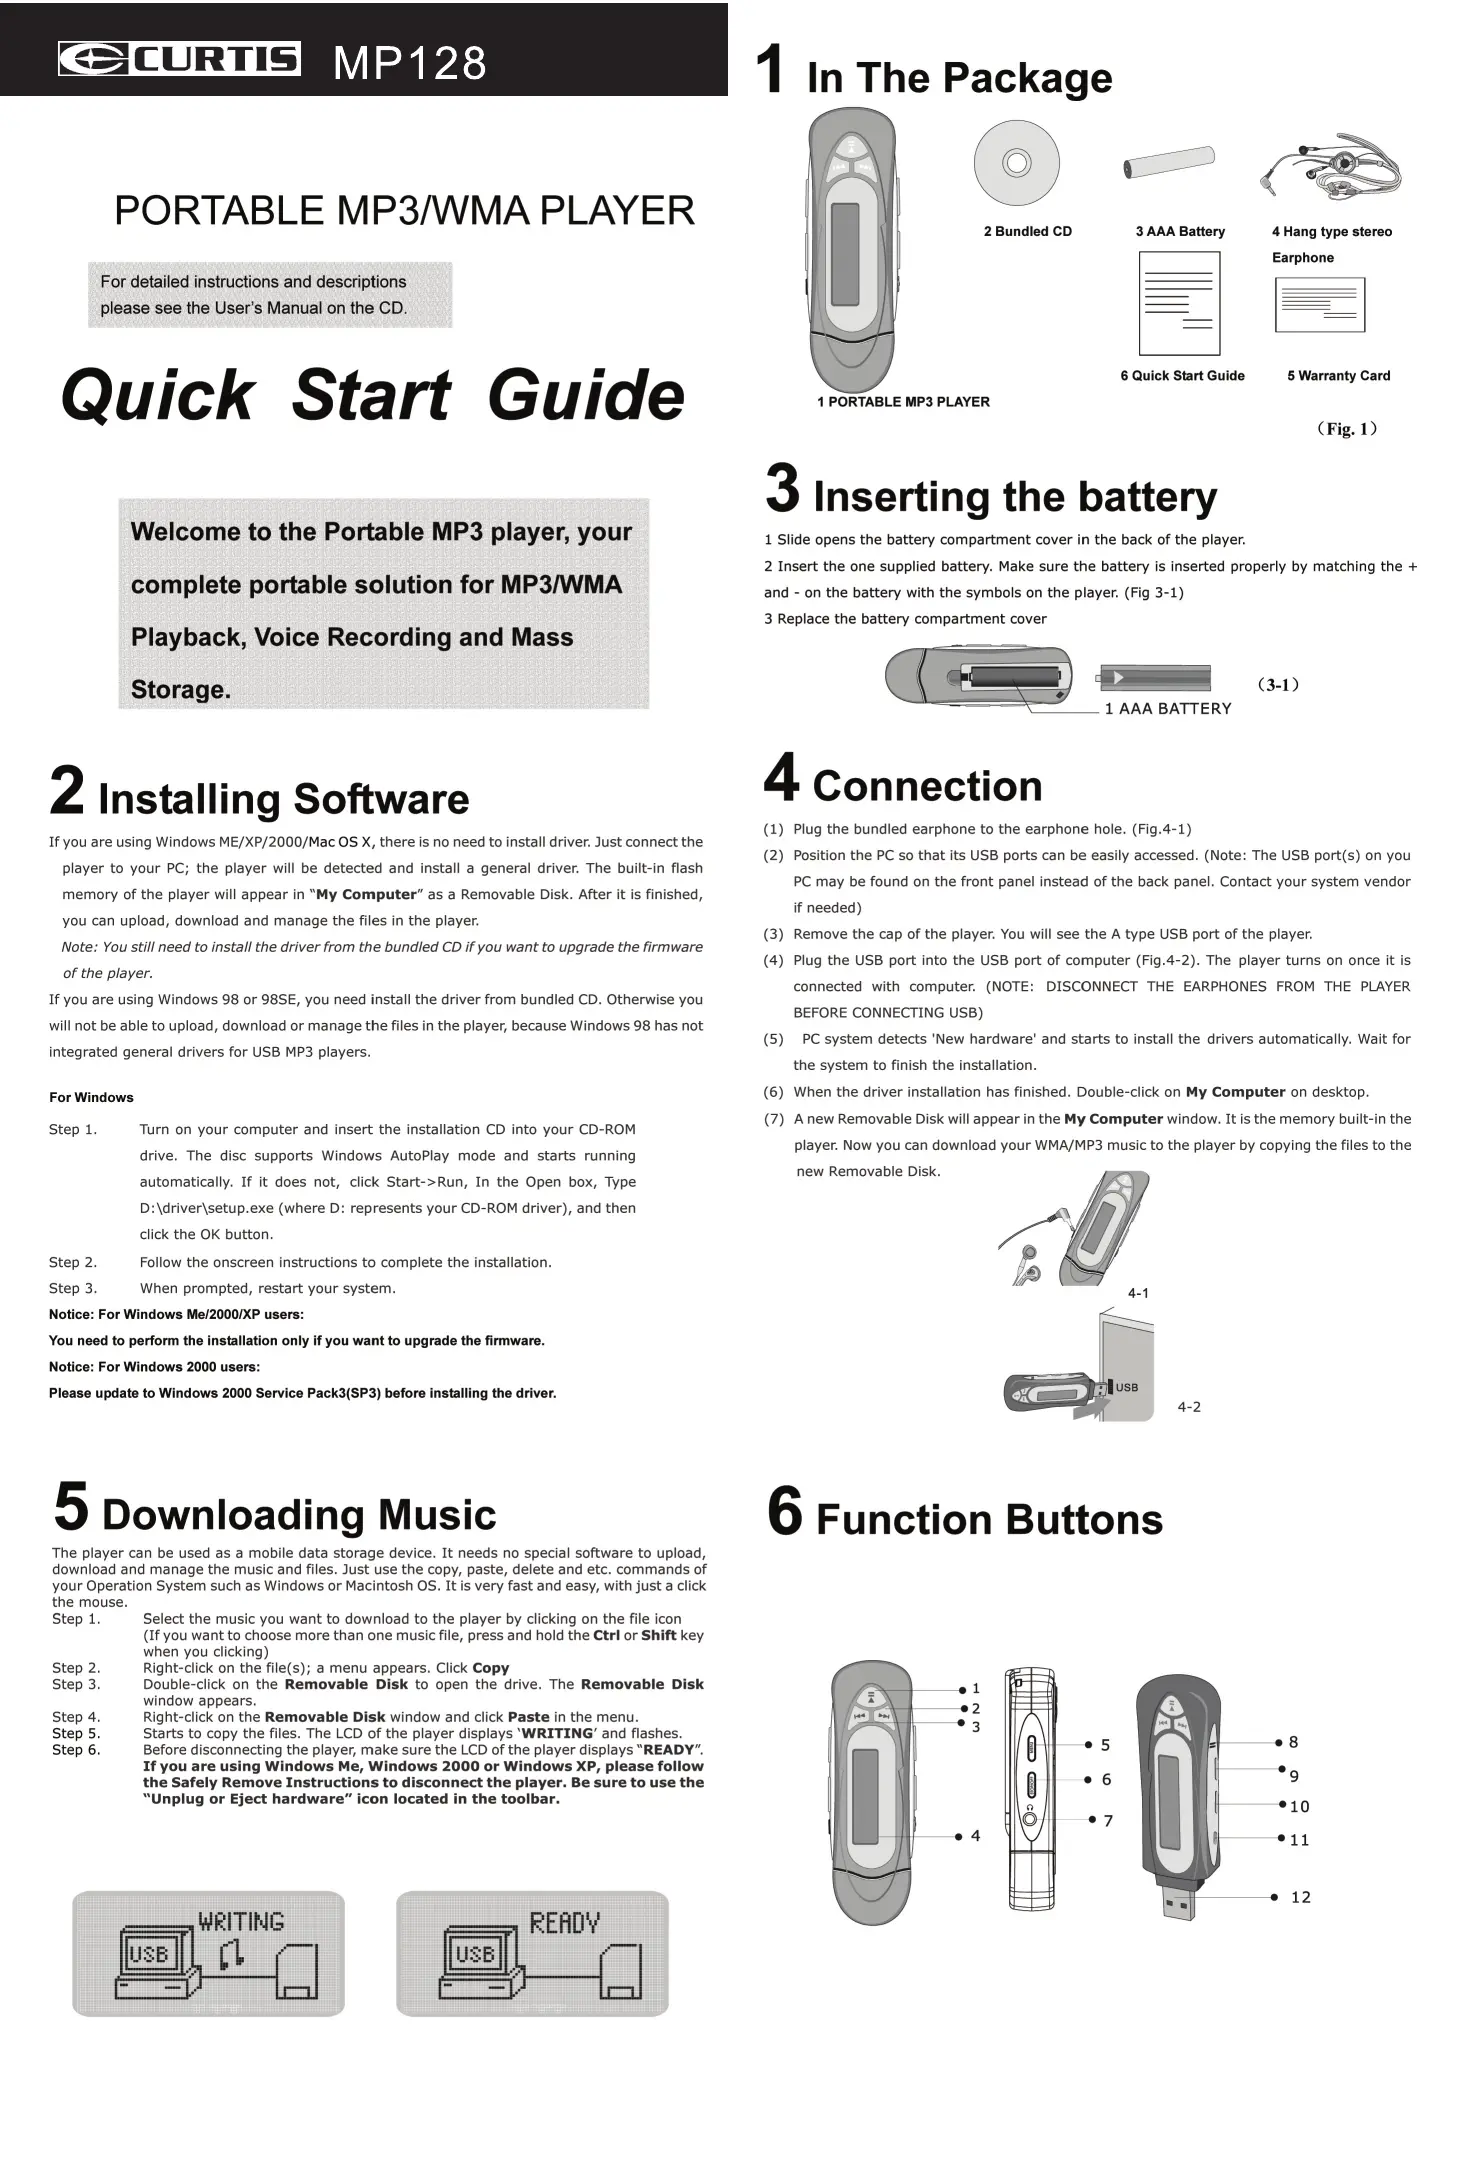
Step 5. Starts to copy the files. The LCD of the player displays 'WRITING' and flashes.
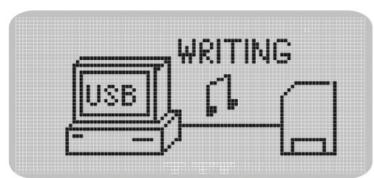
Step 6. Before disconnecting the player, make sure the LCD or the player displays "READY". If you are using Windows Me, Windows 2000 or Windows XP, please follow the Safely Remove Instructions to disconnect the player. Be sure to use the "Unplug or Eject hardware" icon located in the toolbar.
1 In The Package
1 PORTABLE MP3 PLAYER

2 Bundled CD


3 AAA Battery
6 Quick Start Guide
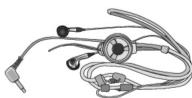
4 Hang type stereo
Earphone
5 Warranty Card
(Fig. 1)
3 Inserting the battery
1 Slide opens the battery compartment cover in the back of the player.
2 Insert the one supplied battery. Make sure the battery is inserted properly by matching the + and - on the battery with the symbols on the player. (Fig 3-1)
3 Replace the battery compartment cover

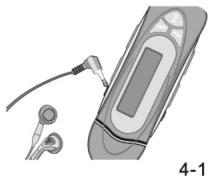
4 Connection
(1) Plug the bundled earphone to the earphone hole. (Fig.4-1)
(2) Position the PC so that its USB ports can be easily accessed. (Note: The USB port(s) on your PC may be found on the front panel instead of the back panel. Contact your system vendor if needed)
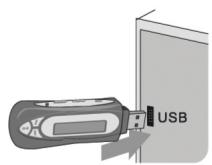
(3) Remove the cap of the player. You will see the A type USB port of the player.
(4) Plug the USB port into the USB port of computer (Fig.4-2). The player turns on once it is connected with computer. (NOTE: DISCONNECT THE EARPHONES FROM THE PLAYER BEFORE CONNECTING USB)
(5) PC system detects 'New hardware' and starts to install the drivers automatically. Wait for the system to finish the installation.
(6) When the driver installation has finished. Double-click on My Computer on desktop.
(7) A new Removable Disk will appear in the My Computer window. It is the memory built-in the player. Now you can download your WMA/MP3 music to the player by copying the files to the new Removable Disk.
4-2
6 Function Buttons
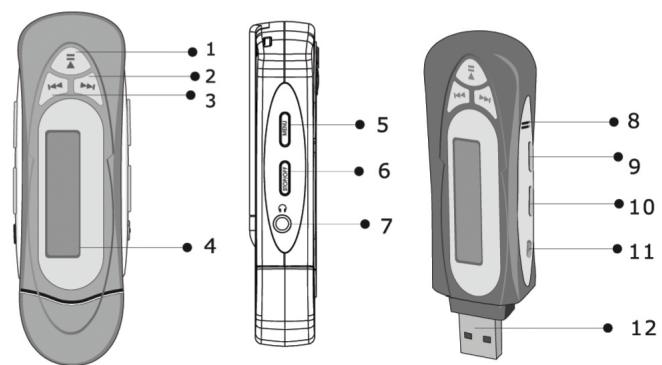
Disconnect the player from PC.
| Button / Switch | Function | Function In Menu |
| Power On/Play/Pause | Press to Turn On the Player; Press to Play one song; Press to Pause the playback | |
| Power Off/Stop | Press to Stop the playback; Press and hold until the shut down bar has finished to turn off the player | |
| Menu button | Press to enter Menu. Press to stop voice record. | Press to confirm your selection or enter current menu. Press and hold to exit the Menu. Press to select record rate in record setting submenu |
| Skip Next Skip Previous | Press to skip the next track Press to skip the previous track | Select one setting or to select menu in the list |
| Volume + / - | Press to Increase/Decrease the earphone volume level | |
| Hold Switch | Slide the Hold switch to Hold position: Hold all buttons Slide the Hold switch back: Cancel the Hold | |
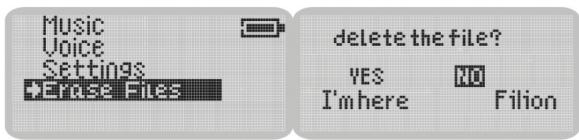
10 Erasing Files
Warning: Files cannot be recovered once erased!
Step 1. Stop the playback or recording when you begin to erase files.
Step 2. Press the Menu button to enter menu. Select Erase Files and enter (Fig.10-1). There are two options to select in Erase Files screen.
Step 3. To erase music files, select Music and enter. To erase voice memos, select Voice and enter.
Step 4. You will be prompted if you are sure you want to erase the listed file or voice memo. (Fig.10-2) The file name will appear on the display to help you decide. The selected answer is No by default. If you do not want to erase the specified file, press the Menu button. Another file will appear and you will be asked again if this is the file you want to erase.
Step 5. If you are sure you want to erase the specified file, press Next button to select Yes. Then press the Menu button to confirm.
Step 6. The file is erased. Another file will appear on the display and you will be asked again if this is the file you want to erase.
Step 7. When you have finished erasing the file(s), the player automatically exits to Erase Files screen.
Step 8. Select Exit and enter to exit to menu list.
10-1
10-2
11 Menu Settings
For details please refer to the User's Manual on the bundled CD.
Menu Structure
| Music | Enter Music Playback mode | Setting Options | Equalizer | Normal /X-BASS/ Rock / Jazz / Classical / Pop |
| Voice | Enter Voice MemoPlayback mode | Play mode | Normal / Repeat track / Repeat All / Shuffle / Shuffle Repeat | |
| Settings | Configure the player settings. | Contrast | Adjust LCD contrast value | |
| Power Savings | Set the auto-off time after the player is idle. | |||
| About | Display the basic information | Power Saving | Set the auto-off time after the player is idle. | |
| Record | Enter to Voice Recording mode | Record Settings | Select different recording sampling frequency | |
| Erase Files | Erase Music files or Voice Memos | Erase Files | Music | Erase Music Files |
| Voice | Erase Recorded Voice Memos |
Customer Care
Unit
No altering or remodeling.
This can cause malfunctioning.
No dropping or strong impacts
This may damage the unit.
Locations to be avoided
Avoid using or storing the unit in following
locations since they can cause malfunctioning.
Bathrooms and other moisture-prone places
Warehouses and other dusty place.
Very hot places near heating appliances, etc.
Avoid keeping the unit in places with high
humidity, strong magnetic field, or near
high heat source(s).
Do not leave the unit exposed to direct sunlight
for long periods of time
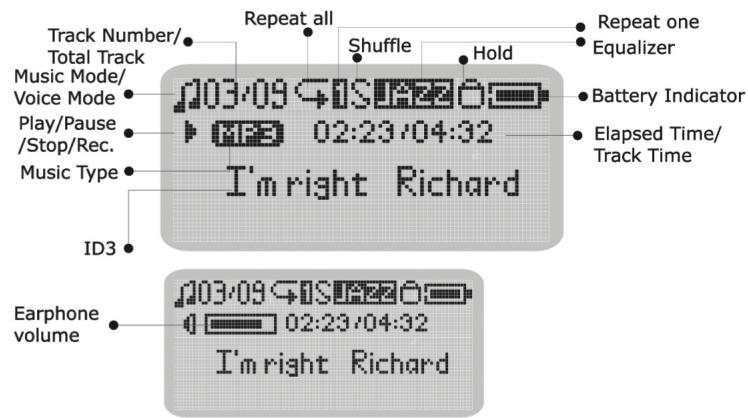
8 LCD Display
9 Voice Recording
You can record voice memos via the built-in microphone.
1 Start Recording
In menu list, select Record and enter. (Fig.9-1) Voice Record starts.

2 Stop Recording
Press Menu button to stop the record. The voice memo has been saved as a file named VXXX.WAV in Voice folder. (Fig.9-2) You can press Play button to play this voice record at this time.
3Playback Voice Memos
The operation is almost the same as music playback. Select Voice in the menu and enter voice mode. You can select a memo to listen to by pressing the Next button. Press Play button to playback the next voice memo. (Fig.9-3)
Formatting Your Player
You can format your player (such as Format the Removable disk) using the Windows Format tool.
Upgrading the Firmware
To update the firmware in the player, the player Update must be installed from the Internet. (see section "Install Software"). Download one driver with new firmware for the player.
Uninstall the existing driver.
Install the new driver.
Connect the player to your computer.
Click [Start] -> [Program] -> [Sigma Tel MSCN Audio Player] -> [Sigma Tel MSCN Firmware Download]
Player Update window pops up. Click on Start to start upgrade. The new firmware is being downloaded to the player.
Please wait for Update complete.
Click Close to exit.
If the player does not work…
If the player cannot work by accident, take out the battery and reinsert it 3 seconds later, or change a new battery.
Sometimes the player will not work because the firmware of the player has been accidentally corrupted. Refresh the firmware to fix this problem.
Press and hold the Play/Pause button of the player.
Continue to hold the Play/Pause button and connect the player to your computer. Release the Play/Pause button after 5 seconds.
The PC will find a Player Recovery Device and install the driver. When it has finished, "Player Recovery Device" will appear in [System Properties] -> [Device Manager] as shown in the picture below. If this does not happen redo step 1 and step 2.
Click [Start] -> [Program] -> [Sigma Tel MSCN Audio Player] -> [Sigma Tel MSCN Firmware Download]
Player Update window will pops up. Click on Quick Download to disable quick download option.
Then click on Start. The firmware will download to Pocket Jam 3.
After downloading is completed, click on Close to exit.