CR1345 - Radio numérique CURTIS - Notice d'utilisation et mode d'emploi gratuit
Retrouvez gratuitement la notice de l'appareil CR1345 CURTIS au format PDF.

| Type de produit | Radio numérique AM/FM avec projection LED de l'heure |
| Marque | CURTIS |
| Modèle | CR1345 |
| Couleur | Noir (estimation) |
| Dimensions (approx.) | 200 x 100 x 150 mm |
| Poids (approx.) | 0,5 kg |
| Alimentation principale | CA 120 V, 60 Hz |
| Alimentation de secours | Pile 9 V (non incluse) |
| Bandes radio | AM et FM |
| Affichage | LED numérique avec projection |
| Fonction réveil | Radio ou buzzer, avec snooze (5-10 min) |
| Minuterie sommeil | Jusqu'à 1 h 59 min |
| Projection de l'heure | Oui, avec réglage de mise au point |
| Affichage de la date | Oui (mois/jour) |
| Affichage des secondes | Oui |
| Réglage de l'heure | Touches HOUR et MIN |
| Réglage de l'alarme | Touches ALARM, HOUR, MIN |
| Sécurité | Fiche polarisée ; ne pas exposer à l'eau ; ne pas ouvrir |
| Entretien | Chiffon doux et sec ; débrancher avant nettoyage |
| Accessoires inclus | Notice d'utilisation |
FOIRE AUX QUESTIONS - CR1345 CURTIS
Questions des utilisateurs sur CR1345 CURTIS
0 question sur cet appareil. Repondez a celles que vous connaissez ou posez la votre.
Poser une nouvelle question sur cet appareil
Téléchargez la notice de votre Radio numérique au format PDF gratuitement ! Retrouvez votre notice CR1345 - CURTIS et reprennez votre appareil électronique en main. Sur cette page sont publiés tous les documents nécessaires à l'utilisation de votre appareil CR1345 de la marque CURTIS.
MODE D'EMPLOI CR1345 CURTIS

The lighting flash with arrowhead symbol, with an equilateral triangle is intended to alert the user of the presence of uninsulated dangerous voltage within the product's enclosure that may be of sufficient magnitude to constitute a risk of electric shock to persons.
CAUTION
RISK OF ELECTRIC SHOCK DO NOT OPEN

CAUTION: TO REDUCE THE RISK OF ELECTRIC SHOCK,DO NOT REMOVE COVER (OR BACK).NO USER SERVICEABLE PARTS INSIDE.REFER SERVICING TO QUALIFIED SERVICE PERSONNEL.
The exclamation point within an equilateral triangle is intended to alert the user of presence of important operating and maintenance (servicing) instructions in the literature accompanying the appliance.
CAUTION: TO PREVENT ELECTRIC SHOCK, MATCH WIDE BLADE OF PLUG TO WIDE SLOT, FULLY INSERT.
WARNING: TO REDUCE THE RISK OF FIRE OR ELECTRIC SHOCK, DO NOT EXPOSE THE APPLIANCE TO RAIN OR MOISTURE.
SAFETY INSTRUCTIONS
THESE IMPORTANT SAFETY INSTRUCTIONS ARE INCLUDED, AS APPLICABLE TO THE APPLIANCE, CONVEYING TO THE USER THE INFORMATION ITEMIZED BELOW
- Read instructions-All the safety and operating instructions should be read before the appliance is operated.
- Retain instructions-The safety and operating instructions should be retained for future reference.
- HeedWarnings-All warnings and cautions on the appliance and in the operating instructions should be adhered to.
- Follow instructions-All operating and use instructions should be followed.
- Water and Moisture-The appliance should not be used near water, (e.g. a bathtub, washbowl, kitchen sink, laundry tub, wet basement, a swimming pool or lake.)
- Wall or Ceiling Mounting-The appliance should not be mounted on a wall or ceiling.
- Ventilation-The appliance should be situated so that its location or position does not interfere with its proper ventilation. For example, the appliance should not be situated on a bed, sofa, rug or similar surface that may block the ventilation openings, or placed in a built-in installation, such as a bookcase or cabinet, that may impede the flow of air through the ventilation openings.
- Heat-The appliance should be situated away from heat sources such as radiators, heat registers, stoves, and other appliances (including amplifiers) that produce heat.
-
Power Sources-The product should be operated only with the type of power supply indicated on the marking label. If you are not sure of the type of power supply to your home, consult the product dealer or local power company. For products intended to operate from battery power, or other sources, refer to the operating instructions.
-
Grounding Polarization-This product may be equipped with a polarized alternating current line plug ( a plug having one blade wider than the other ). This plug will fit into the power outlet only one way period. This is a safety feature. If you are unable to insert the plug fully into the outlet, try reversing the plug. If the plug should still fail to fit, contact an electrician to replace the outlet. Do not defeat the safety purpose of the polarized plug.
-
Power-Cord Protection-Power supply cords should be routed so that they are not likely to be walked on or pinched by items placed upon or against them, paying particular attention to cords at plugs, convenience receptacles, and the point where they exit from the appliance.
-
Cleaning - The appliance should be cleaned with a soft, dry cloth.
-
Non-use periods-The power cord of the appliance should be unplugged from the outlet when left unused for a long period of time.
-
Object and Liquid Entry-Care should be taken so that objects do not fall, and liquids are not spilled, into the product case through product openings.
-
Damage Requiring Service-Unplug this product from the wall outlet and take it to qualified service personnel under the following conditions.
a) When the power-supply cord or plug is damaged.
b) If liquid has been spilled into, or objects have fallen into, the product.
c) If the product has been exposed to rain or water.
d) If the product does not operate when used according to the operating instructions.
Adjust only those controls that are covered by the operating instructions because improper adjustment of other controls may interfere with the product's normal operation.
e) If the product has been dropped or damaged in any way.
f) When the product exhibits a distinct change in performance, this indicates a need for service.
-
Servicing - The user should not attempt to service the product beyond that described in the operating instructions. All servicing should be referred to qualified service personnel.
-
Power Lines—An outside antenna system should not be located in the vicinity of overhead power lines, or other electric light or power circuits, or where it can fall into such power lines or circuits. When installing an outside antenna system, extreme care should be taken to keep from touching power lines or circuits as contract with them might be fatal.
- Outer Antenna Grounding-If an outside antenna is connected to the receiver, be sure the antenna system is grounded so as to provide some protection against voltage surges and built up static. Section 810 of the National Electrical Code ANSI/NEPA 70 provides information with respect to proper to grounding of the mast and supporting structure, grounding conducters, location of antenna-discharge unit, size of grounding electrodes, and requirements for the grounding electrode ( see figure ).
- CLEANING - Unplug this product from the wall outlet before cleaning. Do not use liquid cleaners or aerosol cleaners. Use a damp cloth for cleaning.
- LIGHTNING - For added protection for this product during a lightning storm, or when it is left unattended and unused for long periods of time, unplug it from the wall outlet and disconnect the antenna or cable system. This will prevent damage to the product due to lightning and power-line surges.
- SAFETY CHECK- Upon completion of any service or repairs to this product, ask the service technician to perform safety checks to determine that the product is in proper operating condition.
- OVERLOADING- Do not overload wall outlets, extension cords or integral convenience receptacles as this can result in a risk of fire or electric shock.
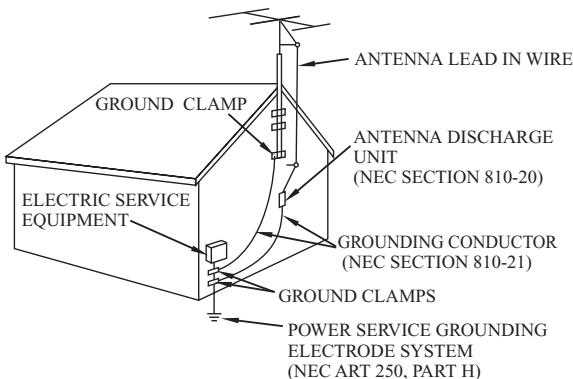
EXAMPLE OF ANTENNA GROUNDING AS PER NATIONAL ELECTRICAL CODE
CURTIS
CR1345
AM/FM DIGITAL LED CLOCK RADIO WITH TIME PROJECTION
OPERATING INSTRUCTIONS
POWER SOURCE:
Plug the AC line cord into AC 120V 60HZ power outlet. The unit in now working and the display figures will blink to show you it is not set correctly
OPERATING INSTRUCTIONS
- ON/OFF/AUTO/BUZZ switch .........Slide the switch to turn radio "ON", "OFF", or to "AUTO" position. BUZZ position is used for alarm.
- TIME BUTTON Press the button simultaneously with the HOUR or MIN button to set the desired time.
- ALARM BUTTON Press the button simultaneously with the HOUR or MIN button to set the desired wakeup time.
- SLEEP BUTTON-----Press this button to display the number of minutes (59 or less) which the radio will sound for 59 minutes and will automatically turn off after then.
- HOUR and MIN buttons-----Use these buttons to set the time while pressing
- VOLUME KNOB -To regulate the loudness of the radio, rotate the KNOB to desired position.
- TUNING KNOB -Turn this knob to the desired radio station
- SNOOZE button-When you are awakened by radio or buzzer, if you wish to sleep a few minutes more, simply to touch the "snooze" button and it will shut off the radio or buzzer for approximately 5 to 10 minutes before the radio or buzzer sounds again This can be repeated several times.
TO SET THE TIME
Step 1: Press the HOUR or MIN button to set the correct time. Note: Repeat the above steps if you run past the correct time. A glowing dot appears in the upper left hand corner of the display, indicating that the time shown is PM time.
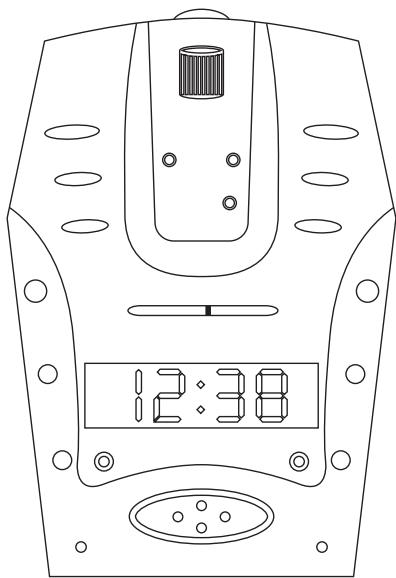
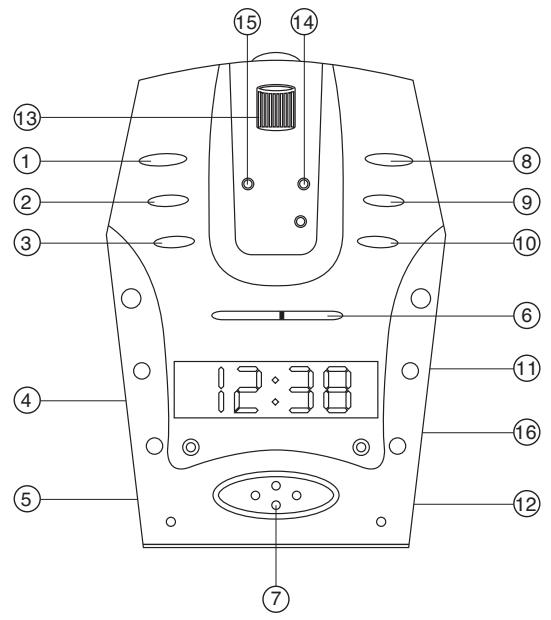
LOCATION:
- AL.OFF BUTTON
2.SLEEP BUTTON - ALARM BUTTON
4.PROJECTION ON/OFF SWITCH - ON/OFF/AUTO/BUZZ SWITCH
- TUNING FREQUENCY SCALE
- SNOOZE BUTTON
- TIME BUTTON
9.HOUR BUTTON - MIN BUTTON
- TUNING KNOB
- VOLUME KNOB
- FOCUS KNOB
- MODE BUTTON
- SET BUTTON
- BAND SWITCH
TO PLAY THE RADIO
Step 1: Slide the ON/OFF/AUTO/BUZZ switch to "ON" position.
Step 2: Slide the Band Switch to the desired position (AM or FM)
Step 3: Select the desired radio station by tuning the Tuning knob.
Step 4: Adjust the volume to the desired listening level.
TO WAKE TO RADIO
Step 1: Set the alarm as previously instructed.
Step 2: Turn the radio on select the desired radio station and volume setting as previously instructed.
Step 3: Slide the ON/OFF/AUTO/BUZZ switch to "AUTO" position. Your unit is now set to turn on automatically at the pre-selected alarm time.
TO WAKE TO BUZZER
Step 1: Set the alarm as previously instructed.
Step 2: Slide the ON/OFF/AUTO/BUZZ switch to "BUZZ" position. You will awaken at the pre-selected alarm time by the buzzer tone. To turn the Buzzer off, slide the ON/OFF/AUTO/BUZZ switch to the "OFF" position or press the AL.OFF button.
ALARM OFF
Slide the ON/OFF/AUTO/BUZZ switch to "OFF" position if you wish to turn off the radio or buzzer after the radio or buzzer has sounded in the wake to radio or wake to buzzer operation. The alarm will not sound again until the next day unless you switch back to auto (or buzz) position or use alarm button to shut off alarm. Then the radio or buzzer will automatically sound again in 24 hours at the same alarm setting.
SLEEP CONTROL
Step 1: Turn the ON/OFF/AUTO/BUZZ switch to the "AUTO", "OFF" or "BUZZ" position.
Step 2: Press the Sleep set button to display the sleep time. The display will indicate 59 minutes. If you wish the radio to play for a shorter period simply press the Sleep button together with the MIN button to set the desired time period. Or if you wish to play longer, Press sleep button along with HOUR button play for 1HR. 59 minutes. (MAX)
Step 3: Press the sleep button. The radio will turn on automatically and will turn itself off when the present time has passed.
Note: The maximum sleep time is 1HR. 59 minutes. The radio will switch off automatically when the sleep time expires. To turn the radio off before expiration of sleeping time, simply press the "SNOOZE" button.
HOW TO USE TIME PROJECTION FUNCTION
Step 1: Slide the ON/OFF (PROJECTION) switch to "ON" position.
Step 2: Rotate the projection part to proper angle position and adjust the focus knob to make sure that the time image is so clear. (You can project the time image onto the screen such as white wall or other surfaces to obtain the best effect)
Step 3: Use MODE and SET button to set the correct time and date.
- To display Month/Date, press "MODE", 1 time.
- To display the Second, press "MODE" 2 times. After display second, press "MODE" to return to normal time
- To set Month, Press "SET" 2 times, push the "MODE" to sequence numbers.
- To set Date, Press "SET" 3 times, push the "MODE" to sequence numbers.
- To set Hour, Press "SET" 4 times, push the "MODE" to sequence numbers.
- To set Minute, Press "SET" 5 times, push the "MODE" to sequence numbers.
Note: To select the hour/minute or Month/Date by pressing the SET button. Then press the Mode button to adjust the current value of the time or date.
BATTERY BACK-UP
Your clock has a battery back up feature in case of power failure. A 9 Volt battery (not included) is required. You must put in a battery to ensure the battery back up feature is ready in case of power failure. If power fails, the back up battery will automatically continue operation of the clock and maintain actual time. However, the display will not be lighted. When electrical power is restored, the display will light up again. The battery will maintain time keeping for approximately 8 hours during power failure or interruption.
Note: Remove the battery of the clock is to be unplugged for a long time to avoid unnecessary battery drain.