
REMOTE 815 - Télécommande universelle GENIUS - Notice d'utilisation et mode d'emploi gratuit
Retrouvez gratuitement la notice de l'appareil REMOTE 815 GENIUS au format PDF.


| Type de produit | Télécommande universelle programmable |
| Marque | Genius |
| Modèle | REMOTE 815 |
| Dimensions (L x l x H) | 220 x 64 x 23 mm |
| Poids (sans piles) | 240 g |
| Alimentation | 4 piles AAA 1,5 V (alcalines recommandées) |
| Affichage | Écran LCD tactile 40 x 104 mm |
| Nombre d’appareils contrôlables | Jusqu’à 8 appareils audio/vidéo |
| Touches par appareil | 59 touches réparties sur 2 pages |
| Méthodes de programmation | Code préprogrammé (bibliothèque) ou apprentissage (learning) |
| Fréquence d’apprentissage | 20 kHz – 455 kHz |
| Distance d’apprentissage | 5 à 10 cm |
| Portée infrarouge | 8 à 10 mètres |
| Mémoire | 512 Ko Flash (données conservées sans piles) |
| Rétroéclairage | 7 couleurs (rouge, vert, bleu, vert clair, bleu ciel, violet, blanc) |
| Fonction Macro | Macro normale (jusqu’à 60 commandes) et Macro intelligente (jusqu’à 16 commandes par apprentissage) |
| Économie d’énergie | Extinction automatique après 90 secondes d’inactivité ; détecteur de mouvement |
| Indicateur de piles faibles | Icône affiché à l’écran |
| Entretien et nettoyage | Nettoyer l’écran avec un chiffon doux et humide ; ne pas utiliser de détergent corrosif |
| Sécurité | Ne pas exposer à la chaleur, ne pas immerger dans un liquide, ne pas utiliser d’objets pointus sur l’écran |
| Accessoires en option | Câble USB SLC-2080 pour duplication et mise à jour |
FOIRE AUX QUESTIONS - REMOTE 815 GENIUS
Questions des utilisateurs sur REMOTE 815 GENIUS
0 question sur cet appareil. Repondez a celles que vous connaissez ou posez la votre.
Poser une nouvelle question sur cet appareil
Téléchargez la notice de votre Télécommande universelle au format PDF gratuitement ! Retrouvez votre notice REMOTE 815 - GENIUS et reprennez votre appareil électronique en main. Sur cette page sont publiés tous les documents nécessaires à l'utilisation de votre appareil REMOTE 815 de la marque GENIUS.
MODE D'EMPLOI REMOTE 815 GENIUS
Table of Contents
About Your REMOTE 815 1
Introduction 1
Battery 3
Touch Screen 3
Description of Keys 4
Setting Up Your REMOTE 815 6
Main Setup Page 7
Operating Each Function 7
- Code 7
1.1 Auto Search 8
1.2 Input Code 9
- Learning 11
3.Macro 13
3.1 Normal Macro 14
3.2 Smart Macro 17
- Delete a Key Code 20
- Delete a Whole Device Codes 20
6.Modifying Key Layout. 21
7. Transmission 23
8. Function Lock 24
9. Reset 24
10.Key Buzzer 25
11.Backlight 26
Appendix A 27
Features 27
Specifications 28
Appendix B 29
Optional Accessory 29
Appendix C 30
Troubleshooting 30
About Your REMOTE 815
Introduction
Unpack your REMOTE 815 Smart Remote Control, and check for the following items:
■ REMOTE 815 Smart Remote Control
User's Guide
Pre-programmed Code List
Contact our distributor immediately, if any of the above items are missing or damaged. Keep the original package, in case you need it for shipping your REMOTE 815.
For optional accessories, contact your distributor directly.
Your Best Assistant
The REMOTE 815 Smart Touch Screen Remote Control is the best choice for integrating your audio/video devices at home, and your REMOTE 815 is a powerful integrated remote control including a smart learning guide, a multiple backlight display and a user-friendly interface touch screen, and allowing you to control all of your infrared home devices easily. Your REMOTE 815 has gone through a series of strict factory inspections, and its dazzling silver metal casing in conjunction with the colorful backlight assure its superior quality. You can start operating your REMOTE 815 after installing the battery. In addition to basic functions, the REMOTE 815 also comes with additional functions for you to set a backlight color, and key volume according to personal preference.
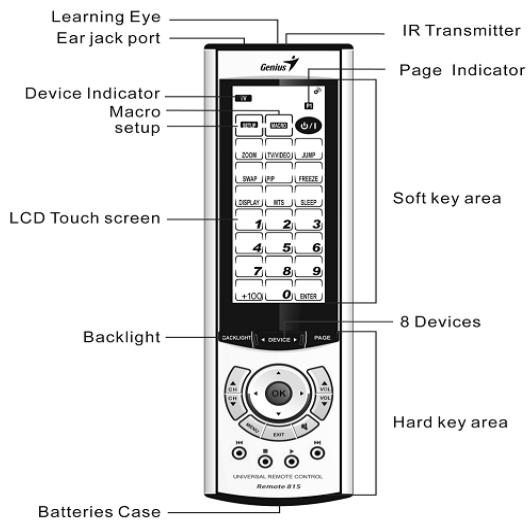
Controlling Eight Audio/Video Devices
Your REMOTE 815 can simultaneously control up to 8 sets of devices, each having at most 59 keys including TV, Satellite, Video Recorder/Player, DVD/VCD, Amplifier/Receiver, CD/MD, Radio/Tape Recorder, or any other device with a frequency from 20KHz to 445KHz. You no longer need a pile of remote controls.
Smart Learning Feature
You can set the REMOTE 815 through the Smart Learning function. You simply follow a guide given on screen and press the keys accordingly to set your devices at home or in the office. At present, the REMOTE 815 is compatible to more than 95% of all brands in global market.
Smart Macro Feature
The Smart Macro function enables you to start or continue executing 16 commands by pressing a key. A general Macro only can set the keys with stored codes already, but your REMOTE 815 comes with a unique design, so that you can set the Macro by the Learning function.
Reconfiguring Key Layout
Your REMOTE 815 allows you to selectively change the name of a press key. Except for default keys, each key press has two or more names for your choice, and you can set the content for all key presses according to your using habits.
Battery
Installing the Battery
Press the button at the back of the REMOTE 815 remote control, and the battery compartment will pop out automatically. Install four AAA batteries into the battery compartment correctly. Then put the battery compartment back.
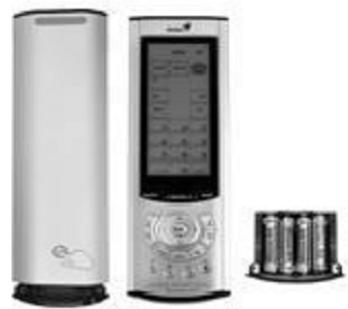
Cautions:
- Make sure the (+) and (-) of the battery match the polarity indicated in the battery compartment.
- DO NOT mix different types of batteries or old and new batteries. Always use fresh batteries. Alkaline batteries are recommended.
- DO NOT expose the remote control in a very hot environment or in a flame.
- Keep the batteries out of reach of children.
- To reduce danger of leakage and damage, remove batteries that have been used for more than two years.
Touch Screen
How to Protect Touch Screen
- DO NOT press the LCD screen forcefully. Gently touch the screen to operate the remote control.
- DO NOT use a pen or any sharp object to press the screen.
- DO NOT submerge the REMOTE 815 in any liquid since it does not come with a waterproof function. Immediately wipe off any liquid spilled on the REMOTE 815 and keep the REMOTE 815 dry all the time.
- DO NOT put the REMOTE 815 in a hot environment, and keep it away from heat sources.
DO NOT drop the REMOTE 815.
DO NOT place any object on the screen. - DO NOT clean the screen with a corrosive detergent. Clean the screen by soft moist cloth.
Key Layout
Two default pages of each device will appear on the screen if you press "PAGE". You can modify the name of a key or an icon in any page. Refer to "Modifying Key Layout" on P. 18 for more information.
Description of Keys
The Function of Each Key
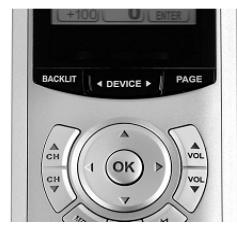
The REMOTE 815 divides its keys into two sections: a touch panel key section (or soft key section) and a mechanical key section (or hard key section). The default function of each key is described below:
DEVICE: Lets you select a device
BACKLIGHT: Turns on the backlight
PAGE: Switch between two pages of the screen
VOL: Control the volume of sound.
CH: Select a channel
OK: Confirm a selection. (Up, Down, Left and Right keys are used for the selection)
EXIT: To exit or quit an operating function
MUTE: Mute a device (except the keys)
Red, Green, Yellow and Blue keys: These are specific function keys
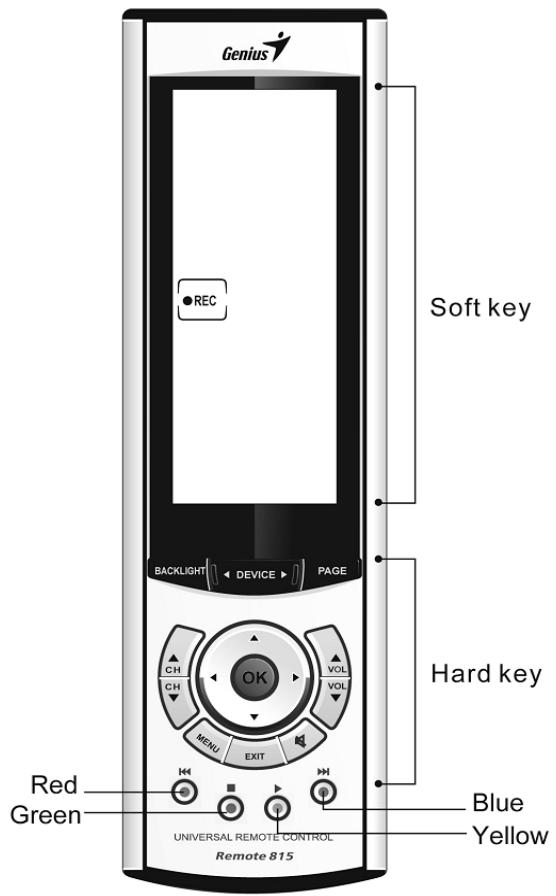
"REC" Key Protect
To avoid starting the recording function or pressing the record key by mistake, you need to press the REC key for more than 2 seconds in the general operating mode before the recording function takes place.
Soft/Hard Key Protect
If a soft key or a hard key is pressed for more than 30 seconds under a general operating mode, the remote control will complete its transmission and end its operation, and then will enter a power-saving mode after 90 seconds.
Setting Up Your REMOTE 815
The REMOTE 815 is simple and easy to setup, so that you can set up your REMOTE 815 as a smart control center for the home devices by following the instructions given below:
Before operation, please note that
- A low battery power will reduce the effective transmitting range of the remote control.
- If your battery is exhausted, a low battery power icon as shown below will appear at the upper right corner of the screen.
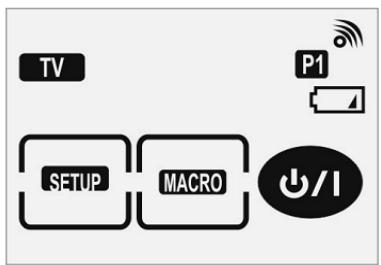
(Low Battery Power Icon)
Warning:
When the low-battery warning icon appears, you cannot enter the Setup Page. Change the battery first before continuing your setup.
- The REMOTE 815 will not lose programmed data when batteries are replaced.
Main Setup Page
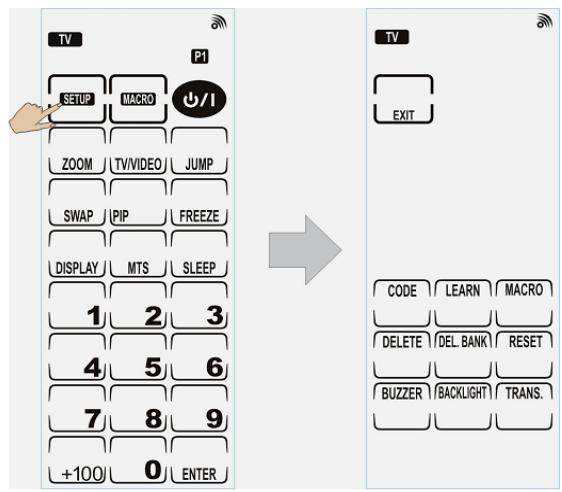
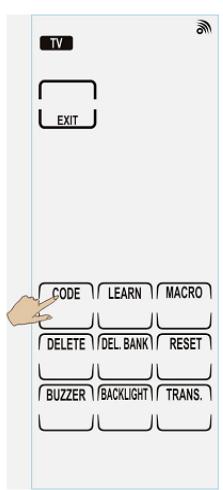
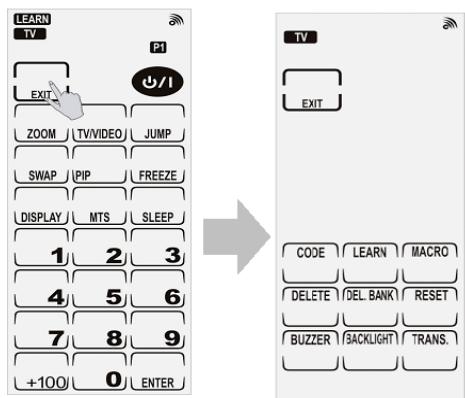
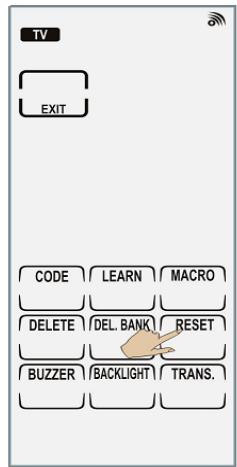
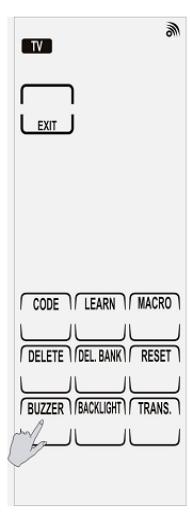
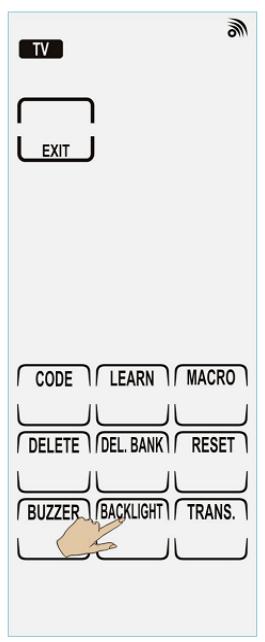
Press "SETUP" at the top of the screen for 2 seconds to enter the setup mode. You will see related setup functions: CODE, LEARN, MACRO, DELETE, DEL. BANK, RESET, BUZZER, BACKLIGHT and TRANS.
CODE Set the pre-programmed code
LEARN Learn IR codes
MACRO Set normal macro or smart macro
DELETE Delete a single key code
DEL.BANK Delete all code data of a device
RESET Return to the factory default
BUZZER Set a buzzer
BLACKLIGHT Set a backlight
TRANS Duplicate all data to another REMOTE 815
EXIT Exit the setup mode
Operating Each Function
1. Code
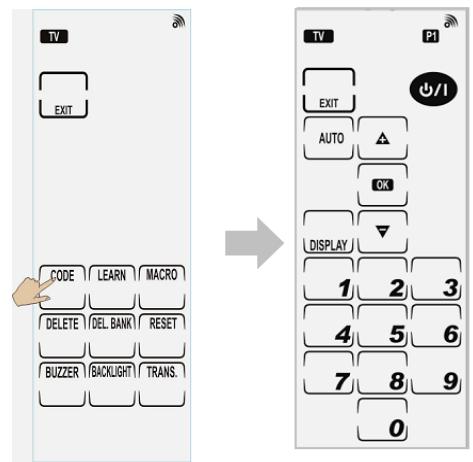
The REMOTE 815 provides two ways of setting the pre-programmed code of your device. You can either search the code by REMOTE 815 automatically, or check the brand of your device from the code list and then enter the required code member into REMOTE 815 manually. Take out the code list from the box if you need to check the brand of your device. Now, enter the setup mode and press "CODE" in order to set the pre-programmed code for your device.
1.1 Auto Search
Before using this function, please turn on your device first, and then aim the REMOTE 815 at the signal receiver of your device. If the device shuts down suddenly, it means you might have found the remote code of the device.
(1) Press "AUTO" after you enter the setup page, and the REMOTE 815 will start outputting the codes stored in the database one by one. Press any key to stop the output operation of the REMOTE 815 when the device is turned off.
EX. Set up TV
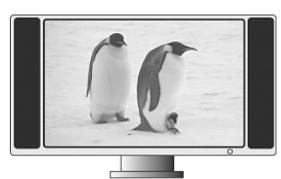
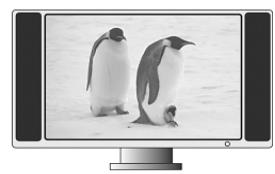
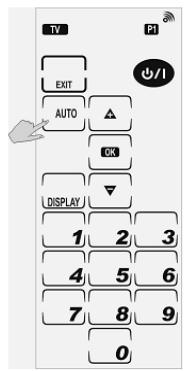
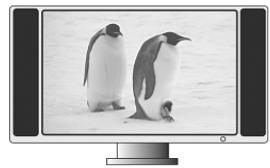
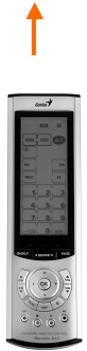
Turn on the TV
Aim the REMOTE 815 at the TV
Press "AUTO" to stat auto searching
The pre-programmed codes will start outputting. When the TV is turned off, press any key to stop the action
(2) Press the /1 key, and test whether the device can be turned on or not. If the code is correct, jump to Step (4) to save data and exit, or go on to the next step.
(3) Press the key one by one to take the previous code and repeat step (2) process until you find the correct one that can turn the TV on.
(4) Make sure you press "OK" to save the setup, and go back to the operation page.
1.2 Input Code
(1) Open the code list and look for the brand of your home device. In general, a brand may have several sets of codes, and you have to confirm the actual code by going through the list.
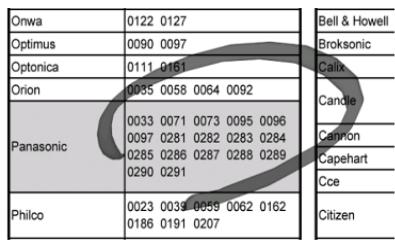
(2) There are four numbers for each code, and when you input a code, the REMOTE 815 will automatically check whether or not the number is entered correctly.
(3) You will see an "OK" message at the top of the screen if you have entered the correct number, or else you will see an "ERROR" message instead. Enter the correct code again, if "ERROR" appears.

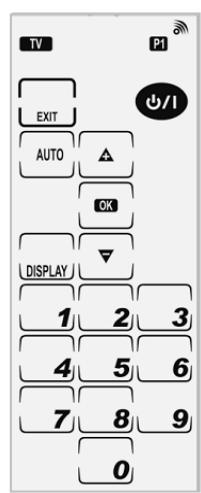

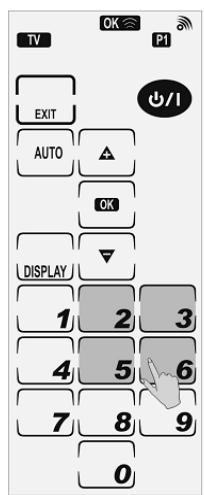
(4) Press the key after inputting a code to test whether or not the code is correct. If correct, the TV will be turned on. If incorrect, enter another code number until you find the correct one.
(5) After you confirm the code is correct, press "EXIT" to exit.
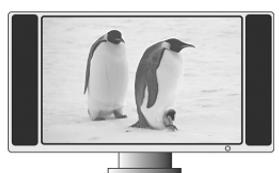
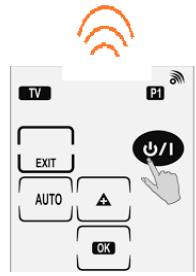

If code is correct, TV will be turned off

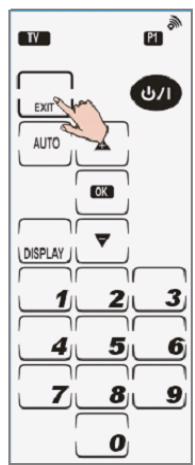
(6) Confirm code
To avoid repeating the input or forgetting which codes you have entered, you can inquire to review code number. Press "DISPLAY" in the code setup page, and the currently set code number will appear.


2. Learning
For REMOTE 815, we have built in an auto-guide system to help you in operation of the Learning function. (The auto-guide system only works for the Soft keys setting, refer to the P4 for detailed information)
Notes:
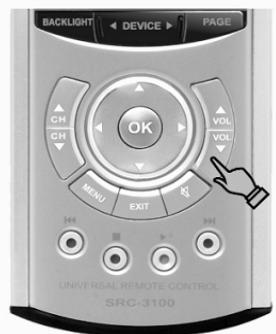
- Before operation, note that you are required to keep 2-4 inches distance away between the REMOTE 815 and the original remote and put them in a line (as shown on right side).
- During learning, keep pressing each learnt key of the original remote until the "OK" message appears on the screen of REMOTE 815 and you hear a beep. For some special codes, you might have to learn all keys twice for general operation. As you see "ERROR" message appears but hear TWO beeps during learning, please press each learnt key of the original remote once again until you see the "OK" message and hear only ONE beep. Otherwise, you will see the "ERROR" message blinking once and hear THREE beeps if the learning fails.
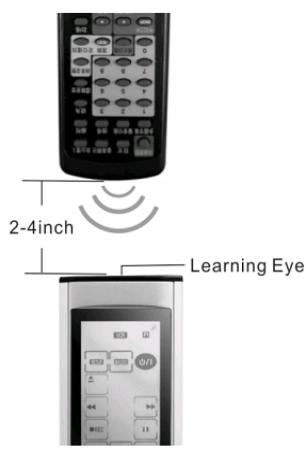
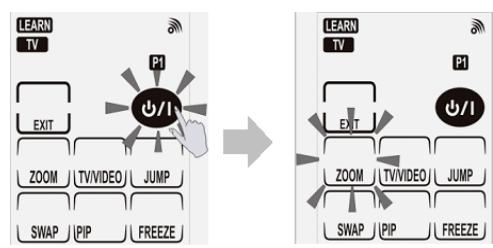
(1) Press "LEARN" in the setup mode to start the learning function. The auto-guide system starts up in the meantime, that allows the IR codes of the original remote control to be learnt by REMOTE 815 one by one according to the blinking keys on the screen.
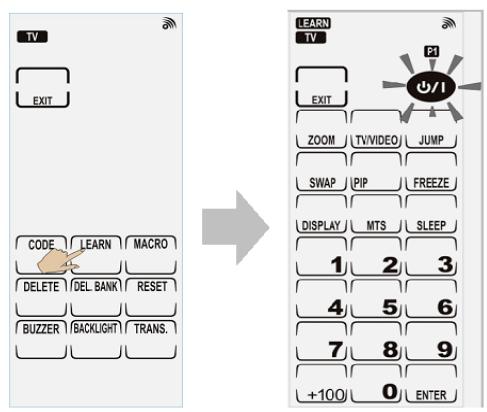
(2) When the key starts flashing, press the corresponding learnt key from the original remote in order to transmit its IR code to REMOTE 815.
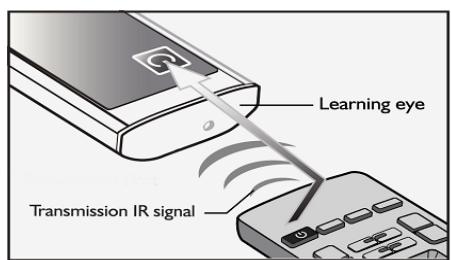
(3) As long as the flashing /1 key has learnt the IR code, the auto-guide system will assign the next key automatically. Repeat Step (2) process until all desired soft keys have been learnt.
(4) For hard keys (rubber keys), because there is no auto-guide system to support, so you should press every hard key and assign it manually (no flashing sign on the screen at the moment). After that, press the corresponding learnt key from the original remote in order to transmit its IR code to REMOTE 815 until all desired hard keys have been learnt.
(5) Press "EXIT" if you want to quit the learning function and return to the setup page.
3. Macro
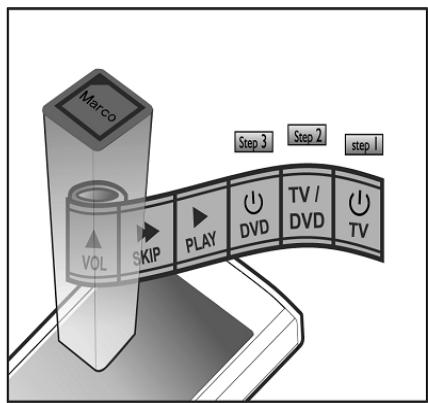
The Macro function allows you to send buttons continuously by pressing a Marco key. In other words, you can set a Macro key to substitute a complicated procedure as described below:
- You can store up to 60 buttons in a single Normal Macro key. However a Smart Macro key only can store up to 10 buttons, and a total of 16 Smart Macro keys. No matter what Normal/Smart Macro key is, you can assign any button (except the device button) as a desired Macro key.
In a Smart/ Normal Macro key, you can set a delay time between two buttons.
The transmitted buttons will appear sequentially on the LCD screen when a macro key is started up.
WHAT is the Normal Macro
After all the code setting has been finished, you can enter desired buttons one by one into a Macro key according to personal preference.

WHAT is the Smart Macro
Gather all necessary remote controls, and press desired buttons one by one sequentially to transmit IR codes into the assigned macro key by the Learning function. It is not necessary to finish setting all codes before running Macro process.
Now, let's learn how to set up a Macro key.
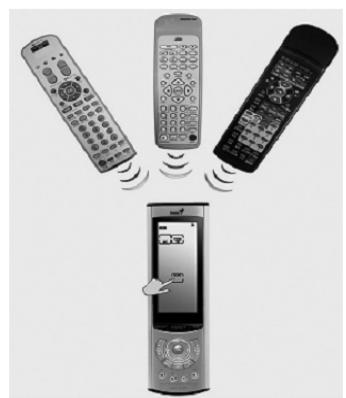
3.1 Normal Macro
At first, you need to confirm the input of remote codes which are successful before setting the Normal Macro.
(1) Press "SETUP" and "MACRO" to enter the setup mode, and press "MACRO KEY" to start the setup.
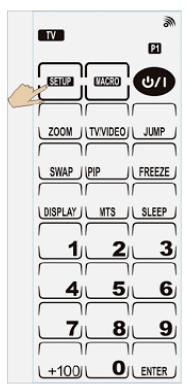
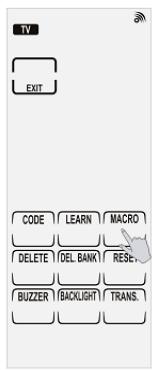
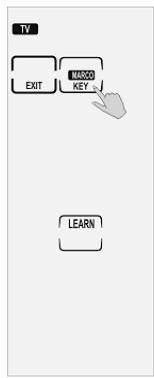
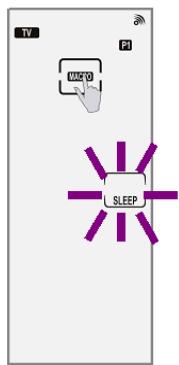
(2) Now, you can see the blinking "MACRO" icon at the top of the screen, select a key for the Macro key (we recommend you select a less frequently used key). After that, start to pressing desired buttons one by one to be saved into the Normal Macro key. Each Normal Macro key can store up to 60 buttons.
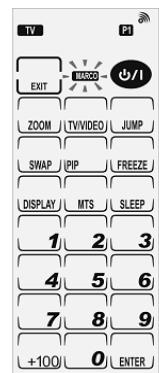
"MACRO" icon is blinking
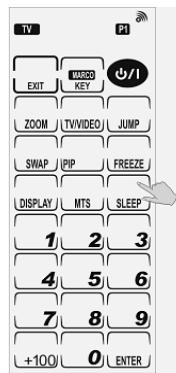
Assign a key to be the Macro key
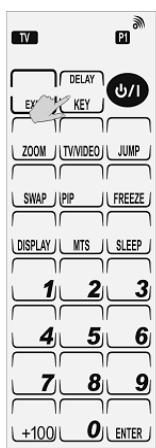
(3) After pressing the first button, you are able to choose whether or not to input a delay time (process as shown below).
a. Press "DELAY KEY" at the top of the screen to enter the delay page.
b. The time selection page includes the numbers 0-9.
Press "1" = 1 second
Press "2" = 2 seconds
Press "1" + "2" = 12 seconds
Press "6'' + "0'' = 60 seconds
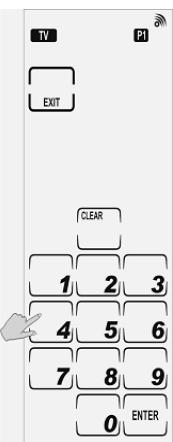
Press "CLEAR" to clear a selected number
Press "ENTER" to confirm the set delay time.
*Press "EXIT" to cancel the delay time setup and return to the Macro setup page.
c. If it is not necessary to set a delay time, the default setting is 0.4 second between 2 buttons.
(4) Continue to input desired buttons until you press "EXIT" to exit. At the moment, the "OK" key will appear. Make sure you press "OK" to save your setup. When you return to the main page, press "MACRO" to check the currently set MACRO key positions.
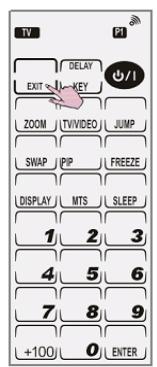

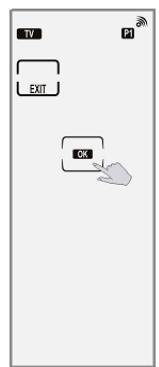

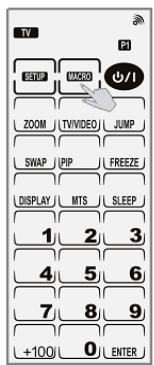

(5) Let us take a look at an example of setting a MACRO.
For instance, the procedure for viewing DVD at home is given as follows:
a. Power on the TV.
b. Switch TV screen to the video mode.
c. Power on the DVD.
e. Start playing the DVD disk.
| Operation Procedure | Required Setting Process on REMOTE 815 |
| Power on the TV | 1. Enter the setup page, and press “MACRO KEY” to start the setup. 2. Select the “TV” device page and press SLEEP as the Normal Macro key (You also can assign this key freely). 3. Press the “Power” button in the TV device page |
| Set 2 second delay time | 4. Press “DELAY”. 5. Press the numeric key “2” to select a delay of 2 seconds. 6. Press “ENTER” to confirm the delay time. |
| Switch TV screen to video mode | 7. Press “TV/Video” |
| Power on the DVD drive | 8. Select the DVD device page. 9. Press the “Power” button in the DVD device page. |
| Set 2 second delay time | 10. Press “DELAY”. 11. Press the numeric key “2” to select a delay of 2 seconds. 12. Press “ENTER” to confirm the delay time. |
| Play the DVD disk | 13. Press the “Play” button in the DVD device page. 14. Press “EXIT” to go to the save page. 15. Press “OK” to save the setting. |
3.2 Smart Macro
Before starting the Smart Macro, you should gather all required original remote controls.
(1) After you enter the Macro setup page, press "LEARN" to start the setup.
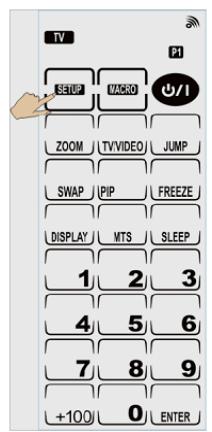
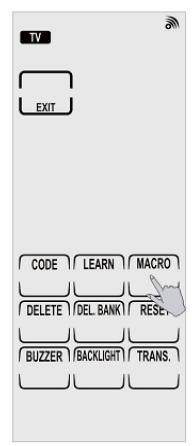
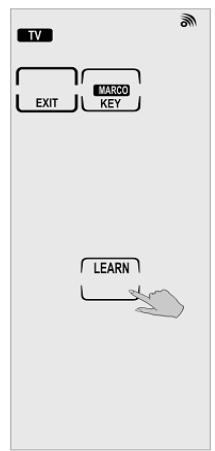
(2) Before operation, note that you are required to keep 2-4 inches distance away between REMOTE 815 and the original remote and put them in a line. During learning, please hold pressing every learnt key of the original remote until the OK message has popped up on the screen of REMOTE 815 and you hear a beep (refer to P.11 for more detailed information).
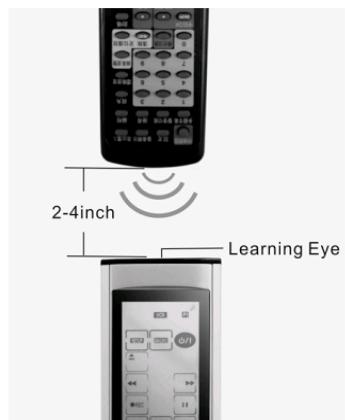
(3) Select a key as the Smart Macro key (we recommend you select a less frequently used key). At the moment the "LEARN" message will appear at the upper left corner. The selected Smart Macro key will keep blinking, and now you can press the desired buttons to be saved into the "Smart Macro" key. Each Smart Macro key can save up to 16 keys.
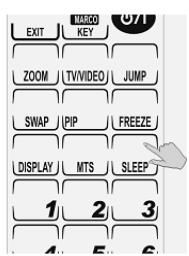
Assign a Key (ex. SLEEP key)

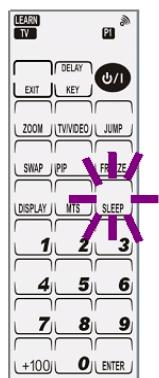
(4) Now take the required original remotes and aim it sequentially at the Learning eye of REMOTE 815 (refer to P9 Learning function) and press desired buttons to transmit its IR code to the REMOTE 815 in order to save in the Smart Macro key. (See the illustrations for clear concept at right side )
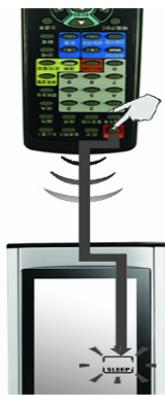
Send the learnt key to the blinking Macro key (ex. TV "POWER" key)
(5) During setting the Smart Macro key, between two pressed buttons, you are able to choose whether or not to input a delay time (process as shown below).
a. Press "DELAY KEY" at the top of the screen to enter the delay page.
b. The time selection page includes the numbers 0-9.
Press "1" = 1 second
Press "2" = 2 seconds
Press "1" + "2" = 12 seconds
Press "6" + "0" = 60 seconds
- Press "CLEAR" to clear a selected number
- Press "ENTER" to confirm the set delay time.
- Press "EXIT" to cancel the delay time setup and return to the Macro setup page.
c. If it is not necessary to set a longer delay time, the default setting is 0.4 second between two buttons.
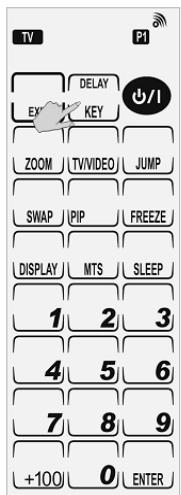
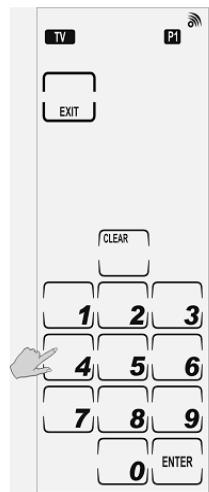
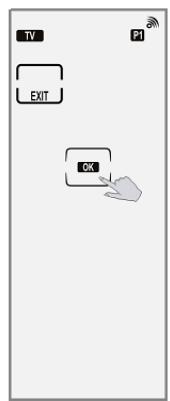
(6) Continue to input desired buttons until you press "EXIT" to exit. At the moment, the "OK" key will appear. Make sure you press "OK" to save your setup. When you return to the main page, press "MACRO" to check the currently set MACRO key positions.
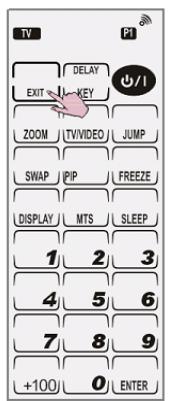


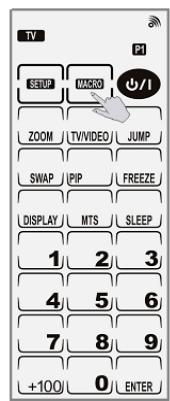

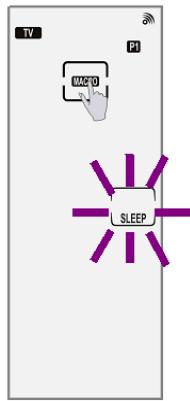
(7) Let us take a look at an example of setting a MACRO.
For instance, the procedure for viewing DVD at home is given as follows.
a. Power on the TV.
b. Switch TV screen to the video mode.
c. Power on the DVD.
e. Start playing the DVD disk.
| Operation Procedure | Required Setting Process on REMOTE 815 |
| Power on the TV. | 1. Enter the Marco setup page, and press “LEARN” for the Smart Macro setup. 2. Press the “TV” device key and select SLEEP as the Smart Macro key. (You also can assign this key freely). 3. Get the TV remote control ready and aim it at the learning eye of the REMOTE 815 4. Press the “POWER” button of the TV remote control. |
| Set 2 second delay time. | 5. Press “DELAY” 6. Press the numeric key “2” to select a delay of 2 seconds. 7. Press “ENTER” to confirm the delay time. |
| Switch TV screen to Video mode. | 8. Press the “TV/VIDEO” button of the TV remote control. |
| Power on the DVD drive. | 9. Get the DVD remote control and aim it at the learning eye of the REMOTE 815 10. Press the “POWER” button of the DVD remote control. |
| Set 2 second delay time | 11. Press “DELAY” 12. Press the numeric key “2” to add and select a delay of 2 seconds. 13. Press “ENTER” to confirm the delay time. |
| Play the DVD disk. | 14. Press the “PLAY” button of the DVD remote control. 15. Press “EXIT” to go to the save page. 16. Press “OK” to save the macro key. |
4. Delete a Key Code
(1) Press "DELETE" after entering the setup mode. A desired device page will appear. You can delete any desired key code in the device, or switch to different device page for further deletion.
(2) For the key code deletion, select the desired key and press it until you hear a beep and see "OK" message on the screen so as to complete the operation. Continue to delete another key code until you press "EXIT" to exit this operating mode.
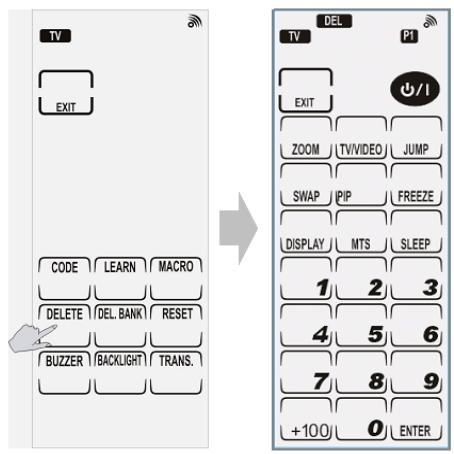
Notes:
This function only can delete the code memory of a particular key, but not the key identity.
5. Delete Whole Device Codes
(1) Press "DEL. BANK" after entering the setup mode. A screen for deleting all codes of a device will appear. You can switch to any device if needed.
(2) Select a desired device and press "OK" for the deletion. If successful, you will hear a beep and see "OK" message on the screen, so as to complete the operation. If needed, you can continue deleting another device until you press "EXIT" to exit.
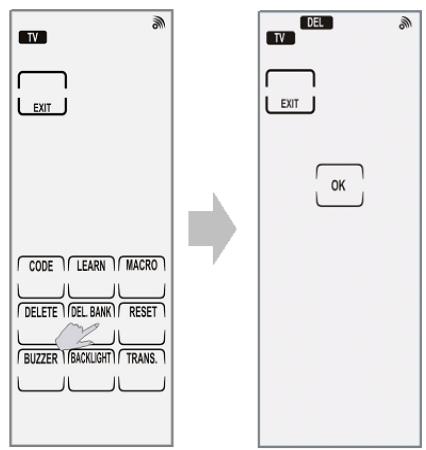
Notes:
This function only can delete the code memory of a particular device, but not a device identity.
6. Modifying Key Layout
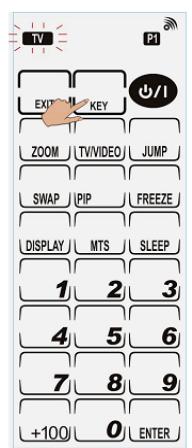
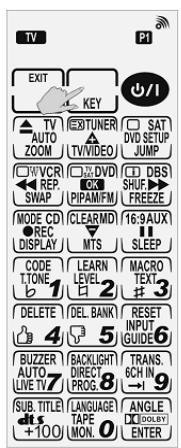
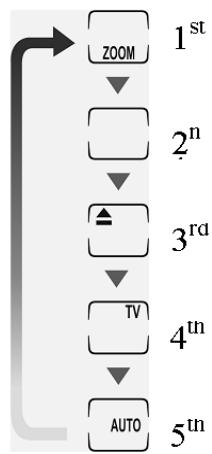
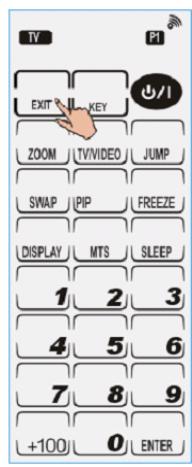
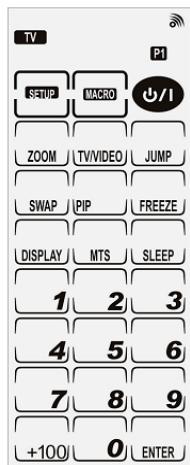
The REMOTE 815 provides you a function to change the content in a touch key, and each key includes 3 to 4 types of different contents. With a simple and easy operation, you can display the content of the desired key and complete personalized control page.
(1) It is not necessary to enter the setup page. Press and hold the "PAGE" key for 2 seconds to enter the Layout setup page.
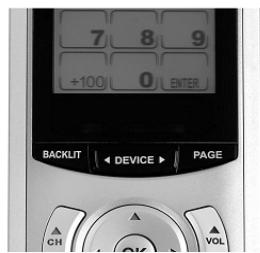
(2) The name of device starts blinking at the top of the screen. It means you have entered the setup page.

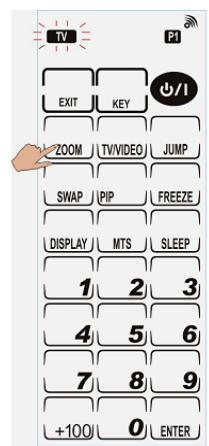
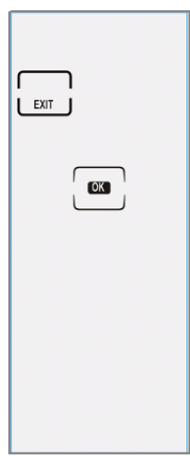
(3) Press "KEY" at the top of the screen to preview all contents of keys. Select and press a key (ex. ZOOM) for modification and the content of the key appears on the screen recursively.



(4) Press "EXIT" to exit the setup page. Then press "OK" to confirm and save the setup and return to the main page. If you do not want to save the setup, just press "EXIT" to return to the main page.


7. Transmission
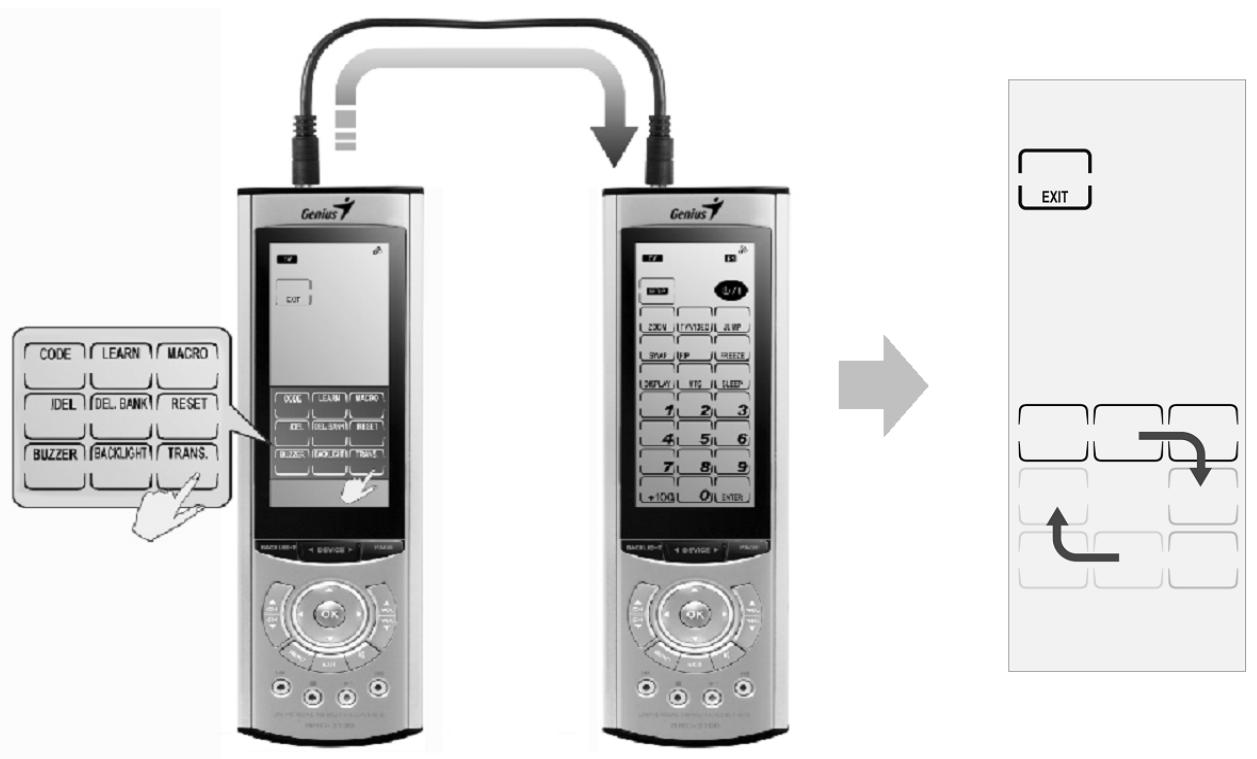
The "TRANS" function will copy all data to another REMOTE 815. Before using the function, you need to purchase a SLC-2080 USB cable (optional) for connection. Follow these instructions to complete the operation.
(1) Connect the USB cable between both remote controls properly.
(2) For the new REMOTE 815, press "SETUP" to enter the setup mode. Then press "TRANS." to start the transmission.
(3) The screen showing the data being transmitted as well as the screen of completing the data transmission will appear.
(4) You will hear a beep and see an "OK" message at the top of the screen after the transmission is completed. The screen will automatically return to the main page.
Notes:
If you fail to transmit the data, you will hear three beeps and see "ERROR" message on the screen.
8. Function Lock
The function will lock some of the setup keys. If it is enabled, you cannot enter the CODE/LEARN/MACRO/DEL functions anymore, but the original settings are unlimited even after you press "RESET".
(1) Enter the setup mode and select a desired device (such as TV).
(2) Press and hold the PAGE key for 4 seconds. When you hear a beep, it represents you have completed the setup.
(3) Press "EXIT" to exit the setup page.


Notes:
If you want to release the setup lock, repeat the above procedure.
9. Reset
Press and hold "RESET" for 4 seconds after you have entered the setup page, and the system will restore the factory default settings automatically.
When the operation is completed, press "EXIT" to exit.
10. Key Buzzer
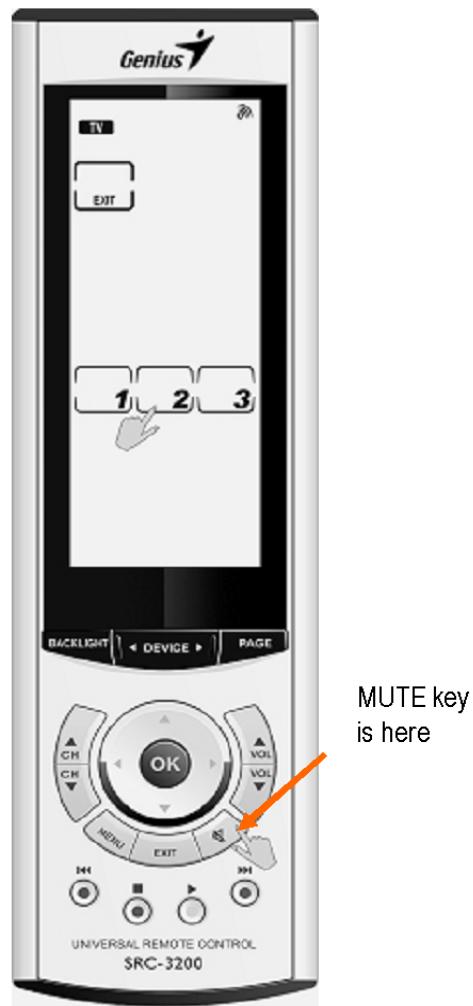
(1) Press "BUZZER" after you have entered the setup mode, and the setup screen will appear. Three different sound frequencies are represented by 1 to 3, and the ("MUTE") key at the bottom is to mute all pressed keys.
(2) Select the desired sound by the numeric key, and the selected one will blink. Press "EXIT" to exit after you have completed the setup.

11. Backlight
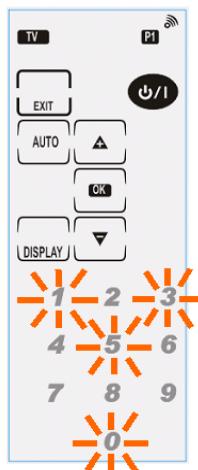
(1) Press "BACKLIGHT" to enter the setup mode. The numbers "1" to "7" represent seven colors of backlight, and the number "0" represents no backlight.
(2) Select a device (such as TV) to set its backlight. Press a desired numeric key as you wish. When the operation is completed, the numeric key will blink, just press "EXIT" to exit.

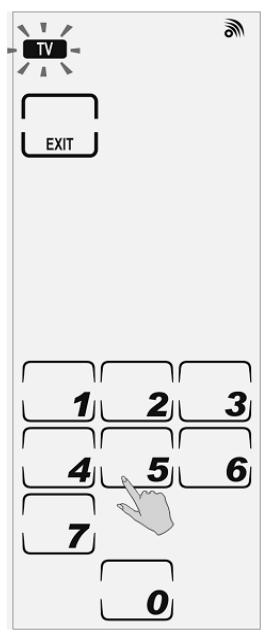
"0" for nothing
"1" for red
"2" for green
"3" for blue
"4" for light green
"5" for sky blue
"6" for purple
"7" for white
Appendix A
Features
Eight-in-One
This feature allows you to integrate up to 8 devices.
Two Ways to Integrate Devices
Learning type and Pre-programmed code library.
59 Keys in Each Device
Each device has 59 keys available in 2 pages.
Changeable Device Key Layout
Normal Macro Function
The function allows you to save up to 60 buttons, including time delays between two keys.
Smart Macro Function
The function only allows you to save up to 16 keys but set up by the Learning directly.
Multi-LED
Seven LED colors are available to distinguish between devices.
Auto Power Saving
To save the battery power, the REMOTE 815 will turn off after idling for 90 seconds.
Motion Sensor
Motion detection is provided for powering up the screen automatically.
Low Power Indicator
Low power indicator is provided for alerting users of battery conditions.
- Flash memory
Data will not be lost when battery is run out of power.
On-line Support (Optional)
Users can upgrade the latest version of firmware and flash memory by the Internet.
Specifications
| Model | REMOTE 815 |
| Battery | 1.5V 4 X AAA Alkaline Batteries (SUM-4) |
| Dimensions ( W x H x L) | 64 x 23 x 220 mm |
| Weight (without batteries) | 8.5 oz ( 240 g) |
| Keys | 59 Keys/ 2 Pages/ 8 Devices |
| Display | LCD |
| LCD Screen ( W x H ) | 40 x 104 mm |
| Integrating Capability | Control up to 8 devices |
| Learning Frequency | 20KHz - 455KHz & Pulse up to 256 bits long |
| Learning Distance | 2” to 4” / 5 cm up to 10cm |
| IR Operating Distance | 8 - 10 meters |
| Memory | 512KB Flash memory |
| Backlight | Multicolor LED |
| Interface | UART/ 115,200bps |
| Power Consumption | Operation Current: 170mA (max) LCD On Current: 160 μA LCD Off Current: 40 μA |
Appendix B
Optional Accessory
SLC-2080
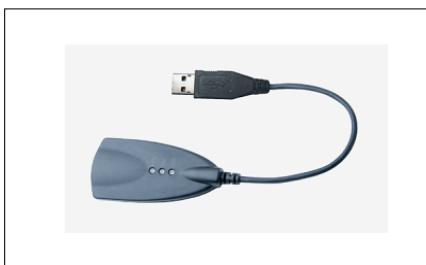
USB Cable
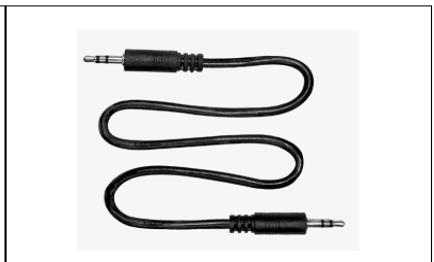
Transmission Line
The SLC-2080 is an optional USB cable that enables a transmission of system setup between PC and REMOTE 815. Besides, with the transmit cable, the REMOTE 815 also can duplicate the data from one unit to another.
Upgrade Tools:
Upgrade firmware and flash memory, or upload/download files. Please attend to Genius website: www.geniusnet.com.tw to get driver and Upgrade Tool on your PC. Using our program you can update the latest firmware and flash memory, moreover, download pre-stored files from PC to REMOTE 815.
Duplicate:
By connecting a "Transmit Cable" between two REMOTE 815s, you can duplicate settings and functions from one REMOTE 815 to another.
Appendix C
Troubleshooting
| Problem | Solution |
| LCD shows no screen when touched. | 1. The batteries may be dead. Replace the batteries. 2. Check if the batteries are installed properly. |
| IR Learning fails. | 1 .DO NOT use the learn function near an incandescent lamp. 2. Memory capacity is full (59 keys for each device.) 3. Learning process may not be completed when battery low in the REMOTE 815 or the original remote. 4. Keep the learning distance between the REMOTE 815 and the original remote within 2-4 inches (5-10 cm). 5. If you still cannot control your target device even no error occurs during the learning process: a. Replace new battery in the original remote control. b. Try the learning function again in accordance with the formal operation process. c. If you still cannot solve the problem, contact the local reseller for service or contact Genius Customer Service Center (sim@geniusnet.com.tw) for further assistance. |
| An “ERROR” message displayed on the LCD screen during the learning procedure. | 1. Make sure you hold and press remote key till the screen displays “OK” or “Error” message on the screen. 2. Make sure the batteries are sufficient with both REMOTE 815 and the target remote control. |
| An “ERROR” message displayed during operation | 1. No code was saved in the pressed key or the operation is wrong. |
| The REMOTE 815 can’t control desired devices. | 1. Check if the desired device on the REMOTE 815 is selected. 2. Move closer to the device. The maximum operating distance is approximately 30 feet. 3. Make sure that you are aiming the REMOTE 815 directly at the device and there is no obstruction between the REMOTE 815 and the device. 4. Make sure that the learning function or the preprogrammed code is executed properly. |
| A key performs two or more functions | 1. Some remote controls issue the multiple commands in a key when it is operated. Make sure you learn the IR codes for different keys to separate respective functions. |
| Macro does not work. | 1. Make sure that you aim the REMOTE 815 at the device while the Macro commands are sent. 2. Macro is not set up properly. Repeat the macro setup procedure.(Page 13 Macro) |
| The LCD screen turns off. | 1. The REMOTE 815 defaults to switch the LCD off automatically after the REMOTE 815 is left unused for 90 seconds. 2. Replace new batteries when the old ones run out the power. |
- Table of Contents
- About Your REMOTE 815 1
- Setting Up Your REMOTE 815 6
- Appendix A 27
- Appendix B 29
- Appendix C 30
- About Your REMOTE 815
- Introduction
- Your Best Assistant
- Controlling Eight Audio/Video Devices
- Smart Learning Feature
- Smart Macro Feature
- Reconfiguring Key Layout
- Battery
- Installing the Battery
- Cautions:
- Touch Screen
- How to Protect Touch Screen
- Key Layout
- Description of Keys
- The Function of Each Key
- "REC" Key Protect
- Soft/Hard Key Protect
- Setting Up Your REMOTE 815
- Warning:
- Main Setup Page
- Operating Each Function
- Code
- Auto Search
- Set up TV
- Input Code
- Learning
- Notes:
- Macro
- WHAT is the Normal Macro
- WHAT is the Smart Macro
- Normal Macro
- Smart Macro
- Delete a Key Code
- Delete Whole Device Codes
- Modifying Key Layout
- Transmission
- Function Lock
- Reset
- Key Buzzer
- Backlight
- Appendix A
- Features
- Specifications
- Appendix B
- Optional Accessory
- SLC-2080
- Upgrade Tools:
- Duplicate:
- Appendix C
- Troubleshooting
Marque : GENIUS
Modèle : REMOTE 815
Catégorie : Télécommande universelle