
PF-A700B - Cadre photo numérique MUSTEK - Notice d'utilisation et mode d'emploi gratuit
Retrouvez gratuitement la notice de l'appareil PF-A700B MUSTEK au format PDF.

| Type de produit | Cadre photo numérique |
| Marque | MUSTEK |
| Modèle | PF-A700B |
| Taille de l'écran | 7 pouces (diagonale) |
| Résolution | 480 x 234 pixels |
| Formats d'image supportés | JPEG (JPG) |
| Formats audio supportés | MP3 |
| Types de carte mémoire | SD, MMC, MS, CF |
| Port USB | Oui (pour clé USB) |
| Sorties | AV OUT (mini-jack), prise casque |
| Entrées | VIDEO IN, AUDIO IN (via AV OUT ?) |
| Alimentation | Adaptateur secteur 5 V CC, 2 A |
| Haut-parleurs intégrés | Oui (2) |
| Orientation | Portrait ou paysage (support pivotant) |
| Fonctions principales | Diaporama, rotation, tri, vignettes, lecture MP3, affichage sur TV |
| Réglages diaporama | Intervalle (3 s à 3 min), transition, répétition |
| Température de fonctionnement | 0 °C à 40 °C |
| Entretien et nettoyage | Chiffon doux et sec ; éviter eau et produits abrasifs |
| Sécurité | Ne pas exposer à l'eau, à l'humidité ou aux chocs ; débrancher si inutilisé longtemps |
| Poids (estimé) | Environ 300 g |
| Dimensions (estimées) | Environ 20 x 15 x 3 cm |
FOIRE AUX QUESTIONS - PF-A700B MUSTEK
Questions des utilisateurs sur PF-A700B MUSTEK
0 question sur cet appareil. Repondez a celles que vous connaissez ou posez la votre.
Poser une nouvelle question sur cet appareil
Téléchargez la notice de votre Cadre photo numérique au format PDF gratuitement ! Retrouvez votre notice PF-A700B - MUSTEK et reprennez votre appareil électronique en main. Sur cette page sont publiés tous les documents nécessaires à l'utilisation de votre appareil PF-A700B de la marque MUSTEK.
MODE D'EMPLOI PF-A700B MUSTEK
Digital Photo Frame Getting Started
Thank you for purchasing Mustek PF-A700B Digital Photo Frame. You can play your favorite JPEG photos or MP3 music directly from a memory card or a USB thumb drive without a computer. Read the following instructions for more detail.
HOW TO CONTACT US
Website: http://www.mustek.com • Customer Service (General Info): E-mail: cservices@mustek.com • Fax: (949) 788-3670 • Technical Support: E-mail: tsupport@mustek.com Phone: (408) 387-6571 • Address: 15271 Barranca Parkway, Irvine, CA 92618
1
text_image
9 10 11 12 13 14 15 16 17 182
text_image
Diagram showing a device with labeled components and an inset view of a mechanical component with directional arrows.3
text_image
A SD MMC MS CF4
5
(B)
(C)
(D)
6
7
text_image
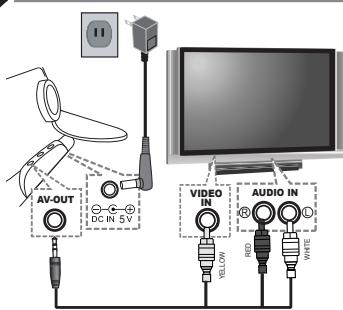
AV-OUT DC IN 5V VIDEO IN YELLOW AUDIO IN RED WHITEThe style and parts of the product shown in this Guide may be different from the actual unit due to various models.
ENGLISH
FCC and Safety Information
Important Safety Precautions;
- Keep away from water or moisture and dusty areas.
- Ambient Temperature 0\~40°C. Never store in hot and very cold areas. - Be carefully to keep it without dropping it or strong impact
- Be carefully to keep it without dropping it or strong impact. - Do not try to open the case alone without technical support
- Connect the AC adapter to the DC IN jack and to power out
- Only use attachments/accessories specified by the manufacturer - When left unused for a long period of time, the unit should be up
- When left unused for a long period of time, the unit should be unplugged from the household AC outlet.
Warning: To reduce the risk of fire or electric shock, do not expose to
rain, moisture, dripping or splashing.
FCC NOTICE This device
This device complies with Part 15 of the FCC Rules. Operation is subject to the following two conditions: (1) this device will not cause harmful
just to the following two conditions: (1) this device will not cause harmful interference, and (2) this device must accept any interference received,
including
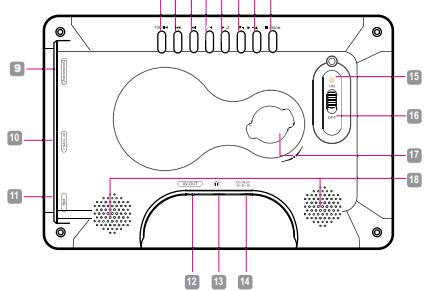
Product Overview
1 MODE/ STOP button
2 Volume-/Down button 11 USB Jack
3 Volume +/ Up button *Supports USB thumb drives only.
4 Left/Rotate 90° counter- 12 AV OUT Jack
clockwise 13 Earphone Jack
5 Right/Rotate 90° clockwise 14 DC IN Jack
6 Previous button 15 Power LED Indicator
7 Next button 16 Power ON/OFF switch
8 PLAY/SEL./Pause/confirm 17 Stand receptacle
button
9 SD/MMC/MS Slot 18 Speakers
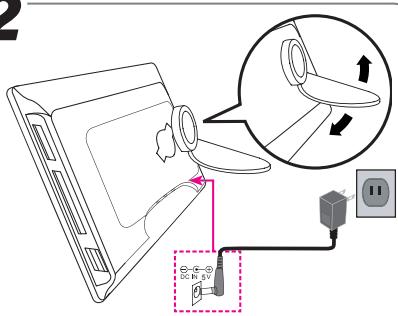
2 Preparations
Attaching the stand
-
Push the head of the stand in the receptacle.
-
Rotate clockwise or counterclockwise until the stand locks
in place.
Note: The photo frame can be placed vertically or horizontally for
either landscape or portrait displ
Connecting to the power
- Connect the supplied AC power adaptor (5Vdc, 2.0A), the
other end to the wall outlet.
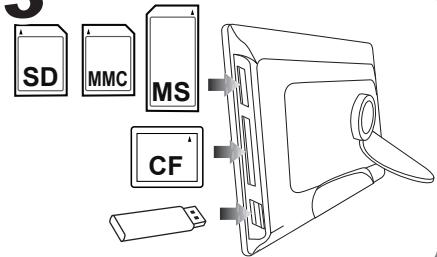
3 Inserting a Memory Card or USB drive
- This device can only display one storage media's contents at a time.
If more than one storage media are used, The MMC/SD card will be displayed first, then CE TYPE I card, and then the USB thumb drive.
- This frame can only play IREG and MP3 formats. If playing other
- This frame can only play JPEG, and MR-S formats. If playing other formats, please convert the images or audio files to readable format
on your com
- Insert your memory card to the appropriate slot according to
the orientation marked on the machine.
Note: To remove MMC/SD card, gently push in the card to eject it
from the slot. To remove CF card, pull the card straight out.
- Insert a USB thumb drive to the USB port.
4 Switching Storage Media
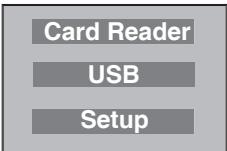
1 To change the storage media input, press MODE button to
display the menu screen.
- Press UP/DOWN button to select "Card Read" or "USB"
mode, and then press PLAY/SEL button.
5 Viewing Photos and Slide Shows
- Displaying pictures bigger than 480 x 234 will take longer to load
load.
- When one or more storage media(s) is inserted, this device will start the play automatically. To stop the play price STOP
start the play automatically. To stop the play, press STOP.
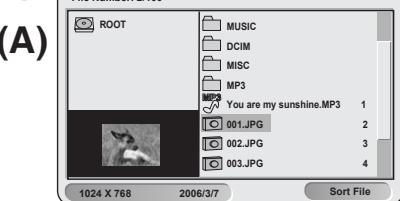
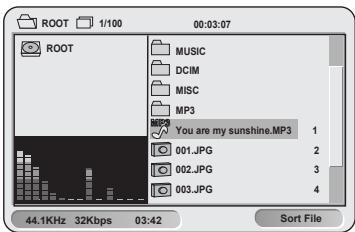
Browsing Mode (A)
- Press UP/DOWN button to select a photo.
Note: If selecting a folder, the folder list will display on the left
screen and the file list on the right. Press LEFT/RIGHT button
to enter the left or right screen, and then UP/DOWN to select the photo you wish to play.
the photo you wish to play.
- Press PLAY/SEL button to play the photo in full screen.
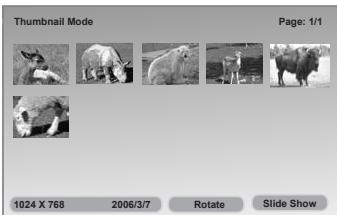
Thumbnail Mode (B)
a. Follow above step 1 and 2.
b. Press MODE button to enter Thumbnail mode.
Note: Press MODE button again to return to the browsing
Mode.
Slide Show Mode (B)
a. Follow above steps to enter Thumbnail mode.
b. Press DOWN/RIGHT button to select "Slide Show" from the
screen, then press PLAY/SEL button.
c. The slide show starts to play.
Note : Refer to Setup Menu section to set up the Slide
Note : Refer to Setup Menu Section to set up the Guide Show settings
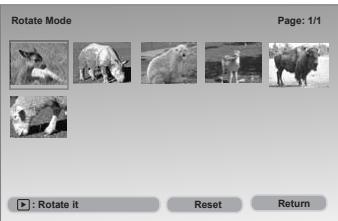
Rotate Mode
Rotate Mode (C)
a. Follow above steps to enter Thumbnail mode.
b. Press DOWN button to select "Rotate" from the screen, then PLAY/DEF button
press PLAY/S
c. Press LEFT/RIGHT button to select the photo, then press PLAY/SF1 button
PLAY/SEL button.
Note : Each press of PLAY/SEL button will rotate the photo by 20 degrees electrical
by 90 degree clockwise.
Tips: In full screen display, you may press RIGHT/LEFT but-
ton to rotate 90 degree clockwise or counterclockwise.
Note : Press DOWN/LEFT to select "Reset" to cancel the rotate. Select "Return" to return to Thumbnail mode
Select Return to return to that Sort Function (B)
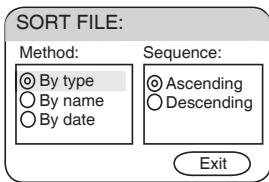
Sort Function (D)
a. Press DOWN/RIGHT button to select "Sort" in the browsing
mode, then press PLAY/SEL button.
b. Press DOWN button to select a sorting method and sequence, then press PLAY/SEI
quence, then press PLAY/SEL.
6 Playing MP3 Music
- Press UP/DOWN button to select a file you wish to play.
Note: If selecting a folder, the folder list will display on the left
Note 1: Selecting a folder, the folder list will display on the left screen and the file list on the right. Press LEFT/RIGHT button
to enter the left or right screen, and then UP/DOWN to select
the file you wish to play.
-
Press PLAY/SEL button to start to play the music.
-
Press UP/DOWN button to increase or decrease the volumes.
-
To stop the play, press STOP button.
7 Viewing on a TV set
-
Connect to the power.
-
Connect AV cable's (not supplied) mini jack to AV OUT, the
other end to Audio/Video jacks on the TV.
-
Switch on the Power.
-
Select an appropriate TV system from Setup Menu.
-
Set the TV to AV input mode.
-
Press PLAY/SEL button to start playback.
9
Setup Menu
-
Press MODE button.
-
Press Down button to select "Setup"
-
Press UP/DOWN/LEFT/BRIGHT to select an item
-
Press PLAY/SEI to confirm
Note: To leave the Setup menu, press MODE button again.
[Figure]
Slide Show Setup
Repeat None: One: Folder: All
Interval Time 3 Sec, 5 Sec, 15 Sec, 30 Sec, 1 Min, 3 Min
Transition No Effect Cover Up: Cover Down Uncover
Effect No Effect, Cover Up, Cover Down, Uncover Left, Uncover Right, Wipe Up; Wipe Down,
Wipe Left, Wipe Right, Push Left, Push Right, Push
(No text to output)
LCD Adjust
LCD Adjust Panel 4:3 16:9
Panel 4.5, 10.5 Brightness 1.0 - 1
Brightness -1, 0, +1
Contrast
System Setup
System Setup GSD English French Course Italian Spanish
USD English, French, German, Italian, Spanish, Portuguese, Dutch, Polish
TV System NTSC PAL
TV System Reset
Reset
Exit Setup Mode
roubleshooting
No power
- Check to make sure the power plug is plugged into the power
outlet.
• Make sure there is power to the outlet.
Unable to view photos on the Digital Photo Frame • Not all, IREG files are compatible. Please open the fi
- Not all SF EG files are compatible. Please open the files in the computer and resave them as, IPEG files and try to playback
computer and in the device.
- Check if using compatible memory cards.
ESPAÑOL
Información de FCC y Seguridad
Precauciones de Seguridad Importantes:
- Guarde lejos del agua o humedad y las áreas polvorientas.
- Temperatura del Ambiente: 0-40 grados centigrados. Nunca almacene en áreas calientes y muy frias. - Sea guidadecamento guardarlo sin escarlo o el impacto fuarto
- Sea cuidadosamente guardano sin caeno o el impacto fuerte. - No intente abrir la unidad solamente sin ayuda específicamente técnica.
- Conecte el adaptador de AC al enchufe de Entrada de DC y al enchufe de energía.
- Utilice solamente adjuntos/accesorios especificados por el fabricante. - Cuando no lo utiliza por un período de tiempo largo, la unidad se deb
- Cuando no la utiliza por un período de tiempo largo, la unidad se debe desenchufar del enchufe de AC de la casa.
Advertencia: Para reducir el riesgo de fuego o de la descarga eléctrica, no
exponga a la lluvia, a la humedad, a caer o a salpicar.
AVISO DE FCC
Este dispositivo se conforma con la Parte 15 de las Reglas de FCC. La operacion está conforme a las dos condiciones siguientes: (1) este dispositivo no causará
esta conforme a las dos condiciones siguientes. (1) este dispositivo no cada para interferencia dañosa, y (2) este dispositivo debe aceptar cualquier interferencia
recibida, incluyendo interferencia que pueda causar la operación indeseada.
1 Descripción Del Producto
1 Botón de MODO/ APAGAR 10 Banura del Tipo I de CE
1 Botón de MODO/ Al A&D 2 Botón de Vol -/ Por Abajo 11 Enchufe de USB
3 Botón de Vol +/ Por Arriba *Apoya solamente las unidades activadoras de pulgar del USB
4 Izquierda/Bota 90° a la izqui- 12 Enchufe de Salida de AV
13 Enchufe de Auricular
5 Derecha/Bota 90° a la derecha 14 Enchufe de Entrada de DC
6 Botón anterior 15 Indicador de la Energía de LED
7 Botón Próximo 16 Interruptor de ENCENDER/APAGAR de la Energía
8 Botón de ENCENDER/ 17 Receptáculo del soporte
SEL./Pausar/confirmación *Para unir el soporte provisto.
9 Ranura de SD/MMC/MS 18 Altavoces
2 Preparaciones
The following table
Unir el soporte
-
Empuje la cabeza del soporte en el receptáculo.
-
Rote a la derecha o a la izquierda hasta las cerraduras del
soporte en lugar.
Nota: El marco de la foto se puede poner verticalmente u horizon-
talmente para demostrar el paisaje o el retrato.
Conectar a la energía
- Conecte el adaptador provisto de AC (5Vdc, 2.0A), el otro
final al enchufe de pared.
3 Insertar una Tarieta de Memoria o una Unidad Activadora de USB
5 insertar una tarjeta de memoria o una unidad Activadora de USD
- Este dispositivo puede exhibir solamente el contenido de un medios de almacenaje a la vez.
Si se utilizan los medios de más de un almacenaje, la tarjeta de MMC/SD estará demostrado primero, luengo la tarjeta de TIPO I de CE, y entonces la unidad activadora de pulgar del USB.
- Primero, luego la tarjeta de 190 O fue Of , y entonces la unidad activadora de pulgar del USB. - Este marco puede jugar solamente el IREG, y formatos de MB3.
- Este marco puede jugar solamente el 3F EG, y formatos de MF S. Si juega otros formatos, convierta por favor las imágenes o los
archivos de audios al formato legible en su computador.
-
Inserte su tarieta de memoria en la ranura apropiada según
-
inserte su tarjeta de memoria en la furada apropiada según la orientación marcada en la máquina.
Note: Para quitar la tarieta de MMC/SD, ompujo suvamento hacia adontro la tarieta para
Nota: Para quitar la tarjeta de MMC/SD, empuje suavemente hacia adentro la tarjeta para expulsarla de la ranura. Para quitar la tarjeta de CE, tire la tarjeta directamente hacia fuera
expulsana de la tariura. Para quitan la taijeta de CI, tire la taijeta directamente hacia fuera. 2. Inscrito una unidad actividades de pulren del USP el avorte del USP
2. Inserte una unidad activadora de pulgar del USB al puerto o
4 Conmutar Medios de Almacenaje
1 Para cambiar la entrada de los medios de almacenaje, presione
el botón de MODO para demostrar la pantalla de menú.
- Presione el botón Arriba/Abajo para seleccionar el modo de "Tarjeta Leí-
da" o de "USB", y después presione el botón de ENCENDER/SEL.
5 Ver las Fotos y las Demostraciones de Dianositiva
- Para demostrar las fotos más grandes de 480 x 234 llevarán
para donestral más retos más grandes de 100 M25. Hier varián más largo de tiempo para la carga.
- Cuando un o más se inserta el media(s) del almacenaie, este dispositivo co-
- Cuando un o más se inserta el media(s) del almacenaje, este dispositivo comenzará el juego automáticamente. Para parar el juego, presione el PARO.
Modo de Vistazo (A)
-
Presione el botón de Por Arriba/Por Abajo para seleccionar una foto
-
Presione el botón de Por Ambas Por Abajo para seleccionar una foto. Note: Si seleciones una carote, la lista de carote exhibiró en la pentilla
Nota: Si selecciona una carpeta, la lista de carpeta exhibira en la pantalla izquierda y la list de archivo demostraró en la derecho. Presione el botén de
IZquierda y la list de archive demostrara en la derecha. Presione el botón de IZQUIERDA/DERECHA para entrar en la pantalla izquierda o derecha, y después
POR ARRIBA/POR ABAJO para seleccionar la foto que usted desea jugar.
-
Presione el botón de JUGAR/SEI, para jugar la foto en pantalla completa
-
P risione el botón de 30% n/SEE para jugar la foto en pantalla completa. Mode de Thumbnail (B)
Modo de Thumbnail (B)
a. Siga el paso 1 y 2 anteriores.
b. Presione el botón de MODO para entrar en el modo de Thumbnail.
Nota: Presione el botón de MODO otra vez para volver al
modo de Vistazo.
Modo de la Demostración de Diapositiva (B)
a. Siga los pasos anteriores para entrar en el modo de Thumbnail.
b. Presione el botón de POR ABA IO/DERECHA para seleccionar "Demostración
B. Presione er botón de PORTABAS/DELECHA para seleccionar "Demonstración de Diapositiva" en la pantalla, luego presione el botón de JUGAR/SEL.
c. La demostración de diapositiva se comienza a jugar.
c. La demostración de diapositiva se comienza a jugar. Note: Refiere o la acción del Moné de Instalación para
Nota : Refiera a la sección del Menu de Instalación para instalar los ajustos de la Demostración de Diapositive
Instalar los ajustes de la Demostración de Diapositiva. Mode de Retación (2)
Modo de Rotación (C)
a. Siga los pasos anteriores para entrar en el modo de Thumbnail.
b. Presione el botón de POR ABAJO para seleccionar la "Rotación"
de la pantalla, luego presione el botón de JUGAR/SEL.
c. Presione el botón de IZQUIERDA/DERECHA para selec-
cionar la foto, luego presione el botón de JUGAR/SEL.
Nota : Cada vez de presionar el botón de JUGAR/SEL rotará
la foto por 90 grados a la derecha.
Insinuación: En la exhibición de pantalla completa, usted puede presionar el botón
de DERECHA/IZQUIERDA para rotar 90 grados a la derecha o a la izquierda.
Nota : Presione POR ABA.IO/IZQUIERDA para seleccionar el "Beinstalar" para
Vuelta P. Peciclos: 104AB/AB/2EQ/2ENBA para seleccionar el "Homotatal" para cancelar la rotación. Seleccione la "Vuelta" para volver al modo de Thumbnail.
Función de la Clasificación (D)
a. Presione el botén de PDR ARA IO/DERECHA para seleccioner "Classifi
a. Presione el botón de FOR ABAJO/DERECHA para seleccionar "Clasificación" en el modo de vistazo, luego presione el botón de ILIGAR/SEI
cación en el modo de vistazo, luego presione el botón de JOGAN/SEE.
b. Presione el botón de POR ABAJO para seleccionar un método que clasifica y una secuencia, luego presione. LLIGAR/SEI
que clasínica y una secuencia, luego presione JOGAR/SEE.
6 Jugar la Música de MP3
- Presione el botón de POR ARRIBA/POR ABAJO para seleccionar un archivo que usted desea jugar.
Nota: Si selecciona una carpeta, la lista de carpeta exhibirá en la pantalla izquierda
Vista: El ciecliona una carpota, la lista de carpota exhibira en la pantalla. Izquierda y la lista de archivo se demostrará en la derecha. Presione el botón de IZQUIERDA/
DERECHA para entrar en la pantalla izquierda o derecha, y luego presione POR
ARRIB/POR ABAJO para seleccionar el archivo que usted desea jugar.
-
Presione el botón de JUGAR/SEL para empezar a improducir la música.
-
Presione el botón de POR ARRIBA/POR ABAJO para aumentar o reducir los volúmenes.
-
Para parar el juego, presione el botón de PARO.
7 Visión en la unidad de TV
Vision en la unidad de TV
-
Conecte con la energía.
-
Conecte el mini enchufe del AV cable (no provisto) a la salida de
AV, el otro extreme a los enchufes de Audio/Video en la TV.
-
Encienda la energía.
-
Seleccione un sistema apropiado de TV desde el Menú de Instalación.
-
Instale la TV al modo de entrada de AV.
-
Presione el botón de JUGAR/SEL para repetir el juego.
8 Menú de Instalación
(3) 本报告书的摘要为《2023年
-
Presione el botón de MODO.
-
Presione el botón de POR ABAJO para seleccionar la instalación.
-
Presione POR ARRIBA/POR ABAJO/IZQUIERDA/DERECHA para seleccionar un artículo.
-
Presione JUGAR/SEL para confirmar.
Nota: Para dejar el Mnú de Instalación, presione el botón de MODO otra vez.
[Figure]
Configurar diapositivas
Repetición Ninguno; Una; Carpeta; Todo
Intervalo 3 s, 5 s, 15 s, 30 s, 1 min, 3 min
Transición Sin efecto, Cubrir arriba; Cubrir abajo,
Descubrir izda., Descubrir dcha., Limpiar