
PC7180 - Imprimante PROGRESS - Notice d'utilisation et mode d'emploi gratuit
Retrouvez gratuitement la notice de l'appareil PC7180 PROGRESS au format PDF.

| Type de produit | Aspirateur traîneau avec sac |
| Marque | PROGRESS |
| Modèle | PC7180 |
| Puissance électrique | 700 W (estimation) |
| Tension d'alimentation | 220-240 V ~ 50/60 Hz |
| Longueur du câble | 5 m (estimation) |
| Niveau sonore | 83 dB(A) |
| Type de filtre | Filtre cartouche lavable, filtre moteur, filtre de sortie (micro ou HEPA) |
| Capacité du réservoir | 1,5 L (estimation) |
| Poids | 4,5 kg (estimation) |
| Dimensions (L x l x h) | 35 x 25 x 25 cm (estimation) |
| Accessoires inclus | Buse sols durs (PC7185), buse pour tissus d'ameublement (PC7175), suceur fente, brosse à poussière, tube télescopique, flexible, support d'accessoires |
| Fonctions principales | Aspiration à sec, indicateur de saturation du filtre, enrouleur de câble automatique, stationnement vertical et horizontal |
| Entretien | Vider le réservoir après usage, laver le filtre cartouche à l'eau (séchage 24 h), remplacer filtres tous les 6 mois |
| Sécurité | Arrêt automatique en cas de blocage, ne pas aspirer de liquides ni de cendres chaudes, débrancher avant entretien |
| Pièces détachées | Filtre cartouche: ET 407 133 054/4; filtre moteur: ET 407 133 055/1; microfiltre: ET 407 133 056/9; filtre HEPA: ET 407 133 057/7 |
| Réparabilité | Filtres accessibles sans outil, autres réparations par service agréé |
| Usage | Domestique uniquement |
FOIRE AUX QUESTIONS - PC7180 PROGRESS
Questions des utilisateurs sur PC7180 PROGRESS
0 question sur cet appareil. Repondez a celles que vous connaissez ou posez la votre.
Poser une nouvelle question sur cet appareil
Téléchargez la notice de votre Imprimante au format PDF gratuitement ! Retrouvez votre notice PC7180 - PROGRESS et reprennez votre appareil électronique en main. Sur cette page sont publiés tous les documents nécessaires à l'utilisation de votre appareil PC7180 de la marque PROGRESS.
MODE D'EMPLOI PC7180 PROGRESS
PROGRESS
PC7160
PC7170
PC7175
PC7180
PC7185
T4501 02 03 05
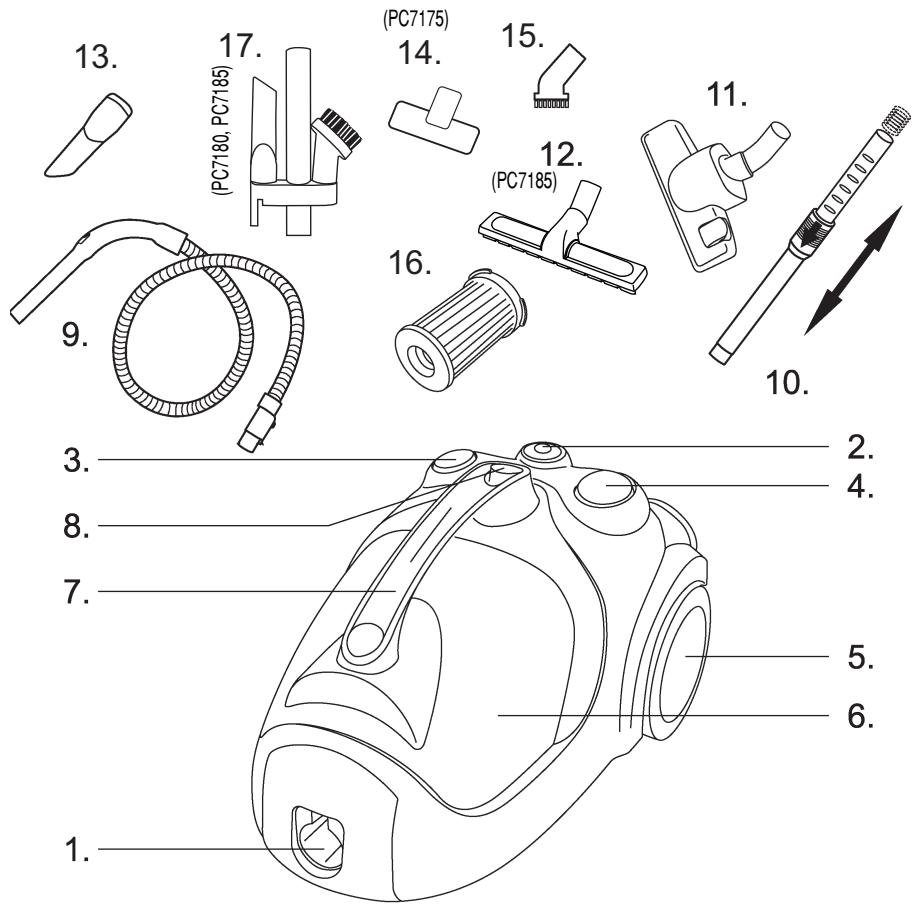
DESCRIPTION OF PARTS
- Suction inlet
- Electronic filter indicator
- On/off switch
- Cable rewind button
- Wheel
- Dust container
- Carrying handle
- Dust container open button
-
Hose
-
Telescopic tube
- Dual purpose floor nozzle
- Hard floor nozzle (PC 7185)
- Crevicenozzle
- Upholstery nozzle (PC7175)
- Dusting brush
- Cartridge filter
- Accessory holder (PC7180, PC7185)
- Vertical parking
- Horizontal parking
IMPORTANT SAFEGUARDS
Read this instruction booklet carefully.
Before using the appliance, check that the mains power voltage corresponds to the voltage shown on the rating plate.
Do not switch the appliance on if it appears to be faulty in any way or it has a damaged cord or plug. Do not try to repair the appliance by yourself. For repairs and accessories we are at your service from Monday to Friday from 8am to 6pm Progress Serviceline : 01805-306080 (Deutsche Telekom 0,12 Euro/min.)
Always remove the plug from the power socket when the appliance is not in use and before carrying out any cleaning or maintenance operations.
Never leave the appliance unattended when it is switched on. Keep the appliance out of reach of children.
This appliance is for domestic use only. Use as described in this instruction booklet.
Do not pull the appliance by the cord. Do not unplug by pulling on the cord.
Do not use appliance on wet surfaces or to vacuum liquids, mud, ash and burning cigarette butts. Do not vacuum up any highly flammable or explosive substances or gases.
Do not unplug the vacuum cleaner with wet hands.
Do not operate the vacuum cleaner too close to heaters and radiators, stoves etc.
Before you start using the vacuum cleaner, please remove large or sharp objects from the floor to prevent damage to the dust container and hose.
INSTRUCTIONS FOR USE
Before placing into operation make certain that the filters are in the proper position.
Unwind a sufficient length of cable and insert the plug into the power socket. A YELLOW mark on the power cable shows the ideal cable length. Do not extend the cable beyond the RED mark.
Press the ON/OFF button to switch the appliance on. On initial start up full power is reached after approximately 1-2 seconds.
To rewind the power cable, press the rewind button with foot, and guide the cable with hand to ensure that it does not whip causing damage.
MAINTENANCE
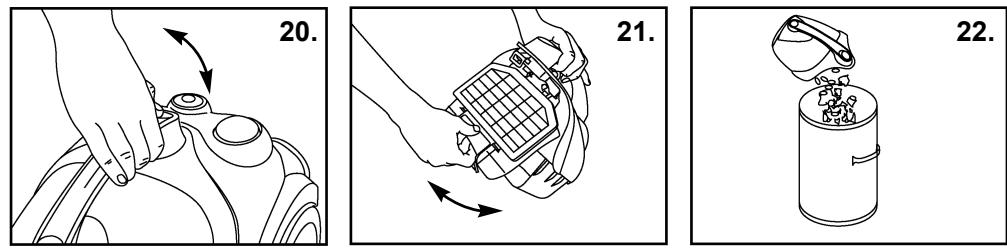
REMOVING THE CONTENTS OF THE DUST CONTAINER
Always operate the cleaner with the dust container installed.
Remove the dust container by using the open button on the handle (fig. 20).
Remove the filter set by pushing the button (fig. 21).
Remove the contents of the dust container (fig. 22).
Insert the filter set back into the dust compartment (fig. 21).
Insert the dust compartment back into the cleaner by pressing it down until it clicks (fig. 20).
Vymena a cis tennifiltu
Vysavač vždy provozujte s nainstalovanymi filtry,aby se nesnižoval sací vykon.
Před Čištěním filtru vysavač odpoje ze zásvky.
Nepouziveje t k oplachovani filtru pracku.
Nepouzivejte k suseni filtru vysousec vlasu.
Vymena kazetovho filtru
Odejměte nádobu na prach použitítm tlačítka otevirání na držadle (obr.20.).
Odejměte filtracné sadu stiskem tlačitka (obr.21).
Vyjměte kazetový filtr otočením proti směru hodinovych ručíček (A) a vytažením (B) (obr.23).
Oplachnete filtr pod vodovodnim kohoutkem (obr.24).
Nechejte filtr schnout po dobu asi 24 hodin a prd dalsim pouzitim se ujistete, ze je dokonale suchy. Nevystavujte ho prímemu slunci nebo extrémnim susićim podminkám (obr.25). Vestlize potbrebujete během sušeni kazetového filtr ysvávat, použijte nahradní filtr který je dodán v obalu.
Vlozte kazetovy filtr zpe t na své misto (B) a otoce jim ve smeru hodinovych ručicek (A) (obr.23).
Vlozte sadu filtru zpét do oddílu pro nádobu na prach (obr.21).
Vlozte opatrnym vtlacenim nadobu na prach zpet do vysavace dokud nezapadne (obr.20). Referencni cislo kazetoveho filtru: ET 407 133 054/4.
Vymena motorovho filtru
Odejměte nádobu na prach použítim tlacíta otevirání na držadle (obr.20.).
Odejměte filtracné sadu stiskem tlacícka (obr.21).
Vyjměte filtr s mřížkou z jeho držáku (obr.26).
Vyjměte filtry z mřížky (obr.27)
Vlozte novy filtr do mriky filtru (obr.27).
Vlozte filtr v mízce zpět na jeho MSTO (obr.26). Referencni cislo motorového filtru: ET 407 133 055/1.
Vymena vystupnho filtru
Otevrete predi n kryt a vyjmte filtr na vystupu vzduchu (obr. 28).
Vvjmeftilrzmfrzky.
Vlozte novy filtr na jeho misto a uzavrete mrizku filtru (obr. 28). Referencnici cislo mikrofiltru: ET 407133 0569 (zalezi na provedeni). Referencnici cislo HEPA filtru: ET 407 133 0577 (zalezi na provedeni).
PRIPOJENI A ODPOJENI HADICE NA VSTUP SANI (obr.29)
Hadici pripoje na vstup sani pritlaenim, dokud nezapadne.
Odpojení hadice od vstupu sání provedete stiskem tlačitka na konci hadice.
KONTROLKA INDIKÁTORU FILTRU
Než začnete s vysávaním, zapojte vysavač a zapnéte ho (bez pripojené hadice). Pokud kontrlka svítí, vycistěte filtr.
Pokud kontrolka nesviti, prijoje hadici a potrebne prisluşenství a začněte vysávat.
Bēhem vysávání bude kontrlka problikávat. To je v pořádu.
OCHRANA ZIVOTNIHO PROSTREDI
Obalovy material ani stary spotrebic nevyhazujte do domovnho oppadu.
Lepenkov'y obalov'y material se muze vyhazovat do sbernych nadob na oppadovy papir.
Plastikovy pytel z polyetylenu (PE)odevzdejte na sberné mistro polyetylenového opadu k recyklaci.
Na konci zivotnosti spotrebice ho nechte recyklovat.
Plastové současti mají na sobě oznáčeni druhu materialú, taků podobné jako jině materialy, se mohou na konciživotnosti spotřebiće recyklovat.
Vyżadeje tsi prosim konkrétni informace u mistristnich uradu. Zaneseny vzduchovy otvor a znečistěné filtry
Gestlize dojde k zaneseni v hubici,trubkach nebo hadici,vysavač se automaticky zastaví.
Odpjte vysavac ze zásuvky a nechte ho asi 45-60 minut chladnout.Pak odstrante prekážky volného proudéní vzduchu a/nebo vyčistěte filtry.
Vysava znovu zapněte.
POPIS
- Vstupni otvor sani
- Elektronicky indikator filtru
- Hlavni vypinač
- Tlačitko naviják kabelu
- Kolecko
- Nádoba na prach
- Prenáseci drzadlo
- Tlačitko oteviráni nádoby na prach
-
Hadice
-
Kovová teleskopická trabka
- Kombinovana podlahová hubice
- Hubice na hladkou podlahorou krytinu (PC7185)
- Štebrinová hubice
- Hubice na calouneni (PC7175)
- Kartáč na prach
- Kazetovy filtr
- Držák příslušenství (PC7180, PC7185)
- Vertikánlí parkováci poloha
- Horizontálí parkováci poloha
DULEZITABEZPECNOSTNIUPOZORNENI
Radne si tuto prirucku prostudujte.
Pred použitím spotbrebiče zkontrolujte, zda napajćí napěti vaši elektrické instalace odpovída napěti uvedenému na typovém štítku spotbrebiče.
Nezapinejte spotbreic, jestlize se vam zdaney porouchany, nebo ma poskozeny privodni kabel nebo sifovou zastrchu. Nepokousejte se opravovat spotbreic sami. V priade opravy nebo potreby nahradnic dhlu se obraceje na svho prodeje nebo na autorizované servisni stredisko.
Kdyz spotfebič nebudete používat a pred kazdym cisětín vždy odpoje zástrčku ze zásuvky. Spotfebič musí byt odpojen ze zásuvky i v pripadé jakékoli opravy.
Nikdy nenechávejte zapnuty spotbrebič bez dozoru. Udržujte spotbrebič mimo dosah detí.
Tento spotbrebič je určenjen pro použití v domácnosti. Používejte ho v souladu s námvdem k obšluge.
Nikdy spotbreic nepremistujte. Tahem za elektricky kabel. Nikdy zastrcku neodpojute ze zasuvky tahem za kabel.
Nepoužívejte spotěbič na mokrém povrchu ani nevysávejte kapaliny, bláto, popel a hořić cigaretové nedopalky. Nevysávejte zárdné silné vznětíve ani vybusné látky nebo plyny.
Neodpojute vysavač ze zásuvky vlhkýma rukama.
Nrepovozujte vysavac priflis blizko zdrojutepla a radiatoru, kamen apod.
Pred yvarsáváním odstrante prosím z podlavy velké a ostre prédmety. Zabránité tak poskození hadice a nádoby na prach.
NAVOD K OBSLUZE
Pred uvedenim do provozu se prsevédcte, ze filtry jsou nasazeny a jsou ve spravné poloze.
Pred použitím spotřebie sc odviinte dostatečnou delku kabel a pak teprve zástrčku zapojujte do zásuvky. Použitelnu delku kabel vyznacuje ZLUTÁ značka. CERVENÁ značka označuje mezní delku, za kterou nesmíté kabel odvjet.
Stiskněte tlacítko hlavního vypínače a vysavac zapnéte. Po zapnutí vysavace je dosaženo maximalníno vykonu asi po 1-2 vterinách.
Kdyz chcete privodni kabel navinout, stisknete nohou tlacitko navijeni a kabel rukou pridržujte, aby švihem nezpúsobil nejakou skodu.
Hladina hluku: 83dB
UDRZBA
VYPRAZDNOVÁN OBSAHU NADOBY NA PRACH
Vysavač zapínejte pouzePokud je náboba na prach vložena do vysavače.
Odejměte nádobu na prach použitím tlacítka otevirání na držadle (obr.20.).
Odejměte filtracné sadu stiskem tlacítka (obr.21).
Vyprázdne tē obsah nádoby na prach (obr.22).
Vlozte sadu filtru zpět do oddílu pro nádobu na prach (ob.21).
Vlozte opatrnym vtlačením nádobu na prach zpět do vysavace dokud nezapadne (obr.20).
REPLACING THE FILTERS
The dust container must be emptied if the window of the electronic filter indicator is illuminated when the cleaner is operating at maximum power and the nozzle is raised from the floor.
Filters should be replaced at least twice a year or when they become visibly soiled.
Always operate the cleaner with filters installed to avoid reduced suction.
Disconnect from electrical outlet before changing the filters.
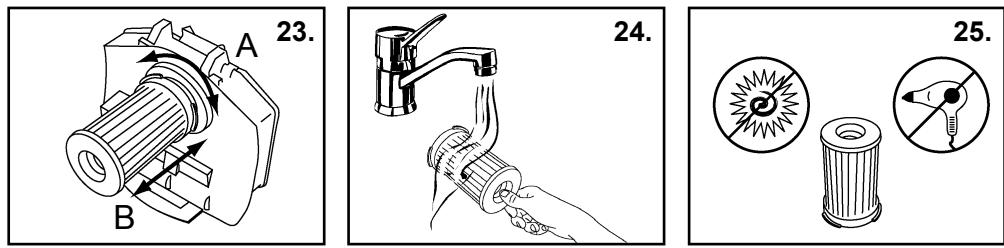
Replacing the cartridge filter
Remove the dust container by using the open button on the handle (fig. 20).
Remove the filter set by pushing the button (fig. 21).
Remove the cartridge filter by turning it counter-clockwise (A) and pull it out (B) (fig. 23).
Rinse it under tap water (fig. 24).
Air dry for approximately 24 hours, to ensure it is completely dry before re-using. Avoid direct sunlight and extreme drying circumstances (fig. 25). If you wish to use your appliance while the cartridge filter is drying, you may use the extra cartridge filter inserted in the packaging box.
Insert the cartridge filter into its place (B) and turn it clockwise (A) (fig. 23).
Insert the filter set back into the dust container.
Insert the dust container back into the cleaner by pressing it down until it clicks.
Cartridge filter reference number: ET 407 133 054/4.
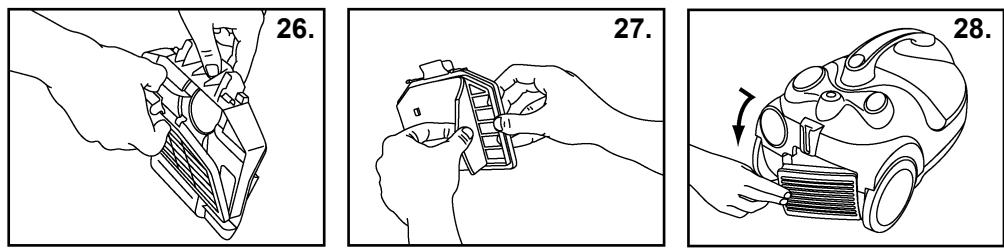
Replacing the motor filter
Remove the dust container by using the open button on the handle (fig. 20).
Remove the filter set by opening the button (fig.21).
Remove the filter with grill from its holder (fig.26).
Remove the filter from the grill (fig. 27).
Put a new filter into the filter grill (fig. 27).
Put the filter with grill back into its place (fig.26).
Motor filter reference number: ET 407 133 055/1.
Replacing the exhaust filter
Open the filter grill to remove the exhaust filter (fig. 28).
Take the filter out of its place.
Put a new filter into its place, then close the filter grill (fig. 28).
Micro filter reference number: ET 407 133 056/9 (depends on the model).
HEPA filter reference number: ET 407 133 057/7 (depends on the model).
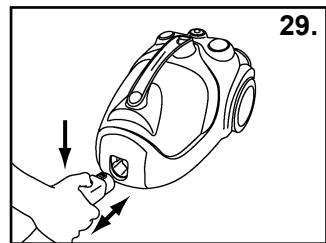
OPERATING THE HOSE IN/OUT OF THE SUCTION INLET (fig. 29)
To connect the hose into the suction inlet push it until it clicks.
To disconnect the hose from the suction inlet push the button at the end of the hose.
FILTER INDICATOR LIGHT
Before commencing cleaning, plug the cleaner in and turn it on (without the hose attached to the cleaner). If the light is on, clean the filter.
If the light is not on, attach the hose and all the other necessary attachments and commence cleaning.
The light will flicker on and off whilst cleaning. This is normal.
PROTECTING THE ENVIRONMENT
Attempt to recycle packaging material and old appliances
The cardboard packaging can be placed in the waste paper collection.
Deposit the plastic bag made of polyethylene (PE) at the PE collection point for recycling Recycling the Appliance at the end of its life
The plastic components all carry a material identification marking so that, like the other materials, they can recycled at the end of the life of the appliance.
Please inquire with your local authority.
Blocked air flow and dirty filters
The cleaner stops automatically if a blockage occurs in the nozzle/tube/hose or if the filters are blocked with dirt.
Disconnect from mains and allow the cleaner to cool for 20-30 minutes. Remove blockage and/or clean filters.
Restart the cleaner.
- PROGRESS
- DESCRIPTION OF PARTS
- IMPORTANT SAFEGUARDS
- INSTRUCTIONS FOR USE
- MAINTENANCE
- REMOVING THE CONTENTS OF THE DUST CONTAINER
- Vymena a cis tennifiltu
- Vymena kazetovho filtru
- Vymena motorovho filtru
- Vymena vystupnho filtru
- PRIPOJENI A ODPOJENI HADICE NA VSTUP SANI (obr.29)
- KONTROLKA INDIKÁTORU FILTRU
- OCHRANA ZIVOTNIHO PROSTREDI
- POPIS
- DULEZITABEZPECNOSTNIUPOZORNENI
- NAVOD K OBSLUZE
- UDRZBA
- VYPRAZDNOVÁN OBSAHU NADOBY NA PRACH
- REPLACING THE FILTERS
- Replacing the cartridge filter
- Replacing the motor filter
- Replacing the exhaust filter
- OPERATING THE HOSE IN/OUT OF THE SUCTION INLET (fig. 29)
- FILTER INDICATOR LIGHT
- PROTECTING THE ENVIRONMENT
- Blocked air flow and dirty filters
Marque : PROGRESS
Modèle : PC7180
Catégorie : Imprimante