
USB NETWORK ADAPTER USB TO RJ45 18M - Adaptateur réseau USB VIVANCO - Notice d'utilisation et mode d'emploi gratuit
Retrouvez gratuitement la notice de l'appareil USB NETWORK ADAPTER USB TO RJ45 18M VIVANCO au format PDF.

| Type d'appareil | Modem USB |
| Interface | USB |
| Compatibilité système | Windows 98SE, ME, 2000, XP, Vista |
| Installation | Installation automatique via CD-ROM |
| Logiciel inclus | Logiciel de connexion inclus sur CD-ROM |
| Alimentation | Alimentation via port USB |
| Dimensions | Non précisé |
| Poids | Non précisé |
| Vitesse de connexion | Non précisé |
| Indicateurs | Non précisé |
| Compatibilité réseau | Non précisé |
| Garantie | Non précisé |
| Langues du manuel | Multilingue |
| Type de connecteur | USB standard |
| Support technique | Non précisé |
FOIRE AUX QUESTIONS - USB NETWORK ADAPTER USB TO RJ45 18M VIVANCO
Questions des utilisateurs sur USB NETWORK ADAPTER USB TO RJ45 18M VIVANCO
0 question sur cet appareil. Repondez a celles que vous connaissez ou posez la votre.
Poser une nouvelle question sur cet appareil
Téléchargez la notice de votre Adaptateur réseau USB au format PDF gratuitement ! Retrouvez votre notice USB NETWORK ADAPTER USB TO RJ45 18M - VIVANCO et reprennez votre appareil électronique en main. Sur cette page sont publiés tous les documents nécessaires à l'utilisation de votre appareil USB NETWORK ADAPTER USB TO RJ45 18M de la marque VIVANCO.
MODE D'EMPLOI USB NETWORK ADAPTER USB TO RJ45 18M VIVANCO
Gebrauchsanleitung – User's Manual – Notice d'emploi – Instrucciones de uso – Istruzioni per l'uso– Gebruiksaanwijzing– Instruções de uso – Instrukcja obstugi – Brugermanualer – Bruksanvisning

USB
CD-ROM
1
2
3.
4.
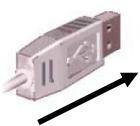
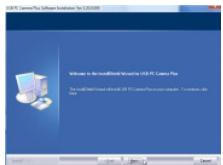
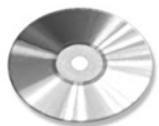
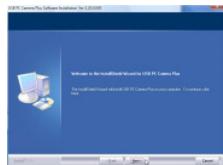
| GB - 1st step: Connect the adapter to the USB port on the computer (fig. 1) | 2nd step: Follow the instructions on the screen. (fig. 2)3rd step: If required, insert the driver CD in the CD-ROM drive (fig. 3) | 4th step: Follow the instructions on the screen (fig. 4)5th step: Connect the USB adapter to the network and set it up to your requirements. | Windows 98SE:System will ask you to insert Win98SE CD-ROM, and copy the necessary files.Windows ME, 2000, XP, VistaThe hardware will be detected and installed by the system |
| D - 1. Schritt:Verbinden Sie die Adapter dem USB-Anschluss desComputers (Abb. 1) | 2. Schritt: Folgen Sie den Anweisungen auf dem Bildschirm.(Abb. 2)3. Schritt: Legen Sie ggf. wenn benötigt die Treiber-CD in dasCD-ROM Laufwerk ein (Abb. 3) | 4. Schritt: Folgen Sie den Anweisungen auf dem Bildschirm.5. Schritt: Verbinden Sie den USB-Adapter mit dem Netzwerk und richten Sie cesses entsprechend ihrenAnforderungen ein. | Windows 98SE:Halten Sie die Windows 98 Installations-CD bereit, umbenöttigte Treiber zu Installieren.Windows ME, 2000, XP, VistaDie Hardware wird vom System erkannt und installiert |
| F - Étape 1:Reliez l'adaptateur à la priseUSB de votre ordinateur.(fig. 1) | Etape 2: Suivez les instructions qui apparaissent à l'écran(fig. 2)Etape 3: Insérez si nécessaire le CD pilote dans le lecteur(fig. 3) | Etape 4: Suivez les instructions qui apparaissent àl'écran (fig. 4)Etape 5 Reliez l'adaptateur USB au réseau etinstallé-le selon vos exigences. | Windows 98SE:Ayez à portée de main le CD d'installation du Windows98 afin d'installer le pilote nécessaire.Windows ME, 2000, XP, VistaLe matériel est reconnu par le système et installé. |
| E - 1° caso: Conecte eladaptador al puerto USB de suordenador. (fig. 1) | 2° caso: Siga las instrucciones de la pantalla. (fig. 2)3° caso: Si es NEEDario, introduzca el CD de loscontroladores en launidad de lecture de CD-ROM. (fig. 3) | 4° caso: Siga las instrucciones de la pantalla. (fig. 4)5° caso: Conecte el adaptorador USB a la red einstale estaULTIMA según sus preferencias. | Windows 98SE:Tenga el CD de instalación de Windows 98 a mano, parainstalar los controladores necessarios.Windows ME, 2000, XP, VistaElsystema Reconoceré e instalaráel hardware. |
| I - Passaggio 1: Collegarel'adattatore alla porta USB delcomputer. (Fig. 1). | Passaggio 2:Seguire le struczioni visualizzate sullo schermo(Fig. 2).Passaggio 3:Se necessario insereire il CD dei driver nellettoreCD-ROM (Fig. 3). | Passaggio 4:Seguire le struczioni visualizzate sullo schermo (Fig. 4).Passaggio 5: Collegare l'adattatore USB alla rete econfigurare quest's ultimately in base alle specificheesigne. | Windows 98SE:mantenere a disposizione il CD diinstallazione di Windows 98 per installare eventuali drivernecessari.Windows ME, 2000, XP, Vista:L'hardware viene riconosciuto ed installato dalystema. |
Gebrauchsanleitung – User's Manual – Notice d'emploi – Instrucciones de uso – Istruzioni per l'uso– Gebruiksaanwijzing– Instruções de uso – Instrukcja obstugi – Brugermanualer – Bruksanvisning
| NL - Stap 1: Sluit de adapter aan op de USB-aansluiting van de computer. (afb. 1) | Stap 2: Volg de aanwijzingen in het scherm op. (Afb. 2) Stap 3: Plaats zo nodig de CD met de stuurprogramma's in het CD-ROM station van uw computer. (Afb. 3) | Stap 4: Volg de aanwijzingen in het scherm op. (Afb. 4) Stap 5: Sluit de USB-adapter aan op uw netwerk enRCT dit in overeenstemming met uw wensen in. | Windows 98SE: Houd de Windows 98 installment-CD bij de hand om debenodigde stuurprogramma's te installereren. Windows ME, 2000, XP, VistaDe hardware worden het system herkend engeinstalleerd. |
| PL* - Krok 1: Podłucz adapter do złaczaUSB komputera. (rys. 1). | Krok 2: Wykonuj polecenia wyświetlane na ekranie (rys. 2).Krok 3: W razie koniecznosci wędy plętę CD ze sterownikami do napȩdu CD. (rys. 3). | Krok 4: Wykonuj polecenia wyświetlane na ekranie (rys. 4).Krok 5: Podłucz adapter USB do sieci i odpowiedniozdefiniuj ustawienia. | Window 98SE: System poprosi o wędzanie płyty CD Win98SEi skopiomanie plików wymaganych w celu oblsugi kameryinternetowej USB.Windows ME, 2000, XP, VistaSprzej zestanie Rozpoznany przyez system i zaintalowany. |
| P - 1° passo:Ligue o adaptador à entradaUSB do seu comptuter. (fig. 1) | 2° passo: Siga as instruções do ecran. (fig. 2)3° passo: Se nécessário, insira o CD do controlador na drive de CD-ROM. (fig. 3) | 4° passo: Siga as instruções do ecran. (fig. 4)5° passo: Conecte o adaptor USB à rede econfigure-a de accordo com as suas necessities. | Windows 98SE: Mantenha o CD de instalação do Windows 98 àIELDra parainstalar os controladores que foram necessários. Windows ME, 2000, XP, VistaO hardware é reconhecido pelo sistemas e depois instalado. |
| DK - 1. skridt: Forbindadaptereren med USB-tilslutningen på compturen. (fig. 1) | 2. skridt: Følg anvisingerne på skærmen. (fig. 2)3. skridt: Læg i givet fald om nædvendigt driver-CDen i CD-ROM-drevet. (fig. 3) | 4. skridt: Følg anvisingerne på skærmen. (fig. 4)5. skridt: Forbind USB-adapteren med netværket, ogind stil dette svarende til dine krav. | Windows 98SE: Systemet:beder dig sètete Win98SE CD-ROM'en i og kopiere de nèdvendige filer for atunderstâte dit USB Web kamera.Windows ME, 2000, XP, VistaSystemet registreer og installerer hardweren. |
| SE - Steg 1: Anslut adaptern till datorns USB-kontakt. (bild 1) | Steg2: Följ anvisingarna på bildskärmen. (bild 2)Steg 3: Lägg vid behov in in drivrutins-CD:n i CD ROM-enheten. (bild 3) | Steg 4: Följ anvisingarna på bildskärmen. (bild 4).Steg 5: Anslut USB-adaptern till nätverket och ställin detta i enlighem med dina behov. | Windows 98SE:Ha Windows 98 installations-CD i beredskap für attinstallera nõdvändiga drivrutiner.WindowsME, 2000, XP, VistaHårdvaran identificeras och installereras av systemet. |
Dystrybutor VIVANCO POLAND Sp.z.o.o. UI Sosnkowskiego 1 02 495 Warszawa
Vivanco GmbHVivanco Gruppe AG
Ewige Weide 15
D-22926 Ahrensburg / Germany
Phone +49 (0) 4102 / 231 - 0
Fax +49 (0) 4102 / 231- 160 Internet: www.vivanco.de
Product support
D 01805/404910(12Cent/Min)
hotline@vivanco.de
G consumer@vivanco.co.uk
F hotline@vivanco-france.fr
E vivanco@vivanco.es
I support@vivanco.it
NL info@vivanco.nl