
USB LINK-N 23429 - Accessoire informatique VIVANCO - Notice d'utilisation et mode d'emploi gratuit
Retrouvez gratuitement la notice de l'appareil USB LINK-N 23429 VIVANCO au format PDF.

| Type de produit | Adaptateur USB Link |
| Caractéristiques techniques principales | Connectivité USB, compatible avec divers appareils |
| Utilisation | Permet de connecter des périphériques USB à un ordinateur ou un autre appareil compatible |
| Maintenance et réparation | Pas de maintenance nécessaire, en cas de défaillance, remplacer l'appareil |
| Sécurité | Conforme aux normes de sécurité électrique, éviter l'exposition à l'humidité |
| Informations générales utiles | Vérifier la compatibilité avec votre système d'exploitation avant l'achat |
FOIRE AUX QUESTIONS - USB LINK-N 23429 VIVANCO
Questions des utilisateurs sur USB LINK-N 23429 VIVANCO
0 question sur cet appareil. Repondez a celles que vous connaissez ou posez la votre.
Poser une nouvelle question sur cet appareil
Téléchargez la notice de votre Accessoire informatique au format PDF gratuitement ! Retrouvez votre notice USB LINK-N 23429 - VIVANCO et reprennez votre appareil électronique en main. Sur cette page sont publiés tous les documents nécessaires à l'utilisation de votre appareil USB LINK-N 23429 de la marque VIVANCO.
MODE D'EMPLOI USB LINK-N 23429 VIVANCO
Gebrauchsanleitung – User's Manual – Notice d'emploi – Instrucciones de uso – Istruzioni per l'uso– Gebruiksaanwijzing– Instruções de uso – Instrukcja obstugi – Brugermanualer – Bruksanvisning
CD-ROM
| 1 | 2 | 4 | 5 | |
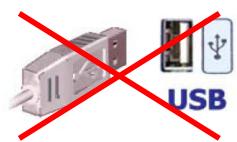
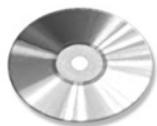
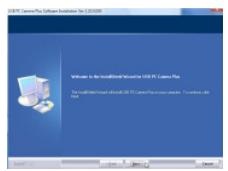
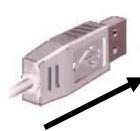
| GB - 1st step: Do not connect the USB adapter to the USB port on your computer. (fig. 1) | 2nd step: Insert the CD ROM into your CD-ROM drive. (fig. 2)3th step: Follow the instructions on the screen. (fig. 4)4th step: Connect the USB plug with your computer. (fig. 5) | 5th step: Follow the instructions on the screen. (fig. 4)6th step:Repeat the process on your second computer | Keep the Windows installation CD available in order to install any required drivers and follow the instructions on the screen | |
| D - 1. Schritt: Verbinden Sie den USB-Adapter nicht mit dem USB-Anschluss. (Abb. 1) | 2. Schritt: Legen Sie die Treiber-CD in das CD-ROM Laufwerk ein. (Abb. 2)3. Schritt: Folgen Sie den Anweisungen auf dem Bildschirm. (Abb. 4)4. Schritt: Verbinden Sie den USB-Stecker mit dem Computer (Abb. 5) | 5. Schritt: Folgen Sie den Anweisungen auf dem Bildschirm. (Abb. 4)6. Schritt: Wiederholen Sie den Vorgang an Ihr zweiten Computer | Halten Sie ggf. die Windows Installations-CD bereit, um benöttigte Treiber zu Installieren und folgen Sie den Anweisungen auf dem Bildschirm | |
| F - Étape 1: Ne reliez pas l'adaptateur USB à la prise USB de votre ordinateur. (fig. 1) | Etape 2: Insérez le CD pilote dans le lecteur de CD. (fig. 2)Etape 3: Suivez les instructions de l'écran. (fig. 4)Etape 4: Reliez la prise USB à votre ordinateur. (fig. 5) | Etape 5: Suivez les instructions de l'écran. (fig. 4)Etape 6: Répétez la procédure sur votre deuxieme ordinateur | Ayez le CD d'installation de Windows à portée de main afin d'installer les pilotes nécessaires et suivez les instructions qui apparaissent à l'écran. | |
| E - 1°重要原因: No connecte su adaptador USB al puerto USB de su ordenador. (fig. 1) | 2°重要原因: Introduzca el CD con los controladores en launidad CD-ROM. (fig. 2)3°重要原因: Siga las instrucciones en pantalla (fig. 4)4°重要原因: Conecte el conector USB al ordenador. (fig. 5) | 5°重要原因: Siga las instrucciones en pantalla (fig. 4)6°重要原因: Repita these pasos en su segundo ordenador. | Tenga preparado el CD de instalación de Windows en caso de que tengue que instalarlos controladores correspondentes y siga las instrucciones de la pantalla. | |
| I - Passaggio 1: Non collegare l'adattatore USB alla porta USB del computer in dotazione. (Fig. 1). | Passaggio 2: inserire il CD dei driver nellettore CD-ROM. (Fig. 2).Passaggio 3: seguire le istruzioni che vengono presentate a schermo. (Fig. 4).Passaggio 4: Collegare lo spinotto USB al computer. (Fig. 5). | Passaggio 5: seguire le istruzioni che vengono presentate a schermo. (Fig. 4).Passaggio 6: Ripetere il processo sul secondo computer in dotazione. | Conservare il CD di installment di Windows a disposizione per installare i driver necessari e seguire le istruzioni visualizzate sullo schermo. |
Gebrauchsanleitung – User's Manual – Notice d'emploi – Instrucciones de uso – Istruzioni per l'uso– Gebruiksaanwijzing– Instruções de uso – Instrukcja obstugi – Brugermanualer – Bruksanvisning
| NL - Stap 1: Sluit de USB-adapteriet Niet aan op de USB-aansluiting van uw computer. (afb. 1) | Stap 2: Plaat de CD met de stuurprogramma's in het CD-ROM station van uw computer. (Afb. 2)Stap 3: Volg de aanwijzingen in het scherm op. (Afb. 4)Stap 4: Sluit de USB-stekker aan op de computer. (Afb. 5) | Stap 5: Volg de aanwijzingen in het scherm op. (Afb. 4)Stap 6: Herhaal het proces bij uw tweede computer. | Houd zo nodig de installmentie-CD bij de hand om de moodzakelijkste stuurprogramma's te kuren installeren. Volg waarbij de aanwijzingen in het scherm op. |
| PL* - Krok 1: Nie podlaczaj adaptorera USB do złacza USB komputera. (rys. 1). | Krok 2: Umieść plęte CD ze sterownikami w napędzie CD. (rys. 2).Krok 3: Wykonuj polecenia wyświetlane na ekranie. (rys. 4).Krok 4: Podlacź wyczȩ USB do komputera. (rys. 5). | Krok 5: Wykonuj polecenia wyświetlane na ekranie. (rys. 4).Krok 6: Powtórzyc czynnosci na drugim komputerze | W razie koniecznosci przygotuj dysk CD z programem instalacynjym Windows, aby zaintalować wymagane sterownikicy zgodnia z poleceniami wyświetlanymi na ekranie. |
| P - 1º passo: Não ligue o adaptorador USB à entrada USB do seu computador. (fig. 1) | 2º passo: Insira o CD de controladores na drive de CD-ROM. (fig. 2)3º passo: Siga as instruções exibidas no ecran. (fig. 4)4º passo: Ligue a ficha USB ao computador. (fig. 5) | 5º passo: Siga as instruções exibidas no ecran. (fig. 4)6º passo: Repita este procedimento no segundo computador. | Mantenha o CD de instalação do Windows preparado para o caso de necessitar de instalar os controladores correspondentes e siga as instruções do ecran. |
| DK - 1. skridt: Forbind/DD: USB-adapteren med USB-tilslutningen på din computer. (fig. 1) | 2. skridt: Sæt CD ROM'en i dit CD ROM-drev (fig. 2)3. skridt: Følg instruktionerne på skærmen (fig. 4)4. skridt: Forbind USB-stikket med computeren. (fig. 5) | 5. skridt: Følg instruktionerne på skærmen. (fig. 4)6. skridt: Repita este procedimento no SECONDO computador. | Mantenha o CD de instalação do Windows preparado para o caso de necessitar de instalar os controladores correspondentes e siga as instruções do ecran. |
| SE - Steg 1: Anslut inte USB-adaptern till datorns USB-kontakt. (bild 1) | Steg2:Lägg in CD-skivan med drivrutinerna i CD ROM-enheten. (bild 2)Steg 3: Följ anvisingarna på bildskärmen. (bild 4).Steg 4: Anslut USB-kontakten till datorn. (bild 5). | Steg 5: Följ anvisingarna på bildskärmen. (bild 4).Steg 6: Upprepa proceduren på din andere dato. | Ha i förekommende fall Windows installations-CD i beredskap für att installerera erforderliga drivrutiner och följ anvisingarna på bildskärmen. |
Dystrybutor VIVANCO POLAND Sp.z.o.o. UI Sosnkowskiego 1 02 495 Warszawa
Vivanco GmbHVivanco Gruppe AG
Ewige Weide 15
D-22926 Ahrensburg / Germany
Phone +49 (0) 4102 / 231 - 0
Fax +49 (0) 4102 / 231- 160 Internet: www.vivanco.de
Product support
D 01805/404910(12Cent/Min)
hotline@vivanco.de
G consumer@vivanco.co.uk
F hotline@vivanco-france.fr
E vivanco@vivanco.es
I support@vivanco.it
NL info@vivanco.nl