MODE D'EMPLOI UNIVERSAL LCD 8 IN 1 REMOTE CONTROL VIVANCO
Vivanco UR 850 LCD remote control for practically all TV, audio, video and other infrared-controllable devices
Inserting the batteries
Open the battery compartment on the back of the device, push the flap down lightly and insert 2 AA alkaline batteries. Make sure that the polarity on the batteries and in the battery compartment correspond (thick spring = cell at bottom = -) and then close the lid carefully. - Use undamaged batteries only.
Adapting to devices
In order to control your devices you must adapt or set the remote control to them. There are two ways of doing so: direct control code entry or code search.
If the UR 850 LCD does not understand you it displays ERROR and you can then repeat the entry.
Direct control code entry

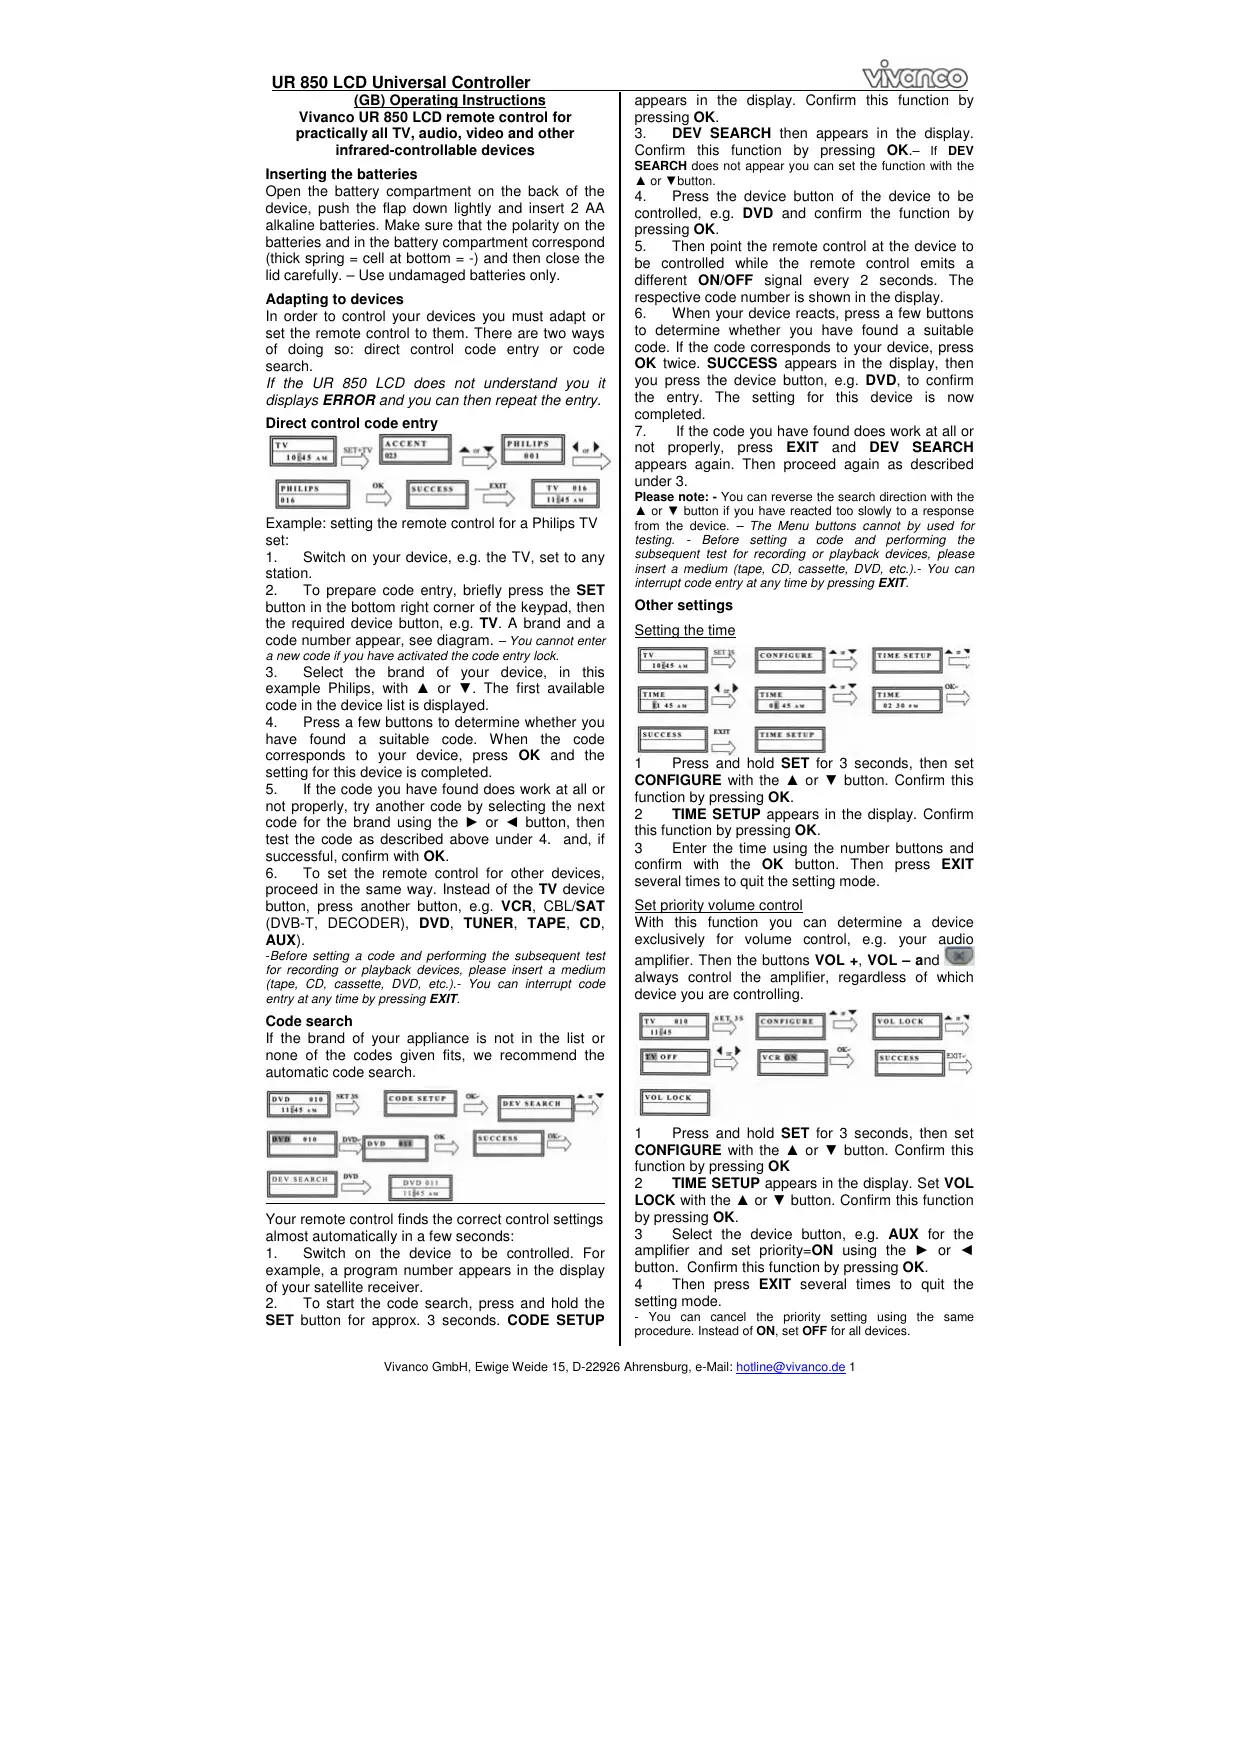
Example: setting the remote control for a Philips TV set:
-
Switch on your device, e.g. the TV, set to any station.
-
To prepare code entry, briefly press the SET button in the bottom right corner of the keypad, then the required device button, e.g. TV. A brand and a code number appear, see diagram. - You cannot enter a new code if you have activated the code entry lock.
-
Select the brand of your device, in this example Philips, with or . The first available code in the device list is displayed.
-
Press a few buttons to determine whether you have found a suitable code. When the code corresponds to your device, press OK and the setting for this device is completed.
-
If the code you have found does work at all or not properly, try another code by selecting the next code for the brand using the or button, then test the code as described above under 4. and, if successful, confirm with OK.
-
To set the remote control for other devices, proceed in the same way. Instead of the TV device button, press another button, e.g. VCR, CBL/SAT (DVB-T, DECODER), DVD, TUNER, TAPE, CD, AUX).
-
Before setting a code and performing the subsequent test for recording or playback devices, please insert a medium (tape, CD, cassette, DVD, etc.).- You can interrupt code entry at any time by pressing EXIT.
Code search
If the brand of your appliance is not in the list or none of the codes given fits, we recommend the automatic code search.

Your remote control finds the correct control settings almost automatically in a few seconds:
-
Switch on the device to be controlled. For example, a program number appears in the display of your satellite receiver.
-
To start the code search, press and hold the SET button for approx. 3 seconds. CODE SETUP
appears in the display. Confirm this function by pressing OK.
3. DEV SEARCH then appears in the display. Confirm this function by pressing OK.- If DEV SEARCH does not appear you can set the function with the or button.
4. Press the device button of the device to be controlled, e.g. DVD and confirm the function by pressing OK.
5. Then point the remote control at the device to be controlled while the remote control emits a different ON/OFF signal every 2 seconds. The respective code number is shown in the display.
6. When your device reacts, press a few buttons to determine whether you have found a suitable code. If the code corresponds to your device, press OK twice. SUCCESS appears in the display, then you press the device button, e.g. DVD, to confirm the entry. The setting for this device is now completed.
7. If the code you have found does work at all or not properly, press EXIT and DEV SEARCH appears again. Then proceed again as described under 3.
Please note: - You can reverse the search direction with the or button if you have reacted too slowly to a response from the device. - The Menu buttons cannot by used for testing. - Before setting a code and performing the subsequent test for recording or playback devices, please insert a medium (tape, CD, cassette, DVD, etc.).- You can interrupt code entry at any time by pressing EXIT.
Other settings
Setting the time

1 Press and hold SET for 3 seconds, then set CONFIGURE with the or button. Confirm this function by pressing OK.
2 TIME SETUP appears in the display. Confirm this function by pressing OK.
3 Enter the time using the number buttons and confirm with the OK button. Then press EXIT several times to quit the setting mode.
Set priority volume control
With this function you can determine a device exclusively for volume control, e.g. your audio amplifier. Then the buttons VOL +, VOL - and always control the amplifier, regardless of which device you are controlling.

1 Press and hold SET for 3 seconds, then set CONFIGURE with the or button. Confirm this function by pressing OK
2 TIME SETUP appears in the display. Set VOL LOCK with the or button. Confirm this function by pressing OK.
3 Select the device button, e.g. AUX for the amplifier and set priority = ON using the or button. Confirm this function by pressing OK.
4 Then press EXIT several times to quit the setting mode.
- You can cancel the priority setting using the same procedure. Instead of ON, set OFF for all devices.
Locking or releasing device codes
To prevent settings from being changed accidentally, proceed as follows:
1 Press and hold SET for 3 seconds, then set CONFIGURE with the or button. Confirm this function by pressing OK.
2 TIME SETUP appears in the display. Set DEV LOCK using the or button. Confirm this function by pressing OK.
3 Select the device button, e.g. TV for the television and set lock=ON using the or button. Confirm this function by pressing OK.
4 Then press EXIT several times to quit the setting mode.
- You can cancel the lock setting using the same procedure. Instead of ON, set OFF for all devices.
Backlight
To save battery capacity you can switch off the LCD illumination. To do so, proceed as follows:
1 Press and hold SET for 3 seconds, then set CONFIGURE with the or button. Confirm this function by pressing OK.
2 TIME SETUP appears in the display. Set LIGHT using the or button. Confirm this function by pressing OK.
3 Switch the light ON or OFF using the or button. Confirm this function by pressing OK.
4 Then press EXIT several times to quit the setting mode.
Adjusting the contrast
You can adjust the contrast to improve readability: 1 Press and hold SET for 3 seconds, then set CONFIGURE with the or button. Confirm this function by pressing OK.
2 TIME SETUP appears in the display. Adjust the CONTRAST using the or button. Confirm this function by pressing OK.
3 Set the contrast to the desired level using the or button. Confirm this function by pressing OK.
4 Then press EXIT several times to quit the setting mode.
Default settings
You can reset your remote control to its factory default setting, e.g. to correct a malfunction, as follows. This deletes all your settings.
- This function is recommended only in the event of your remote control malfunctioning seriously. For technical reasons, the LCD panel becomes almost illegible after a reset. You can make it legible again by greatly reducing the contrast as described in the section Adjusting the contrast.
1 Press and hold SET for 3 seconds, then set CONFIGURE with the or button. Confirm this function by pressing OK.
2 TIME SETUP appears in the display. Set CLEAR ALL using the or button. Confirm this function by pressing OK.
3 The display then shows SURE CLEAR?. Confirm this function by pressing OK.
Operation
You operate your appliances basically in exactly the same way as if you were using the original remote controls, except that you must first press a device button (TV, DVD, etc.) to control the required device. As the symbols on the UR 850 LCD could differ from those on the original remote controls you may have to try out all the buttons in order to find the functions.
Hotline
If you have any questions regarding the UR 850 LCD, please call the Vivanco Hotline: Tel: 01442 246088 Alternatively, send an e-mail to: consumer@vivanco.co.uk
Technical data
Batteries: 2x AA - The UR 850 LCD indicates that the batteries need replacing by displaying a crossed-out battery symbol.
Range: max. 7 m
Not suitable for 400 kHz devices
2-year works guarantee
Should your UR 850 LCD cease to work within 2 years of purchasing you will receive a free replacement from Vivanco. Exceptions: missing codes, deliberate destruction and normal wear and tear of the housing and buttons.
(D) Bedienungsanleitung
Fernbedienung Vivanco UR 850 LCD für fast alle Fennseh-, Audio-, Video und anderen infrarotsteuerbaren Geräte
Batterien einlegen
Bitte öffnen Sie die Batterieklappe an der Geräterückseite, Lasche leicht nach unter drücken, und gegen Sie 2 Alkali-Mignonzellenbatterien ein. Achten Sie auf die Polaritäten auf Batterien und im Batteriefach (dicke Feder = Zelle unter = -), und schreiben Sie das Fach wieder vorsichtig. -itte achten Sie darauf, immer einwandfrei Batterien zu verwenden.
Geräteanpassung
Um ihre Geräte steuern zu können, müssen Sie die Fernbedienung für ihre Geräte einstellen. Dazu gibt es zwei möglichkeiten: die direkte Steuerkodeeingabe und die Kodesuche.
Wenn die UR 850 LCD Sie nicht versteht, dann meldet sie ERROR (Fehler) und Sie können danach die Eingabe wiederholen.
Die direkte Steuerkodeeingabe


Beispiel: Einstellung der Fernbedienung für ein Philips-Fernsehgerät:
-
Stellen Sie Ihr Gerät, z.B. Ihr Fernsehgerätein, ein Programm lauft.
-
Zur Vorbereitung der Kodeeingabe drucken Sie kurz die Taste SET (Einstellung), unteres Tastenfeld rechts, und dann dazu die gewünschte Geräte taste, z.B. TV, in der Anzeuge erscheidt eine Marke und eine Kodenummer, s. Abb.. - Sie können keinen neuen Kode eingeben, wenn Sie die Kodeeingabe gesetzt haben.
-
Mit oder wahlen Sie die Marke Ihres Gerates, also z.B. Philips, aus. Es erscheidt der erstene verfügbare Kode der Geräteliste.
-
Drücken Sie eineitive Tasten, um festzustellen, ob Sie einen passenden Kode gefunden haben. Wenn der Kode zu Ihr Gemarat passet, drucken Sie OK und die Einstellung fur ein Gerat ist beendet.
-
Funktioniert der gefundene Kode nicht oder nicht richtig, dann versuchen Sieitte einen weiteren Kode indemn Sie mittels der Tasten oder den nachsten Kode der Marke auswahlen und gemäß Ziffer 4. testen und ggfs mit OK bestätigten.
-
Die Einstellung der Fernbedienung zur Steuerung weiterer Geräte führen Sie auf gleiche Weise vor. Anstelle der Gerätaste TV drücken Sie andere Tasten, z.B. VCR, CBL/SAT(DVB-T, DECODER), DVD, TUNER, TAPE, CD, AUX).
-Bei Aufnahme- bzw. Wiedergabegeräten legen Sieitte vor der Einstellung eines Kodes und des nachfolgenden Tests ein Medium ein (Band, CD, Cassette, DVD etc.).- Mit EXIT können Sie die Kodeingabe jederzeit abbrechen.
Die Kodesuche
Wenn die Marke eines Gerätes nicht in der Liste
steht oder kein angegebener Kode passt, empfehltsich die automatische Kodesuche.

In wichtigen Sekunden finden ihre Fernbedienung fast automatisch die richtigen Steuereinstellungen:
1.itte das zusteuernde Gerat einschalten.Z.B. erscheint eine Programmnummer in der Anzeige Ihres Satempfangers.
-
Zum Start der Kodesuche drücken Sie die Taste SET (Einstellung) ca. 3 s lang. Es erscheint die Anzeige CODE SETUP (Kodeeinstellung). Mit OK-Drücken diese Funktion bestägten.
-
Es erscheint dann die Anzeige DEV SEARCH (Gerätesuche). Mit OK-Drücken diese Funktion bestätigten.- Falls DEV SEARCH nicht erscheint können Sie die Funktion mit den Tasten oder einstellen.
-
Geräte taste des zusteuernden Gerätes, z.B. DVD drücken und mit OK-Drücken die Funktion bestätigten.
-
Fernbedienung auf das zu steuernde Geräte richten, während die Fernbedienung alle 2 Sekunden ein anderes EIN/AUS Signal sendet. In der Anzeige wird die jeweilige Kodenummer angezeigt.
-
Wenn Ihr Gerät reagiert., drücken Sie eine tasten, um festzustellen, ob Sie einen passenden Kode gefunden haben. Wenn der Kode zu ihrem Gerät passt, drücken Sie 2^* OK. Es erscheint die Anzeige SUCCESS (Erfolg), und dann drücken Sie die Gerätetaste, z.B. DVD, zur Ungabebestätigung. Die Einstellung für ein Gerät ist dann beendet.
-
Funktioniert der gefundene Kode nicht oder nicht richtig, dann drücken Sie EXIT und es erscheidt wieder DEV SEARCH (Gerätesuche). Weiter wieder gemäß Ziff. 3.
Hinweise: - Sie können die Suchrichtung mit den Tasten ▲ oder ▼ umkehren, wenn Sie zu spät auf eine Gerätereaktion reagiert haben. - Die Menüsteuertasten können zum Test nicht verwendet werden. - Bei Aufnahme… bzw. Wiedergabegeräten legen Sieitte vor der Einstellung eines Kodes und des nachfolgenden Tests ein Medium ein (Band, CD, Cassette, DVD etc.). - Mit EXIT können Sie die Codeingabe jederzeit abrechen.
Sonstige Einstellungen
Uhrzeit einstellen

1 SET 3 s lang drucken, mit Tanten ▲ oder▼ CONFIGURE (Einrichten) einstehen. Mit OK-Drucken diese Funktion bestätigten.
2 Es wird TIME SETUP (Zeiteinstellung) angezeigt. Mit OK-Drücken diese Funktion bestätigten.
3 T Mit Zifferntasten Zeit eingeben und mit OK-Taste bestätigten. Dann mehrmals EXIT drücken, um Einstellmodus zu verlassen.
Vorrang Lautstärkeregelung einstellen
Mit dieser Funktion konnen Sie ein Gerät exklusiv für die Lautstärkeregelung festlegen, z.B. ihren Audioversteller. Dann steuern die Lautstärketasten VOL+, VOL- und , ganz gleich welches Gerät Sie gerade steuern, immer den Verträker.

1 SET 3 s lang drücken, mit Tasten ▲ oder▼ CONFIGURE (Einrichten) einstehen. Mit OK-Drücken diese Funktion bestätigten.
2 Es wird TIME SETUP (Zeiteinstellung) angezeigt. Mit Tanten ▲ oder ▼ VOL LOCK (Lautstärke verriegeln) einstehen. Mit OK-Drücken diese Funktion bestätigten.
3 Geratetaste, z.B. AUX für Verstärker, auswahlen und Vorrang=ON mittels der Tasten ▷ oder « einstellen. Mit OK-Drücken diese Funktion bestätigten.
4 Dann mehrmals EXIT drucken, um Einstellmodus zu verlassen.
- Mit derselben Prozeder können Sie die Vorrangeinstellung wieder zurücknehmen. Statt ON stellen Sie bei allen Geräten OFF ein.
Gerätekodes fixieren(sperren) oder freigeben
Um zu verhindern, dass versehentlich Einstellungen verändert werden, gehen Sie wie folgt vor:
1 SET 3 s lang drucken, mit Tasten ▲ oder▼ CONFIGURE (Einrichten) einstehen. Mit OK-Drucken diese Funktion bestätigten.
2 Es wird TIME SETUP (Zeiteinstellung) angezeigt. Mit Tasten ▲ oder▼ DEV LOCK (Gerät sperren) einstehen. Mit OK-Drücken diese Funktion bestätigten.
3 Geratetaste, z.B. TV für Fernseher, wahlen und Sperren=ON mittels der Tasten oder einstellen. Mit OK-Drucken diese Funktion bestätgien.
4 Dann mehrmals EXIT drucken, um Einstellmodus zu verlassen.
- Mit derselben Prozedur können Sie Sperren wieder zurecknehmen. Statt ON stellen Sie bei allen Geräten OFF ein.
Hintergrundbeleuchting
Um Batteriekapazität zu sparen, konnen Sie die LCD Beleuchting ausschalten. Sie gehen dazu wie folgt vor:
1 SET 3 s lang drücken, mit Tasten ▲ oder▼ CONFIGURE (Einrichten) einstehen. Mit OK-Drücken diese Funktion bestätigten.
2 Es wird TIME SETUP (Zeiteinstellung) angezeigt. Mit Tasten ▲ oder ↓ LIGHT (Beleuchtung) einstehen. Mit OK-Drücken diese Funktion bestätigten.
3 Mittels der Tasten oder Licht ein (ON) oder ausschalten (OFF). Mit OK-Drücken diese Funktion bestätigten.
4 Dann mehrmals EXIT drucken, um Einstellmodus zu verlassen.
Kontrast einstellen
Den Kontrast der Anzeige konnen Sie für bessere Lesbarkeit einstehen:
1 SET 3 s lang drücken, mit Tasten ▲ oder▼ CONFIGURE (Einrichten) einstehen. Mit OK-Drücken diese Funktion bestätigten.
2 Es wird TIME SETUP (Zeiteinstellung) angezeigt. Mit Tasten ▲ oder CONTRAST (Kontrast) einstehen. Mit OK-Drücken diese Funktion bestätigten.
3 Mittels der Tasten oder Kontrast auf gewündchten Wert einstellen. Mit OK-Drücken diese Funktion bestätigten.
4 Dann mehrmaits EXIT drucken, um Einsteinmodus zu verlassen.
Werkseinstellungen
Sie können ihre Fernbedienung wie folgt in die wertsseitige Grundstellung zrückversetzen, um z.B. Fehlfunktionen zu beseitigen. Dabei werden alle ihre Einstellungen gelöscht.
- Es wird empfohlen, diese Funktion nur im Falle von massiven Fehlfunctorien der Fernbedienung zu verwenden. Nach dem Rücksetzen ist aus technischen Gründen die LCD-Anzeige kaum lesbar. Wieder lesbar wird die Anzeige durch deutliche Reduzierung des Kontrastwertes gemäß Abschnitt Kontrast einstellen.
1 SET 3 s lang drücken, mit Tasten ▲ oder▼
CONFIGURE (Einrichten) einstehen. Mit OK-Drücken diese Funktion bestätigten.
2 Es wird TIME SETUP (Zeiteinstellung) angezeigt. Mit Tasten ▲ oder ▼ CLEAR ALL (alles Löschen) einstehen. Mit OK-Drücken diese Funktion bestägten.
3 In der Anzeige erscheint dann: SURE CLEAR? (wirklich loschen?). Mit OK-Drücken diese Funktion bestätigten.
Bedienung
Sie bedienden ihre Geräte praktisch genauso, wie Sie es von ihren Originalfernbedienungen her kennen, nur, dass Sie zuvor eine Gerätetaste .TV, DVD usw. drücken müssen, um das gewündte Gerät steuern zu können. Da die Symbole der UR 850 LCD sich von denen ihrer Originalfernbedienungen untersicken können, müssen Sie u.U. alle Tasten zum Finden von Funktionen ausprobieren.
Hotline
Wenn Sie weitere Fragen zur UR 850 LCD haben, rufen Sie bereits die Vivanco Hotline an: Tel: +49(0)4102 231235 Alternatively schicken Sie bereits eine E-Mail an: hotline@vivanco.de.
Technische Daten
Batterien: 2x Mignonzellen, AA - Mittels durchgestriechenem Batteriesymbols weist UR 850 LCD auf einen notwendigen Batteriewechseln hin.
Reichweite: max. 7 m
Nicht für 400 kHz Geräte
2 Jahre Werksgarantie
Fällt ihre UR 850 LCD innerhalb von 2 Jahren nach dem Kauf aus, dann gekommen Sie von Vivanco kosten Los Ersatz. Ausnahmen: fehlende Kodes, vorsätzliche Zerstörung und normale Abnutzung des Gehäuses und der Tasten.
(E) Instruetiones de uso
Telemando Vivanco UR 850 LCD para casi todoslos temas deTelevisores, aparatos de audio yvideo yotiros aparatos de mando infrarrojo
Colocacion de pilas
Abra la taps del compartmento de pilas situado en la parte trasera del aparato, presione ligeramenteHCIacia abajo la lengueta y colque 2 pilas alcalyesipo Mignon.Preste atencion a las polaridades de las pilas indicadas en estas y en el compartmento (resorte grande = pila abajo = - )y cierra cuidadosamente el compartmento.-SiempreDebe empleur pilas impecables.
Adaptación a los aparatos
Para poder controlar sus aparatos,debe adaptar el telemando.Aesto, hay dos posibilidades:la introduccion directa de un codigode mando y la busqueada de codigo.
Si su UR 850 LCD no le 'entiende', avis AERROR (error) y pueda repetir la introduccion.
La introduccion directa de un numero de mando


Eiemplo: adaptar el telemando a un televisor
Philips:
1. Active su aparato, p. ej. su TV; un programa es activo.
2. Para preparar la introduccion de dato, presione brevemente la tecla SET (tecla de ajuste), a la derecha del teclado inferior, y a la vez la tecla de aparato requirenda, p.ej. TV. En el display aparecen una marca y un dato, v. figura - No puede introducir un dato nuevo, si está bloqueada la introduccion de dato.
3. Mediente ▲ o▼ pourrait elegir lamarca de su aparato, en esta caso Philips. Aparece el primer número a disposicion de la lista de temas.
4. Presione algunos teclas para controlar, si ha localizzato un número adecuado. Si el número es correcto para su aparato, presione OK y el ajuste al aparato está terminado.
5. Caso que el número elegido no funciona o no funciona correctamente, elija otro númeroeligible elproximo número de lamarca através delles teclas o y controleleg SEG.indico bajo 4para confirmarlo,dado el caso,mediante OK.
6. El ajuste del telemando para el control de other aparatos es efectuado de la mismaforma. En vez de presionar la tecla de aparato TV, presione otheras teclas,p.ej.VCR,CBL/SAT(DVB-T, DECODER),DVD,TUNER,TAPE,CD,AUX).
Si se tratate de aparatos grabadores resp. reproducreiros, antes de ajustar un SHORT y efectuar el testsumaquebe de insertar un medio (cinta, CD, cassette, DVD etc.).- A工程技术 a interrupir en cualquier momento la introduccion de un SHORT.
Búsqueada de número
Wenn die Marke eines Gerätes nicht in der Listethegt oder kein angegebener Kode passt, empfehltsich die automatische Kodesuche.


Dento de menos segundos, de maneira às automatática su Telemando encontrar los ajustes de control correctos:
- Active el aparato a mandar. P.ej. aparece un numero de programa en el display de su receptor SAT.
- Para起初ar la búsueda de número de presionar la tecla SET (tecla de ajusta) durante unidos 3segundos. Aparece CODE SETUP (ajuste de número). Confirme está funciona presionando OK.
- Entonces, aparece DEV SEARCH (búsqueada de aparato). Confirme esta funciona presionando OK.- En el caso que no aparezca DEV SEARCH, pueda ajustar la función用量ando las teclas o .
- Presione la tecla del aparato a controlar, p.ej. DVD y confirme la funciona presionando OK.
- Mientras el telemando emite cada 2segundos.
otra seals de ACTIVAR/DEACTIVAR debe dirigirlo hacer el aparato que desea mandar. En el display es indicado el numero respectivo.
-
Si su aparato reacción, presione algunos teclas para controlar, si ha遇到了 un caso adequado. Si el caso es correcto, presione 2^ OK.
Aparece el texto SUCCESS (éxito). Entonces, presione la tecla de aparato, p.ej. DVD, para confirmar la selección.Esta terminado el ajuste para un aparato.
-
Caso que elcede遇到了 no funciona o no funciona correctamente, presione EXIT y aparece;nuevamente DEV SEARCH (búsqueda de aparato). Siga seg. indicado bajo 3.
Notas: - Puede invertir la direccion de búsqueada actionando las teclas ▲ o▼, si ha reaciondo demasiadoarde a una reación de aparato. - No se pueda usar las teclas de mando de menu para efectuar el test. - Si se tratate de aparatos grabadores resp. reproducóres, antes de ajustar un número y efectuar el test singularde要做到 insertar un medio (cinta, CD, cassette, DVD etc.).- A工程技术 possible interruprir en cualquier momento la introduccion de un número.
Otros ajustes
Ajustar la hora


1 Presionar durante uno 3 segundos la tecla SET, elegir mediante las teclas o CONFIGURE (configuracion). Confirmar esta func tion presionando OK.
2 Es indicado TIME SETUP (ajustar la hora).
Confirma esta funciona presionando la tecla OK.
3 Introducir la hora a工程技术 de las teclas numéricas y confirmar presionando la tecla OK.
Entones, presionar varias vezes EXIT, para poder salir del modo de ajuste.
Prioridad: Ajuste del volumen
Mediante esta func tion可以使 determinar exclusivamente un aparato para la regulacion del volumen, p.ej. su amplificador de audio. Entones, las teclas de regulacion de volumen VOL ^+ VOL-
y ,iami controlan el amplificador, sea cui fuere el aparatoactualmente mandado.


1 Presionar durante uno 3 segundos la tecla SET,ularig mediatinglas teclas o CONFIGURE (configuracion). Confirmar esta func tion presionando OK.
2 Es indicado TIME SETUP (ajustar la hora).
Mediante las teclas ▲ o▼,ularig VOL LOCK (bloquear volumen). Confirmar esta funciona presionando la tecla OK.
3 Elegir la tecla de aparato, p.ej. AUX para el amplificador, y ajustar prioridad=ON a trovés de las teclas o Confirmar esta funciona presionando la tecla OK.
4 Entones, presionar varias vezes EXIT, para salir del modo de ajuste.
- Repitiendo este proceso, pueda anular el ajuste de prioridad,eligible OFF en vez de ON para todos los aparatos.
Fijar (bloquear) o liberar@códigos de aparatos Para evitar que ajustes son involuntariamente modificados, proceda de laforma作為:
1 Presionar durante uno 3 segundos la tecla SET, encontrar mediante las teclas o CONFIGURE (configuracion). Confirmar esta func tion presionando OK.
2 Es indicado TIME SETUP (ajustar la hora).
Mediante las teclas ▲ o▼ elegir DEV LOCK (bloquear aparato). Confirmar la funciona presionando OK.
3 Elegir la tecla de aparato, p.ej. TV para television, yJKLM. Confiñar la configuración OK
4 Entones, presionar varias vezes EXIT, para salir del modo de ajuste.
- Repitiendo este processo, pueda anular el ajuste de bloqueo,eligible OFF en vez de ON para todos los aparatos.
Illuminación de fondo
Um Batteriekapazität zu sparen, können Sie die LCD Beleuchting ausschalten. Sie gehen dazu wie folgt vor:
1 Presionar durante uns 3 segundos la tecla SET, eagir mediante las teclas o CONFIGURE (configuracion). Confirmar esta func tion presionando OK.
2 Es indicado TIME SETUP (ajustar la hora). A工程技术 de las teclas o elegir LIGHT (iluminacion). Confirmar esta funciona presionando OK.
3 Encender (ON) o apagar (OFF) la iluminación relacion las teclas o Confirmar esta función presionando OK.
4 Entones, presionar varias vezes EXIT, para salir del modo de ajuste.
Ajustar el contraste
Para una legibiliidad mejor puede ajust el contaste del display:
1 Presionar durante uno 3segundos la tecla SET, elegir mediante las teclas o CONFIGURE (configuracion). Confirmar esta func tion presionando la tecla OK.
2 Es indicado TIME SETUP (ajustar la hora). Mediente las teclas o elegir CONTRAST (contraste). Confirmar esta funciona presionando OK.
3 Acionando las teclas o ajustar el contraste你需要. Confirmar esta referencia presionando la tecla OK.
4 Entones, presionar varias vezes EXIT, para salir del modo de ajuste.
Ajustes de fabrica
Para evaporar p.ej. malfuncionamientos, de laforma a lo siguientes descrita peute reactivar los ajustes efectuados en fábrica. En thiso son borrados todos los ajustes por usted efectuados.
- Se recomienda usar esta función únicamente en caso de malfunctionantes graves del telemando. Después de haber sido efectuado el reseto,upon a causas típecas el display LCD es apenas legible. EL display es-Newamente legible, si reduce considerablemente el valor del contraste según descrito bajo Ajustar el contraste.
1 Presionar durante uno 3 segundos la tecla SET, elegir mediante las teclas o CONFIGURE (configuracion). Confirmar esta func tion presionando OK.
2 Es indicado TIME SETUP (ajustar la hora). Mediente las teclas o elegir CLEAR ALL (borrar todo). Confirme esta funciona presionando la tecla OK.
3 Entonces, en el display aparece: SURE CLEAR? (¿borrar todo?). Confirme esta funciona presionando la tecla OK.
Manejo
Prácticamente, el manejo es igual al del usual a工程技术 de la comparación. Prácticamente, el manejo es igual al del usual a forma de un paratomo. Trasstedes, el manejo es igual al del usual a forma de un paratomo. Trasstedes, el manejo es igual al del usual a forma de un paratomo. Trasstedes, el manejo es igual al del usual a forma de un paratomo.
Hot-line
En el caso de queonga preguntas respecto al UR 850 LCDIame la hot-line de Vivanco: tlf: 093 8483520
Datasétécnicos
Pilas: 2x pilas tipo Mignon, AA - Mediente un simbolo de pila cruzado, el UR850 LCD indica la necessities de cambar de pilas.
Alcance: max. 7 m
No apropiado para aparatos de 400kHz
2 años de garantía de fabricula
Si su UR 850 LCD falle bajo de 2 años despues de haberlo adquirido, Vivanco se lo sustituye gratamente. Excepciones:cottigos faltantes, destruccion intencionada y desgaste normal de la caja de las teclas.
(I) Istruzioni per l'uso
Telecomando Vivanco UR 850 LCD per quisi tuti i tevisori ed altri apparecchi audio-video che posso sono essere comandati a infrarossi
Inserimento delle batterie
Aprille l vano batterie sul dorso dell'apparecchio (esercitando una leggera pressione che permettera l'apertura del coperchio). Inserire dunque 2 batterie ministilo alcaline. Prestare attenzione alla polarità indica sulle batterie e nel vano batterie (molla spessa = fondo della pila = -); poi richiudere il vano facendo attenzione. - Utilizzato esclusivamente batterie in ottimo stato.
Programmazione del telecomando
Prima di poter Comandare un appearecchio, è necessario programmare il telecomando per l'apparecchio in questione. Ciò può avvenire in due modi: mediante l'insertimento diretto del codice di lavoro, nonché mediante la funzione di ricerca del codice.
Se UR 850 LCD non capisce un inserimento, emette il messaggio ERROR (Errone) e da la possibilità di rpeditere l'inserimento.
Inserimento diretto del codice di lavoro

Esempio: regolazione del telecomando per un tevisore Philips.
-
Regolare un appearecchio, ad es. un tevisore. Un programma è in corso di svolgimento.
-
Per preparare l'insertimento del codice premeire brevamente il tasto SET (Impostazione), situato sul tastierino inferiore nella parte destra, e poi il tasto di apparetecchio desiderato, ad es. TV. Sul display compaiano il nome di unamarca ed un numero di codice; v. fig. - Non è possibile insertire un nuovo codice quale l'insertimento del codice sia disabilitato. 3. Con o▼ selezione la marca del proprio apparetecchio, ad es. Philips. Compare il primo codice disponibile nelle'elenco degli apparetchi.
-
Premere quale tasto per accertarsi di aver trovato il codice giusto. Se il codice funziona, premere OK per terminare l'impostazione dell'apparecchio.
-
Se il codice trovato non funziona o funziona male, riprovare con un altro codice. Agendo sui tasti o selezione are codice successivo relative alla marca dell'apparecchio in questione, quando testare come descritto al punto 4., e poi convalidare eventualmente con OK.
-
La regolazione del telecomando per il dato di altri appearecchi si eseguirà nella stessa maniera. Invece del tasto di appearechio TV
premere altri tasti, ad es. VCR, CBL/SAT (DVB-T, DECODER), DVD, TUNER, TAPE, CD, AUX.
- Nel caso di apparecchi di registrazione o di riproduzione, inserire un supporto (nastro, CD, cassetta, DVD ecc.) prima di impostare un codice e di procedere al test dello stesso.
Ricerca del codice
Si raccomanda l'utilizzazione della funzione di ricerca automatica del codice qualora l'elenco non comprenda un appearechio, o se il codice specificato non funziona.

Il telecomando eseguirà nel giro di pochi secondi, quasi automaticamente, le impostazioni giuste:
-
Accendere l'apparecchio che si desidera comandare (nel caso di un ricevitore da satelliti, appearearsi, per es., un numero di programma sul display dell'apparecchio).
-
Per avviare la ricerca del codice premere il tasto SET (Impostazione) per ca. 3 secondi. Compare l'indicazione CODE SETUP (Impostazione del codice). Convalidare questa funzione premendo OK.
-
Compare alla I'indicazione DEV SEARCH (Ricerca apparecchio). Convalidare esta funzione premendo OK.- Qualora DEV SEARCH non compaia, è possible impostare esta funzione agenda sui tasti o .
-
Premere il tasto di apparecchio relativo all'apparecchio da comandare, ad es. DVD, e poi convalidare但这a funzione premendo OK.
-
Puntare il telecomando versus l'apparecchio che si vuole comandare, nella telecomando invia agli 2 secondi un'alto segnale di ON/OFF. Sul display compare il numero di codice corrispondente.
-
Se l'apparecchio reagisce, premere qualche tasto per accertarsi di aver trovato il codice giusto. Se il codice funziona, premere 2 volte OK. Compare l'indicazione SUCCESS (Operazione riuscita). Premere quando il tasto di apparecchio, ad es. DVD, per convalidare l'inserimento. L'impostazione di un appearecchio èosi terminata.
-
Se il codice trovato non funziona o funziona male, premere EXIT. Compare nuvamente DEV SEARCH (Ricerca apparecchio). Continuire come descritto al punto 3.
Avvertenza: - Con i tasti ▲ o▼ è POSSIBLE invertire la direzione di ricerca qualora non si reagisce abbastanza tempestivement alla reazione dell'apparecchio. - Non è possibile utilizzate i tasti di lavoro di menu a fini di test. - Nel caso di apparecchi di registrazione o di coproduzione, inserire un supporto (nastro, CD, cassetta, DVD ecc.) prima di impostare un codice e di procedere al test dello stesso. - Con EXIT è possibile annullare l'insertimento del codice in qualsiast momento.
Altre impostazioni
Regolazione dell'ora

1 Premere SET per 3 secondi. Con i tasti o impostare CONFIGURE (Setaggio). Convalidare esta funzione premendo OK.
2 Compare l'indicazione TIME SETUP (Regolazione dell'ora). Convalidare esta funzione premendo OK.
3 Inserire l'ora con i tasti numerici e convalidare con il tasto OK. In seguito premere più volte EXIT per uscire alla modalità di impostazione.
Preferenza di regolazione del volume
Con esta funzione è possible définire un appearecchio escludivamente per la regolazione del volume, ad es. il proprio amplificatore audio. Questo vuol dire che i tasti di volume VOL+, VOL - e agiscono sempre sull'amplificatore indipendente dall'apparecchio attualmente comandato.

1 Premere SET per 3 secondi. Con i tasti o CONFIGURE (Setaggio). Convalidare esta funzione premendo OK.
2 Compare l'indicazione TIME SETUP (Regolazione dell'ora). Con i tasti o▼, impostare VOL LOCK (Disabilitare volume). Convalidare quella funzione premendo OK.
3 Selezionare il tasto di apparecchio, ad es. AUX per l'amplificatore, e impostare Preferenza ON agenda sui tasti o Convalidare esta funzione premendo OK.
4 In seguito premere più volte EXIT per uscire dans la modalità di impostazione.
- Eseguendo la stessa procedura é possible annulare l'impostazione della preferenza. Al posto di ON impostare OFF per tutti gli apparecchi.
Bloccare (disabilitare) o abilitare il codice di apparecchio
Per impedire la modifica involontaria di impostazioni, procedere come segue:
Premere SET per 3 secondi. Con i tasti ▲ o
CONFIGURE (Settaggio). Convalidare esta funzione premendo OK.
Compare l'indicazione TIME SETUP
(Regolazione dell'ora). Con i tasti o▼, impostare DEV LOCK (Disabilitare apparetcchio). Convalidare questa funzione premendo OK.
3 Selezionare i tasto di appearecchio, ad es. TV per il teilevisore, e impostare Disabilitarre=ON agendo sui tasti o Convalidare esta funzione premendo OK.
4 In seguito premere più volte EXIT per uscire dans la modalità di impostazione.
- Esegundo la stessa procedura è possibile annullare le disabilitazioni. Al posto di ON impostare OFF per tutti gli appearecchi.
Retroilluminatione
Per economizzare le batterie è possible disattivare l'illuminazione LCD. Procedere come segue:
Premere SET per 3 secondi. Con i tasti ▲ o
CONFIGURE (Settaggio). Convalidare esta funzione premendo OK.
2 Compare l'indicazione TIME SETUP (Regolazione dell'ora). Con i tasti o impostare LIGHT (Illuminazione). Convalidare esta funzione premendo OK.
3 Agendo sui tasti o attivare (ON) o disattivare (OFF) l'illuminazione. Convalidare esta funzione premendo OK.
4 In seguito premere più volte EXIT per uscire dans la modalità di impostazione.
olazione del contrasto
E' possible regolare il contrasto del display per migliorare la leggibilità:
1 Premere SET per 3 secondi. Con i tasti ▲ o▼ CONFIGURE (Settaggio). Convalidare esta funzione premendo OK.
2 Compare l'indicazione TIME SETUP (Regolazione dell'ora). Con i tasti o impostare CONTRAST (Contrasto). Convalidare alla funzione premendo OK.
3 Agendo sui tasti o impostare il livello di contrasto desiderato. Convalidare esta funzione premendo OK.
4 In seguito premere più volte EXIT per uscire dalla modalità di impostazione.
Impostazioni di default
Per correggere malfunzionamenti è possibile riportare il telecommando alle impostazioni di default come descritto più avanti. Questa operazione annulla tutte le impostazioni eseguite dall'utente.
- Si consiglia di utilizzare cette funzione solo in caso di malfunzionamenti gravi del telekomando. Una volta eseguita esta operazione, il display LCD è appena leggibile per motivi tecnici. Rendere il display nuovamente leggible diminuendo sensibilmente il livello di contrasto come descritto nella sezione Regolazione del contrasto.
1 Premere SET per 3 secondi. Con i tasti o CONFIGURE (Settaggio). Convalidare esta funzione premendo OK.
2 Compare l'indicazione TIME SETUP (Regolazione dell'ora). Con i tasti o impostare CLEAR ALL (Cancella tutto). Convalidare quella funzione premendo OK.
3 Sul display appeare quindi: SURE CLEAR? (Cancella averamente?). Convalidare esta funzione premendo OK.
Comando
Il lavoro degli apparecchi avviene in modo identico a quello più noto dei telecomandi originali. La sola differenza consiste nel dover preme prima un tasto di apparecchio, TV, DVD ecc., per poter poi commandare l'apparecchio desiderato. Dato che i symboli sul telecomando UR 850 LCD sono essere diversi da quelli sui telecomandi originali, occorrera eventualmente provare tutti tasti per individuire le funzioni di ciascun tasting.
Hot-line
Per eventuali commande sull'UR 850LCD, contattare la hot-line Vivanco: Oppure visitate il situ www.vivanco.it.
Specificazioni tecniche
Batterie: 2 pile stilo, AA - L'apparizione di un simbolo di batteria sbarrato sul display di UR 850 LCD segnala che è necessario sostituire le batterie.
Portata: max. 7 m
Non per apparecchi operanti su frequenze pari a 400 kHz
2 anni di garanzia di fabbrica
Se UR 850 LCD si guasta nei 2 anni nella data di acquisto, Vivanco si impegna a sostituire gratuitoamente le telecomando. Eccezioni: codici mancanti, distruzione deliberata e usura naturale della scatola e dei tasti.
Batteries included Batterien beigefegt Pilas &, includas Pile comprese
Please remove transparent foils at contacts in battery compartment!
Bitte transparente Folien im Batteriefach an den Kontakten entfernen!