
HDD MOVIE CUBE P800 - Lecteur multimédia portable EMTEC - Notice d'utilisation et mode d'emploi gratuit
Retrouvez gratuitement la notice de l'appareil HDD MOVIE CUBE P800 EMTEC au format PDF.


| Type de produit | Lecteur multimédia portable avec enregistreur TV |
| Marque | EMTEC |
| Modèle | HDD MOVIE CUBE P800 |
| Dimensions (L x H x P) | 192 x 50 x 151 mm |
| Poids net | Environ 0,5 kg |
| Alimentation | Adaptateur secteur AC 100-240V 50/60 Hz, sortie DC 5V |
| Consommation électrique | Environ 12 W |
| Formats vidéo pris en charge | DAT, VOB, IFO, MPG (MPEG-2/1), AVI (XviD), MPEG-2 TS |
| Formats audio pris en charge | MP3, OGG, WMA (sauf DRM/Pro/Advanced) |
| Formats photo pris en charge | JPEG, BMP |
| Formats de sous-titres | SRT, SMI, SSA, IDX/SUB, SUB |
| Fonctions principales | Enregistrement programmé et en un clic, Time Shift, lecture multimédia, TV analogique et DVB-T, radio Internet |
| Connectique | HDMI, YPbPr, Composite (A/V IN/OUT), S/PDIF optique et coaxial, Ethernet RJ45, USB 2.0 Hôte (x2), lecteur de cartes SD/MMC/MS/MS Pro, entrée antenne RF |
| Fonction réseau | Ethernet 10/100 Mbps, Wi-Fi jusqu'à 54 Mbps (via adaptateur USB optionnel) |
| Résolution vidéo maximale | 1080i |
| Disque dur externe compatible | P100 2,5 pouces (optionnel) |
| Température de fonctionnement | +5 °C à +35 °C |
| Humidité de fonctionnement | 5% à 80% HR |
| Entretien et nettoyage | Débranchez l'adaptateur avant nettoyage. Utilisez un chiffon sec pour absorber tout liquide. Ne pas utiliser de produits abrasifs. |
| Sécurité | Ne pas modifier l'appareil. Confiez toute réparation à un centre agréé. Évitez tout contact avec l'eau. Ne pas exposer aux chocs. |
| Pièces détachées et réparabilité | Consultez notre site web ou contactez le service après-vente EMTEC pour les pièces détachées et réparations. |
| Informations générales | Notice disponible en téléchargement gratuit sur notice-facile.com. Conservez l'emballage d'origine pour le transport. |
FOIRE AUX QUESTIONS - HDD MOVIE CUBE P800 EMTEC
Questions des utilisateurs sur HDD MOVIE CUBE P800 EMTEC
0 question sur cet appareil. Repondez a celles que vous connaissez ou posez la votre.
Poser une nouvelle question sur cet appareil
Téléchargez la notice de votre Lecteur multimédia portable au format PDF gratuitement ! Retrouvez votre notice HDD MOVIE CUBE P800 - EMTEC et reprennez votre appareil électronique en main. Sur cette page sont publiés tous les documents nécessaires à l'utilisation de votre appareil HDD MOVIE CUBE P800 de la marque EMTEC.
MODE D'EMPLOI HDD MOVIE CUBE P800 EMTEC
Table of Contents
-
Introduction 6
1.1 Preface 6
1.2 Packing List 6
1.3 Caution 6
1.4 Connection 8
1.5 First Time Usage 11 -
About the Player 12
2.1 Remote Control 12
2.2 Front View 13
2.3 Right Side View 14
2.4 Rear View 14
- Getting Started 15
3.1 Selecting DVB-T TV 15
3.2 Selecting Analog TV. 15
3.3 Selecting A/V In - Signal from the A/V IN jack 15
3.4 Selecting Browser - Playback Multimedia Files 15
3.5 Selecting Internet Radio 15
3.6 Selecting Setup 15
-
Watching Analog & DVB-TTV programs 16
4.1 Watching Analog TV programs 16
4.2 Watching DVB-TV programs 16 -
Timer Record Menu 18
5.1 Creating a New Schedule 18
5.2 Editing Schedule 18
5.3 Deleting Schedule 18
5.4 Viewing Schedule Status 19
5.5 Viewing Recording History 19
- Setup Menu 20
6.1 Changing DVB-TTV settings 20
6.2 Changing Analog TV settings 21
6.3 Changing Video Settings 21
6.4 Changing Audio Settings 22
6.5 Changing Record Settings 23
6.6 Changing Network Settings 24
6.7 Changing System Settings 24
6.8 Miscellaneous 25
- Browser Menu 27
7.1 Browsing All 27
7.2 Browsing Music 27
7.3 Browsing Photos 27
7.4 Browsing Movies 27
7.5 Browsing via Network 28
7.6 Renaming / Deleting Files 29
7.7 Managing the Playlist 29
8. File Copy Menu 30
- Listening to Internet Radio 31
9.1 Station List Menu 31
9.2 Genre List Menu 31
9.3 My Favorite Station 31
10.Upgrading the Firmware 32
- Appendixes 33
11.1 Specifications 33
11.2 Frequently Asked Questions 34
11.3 Copyrights and Trademarks 35
11.4 Warranty 35
11.5 Licence Information 35
1.1 Preface
Dear Customer,
Thank you very much for purchasing Movie Cube P800. In the digital era, this product is a great home entertainment partner. With the outstanding design, you can enjoy movies and music, view photos of precious moments, record your favorite TV or movie programs and view them anytime.
This player has the following functionality:
| Video Recording | Supports one button recording and scheduled recording, can easily record programs from DVB-T / Analog TV, DVD player, DV, etc., and save as MPEG-2 (.mpg, or .ts) format. |
| Time Shift | Pause and enjoy chasing playback of live TV programs. |
| Movie Playback | Supports DAT (VCD),VOB (DVD), IFO (DVD), MPG (MPEG-2/1), AVI (MPEG-4 ASP: XviD), and MPEG-2 TS files; resolution up to 1080i. |
| Music Playback | Supports MP3, OGG, and WMA files*; Supports one button playlist music playback. |
| Photo Playback | Supports digital camera JPEG, and BMP files. |
| Data Storage | Supports Movie Cube P100 2.5' external hard disk. |
| USB HOST | Supports two USB 2.0 host ports. |
| Card Reader | Supports memory cards: SD/MMC/MS/MS Pro. |
| Network Function | Ethernet & WLAN streaming playback (Wireless function supported by the optional Wireless LAN USB Adapter). |
| HDMI | High-Definition Multimedia Interface transmits the highest quality digital video and audio via a single cable, simplifies cabling and provides high quality home theater experience. |
| Analog TV | Supports analog PAL B/G, D/K, I, SECAM L and L'reception. |
| DVB-T TV | Supports Digital Video Broadcasting Terrestrial (DVB-T) TV reception; supports Electronic Program Guide (EPG) and Teletext. |
We hope that this product will bring you a lot of enjoyment. We are committed to apply multimedia technology in your work, entertainment, family, daily life, car and everywhere! Welcome to EMTEC. Thank you again for choosing our Movie Cube P800.
* Note: WMA Pro & Advanced Profile and WMA with DRM are not supported.
1.2 Packing List
| Part | Quantity |
| Player | 1 |
| P100 2.5' external hard disk | 1 (optional) |
| USB cable | 1 (optional) |
| A/V cable | 1 |
| YUV cable | 1 |
| SCART out adapter | 1 (no need for USA) |
| Remote Control | 1 |
| Remote Control Battery | 2 |
| AC/DC adaptor | 1 |
| AC/DC adaptor Power Cord | 1 |
| English User Manual (printed) | 1 |
| Quick Installation Guide | 1 |
| Warranty card | 1 |
| Driver CD (with User Manual) | 1 |
| Wireless LAN USB Adapter | 1 (optional) |
| DVB-T Antenna | 1 (optional) |
Note : The actual contents in the package might be different from the packing list presented in this manual.
1.3 Caution
This player's design and manufacture has your safety in mind. In order to safely and effectively use this player, please read the following before usage.
1.3.1 Usage cautions
User should not modify this player. If commercial hard disk is being used, the environmental temperature should be within +5°C +35°C .
1.3.2 Power
The player's power voltage: DC 5V.
When using this player, please connect the supplied AC adapter or AC adapter cable to the player's power jack. When placing the adapter cable, make sure it can not get damaged or be subject to pressure. To reduce the risk of electric shock, unplug the adapter first before cleaning it. Never connect the adapter to the player in a humid or dusty area. Do not replace the adapter or cable's wire or connector.
1.3.3 Radio interference/compatibility
If not properly shielded, almost all electronic devices might get radio interference. Under some conditions, your player might get interference.
The design of this player has followed the FCC/CE standard, and has followed the following rules:
(1) This player may not cause harmful interference;
(2) This player could accept some interference received including interference that may cause undesired operation.
1.3.4 Repair
If the player has a problem, you should take it to an appointed repair center and let the specialists do the repair, never repair the player yourself, you might damage the player or endanger yourself or your data.
1.3.5 Disposing of the player
When you dispose of the player, be sure to dispose it appropriately. Some countries may regulate disposal of electrical device, please consult with your local authority.
1.3.6 Hard disk cautions
The player uses an external hard disk for data storage, in normal case, format or repair is not required.
You should carefully read the < Frequently Asked Questions chapter, and check our website for latest information before formatting the hard disk.
Physical impact may create bad sector in the hard disk, you can use CHKDSK to fix the problem.
All data stored in the player may be lost due to physical impact, electrical shock, power lost, HDD formatting etc. Please backup your data.
It is suggested to do defragment after a long period of usage.
Regularly backup the data in the hard disk so that it can be recovered in the event of data corruption or loss. Our company takes no responsibility for loss of data stored on the hard disk.
1.3.7 Others
When using this player, please do not let the player come into contact with water or other liquid, if water is accidentally spilled on the player, please use a dry cloth to absorb the liquid.
Electronic products are vulnerable, when using please avoid shaking or hitting the player, and do not press the buttons too hard.
- Do not let the player come into contact with water or other liquid.
- Do not disassemble the player, repair the player or change the design of the player, any damage done will not be included in the repair policy.
- Do not press the buttons of the player too hard.
- Avoid hitting the player with hard object, avoid shaking the player, and keep it away from magnetic fields.
- During electrostatic discharge and the strong electromagnetic field, the product will malfunction, then unplug the power cable and the product will return to normal performance next time it is powered on.
1.4 Connection
1.4.1 Connecting P100 external HDD
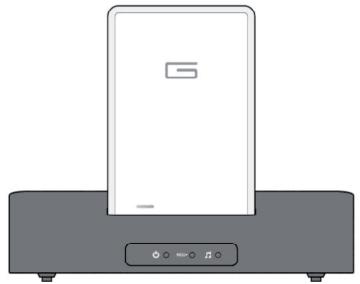
Movie Cube P100 external hard disk can be used on this player as a recording and storage device. Please follow the below picture and insert P100 into the upper slot.

1.4.2 USB Mass Storage Device (like USB stick, MP3, USB HDD etc.) Connection
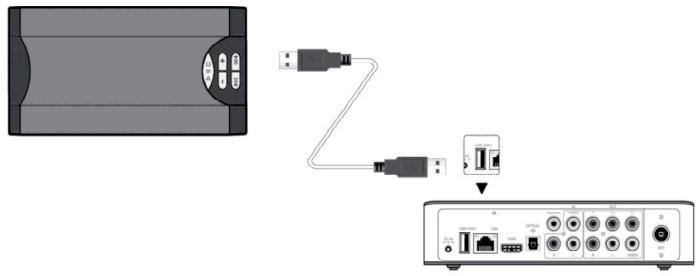
(1) Make sure the player is powered on;
(2) Plug in the USB stick or USB HDD etc. to one of the USB host ports of the player.
1.4.3 Memory card connection
Memory card can be used by inserting into the card slot
(1) Follow the picture to insert the memory card in the card slot properly;
(2) Insert the card by following the arrow pointer in the picture.

1.4.4 TV connection
1.4.4.1 A/VIN
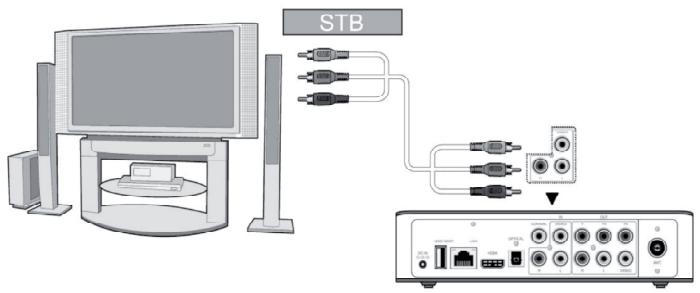
(1) Follow the picture and plug in the 3 color connector to the player's A/V IN jack;
(2) Follow the picture and plug in the 3 color connector to the A/V OUT jack of the TV/IPTV Set-Top Box (STB).
In this way, you can record TV programs from the TV/IPTV Set-Top Box.
1.4.4.2 A/V OUT
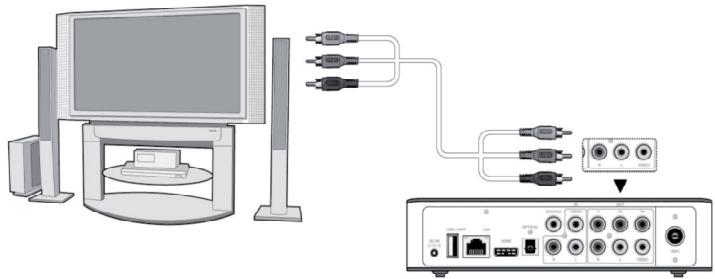
(1) Follow the picture and plug in the 3 color connector to the player's A/V OUT jack;
(2) Follow the picture and plug in the 3 color connector to the TV's A/V IN jack.
In this way, you can enjoy the content in the player on TV or other display devices.
1.4.4.3 Y/Pb/Pr Component OUT
(1) Follow the picture and plug in the 3 color connector to the player's Y/Pb/Pr jack;
(2) Follow the picture and plug in the 3 color connector to the TV's Y/Pb/Pr jack.
Audio Connection while using Y/Pb/Pr Video out:
First method: use the audio output from the A/V OUT jack;
Second method: use the audio output from the S/PDIF Coaxial or Optical jack.
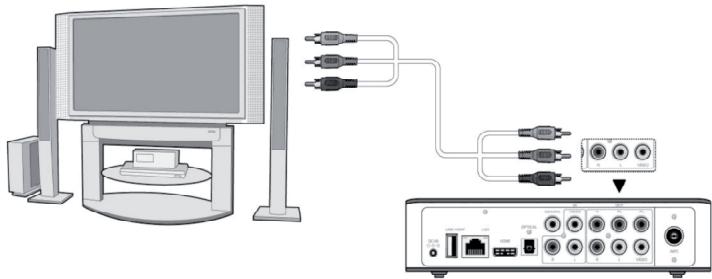
In this way, you can also enjoy videos, music, and photos in the player on TV.
1.4.4.4 HDMI OUT
(1) Follow the picture and plug one connector on your HDMI cable to the player's HDMI jack;
(2) Follow the picture and plug the other connector on your HDMI cable to the TV's HDMI jack.

In this way, you can have the highest quality video and audio via a single cable.
1.4.4.5.ANT./RFIN
Follow the picture and plug a TV Aerial or analog TV cable to the ANT. / RF IN socket;

1.4.5 Digital Audio Device connection
(1) Follow the picture and plug in the RCA connector on your coaxial cable to the player's S/PDIF Coaxial jack. Or if you use optical fiber, please plug in the Toslink connector on your optical fiber to the player's S/PDIF Optical jack (not supplied);
(2) Follow the picture and plug in the other connector on your coaxial cable or optical fiber to the digital audio device (not supplied).

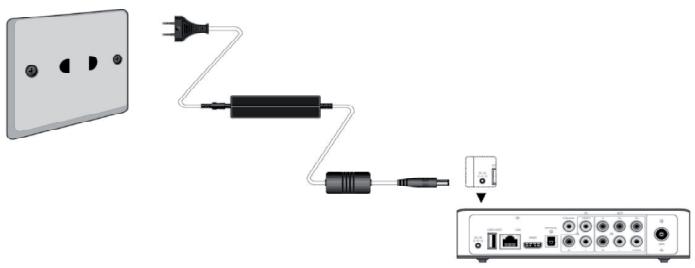
1.4.6 Power connection
(1) Follow the picture and connect the AC adaptor to the player's DC IN jack;
(2) Follow the picture and plug in the AC adaptor to the power outlet.
1.4.7 Ethernet connection
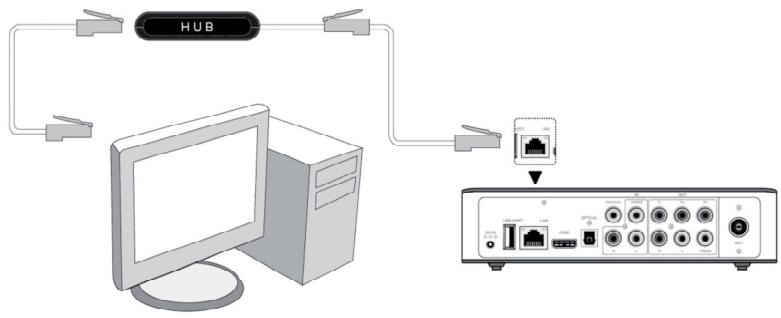
To connect to a LAN (Local Area Network) you require a cat5, cat5e or cat6 network cable (not supplied).
(1) Connect one of the crystal plugs on the cable to the player's RJ45 LAN socket;
(2) Connect the other crystal plug on the cable to a RJ45 LAN port on your router, switch, or hub devices.
1.4.8 WLAN connection
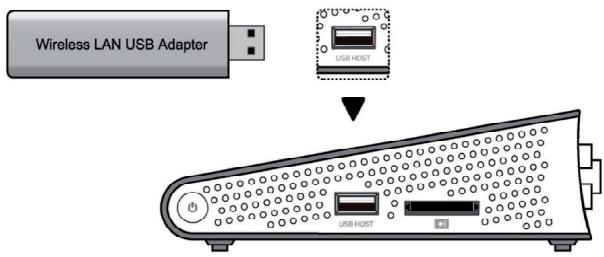
(1) Make sure the player is powered on;
(2) Plug the Wireless LAN USB Adapter (i.e. Wi-Fi USB Dongle) to the USB HOST port of the player.
1.5 First Time Usage
1.5.1 Remote Control
First time usage of Remote control: install the batteries before using the remote control.
1.5.2 Power on/off, language control
- Power on
After connecting the power supply cord and press the power / standby button on the front panel or remote control, the player will soon enter the main interface, and the POWER indicator on the front panel will turn blue.
- Power off
When the system is running, press the power / standby button on the front panel or remote control, the player will enter standby mode, and the POWER indicator on the front panel will turn red; you can also press and hold the power / standby button on the front panel for 2 seconds to power off the unit while the system is on.
- Language control
The system language of this player can be set to English or other languages. Language setup is available in the setup interface, the selected language will take effect immediately.
2.1 Remote Control
All procedures in this manual can be carried out using the remote control buttons. See the following for details on each button and its function:
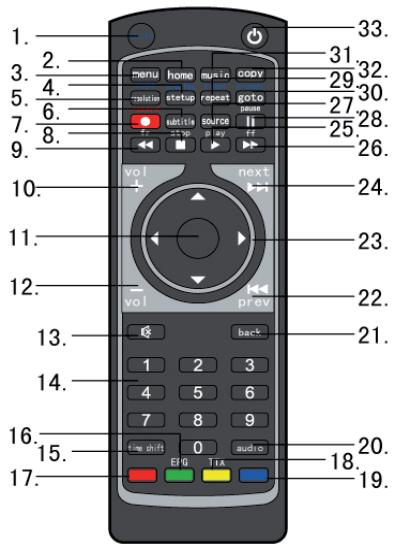
- shift TTX
2.home 19.blue - menu 20. Audio
- setup (display) 21. back
- resolution (zoom) 22. prev
- subtitle 23. navigational buttons
- record 24.next
8.stop 25.play
9.fr 26.ff - vol + 27. source
- enter 28. pause
- vol - 29. repeat (timer)
- mute 30. goto (browser)
- numeric buttons 31. music
- time shift 32. copy
- EPG
33. power / standby
17.red
| No. | Name | Function |
| 1 | shift | shift button: Press to shift the resolution, setup, repeat, and goto buttons to be zoom, display, timer, and browser. |
| 2 | home | home button: Press to view the main interface. |
| 3 | menu | menu button: Press to activate tools menus:Press in the browser menu to rename and delete files.Press in My_Shortcuts in NET of the browser menu to add shortcuts for network access. |
| 4 | setup (display) | setup button: Press to enter the setup menu. display button:Press to display current status.Press during playback and an on-screen display appears, showing track number and time elapsed/remaining.Press during recording and an on-screen display appears, showing the recording quality setting and time elapsed.Press during live TV and an on-screen display appears, showing the current channel number and time.Press during time shifting to turn the time shifting bar on/off. |
| 5 | resolution (zoom) | resolution button: Press to switch between NTSC, PAL, 480P, 576P, 720P, and 1080I. zoom button: Press to zoom in/out the image (photo or video). |
| 6 | subtitle | subtitle button: Press to set subtitle options. |
| 7 | record | record button: Press to begin recording or to resume when recording has been paused.Press repeatedly to set one touch recording (OTR) length(30 MIN. / 60 MIN. / 90 MIN. / 120 MIN. / 180 MIN. / 240 MIN. / Off). |
| 8 | stop | stop button: Press to stop playback. |
| 9 | fr | fast rewind button: Press to fast rewind the current playback.Press repeatedly to select speeds. |
| 10 | vol + | vol + button: Press to increase the volume. |
| 11 | enter | enter button: Press to select options in menus. |
| 12 | vol - | vol - button: Press to decrease the volume. |
| 13 | mute | mute button: Press to mute audio output, and press again to resume. |
| 14 | numeric buttons | numeric buttons: Press to enter channel numbers or numeric input when changing settings. |
| 15 | time shift | time shift button: While in the DVB-T / Analog TV or A/V IN mode, press to activate the time shift function, which allows you to pause live TV and resume the program from the point you left it. While paused, the program is recorded to the internal HDD as long as the space is available. Press to activate the time shift function and wait for the play arrow to appear on the screen. Press the pause button and the program will be paused. Press the play button to resume viewing the program. Time shift mode remains active until you press the stop button. |
| 16 | EPG | EPG button: Press to enter the Electronic Program Guide which displays an on-screen list of programs for the coming week when watching Digital Terrestrial TV. green button: Use for DVB-T Teletext select. |
| 17 | red | red button: Use for DVB-T Teletext select. |
| 18 | TTX | TTX button: Press to open Teletext OSD if it is available in the broadcasted stream of Digital Terrestrial TV. yellow button: Use for DVB-T Teletext select. |
| 19 | blue | blue button: Use for DVB-T Teletext select. |
| 20 | audio | audio button: Press to select an audio track. |
| 21 | back | back button: Press to go back to the previous screen when navigating menus. |
| 22 | prev | previous button: Press to go to the previous file or the previous chapter on a title. |
| 23 | navigational buttons | navigational button: Press the arrow buttons to select menu options. |
| 24 | next | next button: Press to go to the next file or the next chapter on a title. |
| 25 | play | play button: Press to begin the playback of a title. |
| 26 | ff | fast forward button: Press to fast forward the current playback. Press repeatedly to select speeds. |
| 27 | source | source button: Reserved button. No function has been assigned to it yet. |
| 28 | pause | pause / step button: Press to pause the current playback. Press again to step to the next frame. Press the play button to resume the playback. |
| 29 | repeat (timer) | repeat 1/all button: Press to set repeat option - Chapter, Title or Off. timer button: Press to enter the timer menu to add, edit and delete recording schedules. See '5.1 Creating a New Schedule' for more details. |
| 30 | goto (browser) | goto button: Press to jump to a specific point on a title. Specify the point using Title, Chapter and Time. browser button: Press to browse music, photo, and movie files on USB, HDD, and NET. |
| 31 | music | music button: Press to start playing music in the playlist. |
| 32 | copy | copy button: Press to enter the file copy menu. |
| 33 | power / standby | power / standby button: Press to enter standby mode or wake up. |
2.2 Front View

| No. | Name | Fonction |
| 1 | MUSIC indicator | Indicator turns on during music playback. |
| 2 | REC indicator | Indicator turns on when recording starts. |
| 3 | POWER indicator | Indicator (red) turns on when the system is in standby mode; Indicator (blue) turns on when the system is on. |
2.3 Right Side View

1.Card slot
2. USB HOST port
3. power / standby button
2.4 Rear View

1.DC IN jack
3.RJ45 LAN socket
5. S/PDIF OPTICAL jack
7. A/V IN jack
9. A/V OUT jack
- USB HOST port
- HDMI jack
- S/PDIF COAXIAL jack
- Y/Pb/Pr OUT jack
10.ANT./RFIN socket
Power on the system, and after a few seconds, the system will display the main interface. To reach this menu, you can also press home button on the remote control.

3.1 Selecting DVB-T TV
In this menu, you can watch and record Digital Terrestrial TV programs, or use time shift function.
Select the DVB-T icon on the main interface to enter this menu.
3.2 Selecting Analog TV
In this menu, you can watch and record Analog TV programs, or use time shift function.
Select the Analog TV icon on the main interface to enter this menu.
3.3 Selecting A/V In - Signal from the A/V IN jack
In this menu, you can watch and record audio-visual signal from the A/V IN jack on the rear panel of the unit, or use the time shift function.
Select the A/V In icon on the main interface to enter this menu.
3.4 Selecting Browser - Playback Multimedia Files
You can browse all the recorded TV programs and multimedia (Videos/Music/Photos) files on the external HDD, USB, Card or Network, and playback them on TV.
Press the browser button on the remote control or select the Browser icon on the main interface to browse recorded programs, movie, photo, and music files stored either on a HDD, USB device, Card, or Network.
3.5 Selecting Internet Radio
In this menu, you can listen to the SHOUTcast free radio programs on the Internet.
Select the Internet Radio icon on the main interface to enter this menu.
3.6 Selecting Setup
To enter the setup menu, press the setup button on the remote control or select the Setup icon on the main interface.
Equipped with an internal Hybrid TV Tuner, this player integrates Analog and Digital Terrestrial TV receivers. Please refer to '6.1 Changing DVB-T TV settings' and '6.2 Changing Analog TV settings' in order to make correct settings before reading the following chapters.
4.1 Watching Analog TV programs
To enter the Analog TV mode, select the Analog TV icon on the main interface.
The following are some functional buttons on the remote control available when watching Analog TV programs.
| Name | Function |
| up / down | Press to switch channels. (Channels cannot be switched in the recording mode.) |
| prev / next | Press to switch channels. (Channels cannot be switched in the recording mode.) |
| numeric buttons | Press to input channel numbers. Press the enter button to confirm. |
| record | Press to start recording the current TV program. |
| time shift | Press to activate the time shift function. |
| timer | Press to edit scheduled recordings. |
| zoom | Press to zoom out the image. |
4.2 Watching DVB-TV programs
To enter the DVB-T TV mode, select the DVB-T icon on the main interface.
The following are some functional buttons on the remote control available when watching Digital TV programs.
| Name | Function |
| enter | Press to view the program list menu. |
| up / down | Press to switch channels. (Channels cannot be switched in the recording mode.) |
| prev / next | Press to switch channels. (Channels cannot be switched in the recording mode.) |
| numeric buttons | Press to input channel numbers. Press the enter button to confirm. |
| goto | Press to switch between the last two viewed channels. |
| record | Press to start recording the current TV program. |
| time shift | Press to activate the time shift function. |
| timer | Press to edit scheduled recordings. |
| subtitle | Press to activate the subtitle list menu if available. |
| EPG | Press to activate the EPG (Electronic Programming Guide) menu if available. |
| TTX | Press to activate the Teletext menu if available. |
| zoom | Press to zoom out the image. |
4.2.1 Program List Menu
Press the enter button when watching DVB-T TV programs, to display the program list menu where you can see the program number and name.

Press left / right button to select from TV and Radio. Press prev / next button to page up / down. Press up / down button to select channels, and press enter button to confirm.
4.2.2 Info Bar
While switching channels by the up / down button, an information bar will be displayed to show the channel information.

There are 4 tabs displayed on the bar. Taking the info bar in the above photo for example:
N/A - Stands for TV rating;
- ENG - Stands for the voice language;
SS- Stands for subtitle;
TT- Stands for Teletext;
480 - Stands for resolution (SD - Standard Definition, HD - High Definition).
When the string looks concave, the option will be available.
4.2.3 Electronic Programming Guide
Press the EPG button when watching DVB-T TV programs, the Electronic Programming Guide will be displayed.
Press the prev / next button to change channels. Press the left / right button to change date.
Press the up / down button to change program. Press the timer button to add / delete scheduled recording.
4.2.4 Teletext Menu
If the broadcasted stream supports Teletext, press the TTX button to enter the Teletext menu.
Press the navigational and numeric buttons to view the content in the Teletext menu.
4.2.5 Subtitle List Menu
Press the title button when watching DVB-TV TV programs, the Subtitle List menu will be displayed. Press the left / right button to switch between Subtitle List and TTX Subtitle List.
Press the up / down button to select the subtitle, and press the enter button to confirm.
The Timer Record menu allows you to create, edit and delete recording schedules and view all schedule status and history. Press the timer button on the remote control to enter the menu.
5.1 Creating a New Schedule
Press the left / right button on the remote control to select the Edit tab from the menu bar. Select 'Add a New Schedule' and press the enter button. The schedule setting screen appears.


Use the left / right button on the remote control to move between fields and press the up / down button to adjust each setting.
| Source | Select the video source or TV channels for the recording. |
| Start Time | Enter the date and time of the recording. |
| Length | Enter the length of the recording. |
| Repeat | Select how often you want the schedule to record. Choose from Once, Everyday, Mon-Fri, Mon-Sat or for an individual day of the week. |
| Quality | Select the recording quality. Choose from HQ, SLP, EP, LP and SP. The size of the recorded file depends on the selected definition. See HDD Free Space on the left side of the screen for details of how long you can record for using each setting. |
| Preview | This small preview window will show the current program of the selected channel. |
5.2 Editing Schedule
Press the left / right button on the remote control to select the Edit tab from the menu bar.
Select the schedule you want to edit from the list and press the enter button. The schedule setting screen appears.
Modify the schedule as described in '5.1 Creating a New Schedule'.
5.3 Deleting Schedule
Press the left / right button on the remote control to select the Delete tab from the menu bar.
Select the schedule you want to delete and press the enter button. A confirmation message appears.
Select CANCEL, Delete the selected schedule, or Delete all schedules. Press the enter button to confirm.
5.4 Viewing Schedule Status
Press the left / right button on the remote control to select the Status tab from the menu bar. The schedule list is displayed. Select a schedule and press the enter button.

Select 'Enable the timer by VPS', Enable the timer by user's setting or Pause the selected schedule. Press the enter button to confirm.
5.5 Viewing Recording History
Press the left / right button on the remote control to select the History tab from the menu bar. Here you can view a complete history of all recordings that were set.
The Setup Menu allows you to configure DVB-T / Analog TV, video, audio, record, network and system settings. To enter the menu, press the setup button on the remote control.
6.1 Changing DVB-T TV settings
Press the left / right button on the remote control to select DVB-T tab from the menu bar.
DVB-T Region
Select to set the region for Digital Terrestrial TV.
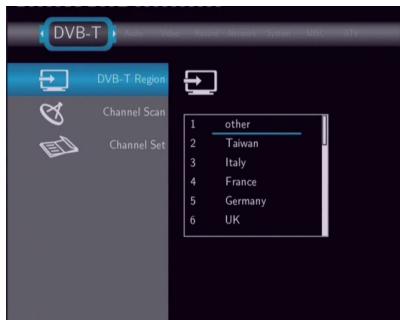
Press the up / down button to select, and the enter button to confirm.
Channel Scan
Select to scan for available Digital Terrestrial TV channels.
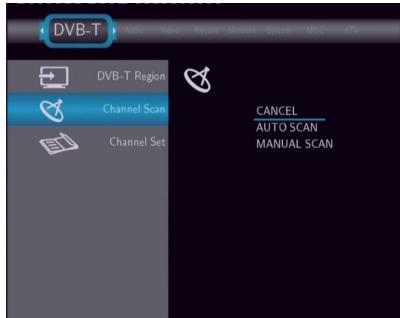
Press the up / down button to select from AUTO SCAN and MANUAL SCAN, and press the enter button to confirm.
AUTO SCAN

In AUTO SCAN mode, the system will automatically scan for available DVB-T TV channels.
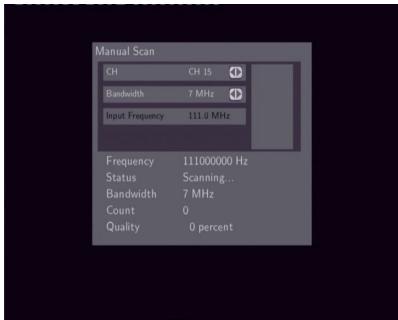
In MANUAL SCAN mode, you can select the CH name, Bandwidth, and Input Frequency. Use the navigational and numerical buttons on the remote control to select or input. Press the enter button to confirm.
Channel Set
Select to edit channel information.
Press the up / down button to select DVB-T, and press the enter button to confirm. In this menu, you can edit the Name and sequence for the DVB-TTV channels. Use the navigational buttons to select and modify the settings and press the enter button to confirm. You can also press the red button to select Default, and press the blue button to select Sort.
6.2 Changing Analog TV settings
Press the left / right button on the remote control to select the ATV tab from the menu bar.
Analog TV Region
Select to set the region for Analog TV.
Press the up / down button to select, and the enter button to confirm.
Channel Scan
Select to scan for available Analog TV channels.
Press the up / down button to select from AUTO SCAN, and press the enter button to confirm. In this menu, the system will automatically scan for available Analog TV channels.
Channel Set
Select to edit channel information.
Press the up / down button to select Analog TV.
In this menu, you can edit the Status, Name, Fine Tune, TV System, and sequence for the Analog TV channels. Use the navigational buttons to select and modify the settings, and press the enter button to confirm.
6.3 Changing Video Settings
Press the left / right button on the remote control to select the Video tab from the menu bar.
Aspect Ratio
Select to set aspect ratio.
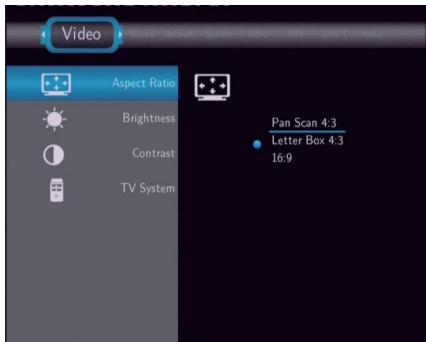
Press the up / down button to select from Pan Scan 4:3, Letter Box 4:3, or 16:9. Press the enter button to confirm.
Pan Scan 4:3: Displays a wide picture on the entire screen and cuts off the redundant portions. Select when a standard 4:3 TV is connected.
Letter Box 4:3: Displays a wide picture with two black borders on the top and bottom of 4:3 screen. Select when a standard 4:3 TV is connected.
16:9: Compresses the image to convert the whole image. Select when a 16:9 TV is connected.
Brightness
Select to set brightness levels.

Press the up / down button to adjust brightness. The new setting is previewed on screen. Press the enter button to confirm.
Contrast
Select to set contrast levels.
Press the up / down button to adjust contrast. The new setting is previewed on screen. Press the enter button to confirm.
TV System
Select to adjust TV system.

Press the up / down button to set the TV system, depending on your viewing preferences. Press the enter button to confirm.
6.4 Changing Audio Settings
Press the left / right button on the remote control to select the Audio tab from the menu bar.
Night Mode
Select to set night mode.

Press the up / down button to select from Off, On, and Comfort. Press the enter button to confirm.
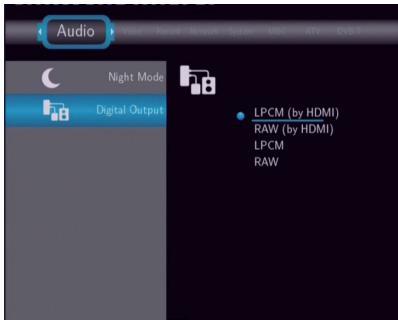
Press the up / down button to select from RAW, and LPCM. Press the enter button to confirm..
6.5 Changing Record Settings
Press the left / right button on the remote control to select the Record tab from the menu bar.
Quality
Select to set the default recording quality setting.
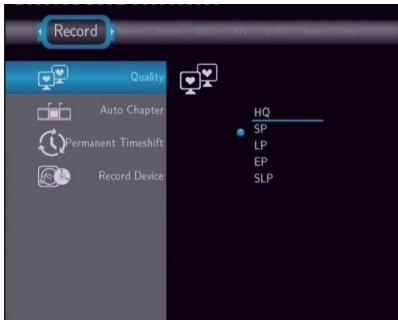
Press the up / down button to select the quality setting you require.
The highest quality setting is HQ which requires the most storage space. The other settings reduce recording quality sequentially but also require less storage space. Press the enter button to confirm.
Auto Chapter
Select to add chapter marks automatically at set intervals.
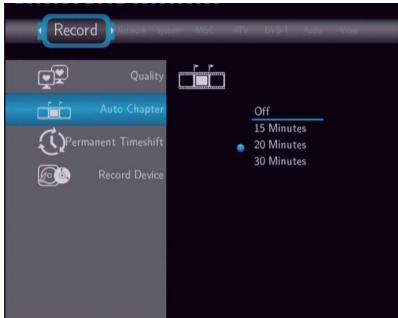
Press the up / down button to select the interval you require. An automatic chapter mark will be added at each interval, allowing you browse titles easily after recording. Press the enter button to confirm.

Press the up / down button to select from HDD,USB and Card. Press the enter button to confirm.
Timeshift Device
Select to set Time Shift device.

Press the up / down button to select from HDD, USB and Card. Press the enter button to confirm.
6.6 Changing Network Settings
Press the left / right button on the remote control to select the Network tab from the menu bar.
Please refer to the user's guide to wireless function in the package of EMTEC Wi200 USB adapter for more details about these settings.
6.7 Changing System Settings
Press the left / right button on the remote control to select the System tab from the menu.
Menu Language
Select to choose the OSD (On Screen Display) language.

Text Encoding
Press the up / down button to select the language. Press the enter button to confirm. Select to set text encoding.
Press the up / down button to select from Unicode, Chinese GBK, BIG5, and etc. Press the enter button to confirm.
Time
Select to set the system time.
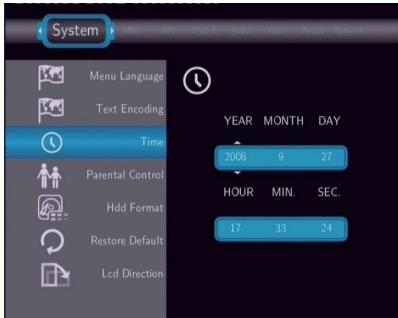
Press the up / down button to select from Manual and Auto (via TV). Press the enter button to confirm.
Press the left / right button to select each field and the up / down button to adjust each setting. Press the enter button to confirm.
Parental Control
Select to set the TV parental control options.

Lock System
A password will be needed for the modification. The default one is '0000'. Press the numerical buttons to input, and the enter button to confirm. Press the up / down button to turn on or off the parental system. Press the enter button to confirm.
Region
Press the up / down button to select the region. Press the enter button to confirm.
6.8 Miscellaneous
Press the left / right button on the remote control to select the MISC tab from the menu.
Slide Show Timing
Select to set the interval time for photo slide show.

Transition Effect
Press the up / down button to select. Press the enter button to confirm. Select to set the transition effect for photo slide show. Press the up / down button to select. Press the enter button to confirm.
Background Music
Select to set the background music options while view pictures.
Press the up / down button to select from off, Folder, and All. Press the enter button to confirm.
HDD Information
Select to view the HDD capacities.
The capacities of the recording, time shift and multimedia partitions are listed here.
Press the enter button to confirm.
Information
Select to view the system information.

The version of the firmware, BIOS, and the MAC Address, etc. are listed here. Press the enter button to confirm.
The Browser menu allows you to browse and play music, photo and movie files stored on P100 external HDD, an external USB device, Card, and Network. To enter the menu, select the Browser icon from the main interface.
Press the up / down button to select the device on which the media is stored. Choose from HDD, USB, Card, NET, and press the enter button.
Once your device is connected, you can browse photos, listen to music, and watch movies.
Note: Recorded files will be stored in the 'REC' folder.
7.1 Browsing All
Use the left / right button on the remote control to select the All tab.
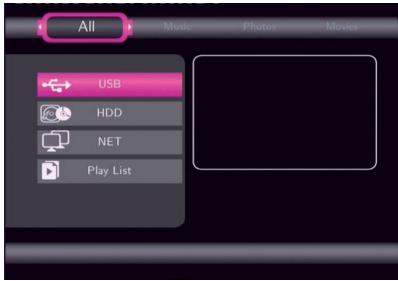
All directories and supported contents will be displayed. Press the up / down button to select the directory or file you wish to browse, and press the enter button to confirm.
7.2 Browsing Music
Use the left / right button on the remote control to select the Music tab.
All directories and supported audio files in current directory will be displayed. Press the up / down button to select the file you want to play and press the enter button.
7.3 Browsing Photos
Use the left / right button on the remote control to select the Photos tab.
All directories and supported image files in current directory will be displayed. Press the up / down button to select the photo you want to view and press the enter button. The photo will be displayed full screen.
Note:
- When the photo is displayed in full screen mode, the slide show starts automatically.
- While listening to music files, you can browse the photos at the same time.
While browsing a photo, you can press the left / right button to rotate a photo in any angle. Besides rotating a photo, you can press the zoom button to zoom in/out that photo. Three zoom levels are available.
7.4 Browsing Movies
Use the left / right button on the remote control to select the Movies tab.
All directories and supported video files in current directory will be displayed. Press the up / down button to select the movie you want to view and press the enter button. The movie will be played in full screen mode.
This browsing movies function supports DAT, VOB, IFO, MPG, AVI, and TS file formats.
While browsing a movie in full screen mode, you can press the zoom button to zoom in/out the image. Four zoom levels are available.
7.5 Browsing via Network
You can streaming playback the multimedia files shared on the local area network (Ethernet or WLAN).
Before viewing the following, please make sure that you have read 7.6 Changing Network Settings and made the right settings.
When selecting NET in the Browser menu, there are two ways to locate the multimedia files shared on your local network.
One way is to browse through workgroup; the other way is to browse through 'My_Shortcuts'.
7.5.1 Browsing through Workgroup
You can choose the workgroup which your PC belongs to from the workgroup list, find your PC name, and press the enter button to confirm.
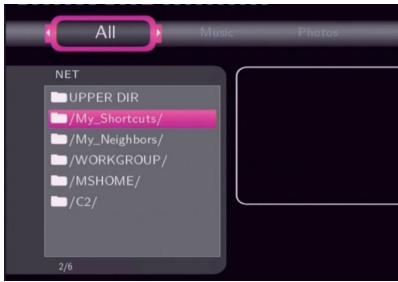
Then select the shared multimedia file you want to browse.
Note:
- While browsing high definition video files (resolution up to 720p / 1080i / 1080p) via Ethernet or WLAN, the video might be buffering. This is normal because of the limit of network speed or signal strength.
- Due to different network conditions, sometimes the workgroup might not be accessed or shown in the list. In such case, you need to use 'My_Shortcuts' to browse shared files.
7.5.2 Browsing through 'My_Shortcuts'
You can also set 'Specific File Server IP' and access it from 'My_Shortcuts' in the menu.
Press the menu button and a 'tools menu' appears.

Network Browser
Select to set Net User ID, Net Password, and Specific File Server IP, which enables to browse files on NET through 'My_Shortcuts'.

Select Net User ID and the entry screen will appear.
Press the navigation buttons to select letters and numbers. Select CAPS to toggle between uppercase and lowercase letters. Press < to delete a letter. Press → to insert a space.
Press the enter button to input each letter or number. Select OK and press the enter button to confirm all changes.
Select Net Password and the entry screen will appear. See above.
Select Specific File Server IP, and use navigational and numeric buttons to enter IP address.

You can also select Detail to set the Label, Domain, and Host Name of the shortcut.
Then select OK and press the enter button to confirm.
Select the shortcut you added and press the enter button to confirm.
Then select the shared multimedia file that you want to browse.
7.6 Renaming / Deleting Files
When navigating in the browser menu, you can press the menu button to activate a popup menu where you can rename and delete files or folders.
Press the up / down button to select from Return, Rename, and Delete. And press the enter button to confirm.
7.6.1 Renaming Files
Press the navigation buttons to select letters and numbers. Select CAPS to toggle between uppercase and lowercase letters. Press < to delete a letter. Press > to insert a space. Press the enter button to input each letter or number. Select OK and press the enter button to confirm all changes.
7.6.2 Deleting Files
Press the up / down button to select OK. And press the enter button to confirm the deleting operation. Or select Return to cancel.
Note: Partitions of NTFS file system format on the hard disc drive might be read-only.
7.7 Managing the Playlist
This player supports playlist function, which allows you to add your favorite content to the playlist, and enjoy them at any time.
7.7.1 Adding files to the playlist
Select the favorite file you wish to add, press the red button on the bottom of the remote control, and the file will be ticked. Press the green button on the bottom of the remote control to confirm, and then an on-screen message 'Add selects to list' will be shown. Multiple selections are allowed. See below photo.

7.7.2 Browsing the playlist
Press the up / down button to select Play List in the browser menu. And press the enter button to confirm. Then you will enter the playlist.
If you wish to delete a file from the playlist, press the red button to select, and then press the green button to confirm.
8. File Copy Menu
Press the copy button on the remote control to enter the File Copy menu, which allows you to copy files between HDD, USB devices, Card and Network.
Step 1: Select the source device and destination device.

Press the up / down button to select device. Press the left button to cancel, and the right button for next step.
Step 2: Select the source files you want to copy.

Press the play button to select files, the left button to cancel, and the right button for next step.
Step 3: Select the destination folder to store the above files.
Press the up / down button to select folder. Press the left button to cancel, and the right button for next step.
Step 4: Copy selected files.
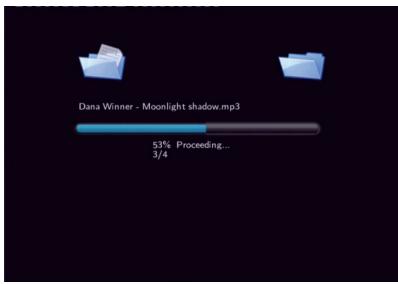
Press the up / down button to select OK, press the enter button to confirm. And the copy will start.
9. Listening to Internet Radio
This player integrates the SHOUTcast free Internet radio function. Select the Internet Radio icon on the main interface to enter this menu.
Note:
- Make sure the player is connected properly to a LAN or WLAN with Internet access, please refer to '6.6 Changing Network Settings' for more details;
- When you enter the Internet Radio menu for the first time, it will take several seconds to download data from the Internet, please be patient;
- For more information about SHOUTcast, please refer to the website: www.shoutcast.com
9.1 Station List Menu
Press the up / down button to select STATION, and press the enter button to confirm.

Press the up / down button to select the station you wish to visit from the list. Press the enter button to confirm. You can also press the prev / next button to page up and down.
When a station is selected, you will enter the CHANNEL List menu. Press the up / down button to select the channel you wish to listen to.
Press the enter button or the play button to start listening to the channel. And press the stop button or the back button to stop.
When a station is highlighted, you can press the menu button to add it to your favorites.
9.2 Genre List Menu
Press the up / down button to select GENRE, and press the enter button to confirm.
Press the up / down button to select the genre you wish to visit from the list. Press the enter button to confirm. You can also press the prev / next button to page up and down. In this way, you can search your favorite stations via genre...
9.3 My Favorite Station
Press the up / down button to select FAVORITE, and press the enter button to confirm.

All the favorite stations you added from the station list menu can be found and managed here.
When a station is highlighted, you can press the menu button to delete it from the favorite.
Note: You can have a maximum of 20 favorite stations in the list.
10. Upgrading the Firmware
The firmware is the operating system (OS) installed on the device. Firmware upgrades can bring new features, improvements and bug fixes.
To check whether you have the latest version of firmware:
- Select MISC in the Setup menu;
- The firmware version number is displayed behind SW Version;
- Compare it with the latest firmware released.

Download the latest firmware from our official website: www.emtec-international.com
Step 1: USB Pen Drive
A USB Pen Drive is needed for firmware upgrade. Copy the upgrade files at the root.

aryl.ttf
TrueType Font file
140 KB

crc32.txt
Text Document
1 KB

install,Oflash.jpg
IMG File
14,157 KB

instal
File
2,65

logo PAL.bmp
720 × 576
Bitmap Image

video_firmware.bin
BIN File
1,217 KB
Step 2: Connect the USB Pen Drive
Plug the USB Pen Drive into one of the USB HOST ports of the player.
Step 3: Hold the power / standby button
Press and hold the power / standby button on the right hand side of the player, and do not loosen.
Step 4: Connect the power cable
Plug the power cable into the DC IN jack, wait about 3 seconds or more, then loosen your finger on the power / standby button;
Firmware installation will start in about 30 seconds. The LED indicators on the front panel will be enlightened and flashing during installation. If it is connected to a TV set, a blue install page will appear on the TV screen.
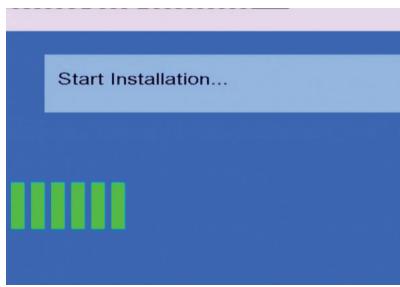
Please wait for several minutes, until the installation is completed.
Note:
Do not turn off the power during installation;
The USB Pen Drive cannot to be unplugged during installation.
11.1 Specifications
USB SUPPORTED:
USB HDD
- Other USB Mass Storage Devices
USB 2.0 Interface
MEMORY CARDS SUPPORTED:
SD/MMC/MS/MS Pro
CONTENT FORMATS SUPPORTED:
DAT/VOB/IFO/MPG/AVI/MPEG-2 TS
MP3/OGG/WMA
- Compression rate: between 32 kbps and 320 kbps
JPEG/BMP
VIDEO CODECS SURPORTED:
MPEG-1/MPEG-2
MPEG-4 ASP: XviD
AUDIO CODECS SURPORTED:
MP2/MP3 /OGG Vorbis/WMA Standard (DRM, Pro & Advanced Profile not supported)/PCM
SUBTITLE FORMS SURPORTED:
- SRT, SMI, SSA, IDX/SUB, SUB
RECORDABLE DEVICES SUPPORTED:
P100 2.5'external HDD
USB HDD, Memory Card
VIDEO RECORDING MODE
Mode 80GBHDD 120GBHDD160GBHDD
HQ 16hrs 24hrs 33hrs
SP 32hrs 48hrs 66hrs
LP 48hrs 72hrs 99hrs
EP 64hrs 96hrs 132hrs
SLP 96hrs 144hrs 198hrs
VIDEO RECORDING FORMAT
HQ/SP/LP/EP/SLP mode: MPEG-2 MP@ML
AUDIO RECORDING FORMAT
HQ/SP/LP/EP/SLP mode: MP2 2-chanel
VIDEO OUTPUT SPECIFICATION
Composite Output 1 Vpp 75 Ohm
Components Output Y:1 Vpp 75 Ohm
Cb:0.7 Vpp 75 Ohm
Cr:0.7 Vpp 75 Ohm
HDMI (Version 1.1)
HDMI Output
AUDIO PERFORMANCE
DA Converter 24-bit/192kHz
AD Converter 24-bit/96kHz
- Signal-Noise (1kHZ) ≥ 95dB
Dynamic Range (1kHz) ≥90dB
- Channel
- Separation
Total Harmonic
Distortion (1kHZ)
NETWORK FEATURE
- Ethernet 0/100Mbps Auto-Negotiation
- WLAN IEEE 802.11b/g, up to 54Mbps (supported by the optional WLAN USB Adapter)
ANALOG TV SYSTEM
Frequency Range 44.25MHz\~863.25MHz (VHF I/III / UHF)
Video PAL B/G, D/K, I, SECAM L and L'
Audio Stereo, Mono
- Analog TV Tuner 75 Ohm (VHF / UHF) TV Analog Antenna or cable
DIGITAL TERRESTRIAL TV SYSTEM
Frequency Range 44.25MHz~863.25MHz (VHF I/III / UHF)
COFDM 2K FFT or 8K FFT COFDM demodulator
(Fully DVB-T compliant : ETS 300-744)
Code Rate 1/2, 2/3, 3/4, 5/6, and 7/8
Guard Interval 1/4, 1/8, 1/16, 1/32
Constellation QPSK 16QAM, 64 QAM
- Bandwidth 6,7 or 8MHz
Digital TV Tuner 75 Ohm (VHF / UHF) TV Digital Antenna
GENERAL
Power Supply AC 100~240V 50 60Hz
Power Consumption Approx. 12 W
Operating Temperature +5°C to +35°C (+36°F to +95°F)
Operating Humidity 5% to 80% RH
Dimensions (W/H/D) 192x50x151mm
- Net Weight Approx 0.5kg
Note: The specifications and design of this product are subject to change without notice.
11.2 Frequently Asked Questions
Question 1. Why cannot I record TV programs onto my external hard disk?
Answer: Please check the file system of the partitions on your hard disk. NTFS partitions on the system might be read-only. Please use FAT32 instead.
Question 2. My files have disappeared from the player.
Answer: Make sure that you browse your files via the correct Browser mode which means correct filtered views such as Photos, Music, or Movies.
Question 3. Why do some supported photo format, cannot be shown in the photo function?
Answer: In the JPEG format there are different modes. The player doesn't support all the modes. So you have to change your photo format first as follows:
(1) Use an image processing software (ie: Photoshop) to open the photo;
(2) Choose "File" then "save as" from the menu, as the picture on the left hand side shows, select the picture format as JPEG, input the file name and click the "save" icon;
(3) After click on the "save" icon, a new window will appear as the picture on the right hand side shows, select "Baseline (standard)" or "Baseline optimized";

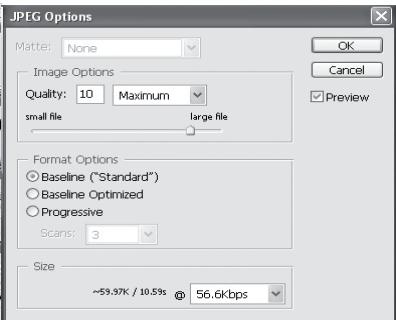
(4) Click the "OK" icon.
Question 4. During power on, why does the TV have a short flashing, blue screen or screensaver?
Answer: This is normal, when the system initializes, it sets up the corresponding parameters so it can output the correct video signal to the TV. During the initializing time, the TV might receive incorrect signals or the signals might not be stable and might cause the TV screen to flash, some TV's might treat this as no signal, and might display a blue screen or scrensaver.
Question 5. Why when I switch to Y/Pb/Pr 480P, 576P, 720P, 1080I, does the TV screen display an unwatchable picture?
Answer: Please check if your TV supports Y/Pb/Pr 480P, 576P, 720P, 1080I output, if your TV does not support, please use the A/V signal display instead, press the TV SYSYEM button on the remote control, then switch the TV's video input to NTSC or PAL.
Question 6. Why is there no sound on movie or music playback when using Y/Pb/Pr component output?
Answer:Y/Pb/Pr output is a video output only, and does not include sound signals, when using Y/Pb/Pr output, please plug the A/V OUT or the S/PDIF jack to output sound.
Question 7. Some functions like recording, time shift etc. do not work. What should I do?
Answer: If you find some functions do not work properly on the player, please change system settings to the default (Refer to 6.6 for changing system settings).

- TABLE OF CONTENTS
- 1.1 PREFACE
- 1.2 PACKING LIST
- 1.3 CAUTION
- 1.3.1 USAGE CAUTIONS
- 1.3.2 POWER
- 1.3.3 RADIO INTERFERENCE/COMPATIBILITY
- 1.3.4 REPAIR
- 1.3.5 DISPOSING OF THE PLAYER
- 1.3.6 HARD DISK CAUTIONS
- 1.3.7 OTHERS
- 1.4 CONNECTION
- 1.4.1 CONNECTING P100 EXTERNAL HDD
- 1.4.2 USB MASS STORAGE DEVICE (LIKE USB STICK, MP3, USB HDD ETC.) CONNECTION
- 1.4.3 MEMORY CARD CONNECTION
- 1.4.4 TV CONNECTION
- 1.4.4.1 A/VIN
- 1.4.4.2 A/V OUT
- 1.4.4.3 Y/PB/PR COMPONENT OUT
- 1.4.4.4 HDMI OUT
- 1.4.4.5.ANT./RFIN
- 1.4.5 DIGITAL AUDIO DEVICE CONNECTION
- 1.4.6 POWER CONNECTION
- 1.4.7 ETHERNET CONNECTION
- 1.4.8 WLAN CONNECTION
- 1.5 FIRST TIME USAGE
- 1.5.1 REMOTE CONTROL
- 1.5.2 POWER ON/OFF, LANGUAGE CONTROL
- 2.1 REMOTE CONTROL
- 2.2 FRONT VIEW
- 2.3 RIGHT SIDE VIEW
- 2.4 REAR VIEW
- 3.1 SELECTING DVB-T TV
- 3.2 SELECTING ANALOG TV
- 3.3 SELECTING A/V IN - SIGNAL FROM THE A/V IN JACK
- 3.4 SELECTING BROWSER - PLAYBACK MULTIMEDIA FILES
- 3.5 SELECTING INTERNET RADIO
- 3.6 SELECTING SETUP
- 4.1 WATCHING ANALOG TV PROGRAMS
- 4.2 WATCHING DVB-TV PROGRAMS
- 4.2.1 PROGRAM LIST MENU
- 4.2.2 INFO BAR
- 4.2.3 ELECTRONIC PROGRAMMING GUIDE
- 4.2.4 TELETEXT MENU
- 4.2.5 SUBTITLE LIST MENU
- 5.1 CREATING A NEW SCHEDULE
- 5.2 EDITING SCHEDULE
- 5.3 DELETING SCHEDULE
- 5.4 VIEWING SCHEDULE STATUS
- 5.5 VIEWING RECORDING HISTORY
- 6.1 CHANGING DVB-T TV SETTINGS
- 6.2 CHANGING ANALOG TV SETTINGS
- 6.3 CHANGING VIDEO SETTINGS
- 6.4 CHANGING AUDIO SETTINGS
- 6.5 CHANGING RECORD SETTINGS
- 6.6 CHANGING NETWORK SETTINGS
- 6.7 CHANGING SYSTEM SETTINGS
- 6.8 MISCELLANEOUS
- 7.1 BROWSING ALL
- 7.2 BROWSING MUSIC
- 7.3 BROWSING PHOTOS
- NOTE
- 7.4 BROWSING MOVIES
- 7.5 BROWSING VIA NETWORK
- 7.5.1 BROWSING THROUGH WORKGROUP
- 7.5.2 BROWSING THROUGH 'MY_SHORTCUTS
- 7.6 RENAMING / DELETING FILES
- 7.6.1 RENAMING FILES
- 7.6.2 DELETING FILES
- 7.7 MANAGING THE PLAYLIST
- 7.7.1 ADDING FILES TO THE PLAYLIST
- 7.7.2 BROWSING THE PLAYLIST
- FILE COPY MENU
- LISTENING TO INTERNET RADIO
- 9.1 STATION LIST MENU
- 9.2 GENRE LIST MENU
- 9.3 MY FAVORITE STATION
- UPGRADING THE FIRMWARE
- ARYL.TTF
- CRC32.TXT
- INSTALL,OFLASH.JPG
- INSTAL
- LOGO PAL.BMP
- VIDEO_FIRMWARE.BIN
- 11.1 SPECIFICATIONS
- USB SUPPORTED
- MEMORY CARDS SUPPORTED
- CONTENT FORMATS SUPPORTED
- VIDEO CODECS SURPORTED
- AUDIO CODECS SURPORTED
- SUBTITLE FORMS SURPORTED
- RECORDABLE DEVICES SUPPORTED
- VIDEO RECORDING MODE
- VIDEO RECORDING FORMAT
- AUDIO RECORDING FORMAT
- VIDEO OUTPUT SPECIFICATION
- AUDIO PERFORMANCE
- NETWORK FEATURE
- ANALOG TV SYSTEM
- DIGITAL TERRESTRIAL TV SYSTEM
- GENERAL
- 11.2 FREQUENTLY ASKED QUESTIONS
Marque : EMTEC
Modèle : HDD MOVIE CUBE P800
Catégorie : Lecteur multimédia portable