
RIGA - Mobilier de jardin KETTLER - Notice d'utilisation et mode d'emploi gratuit
Retrouvez gratuitement la notice de l'appareil RIGA KETTLER au format PDF.

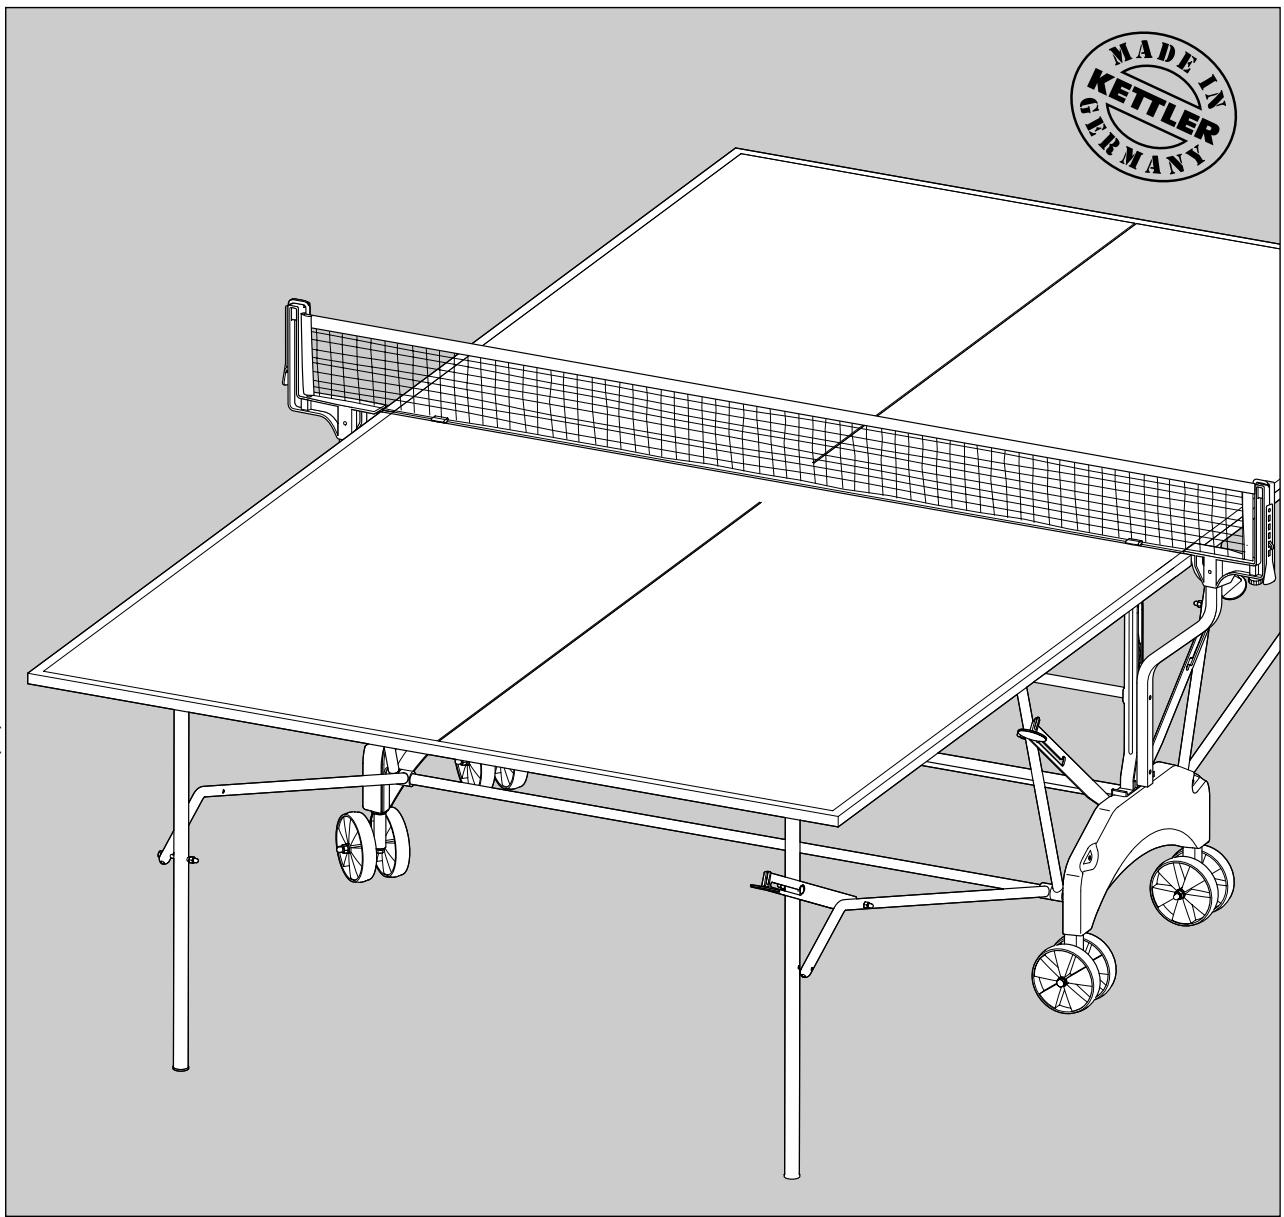
| Type de produit | Table de tennis de table pliante |
| Marque | KETTLER |
| Modèle | RIGA / RIGA Pro (réf. 07042-700, 07043-700, 07042-900) |
| Usage | Intérieur (RIGA) ou extérieur (RIGA Pro) |
| Dimensions (dépliée) | 274 x 152,5 x 76 cm (standard) |
| Poids approximatif | Environ 80 kg |
| Matériau du plateau | Aggloméré (MDF) revêtu |
| Matériau du cadre | Acier |
| Alimentation | Aucune (manuel) |
| Fonctions principales | Pliage pour rangement, roulettes pour déplacement, système de sécurité anti-basculement, plateau officiel, filet inclus |
| Entretien et nettoyage | Chiffon humide, pas de produits abrasifs, éviter l'humidité prolongée |
| Sécurité | Utiliser uniquement pour le tennis de table, vérifier les vis régulièrement, ne pas faire tomber les demi-plateaux, ranger à l'abri du vent lorsqu'elle est pliée |
| Pièces détachées | Liste complète disponible dans la notice ; commander chez KETTLER avec le numéro d'article et le numéro S/N |
| Réparabilité | Utiliser exclusivement des pièces détachées KETTLER d'origine |
| Garantie | Non mentionnée ; contacter le revendeur en cas de problème |
| Normes | Conforme à la norme EN 14468-1:2004 |
FOIRE AUX QUESTIONS - RIGA KETTLER
Questions des utilisateurs sur RIGA KETTLER
0 question sur cet appareil. Repondez a celles que vous connaissez ou posez la votre.
Poser une nouvelle question sur cet appareil
Téléchargez la notice de votre Mobilier de jardin au format PDF gratuitement ! Retrouvez votre notice RIGA - KETTLER et reprennez votre appareil électronique en main. Sur cette page sont publiés tous les documents nécessaires à l'utilisation de votre appareil RIGA de la marque KETTLER.
MODE D'EMPLOI RIGA KETTLER
KETTLER
Assembly Instructions
Riga and Riga Pro
Art.-Nr. 07042-700, 07043-700 und 07042-900
Before assembling or using the table-tennis table, please read the following instructions carefully. They contain important information for use and maintenance of the equipment as well as for your personal safety. Keep these instructions in a safe place for maintenance purposes or for ordering spare parts.
All KETTLER products are designed in accordance with the latest safety regulations and undergo a constant process of quality control during manufacturing. The knowledge gained in this process is used to constantly improve and develop our products. In order to offer our customers the very best in product quality, we reserve the right to make technical changes at any time. In spite of this, should you have any cause for complaint, please contact your KETTLER dealer.
Note on Safety
The table-tennis table should be used only for its intended purpose, i.e. for playing with suitable table-tennis bats and balls.
All other uses are prohibited and may be dangerous. The manufacturer cannot be held liable for damage or injury caused by improper use of the table.
- Damaged or worn components may endanger your safety or shorten the lifespan of the table-tennis table. Replace worn or damaged components immediately and remove the table from use until this has been done. Use only spare parts manufactured by KETTLER.
The table-tennis table complies with all safety regulations. Incorrect repairs, alterations to the design (removal of original parts, addition of other components etc.) may endanger the safety of the user.
Handling the equipment
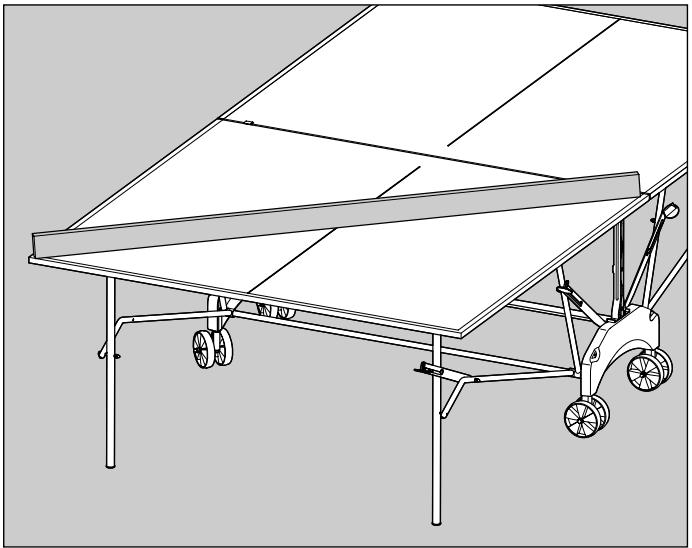
- Do not use the table-tennis table until it has been fully and correctly assembled and checked.
- Ensure that table-tennis tables which are not weatherproof are not exposed to dampness or rain. Keep them well away from direct sources of heat. Should the surface become warped, lay the table on a level surface for a few days.
Set the table up on a level surface. - Do not cover it with plastic foil, under which condensation may form. We recommend the weatherproof KETTLER tarpaulin, art.
Instruct other persons (in particular children) using the table in its correct use, and draw their attention to any potential source of danger, especially when setting up or dismantling the table.
■ When setting up or dismantling the table, stay clear of its folding radius.
- When folded up, the table-tennis table presents a large surface to the wind. For this reason, ensure that it is stored in a sheltered position.
The table-tennis table may be pushed only into the transport position because there is otherwise a danger of injury.
The unit complies with the standard EN 14468-1:2004.
Depending on frequency of use, check all screws, bolts etc. regularly to ensure that they are in good condition.
In case of enquiry, please contact your KETTLER dealer.
no. 7032-000.
For practising without a partner, the table halves can be folded up singly.
For more information on the sport of table-tennis, you are referred to the specialist literature on the subject.
- Do not use corrosive or abrasive materials to clean the equipment. Ensure that such materials are not allowed to pollute the environment. In most cases, a slightly dampened cloth is sufficient.
Instructions for Assembly
The equipment must be assembled with due care by two adult persons.
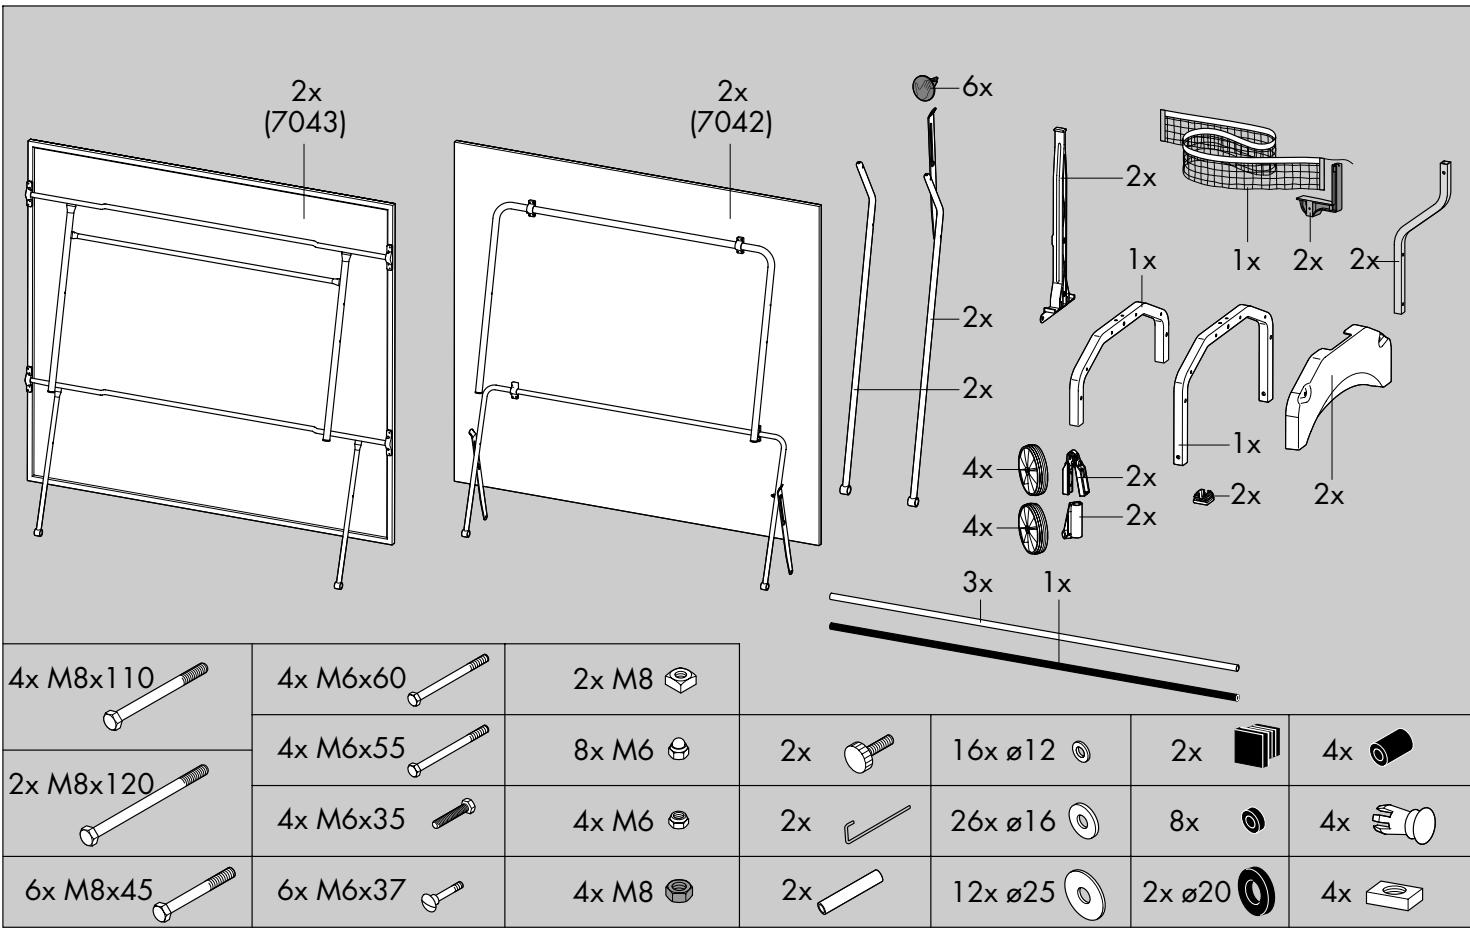
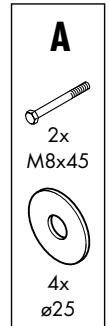
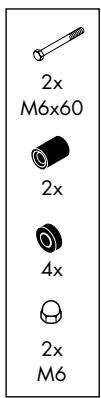
■ Ensure that you have received all the parts required (see check list) and that they are undamaged. Should you have any cause for complaint, please contact your KETTLER dealer.
Before assembling the equipment, study the drawings carefully and carry out the operations in the order shown by the diagrams. The correct sequence is given in capital letters.
Please note that there is always a danger of injury when working with tools or doing manual work. Therefore please be careful when assembling this machine.
- Ensure that your working area is free of possible sources of danger, for example don't leave any tools lying around. Always dispose packaging material in such a way that it may not cause any danger. There is always a risk of suffocation if children
List of spare parts
When ordering spare parts, always state the full article number, spare-partnumber, the quantity required and the S/N of the product (see spare parts drawing).
Example order: Art. no. 07043-700 / spare-part no. 10100016 / 2 pieces / S/N......
Important: spare part prices do not include fastening material; if fastening material (bolts, nuts, washers etc.) is required, this
play with plastic bags!
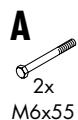
The fastening material required for each assembly step is shown in the diagram inset. Use the fastening material exactly as instructed.
- Bolt all the parts together loosely at first, and check that they have been assembled correctly. Tighten the locknuts by hand until resistance is felt, then use spanner to finally tighten nuts completely against resistance (locking device). Then check that all screw connections have been tightened firmly. Attention: once locknuts have been unscrewed they no longer function correctly (the locking device is destroyed), and must be replaced.
For technical reasons, we reserve the right to carry out preliminary assembly work (e.g. addition of tubing plugs).
Please keep original packaging of this article, so that it may be used for transport at a later date, if necessary.
should be clearly stated on the order by adding the words "with fastening material".
KETTLER International, Inc.
1355 London Bridge RD
Virginia Beach, VA 23453
www.kettlerusa.com
parts@kettlerusa.com
Checkliste (Packungsinhalt)
GB Checklist (contents of packaging)
F Listede Verification (contenu de l'emballage)
NL Checkliest (verpakkingsinhoud)
E Listadecontrol的内容ido del paquete)
1 List di controlo (contenuto del pacco)
PL Listakontrolna (zawartosc opakowania)
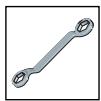
Siebenotigenzusatzlich folgenden Werkzeug (Gehort nicht zum Lieferumfang):
GB You also need the following tools (Not included):
F Vouavesbecoincetutilencomplément(concomprisdansla livraison)
NL U heeft tevens volgend gereedschap nodig (Is nicht in de levering ingesloten):
Usted necesa adiconalmente la asigniente herramiento (no pertenece al volumen de suministro):
① Per eseguire il montaggio, Vi occorre il seguente attrezzo (non è incluso nel volume di fornitura):
Dodatkowo potrzebne sq nastepujace narzedzia (nie objete zakresem dostawy):
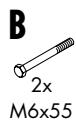
2x
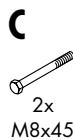
2x

1x
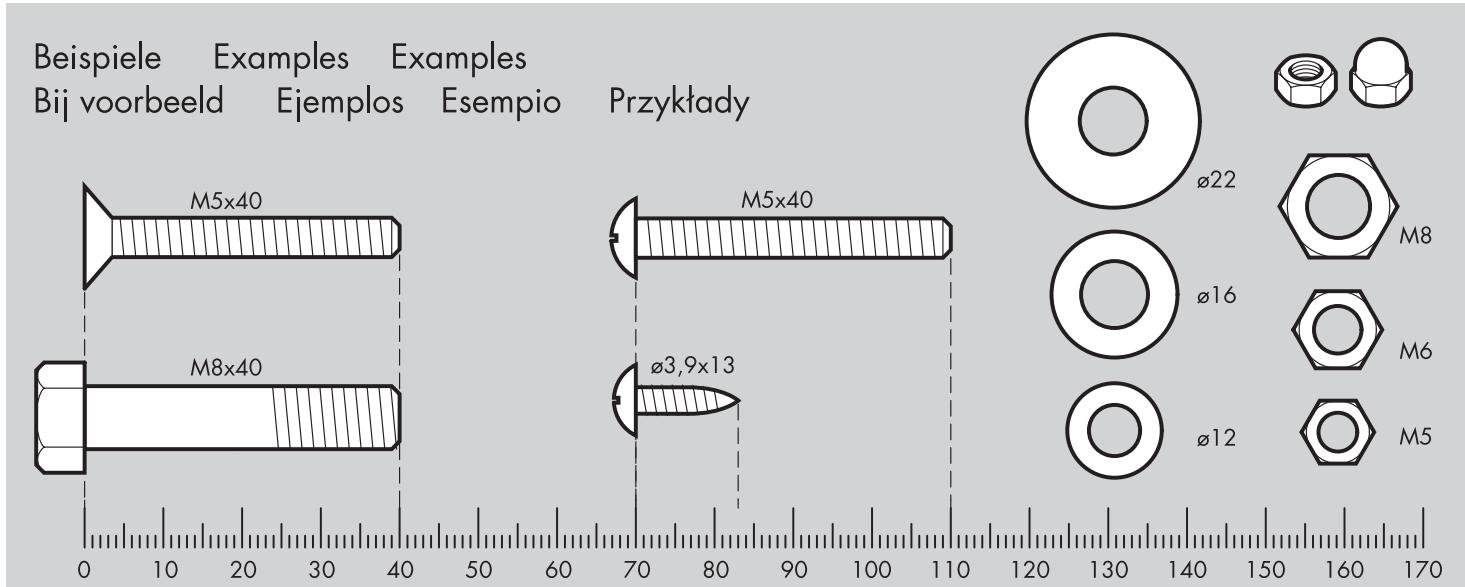
Messhilfe für Verschraubungsmaterial
GB Measuring help for screw connections
F Gabarit pour système de serrage
Meethulp voor schroefmaterialiaal
E Ayuda para la medicacion del material de atornilladura
1 Misura per materiale di avvitamento
PL Wzornik do poluczén szubowych
1

2
3


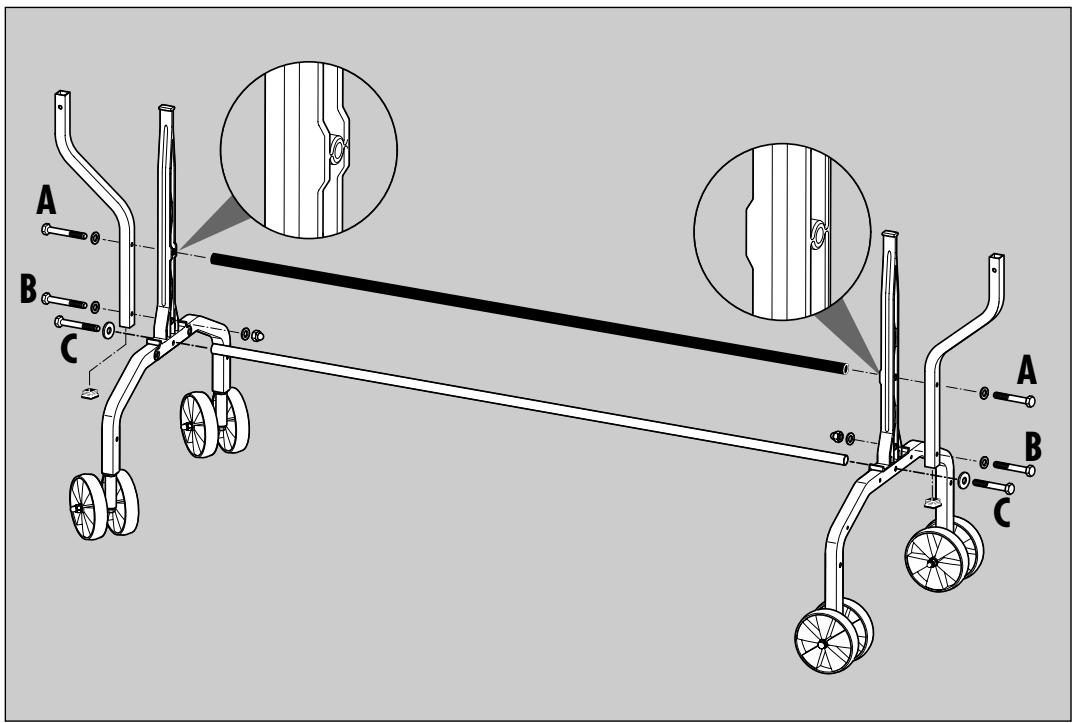

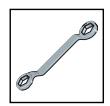
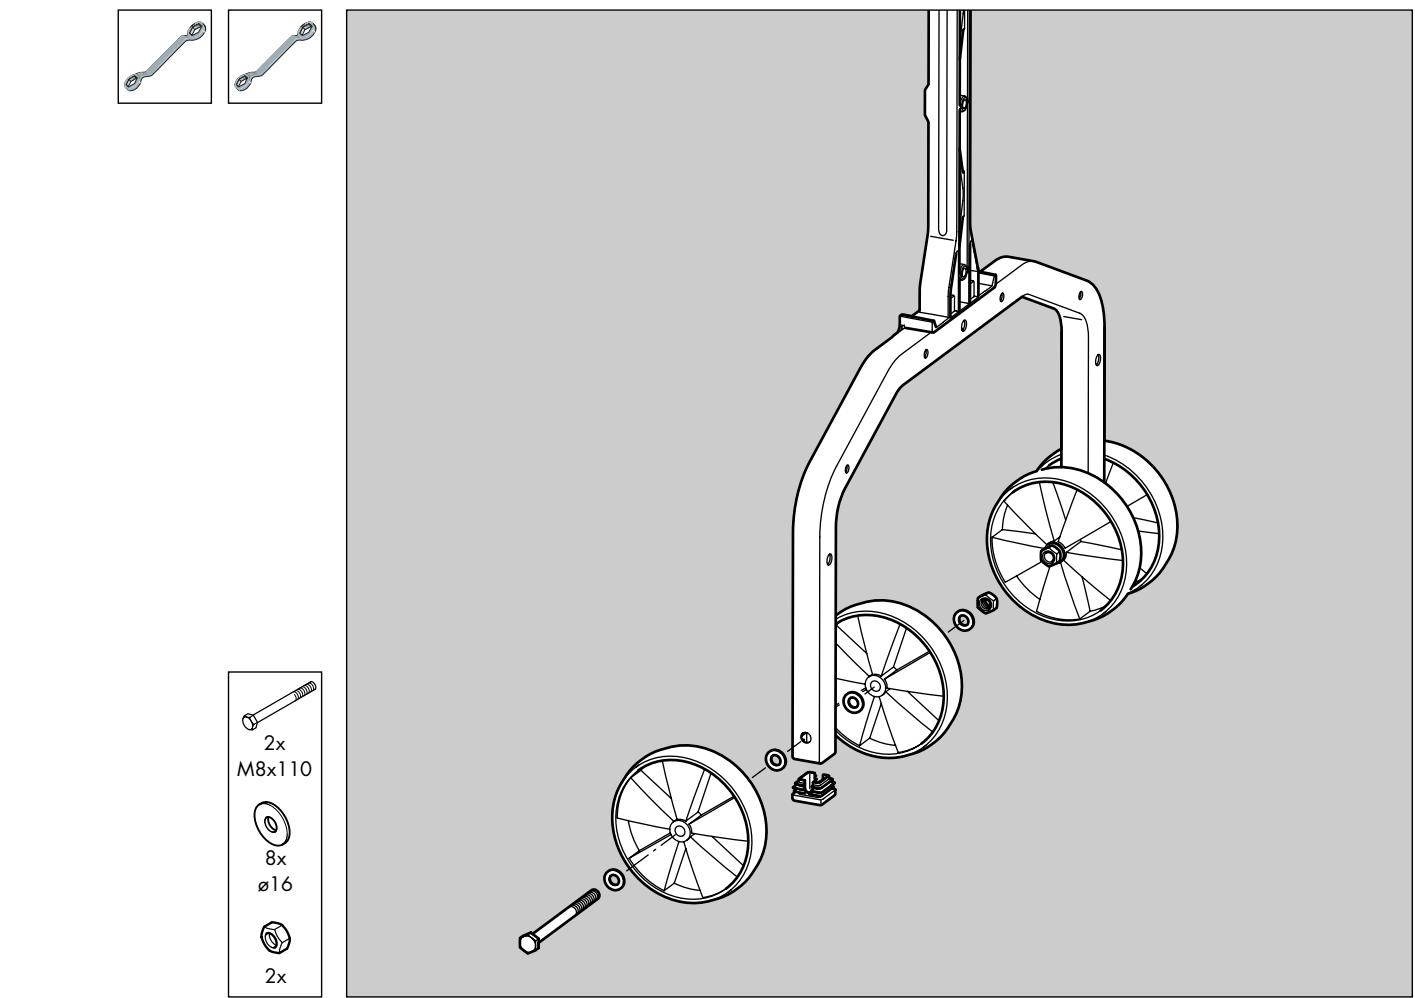
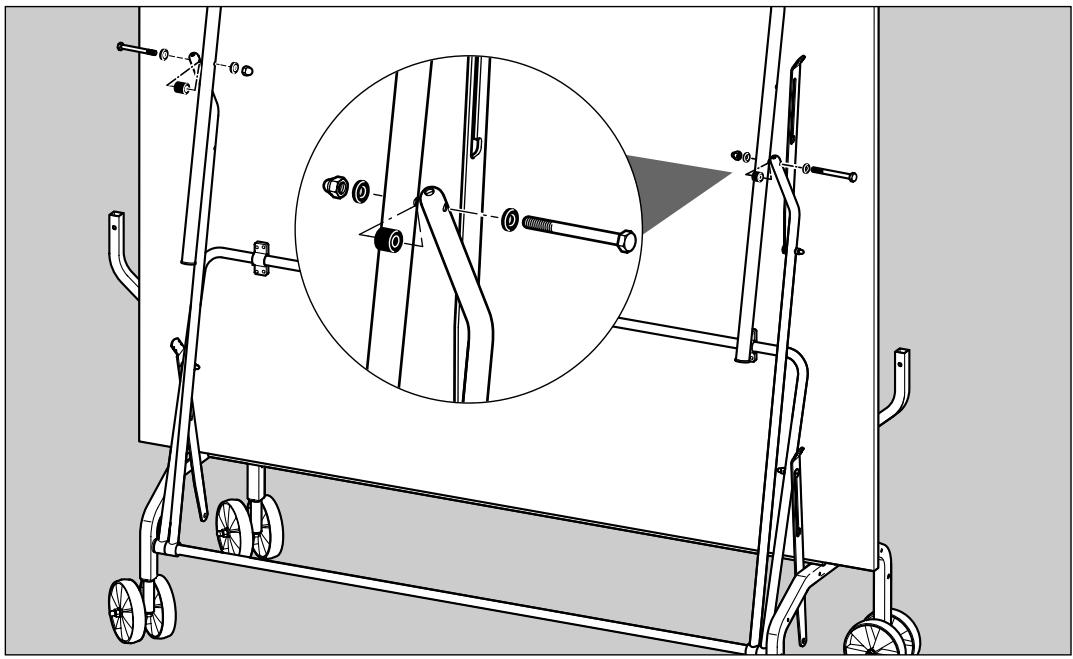
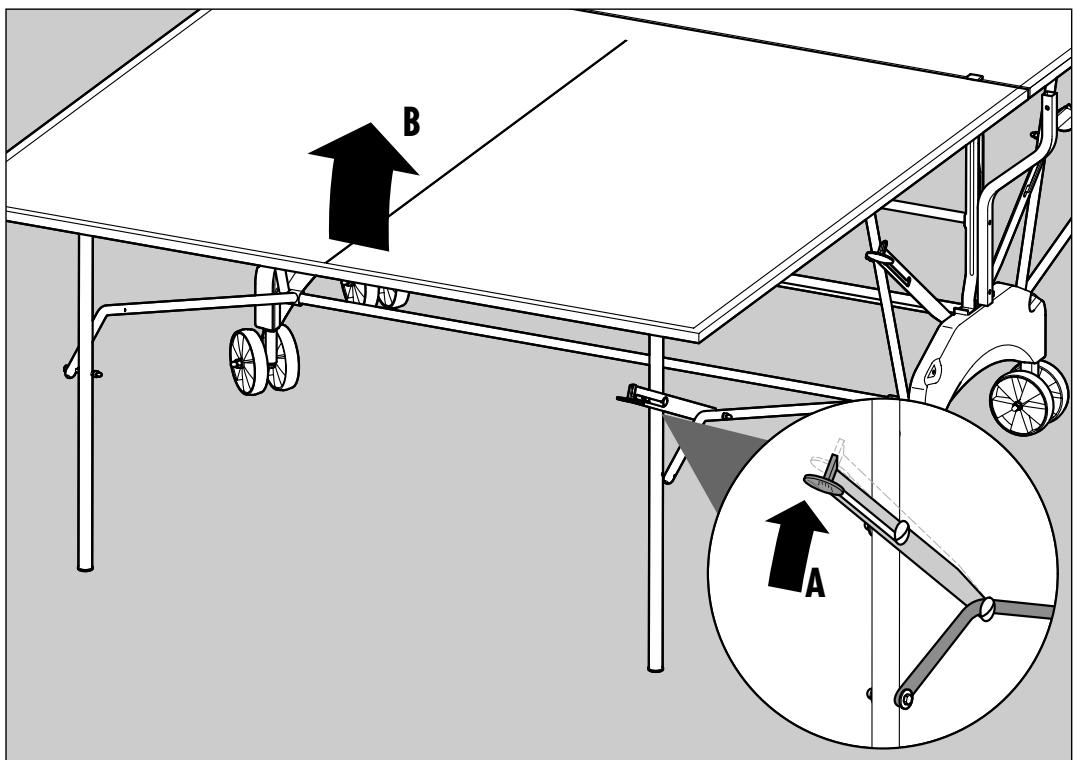
D: Die Streben des Tragrahmens müssen hierbei ein weniger zur Seite gebogen werden; gehen Sie hierbei vorsichtig vor! C: Setzen Sie nun eine Plattenhälte auf. Sichern Sie die Plattenhälte für die folgenden Montageschritte unbedingt gegen Abrutschen und/oder Umkippen! Lassen Sie von einer zweiten Person auf jeder Seite die Schubstrebe und die Tragrahmenstrebe auf das letzte Verbindungsrohr aufschieben. D: Das Verbindungsrohr wird nun mit den Seitenleinen verschraubt.
GB B: To do this, the braces for the frame must be bent slightly to the side. Proceed with care when doing this. C: Position one of the table halves and ensure that it cannot slip or tilt over. Ask another person to attach the push bar and the support-frame brace to the last connecting bar. D: The connecting bar is now bolted to the side elements.
F B: Pour cela les jambes de forces du cadre porteur doivent etre pliees un peu de cote; pratiquer la avec precaution. C: Poser un plateau. Il est absolutement necessaire de securiser les plateaux pour les operations de montage qui suivront, afin qu'ils ne puissant ni glisser ni se renverser. Demander a une autre personne de glisser de chaque cote l'entretoise et la jambe de force du cadre porteur sur le dernier tube de jontion. D: Visser ensuite le tube de jontion aux pieces de cote.
NL B: De stangen van het draagframe moeten hierbij aan de kant enigszins gebogen worden; ga bierbij voorlichtig te werk! C: Stel een bladhelft op. Blokker deze bladhelft voor het volgende deel van de montage gegen wegligden en/of kanteilen. Laat een volwassene aan elke zichde de schuifstang en het
draagframe over de staat verbindinggsbuis schuiven.
D: De verbindingsbuis要去 aan de zichdelen worden vastgeschroefd.
E B: Ponga la mitad de la plancha. iAsegure la mitad de la plancha para los próximos pasos de montaje contra deslizamente y/o vuelco! Deje que una segunda persona empuje a cada lado el puntal de empujé y el puntal del marco en elultimate tubo de unión.
C: Los+puntales del marco soporte tienen que ser ligeramente doblados;ejecute este proceso con cuidado!
D: El tubo de union es atornillado con las partes laterales.
1 B: Attenzione: quello tubolare viene utilizzato unicamente in.
fase di montaggio per stabilizzare la struttura, per cui quan
do si monta il secondo semipianoesso va daccapo svitato! C: Avvitare adesso un tubolare di collegamento laterale con
i componenti laterali. D: Il tubolare di collegamento adesso avvitato con i compo
nenti laterali.
PL B: Poprzejczki pałęka podporowej muszą zostć przy tym niedznacznie rozgiète na zewnȩtrz. Zachowaec przy tym ostrożnosć!
C: Po drugiej stronie ulozyc potowke pty. Dla nastepnych operaci j montažowych nalezy koniecznie zabezpieczy potowke pty przed ześlizgnieciem sie i/lub przewrocieniem sie! Poprosic drugq osobe o nasunięcie po obu stronach psychaczy ukośnych i podpor ukośnych ramy na ostatniq rure taczgca.
D: urcgczgca skreconazostaje teraz czesciami bocznymi.
6

7


9
D Fuhren Sie die Schritte 5 bis 8 fur die zweite Plattenhälte durch. Denken Sie auch hier wieder an die Sicherung der Platte!
GB Carry out steps 5-8 for the second half of the table. Again, ensure that the table cannot slip or tilt over!
Effectuer les opérations 5 à 8 pour la deuxième moitié de table. La non plus, ne pas oublier la sécurisation du plateau.
Voer de montagestappen 5 tot 8 voor de tweede bladhelftuit. Denk ook hierbij wee aan de vergrendeling van het blad!
E Execute los pasos 5 a 8 para la的最后一 mitad de la plancha.
① Ripetere le operazioni da 5 a 8 anche per il segondo semipiano
PL Powtórzyc kroki 5 do 8 dla drugiej połówki phyty.
10

Herunterklappen der Plattenhälften
GB Lowering the table halve
F Rabattre les moitiés de la table
NL Neerslaan van de plaathelften
E Despliegue de los dos segmentos de la plac
Ribaltarele metadetavolo
PL Opuszczanie plyt stolu
Drücken Sie die rechte Kippsicherung. Anschließlich die Platte mit einer Hand festhalten, linke Kippsicherung drücken und Platte langsam herunterklappen (Platte unter keinen Umstunden einfach fallen halten!).
Press the right-hand tip lock. Hold the table firmly with one hand, press the left-hand lock and lower the table-half slowly into position. Never allow it to drop down!
F Appuyer sur la sécurité de basculement de droite. Tenir ensuite le plateau d'une main, appuyer sur la sécurité de basculement de gauche et laisser descendre lentement le plateau (en aucun cas on ne pourrait le laisser tout simplement tomber).
Druk de rechtter kiepvergrendeling in. Houd het blad dan met een hand vast, druk op de linker kiepvergrendeling en klap het blad langzaam maar beneden (laat het blad in geen geval zomaar vallen!).
E Presione el seguro derecho. Sujete a continuacion la plancha con una mano y presione el seguro izquierdo contra vuelco. Baje lentamente la plancha (no deje caer la plancha por ningun motivo!).
Premiere il pulsante antiribaltamento destro. Sostenendo il piano con una mano, premere il pulsante antiribaltamento si-nistro e abbassare lentamente il piano stesso (per nessun motivo lasciare il piano in caduta libera!)
PL Nacisnqc prawe zabeepieczenie przed przewrocieniem sie. Nastepnie przytrzyma cplye jeder nrekq, nacisnqc zabeepieczenie przed przewrocieniem sie po lewej stronie i powolni opusci cyte (pod zdnym pozorem nie pozwolic pycie opasc pod wfasnym cięzarem!).
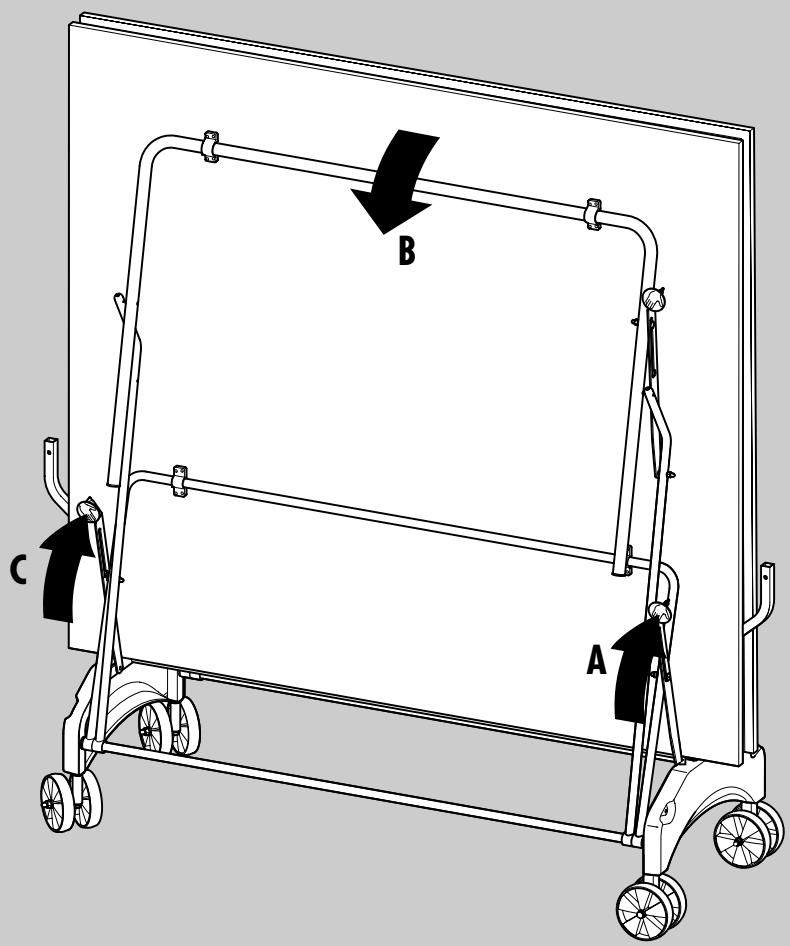
Zusammenklappen der Plattenhälften
GB Collapsing the table halves
F Replier les moitiés de la table
NL Tesamenslaan van de plaathelften
E Plegar los segmentos de las placas
1 Chiudere le meta del ravolo
PL Skladanie plyt stolu
Drücken Sie den Hebel der Standsicherung nach oben und haben Sie die Plattenhälte an. Behalten Sie in der Anfangsphase des Hochklappens den Druck bei.
GB Press the locking lever up and lift the table half upwards. Continue to press the lever during the first part of the upward motion.
F Pousser le levier de la sécurité vers le haut et soulever le demi plateau. Maintenir la pression dans la phase initiale du redressement.
Druk de linker kiepvergrendeling maar boven en til de bladhelften op. In het begin dient u hierbij druk uit te oefenen.
E Presione la palanca de seguro de la estabilidad hacia arriba y levante la mitad de la mesa. Mantenga la presión en la fase inicial del levantimiento.
① Premere versus l'alto la leva del dispositivo stabilizzatore e sollevare il semipiano. Mantenere la pressione nella fase iniziale del sollevamento del semipiano.
PL Obróci dzwignie podpor w gore i podnieszć połowke pły. W pocztkowej fazie podnoszenia naleźny nadal naciskać zabezpieczenia.
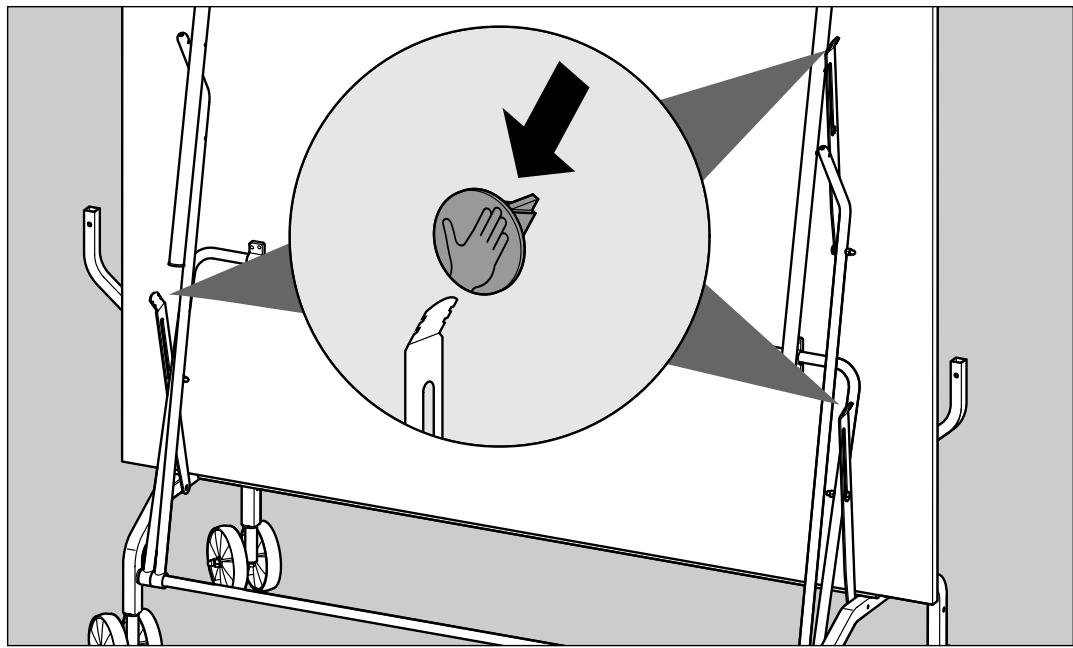
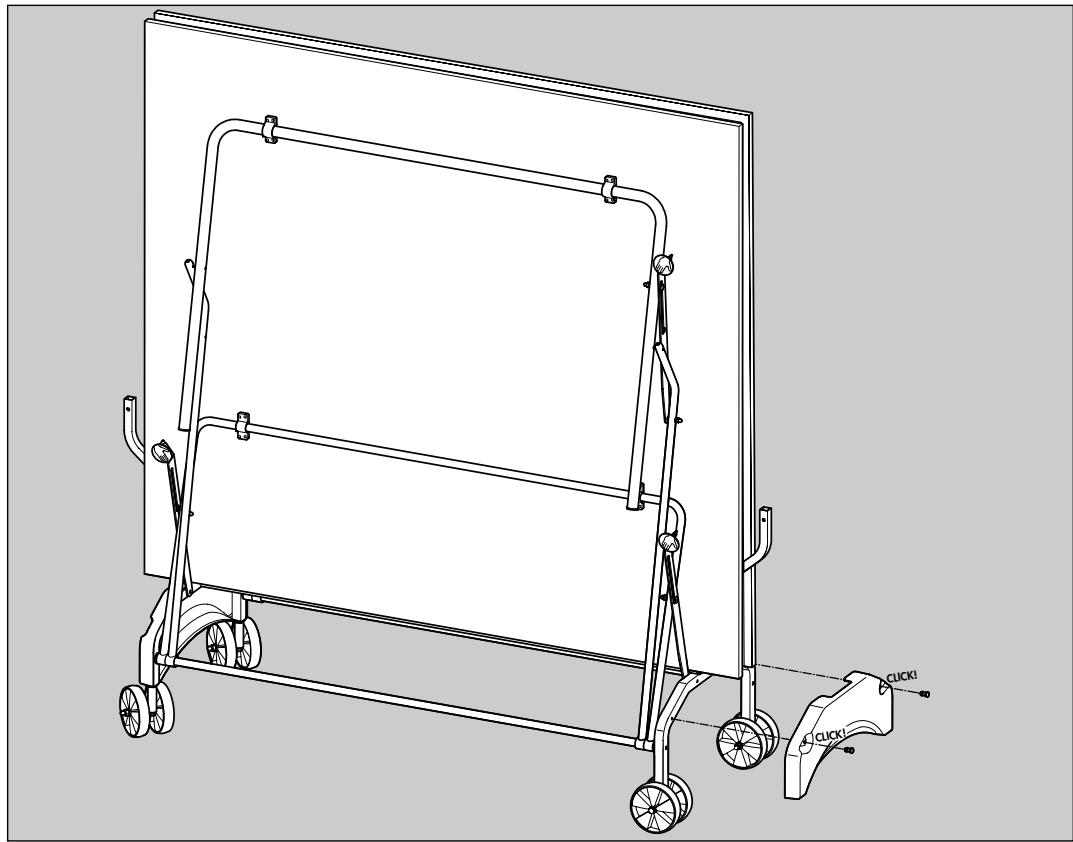
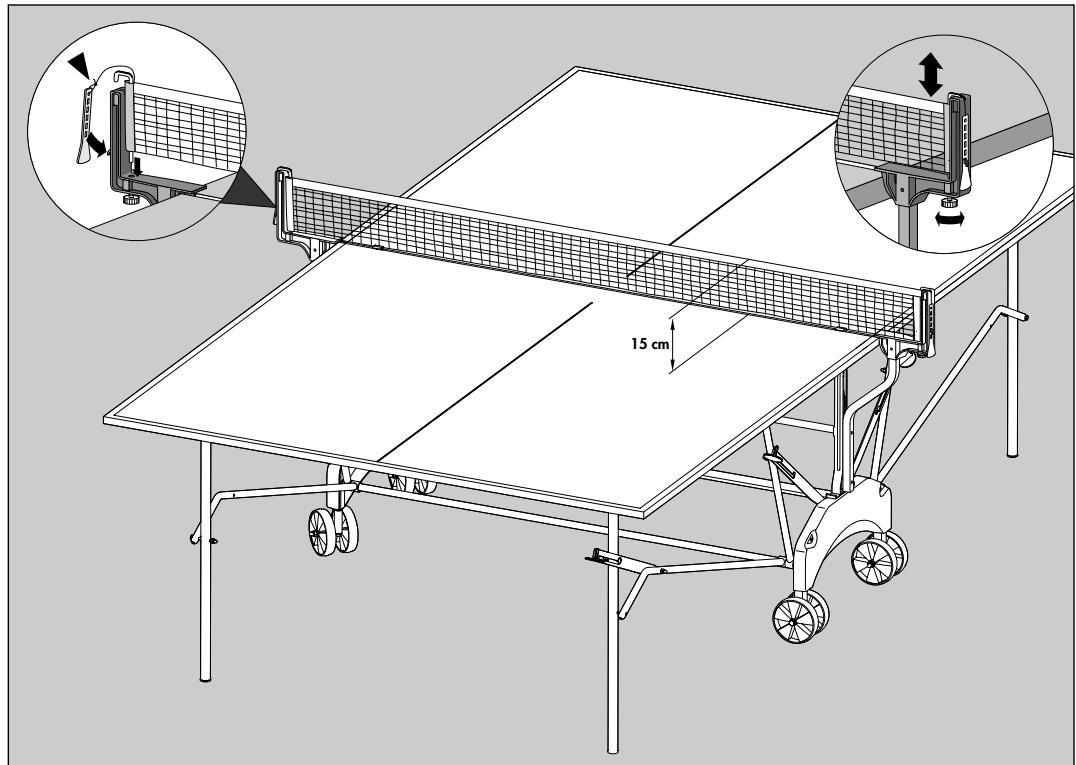
Montage des Netzhalters
GB Instructions for Assembling the net set
F Instructions de montage pour I'ensemble poteaux-filet
NL Montage van de netpost
E Montaje del portared
Montaggio dell'attacco della rete
PL Montaž uchwytu siatki
1
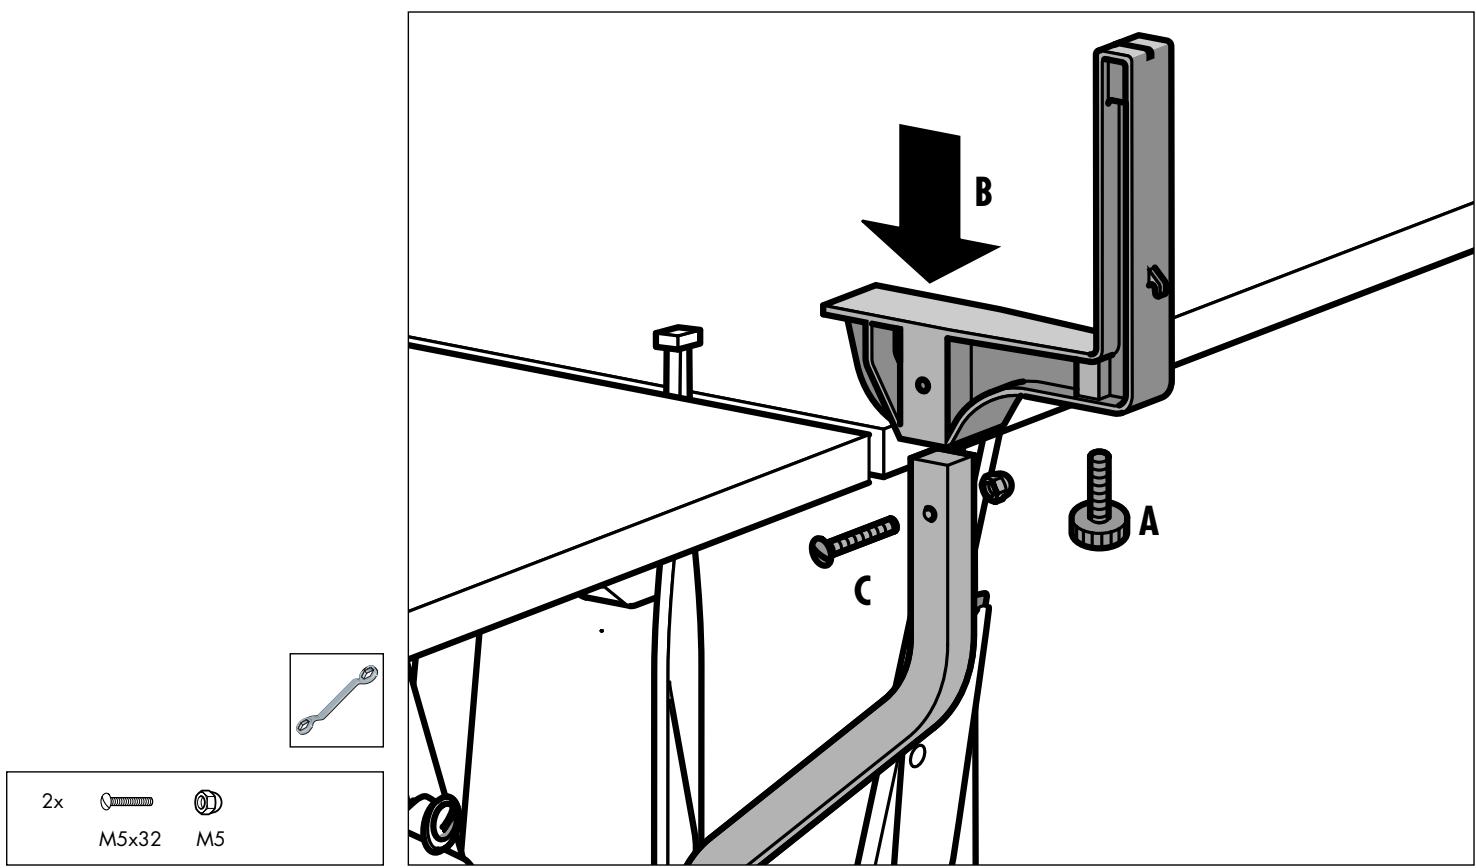
2
Ersatzteilzeichnung
GB Spare parts drawing and list
F Dessin et listedes pièces de rechange
NL Reserveonderdeeltekening en -lijst
E Designación y lista de las piezas de recambio
1 Disegno ed elenco dei pezzi di ricambio
PL Rysunek i lista czesi zamiennych
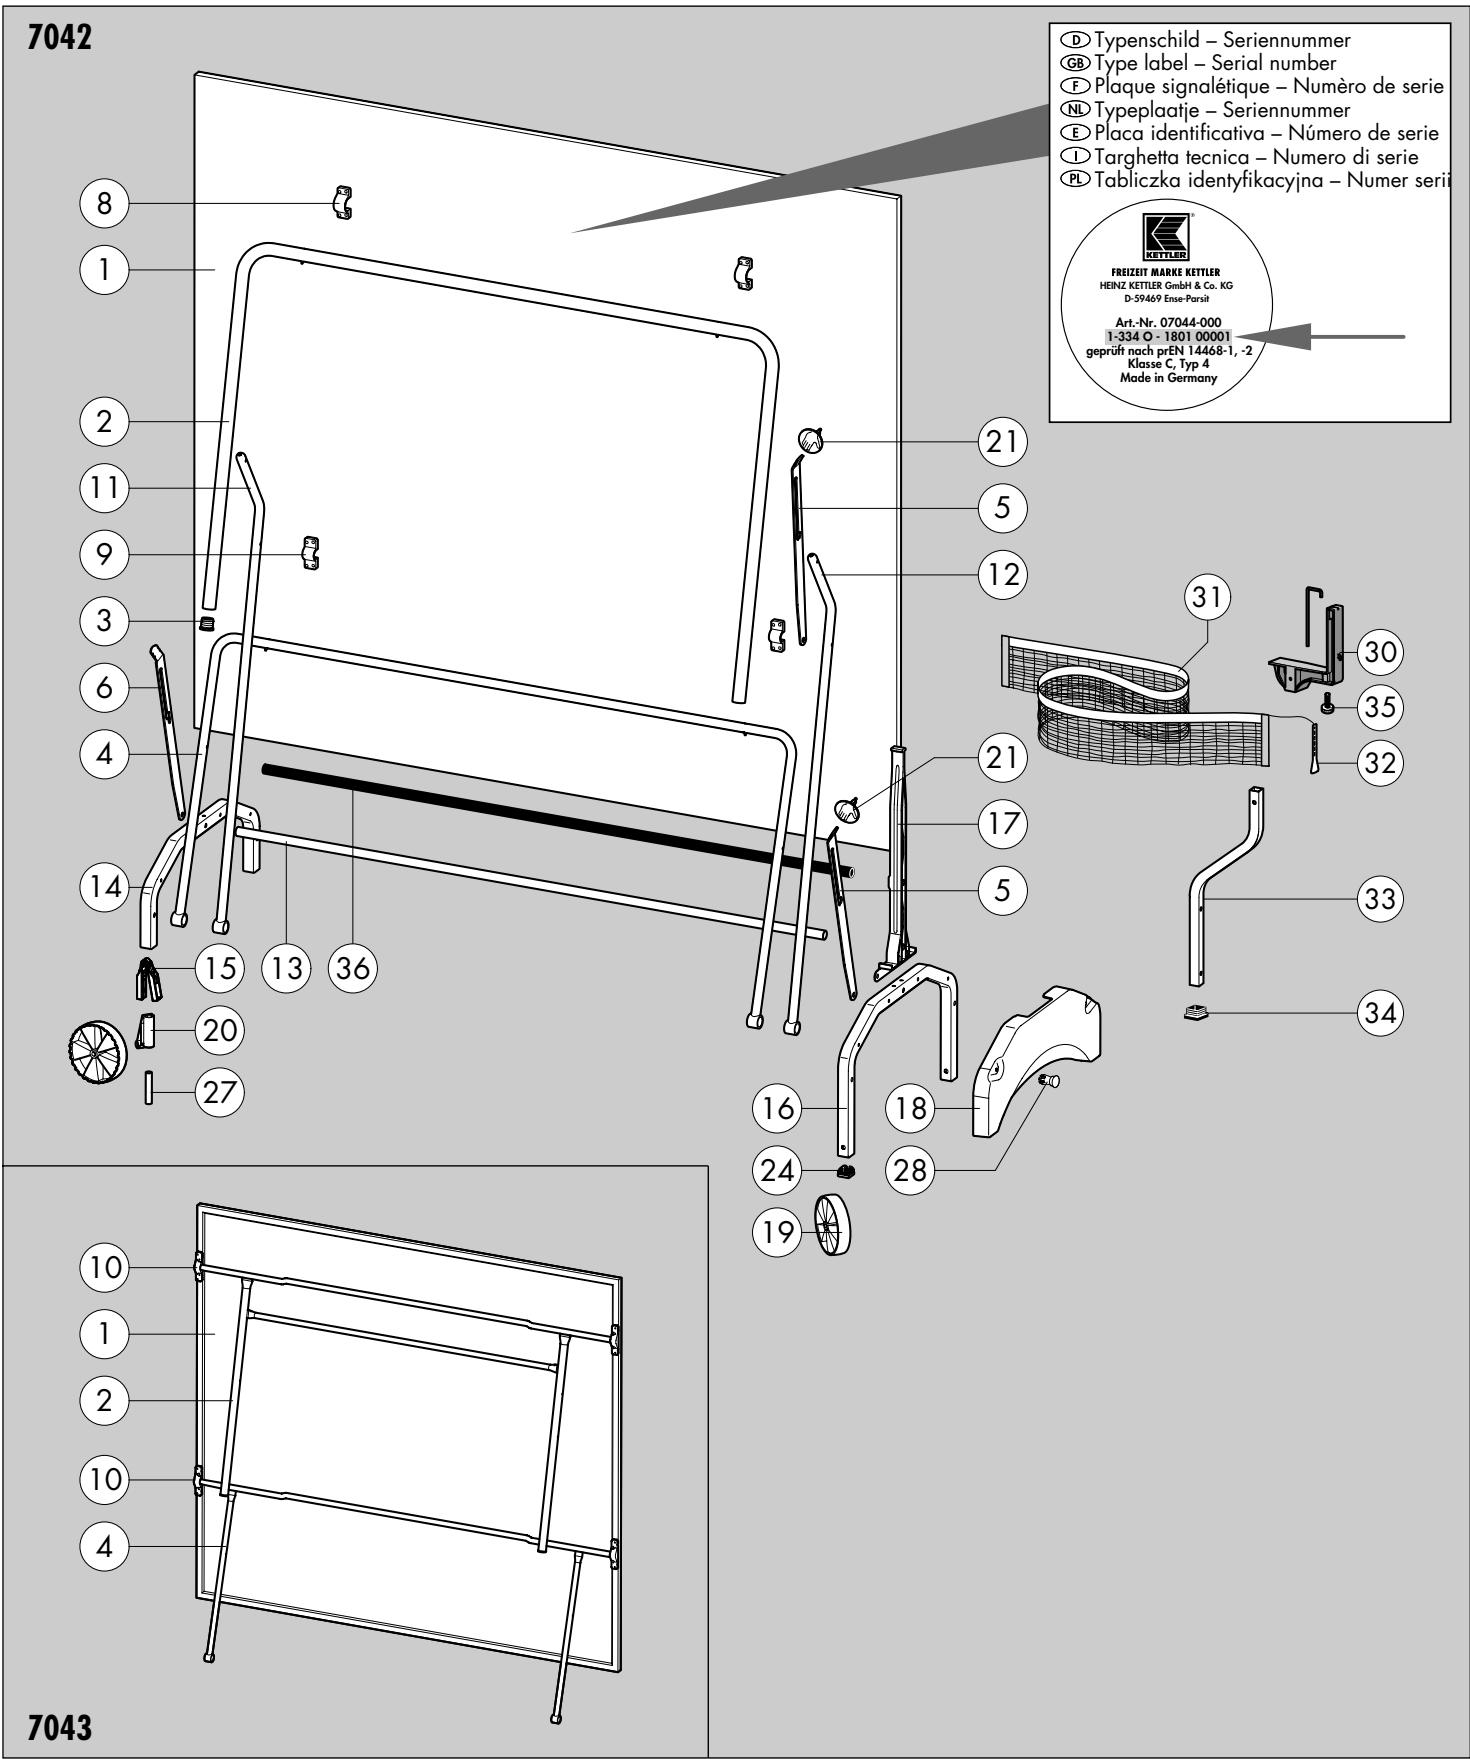
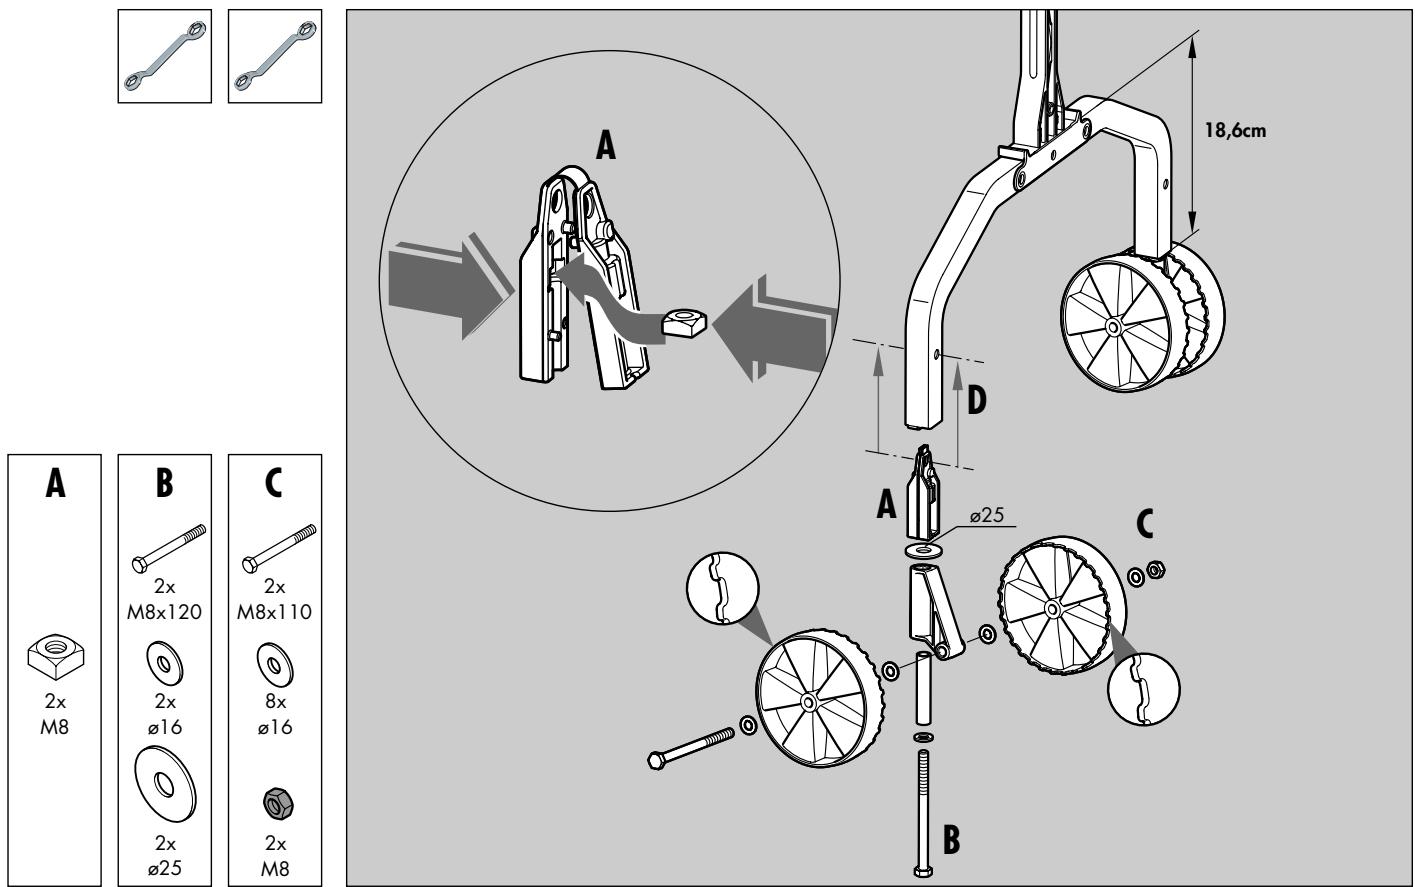
| Riga 7042-700,-900 Indoor & Riga Pro 7043-700 Outdoor | |||||
| No. | Description | Qty. | Part No. | Part No. | Part No. |
| 1 | Top,1/2 | 2 | 94130048 | 94130000 | 94130058 |
| 2 | Leg | 2 | 94110696 | 94110696 | 94110769 |
| 3 | Footcap,Round 25mm | 4 | 70130540 | 70130540 | 70130540 |
| 4 | Support Leg | 2 | 94110698 | 94110698 | 94110771 |
| 5 | Safety Lever,right side | 4 | 94111062 | 94111062 | 94111062 |
| 6 | Safety Lever,left side | 2 | 94111063 | 94111063 | 94111063 |
| 8 | Clamp,round 25mm (used on indoor only) | 4 | 94110341 | 94110341 | |
| 9 | Clamp,round 18mm (used on indoor only) | 4 | 94110192 | 94110192 | |
| 10 | Clamp,round 18mm (used on outdoor only) | 8 | 10128024 | ||
| 11 | J Bar without safety lever hole | 2 | 94110781 | 94110781 | 94110781 |
| 12 | J Bar with safety lever hole | 2 | 94110755 | 94110755 | 94110755 |
| 13 | Crossbar with m8 threads | 3 | 94110764 | 94110764 | 94110764 |
| 14 | Wheelbase for swivel wheels | 1 | 94110765 | 94110765 | 94110765 |
| 15 | Wheelholder | 2 | 70130811 | 70130811 | 70130811 |
| 16 | Wheelbase for fixed wheels | 1 | 94110767 | 94110767 | 94110767 |
| 17 | Strut,alignment | 2 | 70130602 | 70130602 | 70130602 |
| 18 | Sideshroud | 2 | 70130814 | 70130814 | 70130814 |
| 19 | Wheels,tandem set | 2 | 94180177 | 94180177 | 94180177 |
| 20 | Stemtube,wheel | 2 | 70130812 | 70130812 | 70130812 |
| 21 | Handgrip | 6 | 70130532 | 70130532 | 70130532 |
| 22 | Bolt,shoulder M06x37 (not shown) | 6 | 10201209 | 10201209 | 10201209 |
| 23 | Nut,openend M06 (not shown) | 4 | 10300008 | 10300008 | 10300008 |
| 24 | Endcap,square 25mm | 2 | 10100046 | 10100046 | 10100046 |
| 25 | Bolt,hexhead M8x120 (not shown) | 2 | 10206115 | 10206115 | 10206115 |
| 26 | Bolt,hexhead M8x110 (not shown) | 4 | 10206081 | 10206081 | 10206081 |
| 27 | Spacer Sleeve | 2 | 97201453 | 97201453 | 97201453 |
| 28 | Rivet | 4 | 10418503 | 10418503 | 10418503 |
| 29 | Hardware Bag (not shown) | 1 | 94180179 | 94180179 | 94180179 |
| 30 | Netpost | 2 | 94110103 | 94110103 | 94110103 |
| 31 | Net | 1 | 94180128 | 94180128 | 94180128 |
| 32 | Tab for net tension | 2 | 10128002 | 10128002 | 10128002 |
| 33 | Bar,netpost | 2 | 94110975 | 94110975 | 94110975 |
| 34 | Endcap,square 20mm | 2 | 10100095 | 10100095 | 10100095 |
| 35 | Thumbscrew | 2 | 10106000 | 10106000 | 10106000 |
| 36 | Crossbar with M6 threads | 1 | 94110883 | 94110883 | 94110883 |

- KETTLER
- Assembly Instructions
- Riga and Riga Pro
- Before assembling or using the table-tennis table, please read the following instructions carefully. They contain important information for use and maintenance of the equipment as well as for your personal safety. Keep these instructions in a safe place for maintenance purposes or for ordering spare parts.
- Note on Safety
- Handling the equipment
- Instructions for Assembly
- List of spare parts
- Checkliste (Packungsinhalt)
- Messhilfe für Verschraubungsmaterial
- 9
- 10
- Herunterklappen der Plattenhälften
- Zusammenklappen der Plattenhälften
- Montage des Netzhalters
- Ersatzteilzeichnung
Marque : KETTLER
Modèle : RIGA
Catégorie : Mobilier de jardin