WF16JR - Ventilateur Khind - Notice d'utilisation et mode d'emploi gratuit
Retrouvez gratuitement la notice de l'appareil WF16JR Khind au format PDF.


| Type de produit | Ventilateur sur pied |
| Marque | Khind |
| Modèle | WF16JR |
| Dimensions (H x L x P) | 130 x 40 x 40 cm |
| Diamètre de l'hélice | 40 cm |
| Poids net | 3,5 kg |
| Alimentation | 220-240 V, 50 Hz |
| Puissance nominale | 50 W |
| Nombre de vitesses | 3 |
| Fonction oscillation | Oui, horizontale |
| Minuterie | Non |
| Télécommande | Non |
| Grille de protection | Amovible pour nettoyage |
| Niveau sonore | 55 dB (maximum) |
| Sécurité | Arrêt automatique en cas de basculement |
| Entretien et nettoyage | Débrancher avant nettoyage; utiliser un chiffon humide; ne pas immerger |
| Pièces détachées | Hélice, grille, moteur, socle |
| Réparabilité | Moteur accessible; vis standard |
| Couleur | Blanc |
FOIRE AUX QUESTIONS - WF16JR Khind
Questions des utilisateurs sur WF16JR Khind
0 question sur cet appareil. Repondez a celles que vous connaissez ou posez la votre.
Poser une nouvelle question sur cet appareil
Téléchargez la notice de votre Ventilateur au format PDF gratuitement ! Retrouvez votre notice WF16JR - Khind et reprennez votre appareil électronique en main. Sur cette page sont publiés tous les documents nécessaires à l'utilisation de votre appareil WF16JR de la marque Khind.
MODE D'EMPLOI WF16JR Khind
KHIND®
Delivering Happiness


••• Wall Fan / 壁扇 /Kipas Dinding
Instruction Manual / 说明书/Buku Panduan
 | WARNING / AMARAN敬告 |
 | Do not use these appliance in high temperature and high humidity.不要在高温和高湿度下使用这些电器。Jangan gunakan alatan ini di tempat suhu dan kelembapan yang tinggi. |
Important / 重要 / Mustahak
Please read this manual carefully before operating this product. Keep this manual handy for further reference.
请在使用此产品前, 详读此说明书。并将之收藏以作日后参考。
Sila baca buku panduan ini dengan teliti sebelum menggunakan produk ini. Simpanlah untuk rujukan masa depan.
Caution / 重要事项 / Perhatian
- This appliance is not intended for use by persons (including children) with reduced physical, sensory or mental capabilities, or lack of experience and knowledge, unless they have been given supervision or instruction concerning use of the appliance by a person responsible for their safety. Children should be supervised to ensure that they do not play with the appliance. 本产品不供以下人群(包括儿童)使用:生理,感官,精神方面有缺陷,或缺乏经验和知识的人群。除非有专人监督指导,确保他们的安全。请监督儿童,确保他们不要玩本产品。
Perkakas ini bukan untuk digunakan oleh orang (termasuk kanak-kanak) yang kurang upaya fizikal deria atau kecacatan mental, atau kurang pengalaman dan pengetahuan, melainkan mereka diberi perhatian atau tunjuk ajar berkaitan penggunaan perkakas oleh orang yang bertanggungjawab untuk keselamatan mereka. Kanak-kanak haruslah diperhatikan untuk memastikan mereka tidak bermain dengan perkakas ini.
- The fan shall be mounted at high level so that the blades are at more than 2.5 metres above the floor level. 风扇应安装在较高的位置,以使叶片位于地板上方2.5米以上。
Kipas hendaklah dipasang pada paras yang tinggi supaya bilah berada lebih daripada 2.5 meter di atas paras lantai.
-
For safety, switch off unit and unplug from AC mains before cleaning or removing fan. 为了安全起见,请先停止风扇操作及将电线从电源插座移开,才开始清洁风扇或移动风扇位置。 Untuk langkah keselamatan, matikan suis dan tanggalkan plag daripada bekalan AC sebelum membersih atau mengalihkan kipas.
-
Use this fan with specified voltage as stated on the rating sticker. Before connecting fan to AC mains make sure the voltage specified corresponds to the AC supply to your house. 请使用相同的电源如功率标贴所示。在还未将风扇连接至电源插座时,请确定功率标贴所示的电源与家里的电源一样。
Gunakan kipas ini dengan voltan yang telah ditentukan seperti yang tercatat di atas pelekat kadar. Sebelum menyambung kipas ke bekalan AC, pastikan voltan yang ditentukan sama dengan bekalan AC ke rumah anda.
- Do not insert finger or other objects into fan. 请勿将手指或其他物件插入风扇内。
Jangan masukkan jari atau objek lain ke dalam kipas.
- Do not attempt to repair the fan. Always return to our authorised service agents for repairs. 请勿尝试修理风扇。记得将风扇交回我们的授权维修商修理。
Jangan mencuba untuk membaiki kipas. Kembalikan kepada pusat servis untuk membaik pulih.
- Do not immerse the fan in water or other liquids. 请勿将风扇浸在水里或其他的液体。
Jangan rendam kipas di dalam air atau cecair lain.
- Do not use outdoors or near windows. Rain drops may cause electrical hazards. 请勿在户外使用。雨滴会导致触电危险事故发生。
Jangan gunakan di luar rumah atau berhampiran tingkap. Titisan hujan mungkin menyebabkan bahaya.
- If the power cord is damaged, it must be replaced by an authorised service agent or the manufacturer to avoid any hazards.
假如电线损坏,一定要让授权维修代理商或原产商更换以避免任何危险事故发生。
Jika talikod kuasa telah rosak, ia mesti diganti oleh pusat servis yang sah atau pengilang untuk mengelakkan sebarang bahaya.
-
Do not use the following as cleaning solvents: petrol, thinner or benzene. 请勿使用这些产品当作清洗溶剂:汽油,天拿水或苯液。
Jangan gunakan bahan pembersih berikut: petrol, bahan pencair atau benzena. -
Use mild soap with damp cloth or sponge to clean plastic parts. 请用浸过温和肥皂水的湿布或海棉来清洁朔胶部分。
Gunakan sabun yang lembut dengan kain lembap atau span untuk membersih bahagian plastik.
- For household use only, not intended for any business purposes. 仅供一般家庭使用,不用于任何商业用途。
Untuk kegunaan isi rumah sahaja, bukan untuk kegunaan bagi sebarang tujuaan perniagaan.
Operating Instruction / 操作指南 / Panduan Operasi
- Plug the fan to a 220-240V\~50Hz, 220V\~60Hz, 230V\~60Hz power supply.
将风扇插头插入 220-240V\~50Hz, 220V\~60Hz, 230V\~60Hz 电源插座。
Sambungkan kipas dengan punca kuasa dengan bekalan kuasa 220-240V\~50Hz, 220V\~60Hz, 230V\~60Hz.
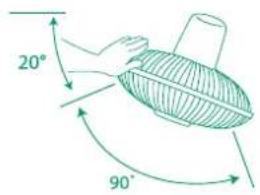
- To adjust vertical angle, switch off the appliance and tilt angle up or down as needed. 当调整垂直风向时,请先关电源,再调整上下风向角度。
Untuk melaraskan sudut tegak, tutup kipas dan miringkan kipas ke atas atau kebawah seperti arah yang dikehendaki.

Simple adjustment of tilt
简单调整倾斜度
Pelarasan kecondongan mudah

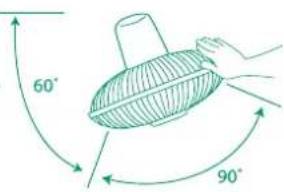
3 position oscillation (swing angle)
3 位置摆动(摆角)
3 kedudukan ayunan (sudut ayunan)
To change the direction of the air flow, push the edge of the guard to the desired position.
要更改气流方向,请将防护罩的边缘推至所需位置。
Untuk menukar arah aliran udara, tolak bahagian tepi pengawal ke kedudukan yang dikehendaki.
Remote Control Operation / 遥控功能 / Operasi Alat Kawalan Jauh
*ON/SPD/OFF BUTTON
Press the ON/SPD/OFF button to switch ON, select the fan speed & switch OFF the fan.
The fan will start at LOW speed.
按ON / SPD / OFF按钮打开,选择风扇速度并关闭风扇。风扇将以低速启动。
* Butang ON/SPD/OFF
Tekan butang ON / SPD / OFF untuk menghidupkan, pilih kelajuan kipas & matikan kipas. Kipas akan bermula pada kelajuan LOW.
*SWING BUTTON
This button serves to turn ON or OFF the fan oscillation.
此按钮用于打开或关闭风扇振荡。
* Butang AYUNAN
Butang ini berfungsi untuk menghidupkan atau mematikan ayunan kipas.

Remote Control
遥控
Alat Kawalan Jauh
Note / 注意 / Nota:
- After the fan has switched off, all preset functions will be cleared.
The fan must be set if it is needed to operate again.
风扇关闭后,所有预设功能都将被清除。如果需要再次操作,必须设置风扇。
Selepas kipas telah dimatikan, semua fungsi akan berada pada kedudukan awal.
Kipas mesti ditetapkan jika perlu untuk beroperasi semula.
- The fan can be started only with the ON/OFF button. 只能使用ON / OFF按钮启动风扇。
Kipas boleh dimulakan hanya dengan butang ON / OFF.
- The fan remote control is operated by 2 standard batteries AAA 1.5V. 风扇遥控器由2节标准电池AAA 1.5V操作。
Alat kawalan jauh kipas dikendalikan oleh 2 bateri standard AAA 1.5V.
- Fan remote control can only be operated within 3 metres from fan.
风扇遥控器只能在距离风扇3米范围内操作。
Alat kawalan jauh kipas hanya boleh dikendalikan dalam jarak 3 meter dari kipas.
Receptor 接收器 Penerima
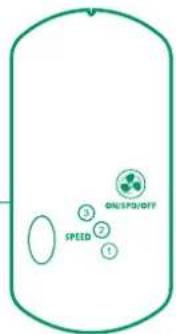
Control Panel On Fan Body / 风扇主体上的控制面板 / Panel Kawalan Pada Badan Kipas
The SPEED and ON/OFF button may use as manual control switches.
The functions same as remote controller.
SPEED和ON/OFF按钮可用作手动控制开关。功能与遥控器相同。
Butang SPEED dan ON/OFF boleh digunakan sebagai suis kawalan manual.
Fungsi sama seperti alat kawalan jauh.
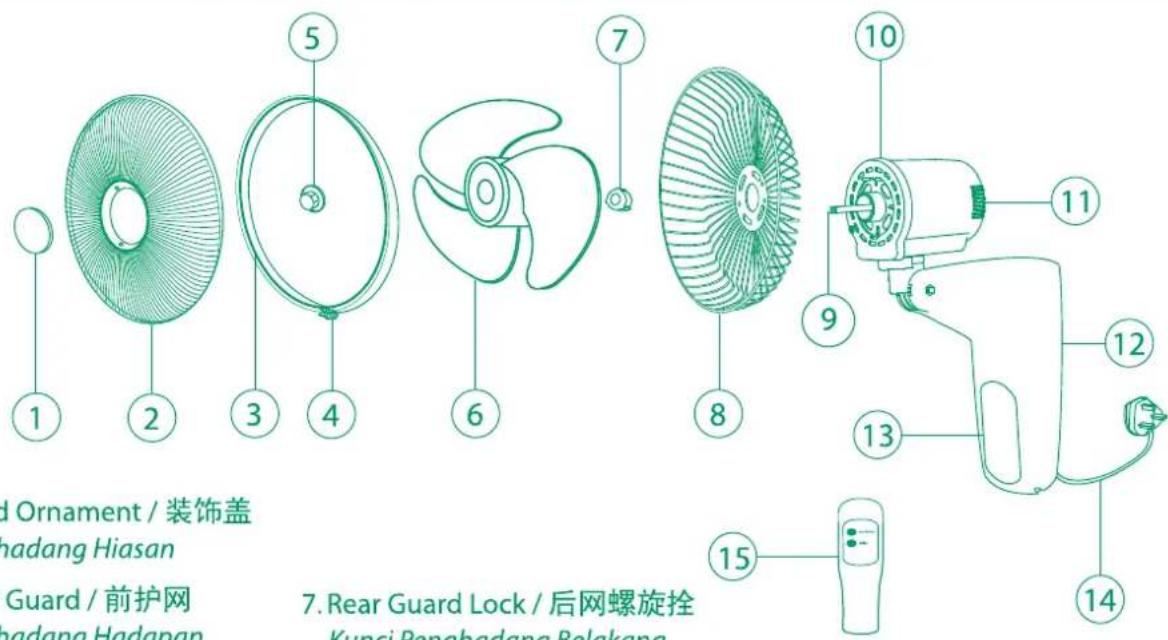
Parts Identification / 零件名称 / Pengenalan Bahagian
-
Guard Ornament / 装饰盖 Penghadang Hiasan
-
Front Guard / 前护网 Penghadang Hadapan
-
Guard Ring / 网圈 Gelang Penghadang
-
Guard Clip / 网夹 Klip Penghadang
-
Spinner / 机头罩 Pemutar
-
Fan Blade / 风扇叶 Bilah Kipas
-
Rear Guard Lock / 后网螺旋拴 Kunci Penghadang Belakang
-
Rear Guard / 后护网 Penghadang Belakang
-
Motor Shaft / 马达铀 Shaft Motor
-
Front Motor Cover / 马达前护盖 Penutup Motor Hadapan
-
Rear Motor Cover / 马达后护盖 Penutup Motor Belakang
-
Fan Body / 风扇主体 Badan Kipas
-
Control Panel / 开关面板 Panel Kawalan
-
Power Supply Cord / 电源线 Kord Bekalan Kuasa
-
Remote Control / 遥控 Alat Kawalan Jauh





- Attach Bracket to the wall securely.
镶锁紧所配给的铁托架于墙壁上。
Pasangkan pendakap pada dinding dengan ketat.
- Hang fan body to bracket. Remove Spinner (5) by turning in clockwise direction and remove Rear Guard Lock (7) by turning in anticlockwise direction.
较紧风扇主体于铁托架上。向顺时针方向旋转,松解机头罩(5)。向逆时针方向旋转,松解后护网固定螺旋栓(7)。
Gantungkan badan kipas pada pendakap. Tanggalkan Pemutar (5)
dengan memutar ke arah putaran jam.dan Kunci Penghadang Belakang (7) dengan memutar ke arah lawan jam.
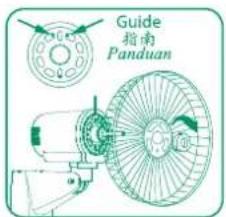
- Press the head clip inward as shown in the diagram and pull out the fan blade from fan blade clip.
如图所示, 将扇叶夹头往内按, 以便把扇叶从扇叶夹取出。
Tekan kepala klip seperti di dalam gambarajah dan tarik keluar bilah kipas dari klip bilah kipas.
- Remove the fan blade clip from the rear guard by pressing the clip inward direction. 将扇夹向内按以便与后网拆离。
Alihkan klip bilah kipas daripada penghadang belakang dengan menekan klip bilah kipas ke arah dalam.
- Fix the Rear Guard (8) by matching holes to the three round pins on the Front Motor Cover (10). Fasten the rear guard lock by turning in clockwise direction.
将后护网(8)装在马达前护盖(10)上,配合后护网的三个洞于马达前护盖的三枝针状凸物,依顺时针方向锁上后网螺旋栓。
Pasang Penghadang Belakang (8) ke Penutup Motor Hadapan (10) dengan menyesuaikan lubang pada Penghadang Belakang dengan tiga pin bulat yang terdapat pada bahagian depan penutup motor hadapan. Ketatkan kunci penghadang belakang dengan memutar ke arah putaran jam.
- Insert Fan Blade (6) to the Motor Shaft (9). Lock the fan blade by securing the spinner in anticlockwise direction.
将风扇(6)叶套上马达轴(9),用机头罩依逆时针方向锁上风扇叶。
Masukkan Bilah Kipas (6) pada Shaf Motor (9). Kuncikan bilah kipas dengan memutarkan pemutar ke arah lawan jam.

- Hold the Front Guard (2) with logo - in an upright position.
Fix plastic hook on the rear guard as shown.
Secure the two guard properly with Guard Clip (4) to avoid front guard from falling down.
* 摆正前护网(2)网前商标摆正)。
* 将塑胶钩固定在后护网上(参考示图)。
* 用网夹(4)把前护网和后护网互相钩紧,以防掉落。
Pegang Penghadang Hadapan (2) berlogo - dalam arah ke atas. Masukkan pencangkuk plastik pada penghadang belakang seperti ditunjukkan. Ikat kedua-dua penghadang dengan mengunci Klip Penghadang (4) pada penghadang depan kepada penghadang belakang daripada jatuh.
![graph TD A["MOTOR"] -->|Black / Hitam / 黑色| B["SN"] B -->|Yellow / Kuning / 黄色| C["COM"] B -->|Grey / Kelabu / 灰色| D["N"] B -->|Orange / Jingga / 橙子| E["L"] B -->|Red / Merah / 红色| F["HIGH"] B -->|Blue / Biru / 蓝色| G["MED"] B --> H["OSC"] C --> I["Blue / Biru / 蓝色"] --> J["N"] C --> K["Brown / Cokla…](/content/2026/07/1491377/images/ac7281e9ec7fa6f627f573401586ed76c44b0ef8efb03aa5e9ba143402f4cb42.jpg)
Specification / 规格 / Spesifikasi*
| Fan Size风扇尺寸Saiz Kipas | Voltage电压Voltan | Power功率Kuasa | Power Factor功率因数Faktor Kuasa | Rated Air Delivery m3/min (at 240V~50Hz)空气输送Penghantaran Udara m3/min (at 240V~50Hz) | Speed (RPM) / 速度Kelajuan | No. of Running Position速度分级Bahagian Pilihan | |
| Low / 低速Rendah | High / 高速Tinggi | ||||||
| 16" | 220-240V~50Hz220V~60Hz230V~60Hz | 50W | 0.97 | 60 | 900 RPM | 1275 RPM | 3 |
* Specification subject to change without prior notice.
* 以上的规格有任何的更改,怒无另行通知。
* Pertukaran spesifikasi boleh bertukar tanpa sebarang notis.


- KHIND®
- IMPORTANT / 重要 / MUSTAHAK
- CAUTION / 重要事项 / PERHATIAN
- OPERATING INSTRUCTION / 操作指南 / PANDUAN OPERASI
- REMOTE CONTROL OPERATION / 遥控功能 / OPERASI ALAT KAWALAN JAUH
- ON/SPD/OFF BUTTON
- BUTANG ON/SPD/OFF
- SWING BUTTON
- NOTE / 注意 / NOTA
- CONTROL PANEL ON FAN BODY / 风扇主体上的控制面板 / PANEL KAWALAN PADA BADAN KIPAS
- PARTS IDENTIFICATION / 零件名称 / PENGENALAN BAHAGIAN
Marque : Khind
Modèle : WF16JR
Catégorie : Ventilateur