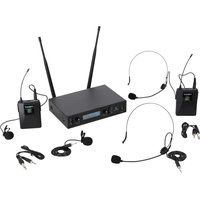
RWM-200 L2 - Système audio Rockville - Notice d'utilisation et mode d'emploi gratuit
Retrouvez gratuitement la notice de l'appareil RWM-200 L2 Rockville au format PDF.


| Type de produit | Caisson de basse actif |
| Marque | Rockville |
| Modèle | RWM-200 L2 |
| Dimensions (L x H x P) | 30 x 30 x 30 cm |
| Poids | 10 kg |
| Puissance RMS | 200 W |
| Puissance crête | 400 W |
| Réponse en fréquence | 20 Hz – 200 Hz |
| Impédance | 4 ohms |
| Alimentation | 110-240 V, 50/60 Hz |
| Fonctions principales | Volume, fréquence de coupure, phase |
| Entrées | Ligne RCA, haut-parleur |
| Sorties | Haut-parleur pass-through |
| Entretien et nettoyage | Dépoussiérer avec un chiffon sec ; éviter l'humidité |
| Sécurité | Débrancher avant nettoyage ; ne pas exposer à l'eau |
| Pièces détachées et réparabilité | Amplificateur remplaçable, haut-parleur disponible |
| Informations générales | Caisson compact pour home cinéma |
FOIRE AUX QUESTIONS - RWM-200 L2 Rockville
Questions des utilisateurs sur RWM-200 L2 Rockville
0 question sur cet appareil. Repondez a celles que vous connaissez ou posez la votre.
Poser une nouvelle question sur cet appareil
Téléchargez la notice de votre Système audio au format PDF gratuitement ! Retrouvez votre notice RWM-200 L2 - Rockville et reprennez votre appareil électronique en main. Sur cette page sont publiés tous les documents nécessaires à l'utilisation de votre appareil RWM-200 L2 de la marque Rockville.
MODE D'EMPLOI RWM-200 L2 Rockville
ROCKVILLE RWM-200 Series Quick Start Guide*
Thank you for purchasing this Rockville RWM-200 SeriesWireless UHF 200 Channel Wireless Microphone System. Please read this quick start guide carefully for proper use of your microphone system. Should you need assistance, please call our technical help line at 1-646-758-0144, 24 hours a day/7 days a week. Scan the QR code or visit the URLs to access how-to-video(s), this quick start guide, and other important information you may need to get the most out of your item.

FUNCTIONS*

-
Power switch
-
Mic A Antenna
-
Mic A Frequency Set: Press to the up/down buttons to manually adjust Mic A's frequency.
-
Mic A Sync/Scan (Hold): Long press to start scanning for available frequencies. The unit will look for the clearest signals in the area with the least interference. To sync the body pack, use the Mic A Frequency Set Buttons (FREQ up/down) to select the desired frequency. Now open it's front cover and hold it in front of the IR SYNC LED located above the unit's VOLUME B knob (see item 13). Then press the Sync/Scan button on the receiver and hold the body pack there until it is done syncing. To sync the handheld, use the Mic A Frequency Set Buttons (FREQ up/down) to select the desired frequency. Now face the mic's screen towards the IR SYNC LED then press and release the Sync/Scan button. When you see the frequency on the mic's screen it will be synced to the new scanned frequency.
-
Volume A: acts as an output gain control.
-
RF Signal strength: indicates the strength of the corresponding mic's wireless signal based on the distance between the mic and the unit.

*Please note, although the RWM-200 H2 receiver is shown, all instructions in this guide also apply to the RWM-200 L2 receiver:
-
AF Signal strength: Indicates the level of the audio the receiver is receiving from the transmitter
-
Connection indicator: Appears when the mics are connected to the receiver.
-
Frequency: Shows the current frequency that the unit is set to in order to receive signal.
-
Mic Number indicator: Shows which mic is connected to the channel.
-
Mic Channel indicator: Shows the mic's current channel.
-
Mic B Antenna
-
IR Indicator
-
Volume B (refer to item 5)
-
Mic B Frequency set (refer to item 3)
-
Mic B Sync/Scan (Hold) (refer to item 4)
Microphone
-
Mic channel: Consists of three digits. The first digit indicates the mic number, either 0 or 1. The
-
Misfusstens
-
Mio frequency
-
And Binary level
-
Power button: Press and hold to turn the mic on or off.
-
Battery compartment: Requires 2 AA batteries (included).
-
Mic Settings button (refer to the Setup section for details
-
Mic Volume buttons: Use these buttons to adjust the microphone's transmit volume.
Belt Pack
-
3.5mm mic input jack
-
Power button: Long press to turn the mic on or off. Short press to mute the unit. The mute icon will light up.
-
Antenna
-
Belt clip
-
Mic frequency
-
Mic battery level
-
Mute indicator: is visible when the unit is muted.
-
Mic volume buttons: Use these buttons to adjust the microphone's transmit volume.
-
IR transmitter
-
Mic Settings button (refer to the Setup section for details).
-
Battery compartment: Requires 2 AA batteries (included).

rockvillesupport.com/rwm-200-h2

rockvillesupport.com/rwm-200-2

SETUP
Installing the Antennas
-
To attach the antennas locate the antenna ports at the back of the unit. These ports have two small metal posts on the cylinder, one at the top and one at the bottom (fig. a).
-
The antennas' connector has two openings that correspond to the metal ports on the antenna port (fig. b). Turn the locking bezel on the antenna connector until the openings are vertically aligned (fig. c).
-
Line up the antenna's connector with the port and slide it onto the port (fig. d).
-
Firmly grasp the antenna connector and turn the locking bezel clockwise until you feel it lock (fig. e). Repeat these steps for the other antenna.
![graph TD A["Fig. a"] --> B["Figure 1"] B --> C["Figure 2"] C --> D["Figure 3"] D --> E["Figure 4"] style A fill:#f9f,stroke:#333 style B fill:#ccf,stroke:#333 style C fill:#cfc,stroke:#333 style D fill:#fcc,stroke:#333](/content/2026/07/1487401/images/d443aab4b59b3d1570c914ef45fed6a0fca9ca7271967a8ee35c971a09afcb92.jpg)


Connecting the Power Supply
-
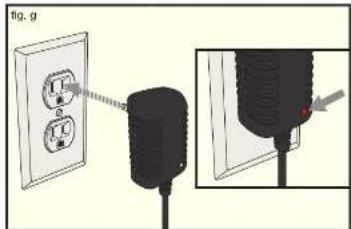
Plug the smaller end of the power supply into the power input port (fig. 1). Plug the power supply to a wall socket (fig.g).
-
The power supply plugs features a red LED which indicates it is operating properly (fig. g, inset). If the LED does not light up, double check the connection. If the problem persist, please contact Rockville customer support.

Transmitter
Press the power switch (fig. h) to turn on the unit. The screen will light up (fig. i).


SETUP (continued)
Hand-held Micronphones
-
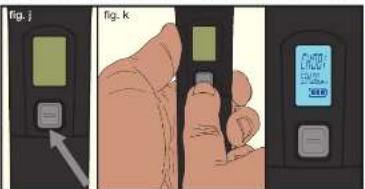
Turn on the microphones by pressing and holding the power button located below the LCD screen (fig. 1) until the microphones' LCD screens light up (fig. k).
-
There are 2 ways to connect to the receiver if not synced. You can set the receiver to the frequency the mic is sending by using the FREQ Up/Down buttons until it matches the freq shown on the mic's screen. Or (recommended), use the scan procedure as described in the FUNCTIONS on the other side of this guide, if connection is successful, they will show up on the receiver's LCD display as 0 and 1 (fig. 1).

Microphone Volume Settings
-
Press either the VOL+ or VOL- button (fig. m) to access the mic volume settings screen (fig. n) and adjust the mic's transmission volume using the VOL+/VOL- buttons. Use the VOLUME A output gain knob to adjust the output
-
From there you can press the SET button to adjust other mic settings (fig. n) (see Microphone Settings section below) or wait a few seconds and the mic will automatically return to the main screen

![graph TD A["输入"] --> B["Q1"] B --> C["Q2"] C --> D["Q3"] D --> E["Q4"] E --> F["Q5"] F --> G["Q6"] G --> H["Q7"] H --> I["Q8"] I --> J["Q9"] J --> K["Q10"] K --> L["OR"] L --> M["输出"]](/content/2026/07/1487401/images/8e00c8cebfd248b9d522f51669d9285c3b00dbd548f5311736bda6d5bbd111a3.jpg)
Microphone Settings
-
From the main screen, press the SET button to access the Microphone Settings menu (fig. o).
-
Continue pressing SET to cycle through the menu items: EC: Echo/EQ: Bass, Mid, Treble/RF: Power Setting, in that order (fig. p). To make adjustments use the VOL+/VOL- buttons. Once you've made your adjustments, press the set buttons and continue pressing it until you arrive at the main screen.

![graph LR A["EC"] --> B["ER"] B --> C["ER"] C --> D["ER"] D --> E["nF"] E --> F["CHOB1"]](/content/2026/07/1487401/images/be2bd5f6e7421ba7a07b46f173edf7eb1e2030d6a3f45bcca8c350e0676fb401.jpg)
Menu Item Descriptions
EC: Echo Effect - this effect creates a delay and repetition of the sound captured by the microphone.
EQ: Equalizer - 3 band EQ that attenuates the low (b), middle (A), and high (I) frequency bands.
RF: Power Setting - allows you to adjust the strength of the signal that the mic is sending to the receiver. A higher setting means better connectivity at long distances, but decreases battery life.
Belt Pack (Lavalier and Headset)
- To connect either the Lavalier mic or guitar cable to the body pack insert the threaded 3.5mm jack into the port at the top of the body (fig. q). Once it clicks, turn the headphone jack clockwise until it is firmly seated (fig. r). Do not overlighten.
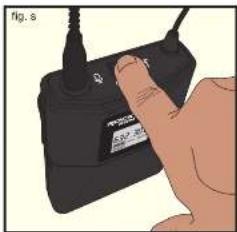
- Press and hold the power button at the top of the body pack (fig. s) until the LCD screen lights up.
- The body pack should automatically connect to the receiver once configured via the IR Sync.


Belt Pack Microphone Volume Settings
- From the main screen press and hold either the VOL+ or VOL- button (fig. 1) to access the mic volume settings screen (fig. 1) and adjust the mic's transmission volume using the VOL+/VOL- buttons. Use the VOLUME A output gain knob to adjust the output.
- From there you can press the SET button to adjust other mic settings (fig. u) (see Body Pack Settings section be ow) or wait a few seconds and the mic will automatically return to the main screen

![graph TD A["UGI 1"] --> B["63230.0"] B --> C["OR"] C --> D["ECHO 1"] D --> E["E%o -DI"] E --> F["E%R -DI"] F --> G["E%L -DI"] G --> H["cF 1"]](/content/2026/07/1487401/images/f884dcb535a0039caf4ceb70a5af22a794df62183348de2f1df8e8fe31cad3c6.jpg)
Body Pack Settings
- From the main screen, press the SET button (fig. v) to access the Microphone Settings menu.
- Continue pressing SET to cycle through the menu items: ECHO: Echo/ER: Bass, Mid, Treble/rF: Power Setting, in that order (fig. w). To make adjustments use the VOL+/VOL- buttons. Once you've made your adjustments, press the set buttons and continue pressing it until you arrive at the main screen.

![graph LR A["ECHO"] --> B["E95 -01"] B --> C["E98 -01"] C --> D["E95 -01"] D --> E["rF"] E --> F["632300"]](/content/2026/07/1487401/images/c3223640b31ade15c7eefbe90709995196667caa91fc30546a971ba0a3e37891.jpg)
Menu Item Descriptions
ECHO: Echo Effect - this effect creates a delay and repetition of the sound captured by the microphone.
Eq: Equalizer - 3 band EQ that attenuates the low (b), middle (A), and high (t) frequency bands.
rF: Power Setting - allows you to adjust the strength of the signal that the mic is sending to the receiver. A higher setting means better connectivity at long distances, but decreases battery life.
RockvilleAudio.com
0025 ROCKVILLE of The Information presented is subject to change and/or improvement without notice.
Marque : Rockville
Modèle : RWM-200 L2
Catégorie : Système audio